Welcome to another installment of Starting Hex, a series about Warhammer Underworlds. I'm going to do something similar to the
Weapons Upgrades article from last month and pick out a subset of cards from various decks to talk about. This time, I'm covering some of the potent repositioning cards in Underworlds – pushes and teleports!
Why Value Pushes and Teleports?
Like most strategic games, positioning in Underworlds is a key component to performing well. In most games, there's a lot of back-and-forth where the players jockey for control over key areas of the board while doing the normal "trying to kill each other" business that happens in war games. Choosing the correct hexes to move or charge your fighters into can decide the outcome of the game, so it's only natural that getting access to additional pseudo-movement in the form of power cards can be valuable.
There are roughly three ways in which I find these effects to be useful. Action efficiency, objective scoring, and a nebulous thing I'm calling board presence. There will be overlap between these three categories, and I'm sure there are other ways to label these effects, but this is what I'm going with.
Push and teleport power cards create action efficiency in that you're able to effectively "break" one of the underlying rules in Underworlds: the set of twelve activations that each player receives. No matter what faction you take, no matter what cards you play, and no matter what your dice luck happens to be, this is a part of the game that never changes. Having the ability to reposition your fighters without having to use one of these precious activations can be huge. You can even consider it like getting additional activations if it allows you to maneuver your fighters further than you'd normally be able to. Being able to use a power step to reposition one fighter, then go into your turn and take an actual activation with another fighter lets you maneuver two different fighters before your opponent has a chance to respond. It also allows you to chain multiple pseudo-activations together – for example, you can take your first activation by putting a fighter on guard, then Sidestep that same fighter onto a treasure token to have a hard to shift defensive position in only a single turn.
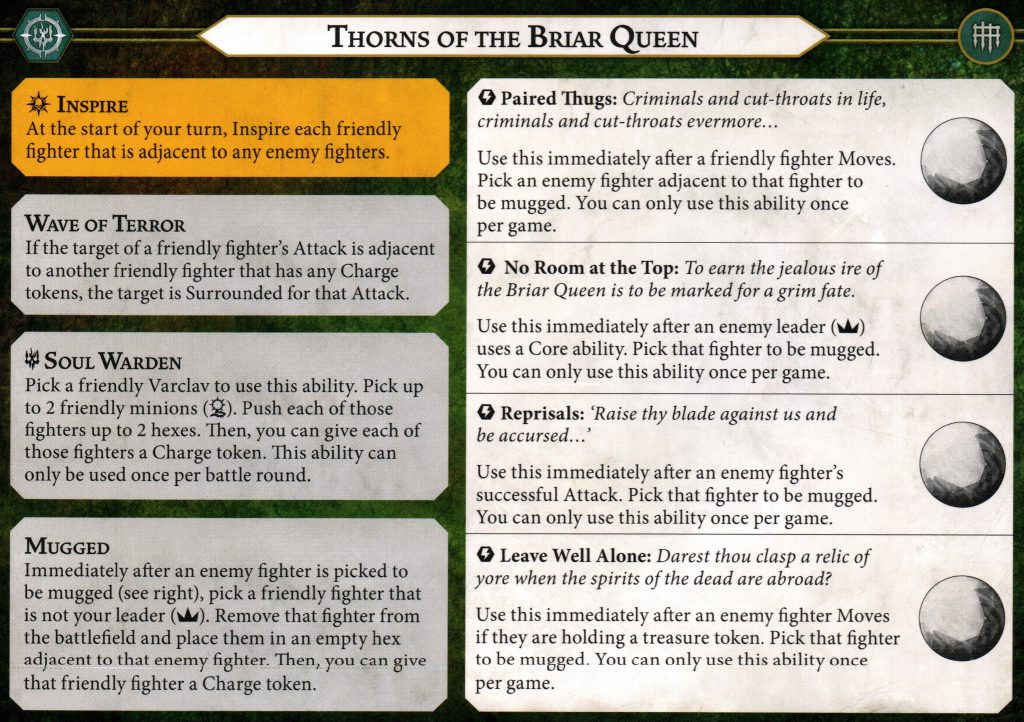 Speaking of pushes and teleports, the Thorns of the Briar Queen sure have a lot of options!
This leads well into the next category, objective scoring. Many of the objectives in Underworlds have a requirement of your fighter(s) being in certain locations on the board, whether it's specific territory, on a feature token, or being adjacent to other fighters. Being able to utilize these repositioning effects can get your fighters in the right spot and be the difference between winning and losing a game. They're also great for aggressive objectives because a push allows you to get a fighter into attack range without needing to charge. This sets the fighter up to continue making attacks in future activations which can be helpful if you're fishing for something like Perfect Strike when using your most accurate fighter. "Use Sidestep to get on a token" isn't revolutionary gameplay but it's been a strong tactic since the very first days of Underworlds almost 8 years ago.
These tools are equally useful for denying your opponent from scoring their own objectives. If you're playing against Wrack and Ruin, for example, you know they could be packing Alone in the Dark and Stay Close. With this knowledge and something like Lure of Battle or Sidestep in hand, you can feel relatively safe charging with your fighters and still be able to push one of them into position before the end phase to block the opponent from their high payoff objectives.
Board presence can be either offensive or defensive. This includes things like pushing one of your fighters closer to the enemy to suddenly open up a potential charge, teleporting a fighter out of a dangerous spot back safe in your territory, or positioning another of your fighters next to your target to gain enhanced accuracy due to flanking them. Since many of these effects are from ploys, they have the potential to catch your opponent off guard and given them little to no time to respond before you can capitalize on your enhanced positioning. This would also cover utilizing repositioning tools to get your fighters into attack range so they can avoid the downsides of a charge token – anyone who has had to face down Mollog equipped with Duellist knows the terror that such a powerhouse can instill when they're capable of skating around the board with each swing.
Pushes and Teleports in Rivals Decks
There are a variety of pushes and teleports available to warbands on their warscrolls, but for now I'm going to focus on the cards you can find in the various Rivals decks. I'll be covering the decks in release order and highlight the positioning cards that they each have in their respective power decks. This can be a handy way to shop for a second deck pairing in Nemesis, or just let you know what tech various decks offer to you or your opponent in terms of pushing fighters around.
Blazing Assault
 Credit: UnderworldsDB.com
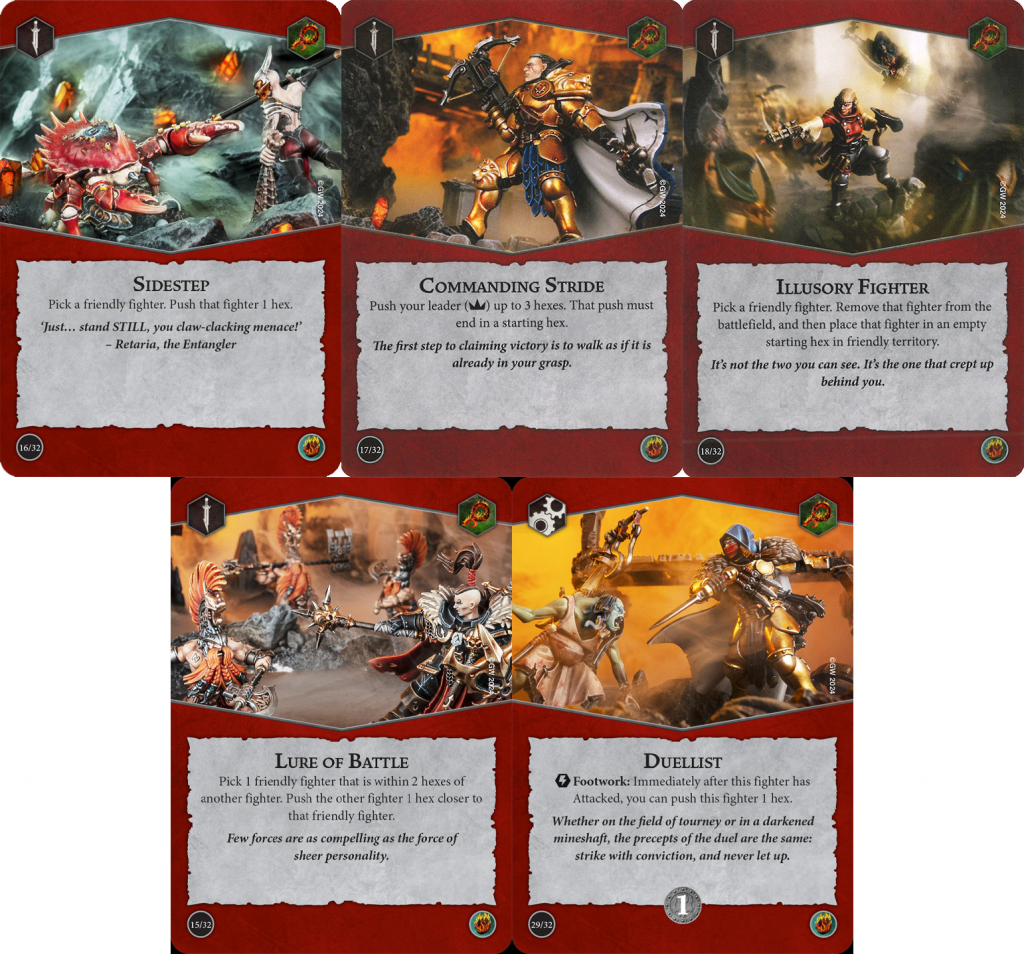
It won't come as a surprise to hear that Blazing Assault, the deck known for a bonkers strong power deck, has plenty of options here. Sidestep is the poster child of pushes because of it's flexibility – many other options that will be touched on here have some sort of restriction, but Sidestep is hindered by none. It's the baseline that you can compare any of these other cards to.
Commanding Stride has a leg up over Sidestep in the number of hexes pushed, but two substantial downsides in that you have to end the push on a starting hex
and only your leader is capable of being the target of this effect. Leader focused warbands like Mollog's Mob, Headsmen's Curse, or Cyreni's Razors will be able to make the most of this, but even straightforward elites like Gorechosen of Dromm or Morgok's Krushas can take advantage of what's often times a free full move in the power step.
Illusory Fighter is the only card we'll cover today that's restricted and it's for a good reason. Depending on where your fighter is before playing it, it can function as a 10+ hex push which offers unparalleled maneuverability. There's no restriction on who can use it – fighters with move or charge tokens are valid targets, so it can be used to yank a charging fighter back to safety just as well as it can be used to pop up a threat next to a squishy target.
Lure of Battle is one of the few examples of a card that can affect enemy fighters, which makes it fantastic for disrupting your opponent. Are you playing against Starblood Stalkers and want to delay their inspiring by another turn or two? Yank a lizard off a treasure token so you can charge onto it next turn. Don't forget you can also use it on your own fighters to pull someone forward for enhanced threat range or to yank an endangered fighter out of the melee.
Duellist is another card that will pop up a few times and is the first upgrade in this list. I already touched on its power when equipped to a fighter with a range 2+ attack. Being able to skate around the battlefield without charging can allow dangerous fighters to get multiple, efficient activations in a round. I still have nightmares of Tammael with Duellist slicing through my ghosts like a hot knife through ghost butter.
Emberstone Sentinels
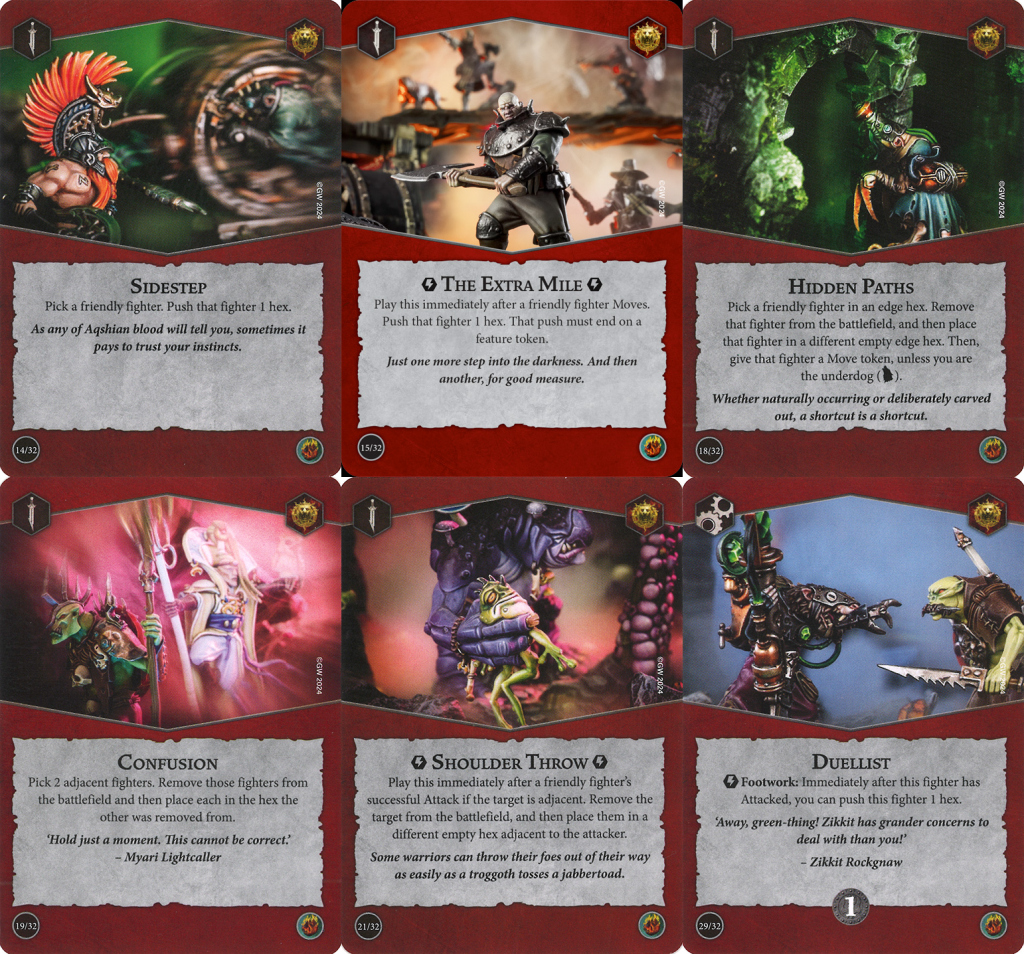
Hey look, it's Sidestep again. While Sidestep in Blazing Assault will often be used to extend threat ranges, it's fantastic in Emberstone Sentinels for securing treasure tokens. Use it to hop onto one just out of reach of a move, use it after taking the Guard action to solidly secure one adjacent to your fighter, or even use it after one of your fighters has been driven off a token to hop right back on.
The Extra Mile is like a bad version of Sidestep, but given how stellar Sidestep is, that still means it can be useful. It loses points from being more situational than other pushes, but it does support the core game plan of Emberstone Sentinels which is holding treasures. It has received a very slight upgrade with the release of Spitewood, because the wording of the card only cares about pushing onto
feature tokens, not treasure tokens. This means the new Aqua Ghyranis tokens are valid landing zones.
Speaking of situational cards, Hidden Paths is an edge-to-edge teleport. It loses some flexibility because your fighter has to already be in an edge hex and, unless you're the underdog, that fighter will also be picking up a move token after Hidden Paths resolves. You'll never be able to use it by itself to get onto a treasure (or aqua ghyranis) token since those can't be placed on edge hexes to begin with, so its potential for scoring Emberstone Sentinels objectives is not high without an assist from another push effect. Warbands that rely heavily on a key fighter (like the Sepulchral Guard) could use it as a convenient escape card, provided they get a board with a starting hex in an edge hex.
Confusion joins the ranks of Lure of Battle as one of the few ways you can move an opponent's fighter in the power step. In Emberstone Sentinels it's great for locking down a last minute treasure token that your opponent thought they had safely secured from you. It's also a fantastic disruptive piece that can toss an opposing fighter
off of a token, even if they are on guard. It can break up the united effect from Deadly Synergy. It can be used to tuck a vulnerable fighter into safety behind another of your healthier and/or more expendable fighters.
Shoulder Throw is a card I honestly have never seen be played. The fact that it can only be played after a successful attack
and your attacker is adjacent means it often gets cut from decks, but I'm starting to think it might have a place. It fills a particular niche given how many of the new warbands come with built in Stand Fast effects – even if your opponent denies you a drive back, you can still judo throw them out of the way. It's also one of the more effective ways of denying Deadly Synergy opponents from being able to easily unite their fighters, and I foresee that deck being very popular after it's strong showing at Worlds.
Duellist is back. It does everything I mentioned in Blazing Assault, but it also has the benefit of functioning as a guaranteed overrun in this deck. If your opponent is blocking a treasure token and you're able to knock them off of it, you can use the Duellist push to secure the token for yourself regardless of how many crits you rolled in the attack.
Pillage and Plunder
 Credit: UnderworldsDB.com
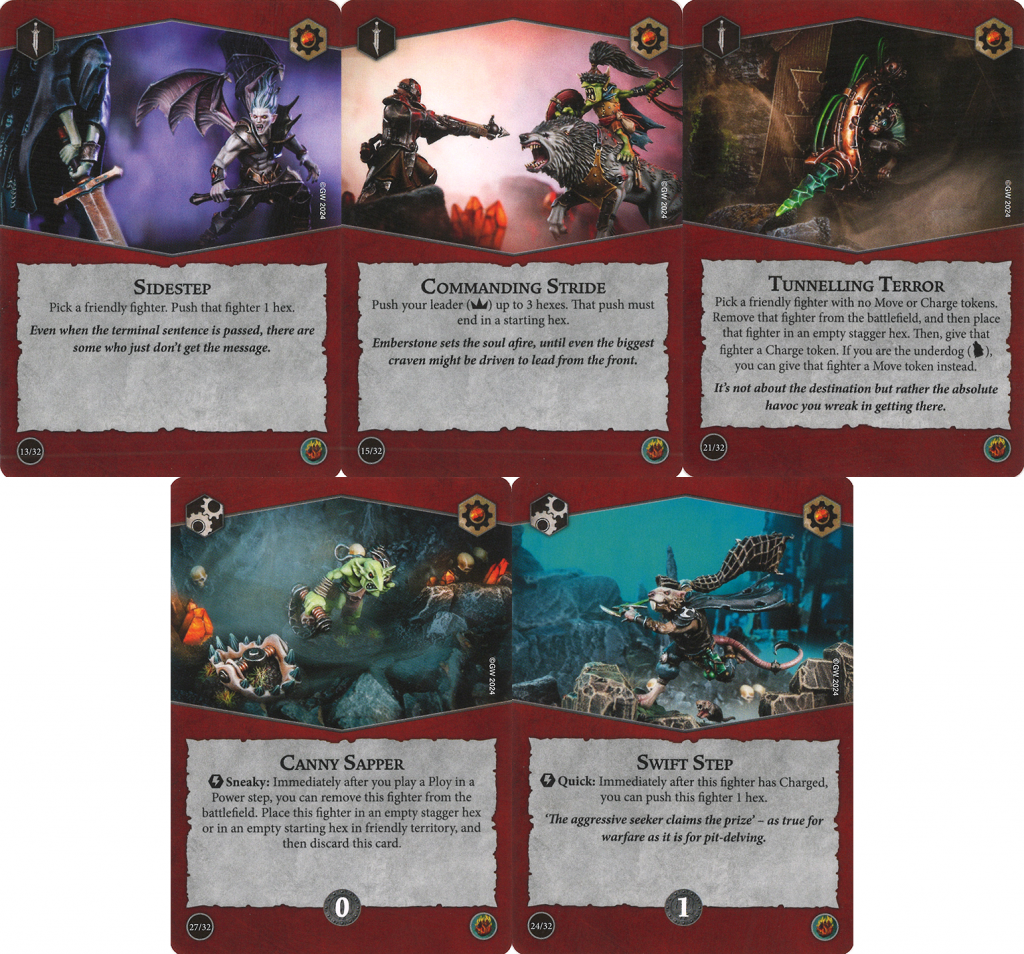
Sidestep #3! There's not much new to be said. It's a good card.
Commanding Stride #2! Yep, still a big payoff with a high risk and it's situationally useful depending on your warband. It's worth highlighting that it can't end on a treasure token for your fighter to then delve, so it doesn't exactly go hand-in-hand with Pillage and Plunder's gameplan but it can still have uses.
Tunnelling Terror is a potent teleport but with substantial downsides that cause it to be cut from many Nemesis decks. Not being able to use it on a fighter with move or charge tokens limits its ability to be a safety leash on an exposed fighter. You can't even use it to reliably stage a surprise attack either due to gaining a charge token unless you're the underdog. It also has the most restricted landing position of any teleport we'll cover since it can only pop your fighter up in a stagger hex. Most boards have two of these, but one of the Spitewood boards only has a single one dead center of the board.
Canny Sapper, on the other hand, is a phenomenal teleport. It's an upgrade, but it costs 0 glory so it's almost like a ploy instead. It has plenty of valid landing zones in your territory and typically one in your opponent's territory. The biggest downside is that it's a little more restrictive to trigger than it may seem at first glance. You have to play a ploy
in a power step to get the teleport – this means any reaction ploys like Brash Scout or Prideful Duellist will not trigger it. This can lead to situations where you're torn between saving a ploy for an optimal use or using one to trigger Canny Sapper, but that's often like complaining about too many good options.
Swift Step is almost like Duellist, but with a pretty hefty restriction. The timing here is after a charge, which is after both the move
and attack have been fully completed – which means you can use this to hop onto a recently cleared token, or use it to skitter away if the attack wound up failing for whatever reason. Duellist is good, limited Duellist can still be good.
Countdown to Cataclysm
 Credit: UnderworldsDB.com
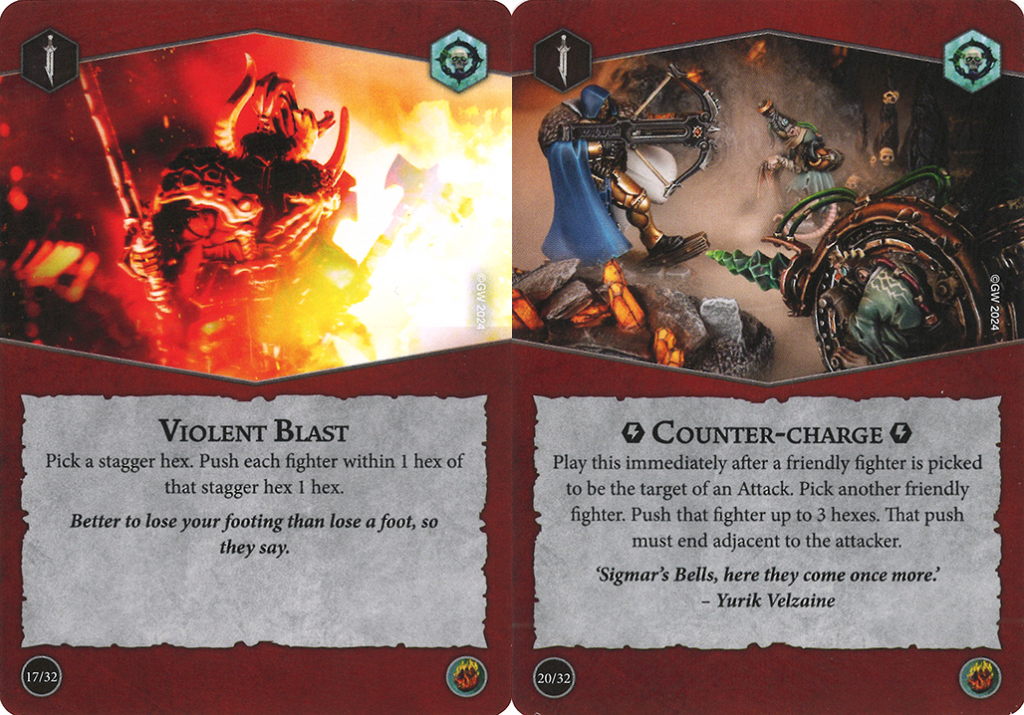
Violent Blast can vary wildly depending on your game plan, warband, and the board setup. I've seen games where it sat dead in my hand and ones where it has pushed 3 fighters around to steal treasures and kill off enemies thanks to effects like Snirk's danger zone. This is one of those cards that I tend to struggle to make the most of and then my opponent devastates me with their own play. It's solid and I want to get better with it, personally.
Counter-charge rocks. The base use case is to give your targeted fighter some extra defense by turning on flanks on the save dice, but it can also be a powerful offensive tool to get a fighter into melee range. Due to the timing of the push, the attacker cannot redirect their attack to the pushed fighter so they are typically safe and will be around for your follow-up activation.
Reckless Fury
[Diving in, Bellowing tyrant]
Diving In initially feels like a fairly restrictive card, but given that Reckless Fury wants to do its best to ensure everyone everywhere is having a grand ol' time with charge tokens, I've found I can typically make good use of it. The range of 2 hexes is more impactful than it sounds, at least to me. Even if your fighter is already adjacent to a charged fighter, you can "surf" around that second fighter to get into a better position if need be.
Bellowing Tyrant is another card that I personally have never played or seen played. Unlike most cards in this list, it doesn't
really help with action economy because you still have to use an activation on Bellow. It feels like it has to have a home somewhere due to the fact that it's a multi-fighter multi-hex push, but I'm struggling to find that place. If anyone's seen Bellowing Tyrant used to good effect, I'd love to hear it.
Wrack and Ruin
 Credit: UnderworldsDB.com
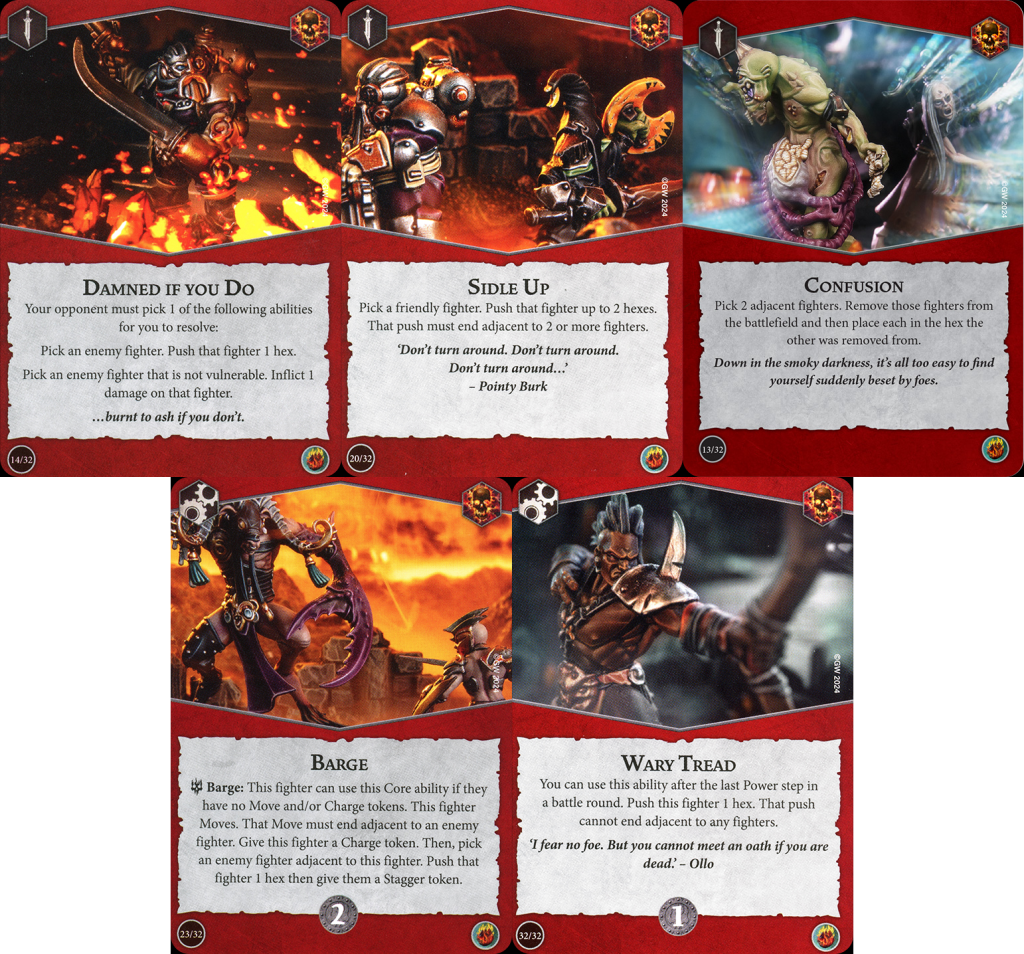
Damned if you Do is
kind of an enemy push. It's rarely going to be a push when you truly need it because your opponent can just pick to take damage instead, but given how rare enemy pushes are it still has a spot in a lot of my Wrack and Ruin decks. Unlike some other "enemy chooses" cards, both sides of Damned if you Do are potent effects. Even if your opponent chooses the one that is least-bad for them at the time, you can typically find a way to take advantage of the outcome.
Sidle Up is another restrictive 2-hex push. Unlike Diving In, there's some negative synergy between this push and one of the big payoff objectives in the deck – Alone in the Dark. That said, I think Alone in the Dark is going to be more difficult to score in general thanks to Deadly Synergy, so there's a world where Wrack and Ruin decks stop taking that objective and can more comfortably fit this 2-hex push into their power deck.
Confusion is back! Unlike in Emberstone Sentinels, I've found Confusion in Wrack and Ruin to mostly be used for disruption but it can still be used near the end of a round to swap an enemy out of an edge hex and then run away with your own fighter to ensure Stay Close can score. It's such a potent disruption tool that even without Stay Close, I think it's a solid pick.
Barge is quite an expensive upgrade at 2 glory and comes with quite a few restrictions to using it. However, it's a guaranteed push and stagger against an enemy fighter with no dice rolls involved and you can push in any direction – not just directly away as with a drive back. It's niche, and I don't see many people taking it, but I do like Barge as a disruptive tool.
Wary Tread is like a reusable Sidestep! Sort of. Sometimes. Even with the stipulations it brings, getting a push at the end of each round is great value for only one glory. The timing window even allows for you to play this in the last power step of a round and still be able to push with it, so you're guaranteed to get a single push with Wary Treat (provided you don't play it out early and that fighter dies).
Edge of the Knife
 Credit: UnderworldsDB.com
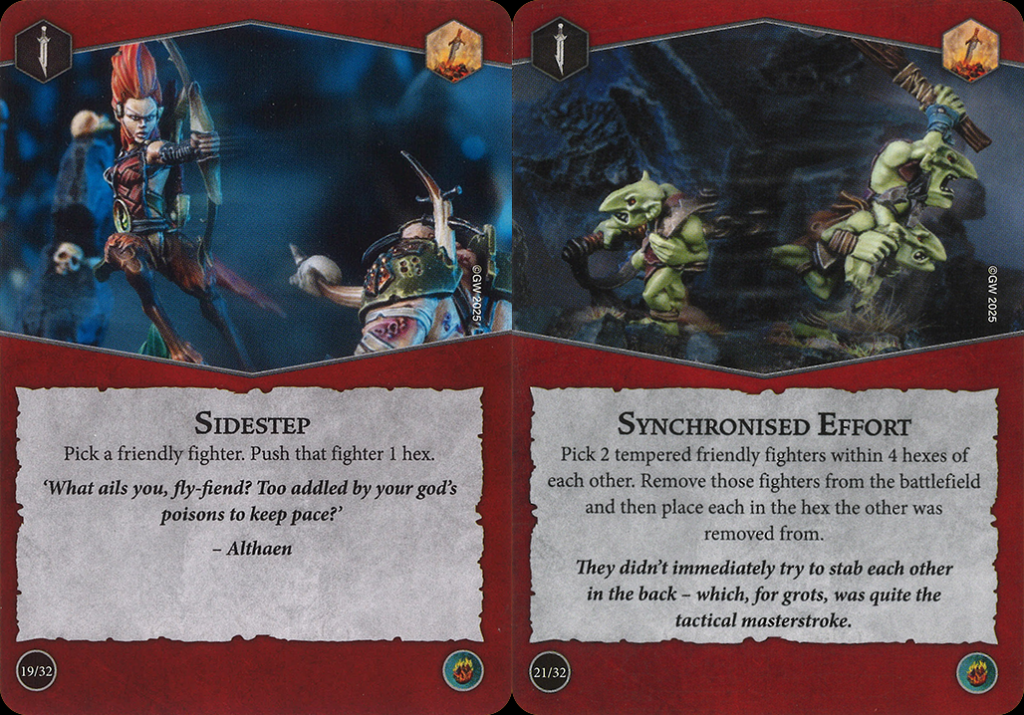
Sidestep's good. Next!
Synchronised Effort is a fairly niche card, but so is this entire deck. The switcheroo teleport range of 4 hexes is substantial, but the limitation to tempered fighters reigns in the power quite a bit. I've used it to good effect in Thorns of the Briar Queen to swap out a charged fighter with an uncharged, uninspired fighter to be able to then inspire them and make a few attacks with the improved profile. The Dark Horse upgrade in the same deck can be combined with Synchronised Effort to good effect – having a an enemy Mange suddenly turn into Blackpowder is probably not what anyone wants.
Realmstone Raiders
 Credit: UnderworldsDB.com
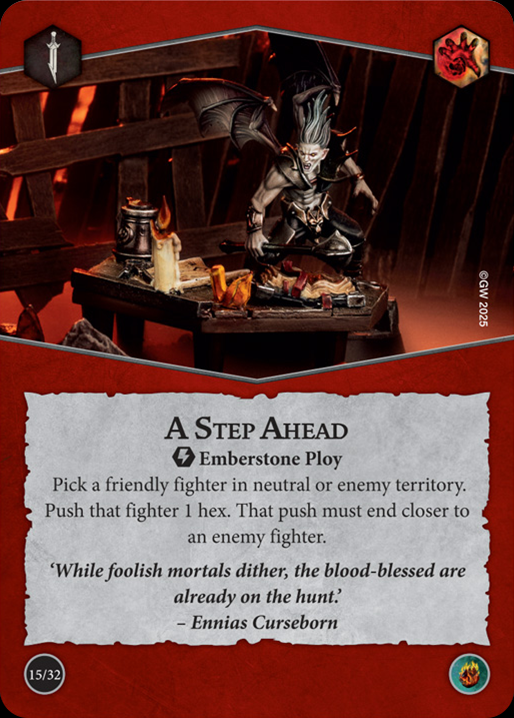
A Step Ahead is one of the best Emberstone cards this deck has, and considering so much of the deck requires you to include Emberstone cards it's nice that at least one of them can be a payoff instead of a tax. Sure, you have to pick a fighter in neutral or enemy territory. Sure, the push has to be toward an enemy. You're not going to be able to run away when using A Step Ahead. As I've said a few times though, even a bad Sidestep is still a good card and that's what this is.
Raging Slayers
 Credit: UnderworldsDB.com
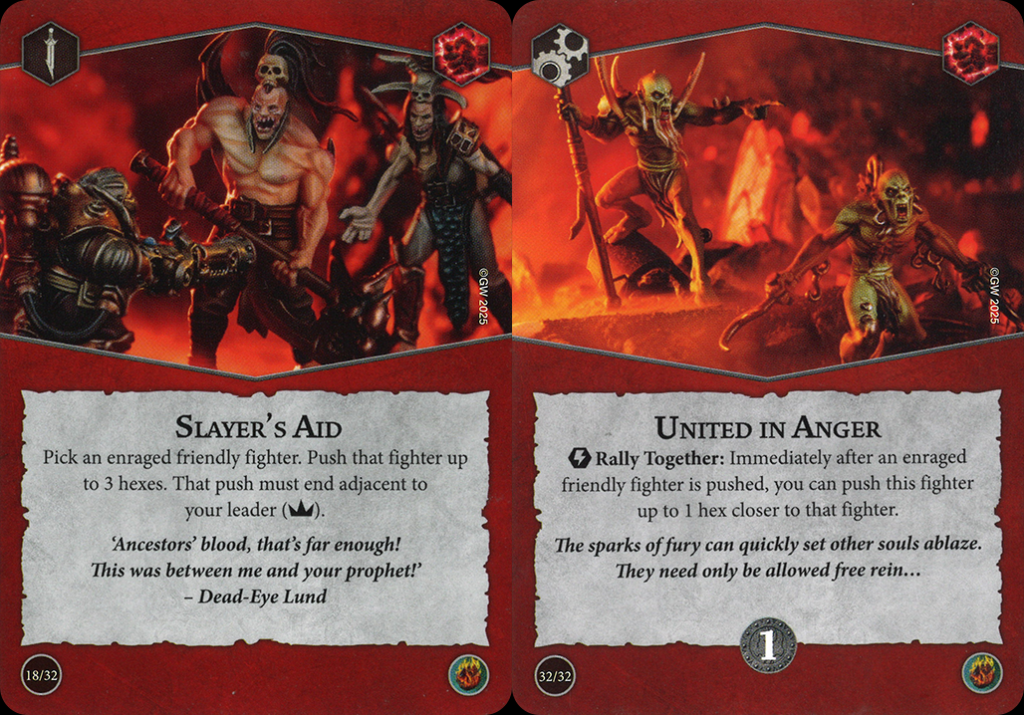
Slayer's Aid is… weird. You can only use it on a fighter that's already charged and it can only be pushed toward your leader. Three hexes is a substantial amount, but the additional restrictions really reign this card's usefulness in and that's not even taking into account that it's a dead card if your leader is slain.
If you're using United in Anger in a fair way, it's not going to do a whole lot. You'll get a push, maybe two, in a round and they might not be in the direction you always want to go. What you can do though is combine this card with any other push effects, either from this list or from a warscroll, and revel in your Buy One, Get One push sale. Throw United in Anger out in a power step, then immediately follow up with a Sidestep on another fighter to get two pushes. Maybe you're playing Borgit's Beastgrabbaz and can use Reassuring Presence to push your three minions, thus allowing Borgit himself to push 3 hexes closer to the Uglug ball.
Hunting Grounds
 Credit: UnderworldsDB.com
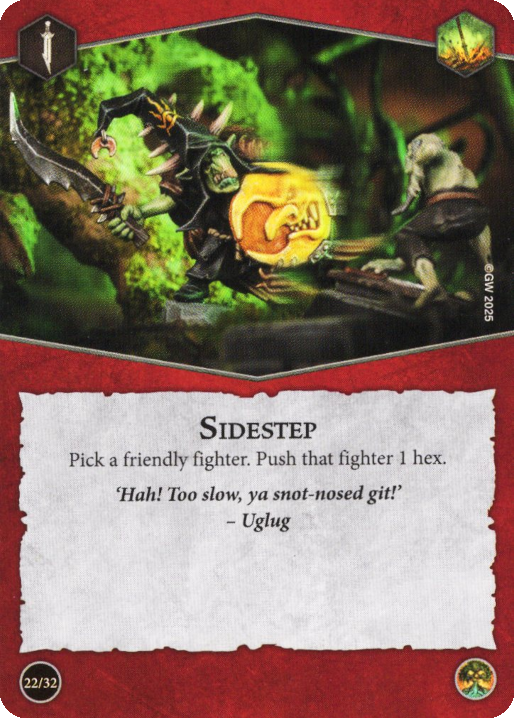
Speaking of Borgit, he's on the card! Sidestep continues to be great. I'd take multiple copies of it if I could.
Deadly Synergy
 Credit: UnderworldsDB.com
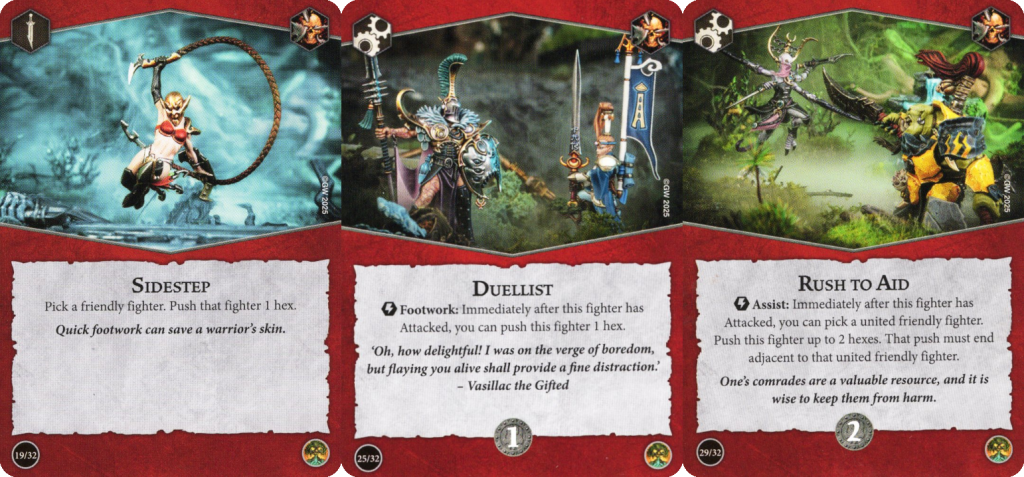
Sidestep in Deadly Synergy not only has positional value, but it can be used to make your attacks more accurate and defense more resolute by ensuring a fighter is united. You'd never not take Sidestep, but you certainly wouldn't not take it in Deadly Synergy.
Duellist likewise has extra value in being able to maintain the united state with other fighters. There are multiple end phase objectives in this deck that Duellist can help set you up to score as well.
Rush to Aid is a card I wish I took in my Worlds deck, but it didn't come up often enough in testing for me to feel comfortable with it. A reusable 2-hex push is solid, even with the restriction that it has to be towards a united fighter. Even if you're attacking with a united fighter and then use the Assist push to just skate around the other fighter, you can gain substantial maneuverability and hop onto tokens, get out of enemy threat range, or set up a better attack for your next turn. It's expensive at 2 glory but I think it's worthwhile.
Push It Real Good
I tried to work a Salt-N-Pepa reference in, but I never did find a good spot. Pretend this came up organically earlier.
One thing I found interesting from doing this is realizing the overlap between Rivals decks that show up constantly in competitive environments and the Rivals decks that pack a lot of push and teleport effects. That's not the sole reason that we see Pillage & Plunder and Blazing Assault so frequently, but it's not surprising that being able to take advantage of all of the strengths of these cards also tends to mean you're able to execute gameplans more smoothly. Likewise, decks like Realmstone Raiders already have an uphill battle in restrictive scoring conditions, but it's also lacking generically useful tools like Sidestep, so seeing it perform so poorly makes even more sense.
There's plenty of room for new effects along these lines, so I'm eager to see what the design team has in store. Will we see Sidestep #7? Will anything ever dethrone Sidestep as king of the pushes? I can't wait to see.
Have any questions or feedback? Drop us a note in the comments below or email us at contact@goonhammer.com. Want articles like this linked in your inbox every Monday morning? Sign up for our newsletter. And don’t forget that you can support us on Patreon for backer rewards like early video content, Administratum access, an ad-free experience on our website, and more.Thank you for being a friend.


 Goonhammer App and Patron Updates: April, 2026
 Kill Team Tournament Report: Engage, Party, Repeat's March Madness 2026
 Goonhammer Reviews: Tribal Conquest