With
Trackblazer coming out on March 12th, the time is nigh for Trainers in Umamusume of all skill levels to prepare for the new scenario; whether you’re a brand new player or a returning player, or even someone who took a break and wants to see what’s changed, Trackblazer has numerous changes to the Umamusume: Pretty Derby formula that can really throw players for a loop without preparations. We previously covered
the changes and expectations for the Scenario in a previous article, but this week I wanted to specifically focus on a less understood mechanic that you’ll hear talked about a lot (and was mentioned in said article!) called Race Bonus.
Race Bonus is a mechanic that affects how much stat growth your trainee receives after racing, and if you’ve ever thought that your trainee doesn’t seem to benefit from racing in your careers, much of that likely has to do with the fact that you probably have had far too little Race Bonus in your decks, especially depending on the depth of your Deck roster and what you’ve been focusing on. If you’ve especially been finding that your trainees aren’t reaching the potential you’d like and feel like some minor bonuses or extra growth would have helped, Race Bonus could be a culprit, but in Trackblazer, it becomes an actual detriment. Let’s break down what the mechanic is first.
Race Bonus and You
While Support Cards often have a fairly large number of stats and bonuses that they offer, many of them seem somewhat opaque at first glance; the game does not inherently explain what “Friendship Training” or “Power 1” means, for example, and since many players rely on guides to tell them what card to use, it isn’t always something players spend a lot of time looking at or reading. This is primarily why many cards are better than others, as they confer better, more specifically beneficial bonuses when included in your decks (especially at higher LB levels). The much vaulted Kitasan Black, for example, provides
25% Friendship Bonus, Mood Effect 30%, Power bonus 1, Training Effectiveness 10%, Friendship Gauge 35, Race Bonus 5%, Fan Bonus 15%, Hint Levels 2, Hint Frequency 30%, and Specialty Priority 80. At first glance, this might all just seem like a lot of numbers, and in some cases, it is a lot simpler than it seems. Breaking it down very quickly, these numbers impact what extra bonus you get for doing specific actions, and obviously the higher the percentage or number, the better.
Race Bonus is a mechanic that provides benefits based on winning races, and specifically really only gives you anything if your trainee places 1st or 2nd in a race, with the most bonuses being if they come in 1st. Unlike some of the above mechanics, though, Race Bonus has specific break points depending on scenarios that are not inherently known to players initially, and that often is where most decks are deficient when it comes to taking advantage of the mechanic. In URA Finale and Unity Cup Scenarios, this hasn’t been much of an issue, because the constant narrative events and training events from cards provided many bonuses that made diminishing or even less valuable results from races seem invisible; it just felt, perhaps, that you had to do them as a game mechanic for progress than anything else, and why sometimes having to do races for fan thresholds felt like losing valuable training progress.
Race Bonus has 2 specific break points:
34% and
50%; essentially, 34 for anything that isn’t Trackblazer is fine, and for Trackblazer, you want at least 50. As noted in our scenario guide, Trackblazer relies on racing, and races make up the majority of what you will be doing during the scenario, even more so than you did in the previous scenarios. Rather than racing for specific fan requirements or as narrative events, Trackblazer is literally all about races, and you’ll be doing far more “supplementary” races than you probably expect to be doing.
If you’re thinking that your trainees have been turning out great up until this point and you haven’t paid any attention to Race Bonus, well, that’s because the previous scenarios don’t really incentivize you to race, nor do most trainees want to race more than they have to; even trainees like Meisho Doto, whose scenario can leave her low on fans during Senior Year, you are disincentivized from racing due to a Career specific debuff. Racing is risky, and the risks in URA and Unity are almost never worth it when training is right there. That’s not true of Trackblazer, though, which removes almost all character specific events from the mix, but does place a heavy emphasis on racing and race results as the determinant of your success in a career. That means that you may be able to clear a scenario without worrying about Race Bonus, but your trainee may not be as good as they could be, and in some cases, you may even find that your stat growth is not good enough to clear the scenario without it.
Deck Building: Variety
50 may not seem like a huge number, except that there are only 6 cards in your Support Deck, and many of them provide very little Race Bonus. Trackblazer is sort of unique in that it is the first scenario which really asks players to not stack single stat cards like previous ones did, instead taking advantage of cards that provide heavy Race Bonus and also useful stats. This is also, ironically, where Guts Cards become somewhat useful as opposed to previous scenarios. There are 6 cards in the current Global pool (or are about to release) that provide a whopping
15% Race Bonus at MLB: SSR Sakura Chiyono O Guts, SSR Nice Nature Wit, SSR Marvelous Sunday Power, SSR Ikuno Dictus Guts, and the Nishino Flower Power SR and upcoming
Admire Vega Guts SR.
 Very good SR for Trackblazer, but be aware pulling for SRs is actually harder than SSRs!
Last week, we talked about what was coming up in the game in terms of banners and releases, and Admire Vega’s card will be a supporting SR for Narita Top Road’s SSR banner. If you’re really looking to take advantage of Trackblazer training for Champions Meeting and generating new Aces, you really want the Admire Vega Guts card, which is quite difficult to obtain at MLB compared to an SSR; while an SSR is rarer than an SR, you can also get Pity for SSRs, whereas SRs are just entirely reliant on luck. The other cards in this list have some quirks, too, in that one of them (Marvelous Sunday) was an Event reward, meaning that if you didn’t participate in the event, you just won’t have the card at all.
But don’t despair, because there are a lot of cards that provide
10% Race Bonus too. Some of these are also pretty good, which makes that even better, since using subpar cards just for Race Bonus is not going to result in something you really want for your decks. To make things simple, let’s just list the cards you’ll want to keep an eye out for:
In
Speed: Tokai Teio SSR, Gold City SSR, Sakura Bakushin O SSR, Biko Pegasus SSR, Kawakami Princess SSR, Sweep Tosho SSR, Narita Top Road SSR, Special Week SSR, and Shinko Windy SR. Of all of these, Matikanefukukitaru and Special Week are 2 of the best cards in general, with Special Week working very well for Pace Chaser trainees.
In
Stamina: Super Creek SSR, Satono Diamond SSR, Winning Ticket SSR, Narita Brian SSR, Manhattan Cafe SSR, and Manhattan Cafe SR are your best options; again, of these, Super Creek is probably the best one when you need Swinging Maestro for Recovery, and Manhattan Cafe’s cards can be very good for Long trainees.
In
Power: El Condor Pasa SSR, Smart Falcon SSR, Yaeno Muteki SSR, Tamamo Cross SSR, Daitaku Helious SSR, Admire Vega SSR, and at SR rarity you’ll want to look for Hishi Amazon, Mejiro Ryan, Daitaku Helios, and Sakura Bakushin O. The issue here is that Admire Vega’s SSR is actually less useful than her upcoming SR, and some of these others are not particularly useful cards unless in a pinch; of them, El Condor Pasa and Smart Falcon are likely the best cards in the pool.
In
Guts: Winning Ticket SSR, Haru Urara SSR, Mejiro Ryan SSR, Yukino Bijin SSR, Sakura Bakushin O SSR, and Air Groove SR. There’s not a big pool here, and most of these cards are not particularly amazing, but one good note is that Haru Urara’s card is the one you likely have MLB due to it being free and available with Friend Points; the others are less that, and may be less available, based on your deck and what you’ve pulled.
In
Wit: Fine Motion SSR, Mejiro Dober SSR, Curren Chan SSR, Narita Taishin SSR, Agnes Tachyon SR and Marvelous Sunday SR. If you missed Marvelous Sunday’s event card mentioned above, don’t worry, because her SR Wit card is better, and Agnes Tachyon’s card is also great! Fine Motion is the real star here, so if you have her MLB, you’ll want to use her, and if not, consider borrowing her for Trackblazer.
Check Your Perks
 Be honest, you never noticed that button 'Perks' until now, did you.
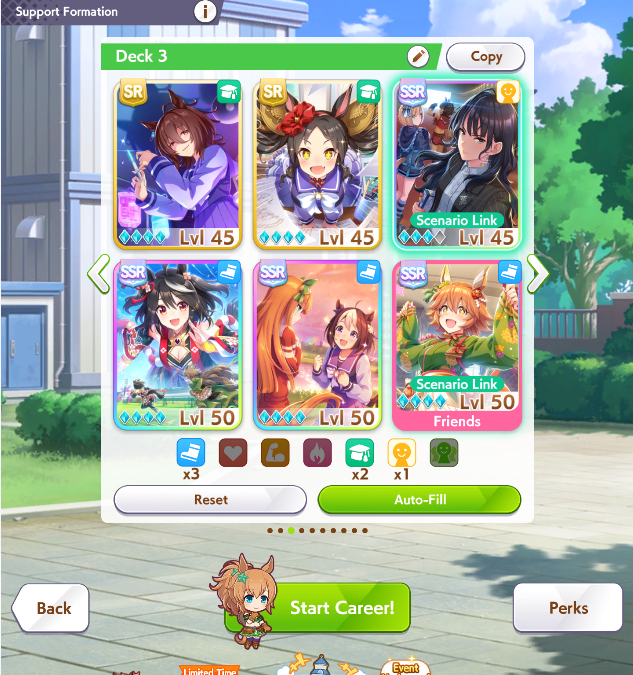
But how do you know what you have in total, without having to memorize all of these cards all the time? Well, there’s an option when you go to Deck selection in a Career that you probably have never looked at:
Perks. This little button is in the bottom right of the screen and shows you the total of all benefits that your deck is currently providing you, showing you what each card you’re doing provides. This can still be a little overwhelming and slightly obtuse, because it doesn’t show you the total of your Perks, just which card is providing which perk.
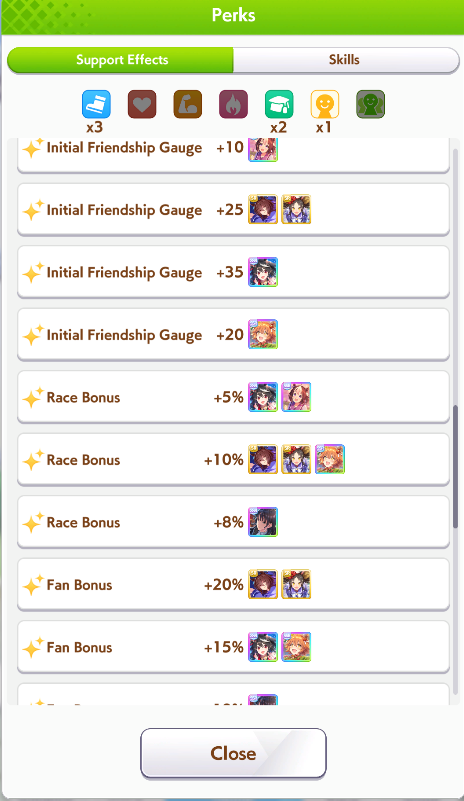
For example, this deck that I have here for Unity Cup is providing me with 43 Race bonus, but the Perk menu doesn’t inherently make that obvious until you note the icons for each card next to it. Since I’m not building for Trackblazer, I wouldn’t be looking for 50, but I’ve certainly almost hit it with just this deck that I was using for the previous Champions Meeting training for a Pace Chaser. The last thing I want to note here is that the Perk menu doesn’t always list the
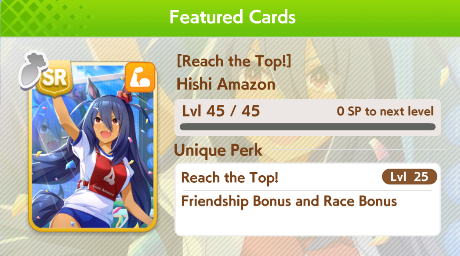
Unique Effect that cards can provide; for example, Hishi Amazon provides a base extra 5% Race Bonus, but that isn’t included in the Perk Menu, so you will need to remember to add that in yourself or at least be aware of it (which is why she’s listed at 10% above).
 For some reason, the bonuses provided by Unique Perks aren't included in the Perk menu calculation.
Trackblazer is going to be a bit of a breaking point for many players, so being informed about it before it arrives will hopefully help you avoid getting burned out or disappointed in the game. To be honest, Umamusume: Pretty Derby is a game that can become very easy to burn out of, and so if you’ve been playing it since release or have taken a break and are coming back, don’t feel bad if you’ve felt like the game is demanding more of you than you expected. Even for myself, there are times when I just take days off from the game and do very little but try to get a set of dailies in and close the game. There are some quality of life aspects we don’t have yet that can help, but I want to note that Trackblazer may not be for everyone, so if you find that you really dislike the Scenario, don’t fret; there’ll be a new one in a few months, and hopefully that one will be to your liking! And, of course, remember that the goal of any game is to have fun; if you aren’t having fun, do something else, and that extends even to one of my favorite games. Good luck with Trackblazer, and if you have any questions, please leave us comments down below, drop by the Goonhammer Discord if you’re a Patron, or even email me at
marcy@goonhammer.com! Until then, see you out on the track!
Have any questions or feedback? Drop us a note in the comments below or email us at contact@goonhammer.com. Want articles like this linked in your inbox every Monday morning? Sign up for our newsletter. And don't forget that you can support us on Patreon for backer rewards like early video content, Administratum access, an ad-free experience on our website, and subscriber-only content covering competitive Warhammer 40K!Thank you for being a friend.

 Goonhammer App and Patron Updates: April, 2026
 Kill Team Tournament Report: Engage, Party, Repeat's March Madness 2026
 Goonhammer Reviews: Tribal Conquest