I’ve always had a soft spot for the losers. In fiction I tend to prefer the barely competent goofs over the unstoppable badasses, and that preference seems to follow me into gaming as well. When I pick up a new game with any sort of meta I will often look for the poorly performing factions and try to play them first.
Last year some friends and I played a series of
Star Wars Unlimited games using what at the time were the bottom-tier leaders, and we had a blast doing it (
you can read more about that here). I thought it might be fun to try something similar with Shatterpoint by playing a game with some of the poorest performing primaries and seeing how they do on a more level playing field, when they’re not up against top performers.
Separatist Alliance vs. Galactic Empire
According to
Longshanks (the third-party tournament ranking system for Shatterpoint), the bottom four primaries are two Separatists and two Imperials, which naturally splits up into into two obvious strike teams. To keep things simple, my opponent and I decided to stick to their “out of the box” squads, which gave us the following match-up:
Asajj Ventress / Kalani / B1 Battle Droids
General Grievous / Kraken / B2 Battle Droids
vs
CT-9904 / ES-04 / Elite Squad Troopers
General Veers / Snowtrooper Lieutenant / Snowtroopers
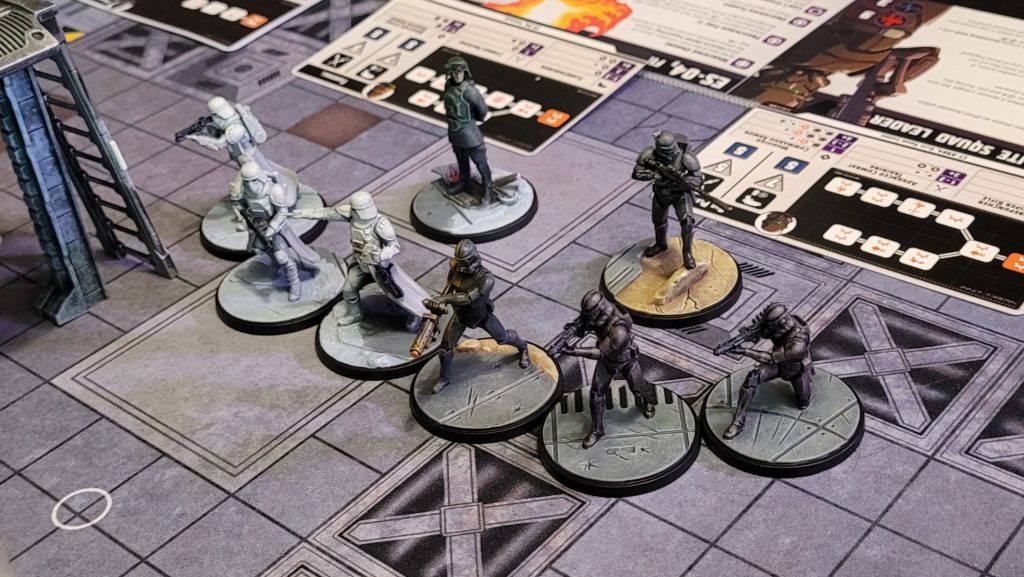 General Veers, CT-9904, and their loyal troops. Painting and photo by Jefferson Powers.
Looking at the Separatists,
General Grievous has a bit of extra movement with
Scuttle, and he has a few abilities that will keep the Battle Droids moving.
Kraken and
Kalani will help with this as well, while the
B1s and
B2s are...let’s just call them “uncomplicated.”
Ventress is a bit of a lone wolf – she’s pretty impressive on her own but does nothing to help out her squad mates, or vice versa. This strike team seems like a squad of five units paired with a squad of one.
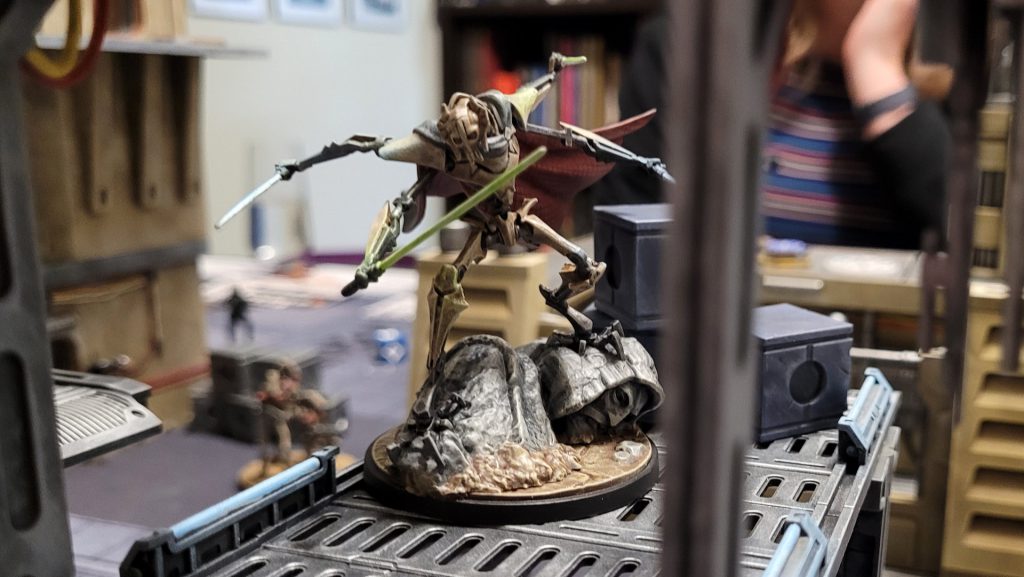
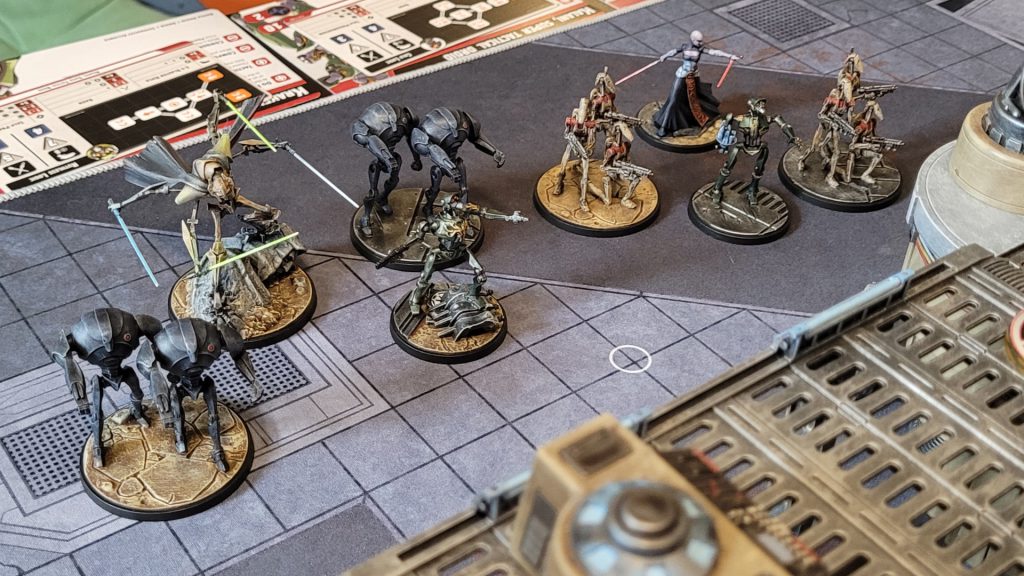 General Grievous, Asajj Ventress, and a ton of Battle Droids. Painting and photo by Jefferson Powers.
Over on the Imperial side,
General Veers is focused primarily on backing up his
Snowtroopers, so it’s a pity that none of CT-9904’s Elite Squad Troopers have the
Stormtrooper tag. The
Snowtrooper Lieutenant is a little more versatile, with two abilities targeting the
Galactic Empire tag that ES-04 and the Elite Squad Troopers might be able to make use of.
CT-9904 is similar to Ventress in that he’s a bit of a loner who is focused heavily on attacks and wounding enemy units. Thankfully, the recently rebalanced
Elite Squad Troopers can lend their
Supporting Fire abilities to any Galactic Empire unit.
At least we have a General on each side, so it should be a fair fight, right?
First Struggle: Daring Gamble
We used the
Never Tell Me the Odds mission set, which has an interesting arrangement of objective points and is focused on giving out extra struggle tracker movement for wounding enemy units. Our first mission card gives that ability to Secondary units.
Opening Moves
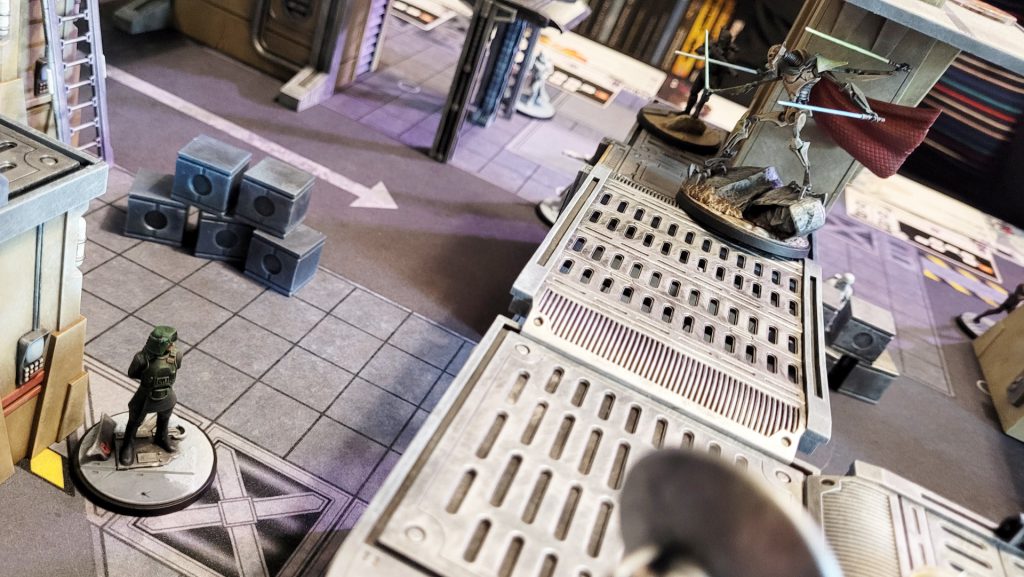
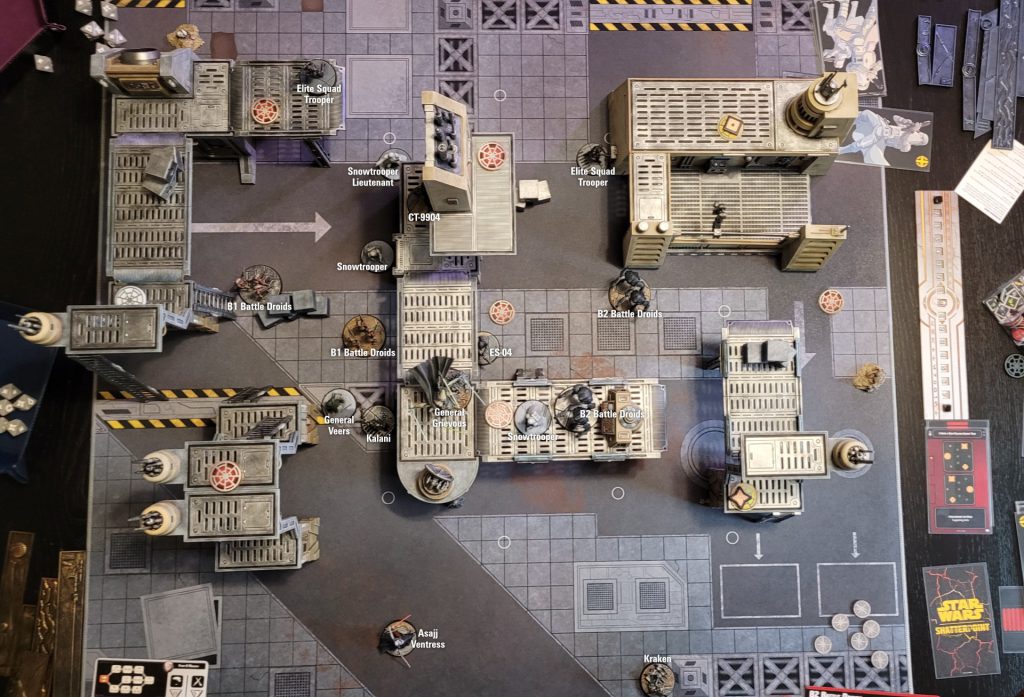
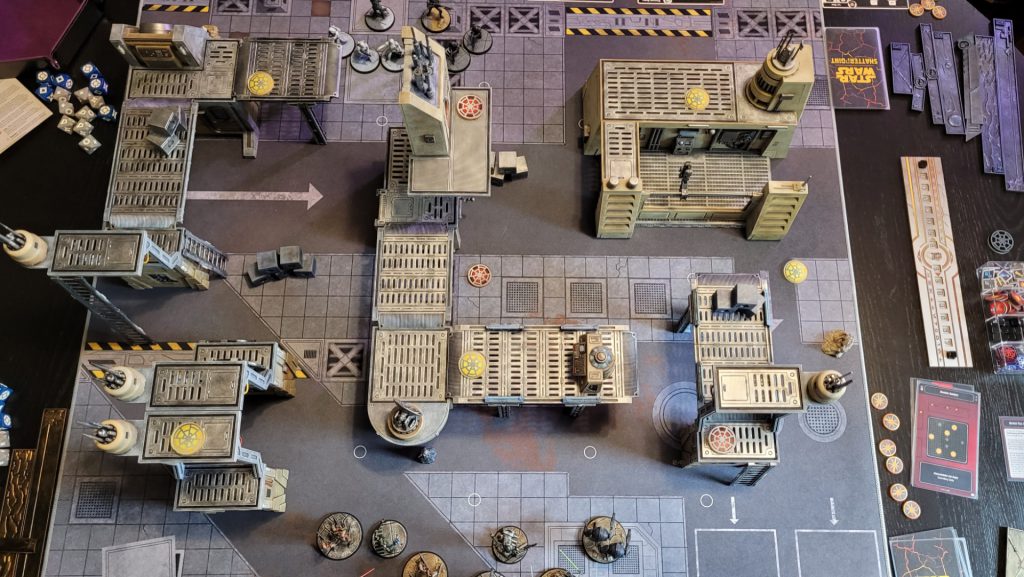 Terrain and starting positions. Painting and photo by Jefferson Powers.
My opponent, playing the Empire, took the first turn by activating the
Elite Squad Troopers, splitting them up to sit on the two active objectives closest to her end of the board. I drew
Kalani for my first order card, but decided to take advantage of his reserve discount. Alas, my second draw was
Kraken, so I would be activating a Tactical Droid after all. First he used his Tactic ability,
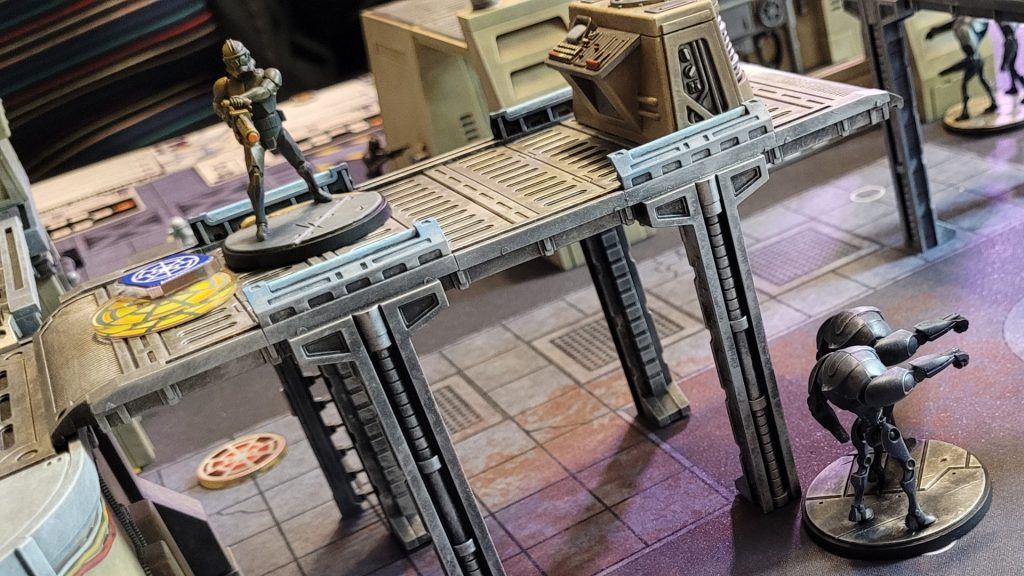
Do Not Let Them Escape, to move himself a little closer to the nearest active objective, then he used
Tactical Network to move one of the B1s into control range of another objective. Finally Kraken moved, climbing onto a gantry and into range of his objective, giving me control of two but also putting Kraken out in the open with a big target painted on him.
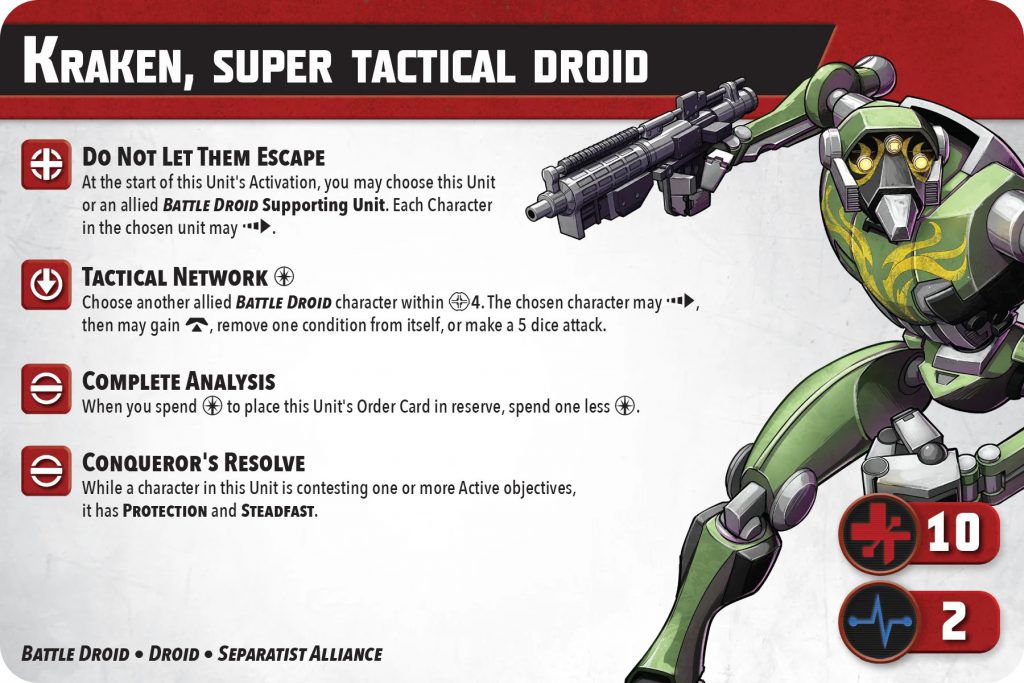 Image © Lucasfilm © Atomic Mass Games.
My opponent’s next activation was
CT-9904, who, after using
Move to Position on himself and Veers, got lined up for a shot at Kraken, dealing 4 damage, a disarmed, and a shove. Thankfully, Kraken’s
Conqueror’s Resolve ability canceled 1 damage and the shove, so he was able to stay on the objective. My opponent still controlled 2 objectives, moving the struggle tracker back to the center and giving us both a momentum.
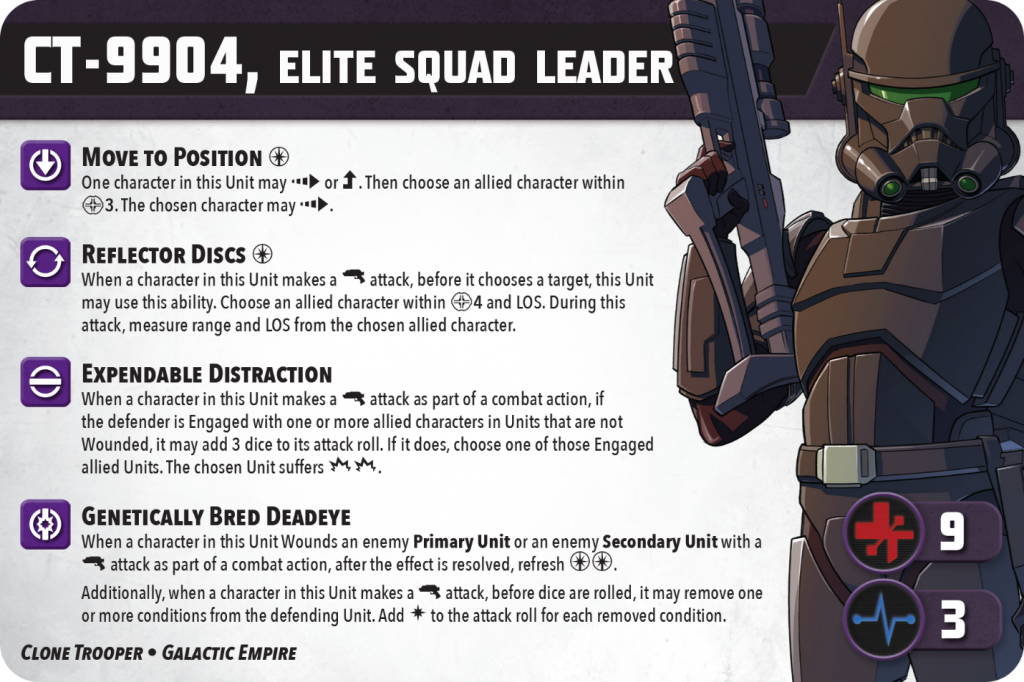 Image © Lucasfilm © Atomic Mass Games.
Dueling Generals
 Grievous knocks Veers off his perch. Painting and photo by Jefferson Powers.
My next draw was my
Shatterpoint card. I used it to activate
General Grievous, thinking that with the extra advance provided by his
Scuttle ability, he might be able to get to the active objective at the center edge of the board, the farthest from both of our starting edges. Grievous first used
Onward, his Tactic ability, to move one of the B2s forward, but he wasn’t quite able to make it to the objective. He did get a shot off at one of the Elite Squad Troopers, dealing 4 damage, a shove, and a pinned, and then used
Appetite for Destruction to move the same B2 forward a bit more. Unfortunately, the Elite Squad Trooper was no longer in line of sight after Grievous’ shove knocked him off of the maintenance bay, so the B2 couldn’t take advantage of the free attack. I still controlled 2 objectives, but so did my opponent, so neither of us was really making any gains on the struggle tracker.
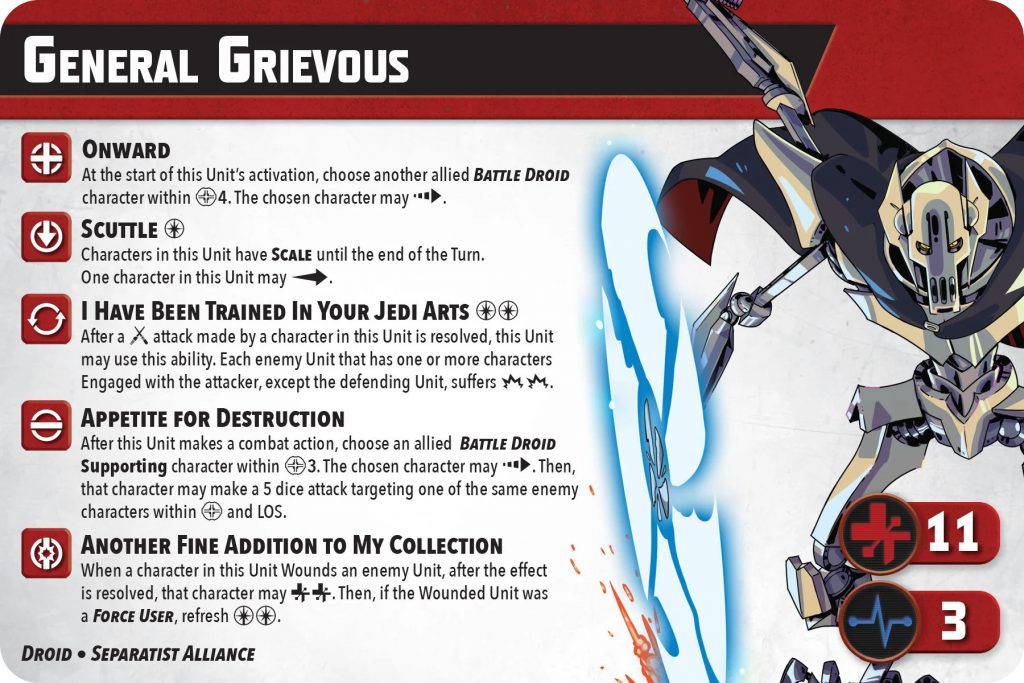 Image © Lucasfilm © Atomic Mass Games.
Next up my opponent activated
General Veers, first using his tactic ability to move the Snowtrooper Lieutenant, and following up with
I Will Have Results on one of the Snowtroopers to give him a dash and then a 5-dice attack, which he directed at Kraken for 1 damage. Veers did a move action to advance, then a combat action of his own, also targeting Kraken for 2 more damage. Kraken was now sitting at 6 damage, but would have been in much worse shape without the
Protection and
Steadfast he was getting for contesting the objective. But Veers wasn’t finished yet – he wrapped up his turn with
We Are the Storm, giving Kraken a choice of either dashing away from the objective or taking 3 more damage, which would have put him a little too close to a wound for my liking. Kraken chose to dash out of range of the objective.
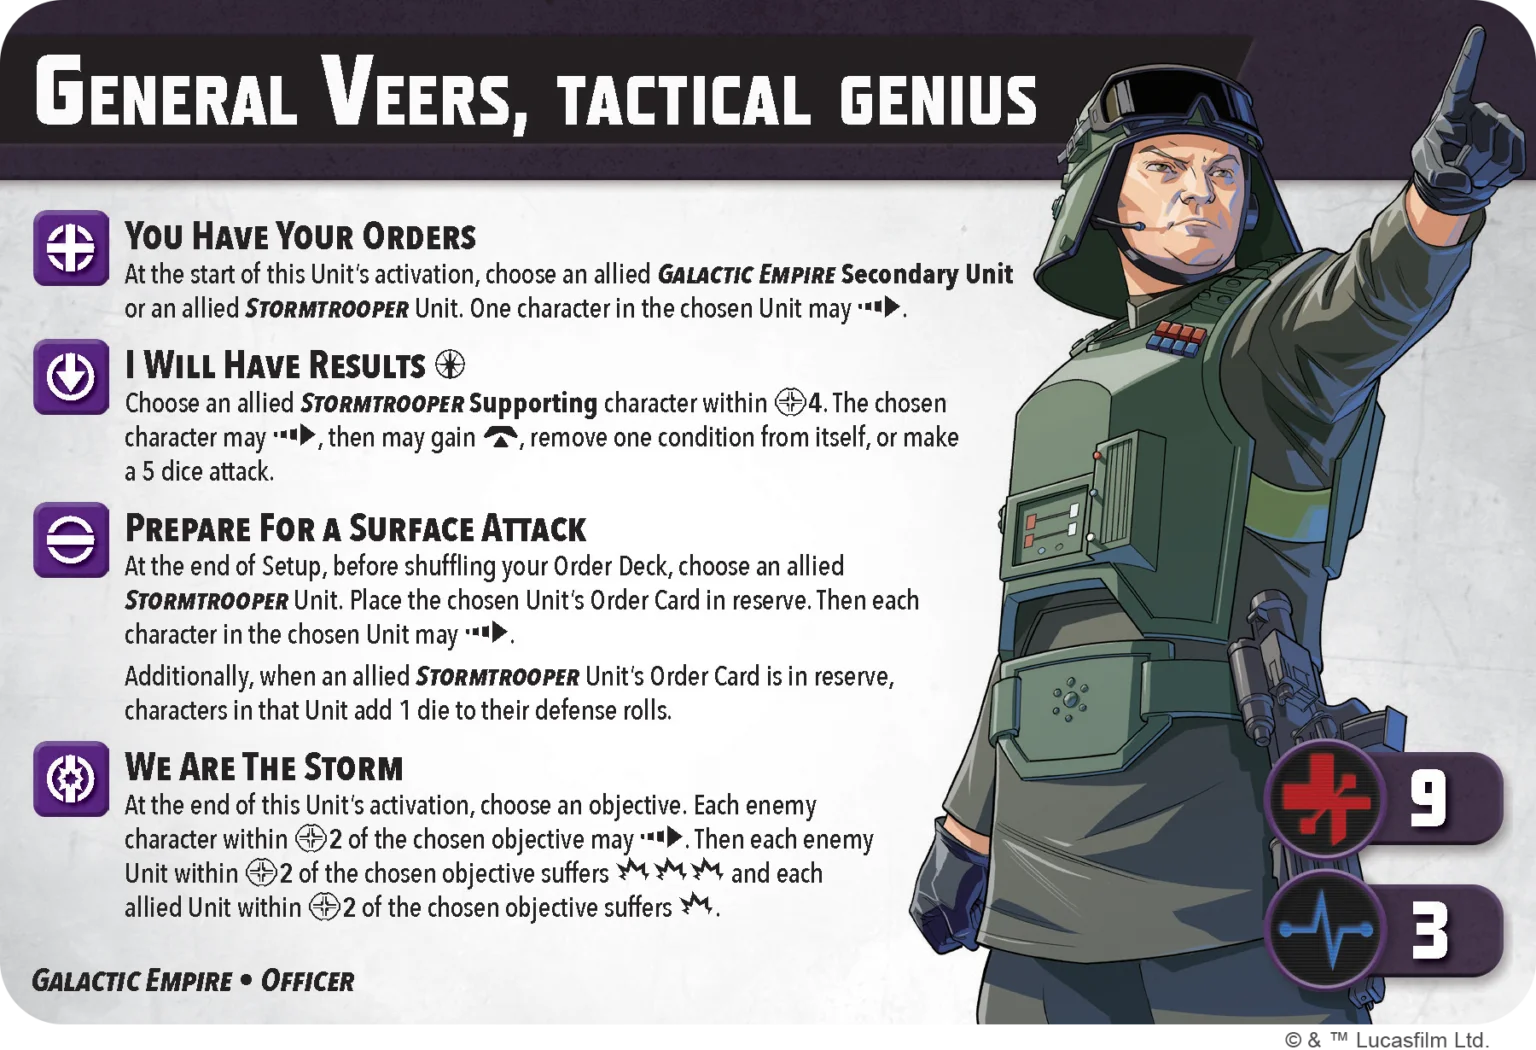 Image © Lucasfilm © Atomic Mass Games.
As luck would have it, I drew
Grievous’ order card next. He used
Onward to move one of the B2s close enough to control that center left objective. This freed Grievous up to make General Veers regret his recent choices. Grievous used his move action and
Scuttle ability to get close enough for a melee attack on Veers, first changing his combat stance to
Quad Arm Attack. The attack dealt Veers a devastating 9 damage and 2 shoves, wounding him and knocking him out of position. Grievous followed up with
I Have Been Trained in Your Jedi Arts to give 2 damage to the nearby CT-9904. Moving the B2 got me a third active objective, so I was able to take a solid lead on the struggle tracker.
Flamethrowers and Battle Droids
 ES-04 takes control while the Battle Droids are looking elsewhere. Painting and photo by Jefferson Powers.
My opponent’s next order card was
ES-04, AKA Firebrand. She used her
Marching Orders Tactic ability to move herself and a Snowtrooper, followed by a move of her own and a quick shot at Kraken, dealing 2 damage and leaving him 2 away from a wound, which is too bad because as a Secondary she would have benefited from the current mission card. She then got a hunker token thanks to
Supporting Fire [Hunker] from the Elite Squad Troopers, and gave one to the Snowtroopers thanks to her own
Obscuring Flames ability. My opponent still only controlled 2 objectives, so the struggle tracker moved 2 but stayed on my side, giving my opponent 1 momentum.
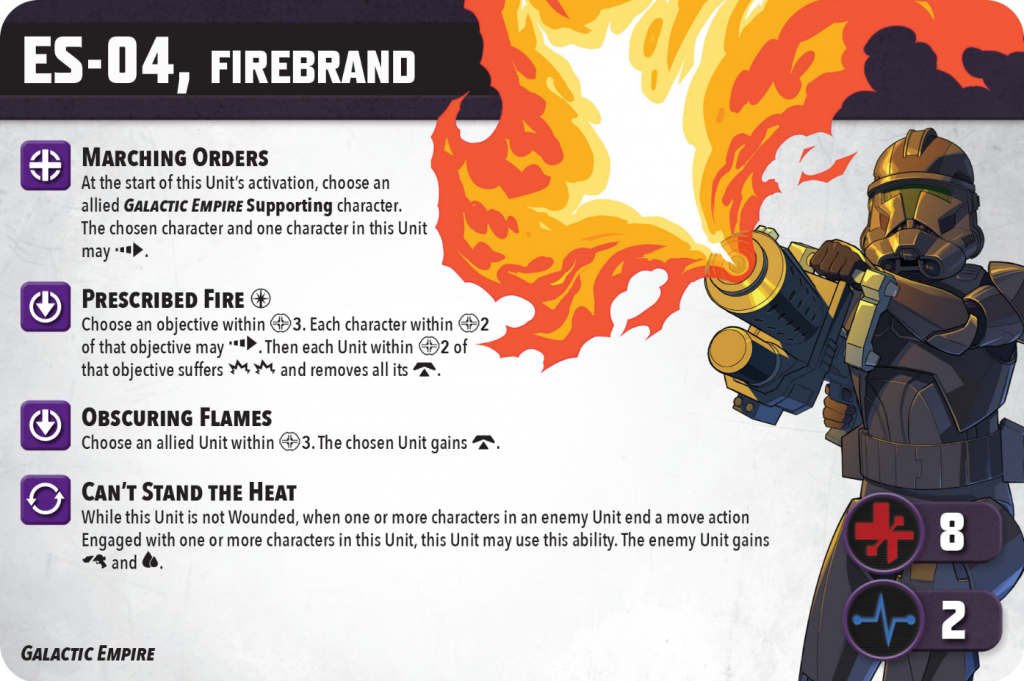 Image © Lucasfilm © Atomic Mass Games.
 Image © Lucasfilm © Atomic Mass Games.
My
B1 Battle Droids finally activated, attacking the Snowtrooper Lieutenant for 2 damage and a strained – the Lieutenant reacted with his
Commanding Presence ability to turn the strained condition into another damage. I still controlled 3 objectives, moving the struggle token to 4, with my momentum at 5. So close to winning the struggle! My opponent drew her
Shatterpoint card next, which she used to activate
ES-04 again. After using
Marching Orders to give herself and one of the Elite Squad Troopers a dash, ES-04 managed to get into control range of one of my objectives. She then focused and blasted Kraken for 5 damage, a pinned, and 2 shoves, leaving him wounded and me wondering what Kraken did to annoy my opponent so much...
The wound on Kraken from ES-04 triggered the mission card, moving the struggle token one space in my opponent’s direction. Now my opponent controlled 3 objectives, moving the struggle tracker back to the center and giving us both a momentum. With all the momentum we had gained between wounding opposing units and bouncing the struggle tracker back to the middle, the first struggle was bound to end soon, and I needed to get back control of at least one objective if I wanted to win the first struggle.
I activated the
B2 Battle Droids, who were able to close on ES-04, dealing a total of 4 damage and 2 shoves between the two of them and regaining control of the objective. But with three control and momentum at 4, I was more or less right back where I started. My opponent activated her
Snowtroopers, using
Assault Tactics for an extra dash to get them into position to attack my B1s who were guarding an active objective away from most of the action. The Snowtroopers attacked and dealt a little damage, shoved one of the B1 models out of the way, and scored some healing thanks to
Supporting Fire [Heal] from the Elite Squad Troopers. The Snowtroopers moved closer to the objective but weren’t able to snatch control away, leaving my opponent with 2 control and gaining her another momentum since the struggle tracker was still on my side of the board.
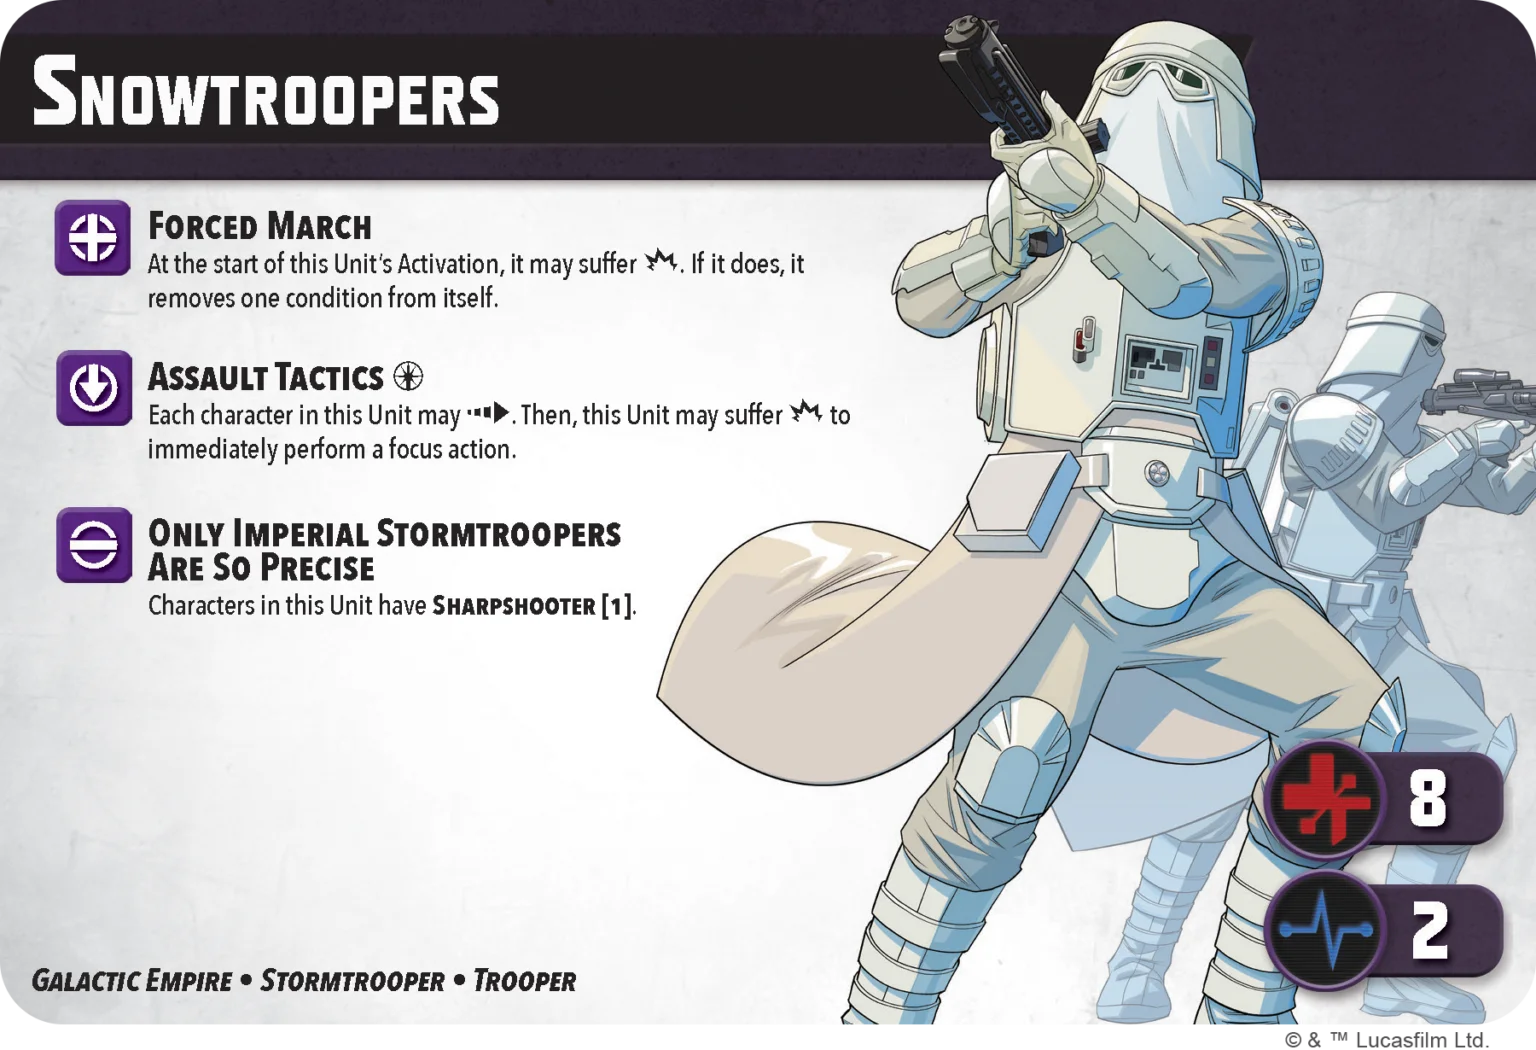 Image © Lucasfilm © Atomic Mass Games.
I had one more order card in my deck, which I knew to be Asajj Ventress. But I had 3 active objectives and knew I was going to win the struggle this turn, so I decided to activate
Kalani instead and try to set up for the second struggle. I used
Roger Roger, his tactic ability, to move one of the B2s into a (hopefully) more advantageous position for later. Then I gave Kalani a move action to advance, and took a pot-shot at one of the Snowtroopers, hitting for 3 damage and a shove. With 3 control I won the first struggle.
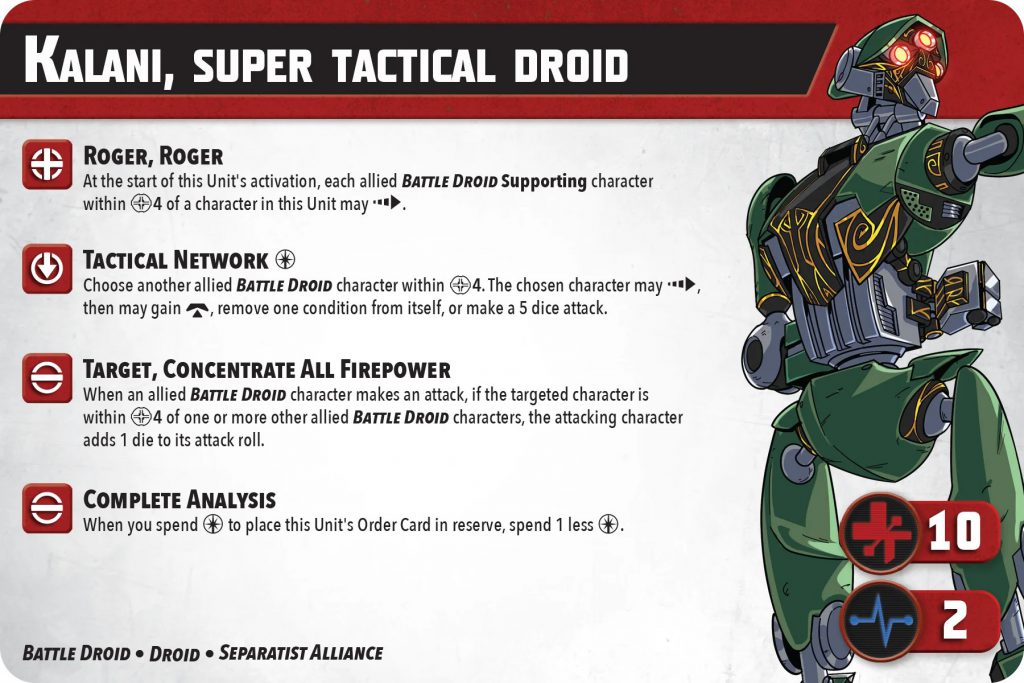 Image © Lucasfilm © Atomic Mass Games.
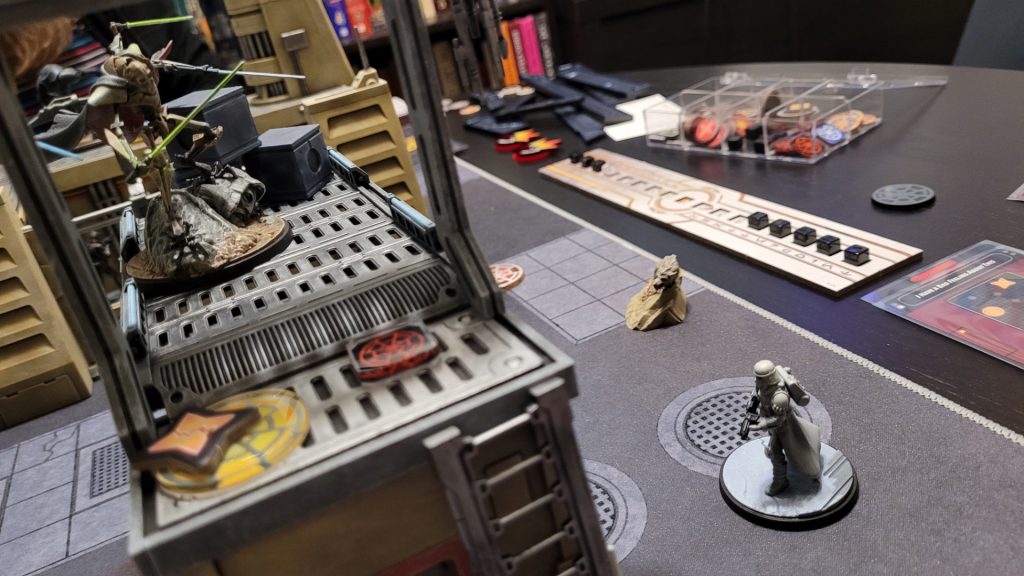
Second Struggle: I Have a Bad Feeling About This
The new pattern of active objectives didn’t really do either of us any favors – the one we had both committed the most units to went dark, and none of us had units close enough to any of the newly revealed objective points to take control of them. What’s more, we were both down to our last activation cards before reshuffling, so our options would be sorely limited.
 The state of play at the start of the second struggle. Photo by Jefferson Powers.
For this struggle, the extra tracker movement would be awarded any time a Supporting unit managed to inflict a wound.
Snowtroopers Doing All the Hard Work
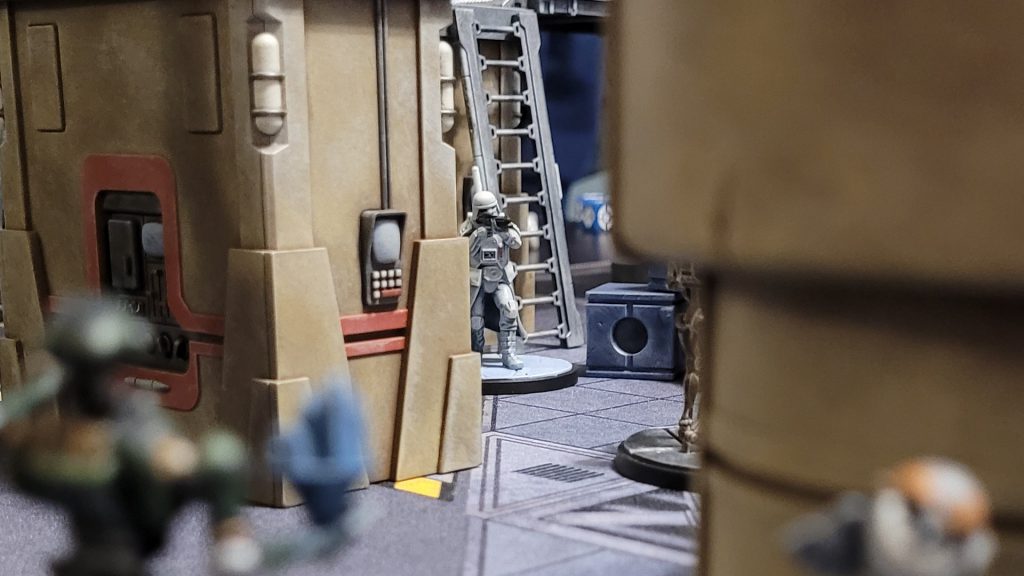 An Imperial Snowtrooper getting it done. Painting and photo by Jefferson Powers.
My opponent activated the
Snowtrooper Lieutenant, using his Tactic ability,
Press On, to move one of the Elite Squad Troopers to within control range of one of the objectives. The Lieutenant then focused and shot at the B1s, dealing 5 damage (enough for a wound) and scoring 3 heals, plus one more from the Elite Squad’s
Supporting Fire [Heal]. My opponent had taken control of one objective, but lucky for me it wasn’t the priority objective.
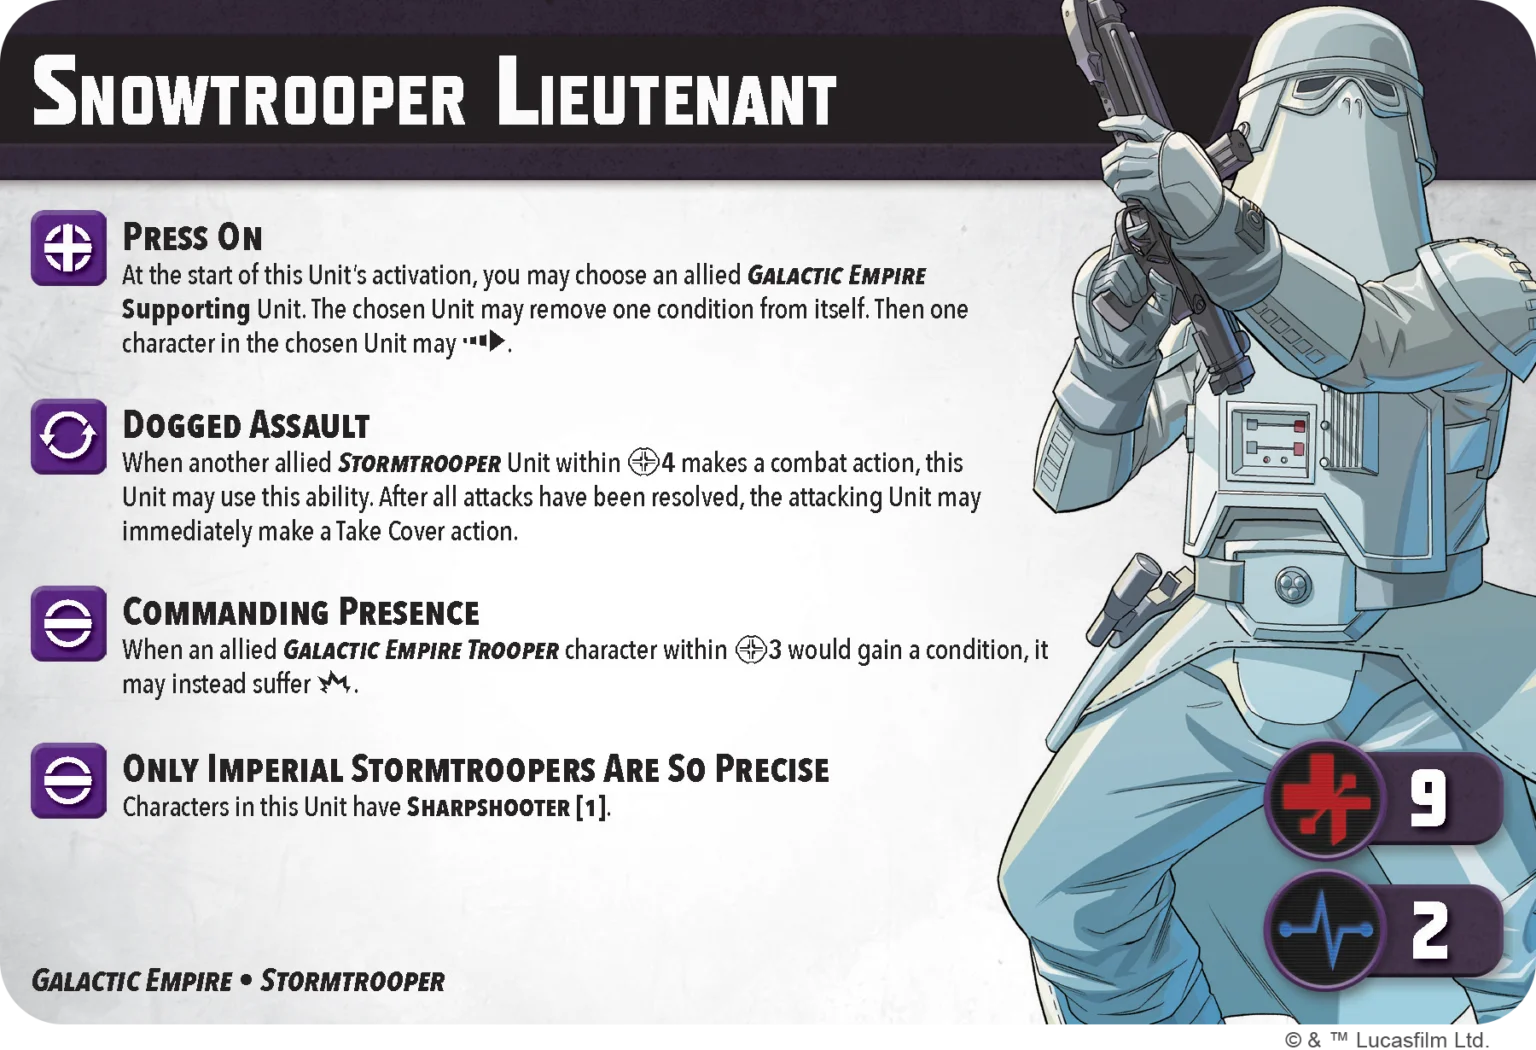 Image © Lucasfilm © Atomic Mass Games.
Finally it was time to get
Asajj Ventress into the fight. Unfortunately, I was out of Force, sorely limiting what she would be able to do. I couldn’t get her close enough to any of the active objectives, so instead I gave her a move action to get her close enough to Grievous to target him with a Heal action. Who says Ventress is a lone wolf? Unfortunately I didn’t control any objectives this turn.
After a reshuffle and Force refresh, we were both feeling a little better about our options. My opponent drew the
Snowtrooper Lieutenant again, using his
Press On Tactic ability to move one of the Snowtroopers into control range of the priority objective. Then the Lieutenant did a move action to advance, followed by a shot at Kalani, who made a truly awful defense roll and took 4 damage, an exposed, and a shove. Plus the Lieutenant was able to heal the Snowtroopers Support unit back to full health, and then reposition, using a ladder to get to the top of a tower where he would be able to help control the objective and hopefully avoid melee attacks from Ventress or Grievous. This was the priority objective for this turn, so my opponent moved the struggle tracker 3 spaces farther in her direction.
My first card after the reshuffle was the
B2 Battle Droids. The first B2 attacked the other Snowtrooper, dealing 1 damage and a shove, dropping the trooper right in front of the other B2 who followed up with 5 more damage and another shove. They then used their
Relentless Advance ability for a dash, followed by a regular move action to advance one B2 into control range of this turn’s priority objective, and the other into range of the objective that the Elite Squad Trooper took control of earlier. The Elite Squad Trooper was contesting the objective from a lower elevation, so the B2 took control, giving me a total of 3. This still had the tracker on my opponent’s side, so I gained 1 momentum.
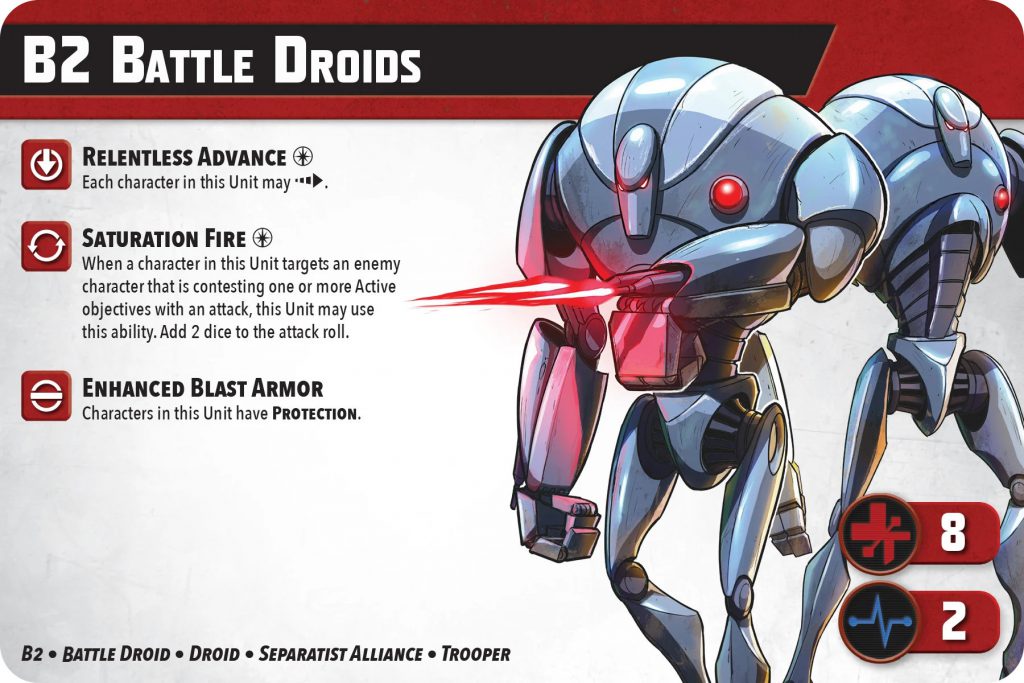 Image © Lucasfilm © Atomic Mass Games.
My opponent next activated
General Veers, who did his job bossing the Snowtroopers around, but also got in on the action himself. He used his
You Have Your Orders tactic ability to give one Snowtrooper a dash, moving into control range of one of the objectives. Then Veers attacked Kalani with a regular combat action, dealing 5 damage and a push, and healing the Snowtrooper unit. He then moved, getting within range 4 of one of the Snowtroopers so he could use
I Will Have Results to have that trooper attack one of the B2s, only scoring 2 damage but also getting a heal and a reposition that got him to the priority objective. Unfortunately I was only guarding it with a B2 at a lower elevation, so my opponent was able to snatch control away from me, scoring 3 control and moving the tracker back to 4 on her side.
Ventress Finally Does Something
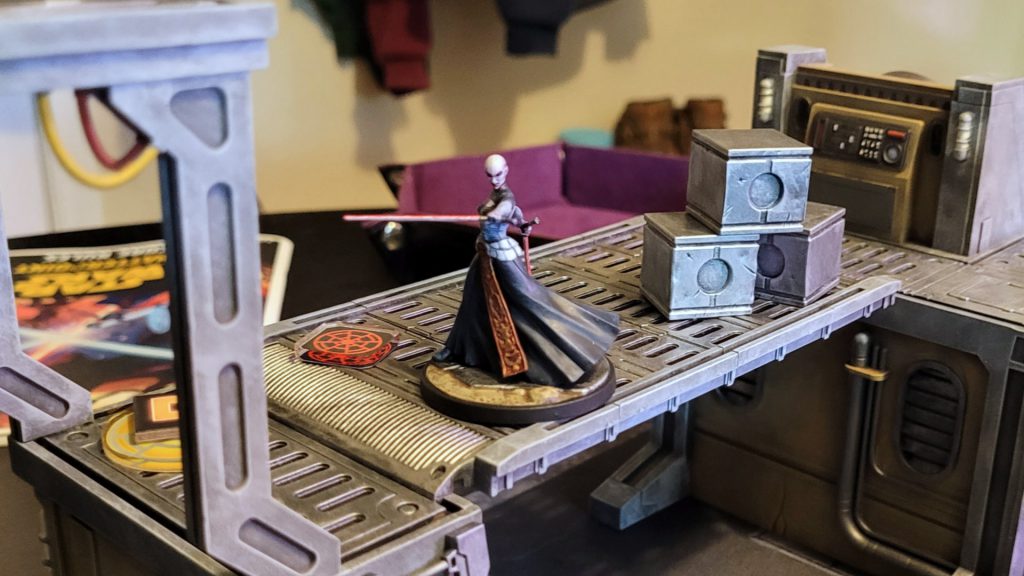 Ventress strikes a pose. Painting and photo by Jefferson Powers.
I drew Kalani’s order card next, but he wasn’t really in a position to do anything useful, so I put him in reserve and drew
Ventress. This time I had enough Force to use her effectively, so I used her
Dathomirian Dexterity and a regular advance move to get her to the priority objective, where she made short work of the Snowtrooper guarding it, dealing 7 damage, all four conditions, and gaining a free
Force Push against the nearby Snowtrooper Lieutenant. This got me back to 3 control, putting the tracker back to where it was at the end of my last turn but gaining me another momentum.
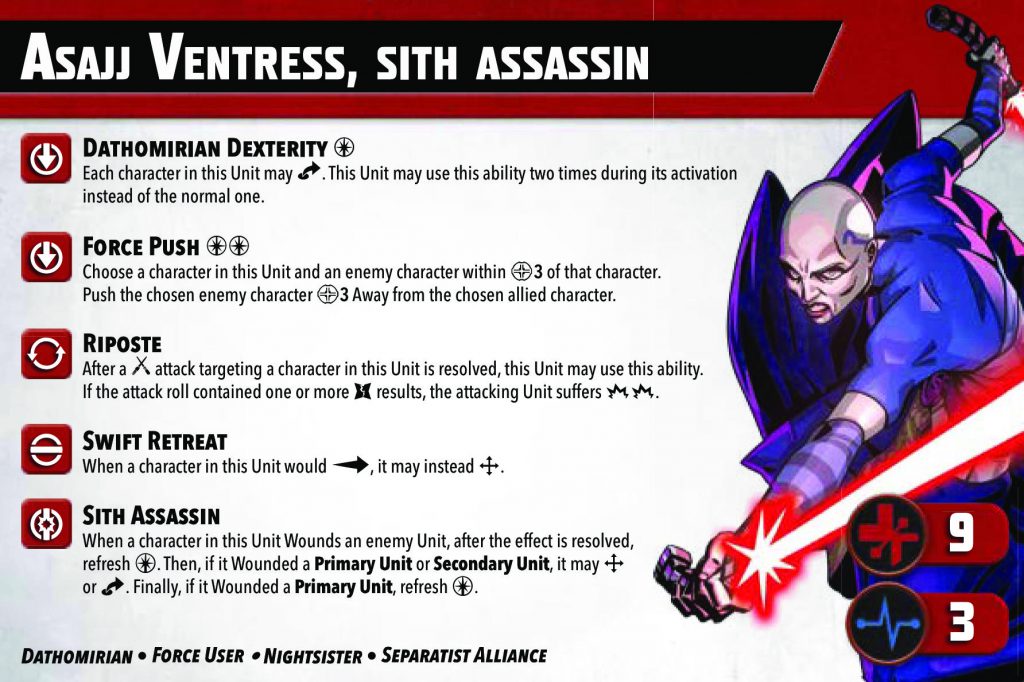 Image © Lucasfilm © Atomic Mass Games.
The priority objective moved to the top of the maintenance bay, away from the bulk of the action. I had a B2 at the same elevation contesting the objective, and my opponent had an Elite Squad Trooper within control range but on the ground. My opponent activated
CT-9904, moving him within control range but staying at the lower elevation so he could still make a ranged attack, and hoping for a shove to knock the B2 off the maintenance bay roof. The gamble paid off: the B2 was hit with 5 damage, a push, and a strain. With all three models now at a lower elevation to the objective, my opponent took control, giving her a total of 3 control for the turn.
Meanwhile, back on the other side of the battlefield, my opponent had a Snowtrooper parked on one of the other objectives, also on an elevated platform. I activated
Kraken, who (after clearing from wounded to injured) used his
Do Not Let Them Escape tactic ability to give the B1s a dash, hopefully getting them closer to the action. Then, borrowing a page from CT-9904’s book, he made an attack against the Snowtrooper in an attempt to knock him off the platform. He scored 2 pushes, as well as 3 damage and a free use of his
Tactical Network ability, which allowed one of the B2s to move and attack ES-04 for 2 damage. Tactical Droids are pretty good as long as they have a steady supply of Battle Droids nearby...
And We’re Back to the Snowtroopers
 That Snowtrooper has no idea what he's walking into. Painting and photo by Jefferson Powers.
Unfortunately, this move only got me to 2 control, and I could see the struggle slipping away from me. My opponent drew her
Shatterpoint card, which she used to activate the
Snowtroopers. They were in rough shape from their encounter with Ventress – wounded and with all four conditions. At the start of their activation they switched to injured, cleared their damage and strained condition, and then used their
Forced March ability to clear the pinned condition so they could move. Then they used
Assault Tactics to dash and gain a Focus action (taking the damage), followed by a combat action. The first Snowtrooper made a melee attack against Ventress which only scored 1 damage, but cleared the unit’s disarmed condition. The other Snowtrooper then attacked Kraken, dealing 4 damage, a pinned, and 2 pushes. His
Conqueror’s Resolve ability canceled a damage and one of the pushes, but that still left one, which sent him flying off the tower.
The Snowtroopers then did a move action, one of them taking over the tower which currently held the priority objective, and the other getting out of Ventress’ engagement range. My opponent scored 3 control and was very close to winning the struggle.
I activated
General Grievous, who used
Onward on one of the B1s before advancing, taking damage from his strained condition in the process. He then used
Scuttle for some additional movement, followed by an attack on one of the Snowtroopers that inflicted 4 damage, a pinned, and a push off the tower. This time he was in a better position to take advantage of Appetite for Destruction, giving one of the B2s a shot at the Snowtrooper for an additional 2 damage. The priority objective had moved on, however, so I was only able to score 2 control – I was slipping further and further behind.
My opponent drew the
Snowtroopers order card (she was getting a lot of mileage out of these guys). They used
Assault Tactics, using the dash to clear their pinned condition, and then a move action to advance into position for an attack. The first one attacked Kalani for 5 damage, 3 heals, and a push, wounding him and scoring a struggle tracker move from the mission card. The other Snowtrooper took a shot at Kraken for 4 more damage. My opponent only controlled 1 objective, but combined with the mission card score it was enough for her to win the struggle.
Third Struggle: No Such Thing as Luck
I will freely admit that I got really lucky with the third struggle card – it gave me easy control of two objectives without giving my opponent anything. The mission card reward was back to Secondary units, which wouldn’t do me much good as neither Kalani nor Kraken are heavy damage dealers.
The B1 Battle Droids Are Surprisingly Effective...Until They’re Not
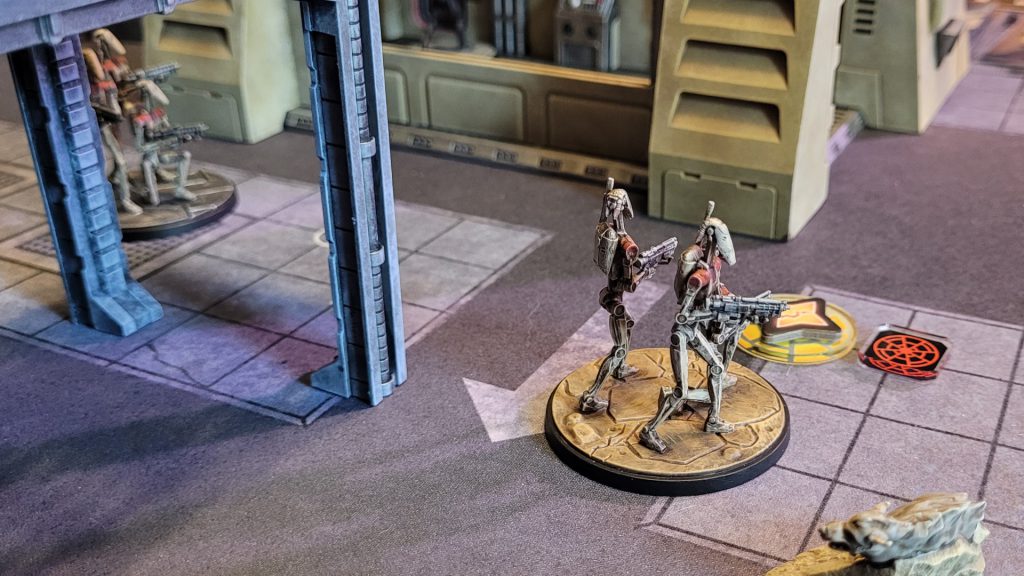 A unit of Battle Droids wondering where everyone went. Painting and photo by Jefferson Powers.
With the priority objective squarely under Ventress’ control, I activated the
B1s, who so far hadn’t do much more than mill about. They were in a great position to take advantage of Kalani’s
Target, Concentrate All Firepower ability for an 8-dice attack, plus their own
Combat A.I. Protocols would pile on a strained or exposed condition. After clearing from wounded to injured, they took a shot at ES-04, dealing 5 damage, an exposed, and a shove, wounding their target. They also got a reposition for themselves, which put them in a great position to perform a similar attack against one of the Elite Squad Troopers. That attack resulted in 7 damage, an exposed, a strained, and another reposition, wounding the Elite Squad Troopers as well. Not bad for a bunch of clankers.
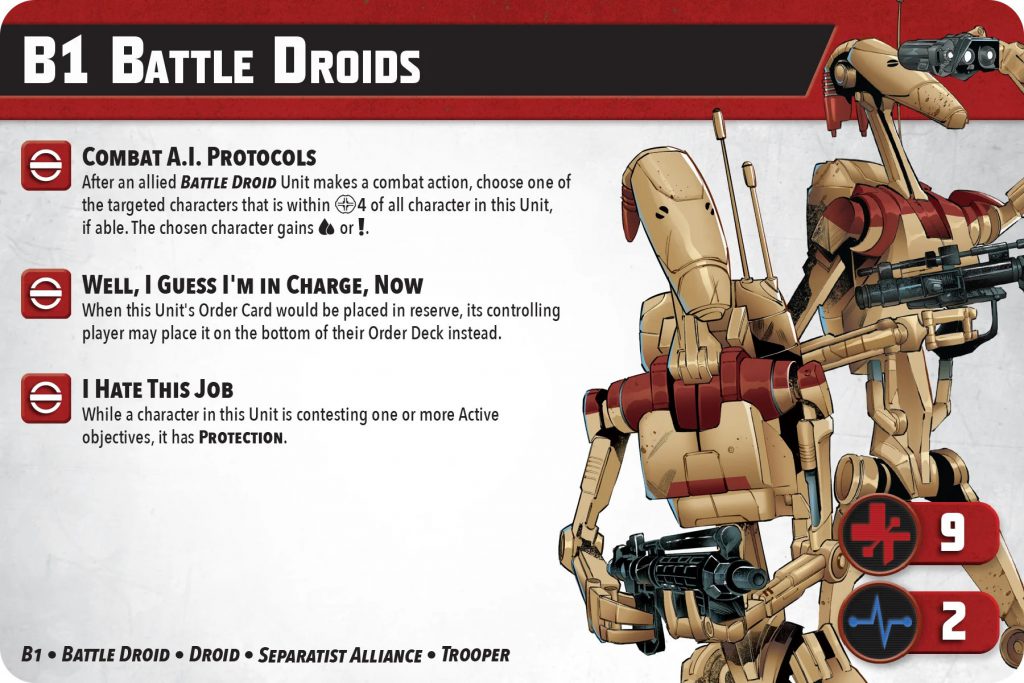 Image © Lucasfilm © Atomic Mass Games.
I was able to use the B1s’ second reposition to get one of them into control range of another objective, giving me control 3 – a great start.
The priority objective moved to the point my B1s had just taken control of. My opponent drew the Elite Squad Troopers but chose to put them in reserve, replacing them with
ES-04. After clearing from wounded to injured, she used her
Marching Orders tactic ability (plus a move action for herself) to move herself and a Snowtrooper into control range. Then she attacked one of the B1s for 3 damage and a pinned, but the B1 was able to use
Protected to cancel one damage. My opponent scored 2 control and 1 momentum, but things weren’t looking good.
Grievous Steps In
 General Grievous has had about enough of this. Painting and photo by Jefferson Powers.
I drew my
Shatterpoint card, which I decided to use on
General Grievous. The priority objective had remained in the same location, and he was close enough to help me reclaim it. He used
Onward to move the other B1 to within control range, then he advanced to engagement range of the Snowtrooper, who never knew what hit him. After switching his combat stance to
Quad Arm Attack, Grievous let loose with an attack that did 5 damage and a shove, wounding the Snowtrooper in the process. I scored 3 control, almost enough to win the game.
My opponent played her
Elite Squad Troopers from reserve. After clearing from wounded to injured, one of them took a shot at a B1, dealing 2 damage, a pinned, an expose, and a shove, but with the Snowtroopers wounded it wasn’t enough for her to regain control of the objective. The other Trooper made a run at Ventress, dealing 2 damage, a pinned, and a shove that unfortunately didn’t move her far enough away from the objective she was parked on. My opponent didn’t manage to score any control, and seeing that there was no way I wouldn’t control enough to win on my next turn, we called the game there.
After Action Assessment
So are we any closer to understanding why these primaries are the poorest tournament performers? It might have been a better test to run each of them against more competitive strike teams, but I think it was more fun to pit the bottom ranks against each other, to see how they did under the best possible conditions. And we did come away from the game with a few useful insights.
By my opponent’s reckoning, the biggest problem with both Veers and CT-9904 was relatively low hit points, both for them and for their Secondary and Support units. Veers and the Snowtroopers have a fair amount of healing in their combat trees, but that means they’re spending their attacks keeping themselves alive instead of inflicting damage.
Force pool availability was an issue as well, as those inevitable injuries cause a lot of the really useful abilities to cost more. CT-9904’s ability to regain force is difficult to pull off – it requires a combat action, which means it can only happen during his activation and needs a lot of setup in order to make it work.
In the plus column, General Veers and the Snowtroopers worked very well together – Veers kept them moving and attacking, and they arguably did more damage over the course of the game than any of the other Imperial Units. Plus my opponent got a lot of use out of Veers’
We Are the Storm ability to blow up objective points.
Over on my side, the main thing I struggled with was the Battle Droids. Almost all of the Tactical Droids’ abilities require range 4 to the Support Battle Droids, which means you really need to think about keeping them all in some kind of formation to maximize their effectiveness – not always easy when you’re scrambling to active objectives all over the board.
Grievous was great at dealing damage and moving Battle Droids around, but one problem that occasionally came up for him was his larger base – it was sometimes difficult to squeeze him into tight spots, especially up on towers and gantries or if you’re trying to drop him in among multiple enemies to take advantage of
I Have Been Trained in Your Jedi Arts.
Ventress is effective on her own, but she does nothing to help out her Secondary or Support units (and vice versa), which is a problem in a game that is all about synergy between squad-mates. The logical solution would be to give her a different support staff, with one obvious choice being Savage Opress and the Nightsister Acolytes. But you would need to look at whether Ventress is a better Primary for that squad than Mother Talzin, which sounds like a great idea for a separate Goonhammer article.
All in all we enjoyed playing the “bottom of the barrel” squads against each other. They weren’t terribly smooth or efficient, and I can see why they might be struggling against more competitive lists. But they’re still fun squads to play, and it was nice to get to see what they can do when they’re not so worried about needing to punch above their weight.
Have any questions or feedback? Drop us a note in the comments below or email us at contact@goonhammer.com. Want articles like this linked in your inbox every Monday morning? Sign up for our newsletter. And don't forget that you can support us on Patreon for backer rewards like early video content, Administratum access, an ad-free experience on our website and more.Thank you for being a friend.

 The state of play at the start of the second struggle. Photo by Jefferson Powers.

 Goonhammer App and Patron Updates: April, 2026
 Kill Team Tournament Report: Engage, Party, Repeat's March Madness 2026
 Goonhammer Reviews: Tribal Conquest