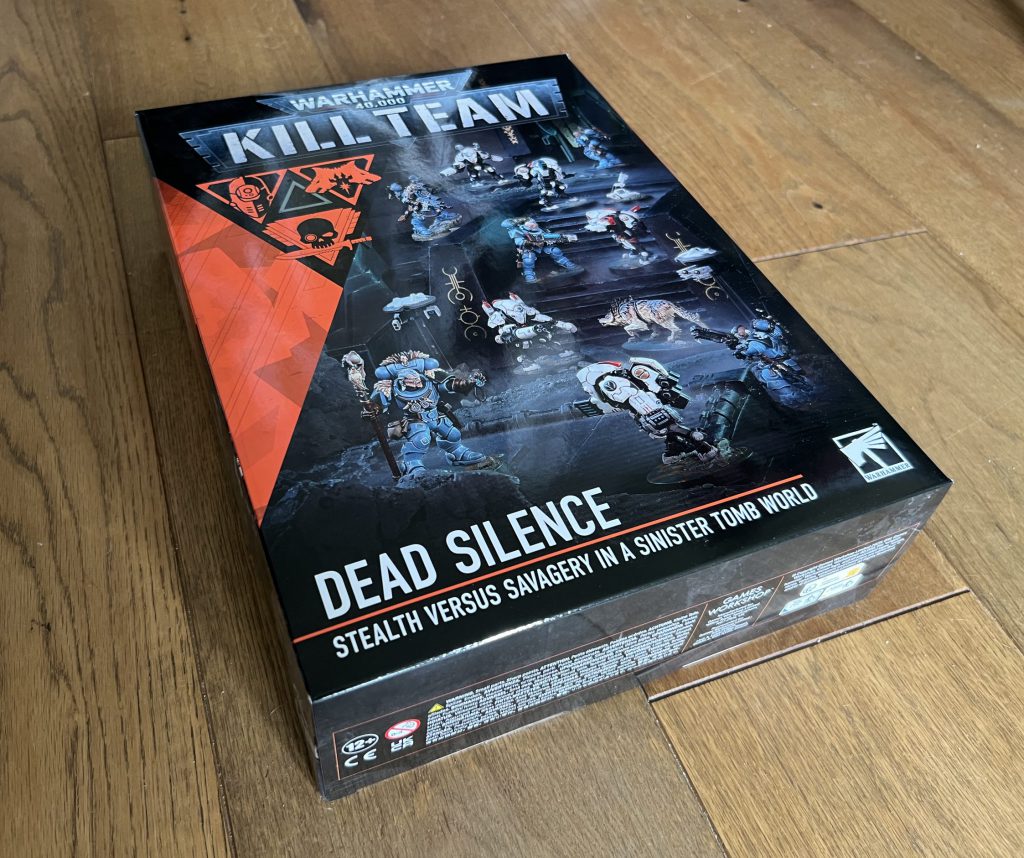
Dead Silence is the new expansion for Kill Team. As usual it has two completely new teams, the XV26 Stealth Battlesuits and Wolf Scouts. It also has a campaign system that lets you link together games as rival teams compete to loot forbidden tech from the Tomb World of Ctesiphus before all the Necrons wake up and kill everything. It's a good time for all the family.
It's also a much smaller box than we've had recently, because it's got much less stuff in there than Typhon and Tomb World.
Kill Team Dead Silence
If you'd like a video review, check out this one from Can you Roll a Crit.
Thanks to Games Workshop for giving us early access to Dead Silence.
The Models
With two elite teams and no additional NPOs or terrain to bulk it out, Dead Silence has fewer models than any Kill Team box we’ve seen. This contrasts with Typhon and Tomb World, which both included terrain and a squad of NPOs as well as their two teams. The next box, Shadowhunt, will include ten Sisters of Battle, six Chaos jump troops including a Lord and the enormous C’tan Nightbringer, so Dead Silence is quite an outlier in terms of plastic content. On the plus side it's substantially cheaper than these other boxes, so if you just want two teams this is a very efficient way to get them.
Instead of plastic you get paper, for the terrifyingly unpronounceable Ctesiphus Expedition Campaign. There are two pads in the box, one of maps and another of Campaign Logs, where you track your team's location, supplies, points and so on.
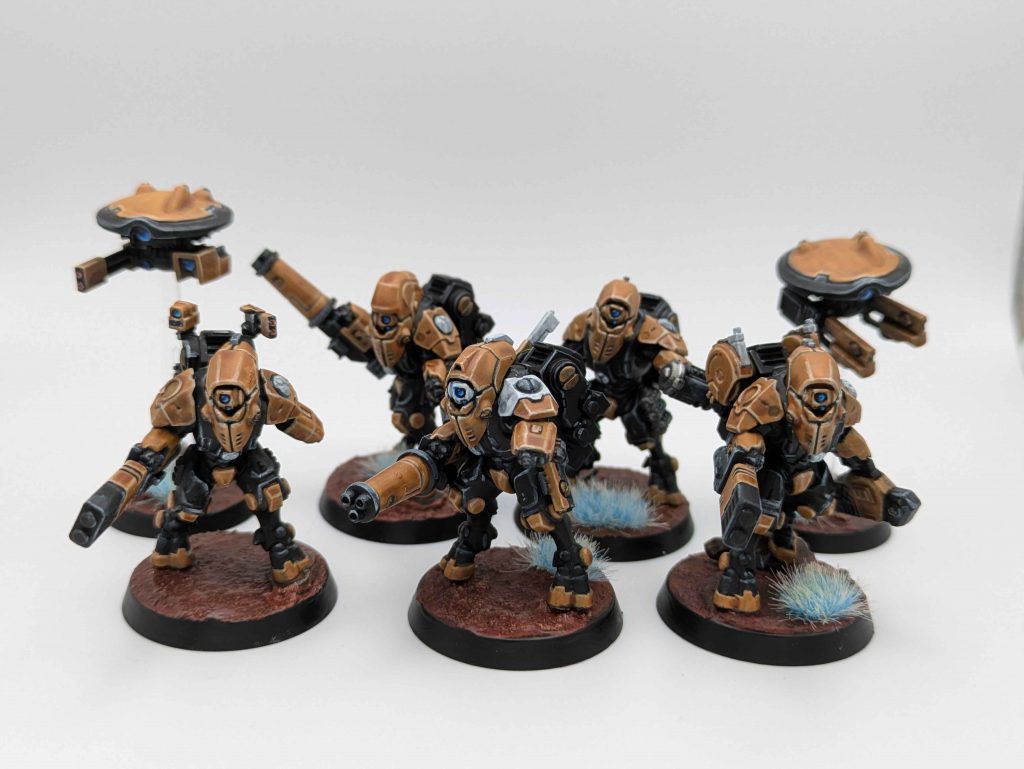
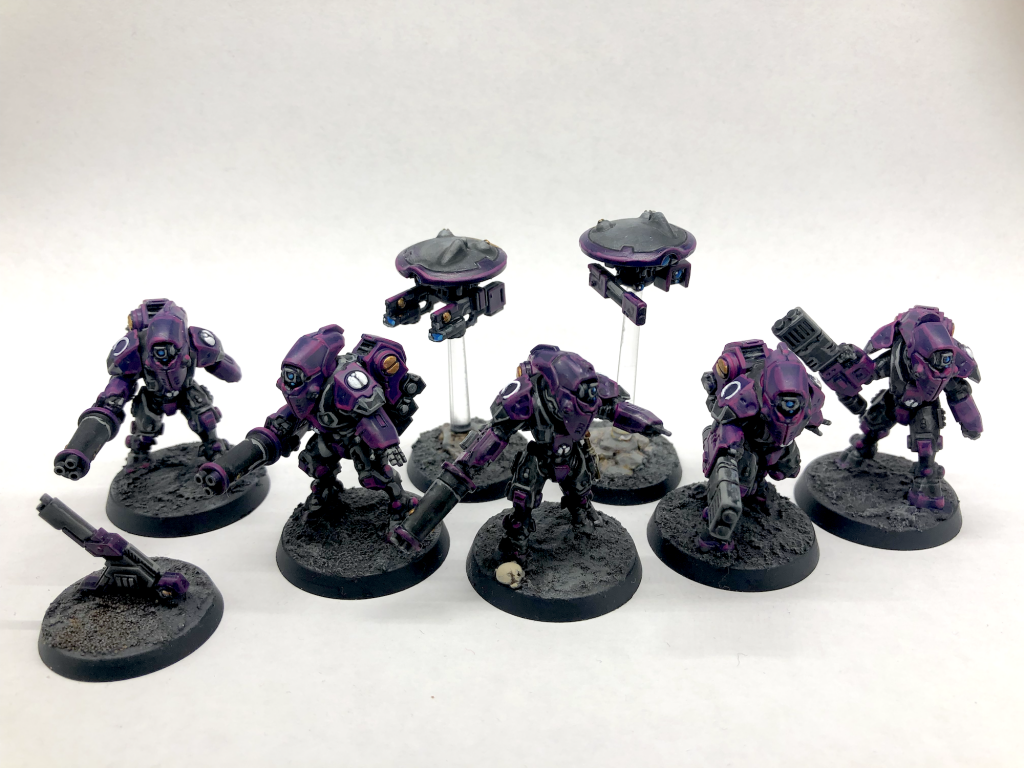
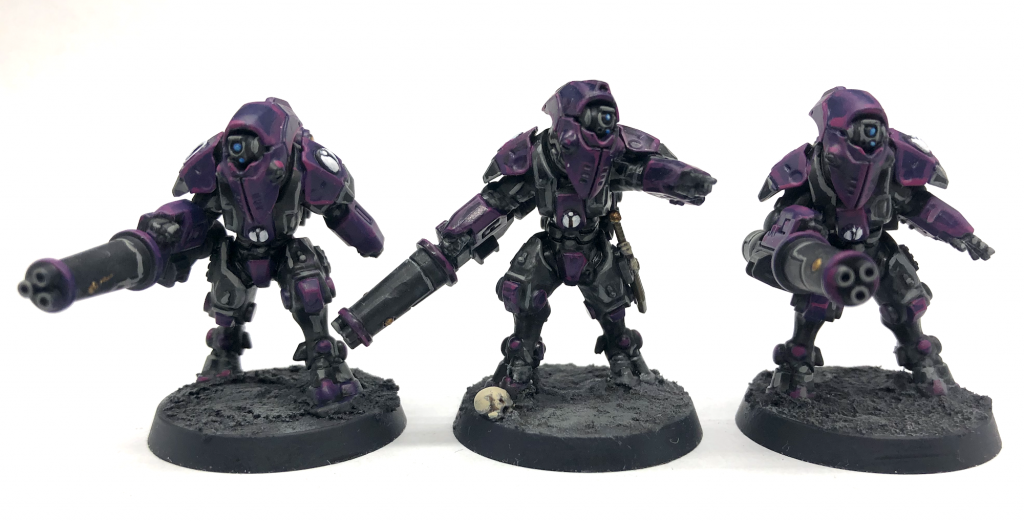
You get a squad of five Stealth Suits in Dead Silence, plus a Gun Drone and a Marker Drone. The whole lot is on a single sprue, which means there aren’t all that many spare bits. You do get pieces to make generic Infiltrators instead of the specialists and Shas’vre, but there’s not much reason to do that. You get five Burst Cannons and two Fusion Blasters.
Credit: HappyRacoon
The arms are keyed to fit particular torsos in set positions. You can remove these keys if you want but I mostly didn’t bother as I quite liked the positions they came with. You’ll find that the heads also match up with the arms, as they tend to be looking in the direction the right arm is pointing - unless you’ve pointed it somewhere else of course.
I thought you’d be able to stick any pair of legs on any torso, but no, they’re unique again. That means you’ll need to remove some of the locating pins unless you want to stick with the five set poses.
I swapped the left arms and heads between the Neutraliser and Liberator, mostly to be certain that you could. It’s made the Liberator look a bit more like they’re about to throw the EMP bomb, and the Neutraliser is maybe a bit more dynamic too.
You can give your Fusion blasters to any of your Stealth suits in Kill Team, so I wanted to try and magnetise them to have the option. The guns fit to the arms very nicely but the contact surfaces are narrow so I ended up using three 1x1mm magnets for each one. This holds the guns fairly securely, though you wouldn’t want to hold the models up by them.
Loading...
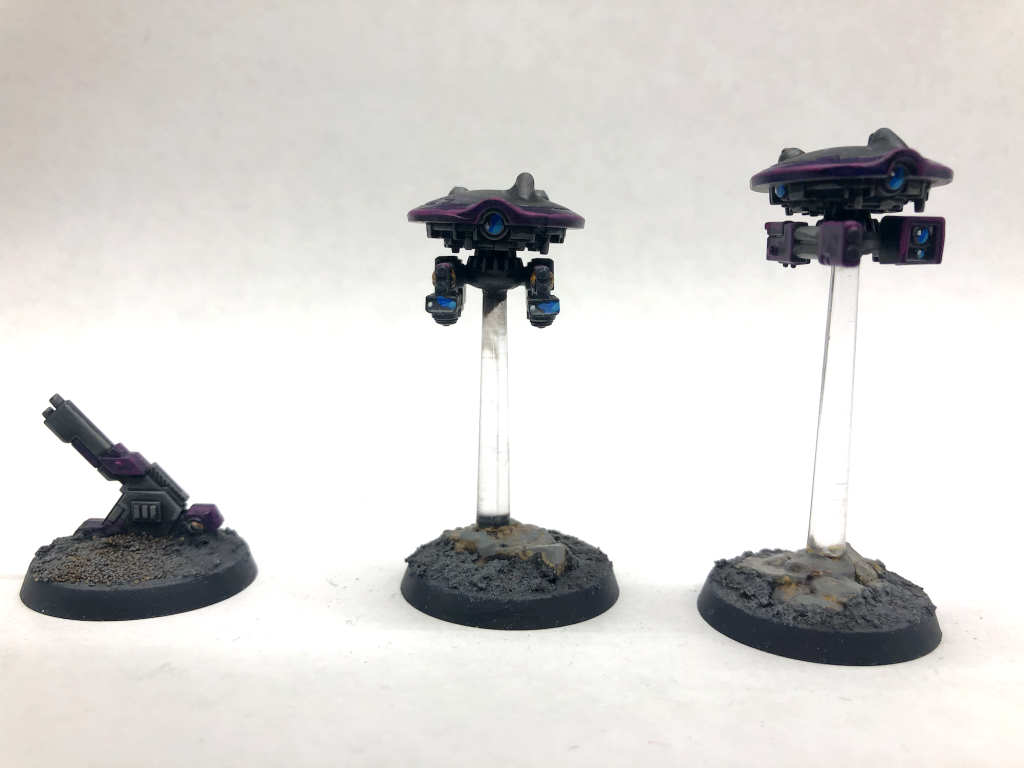
The drones are on 28mm bases. The sprue has a couple of little patches of rocks that you can stick onto these, so that they can take the flying stand. They’re the ball and socket type of flying stand so they shouldn’t snap, though the drones can fall off them, which they’re certain to do at some moment where it seriously matters in a game. That’s fixable with Blu tac or similar.
I have to say I had a pretty miserable time with mould lines on this kit. They were very conspicuous and ran over lots of detail, like the Shas’vre’s pointing finger, various lenses and so on. The kit took a lot longer to build than I had expected, due to all the time I spent staring through a magnifying glass and carefully trimming pieces back to where they were supposed to be. The end result is great but it was laborious getting there. This just seems to have been bad luck as nobody else seems to has had the same issue.
XV26 Stealth Battlesuits. Credit: NotThatHenryC
I’ve tried a digicam pattern on some vehicles before and this felt like a good opportunity to experiment with it on figures. To do this I sprayed my Stealths with grey seer and then painted on patterns with black legion and a grey I mixed up, by adding lighter colours to Basilicanum Grey, which I found too dark. I gave the whole thing a wash in Agrax, painted the metals, a few red bits and some lenses, and highlighted the light grey bits in Ulthuaan Grey. They’re based with a rubble mix that got hit with Basilicanum Grey and then drybrushed lighter and I slapped some pigment on the lower legs to make them look dusty. I think it’s created quite a decent effect, looking like they’ve been in the field for a while. I haven’t finished the whole team yet though as it’s not a quick scheme to do.
Greg: The mold line thing is interesting because my kit did not have that problem - there were a few that needed cleaning up, but not nearly as bad as your experience. That’s a small enough sample size that it’s virtually impossible to draw conclusions.
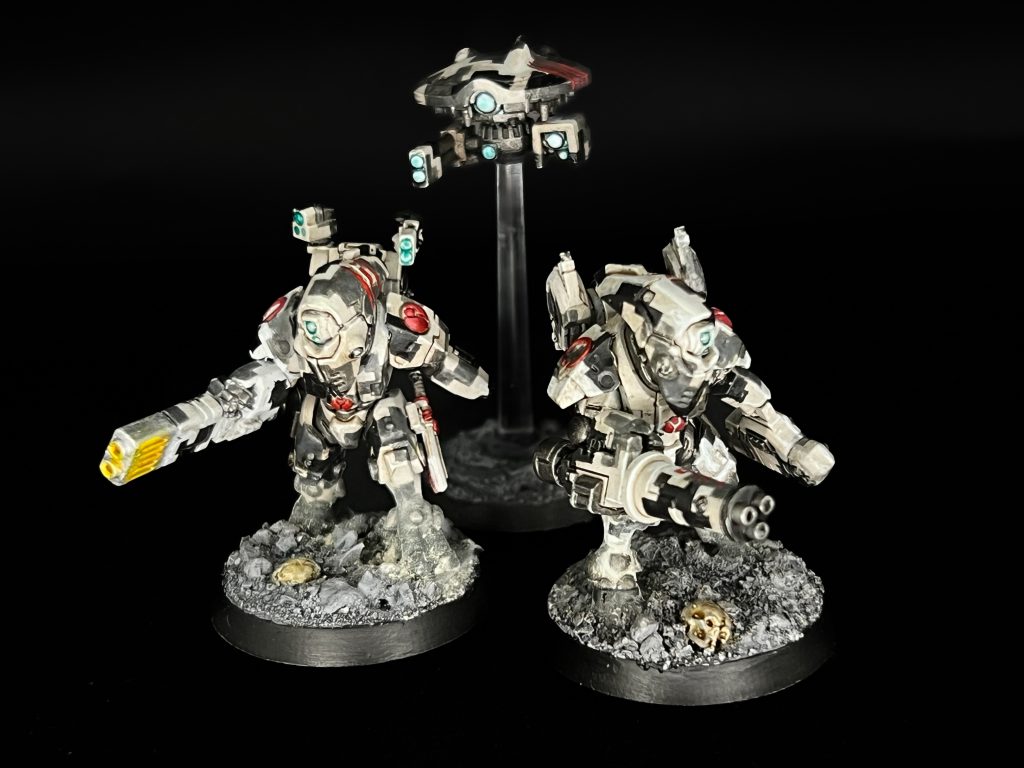
XV26 Stealth Battlesuit. Credit: Greg Chiasson
Otherwise I thought the kit was good, in a typically mid-2020s GW way. Lovely sculpts, plenty of crisp details, and each model is in a unique (albeit fixed) pose, with no duplicate parts save for the guns. The parts for each model are grouped together on the sprue, so even if the numbers make no sense you can just look for the nearest leg to the torso you last clipped out and that’ll probably be the right one. I built mine without any of the specialist Kill Team equipment - I figured the rest of our painters would have that angle covered - and even as plain old 40k game pieces, I still think the poses and detailing are great.
XV26 Stealth Battlesuit. Credit: Greg Chiasson
The look of the XV-26 gets away from the deep-sea diving suit that is the XV-25, with lighter armor and more-articulated plates. In a lot of ways, it harkens back to the original metal XV-15 (particularly in the backpack and arms), just with the head swapped for a less monolithic version of the 25’s helmet, and quite a bit taller and lankier than either of them. It’s a good update, in the way that all good updated sculpts are: it immediately makes the older models, which used to be perfectly fine, look like trash.
Weirdly the part I enjoy the most is the redesigned drones. They didn’t change much - these aren’t Primaris Drones - but the details are sharper and the models feel a bit chunkier. Combined with the removal of the old wobbly flying stands and clear 25mm bases underneath, they feel much more stable. The carapace has a slightly more organic look, with rounded bolts on top instead of antennae and what I can only describe as an eyelid for the front camera, that we’ve seen before on the Ghostkeel’s specialized drones. If they re-did all the drones in this style, I wouldn’t complain.
XV26 Stealth Battlesuit. Credit: Greg Chiasson
Mine ended up purple because my normal Tau are white and yellow. Owing to their stealthy nature, I wanted to do black and yellow, then realized that that would be Steelers colors, which offended my mid-Atlantic sensibilities. Hence, purple. [Hear, hear. --Ed.]
Wolf Scouts
Wolf Scouts sprue. Credit: Rich Nutter
Here's a painting guide for Wolf Scouts by Robert "The Chirurgeon" Jones. Now you have no excuse if your scouts don't look as good as his.
Credit: Robert "TheChirurgeon" Jones
Sky Serpent: I haven’t painted a Space Wolf since their third edition Codex which was released in 2000; that’s a long time and a journey worthy of a saga!
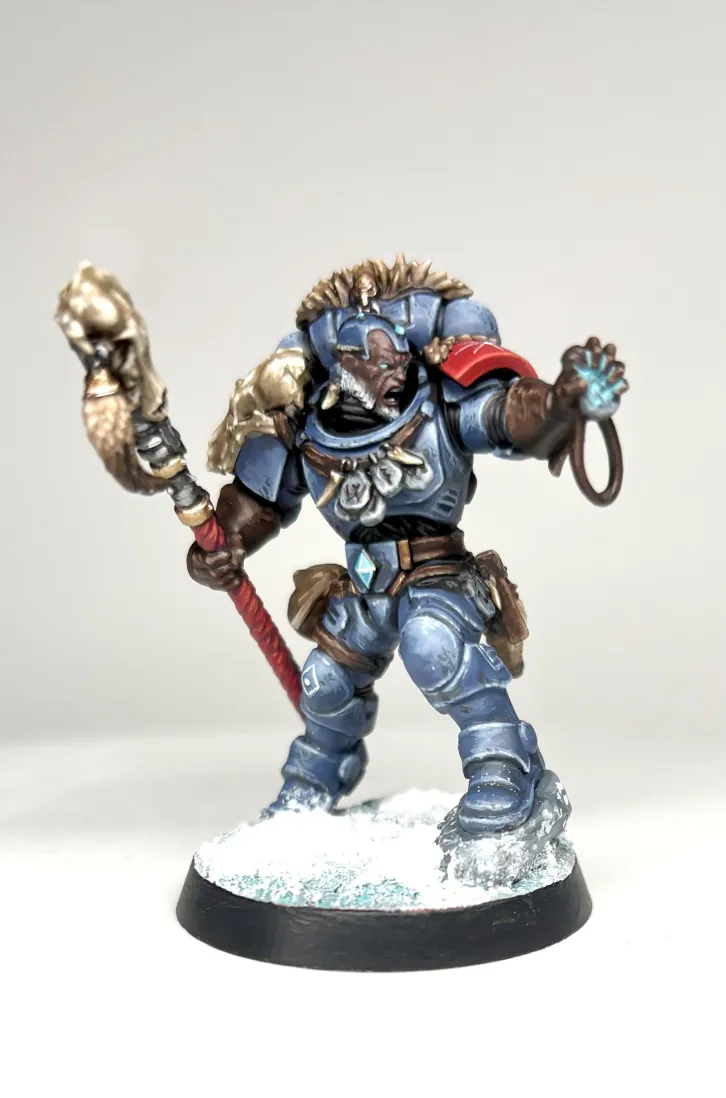
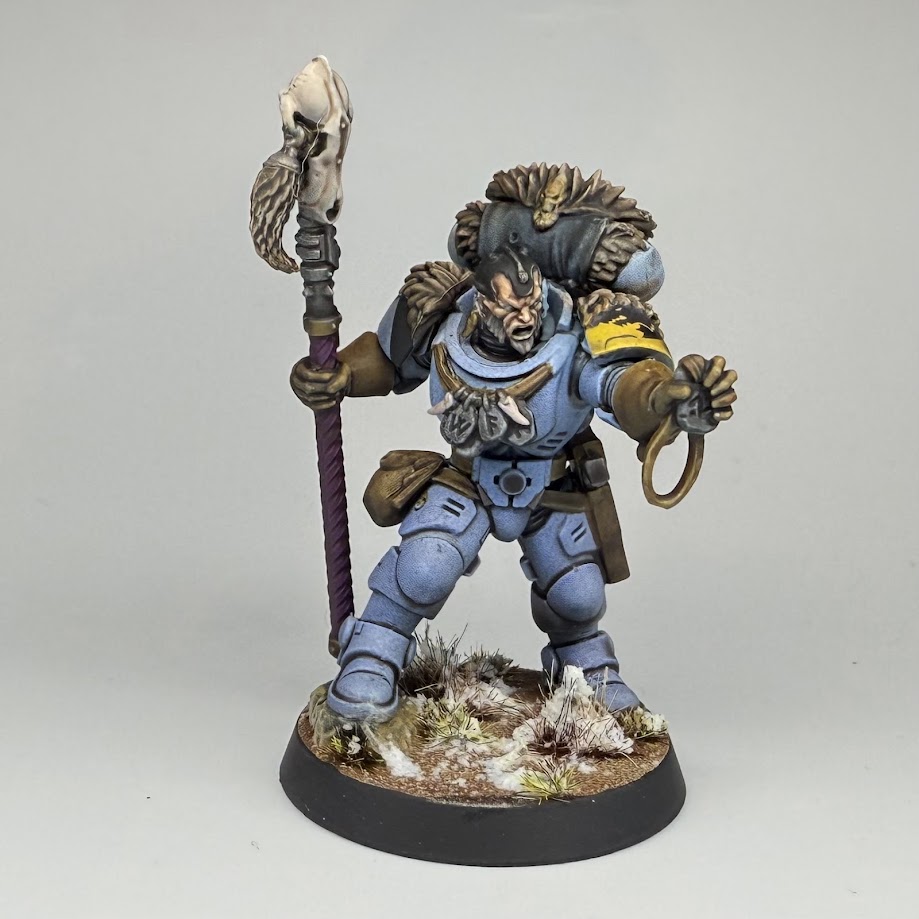
I chose to sink my time into one miniature which was the Rune Priest Skjald. I love the details of the miniature but I wanted to change up the pose slightly and used the body which is usually used for the Fangbearer - you can make some really unique Wolf Scouts by mixing up the bodies but I’d make sure you test fit any of these first
Rune Priest Skjald. Credit: Skyserpent
Building the Rune Priest Skjald was very quick and simple and didn’t take any further alteration.
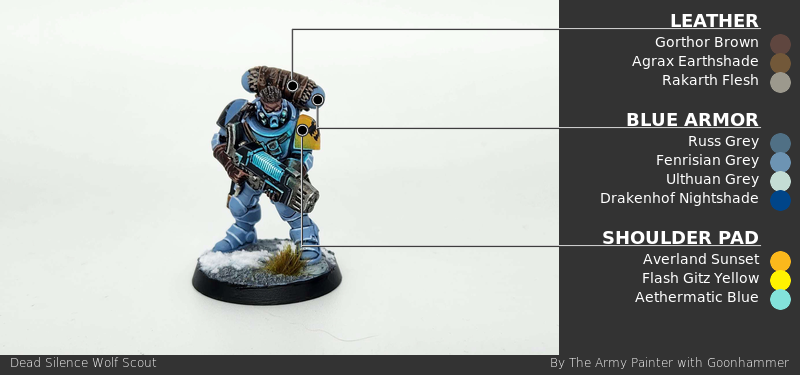
Beginning with a black base, I worked my way up through the usual Space Wolves colours - The Fang, Russ Grey, Fenrisian Grey with some 50/50 mixes in between and final highlights of Blue Horror and some chips added using Skavenblight Dinge. I focussed my highlights on areas where light would naturally hit and painted almost in a stippling manner to give the armour some extra texture to make it look weathered.
The fur used XV-88 as the base with increasing amounts of Vallejo Pale Sand added with a wash of Rhinox Hide and Abaddon Black added to the tips of the wolf tails.
There are lots of bones and skulls on the model and for these I used Zandri Dust, Ushabti Bone and Pale Sand.
To create an icy snow base I began with a texture paste which I painted Celestra Grey. I added some washes of Aethermatic Blue and Temple Guard Blue before drybrushing it Ulthuan Grey and White Scar.
I made some snow by mixing Bicarbonate of Soda, PVA glue, water and some white paint and then applying this in clumps.
Cronch: My first go at Space Wolves was with the release of the army set, characters and terminators earlier this year, so it was exciting to see the Wolf Scouts come along so soon as well.
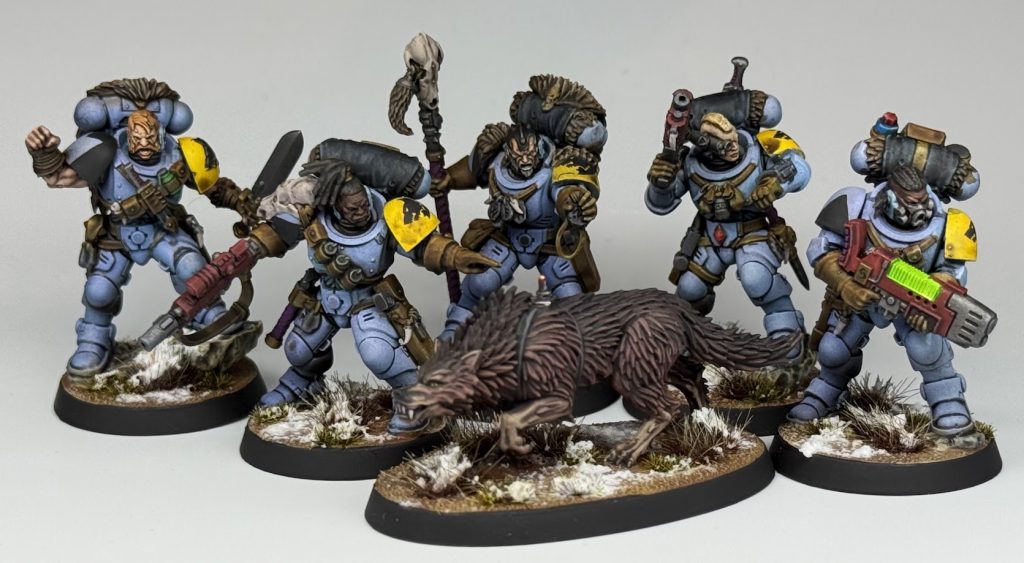
Wolf Scouts Kill Team. Credit: Rich Nutter
Building these I found mostly easy, although the mould lines on my sprues were a little pronounced. They were easy enough to clean up with a knife though, and I also ran a 400 grit sanding sponge over any flat panels that I’d cleaned up to smooth them back out.
Wolf Scout Pack Leader. Credit: Rich Nutter
One thing I did have trouble with was deciding what to build! Most models build either a named operative or a generic Hunter, but the Pack Leader sculpt also builds the Frosteye. Not too much of a problem - I just built my Frosteye on the body that would otherwise be the guy with the mine, accepting that some of his belt kit would be a bit different. What really caught me out though was that you only get one backpack that can have a fur mounted on it, which gets called for in both the Skjald and Pack Leader builds. To GW’s credit, the instructions clearly highlight with an icon that you only get one of these, implying that a choice needs to be made, but in my haste I assumed that meant I was going to have to do something different for the Frosteye build, not that it would stop me building one of the other models as intended.
Wolf Scout Rune Priest Skjald. Credit: Rich Nutter
In the end, I carved out the slot piece on the underside of the Skjald’s fur and sat it on top of one of the other backpacks - I think it worked out fine. There’s a good selection of heads too for some further customisation, although I would have liked to see some helmeted options too. I guess the Wolf Scouts are usually grizzled veterans travelling light, so maybe they’ve all decided they don’t need lids. I think, like a lot of Marine Kill Teams, there will be value in buying a second set to build the full range of operators plus some Hunters, so I might do some of the more generic guys with helmets in the future.
I approached painting these similarly to the other Wolves I’ve done, spending time on the armour before filling in details with speed paints. I must confess that I was rushing these a bit, so there’s still work to do - they’re perfectly battle ready, but I’d like to tidy up the armour, do some weathering and add some highlights to everything. I like weathering with this method, as quite often you can cover overspill (like around some of the furs on the backpacks) by weathering the area.
The armour is Pro-Acryl Grey Blue, with a zenithal of White Blue. To save time vs my new oil wash, I gave the model an all over wash of “marine juice” aka flesh wash, brown wash and medium mixed together. I regret this in hindsight, as it has stained the very matt Pro-Acryl surface and made the armour quite a different colour to my other Wolves. Still, we live and learn - I can take some time to layer it back up in the future.
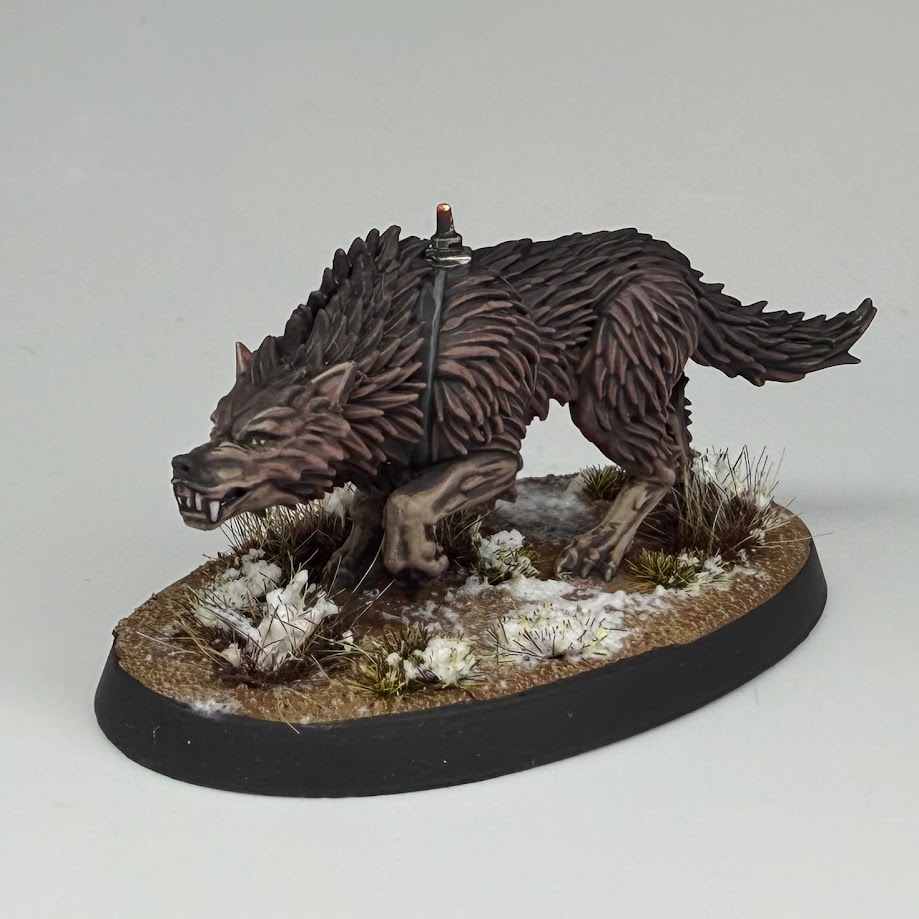
The Fenrisian Wolf is based black, before drybrushing up through Mini Colour Chocolate, Jasper and Capuccino, with mixes in between.I’m really happy with how the wolf came out, I think he’s the most finished model of them all. Normal dirt bases with Valhallan Blizzard snow tie the models in with the rest of the Space Wolves I’ve gotten done.
Wolf Scout Fenrisian Wolf. Credit: Rich Nutter
Overall, I like this kit! Just be careful when building to make sure you have the parts available for the variants you want to build.
The Campaign System
Dead Silence contains rules for playing through the Ctesiphus Expedition Campaign, in which teams explore a Tomb World in search of riches, glory and so on. This is a hex map campaign designed for a few players that will link together games to create a narrative.
It’s a pretty light system. Each campaign turn you move your team around the map, play a game then perform some kind of action, like exploring or building a camp. Everyone plays, even if they haven't encountered another team. That could feel a bit abstract but avoids having people sit out turns with no games to play. You can even play your games against people who aren’t part of the campaign if you want. There are also rules for playing a solo or co-op campaign, which works a bit differently.
In multi-player campaigns you decide a set number of rounds for the campaign to have before the end. They recommend seven. Each turn you raise the threat level by one and when it reaches the agreed level you see who has done best on various different objectives, like Campaign points, games won, hexes explored and so on. The solo/co-op game works differently, with an objective of reaching 10 campaign points before the threat level gets to 10, and seeing how well you can do at other stuff.
The Map
The Dead Silence Dossier has four campaign maps in and you get a tear-off pad with loads more of them in the box. They vary from 26 hexes to over 50, so you can use a size of map to suit the number of players you have. Each hex features a couple of lines where you can fill in information you discover when exploring the hex, a number and a flag, which indicates if someone has a base or camp there.
Loading...
There are three kinds of hex: Surface, Tomb and Blocked. Typically, the maps have Surface hexes around the outside, Tomb in the middle and Blocked scattered around. Players start in Surface hexes before moving into the Tomb.
In future I expect you’ll be able to buy the dossier separately but I don’t know if you’ll get the pad of maps with it. If not, you’ll be limited to the four in the book, or of course maps you design yourself. It's nice to have the printed maps but definitely not essential.
Playing the campaign
Everyone starts on one of the Surface hexes, so usually around the outside of the map. You have to be at least two hexes from other players and you might want to be further than that, as you can move three hexes per turn and you don't want anyone immediately demolishing your camp.
Everyone also starts with 10 supply points, which you use up as you explore the map and do actions. You determine an initiative order and can then move your teams from 1-3 hexes, paying a supply point for every hex you move. You can also choose to stay still or regroup to your nearest base or camp, neither of which cost any supply.
If you finish a move in an unexplored hex you explore it. That means rolling a D36 twice (that's a D3 for tens and a D6 for units) and comparing it against some tables. One table tells you what you discover there, which might be a landing site where you can easily build a camp, all sorts of esoteric Necron-y stuff like an Astral Augury or Transtechnic Fulcrum or, a third of the time, nothing. You roll a second time for the condition, again with clear conditions a third of the time. Otherwise the game you play there will be affected by Dust storms, Skull mounds, Nanoweave web traps and so on. There are two sets of tables: one for Surface hexes and one for Tombs, so you'll find different things and face different conditions depending on where you are.
Locations affect your campaign points, in all kinds of ways. Some of them require you to use a campaign action (more on these later) to either Search or Camp on the hex, in order to gain some kind of benefit - usually Campaign or Supply Points. There's quite a bit of RNG here that will affect the outcomes of the campaign, as the benefits of Locations vary enormously, including some that are harmful. For example an Observation Tower lets you explore Surface hexes anywhere for free, rolling twice and picking the result if they're nearby. A Doomsday Vault on the other hand will cost you D3 Supply Points to use, letting you immediately Demolish any hex you like, perhaps taking another player's home base out! Coming across a Beat Lair is just annoying though and you'll probably have to waste your Action that round Demolishing the thing, to avoid losing D6 Supply Points.
Credit: CanYouRollaCrit?
Conditions do all kinds of weird things like have a missile land in the middle of the board at a random moment or have all the breach points open at the start of TP2, damaging everyone nearby. They affect both players so ought to balance out, or at least add a bit more flavour and unpredictability to games. They are optional, so if either of you would prefer not to have a 1/6 chance of getting stuck in a web every time you dash, just don't use them.
After the Movement phase comes the Battle phase, in which you play games of Kill Team. Games can be played against anyone in the campaign, though you can issue challenges. You use the condition of the hex of whichever player doesn't have Initiative during set up, as it's assumed the other player has come to attack them. Whoever wins gains a Campaign Point, so winning your games is a great way to win the campaign - unsurprisingly.
Then you get the Action Phase, with five optional actions to do. You can Scout, which explores a hex within 3 hexes of your team at a cost of 1-3 Supply Point for every hex it is away. You can resupply, gaining Supply Points depending where you are: 10 at your base, D3+3 at a camp, 1 at other locations and 0 on blocked hexes. You can Search, which will reward you if the hex you're in provides some kind of benefit for Searching it, which is usually some kind of points but sometimes weirder. You can build a camp, at a cost of supply points equal to the distance back to your nearest base or camp. That gives you a place to resupply to and may provide points or other benefits too, depending on your location. Finally you can Demolish an opponent's base or camp if you're in it, but only if you've first won a game against them in this campaign round. That will make it much harder for them to regroup and gain Supplies, seriously limiting what they can do from there on.
Finally there's the Threat Phase. A few effects may occur here but the main thing is to raise the threat level. When it gets to your agreed level the campaign is finished and you see who has won.
They suggest various different prizes you can give out so there isn't just one winner. The Warlord is whoever has most Campaign Points, the Explorer has explored the most hexes and the Headhunter has killed the most operatives, for example.
Solo and Co-op Campaigns
This is basically the very similar to a multiplayer campaign, except that the win conditions are different. You can also choose to play your games against humans or using the Joint Ops missions. That's fine for the Tomb missions as you can run the Tomb World ones but we just have the Core Book missions for the Surface - perhaps using the Necron NPO deck.
Wolf Scout Fangbearer. Credit: Rich Nutter
Threat doesn't automatically go up by one per turn in a solo/co-op campaign. Instead it increases on a 4+ when you explore a Tomb hex, except if you're Scouting, on a 3+ when you win a game on or on a 5+ if you lose and also sometimes if you Search or Demolish things. You can lower it by D3 if you resupply in your base or a camp.
The campaign mechanics don't translate perfectly to having only one player. There are no other camps to demolish for example, so you won't be so excited to discover a Doomsday Vault, which would have allowed you to Demolish them. You may as well move around the map slowly to conserve supplies if you aren't concerned about other players messing you up.
Having said that, sure, this system can let you play along with a friend, doing a series of co-op missions to see if you can recover the information you need and escape. If you're running a new team through some Joint Ops missions to see how they get on, maybe having a few Conditions in play will make that more interesting.
How to Use This System
I think this is a nice system for a club to use for people who just want a reason to play games of Kill Team. It will give you a bit of structure to things and perhaps a way to meet and play new people. My own FLGS has run a few short-ish leagues and I think it would be good to try this campaign next, instead of just having unconnected games. Adding in conditions will help keep things interesting.
This isn't a system for people looking for a deep RPG-like campaign system. There are no rules for your operatives gaining experience, getting hurt or acquiring new gear. Every game resets to a "clean" new team and you carry on. I know some people were sorry to see that go at the end of Kill Team 2.0. I don't suppose one box like this could have replicated that level of content for 40+ teams.
Final Thoughts
This is a really good box for Kill Team. It's a full Stealth team and nearly a full Wolf Scout one, plus a campaign system that should add some intrigue to your games. We think the Stealths are a really interesting team that will be challenging to play. The Wolves are simply awesome, if perhaps a bit oppressive for melee teams.
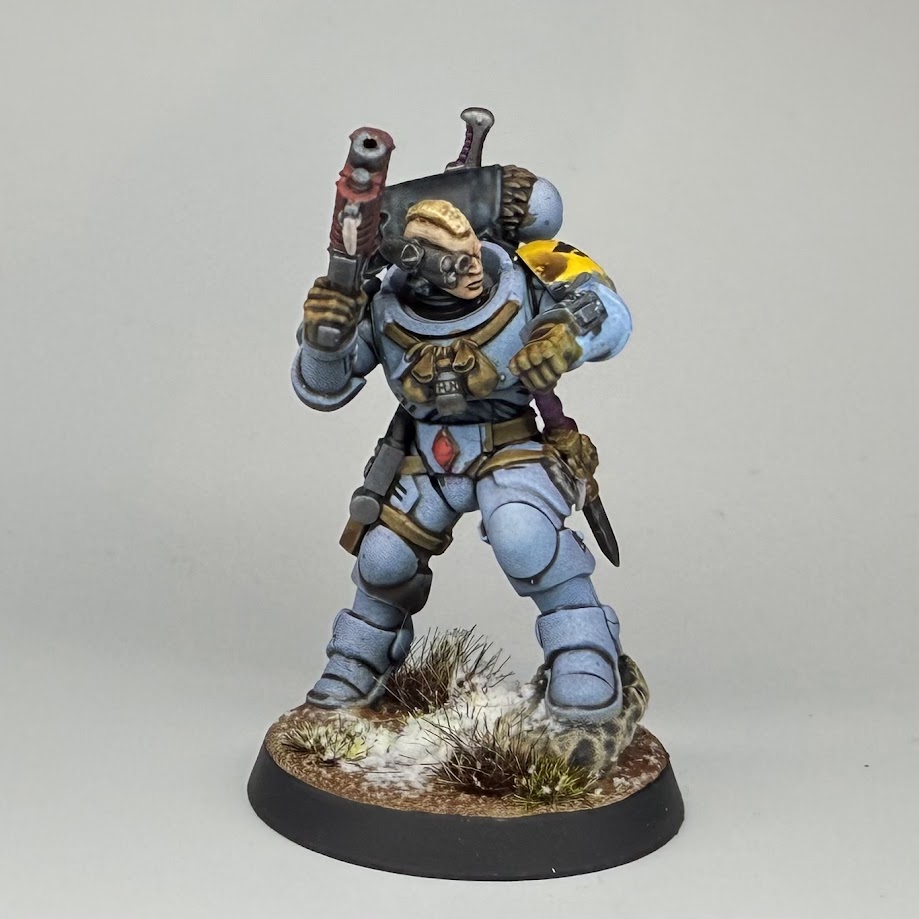
Turns out a Fusion blaster with Accurate 3 and Severe is quite good. Credit: NotThatHenryC
Have any questions or feedback? Drop us a note in the comments below or email us at contact@goonhammer.com. Want articles like this linked in your inbox every Monday morning? Sign up for our newsletter. And don't forget that you can support us on Patreon for backer rewards like early video content, Administratum access, an ad-free experience on our website and more.
 Kill Team Dead Silence
 XV26 Stealth Battlesuit sprue. Credit: NotThatHenryC
 Credit: HappyRacoon
 XV26 Stealth Battlesuits. Credit: NotThatHenryC
 XV26 Stealth Battlesuit. Credit: Greg Chiasson
 XV26 Stealth Battlesuit. Credit: Greg Chiasson
 XV26 Stealth Battlesuit. Credit: Greg Chiasson
 Wolf Scouts sprue. Credit: Rich Nutter
 Credit: Robert "TheChirurgeon" Jones
 Rune Priest Skjald. Credit: Skyserpent
 Wolf Scouts Kill Team. Credit: Rich Nutter
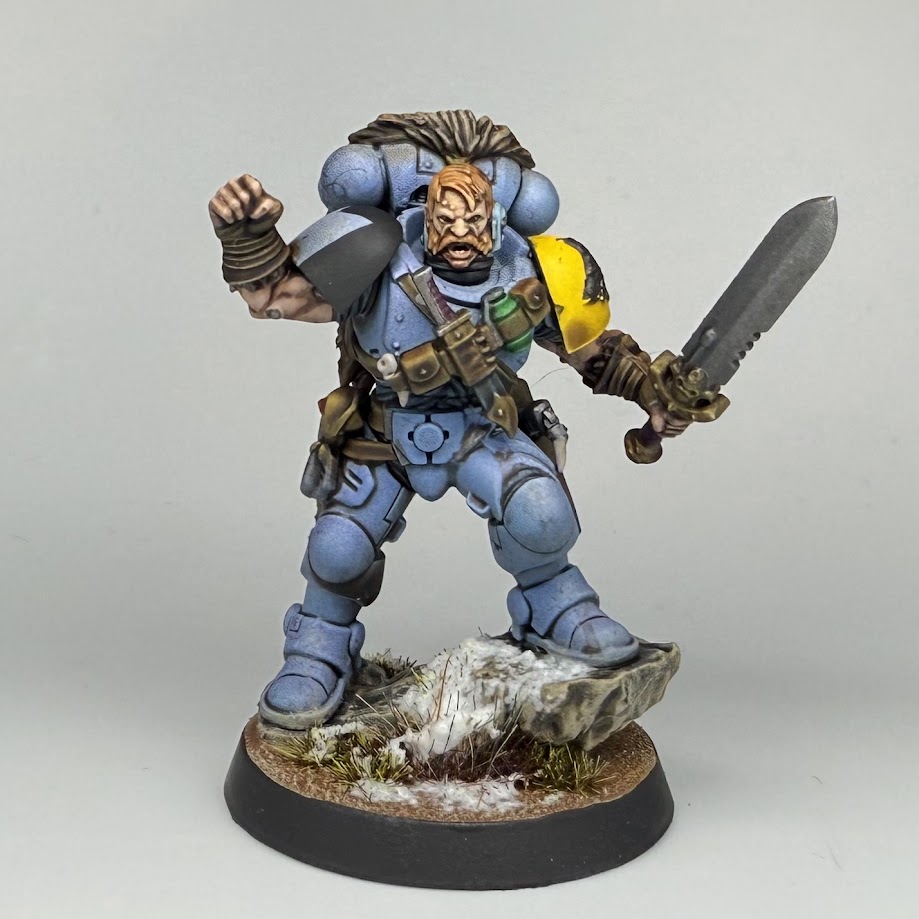 Wolf Scout Pack Leader. Credit: Rich Nutter
 Wolf Scout Rune Priest Skjald. Credit: Rich Nutter
 Wolf Scout Fenrisian Wolf. Credit: Rich Nutter
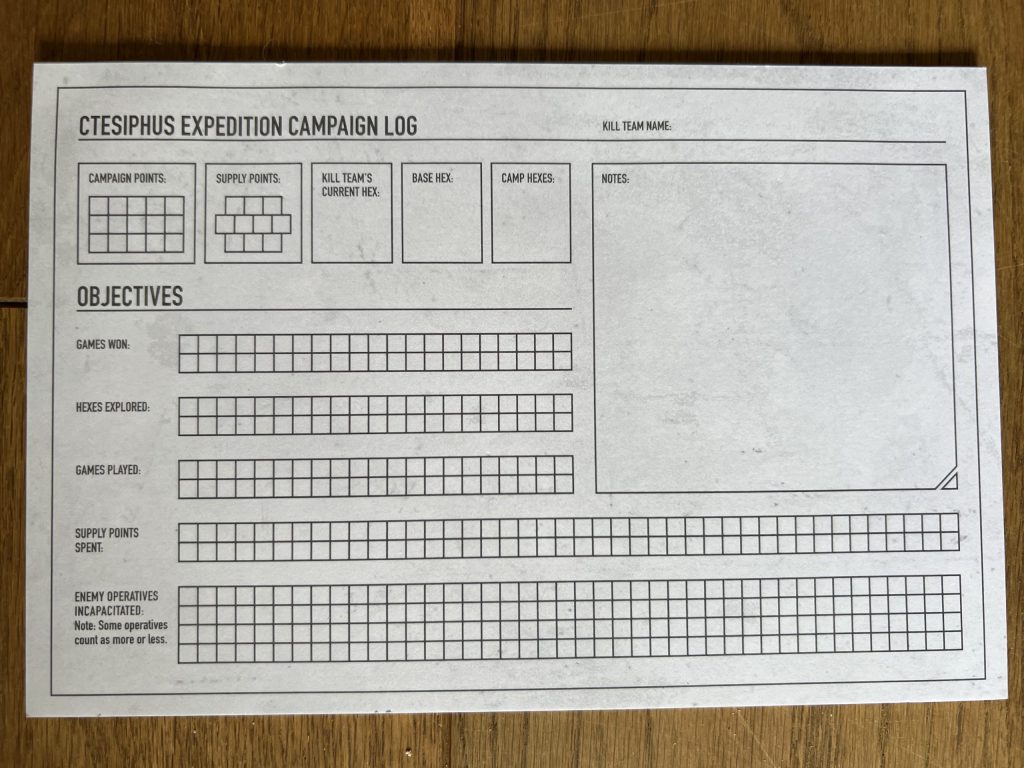 Ctesiphus Expedition Campaign Log. Credit: NotThatHenryC
 Credit: CanYouRollaCrit?
 Wolf Scout Fangbearer. Credit: Rich Nutter
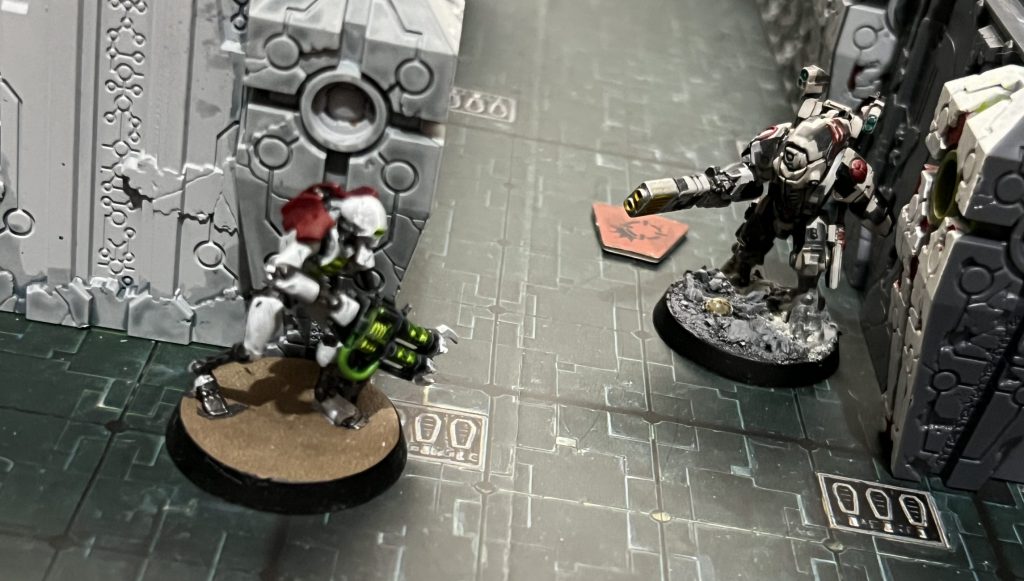 Turns out a Fusion blaster with Accurate 3 and Severe is quite good. Credit: NotThatHenryC

 Goonhammer App and Patron Updates: April, 2026
 Kill Team Tournament Report: Engage, Party, Repeat's March Madness 2026
 Goonhammer Reviews: Tribal Conquest