We've written a ton about competitive terrain layouts but in this short series we're looking at how to make good layouts for narrative play - layouts which go above and beyond the paintball arenas and bare MDF often presented in competitive formats. Last time around, I looked at some of the basics behind creating "good" layouts and why it's important to have good terrain - if you missed that article,
you can find it here.
This time around we'll be looking at making the Sector Mechanicus terrain work for games and, per the requests of our lovely Patrons, looking at building for specific mission layouts. So let's dive in.
Sector Mechanicus Terrain
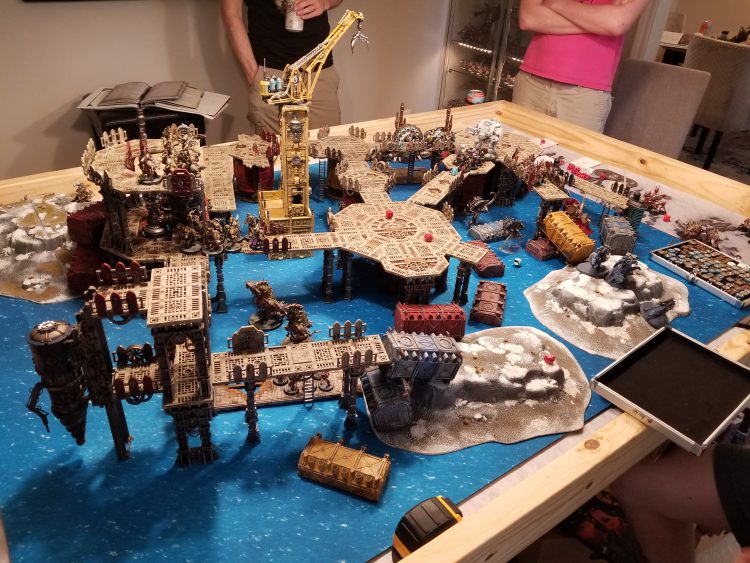
First introduced with the release of Shadow War: Armageddon back in 2017, the Sector Mechanicus Terrain is some of the most detailed terrain Games Workshop has released and has seen multiple re-releases since across a mix of 40k and Kill Team releases. It's pretty ubiquitous and I'd wager a large number of narrative players have at least a few pieces of Mechanicus terrain sitting around.
But while Sector Mechanicus terrain looks great, it has more than a few problems. The first being that it's incredibly open - those support struts and pieces of scaffolding don't do much to block line of sight, leaving big, open sightlines underneath. That's a huge problem, and it can lead to tables which
look like they're covered in dense terrain but are actually wide open shooting galleries.
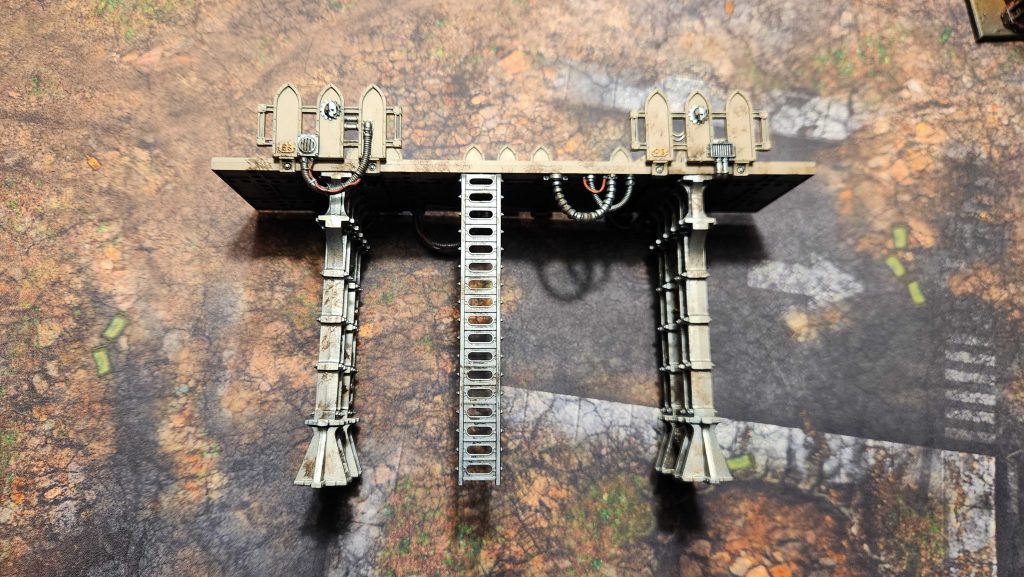
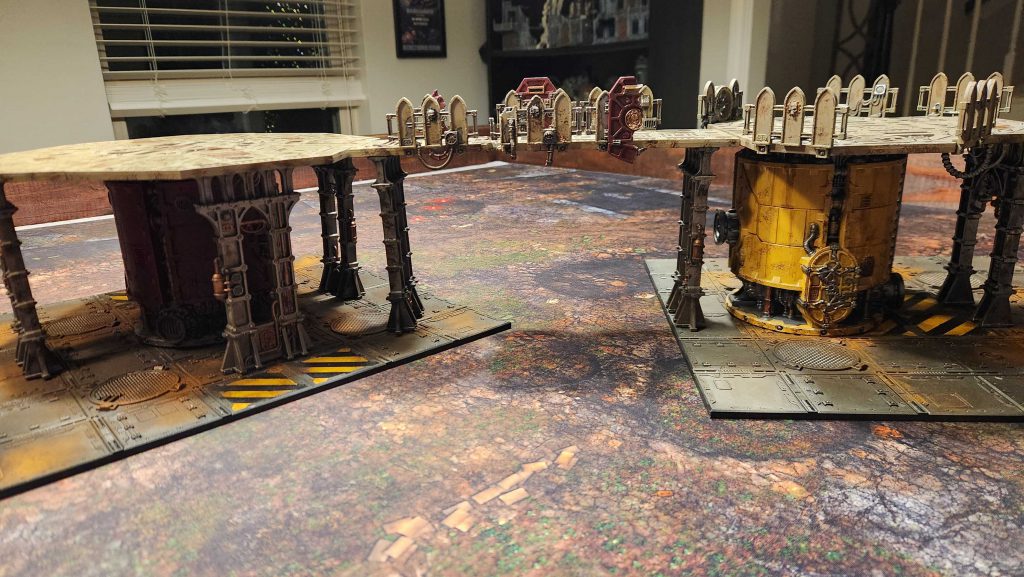
The other issue is the width of those gantries: At 2.5 inches wide, they're barely wide enough to accommodate two models on 32mm bases, making them great for small model count skirmish games but less ideal for squad-based games like 40k. Those raised platforms are fine for hosting a unit planning to sit and shoot, but they can't really host a lot of action - you need large areas to fight over if you want to have objectives and units fighting each other in melee.
So when we build a table using Sector Mechanicus Terrain, our big question becomes: How do we block line of sight for parts of the table where there are no buildings or walls? There are a few ways you can do this:
Option 1: Terrain Bases
You can just take a cue from competitive play and slap a base under it. A 10"x5" base will hold a single section of raised walkway. The rationale here is that wires, fumes, and moving machinery make it impossible to get an accurate read through the base. That's
okay - and it's certainly good enough for me in a pinch, but it doesn't quite fit the spirit of what we want to do.
Option 2: Small Cover
If you don't have something big to use or a terrain base, you can use something like a Prometheum pipe or plasma conduit to mark where the line of sight under the walkway should be blocked. This is also okay, but worse than just using a base and we can do better.
Option 3: Shipping Containers

This is going to be our go-to solution. A stacked pair of munitorum containers will more or less fill the gap under a walkway and block line of sight completely. They get the job done and the abstraction of saying "look you can't shoot through here" is easy to understand - trying to shoot some tiny gap left over is pretty lame, besides. As an added bonus, you can stand on top of these, effectively making your walkways wider at key points.
Option 4: Other Large Terrain
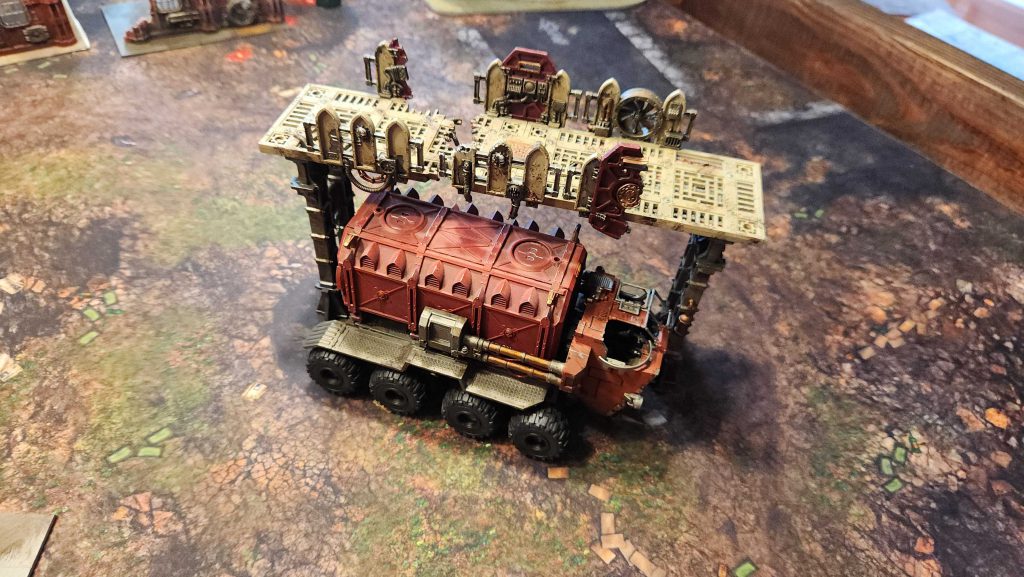
I find that the Cargo-8 Ridgehauler works great here as well. It gets the same point across, gives you another "midpoint to climb up, and helps break up the visuals just as well. Plus it's a cool model to use. Great stuff.
Building a Sector Mechanicus Table
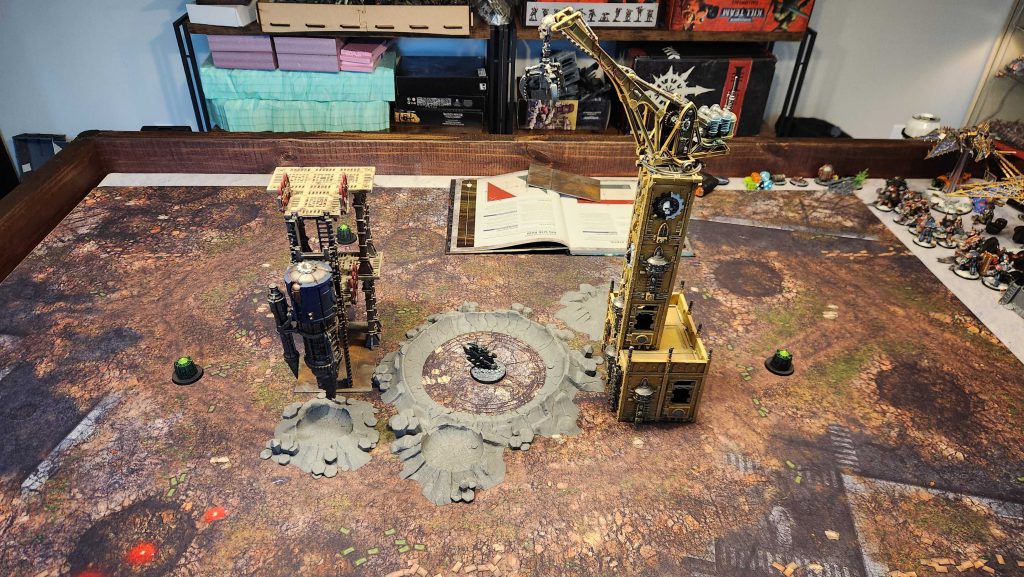
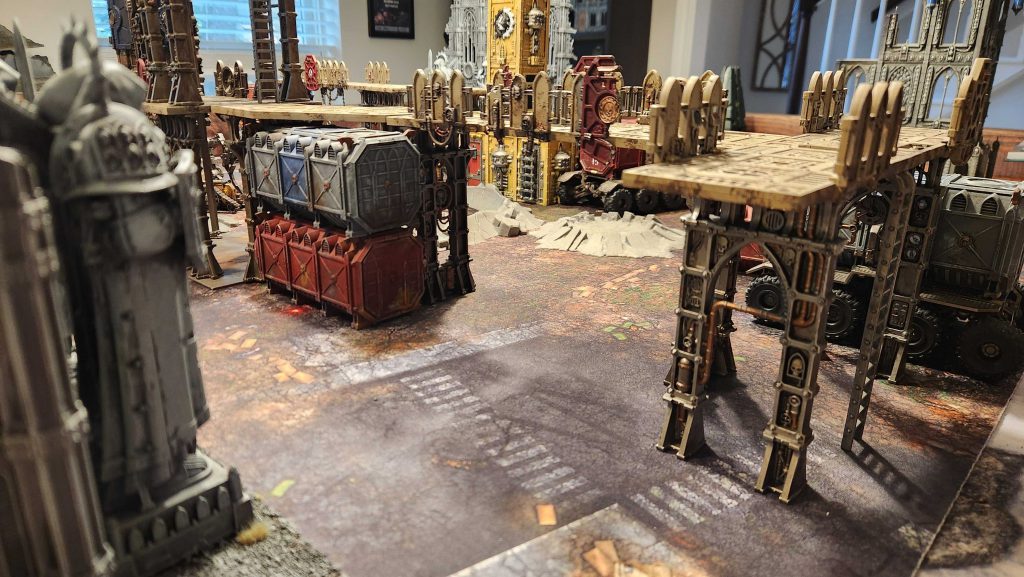
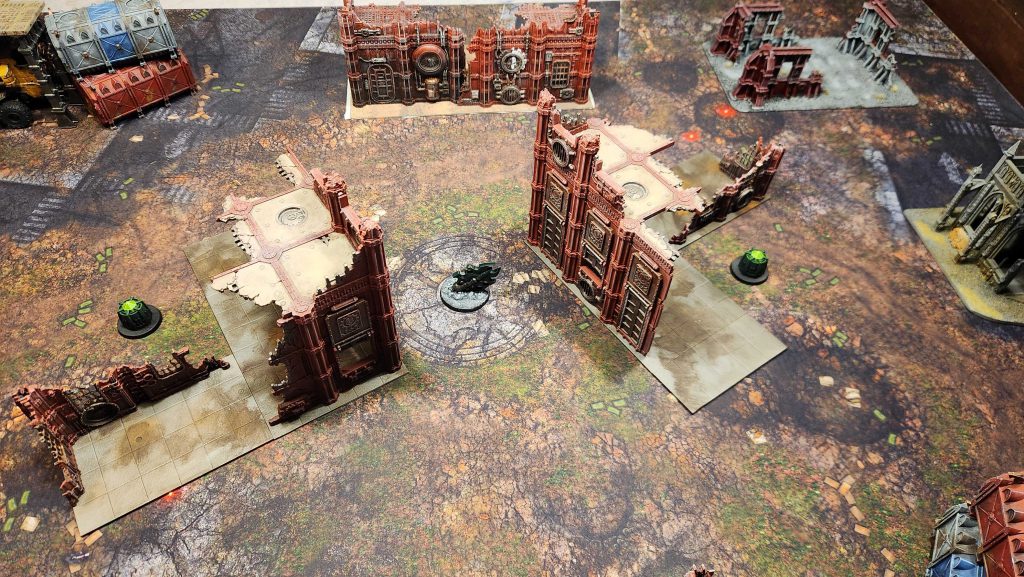
For all its faults, if you have enough Sector Mechanicus terrain, you can do some really cool stuff. Specifically, you can create a game of 40k that's multi-layered and truly three-dimensional, rather than just feeling like a flat game where the models could have been cardboard tokens. You can create raised areas where different units can skirmish. With that in mind, we're going to create a terrain layout with this in mind, putting the center objective on a raised platform at mid-table.
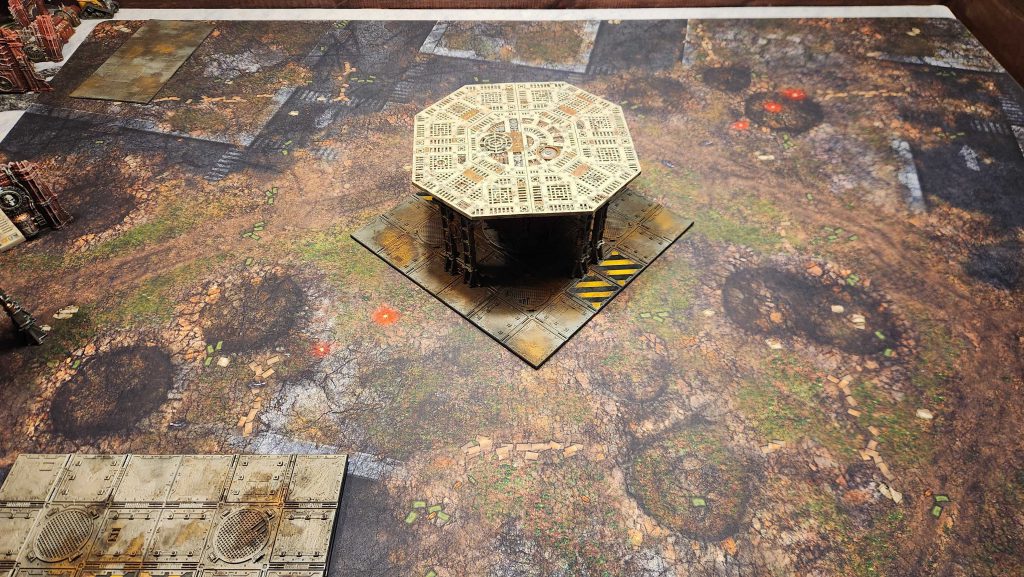
For this plan to work on an objective in the middle of the table we need two key things: First, some solid line-of-sight blocking beneath it, and second, a large platform to define it. This won't work unless multiple units can be on there fighting at the same time, and so it has to be large enough to hold the objective
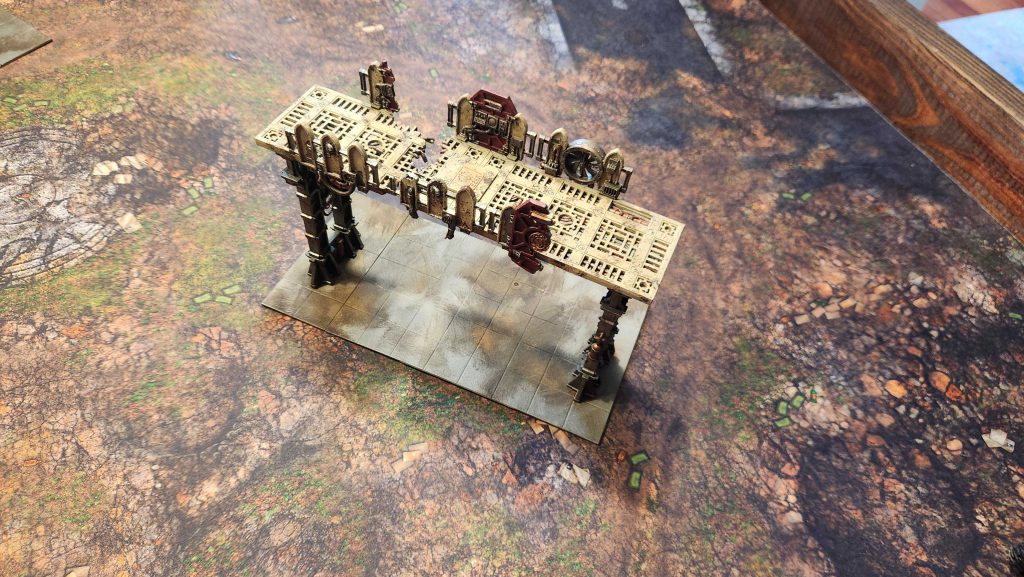
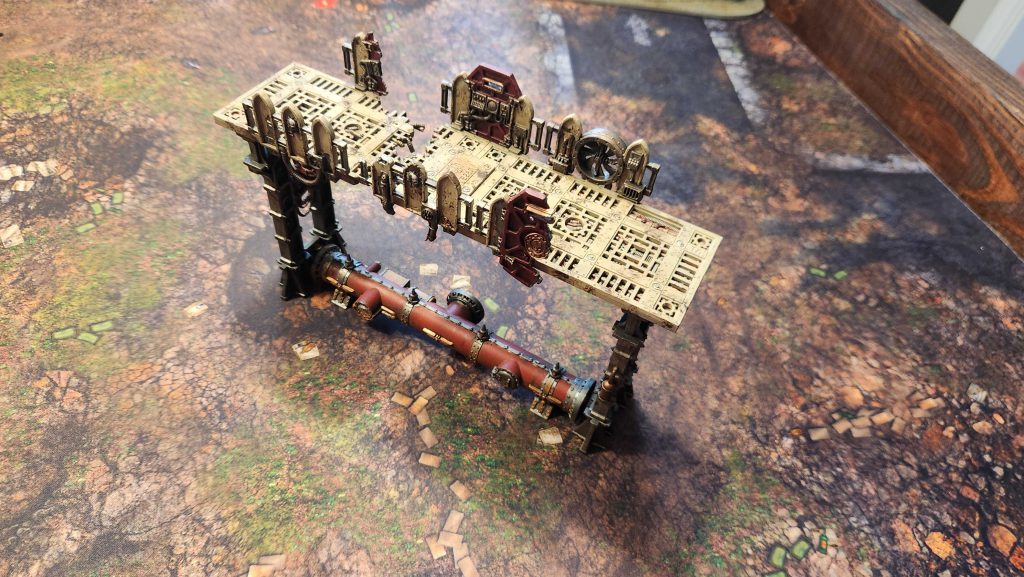
and its entire objective control area to really work. That's a lot of Sector Mechanicus terrain - in this case it's a forge, the octagonal plates on top of it, and four of the bending walkways around it, supported by struts.
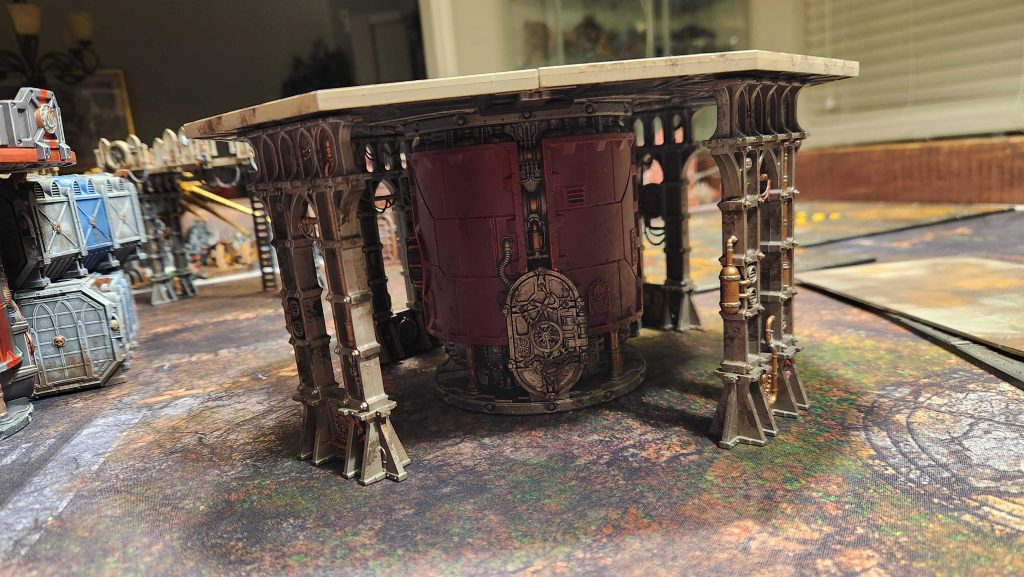
I've put this all on a Necromunda Zone Mortalis tile, which both eats up a big 12x12" area to block line of sight, but also makes enough sense given what the underside of the terrain looks like - there's enough coverage under there that infantry can move through but that you'd be OK saying "yeah ok, that blocks line of sight."
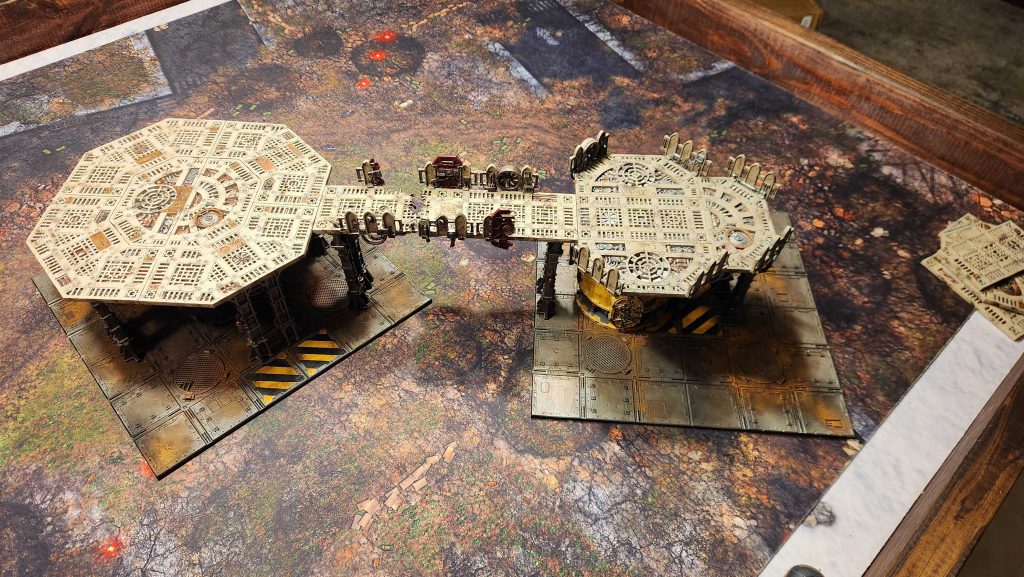
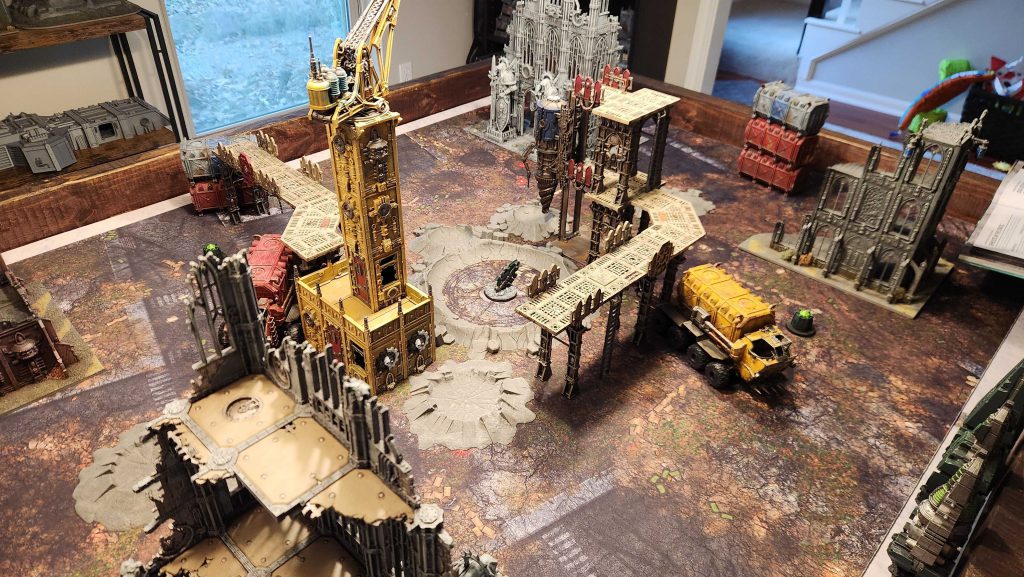
My next step is to build walkways which connect that center platform to other parts of the table. These are ideally also large areas, and we want to have tight control over the lines of sight on this table so I'm using more Zone Mortalis Tiles as terrain bases but you could vary this upas you see fit.
This gives both narrow sightlines but also a large open area you can still move a vehicle through - land raiders and baneblades should be able to fit under here.
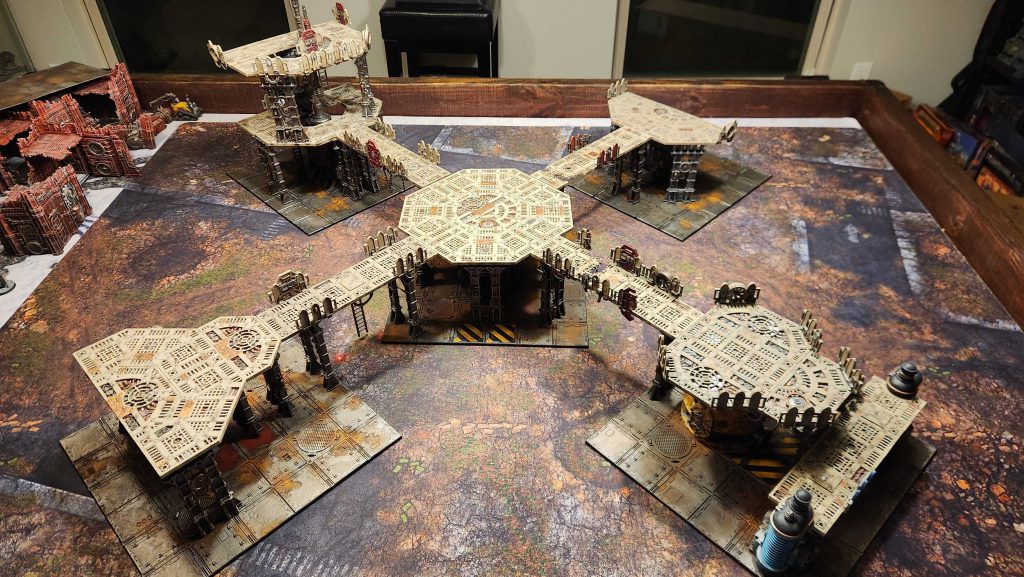
With that out of the way I add more terrain around the corners. I want to have multiple walkways leading to the middle sot hat units have a chance to start on the upper level without spending an entire turn moving up there. This also gives me a chance to use multiple large area terrain bases, and again I'm using Zone Mortalis tiles here because they fit the aesthetic I'm going for.
I did briefly consider adding a second level but that ultimately kills the purpose of having that large central platform and just ends up crowding things too much.
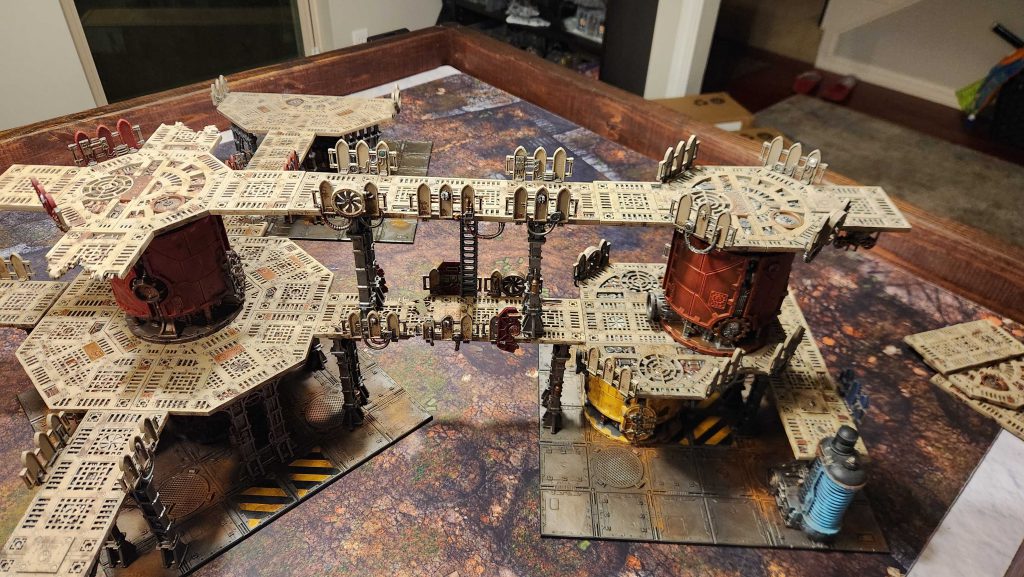
Once that terrain is down it's time to close things off. I drop some crates to tighten up the sightlines and add area terrain to each side of the table to block the long sightlines down each table side - I don't want units on top of the raised portions to have free reign to shoot wherever. That said, I also want to limit cover up top - better sightlines downward should mean being more exposed as well.
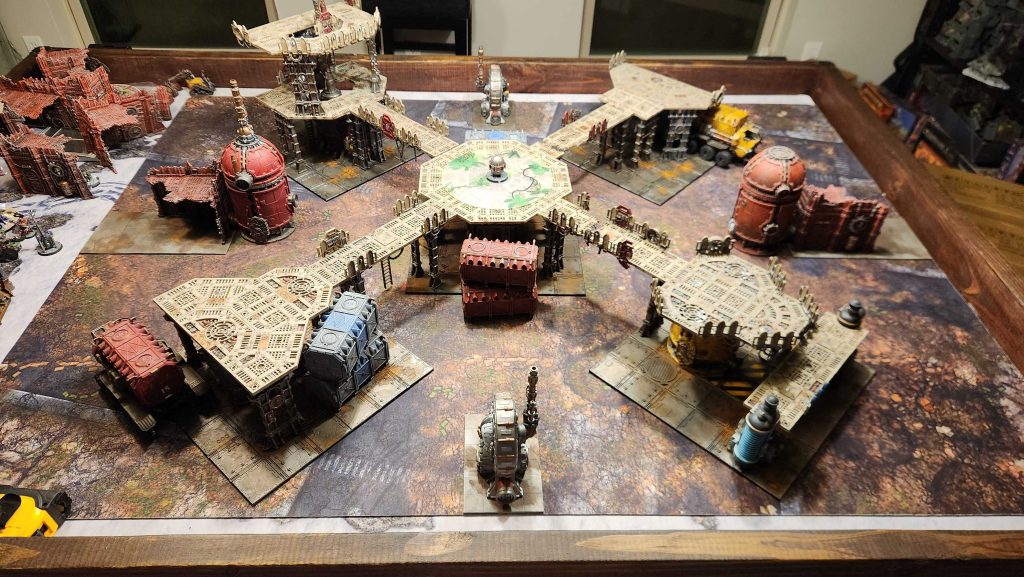
This more or less ends up being the finished table. It's more asymmetrical than I usually prefer, but I can live with some of that in Narrative play, especially if we're in a scenario that has a predetermined attacker/defender and player going first. This layout should work for most deployment maps, though I like it the least for Sweep and Clear - but it still should do just fine there.
If there's a thing I don't
love about this, it's how open the top area is - you're a sitting duck up there, which can discourage going up top. It's just really hard to add line of sight blocking terrain up there without killing the precious real estate we've created for units to move and exist. That's not ideal but I don't have a great solution for that. Better hope that central objective is worth being up there to risk your life!
Building for Specific Missions
What does this look like if we want to build for specific missions? One of the more interesting requests I received from our patrons was to show how I'd build a layout for specific missions and so I'm going to be doing that here, starting with a couple of more interesting picks from the Pariah Nexus Crusade book.
The Mission: Dig Site Raid
This mission in the Pariah Nexus Crusade book, sees two armies clashing over Noctilith/Blackstone fragments in a Mechanicus dig site. So our goal is to create a battlefield which feels like a dig site - replete with open, excavated ground - but still something you'd want to play a game of Warhammer on.
A quick note: I haven't painted all the terrain I'm using for this yet. It's in the works, and it's not uncommon for me to build and paint terrain
just for a specific narrative game.
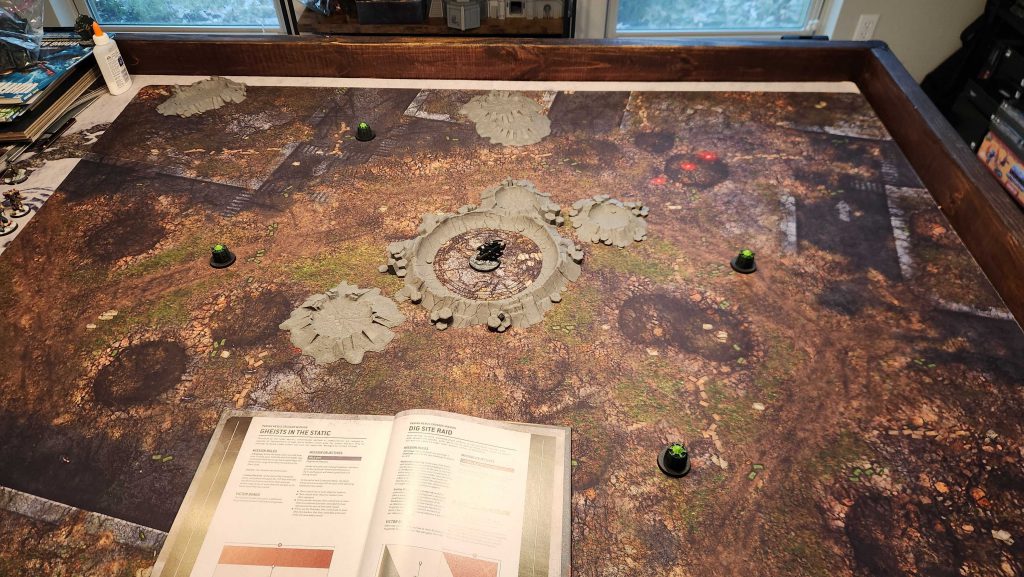
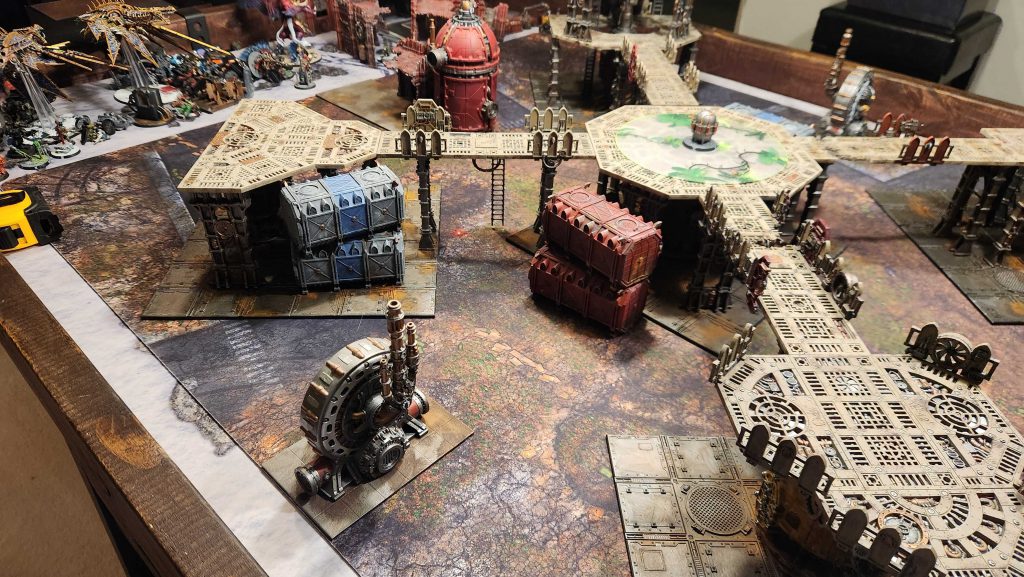
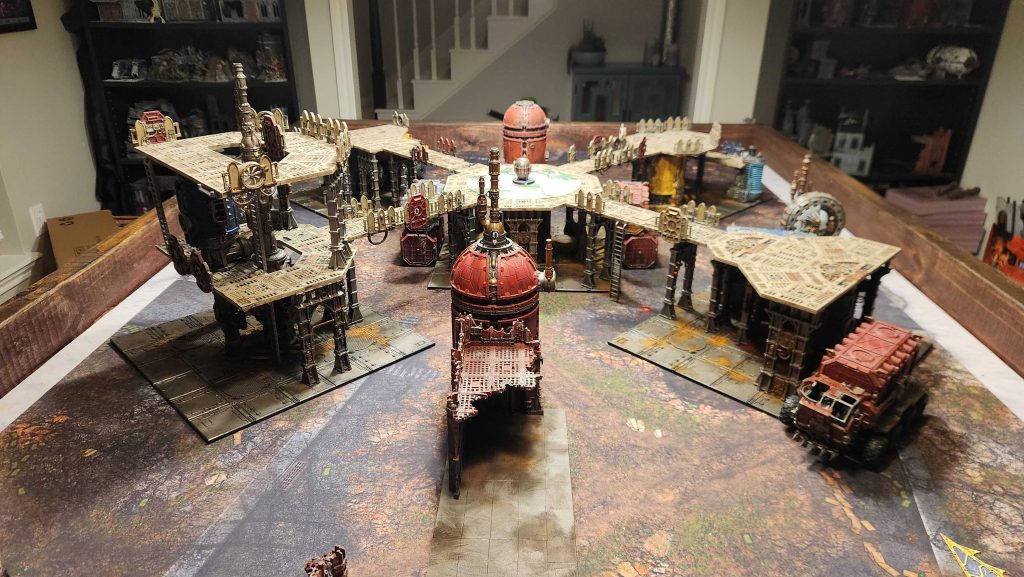
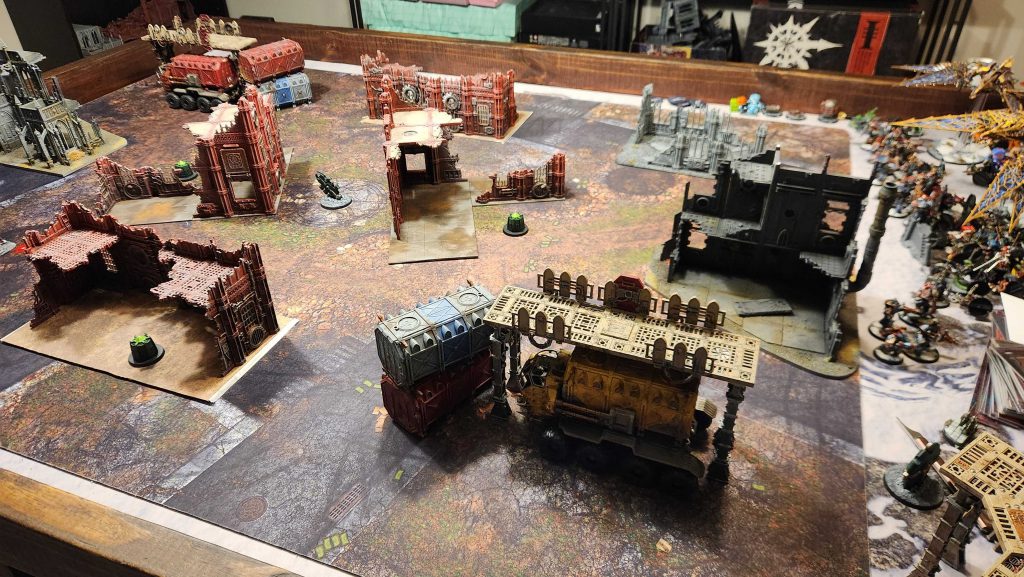
This one starts with a dig site. I've got five objectives, with the central one being in a dig crater. I've got some neat 3d-printed craters I can use for this.
Next comes building around the big crater. I have two key pieces I can use for this: a mounted crane I've built from old Sector Imperialis terrain and the Genestealer Cults drill. That second piece gives me a good excuse to use more Sector Mechanicus terrain here and the two combine to create the vibe I'm going for.

Next comes some Sector Mechanicus terrain. I'm not going crazy here but I can connect raised walkways to both pieces of terrain, helping wall off the middle of the table a bit so units have to come out to play in that space. Next I add some additional terrain around the corners of the table - I want a piece in each corner for units to start out of line of sight - and create the suggestion of a dig site built in the middle of a ruined city. It's a fun reminder that the Adeptus Mechanicus are more concerned with the Necron technology they can steal moreso than the Imperial citizens living on top of it.
As I was setting this up, I noticed a key problem: This map has corners deployment, and the way I've set things up, there's an obvious long diagonal sight line through the crater in the middle of the map. That sucks for gameplay - it creates a shooting gallery which discourages playing for the middle. So I need to cut that off, and the easiest way to do that is to just rotate the middle terrain.
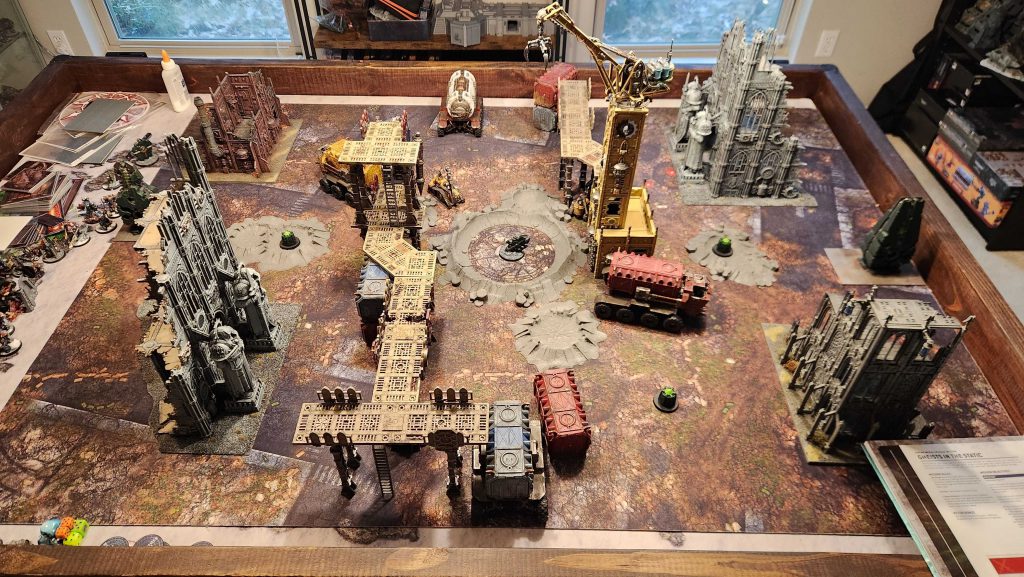
Flipping this around solves a key problem: Now units have to walk through to the middle of the table if they want to contest that objective. In a similar fashion to what I did on the last map, I drop crates and terrain pieces on the sides of the table to block sightlines. I'm also using shipping containers and ridgehaulers to to block sections of those walkways so they aren't just completely open. The final result is a table that has the visual effect I need without being insanely open. It'll work very well for the Crucible of Battle deployment this mission uses.
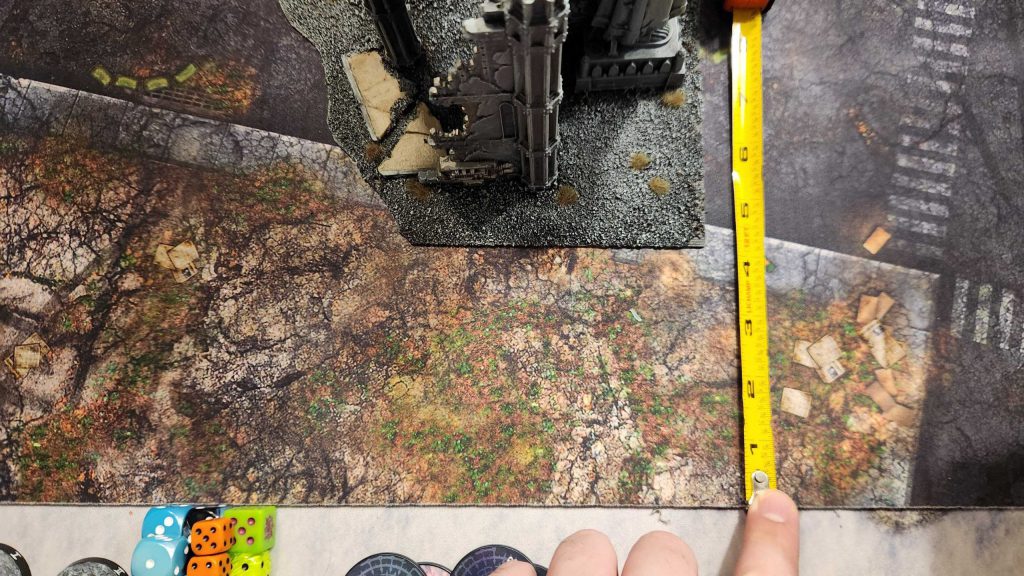
As a final step, I go in and make sure all of my big corner ruins are 4" off the table edge so that vehicles can move around them. This is important to do on most of your layouts - you need to make sure vehicles can get around.
Overall I'm pretty happy with these sightlines - they aren't too bad, and every objective has a spot you can stand and control it while hiding from a shooting line across the table.
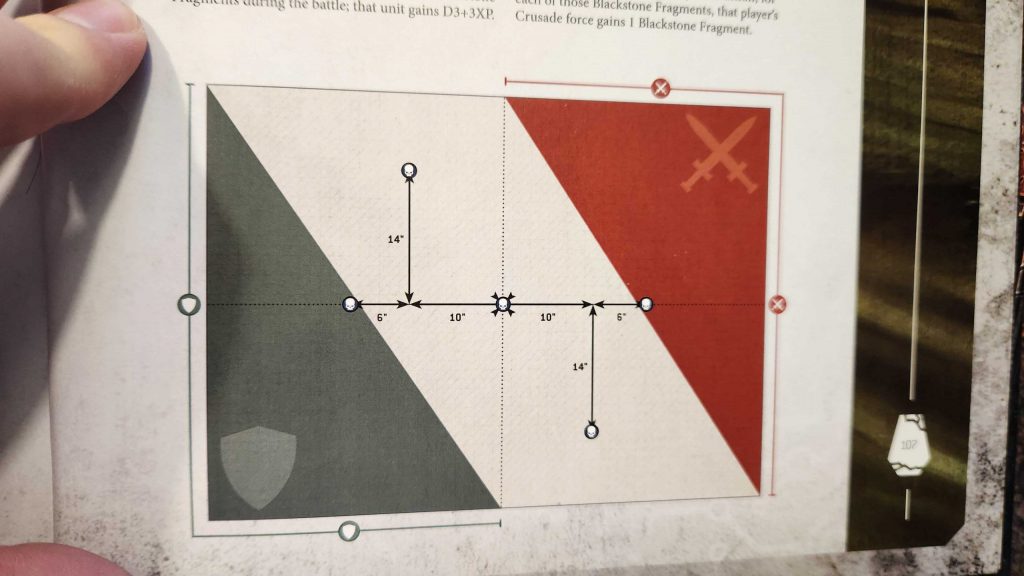
The Mission: Nullification Field
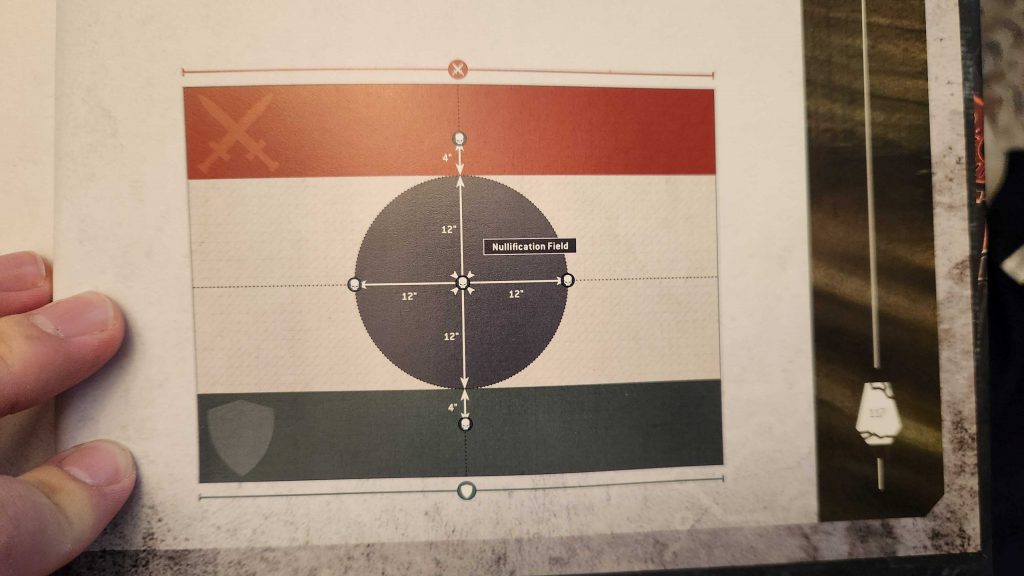
This mission features a 12" diameter circle in the middle of the table in which units do not get invulnerable saves. That's pretty insane and I don't think it's an amazing mission, but it's a more interesting one to build around, and it uses Dawn of War deployment.
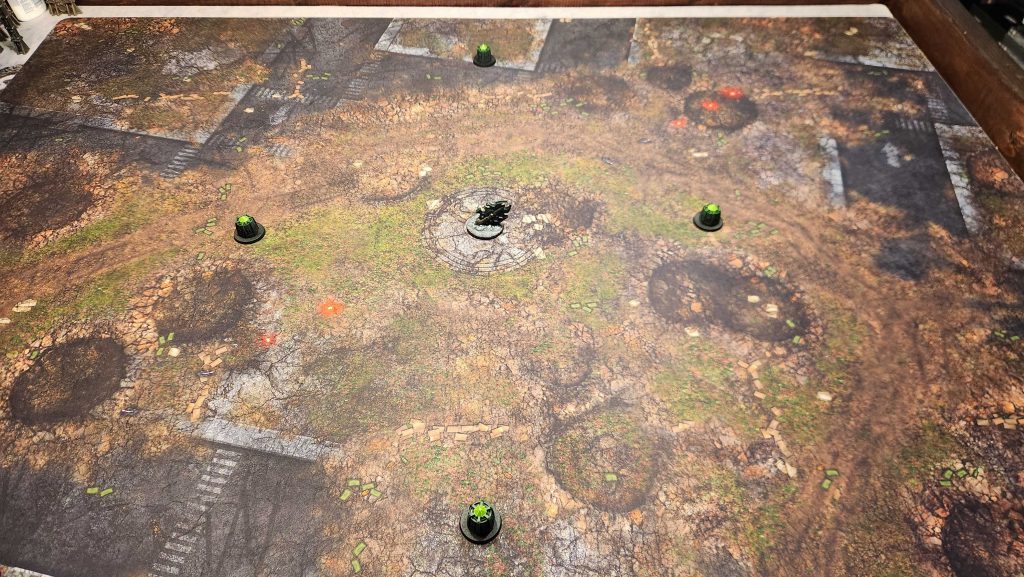
With something like this I like to start by dropping the objectives on the table and looking at where they sit relative to each other. In this case they're pretty close, but my guiding principle is still that you should largely not have open sight lines between multiple objectives. That'll be harder to do here but it's still possible.
Note: Originally I planned to use terrain pieces - specifically a Convergence of Dominion - to help denote the circle, but this just didn't work with the terrain I put down. The lanes to get to the center of the table were too tight for vehicles so I removed them.
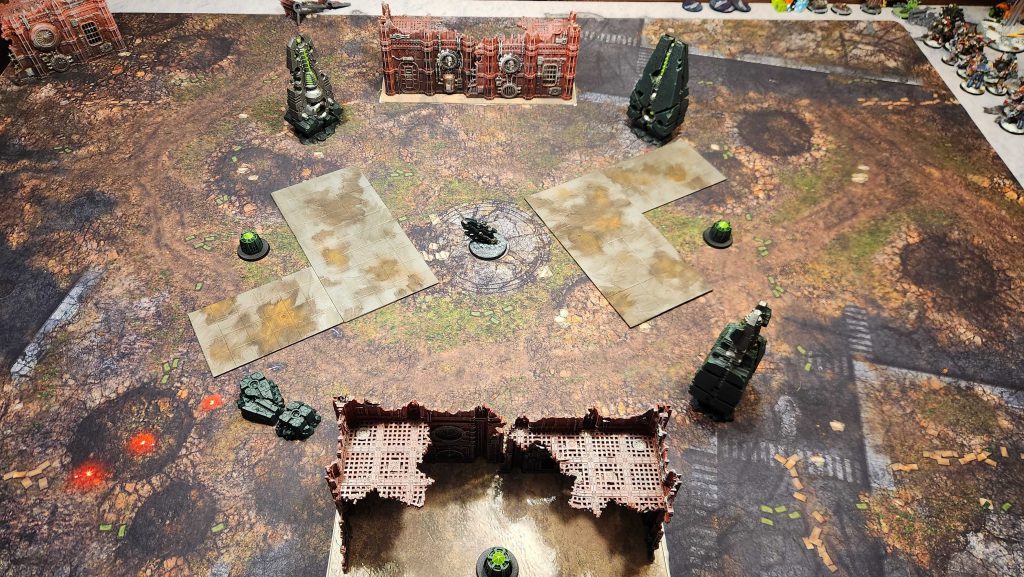
I start here with some more classic pieces: 12x6 bases to create ruins to protect the "home" objectives, and a pair of larger L-shapes in the middle of the table. These help hide the objectives from each other while creating natural expansions for each player to move to. This is crucial in Dawn of War, where it's really easy to see across most of the table if you don't have good terrain.
These get tall ruins added to them - I want something that looks reasonable - and those create good staging points for melee units as well. Now you have something you can hide behind and stage an assault on either the center of the table or the opponent's home objective - and this is even more critical when you don't have invulnerable saves. You can also sit a unit in the crook of that L shape.
I throw ruins against the sides of the table to block those long sightlines and put mechanicus ruins in each corner. These are more about creating large blocks for line of sight than anything else. There's still a long diagonal line of sight here but you can't really do anything about that on Dawn of War - it's nearly impossible to avoid having at least one of those. The best we can do here is give units alternate ways of moving up the table which don't have to pass through that line.

And anyway the occasional long line of sight isn't the end of the world. We can have a treat or two for shooting armies in the mix; we just don't want them to be the only armies which can function. it's extra important here on a mission where being in the middle of the table will cost you your invulnerable save. The good news is we've created a table where you have ample hiding places for deploying your units while still having decent cover as you move up the table. This one is more open than some of the other tables I've built but they shouldn't all be super dense melee fests.
Eagle-eyed competitive players may notice that this looks very familiar to Layout 3; you aren't wrong - this is doing a lot of the same things as that. The key differences here are cutting off the sides of the table to remove those long sight lines and adding larger pieces to the corners so you aren't trying to hide behind a 4x6" block during deployment. THe Ls int eh center are also a bit more pronounced, giving a bit more cover and eating up a bit more space. This is more like "what if layout 3 had eight 12x6 terrain features?" and the answer is "then it'd feel better to play on."
Next Time: Nachmund and More Missions
That wraps up our look at Sector Mechanicus terrain. Next time we'll continue our challenge series by looking at the Nachmund terrain, with its fences and buildings. That set has its own challenges but we can make it work. I'll also look at one or two missions from the Nachmund Gauntlet booklet and see about doing some new layouts for those. I really appreciated the feedback I got last time around, so if you have specific requests for what you'd like to see in a future article in this series, let me know!
Have any questions or feedback? Drop us a note in the comments below or email us at contact@goonhammer.com. Want articles like this linked in your inbox every Monday morning? Sign up for our newsletter. And don’t forget that you can support us on Patreon for backer rewards like early video content, Administratum access, an ad-free experience on our website and more.Thank you for being a friend.


 Goonhammer App and Patron Updates: April, 2026
 Kill Team Tournament Report: Engage, Party, Repeat's March Madness 2026
 Goonhammer Reviews: Tribal Conquest