For those of us who grew up with the original
Star Wars trilogy, there is no bit of background scenery that sparked our imaginations more than the bounty hunter lineup from
The Empire Strikes Back. Who were those guys? The only reason we even knew their names was from the action figure packaging, and their back stories weren’t revealed until many years later. It’s brilliant filmmaking – with just a handful of extras in costume and a few lines of dialogue, the scene hints at a much wider Star Wars universe than what we see on screen in the films.
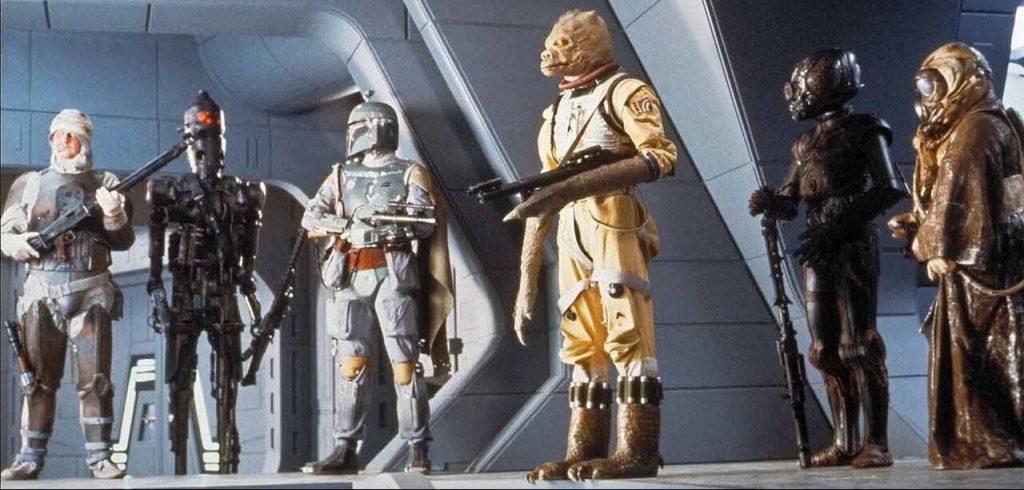 Image from The Empire Strikes Back. © Lucasfilm.
Having spent countless hours of my childhood inventing stories for these characters via the medium of small plastic figurines, I am thrilled to be able to continue to do so well into my adulthood thanks to their inclusion in Shatterpoint as the We Don’t Need Their Scum unit pack (well, most of them, anyway). But first they’re going to need some paint.
No Disintegrations
My esteemed colleague
Tom Reuhl has already covered
Boba Fett, On Contract in detail, so we’ll move on to the other three.
IG-88B, Created to Succeed
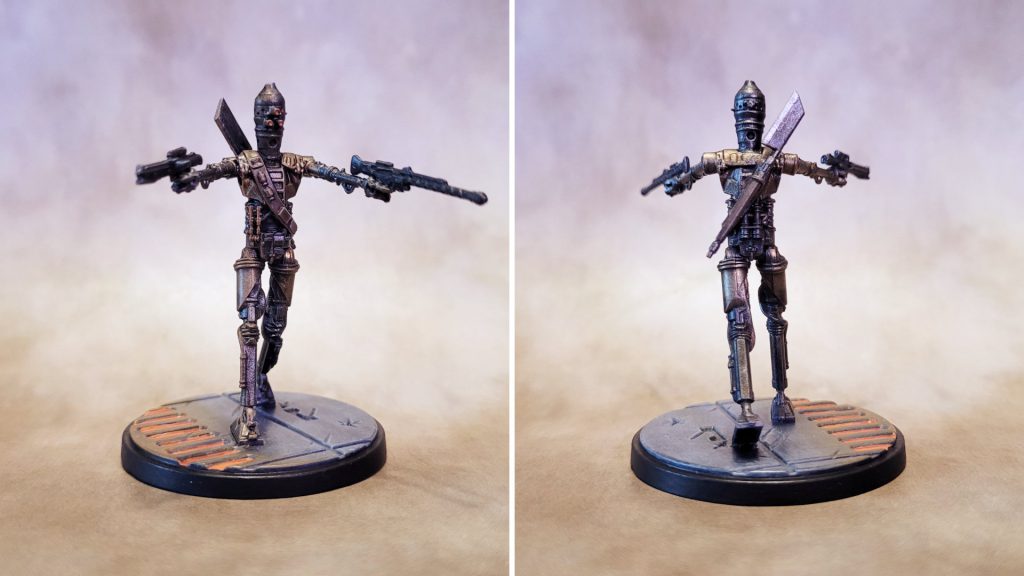 IG-88 painted for Star Wars: Shatterpoint by Jefferson Powers.
The fearsome assassin droid was the easiest to get painted. I started with Vallejo black brush-on primer, followed by a drybrushing of Vallejo Air Gun Metal to get the overall metallic tone. Before getting into the details on the figure, I did the base by drybrushing Army Painter Deep Grey over the black primer, followed by lighter drybrush layers of Reaper Cloudy Grey and Rainy Grey. I wanted to place IG-88 in the Cloud City carbon freezing chamber, so I kept the metal floor pretty dark, and would do the grating in orange after completing the figure.
Photos of IG-88 vary depending on the lighting and how in focus he is, but many of them seem to indicate that he has some copper in his armor in addition to metallic grey, so I added some Vallejo Air Copper to his outer thighs, knees, shoulders, and a few of the pipes and hoses along his legs and torso.
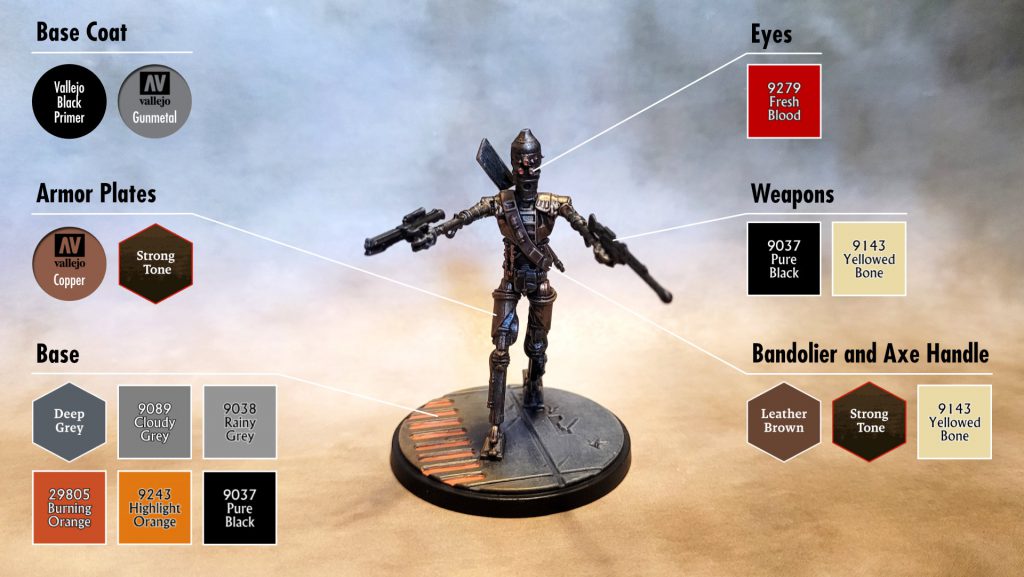 Photo & color guide by Jefferson Powers.
I painted the bandolier and the handle of the axe on his back in Army Painter Leather Brown, then hit the brown and copper areas with a coat of Army Painter Strong Tone wash to add in some shading. I touched up the two guns with Reaper Pure Black, and brushed some Vallejo Gun Metal onto the axe blade to lighten it up a bit and make it stand out from his darker metallic “skin.” Then I hit the whole model with a very light drybrush of Reaper Yellowed Bone to add highlights, focusing mainly on the belt and guns.
I added a few dots of Reaper Fresh Blood to his three eyes (at least I think those are eyes), but the model was still looking a little bland so I did the floor grating in Reaper Burning Orange, followed by Reaper Orange Highlight, which I also drybrushed onto the surrounding floor and the side of the figure’s right leg and torso, to give a glow effect. I cleaned up the base edge with some black and IG-88 was ready for his final varnish.
Dengar, the Demolisher
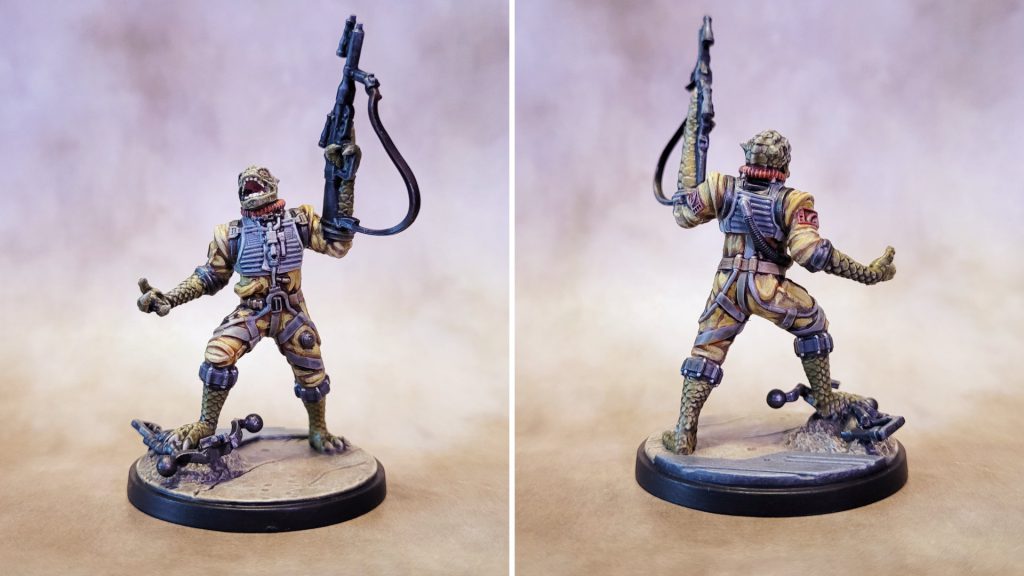
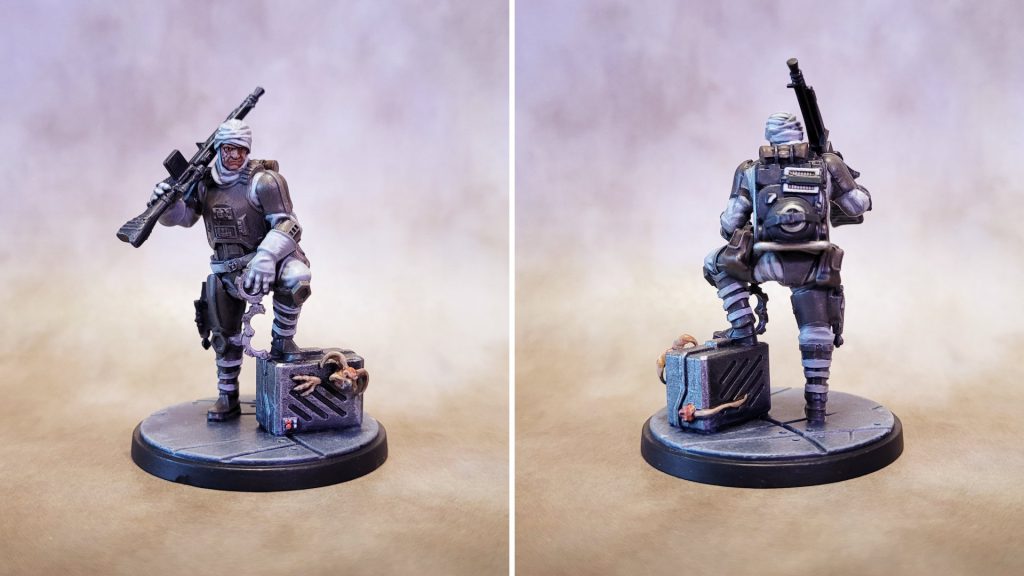 Dengar painted for Star Wars: Shatterpoint by Jefferson Powers.
Looking at this model, I did find myself wondering what that monkey lizard did to get a bounty on its head. Or has Dengar fallen on hard times and been forced to resort to recovering lost pets? See, the stories just write themselves...
Dengar presents an interesting painting challenge in that his armor is the opposite of the countless Stormtroopers and clone troopers that we’ve all painted – instead of white armor with black joints, he is dark grey with light grey wrappings under the armor. I went with a similar approach though, starting with a drybrush layer of Reaper Mountain Stone over all the armor sections, followed by a much lighter drybrush of Reaper Desert Stone, just to catch the edges.
Before continuing with Dengar himself, I drybrushed a base layer of Vallejo Air Gun Metal over the cage, using a small brush and taking care not to get any of the metallic paint on Dengar’s foot. That’s not an easy task when drybrushing, especially if you’re using metallic paint, so I touched up his foot using Mountain Stone with just a touch of black mixed in. I did the base at the same time, using the same three layers of drybrushed grey tones and touching up around the cage where needed.
Returning to the main figure, I painted all the cloth wrappings and his gloves in Reaper Rainy Grey, and then brushed on some highlights using first Reaper Misty Grey, and then Polished Bone for the lightest areas. This gave the light areas a warm tone that went nicely with the brownish-grey armor.
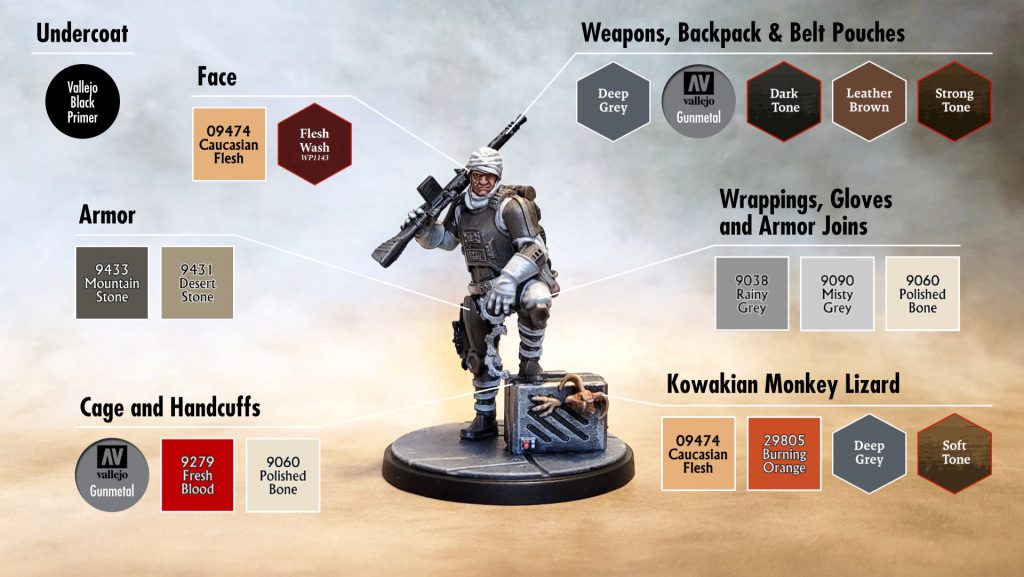 Photo & color guide by Jefferson Powers.
I painted his face with Reaper Caucasian Flesh, followed by a wash using Army Painter Flesh Wash, adding white and black dots for the eyes after the wash had dried. I did basically the same thing for the monkey lizard in the cage, giving it a base coat of Caucasian Flesh, Burning Orange for the tufts of hair on the head and tail, and Army Painter Deep Grey for the nose, followed by a Soft Tone wash to bring out some of the texture.
I painted the handcuffs in Vallejo Gun Metal followed by Dark Tone wash. I painted the rifle and backpack in Army Painter Dark Grey, adding Gun Metal to some of the backpack details, and then used a Dark Tone wash on those as well. The backpack has what looks like a tiny bedroll on it, which I painted in Army Painter Leather Brown followed by a Strong Tone wash. I used the same color recipe for his two belt pouches.
I was pretty happy with the range of tones I had, so I didn’t bother with a final drybrush for highlights like I usually do. I just painted the base edge in Pure Black and put Dengar in line for varnish.
Bossk, Single-Minded Slayer
 Bossk painted for Star Wars: Shatterpoint by Jefferson Powers.
Yellow can be a challenging color to work with, so with Bossk’s flight suit in mind I decided to prime him in Army Painter grey with a white drybrush to give me an easier undercoat to work with. I’d had some pretty good results with Zealot Yellow Speedpaint, so I used that as the base color. But while the mid tones and highlights looked pretty good, the shadow tone was far too orange for my liking. I went over it with a Soft Tone wash, which helped a little, but I also touched up a lot of the shadow areas with Reaper Leather Brown, and hit the mid tone and highlight areas with NMM Gold Base and NMM Gold Highlight, making me wonder if the Zealot Yellow base coat was necessary at all.
I did the flight suit collar and shoulder insignia in Reaper Rust Brown, which is really more of a red tone, knowing that I would make use of the model’s texture later to add highlights. Some of the straps and belts I just left in the light grey primer color, touching up here and there with Reaper Rainy Grey and Misty Grey. I painted the belt around his waist in Reaper Leather Brown, and the cuffs at his knees and shoulders in Army Painter Deep Grey. I did the main hose at his lower back in Reaper Pure Black, and all the various metal bits in Vallejo Air Gun Metal followed by a Dark Tone wash.
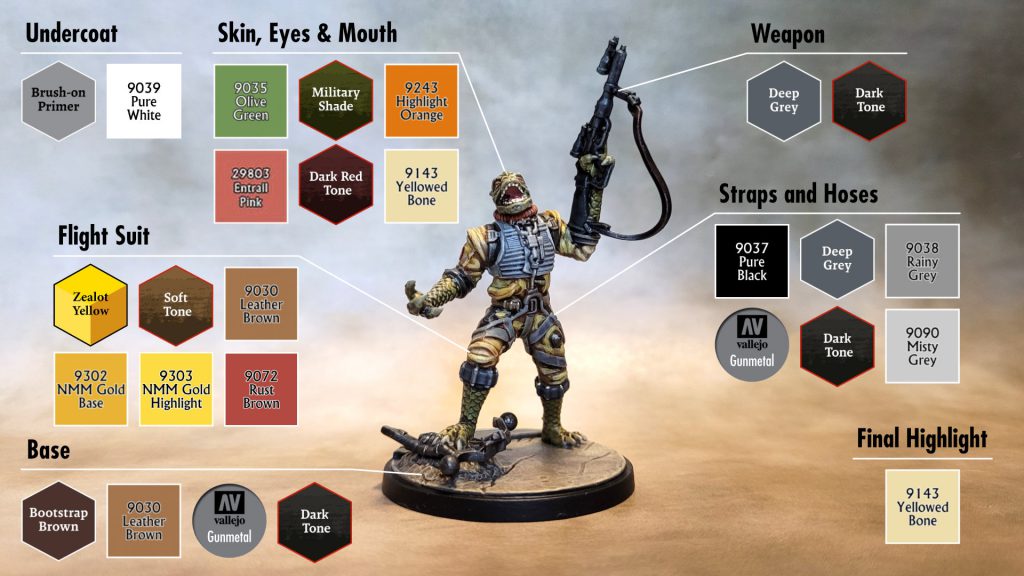 Photo & color guide by Jefferson Powers.
I painted his weapon in Army Painter Deep Grey, and the bowcaster he’s standing on in Vallejo Air Gun Metal, and gave both a Dark Tone wash. I wanted to get the base done before working on his feet, so I did the “floor” section of the base using the same range of greys that I used for Dengar and IG-88 above. The ground started with a base coat of Army Painter Bootstrap Brown, then a heavy drybrush layer of Reaper Leather Brown followed by a second drybrush layer in Reaper Yellowed Bone.
Bossk’s skin is wonderfully textured, which is great for my preferred technique of doing a mid tone base color followed by a wash for shadows and a drybrush layer for highlights. For Bossk’s face, forearms, and legs I used Reaper Olive Green as the base color, followed by a wash with Army Painter Military Shade, which is a nice dark green. I did his eyes in Reaper Highlight Orange with black for the pupils, and his mouth in Reaper HD Entrail Pink (a great color that was part of Reaper’s High Density range, now sadly discontinued). I gave the inside of his mouth a Dark Red Tone wash, then went over the teeth, claws and toenails in Yellowed Bone.
I hit the entire model with a final drybrush of Yellowed bone, focusing in particular on his exposed skin and the yellow flight suit, then went over the edge of the base in Pure Black. In spite of the course-correction with the yellow, I was pretty pleased with the results.
Ready for the Table
With that, we have some of
Star Wars’ most intriguing background characters ready to populate the Shatterpoint gaming table. I think Bossk is the most striking model in this pack, with his dynamic pose and bright colors, but surprisingly I had the most fun painting Dengar. I would love to be able to add 4-LOM and Zuckuss to the mix – I’m holding out hope that they’ll headline a Supporting Units pack some day...
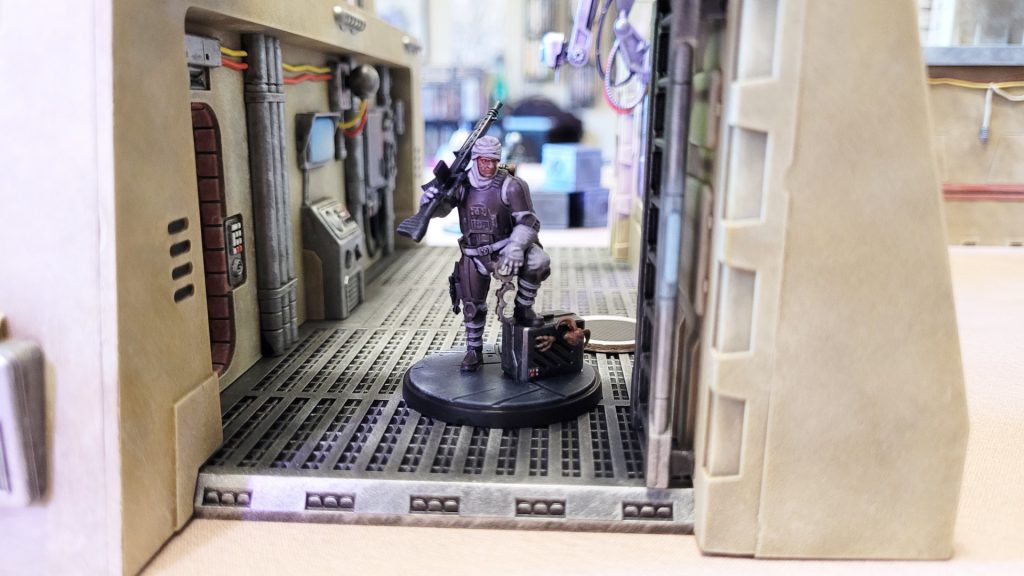 Dengar finally catches up with the monkey lizard in the maintenance bay.
Have any questions or feedback? Drop us a note in the comments below or email us at contact@goonhammer.com. Want articles like this linked in your inbox every Monday morning? Sign up for our newsletter. And don't forget that you can support us on Patreon for backer rewards like early video content, Administratum access, an ad-free experience on our website and more.
Dengar finally catches up with the monkey lizard in the maintenance bay.
Have any questions or feedback? Drop us a note in the comments below or email us at contact@goonhammer.com. Want articles like this linked in your inbox every Monday morning? Sign up for our newsletter. And don't forget that you can support us on Patreon for backer rewards like early video content, Administratum access, an ad-free experience on our website and more.Thank you for being a friend.


 Goonhammer App and Patron Updates: April, 2026
 Kill Team Tournament Report: Engage, Party, Repeat's March Madness 2026
 Goonhammer Reviews: Tribal Conquest