Rogue One: A Star Wars Story added a brand new cast of colorful characters to the Star Wars universe, and they are tailor-made for the game table. Painting this particular squad pack might seem a little daunting: normally we have two individual characters plus two (or more) generic models like clone troopers or rebel soldiers, but here we have four entirely different characters, each with their own distinctive color scheme.
As a painter, I am constantly striving for a balance between wanting my models to look good, and wanting to get them done in a reasonable amount of time so I can get to playing the game. Over the years I’ve worked out a few ways to speed things up, some more successful than others. One thing I like to do is try to start with the model’s most predominant color as an overall base coat – then it’s just a matter of filling in the details with the other colors.
This approach worked particularly well for the Rogue One squad. Three of the four characters wear dark grey as their primary color, with Baze Malbus being the only exception. I started all four models with a coat of Vallejo brush-on black primer. Then, for Jyn Erso, Bodhi Rook, and Chirrut Îmwe I drybrushed a heavy layer of Army Painter Deep Grey, followed by lighter layers of Army Painter Uniform Grey and Reaper Misty Grey.
Do the Bases First
All that grey drybrushing made it easy to get the bases done. After the first layer of Deep Grey on the models, I painted in the metal flooring parts of the bases in the same Deep Grey. Then, as I drybrushed the models in the two lighter shades of grey, I did the bases at the same time. I followed that by going back over the lines between the floor panels in Deep Grey to darken them a bit, and filling in the grating on Bodhi Rook’s base in black. For the little strip of ground on Jyn Erso’s base, I painted the area in Army Painter Leather Brown, then drybrushed Army Painter Tomb King Tan followed by Ancient stone, using a smaller brush and taking care not to “splash” onto the metal floor area too much.
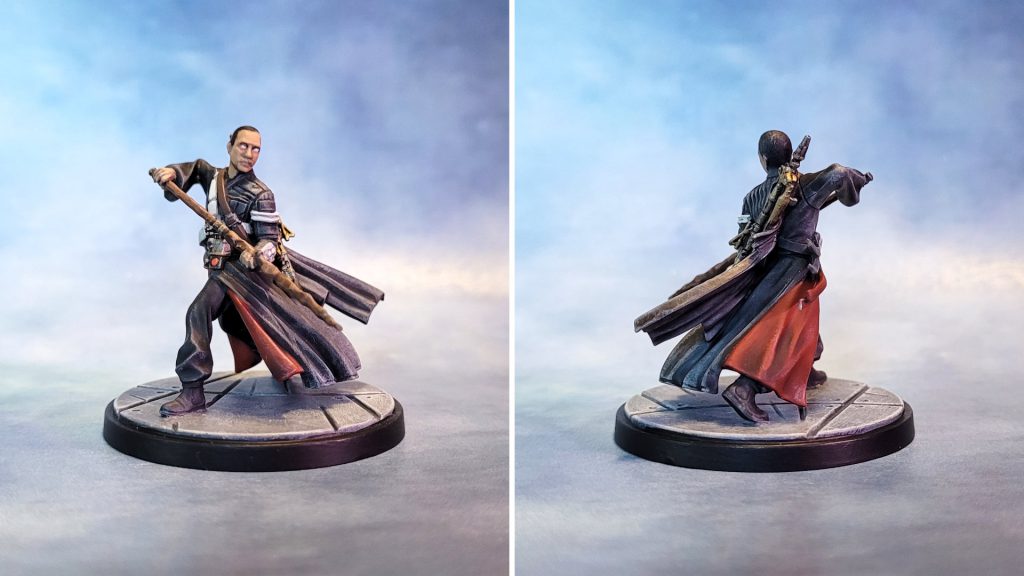
Jyn Erso, Stardust
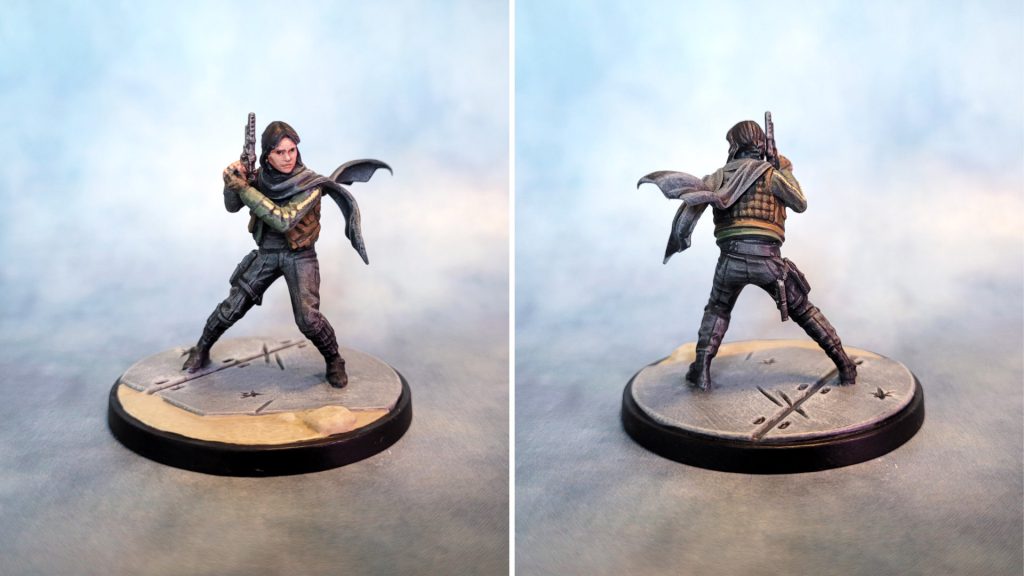 Jyn Erso painted for Star Wars: Shatterpoint by Jefferson Powers
With the base coat of drybrushed grey, that’s Jyn Erso’s pants and scarf already done. I painted in her vest and gloves with Army Painter Bootstrap Brown, then brushed on some highlights in Leather Brown. For her sleeves, I started with Reaper Muddy Green, covering the drybrushed grey from the base coat but leaving the black in the deeper recesses showing through. Then I added some highlights in Army Painter Olive Drab, and went over the stripe in Army Painter Barren Dune.
I painted her face and fingers in with Army Painter Topaz skin, then did the eyes with a quick slash of white followed by a dot of black. I did the highlights in Army Painter Tourmaline Skin, brushing across the forehead, down the nose, and then hitting the upper cheeks and chin, leaving the darker skin tone to show through at the eyes, lips and lower cheeks.
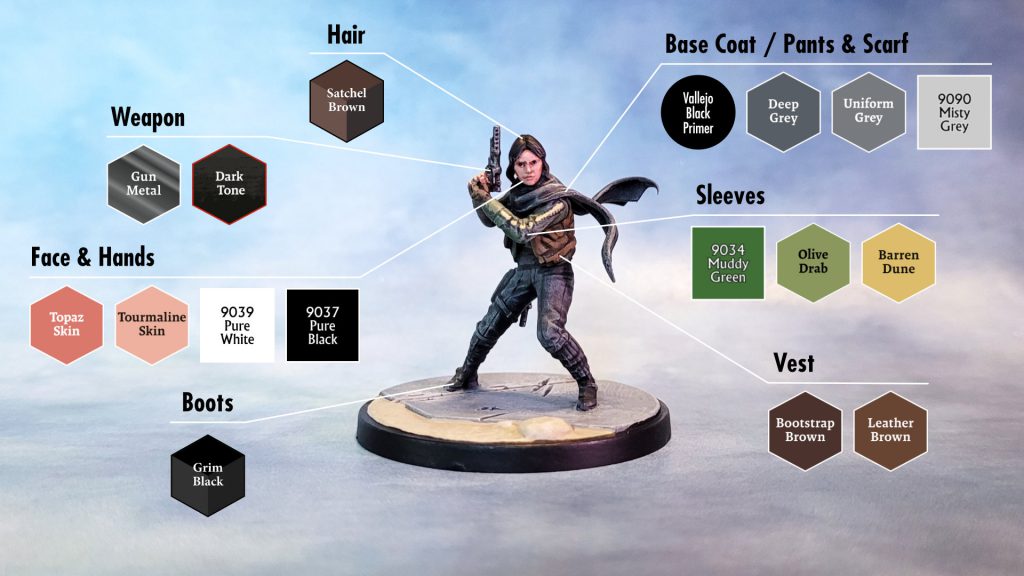 Photo & color guide by Jefferson Powers
I did her weapon using a simple base coat/wash approach, using Army Painter Gun Metal for the base, followed by a Dark Tone wash. For the final details I used Army Painter Speedpaints: Grim Black for the boots and Satchel Brown for the hair. Finally I did an extremely light drybrush in Army Painter Ancient Stone, just hitting a few spots here and there: face and hair, scarf, sleeves, and the tops of the knees where an overhead light might hit them.
Bohdi Rook
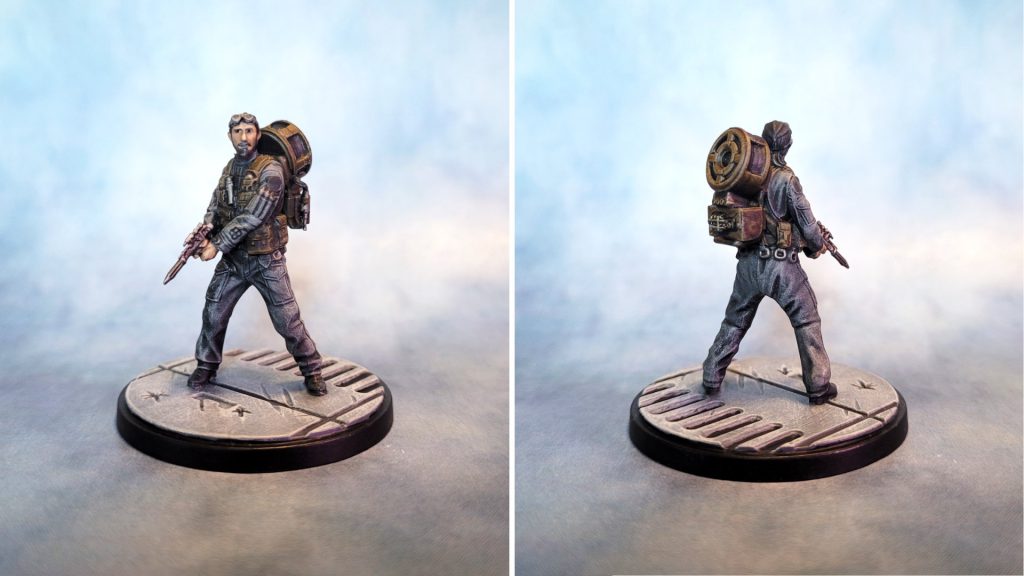 Bodhi Rook painted for Star Wars: Shatterpoint by Jefferson Powers
Bodhi was the easiest model in this squad pack: the bulk of his costume is a grey flight suit, so after my grey base coat, all I needed to do was to fill in a few details here and there. I used Reaper Tanned Shadow as a base for his face and hands, followed by Reaper Tanned Skin for highlights, with the same approach I used for Jyn: across the forehead, down the nose, the tops of the cheekbones, and along the fingers and backs of the hands.
For his vest and backpack I did a base coat of Army Painter Leather Brown, then a Strong Tone wash. I filled in the recessed areas of the backpack with Grim Black Speedpaint, which I also used for his hair, beard, and boots. I then went in and painted his weapon and all the little metal bits sticking out of pockets and hanging off the backpack in Gun Metal, followed by a Dark Tone wash – as you can see, this is my go-to technique for metallic areas most of the time.
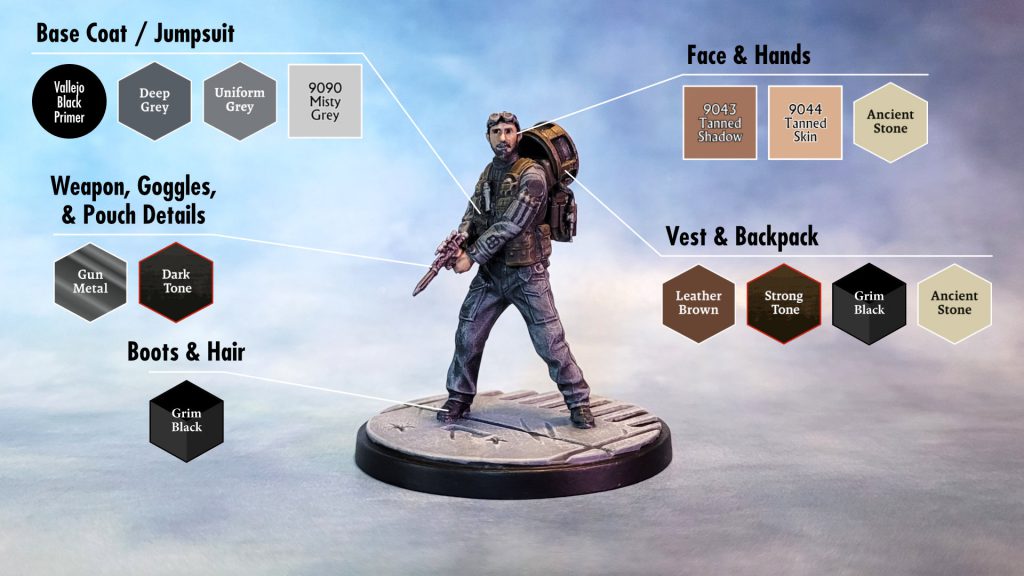 Photo and color guide by Jefferson Powers
Finally, as with Jyn I did a very light drybrush of Ancient stone to pick out a few highlights, mainly on the face, shoulders and backpack.
Chirrut Îmwe
 Chirrut Imwe painted for Star Wars: Shatterpoint by Jefferson Powers
Chirrut’s outfit is a little bit darker than Bodhi or Jyn’s, so I went a little lighter on the initial grey drybrush. Additionally, I went back over his pants and boots in Grim Black Speedpaint to darken them up a bit more. For his red inner cloak I used Reaper Carnage Red followed by a Dark Tone wash, but you have to be a little careful when using washes on capes and cloaks – the wash will want to pool at the bottom, so you need to keep brushing it back up into the upper crevices while it’s drying.
I did his face and hands with a base of Reaper Tanned Shadow followed by Tanned Skin highlights, using the same technique for faces and hands described above. I painted his solid white eyes in Reaper Polished Bone, and left his hair in the black/grey base coat.
For the bowcaster on his back, I mixed equal parts Army Painter Bright Gold and Shining Silver, to get a pale gold. I then did a few of the bowcaster’s details in Gun Metal and hit the whole thing with a Dark Tone wash. I did the brown belt across his chest in Army Painter Bootstrap Brown, and the white straps and details were base coated in Reaper Rainy Grey and then highlighted in Misty Grey.
I think his staff took the most different colors: a base of Bootstrap Brown with Leather Brown and Ancient Stone highlights, and the metallic details in Gun Metal with a Dark Tone wash.
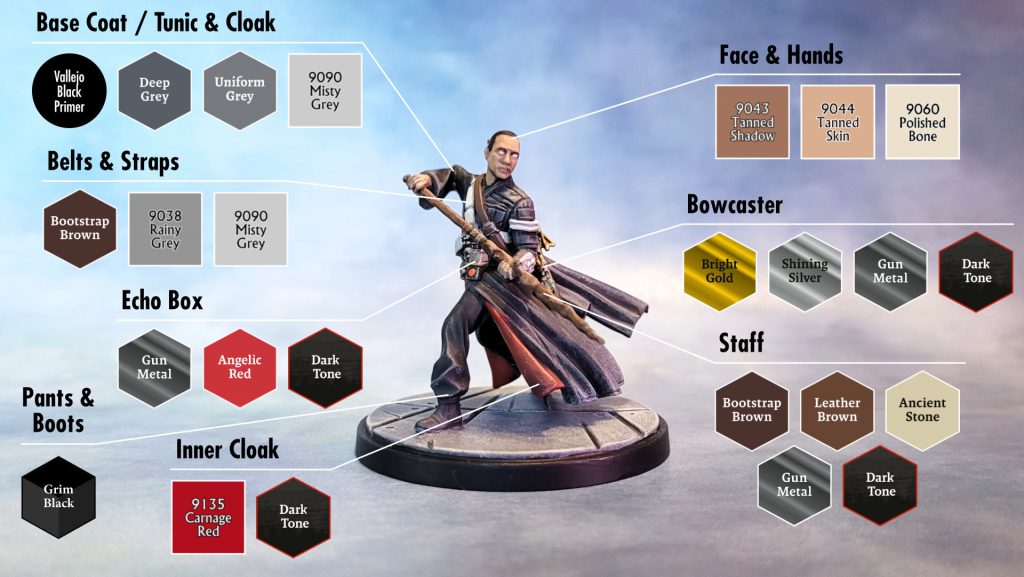 Photo and color guide by Jefferson Powers
The final detail was the item hanging off his belt. In the process of looking for reference I found out something I never knew before: this is an Echo Box, and it’s used by the blind in the Star Wars universe as a kind of radar to warn them of nearby obstructions. That’s probably more information than I needed to paint the box in Gun Metal with a Dark Tone Wash, and Army Painter Angelic Red for the light.
Baze Malbus
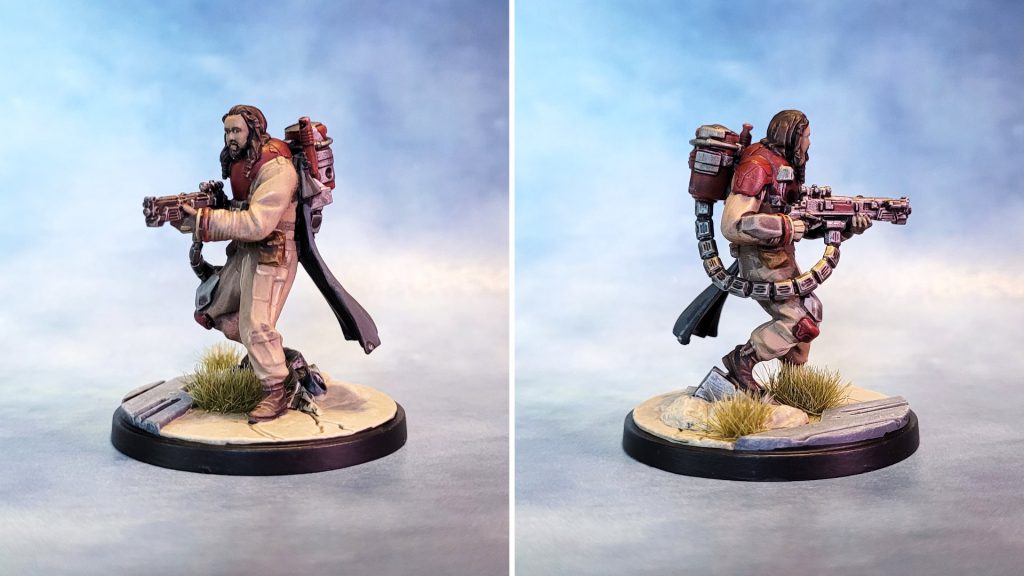 Baze Malbus painted for Star Wars: Shatterpoint by Jefferson Powers
Finally we come to the odd man out, at least in terms of his color scheme. Baze Malbus wears a much lighter costume than the others, so after the black primer I painted the entire model in Army Painter Bootstrap Brown, followed by heavy drybrush layers of Paratrooper Tan and Ancient Stone. This gave me a nice tan base coat that it would be easy to layer the other colors on top of. His base is mostly sandy earth, making it easy to do at the same time – I wanted it to look like the pale beach sand on Scarif, so I used Leather Brown as a base and drybrushed Tomb King Tan, then Ancient Stone. I filled in the wreckage he’s standing on with Gun Metal and a Dark Tone wash.
I used the same technique as above for his face: Tanned Shadow base and Tanned Skin highlights, with white and black for the eyes. Baze wears full gloves so I left them in the tan base color. For his hair and beard I used Satchel Brown Speedpaint.
I painted Baze’s distinctive red armor primarily in Slaughter Red Speedpaint over the tan base coat. The lower knee pad on his right leg, and the rings around his wrists, are the same red color, but he has two armor plates (one on his arm and one on his leg) that are a light warm grey color. For these I used Reaper Wolf Grey (a warmer tone than the Army Painter greys I’ve been using) with a Strong Tone wash (also warmer in tone than the Dark Tone wash).
I used Gun Metal for his backpack and weapon, adding red where needed with Reaper Carnage Red, then hit the whole assembly with a Dark Tone wash. I painted his cloak black and added some highlights in Deep Grey, also noting that the cloak has a rivet at the bottom corners, which I painted in Gun Metal. Finally, I filled the boots in with Hardened Leather Speedpaint.
Finishing Touches
Once all four models were complete, I hit them with a coat of Army Painter Matte brush-on varnish. However, lately I’m finding that it dries with more of a satin, almost semi-gloss finish, so the next day I went back over portions of each model in AK Interactive Ultra Matte varnish. This stuff tends to be
really matte, so I usually mix it with Army Painter Speedpaint Medium, about 1 part medium to 2 parts varnish. Brushing it on lets me be selective about which parts of the models I want to have an extra matte finish – I usually just do cloth and skin, leaving the semi-gloss finish visible on things like armor and weapons.
For Baze Malbus’ base, I thought the seam between the ground and the wreckage he’s standing on looked a little awkward, so I used some Gamers Grass Dry Green tuft to cover it up a bit.
And that’s
This is Rogue One done in record time. Hopefully you’ll be able to get them to the table just as quickly – I'm not sure Cassian Andor needs the help, but it certainly couldn't hurt...
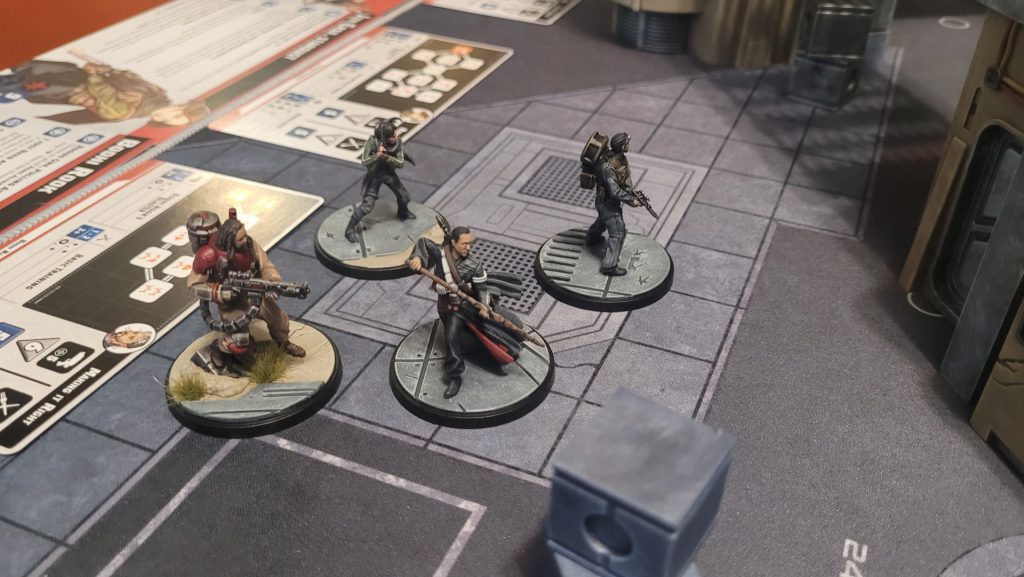 Photo by Jefferson Powers
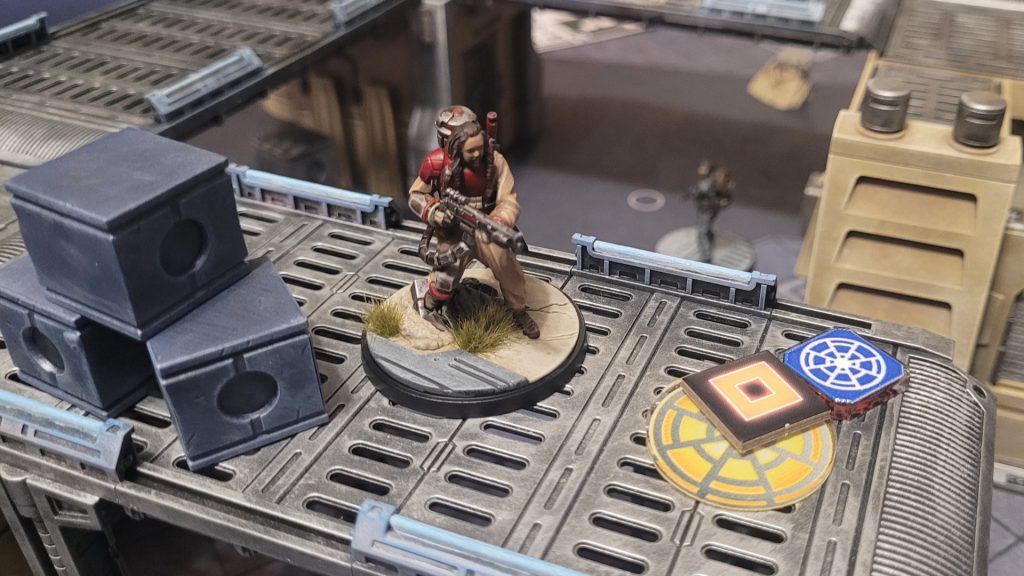 Photo by Jefferson Powers
Have any questions or feedback? Drop us a note in the comments below or email us at contact@goonhammer.com. Want articles like this linked in your inbox every Monday morning? Sign up for our newsletter. And don't forget that you can support us on Patreon for backer rewards like early video content, Administratum access, an ad-free experience on our website, and subscriber-only content covering competitive Warhammer 40K!
Photo by Jefferson Powers
Have any questions or feedback? Drop us a note in the comments below or email us at contact@goonhammer.com. Want articles like this linked in your inbox every Monday morning? Sign up for our newsletter. And don't forget that you can support us on Patreon for backer rewards like early video content, Administratum access, an ad-free experience on our website, and subscriber-only content covering competitive Warhammer 40K!
Thank you for being a friend.


 Goonhammer App and Patron Updates: April, 2026
 Kill Team Tournament Report: Engage, Party, Repeat's March Madness 2026
 Goonhammer Reviews: Tribal Conquest