Hello again, citizens- and welcome to another How To Paint Everything featuring our noble Jedi protectors and the stalwart clone soldiers of the Grand Army of the Republic!
Today’s HTPE features the Miralan Jedi Luminara Unduli and Barriss Offee, as well as a unit of Republic Clone Commandos. For the purposes of these models, I’ve opted to lean heavily into their appearances on the Clone Wars TV show, rather than their brief screentime in the films. Let’s dive right in!
(Wait, stop- first a note about color choices: Painting this box occurred during my “transition period” from using primarily Citadel paints with some ProAcryl on the side to primarily ProAcryl with some Citadel on the side, and the gremlins that inhabit all painting workshops have destroyed my notes. As such, with Goonhammer being a Warhammer-centric site, I’ve worked up the colors I used from the Citadel side unless I specifically remember using ProAcryl, with the understanding that you can achieve a similar effect from either range!)
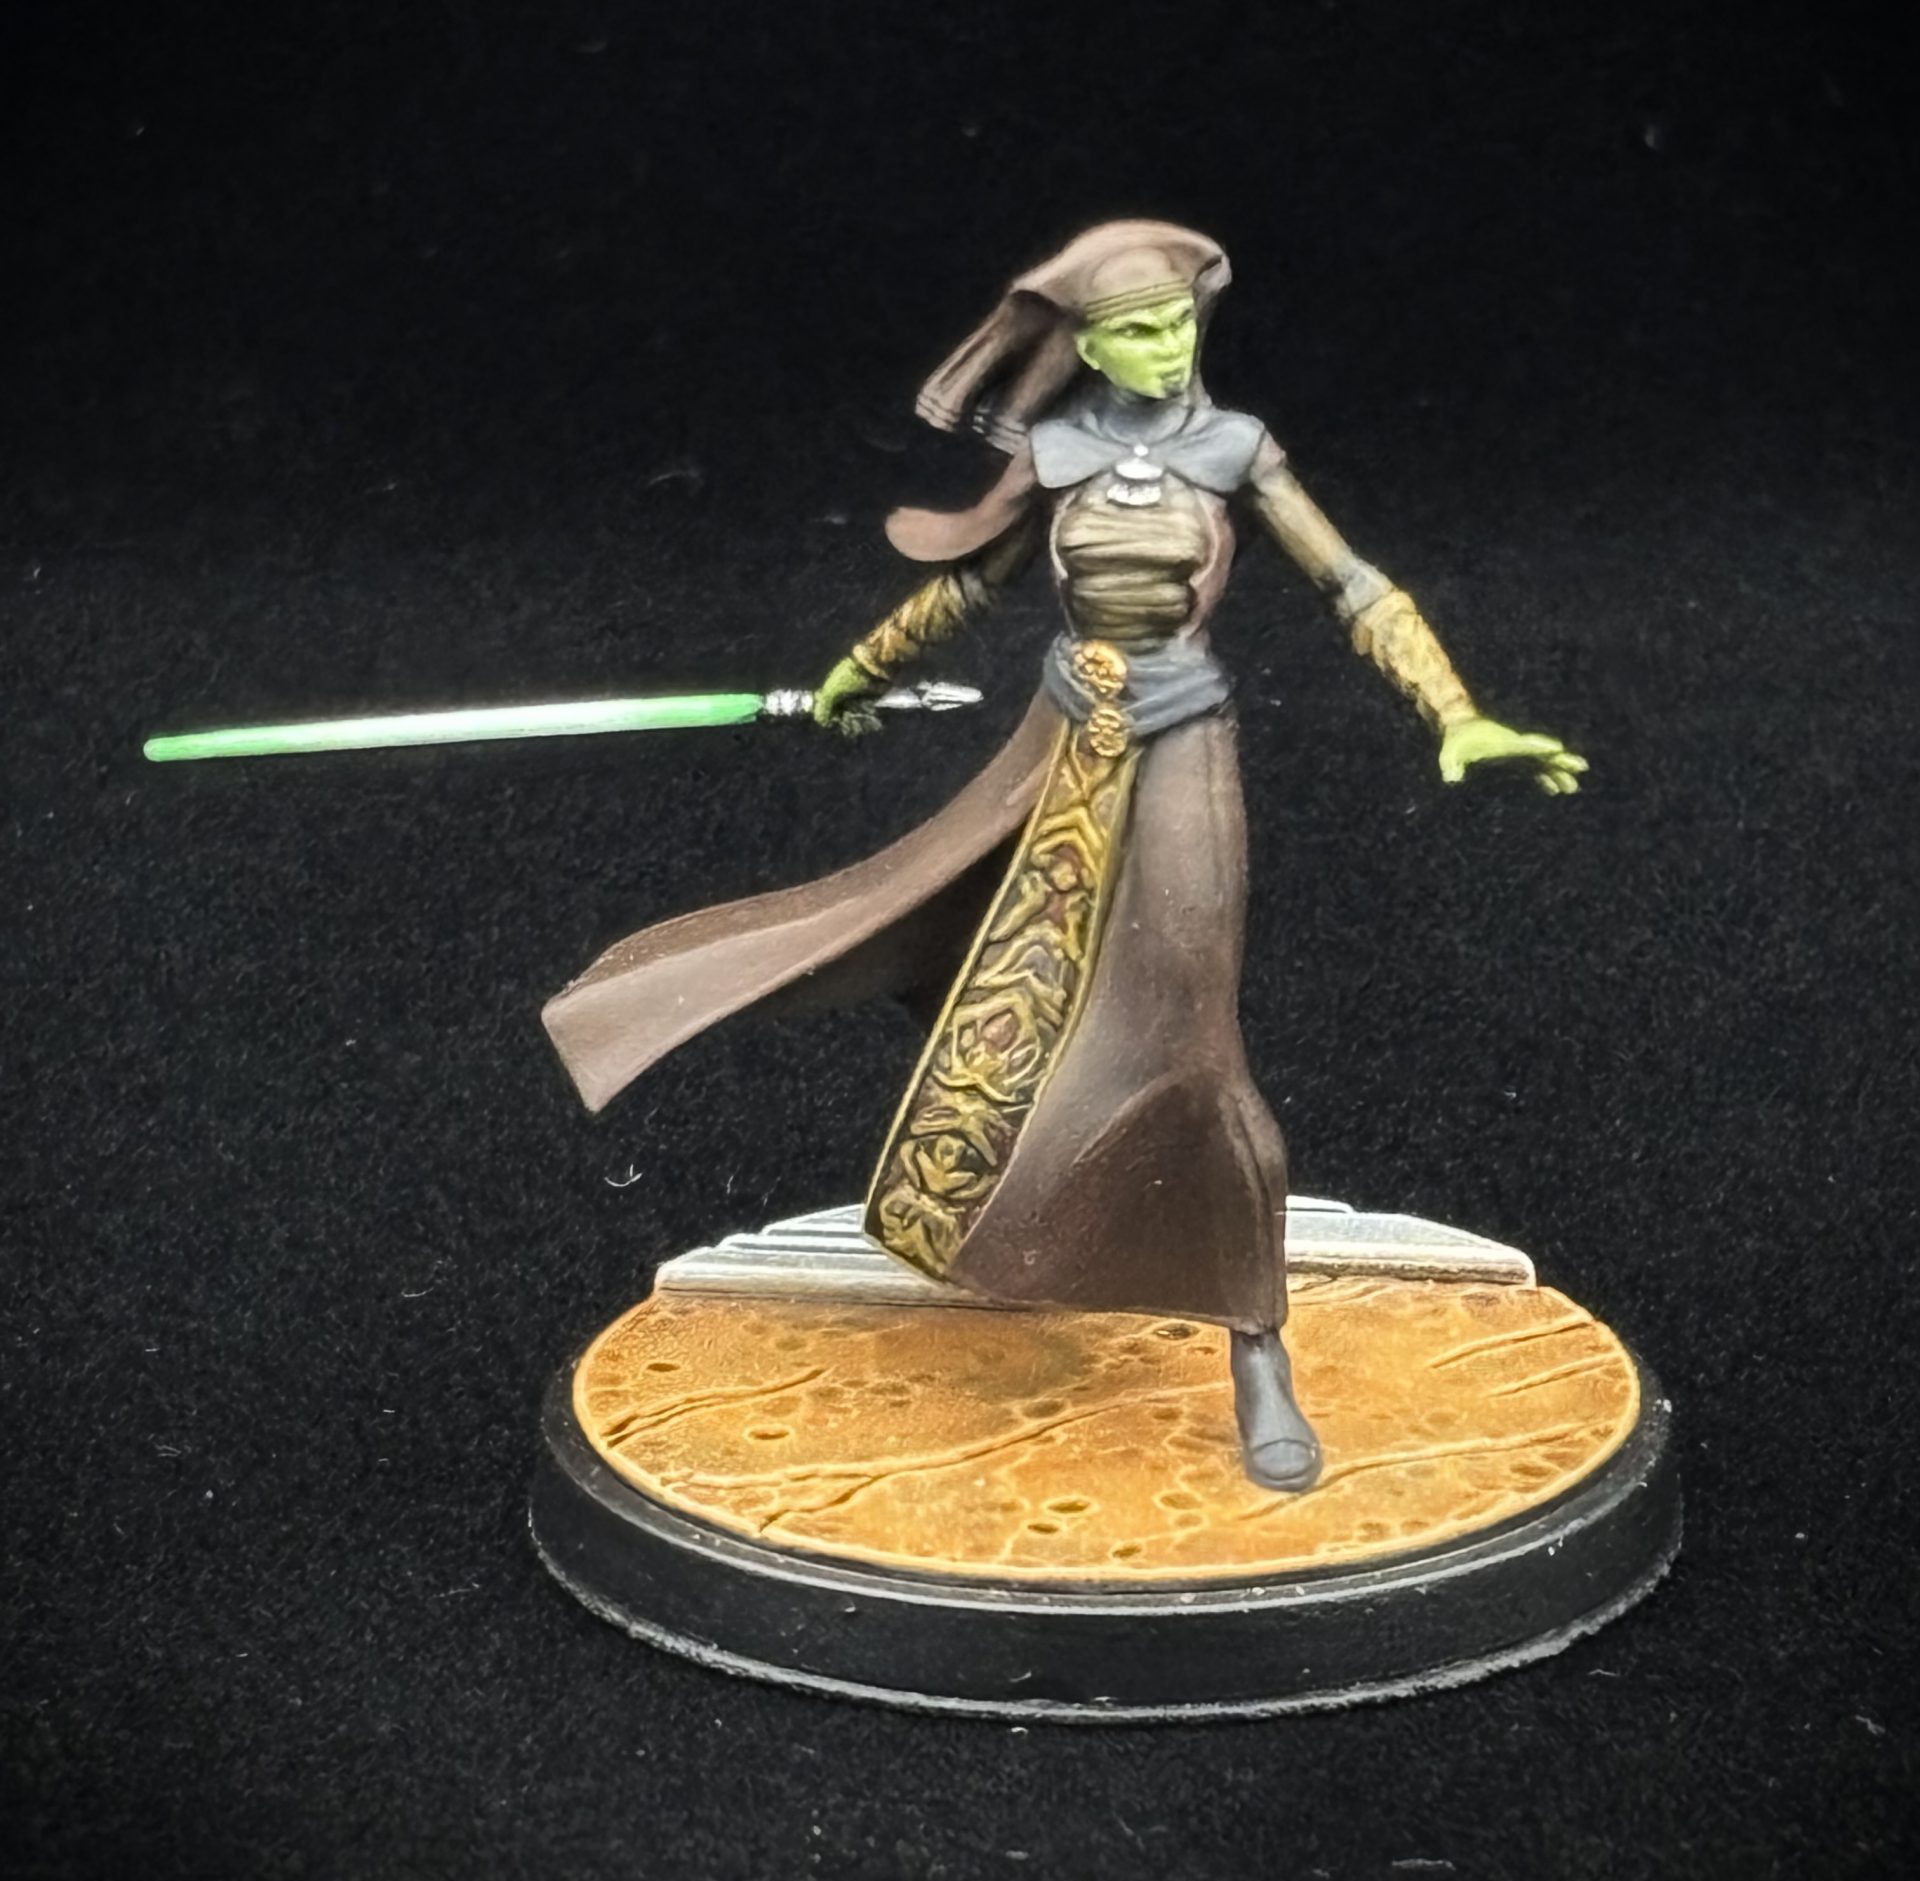
Jedi Master Luminara Unduli
Jedi Master Luminara Unduli. Credit: WakeDrannor
A character I truly love in the story of the Clone Wars, Luminara was a joy to paint. There’s a nice subtle complexity to her overall look, and the CW designers did a great job of combining different textures and colors to create someone whose appearance is at once practical and measured, but also sophisticated.
The first thing I do when painting a model (and this goes double for Jedi with all their robes) is break it up into layers of their outfit and make a color plan. For Luminara, I identified the following areas:
Outer robe, headdress, and tabard background: I wanted this to be a fairly neutral brown. I knew I was going to use a reddish tone on Barriss’s robes, so I deliberately kept this one away from that part of the spectrum. (Base: Rhinox Hide; Wash: Agrax Earthshade; Highlights: Thondia Brown)
Inner wrappings and headdress trim: I settled on a tan color here to offset the darker outer layer. (Base: XV-88; Wash: Agrax Earthshade; Highlight: XV-88 with a little Baneblade Brown mixed in to flatten the yellow-orange tone.)
Bracers and tabard design/edge: While I wanted to stay in the “earth tones” range, this was a spot I knew I wanted to lean into the yellow/gold a little bit. I went with ProAcryl for this one- Yellow Ochre, specifically- because I wanted that consistency for working. (Base: PA Yellow Ochre; Bracers only Wash: Agrax Earthshade; Bracers only Highlight: PA Yellow Ochre again.)
Let’s talk about the tabard for a second. Luminara has a very ornate Miralan tabard; thankfully AMG has graciously given us a sculpted version rather than a blank one. I toyed around with several ideas for this- some kind of color shift to capture gold threading? A sheen wash after the colors were laid in? I ultimately tried a few things and then settled on something that I felt would read well from the table- clean outlining of the design with Yellow Ochre (no wash here) to create a visual triangle with the bracers and a few subtle spots of color- these were achieved with PA Dark Burgundy highlighted with PA Burgundy and Leviathan Purple highlighted with a mix of Genestealer Purple and Daemonette Hide. It’s really important to keep these small and understated; you want just enough to add a little visual interest, but a bunch of color coming through and overpowering the overall earthy look. Do a few spots all the way to the finished level and then add more if you need- don’t go overboard!
Belt, shoes, and collar: These were going to be black, but again I wanted to tie them in with the overall earth tone scheme a bit. To achieve this, I used Corvus Black instead of a “pure” black like Abaddon and gave them the same brown wash as the rest of the clothing before highlighting with Eshin Grey. (Base: Corvus Black; Wash: Agrax Earthshade: Hightlight: Eshin Grey)
As with most Jedi, once you’ve done the robes, etc., you’re 75% of the way there. I did up the Metals using my standard system (Scale 75 metals and some Formula P3 armor wash I’ve been hoarding- you can replicate it with your wash of choice, however) for the lightsaber, the belt clasps, and the cloak pin, and then it was down to the skin and lightsaber blade. (Silver- Base: S75 Black Metal; Wash: FP3 Armor Wash; Highlight: S75 Heavy Metal. Gold- Base S75 Dwarven Gold; Wash FP3 Armor Wash; Highlight S75 Elven Gold- I skipped the “silver edging on gold” step here because I wanted to keep the model in the brown/yellow range as much as possible and the overall gold result looked good with the tabard.)
For the Lightsaber Blade, I’ve basically got my version of Jedi lightsabers down to a science at this point, and so the only difference from what I did with Obi-Wan’s lightsaber in the Hello, There! HTPE is the color- green instead of blue. (The Hello, There! article shows both airbrush and non-airbrush versions of this process; these days, I mostly use the non-airbrush method, as I’ve become more confident in my blending the effect.) I started from a ProAcryl Green base (this is a lovely true green; you could also use Citadel Warpstone Glow) and worked my way to the PA Bold Titanium White, using a little thinned Karandras Green contrast and some of my treasured Waywatcher Green glaze to smooth transitions. These were the only three colors I used here; I just mixed white into the green to get where I was headed and eventually worked all the way up to pure white.
We’re going to detour over and look at Barriss next before we talk about Luminara’s skin/face, because I think it’s helpful to do the two of them side-by-side.
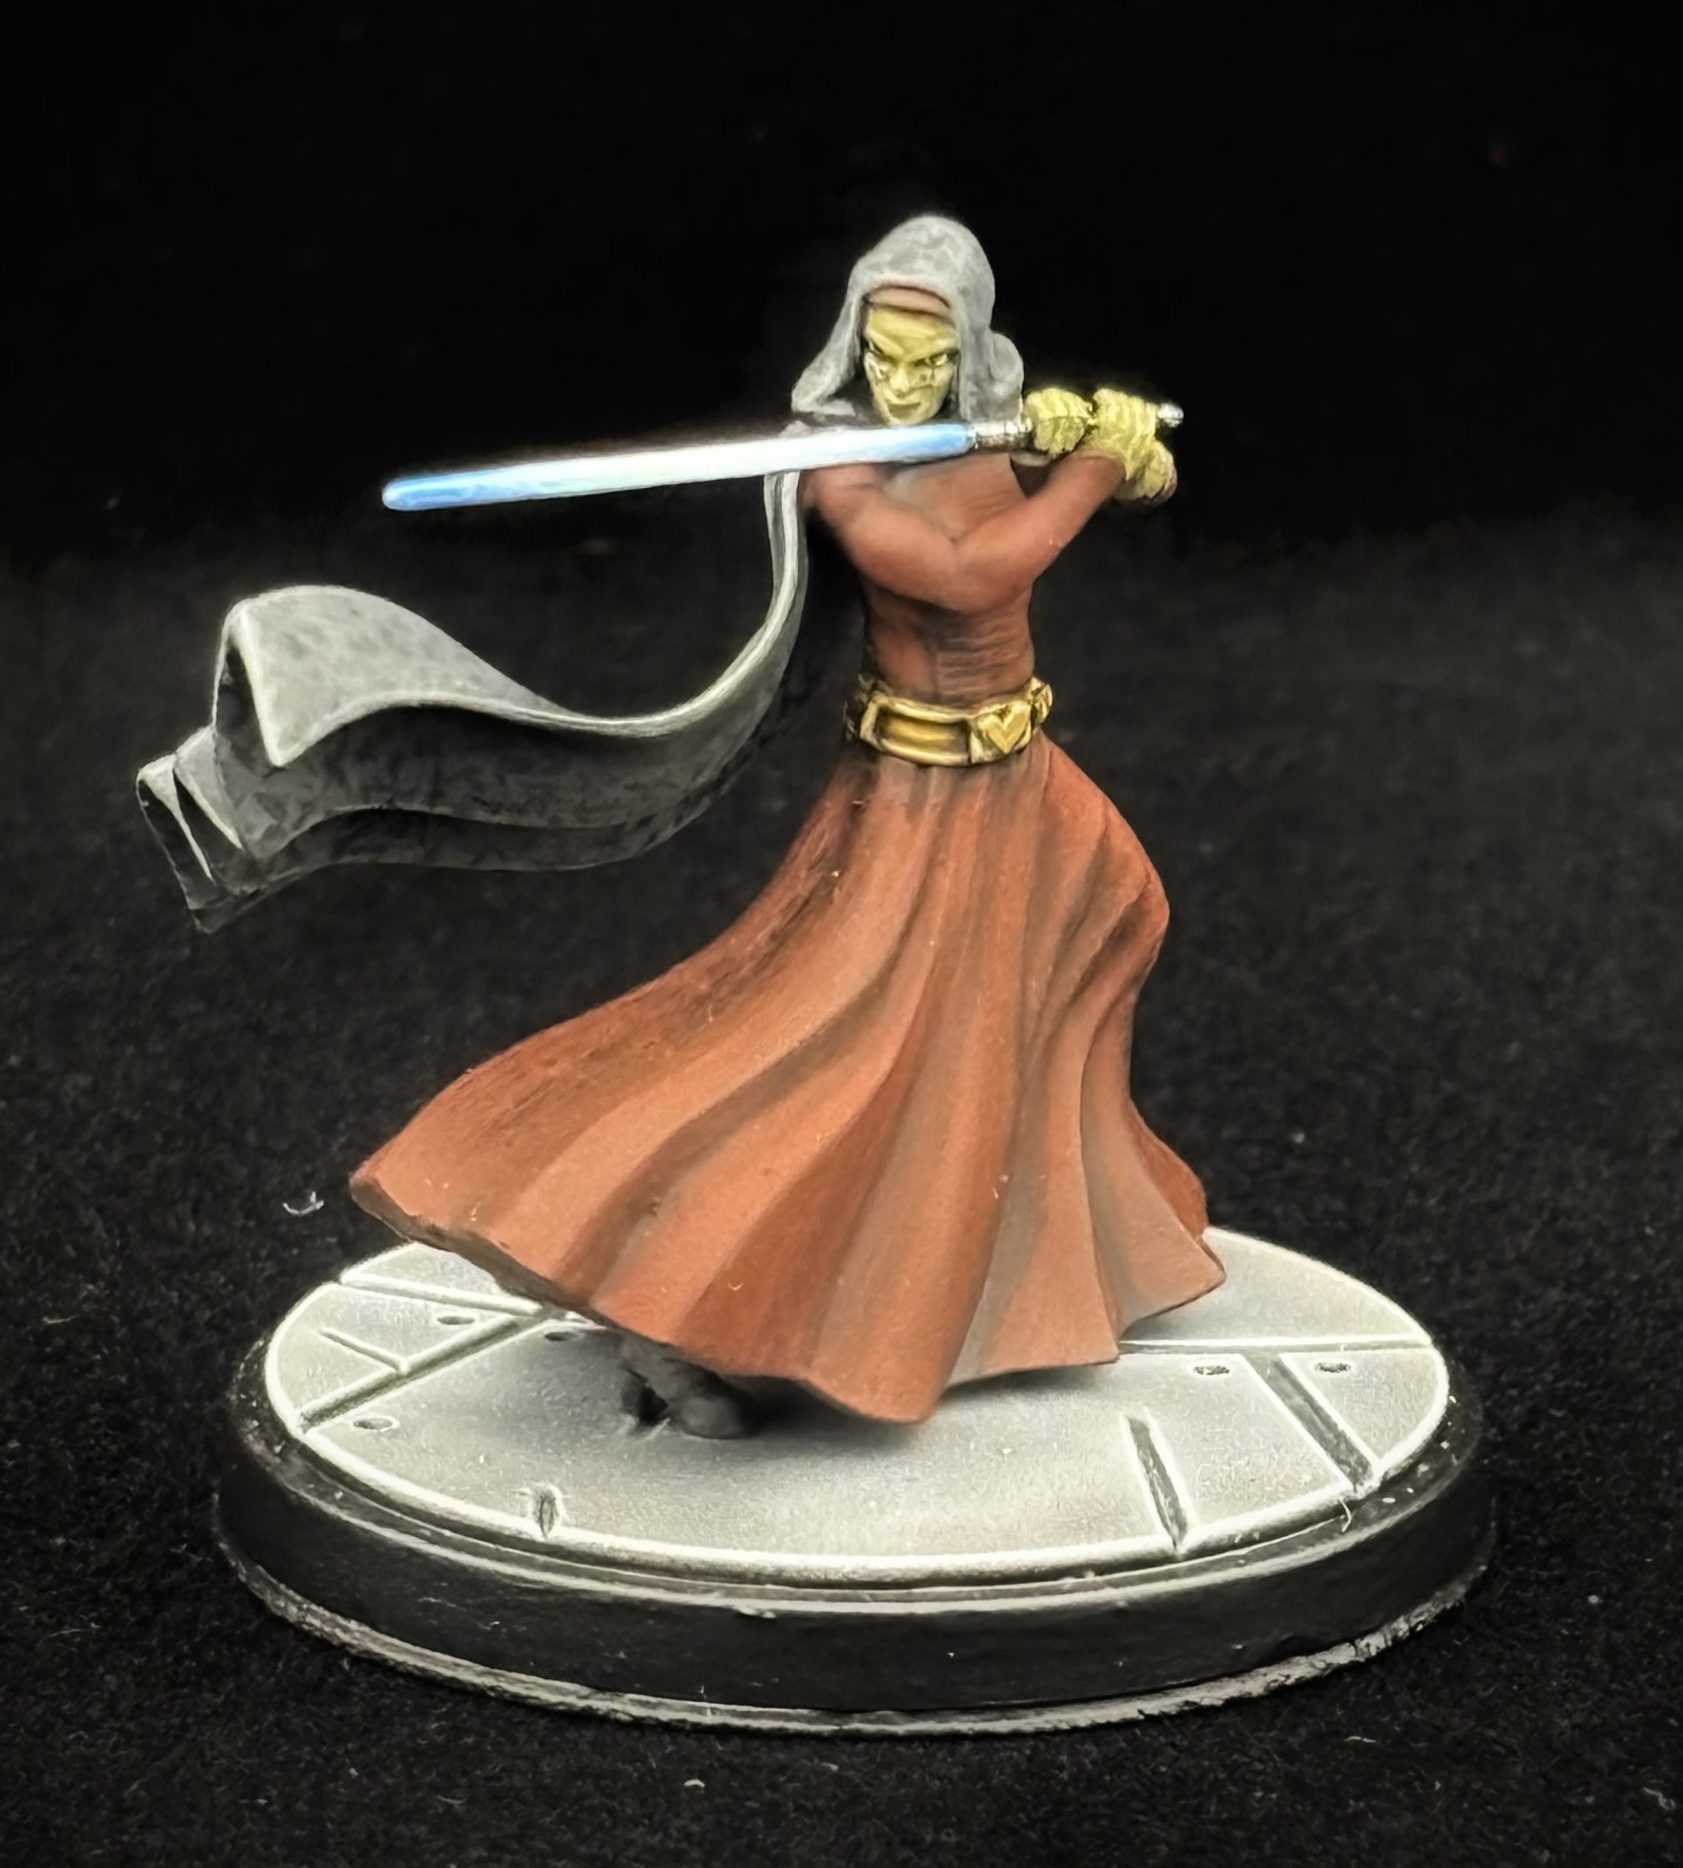
Barriss Offee, Jedi Padawan
Barriss Offee, Jedi Padawan. Credit: WakeDrannor
What a character arc Barriss Offee ended up having, huh? I’d never have guessed she’d end up being such a fan favorite from her first appearances, but she has really won me (and many others) over. I was even more surprised to discover how much fun she is to play in Shatterpoint! She’s got an amazing kit, bringing displacement, dice boosts, and an amazing ability to get just about anywhere on the table in a single activation…some people are sleeping on my girl here, let me tell you. Let’s get her painted up and on the table so you can see for yourself!
Barriss is a very simple model in a lot of respects- her robe and cloak cover 90% of the model! Painting her up is pretty easy, but a word of caution- I strongly recommend painting Barriss with her lightsaber separate. You can attach the lightsaber and then paint it once the rest of the model is done if you want (I did), but you are going to find painting her, especially her face, much easier if it is not attached until that final step.
OK then, let’s do this:
Robe: This is the biggest single area on the model; fortunately AMG has given us a model with a lot of lovely folds and creases to make what could have been a boring sculpt more interesting. I opted for a strong reddish-brown color to differentiate her from her master while still staying in the same earth tones range. As a side effect, it also speaks a little bit to the reddish Geonosian soil I use for the bases, which are kind of a nice midpoint between the ochre on Luminara and the red in Barriss’s robe. Take your time with this step; it’s the majority of the model, so it’s going to take a bit, but it’s worth it. You can also- as I have- employ some slightly “chunkier” highlighting here to emphasize the folds, as long as you follow their lead. I also used this color for the little tip of the headdress underneath her hood. (Base: PA Mahogany; Highlights: PA Burnt Sienna and Citadel Doombull Brown in increasingly lighter layers.)
Cloak: This is deceptive; Barriss has this really cool textured grey cloak that is not sculpted (and honestly, I’m not sure how they could have without it looking terrible). Painting it is easier than it looks, however. Start with a darker grey color and highlight up as normal, but leave it a little “flatter” than you normally would across the cloak, and do your edge highlights a little sharper than you otherwise would. This will all make sense in a moment. (Base: Eshin Grey; Highlights: Mechanicus Standard Grey, Administratum Grey)
Once you’ve got the grey done, take some thinned down black paint or your Contrast/Speedpaint of choice (I used Citadel Black Legion) and just start working some hatches and geometric designs onto the flat areas of the cloak. This is going to be time-consuming if you want it done right, but it’s not actually hard. I mostly used little shallow “t,” “E”, and “V” shapes. Trust the process and go SLOW until you’ve filled the area. You want something that reads as texture from the table and is interesting up close, but you’re not actually trying to create any specific shapes to get this effect- just the suggestion is enough.
Barriss’s Belt and Lightsaber Metals were painted just like Luminara’s, above.
Lightsaber Blade: Just like Luminara’s, but blue. See the aforementioned Hello, There! HTPE for this exact process, as Barriss’s lightsaber matches Obi-Wan’s. (Colors Used: PA Blue, PA Sky Blue, PA Bold Titanium White, Pylar Glacier contrast, Guilliman Blue glaze)
OK, let’s talk skin tones for these ladies. Miralans range from green through yellow and all the way to purple, according to Wookieepedia. Despite their similarities, Luminara and Barriss’s are different, with Lumi leaning towards the greener end of the scale and Barriss looking more yellow. Perhaps a side-by-side will help:
Luminara and Barriss. Credit: WakeDrannor
Barriss is actually more yellow on the TV show, while Lumi skews more towards kind of a yellow but still clearly green color. I leaned Barriss a little more towards her master’s skin color in my version, trying to keep them distinct but a little more visually tied together than they are on TV.
Luminara: I used Straken Green for the base for Luminara, but then leaned more into the green for my highlight layers. (Base: Straken Green; Highlights: mix in progressively more Skarsnik green, eventually mixing in just a touch of a neutral grey of choice- or the tiniest bit of white if you’re super careful- for the final highlight.)
Barriss: I started with Straken Green here, too, but then went down the yellow-green route. It wasn’t intentional- maybe my brush was drying out or something?- but I ended up being a little harsher/choppier on these highlights than on Lumi, who was very smooth. Perhaps I was subconsciously channeling the fact that Barriss is a less-polished woman than her master, one more vulnerable to extremes of emotion. Who knows? I’m quite happy with the effect, regardless- sometimes in painting, accidents are your best friend. (Base: Straken Green; Highlights: mix in Militarum Green and eventually Nurgling Green for the final layer.)
Tattoos: Both Jedi have tattoos that are an important cultural record of a Miralan’s accomplishments; Luminara’s on her chin and Barriss’s on her cheeks. Now, you could agonize over trying to use a microscopic brush to render these in exacting detail…but I didn’t. I used the same thinned black paint I used on Barriss’s cloak to put a trio of black diamonds on each of Barriss’s cheeks and to dot the pattern on Luminara’s chin and called it a day- the overall effect creates the look perfectly from the tabletop, and honestly trying to do more could end up making the model look too “busy” and detract from the overall effect unless you’re an absolutely ridiculous painter, at which point you don’t need my notes on how to do this anyways!
Eyes: I’ve heard many people claim the correct way to do eyes is paint them black and dot in the white. I’ve never been able to get the hang of that. I paint eyes by painting the area where they will be in dark brown or black, then painting the eyes white and dotting the pupils with my tiniest brush. Your mileage may vary.
After that, we’re on to the Clone Commandos!
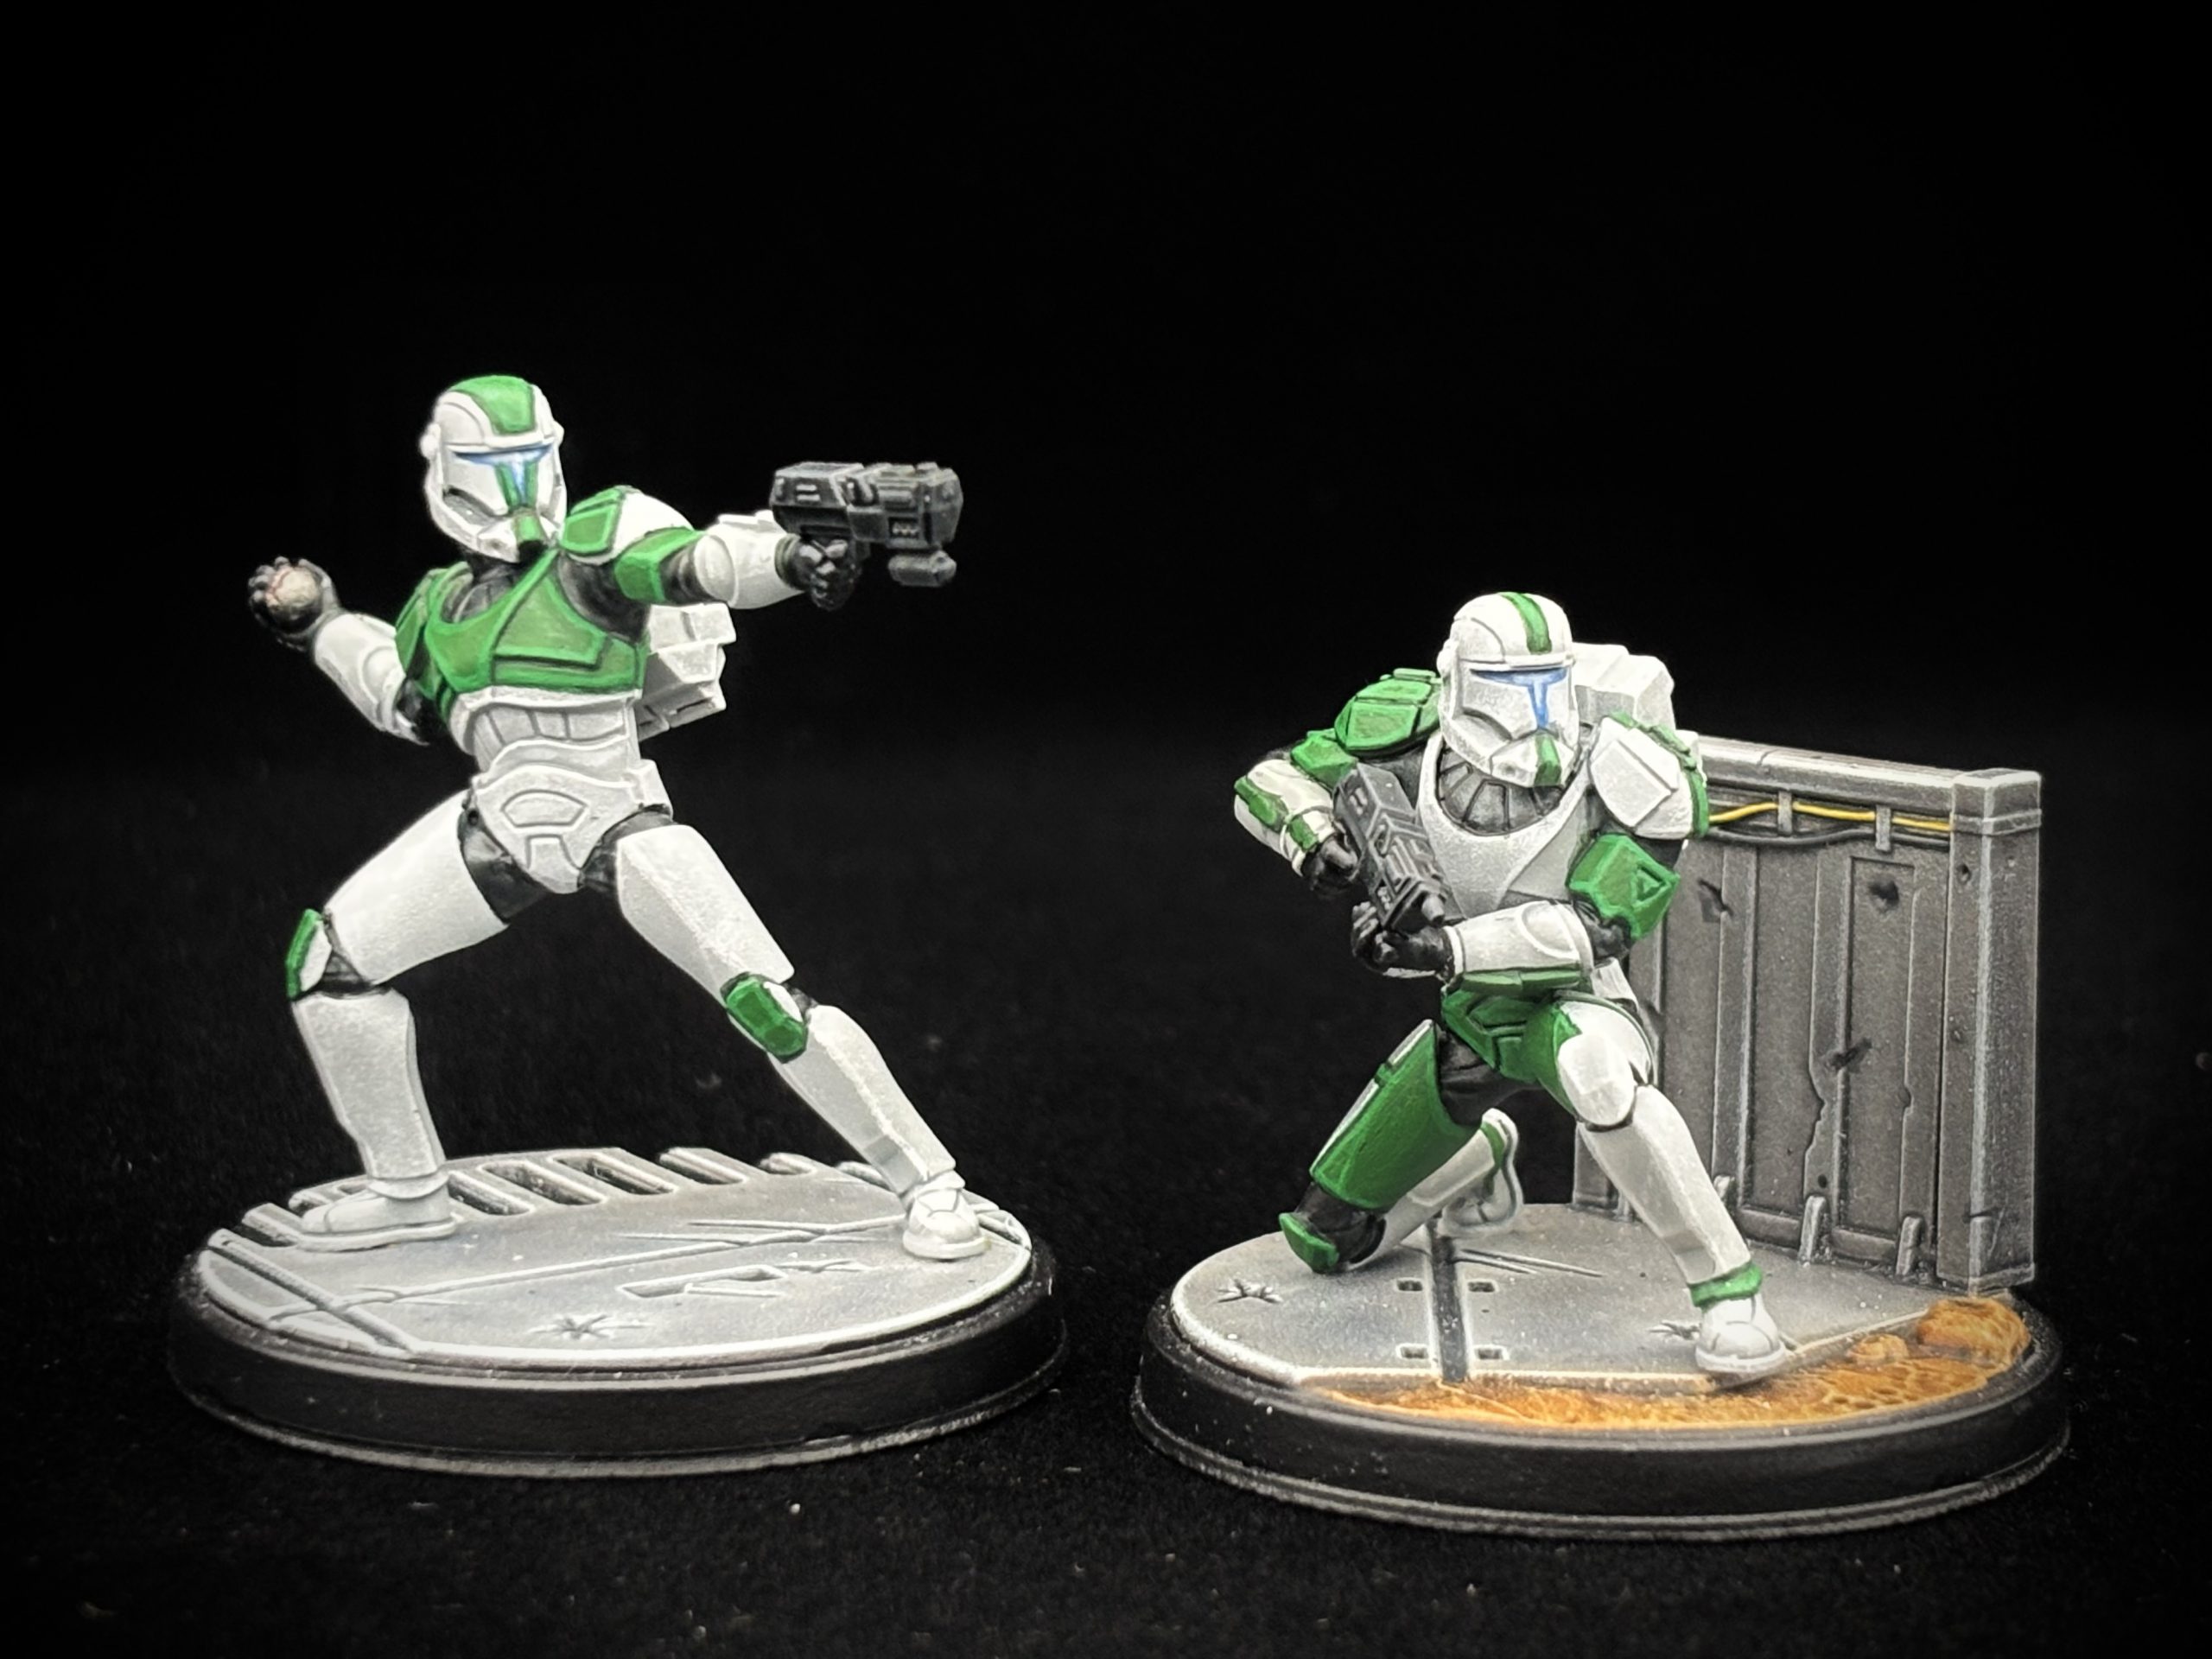
Republic Clone Commandos
Republic Clone Commandos. Credit: WakeDrannor
After our two Jedi, these are refreshingly simple. I refer you to my guide to painting Clone Armor in the now clearly over-referenced Hello, There! HTPE. Use that for the white, the black undersuits, and the weapons. This is 80% of the model, already done!
Do the grenade: I’ve decided it’s a thermal detonator, but it might just as easily be a “droid popper” EMP- in the same way you did the silver on Barriss and Luminara. If you want a little extra credit, you can do what I did and run a bit of the thinned-down yellow, red, or orange of your choice into the seam of the detonator to make it look “live” as it is when Leia is holding it in Jabba’s Palace in Return of the Jedi. Or blue, if you want the droid popper look. Or leave it metal. Whatever you like.
Ok, let’s do those visors. Unlike other clones, Commandos have active systems inside their helmets that make their Paint these a pale blue (I used PA Sky Blue), then white (PA Bold Titanium White), then glaze them thinly with a deeper blue (I used the old Citadel Guilliman Blue glaze, but you can thin any mid-or-slightly darker tone blue to work). Finally, go back and pick out the very center with thinned white to capture the glow effect, and clean up any mess you’ve made to your nice white helmets.
Lastly, time for armor markings. There are no rules here, and if you’re like me, you may be getting ready to repaint these guys, because you originally did them up as Boss and Fixer, but now Delta Squad actually exists…anyways, I decided to go with green, because Luminara’s clone command is the 41st Elite Corps (you can see them in glorious action getting decapitated by Yoda on Kashyyyk at the end of Revenge of the Sith), and that’s their color. There isn’t really any official rhyme or reason to the markings on clone armor beyond color, and in fact is a big part of the way soldiers express their own individual identity, so you can kind of make this up as you go. My rule of thumb is that I block in colors one area at a time and then step back from the model to look at it as a whole, and stop when it seems “right.” All your usual rules about color arrangement, especially making visual triangles, apply here (you’ll notice my standing clone has his upper armor markings centralized and the lower armor ones out on the kneecaps, while my crouching one has the inverse- centralized on the legs and out on the shoulders). The process is simple- block in with a thinned down darker base, wash if you like but be careful because you can really easily ruin the white if you mess up, and then highlight. For my money, I usually skip the wash. What can I say, I’m cautious by nature. (Base: Caliban Green; Highlight: 50/50 mix Caliban Green and Warpstone Glow/PA Green; Edge Highlight: Warpstone Glow/PA Green)
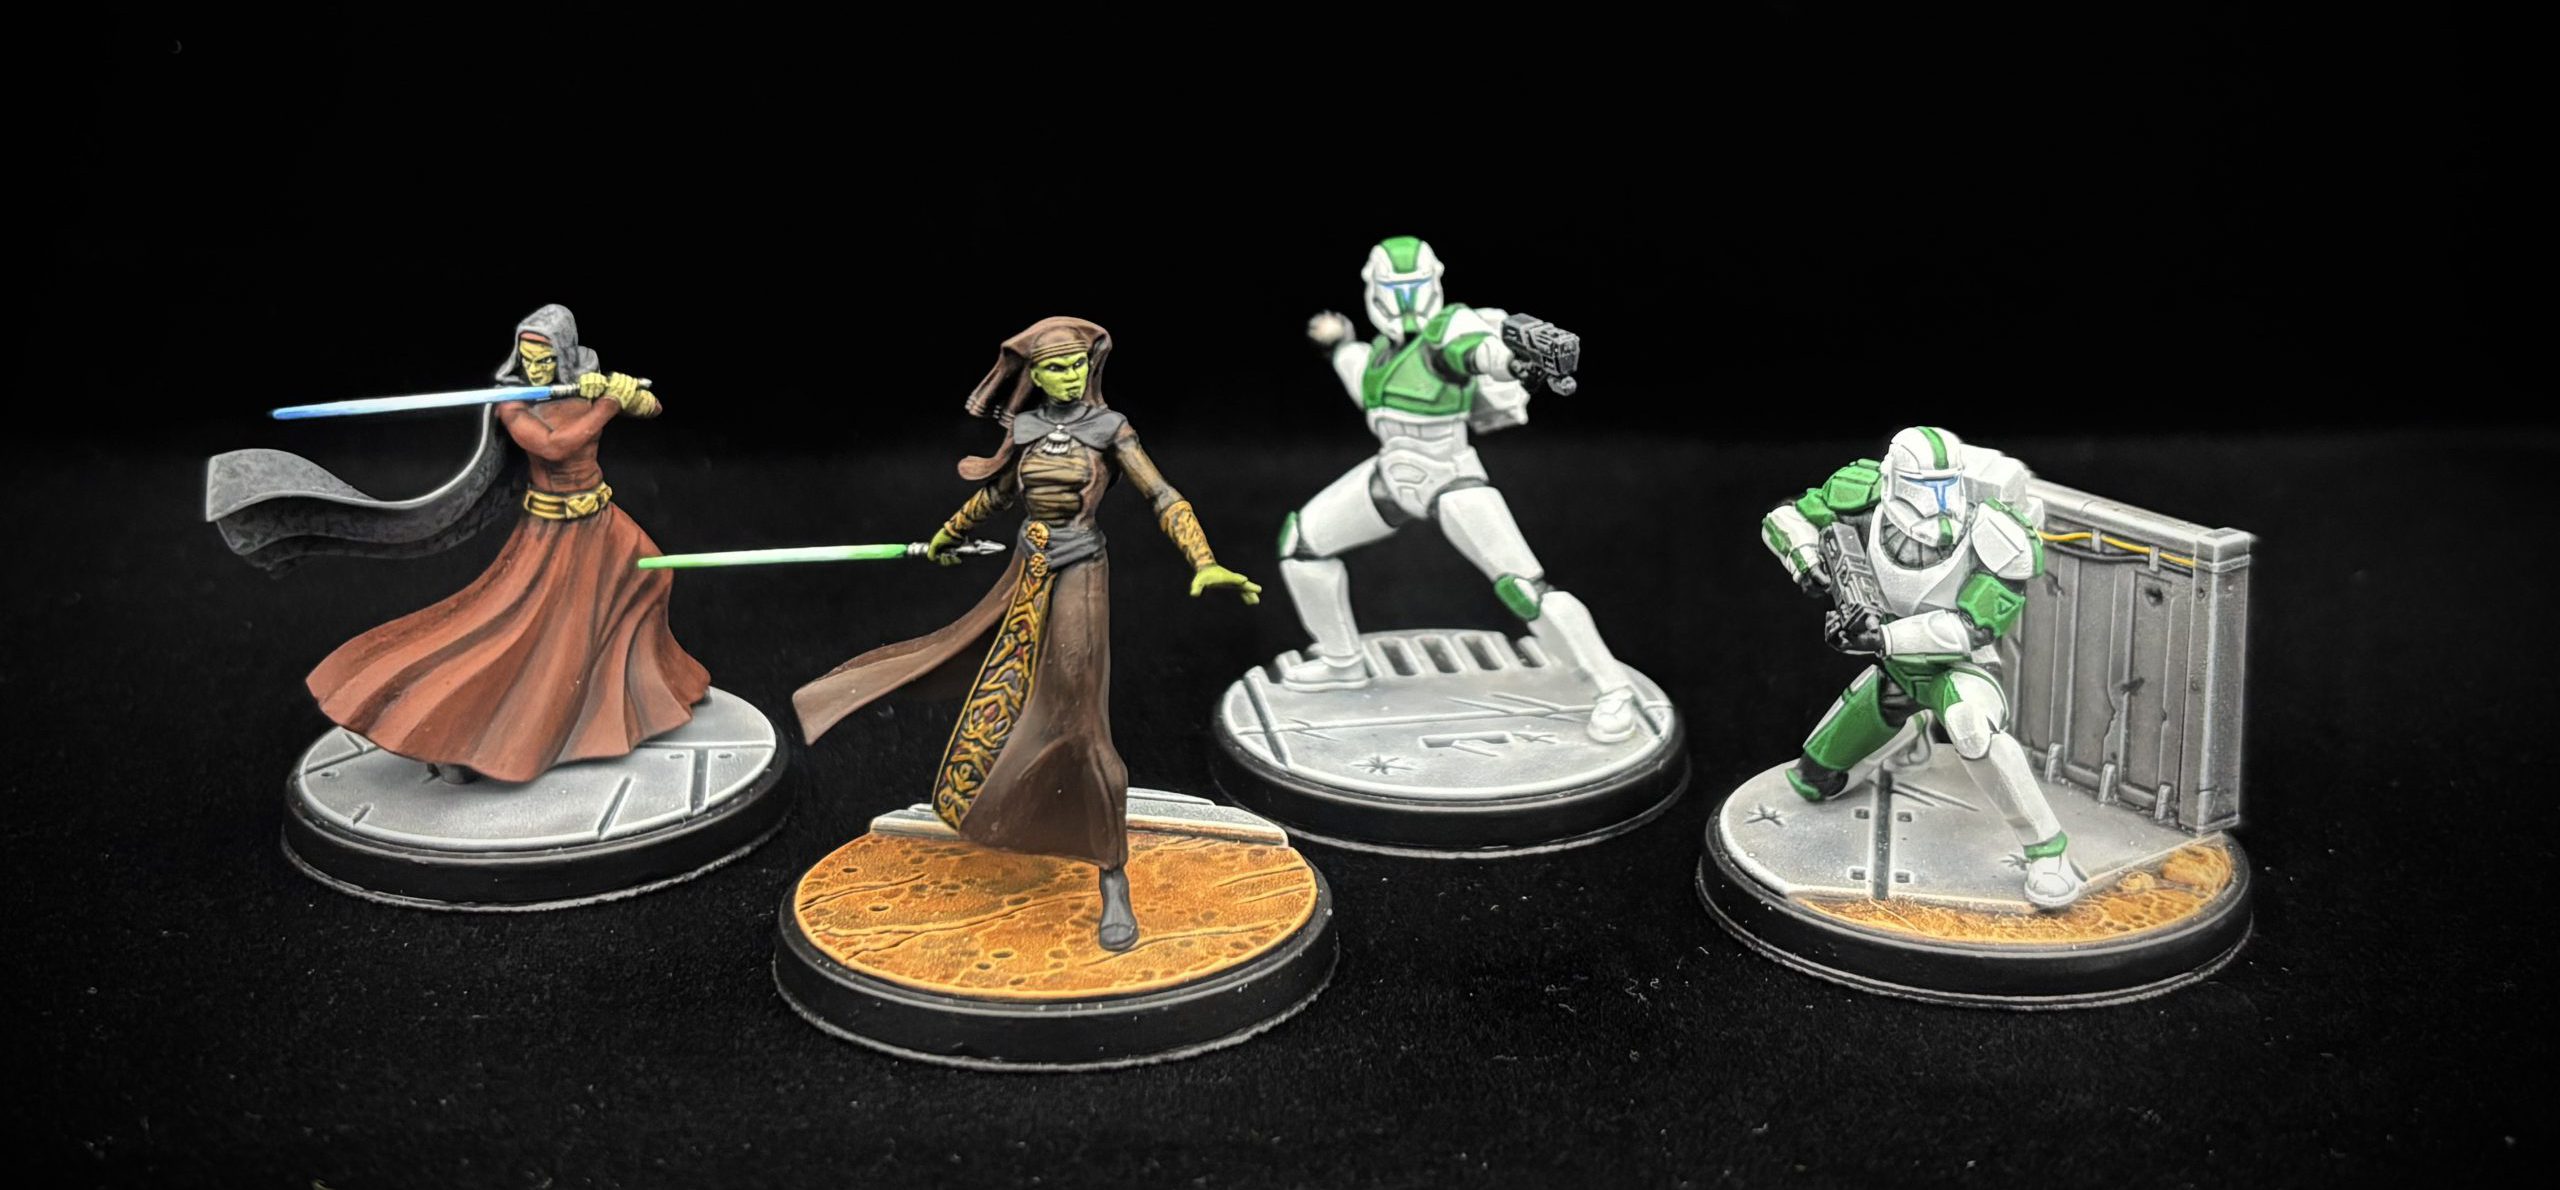
Finishing Touches
Plans and Preparation. Credit: WakeDrannor
Do the bases just like the (you guessed it) Hello, There! tutorial showed. Paint the wall to match the deck plating, then pick out the wires in either black or a splash color (I chose to do one black and the other yellow to go with the green on the armor and tie them to Luminara and Barriss's skin tones, but anything that "pops" will work). Pin them on (you really do need to pin at least one foot down, but I usually do just one for Shatterpoint) using "no frost" superglue, add a magnet to the base if you’re like me, paint the rim black, varnish, and you’re ready to defend the galaxy!
Have any questions or feedback? Drop us a note in the comments below or email us at contact@goonhammer.com. Want articles like this linked in your inbox every Monday morning? Sign up for our newsletter. And don't forget that you can support us on Patreon for backer rewards like early video content, Administratum access, an ad-free experience on our website, and subscriber-only content covering competitive Warhammer 40K!

 Jedi Master Luminara Unduli. Credit: WakeDrannor
 Barriss Offee, Jedi Padawan. Credit: WakeDrannor
 Luminara and Barriss. Credit: WakeDrannor
 Republic Clone Commandos. Credit: WakeDrannor
 Plans and Preparation. Credit: WakeDrannor

 Goonhammer App and Patron Updates: April, 2026
 Kill Team Tournament Report: Engage, Party, Repeat's March Madness 2026
 Goonhammer Reviews: Tribal Conquest