CT-9904, formerly known as Crosshair, and his squad of elite proto-stormtroopers were suitably menacing when they appeared in
The Bad Batch, and their status as the mid-point between the clone troopers and the non-clone Imperial Stormtroopers is interesting, but let’s be honest: four guys in black armor doesn’t sound like a particularly interesting painting challenge. Which is why, as much as anything else, I held off on getting the
Good Soldiers Follow Orders squad pack. But something finally came up that I needed it for, so in order to make this guide a little more interesting I thought I would try painting this squad using three different techniques.
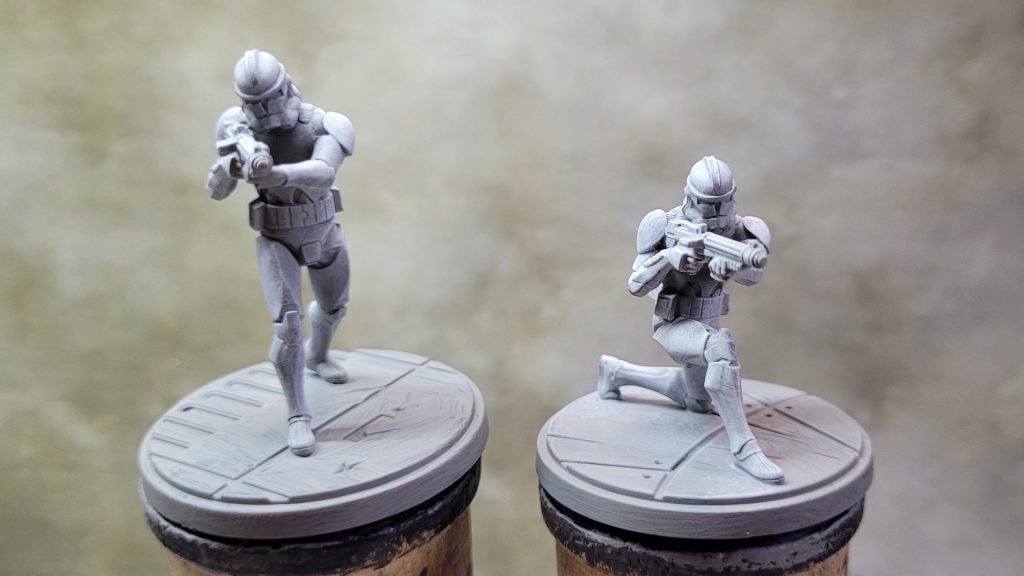
On first glance I thought it would be an additional challenge to make these four models easy to differentiate from each other, but the sculpts have done that work for me. CT-9904 and ES-04 have very distinctive weapons, plus CT-9904 is in a fairly unique pose with his foot up on a rock, so it shouldn’t be too difficult too tell them apart on the battlefield, which leaves process of elimination to identify the Elite Squad Troopers. To make that even more clear, I put the primary and secondary on bases with a mix of floor and sand, and the support models on the all-floor bases.
Do the Bases First
When painting for Shatterpoint I’ve gotten in the habit of doing the bases first: it gets what is usually the most mundane and functional part of the model out of the way, it ensures that the bases for the whole squad look consistent, and generally it’s going to be a lot easier to touch up the base if you need to after painting the model, than it will be if you need to touch up the model after painting the base. Although in this particular case that might not be true...
After priming the entire model (I’ll talk about that more when we look at the individual figures), I painted the entire base in Army Painter Deep Grey. After letting that thoroughly dry, I drybrushed a heavy layer of Uniform Grey followed by a lighter drybrush of Ash Grey. Then I went back into the seams between the floor panels in Deep Grey to darken them a bit.
For the sandy areas on the bases that have them, I started with a coat of Army Painter Leather Brown, then a heavy drybrush of Wasteland Clay, trying not to get too much on the metal floor where it meets the sand. I followed this with lightly drybrushed layers of Barren Dune and Ancient Stone. I touched up the floor areas with some Uniform Grey on the areas where the sand colors had splashed over. Finally, for all four bases I went over the edge in Army Painter Matt Black.
Elite Squad Troopers: Army Painter Speedpaints
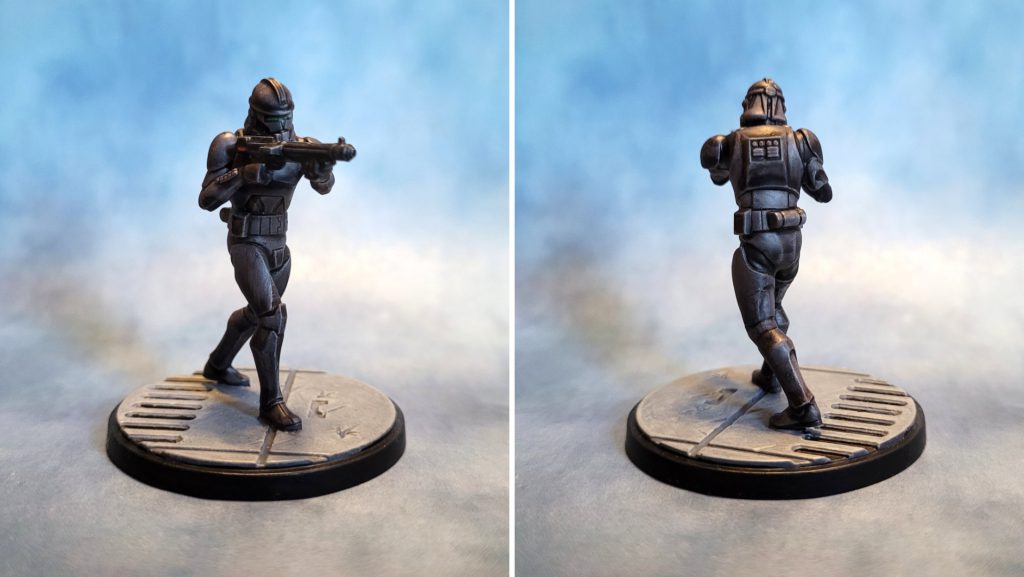
 Elite Squad Troopers painted for Star Wars Shatterpoint by Jefferson Powers.
It’s not often that I paint an entire model using only Speedpaints – I tend to use them as one of may tools in my toolbox. I normally use Speedpaints in the “slap chop” style (although I have never liked that term, it sounds like a kitchen gadget) – starting with black primer and doing a few heavy drybrush layers in light grey or white to create a base coat of midtones, highlights, and light sources. I think I favor this technique because of my preference for using black primer, but I am coming around to the idea that Speedpaints work best when used as they were designed, over a white (or at least very light) base coat.
 White drybrush over a mid-grey primer gives us a less extreme undercoat than we would if we started with black.
For these models I decided to split the difference: I started with Army Painter brush-on primer, which is a warm mid-grey, and followed that with a heavy drybrush of Reaper Pure White. This gave me a fairly light base coat that would make better use of what Speedpaints are designed to do, while still retaining underlying shadows and highlights. I also find this very helpful for revealing detail in the model before I start applying color. The drybrushing also adds a bit of “scratchy” texture that will emulate the
Clone Wars/Bad Batch animation style.
In reviewing “Replacements,” the
Bad Batch episode that introduces Crosshair’s elite squad, It became clear that their armor is in fact dark grey rather than black. This might not seem like much of a distinction, but it does give is a lot more leeway when painting these characters. One of the things that helps break up the white-armored clone troopers and stormtroopers is the black joins between the armor pieces – with the Elite Troopers’ armor being grey rather than black, we can do that here too.
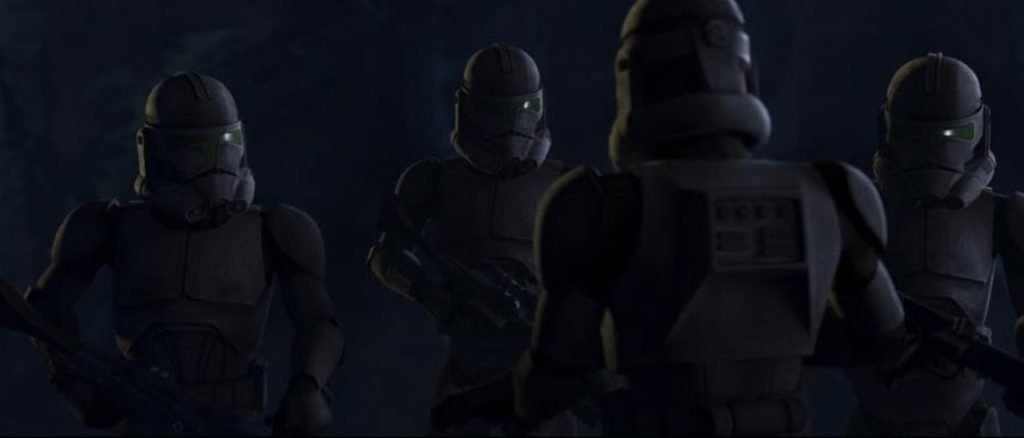 Image from the Bad Batch episode "Replacements." © Disney/Lucasfilm.
After giving the base coat time to dry, I started the two Elite Troopers with a head-to toe coat of Gravelord Grey speedpaint (other than the weapons). I have found that this particular Speedpaint color dries a lot darker than it initially goes on, but nevertheless, once dry I found it to be a little too light for my liking. So I gave it a second coat of Gravelord Grey, this time mixing in a few drops of Speedpaint medium to thin it a bit.
I waited for the second coat to dry and was happy with the results for the most part. There were a few areas here and there where the Speedpaint had pooled in ways I didn’t like, but I would touch those up later. Next I went over all the armor joins with Grim Black to make them visibly darker than the armor itself. I also painted the weapons in Grim Black.
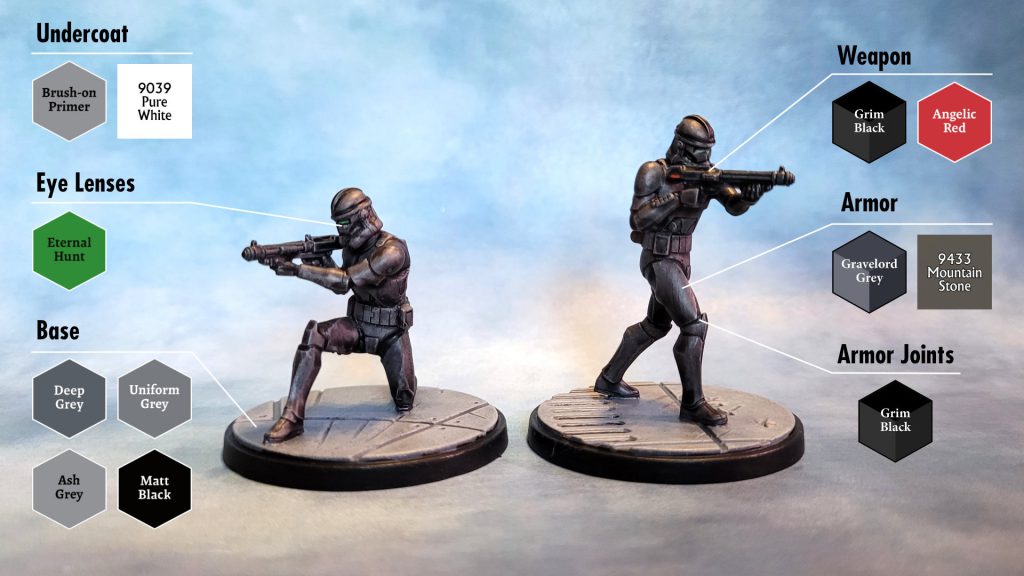 Photo & color guide by Jefferson Powers.
As I mentioned earlier, I had noticed a few areas of the armor I wanted to touch up, which I did after giving the Speedpaint several hours to completely dry. The warm grey primer under the Gravelord Gray gave it a slightly warm tone, so I used Reaper Mountain Stone to fill in areas where the Speedpaint had pooled awkwardly, or where the Grim Black had splashed onto the grey armor.
At this point I was more or less done, but the Shatterpoint artwork for this unit suggested a few splashes of color that might make these guys look a little more interesting. I added a bit of Army Painter Eternal Hunt green to the helmet visors, and just a little block of red to the weapons, touching up around the edges of the color with Army Painter Matt Black.
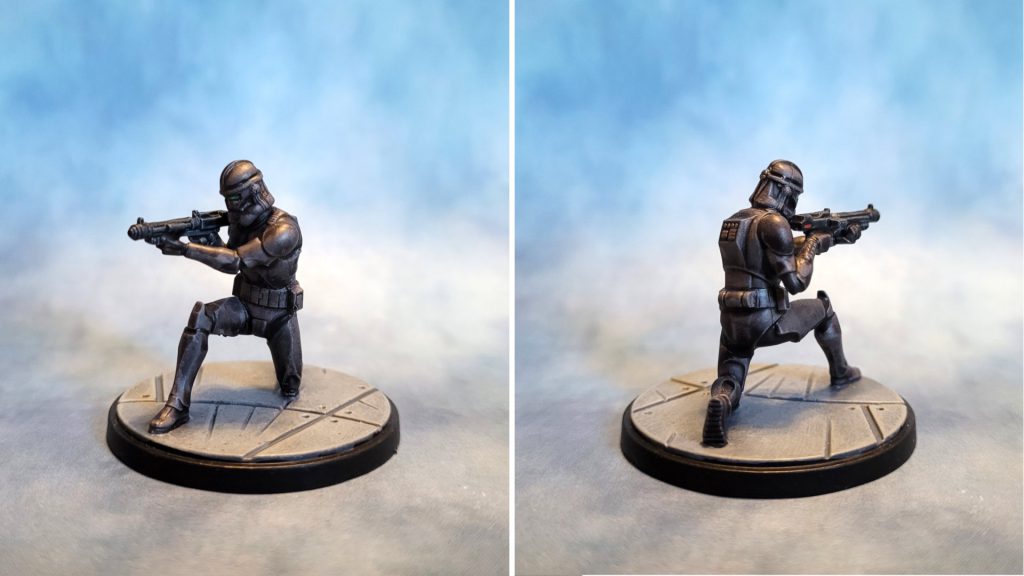
ES-04, Firebrand: Layered Drybrushing
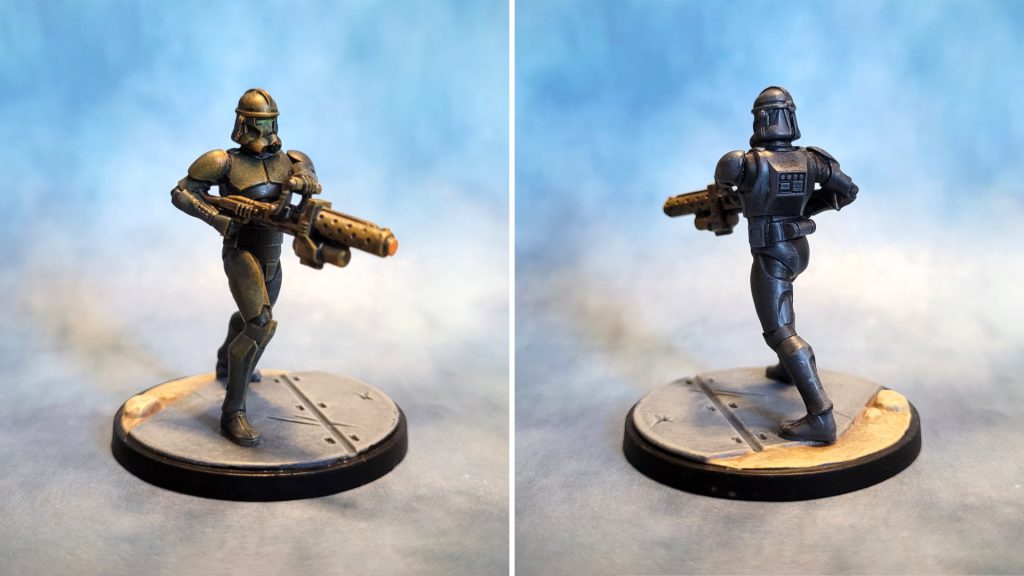 ES-04 Firebrand painted for Star Wars Shatterpoint by Jefferson Powers.
This is more-or-less my standard painting method, and if I was going to do all four of these models the same way this is probably how I would do them. I started with a base coat of Vallejo black brush-on primer. After letting that dry overnight, I drybrushed the entire model with a heavy layer of Army Painter Deep Grey followed by a lighter layer of Uniform Grey to catch some highlights on the armor.
Just like the previous models, I went over the armor joins in Grim Black Speedpaint – this works great for clone trooper and stormtrooper models because the Speedpaint naturally pools in the recessed areas, while retaining a slightly lighter highlight in areas where we can see a lot of join, like around the knees and the crotch.
I painted the weapon in Army Painter Gun Metal and, after letting it dry, gave it a Dark Tone wash. I have gotten into the habit of thinning my washes with a drop or two of Speedpaint Medium – I find that it improves the flow a little and prevents it from drying too blotchy over smooth areas, which it sometimes does otherwise.
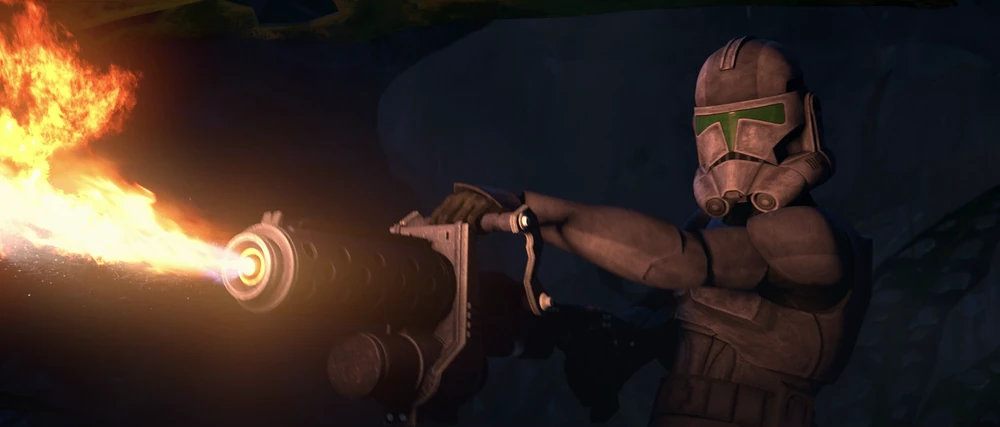 Image from The Bad Batch episode "Replacements." © Disney/Lucasfilm.
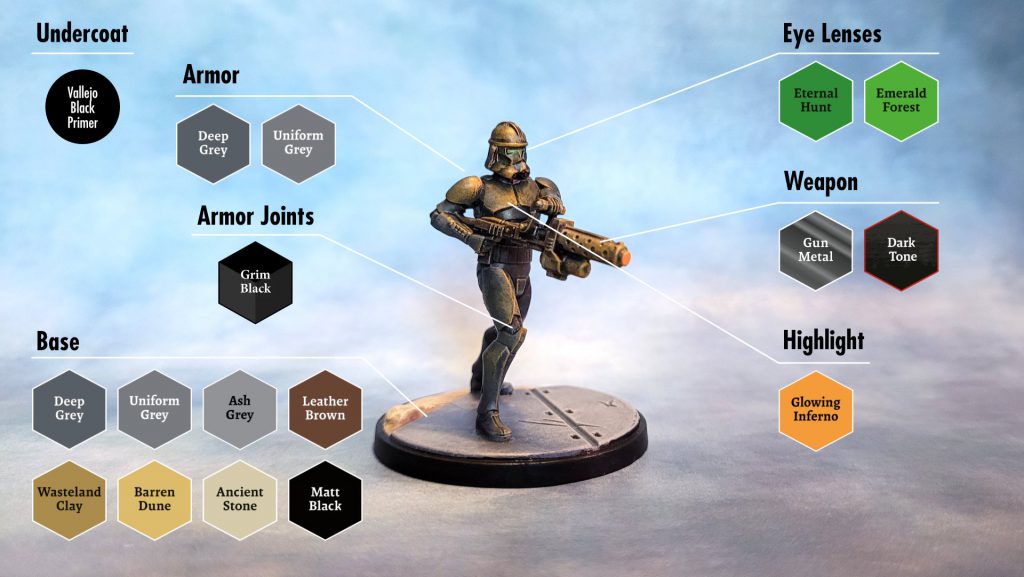 Photo & color guide by Jefferson Powers.
This model has larger visible eye lenses, so in addition to Eternal Hunt I added just a dot of Emerald Forest to each eye to create a subtle glow effect. Finally I drybrushed some highlights using Army Painter Glowing Inferno to simulate the fire coming out of the weapon, and added a dab of the same color to the front of the barrel. It created a nice bit of object source lighting, and will help distinguish this model from the others on the tabletop.
CT-9904, Elite Squad Leader: Triad System
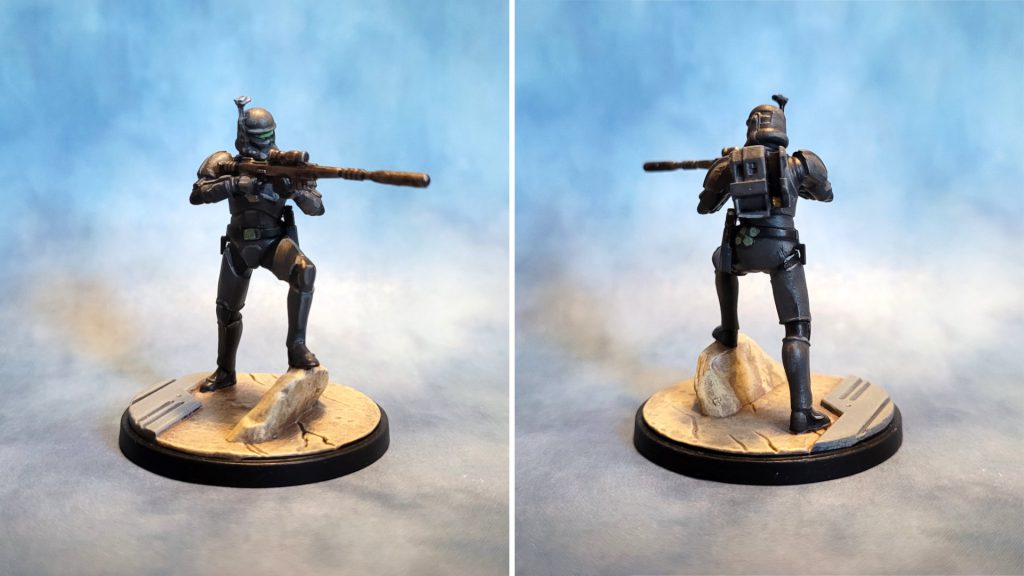 CT-9904 Elite Squad Leader painted for Star Wars Shatterpoint by Jefferson Powers.
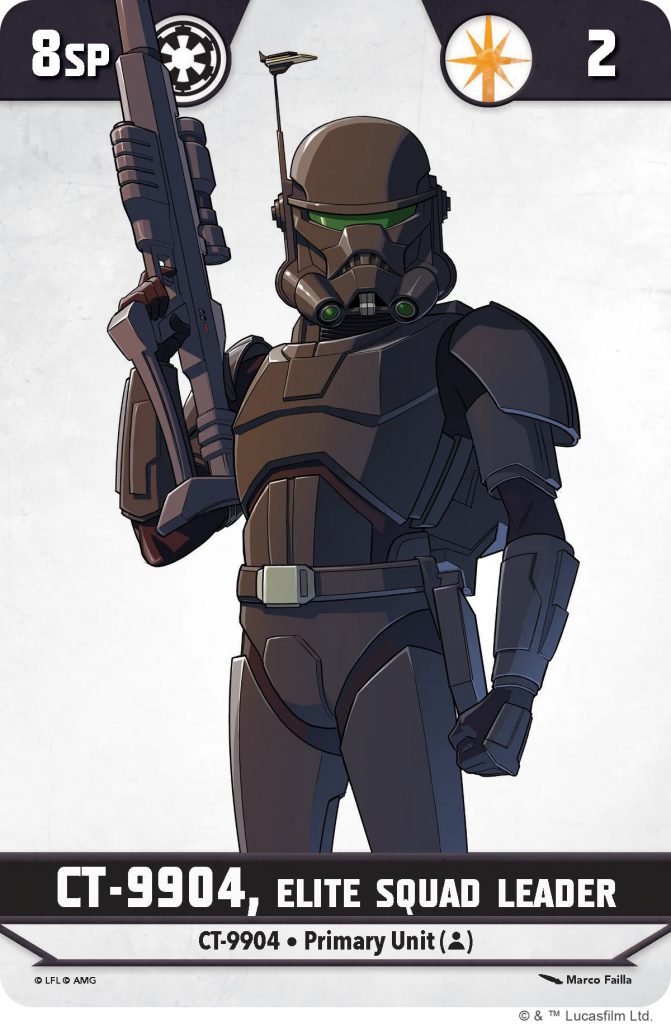
For the Elite Squad Leader I decided to go for a flat, 2D animated look, similar to what I did with the
Wisdom of the Council squad pack. The triad painting system, using three different shades of the same color to build up from shadows through mid-tones to highlights, would be perfect for this approach. The stat card artwork is done is this style and would make an excellent color guide.
 CT-9904 Elite Squad Leader stat card artwork. © Lucasfilm © Atomic Mass Games.
Again starting with Vallejo black brush-on primer, I chose Army Painter Matt Black and Reaper Mountain Stone and Wolf Grey as my color triad for the armor. I mixed just a touch of black into the Mountain Stone to create a dark warm grey, which I used as the shadow color. I then used straight Mountain Stone for the mid tones, using the stat card artwork as a guide for where to put the lighter grey. I followed that up by adding just a few highlights here and there with Wolf Grey, and filled in the armor joins with Matt black followed by just a touch of the dark warm grey mixture, mainly on the fingers and a few of the wider armor join spots.
At this point I found that what I had was a little lighter than I was hoping for – I would need to course-correct. I added a few drops of Warpaints Stabilizer to the dark grey mixture I had made for the shadow tones. This created a warm grey glaze, which I brushed over all the armor areas. Once dry, this had the effect of both darkening down the grey armor a little and also smoothing out the blends between the three different grey shades. I re-did a few of the highlights and was pretty happy with the end results.
I finished up with a few details: I painted the weapon in Army Painter Gun Metal followed by a Dark Tone wash, and did the eye lenses in Eternal Hunt and Emerald Forest. I noticed that the stat card artwork had his belt buckle in a greyish green, so I used Reaper Mossy Green and Army Painter Olive Drab to replicate that (I also used it for a few other details on the belt.
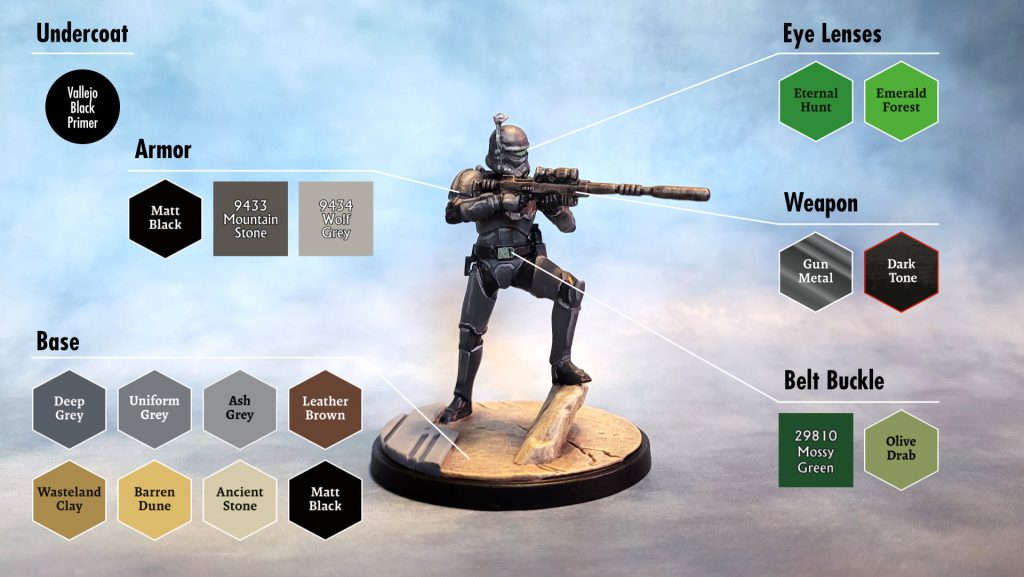 Photo & color guide by Jefferson Powers.
Final Touches
I finished each model with a coat of Army Painter Brush-on Matte Varnish. This actually has a satin, almost semi-gloss finish which I think works great for futuristic armor.
I won’t say that this was the most fun I’ve ever had painting Shatterpoint models, but these certainly weren’t a chore to do. Any one of these approaches should get your Elite Squad Troopers ready for the table in no time at all.
Thank you for being a friend.


 Goonhammer App and Patron Updates: April, 2026
 Kill Team Tournament Report: Engage, Party, Repeat's March Madness 2026
 Goonhammer Reviews: Tribal Conquest