 Credit: Evan "Felime" Siefring
 Credit: Evan "Felime" Siefring
The easiest way to explore the process of painting an inquisitor is through a model. I'm mostly going to talk through rationale on this model, and append the paint recipes at the end.
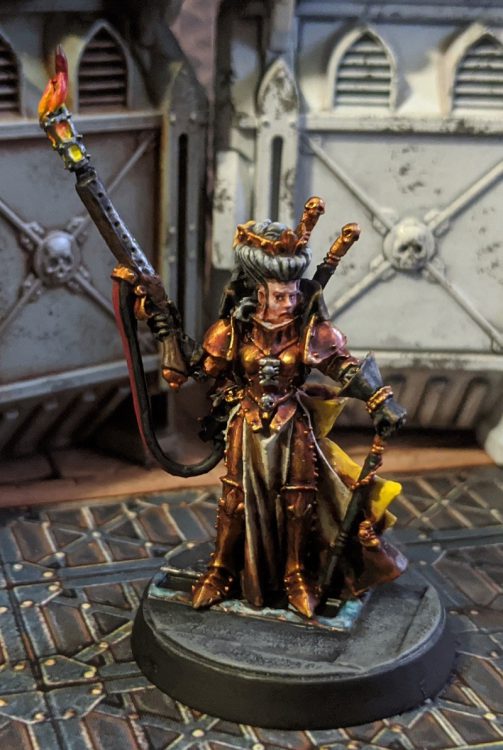
This is one of the ancient inquisition sculpts that came out with the original witch hunters codex, and probably one of my favorite models GW has ever produced. It's out of production, but I managed to through made to order. It's a touch small by modern standards, and there's a few spots that are slightly iffy, but like many of that batch of models, it exudes character. At least to me, the direction to go with this model was pretty obvious from the start.
With her massive hair and baroque armor, this isn't someone who stalks the gutters. She blends in flawlessly among the upper crust of the Imperium, rooting out decadent cults and traitorous schemes among the nobility. Her equipment is worn and weathered, but impeccably looked after. Appearances must be maintained, even when battling cultists in the wreckage of a grand ballroom.
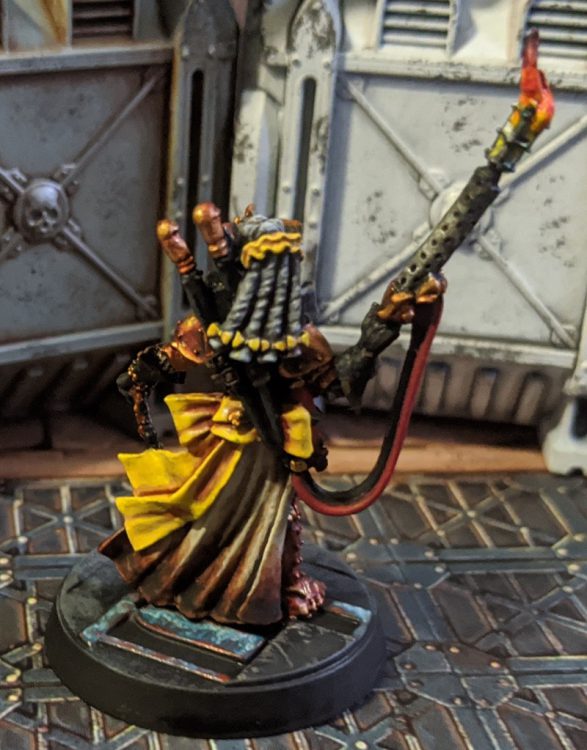
Her robes and armor were the first parts of the color scheme I nailed down. I really wanted to do a deeply shaded gold armor, as well as try out some glazing to do the transition on the robes. The wig screamed powdered to me, so I decided on grey for that. A pale skin tone seemed appropriate for a noble spending most of her time indoors and and was fairly convenient for making the face a focal point. From there, the main color to decide on was the bow. As the warm, gold armor was so dominant on the model, I didn't want to clash with that. I considered red, but it was a bit stereotypical. I think the yellow worked out well, harmonizing with the other colors, being appropriately attention grabbing for a noble, and also lending a slightly more delicate and feminine look to the entire composition.
Paint Recipes:
- Gold: Retributor Armor with one coat of Guilliman Flesh all over, followed by successive, targeted washes of Reikland Fleshshade in the recesses to deepen the shadows.
- Robes: Several Coats of VMA Sand(Ivory) to achieve a uniform color, followed by an overall wash of Agrax Earthshade. I applied many successive glazes of Agrax, covering less and less of the tabard each time to achieve a smooth transition. At the end of the process I touched up a few places at the bottom of that were still a bit too light with VMA Burnt Umber.
- Hair: I completely forget what greys I used for this, but I painted the entirety of the hair with a mid-grey, washed with Nuln Oil, rehighlighted with mid grey, then worked up with white added to the grey for highlights.
- Yellow: Several thin coats of VMC Yellow Ochre to achieve a smooth finish, followed by Reikland Fleshshade. A highlight of Yellow Ochre mixed with VMC Deep Yellow was used to tidy up the shades, then several glazes of Deep Yellow were used to highlight. The yellow is transparent enough to work as a glaze with normal amounts of water to thin it.
- Leather: VMC Black, highlighted with Skavenblight Dinge and Gorthor Brown, and shaded with Nuln Oil.
- Flame: Painted white, then covered with thinned VMC Deep Yellow, followed by VGC Flame Orange and Evil Suns Scarlet further and further up the flame. I didn't let everything dry, so they blended together slightly. Finally, after they had dried completely, I added some thin black paint to the tip to give it a smokey look.
- Steel: Vallejo Mecha Air Dark Steel, Shaded with Nuln Oil, then sparingly highlighted with Vallejo Mecha Air Steel. The blackening on the inferno pistol was achieved with several washes of Nuln Oil.
Case Study - The Stranger
Now let's look at the process from a different perspective, starting from an unpainted model and walking through the rationale and steps.
 Credit: Evan "Felime" Siefring
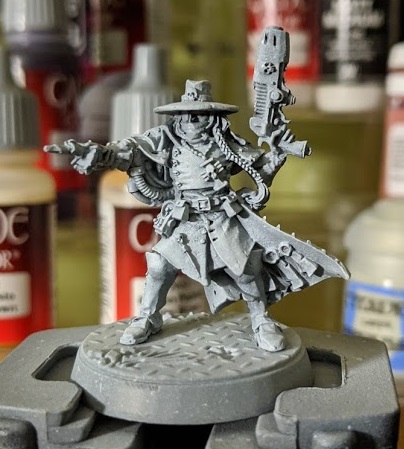
This model is an old limited edition model games day model I managed to pick up. (A similar model is still available from GW
here, despite the sculpt being old enough to vote.) I've zenitally primed the model to help me take stock of everything, but don't despair if you lack an airbrush, this isn't one of
those tutorials.
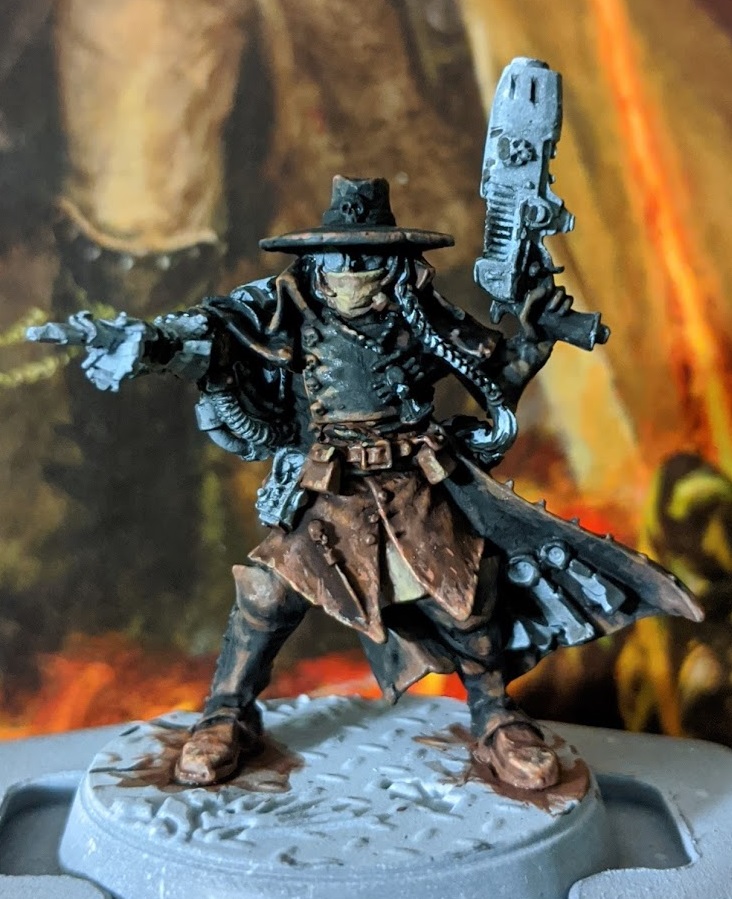
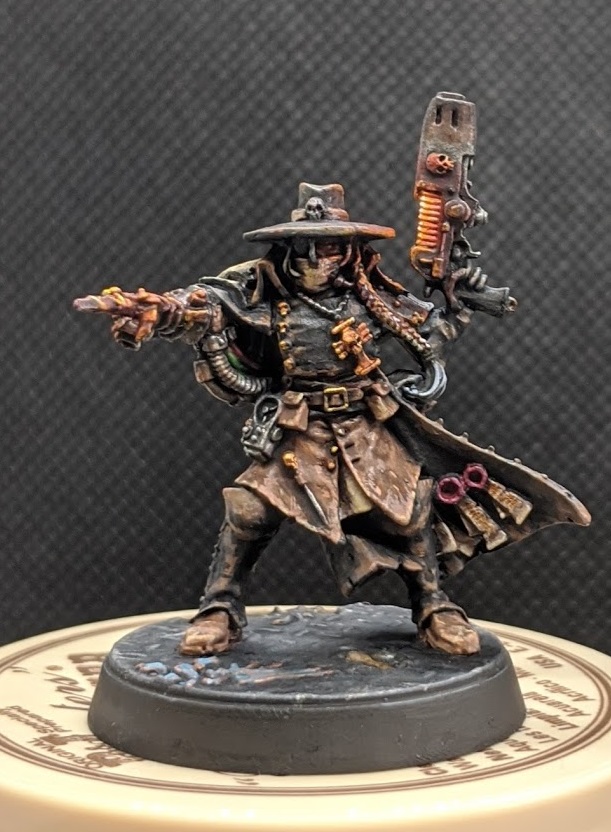
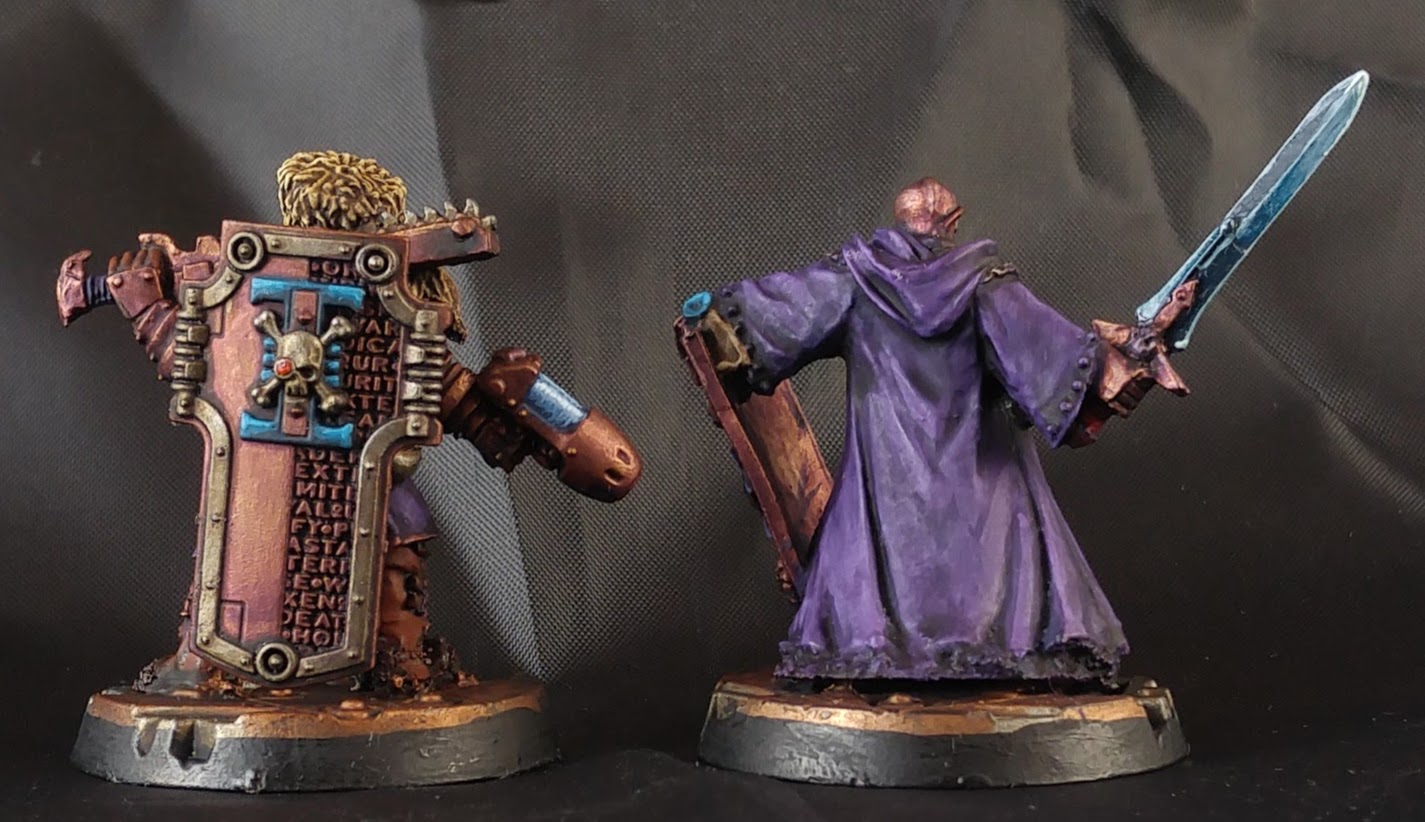
While this model was originally meant to represent Gideon Lorr, a puritanical witch burner, this model speaks to me. On a deep, spiritual level. It whispers grungy tales stalking mutant gangs in the underhive. Tales of dangerous alleys and dodgy characters. This guy doesn't operate in the open, and his equipment is battered and well worn.
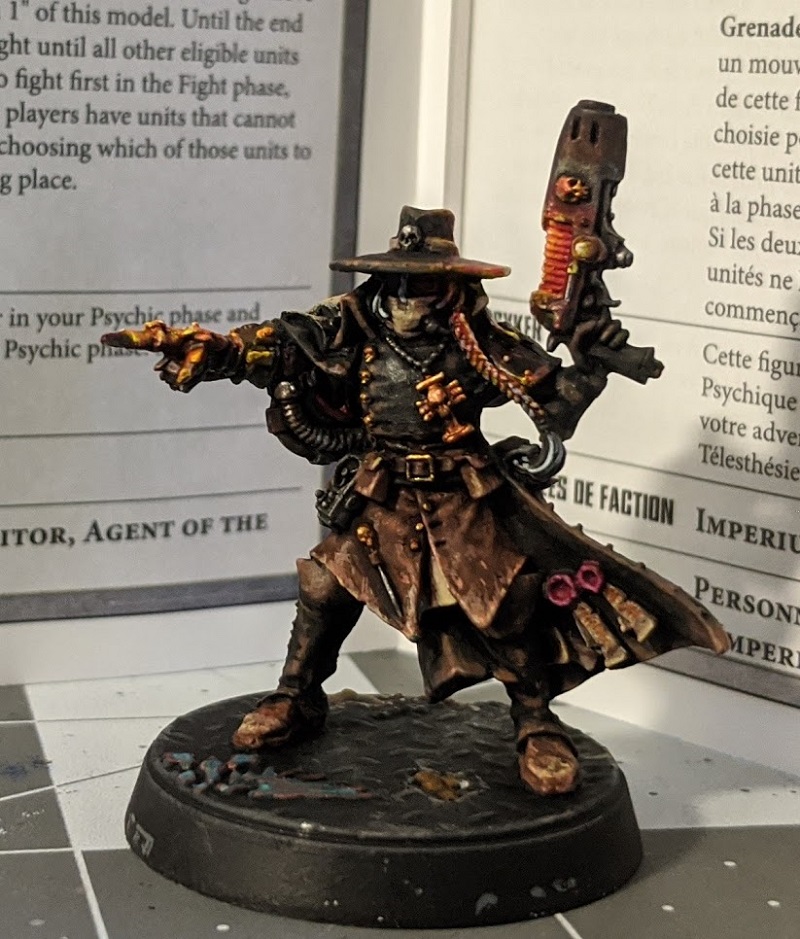
Eventually I settled on a scene to base my paint choices around. He's the man sitting broodingly in the corner of an underhive dive bar. Everyone knows he's trouble and keeps their distance, but nobody really knows how much trouble until a plasma bolt blows off the cult-leader's head and storm troopers start rappelling in through the abruptly installed skylights.
Pursuant of this, I decided a few things. Apart from his rosarius, which I assume he usually keeps tucked away and hidden, I wanted to mostly avoid gold. Attention grabbing bling is not his thing. Second, I wanted to keep all of his attire very muted and worn, sticking to mostly dark, earthy colors. There's nothing clean about him, and I wanted the color palette to reflect that.
 Credit: Evan "Felime" Siefring
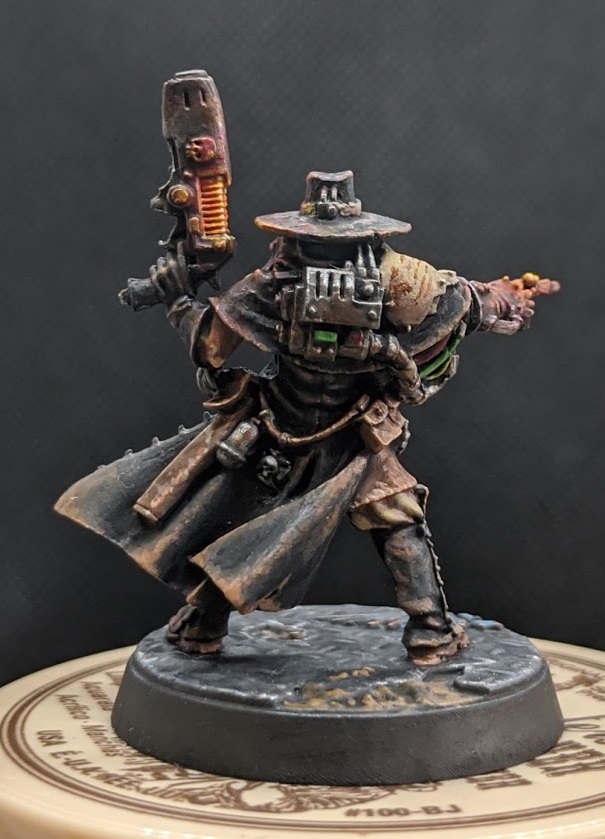
I began with the color that would be the biggest area on the model, his coat. There really wasn't any question in my mind what color this dude's trench coat would be. (Technically it's a weird cross between an Iverness coat and a napoleonic cutaway dress coat. Don't @ me.) It had to be black. I also made his hat, gaiters (boot covers), and gloves black, to carry the same color across the model while leaving some separation between them to avoid it becoming an entire field of black. At this point it's basically the exact method for worn black leather I went over in
this article. I will summarize here:
- Basecoat VMC Black
- Progressive mixes of Black and Skavenblight Dinge, then with Skavenblight and Gorthor Brown, highlighting with dots, interrupted lines and scratches, concentrating on areas of the most wear.
- Wash of Nuln Oil
- Rehighlight in a similar manner with Gorthor Brown
- Mix in more and more Jokaero Orange to the Gorthor Brown for a few layers of smaller and smaller highlights, and pure Jokaero Orange highlighting the corners and absolutely most battered spots.
 Credit: Evan "Felime" Siefring
For the brown leather I used a similar process to the first, but dove into something I only briefly mentioned in the leather article. Using flesh tone paints as highlights. This gives a particularly scuffed, battered appearance, which I think fits well here:
- Basecoat Gorthor Brown
- Highlight with mixes of Jokaero Orange and Gorthor Brown
- Wash of Agrax Earthshade
- Highlight of Jokaero Orange, followed by P3 Khardic Flesh and then VMC Dark Flesh
I also touched a few corners of the black with Khardic flesh to help define edges where needed.
 Credit: Evan "Felime" Siefring
His undertunic was painted a light tan. This was accomplished with a basecoat of
Gorthor Brown and highlighted with mixes of Gorthor and
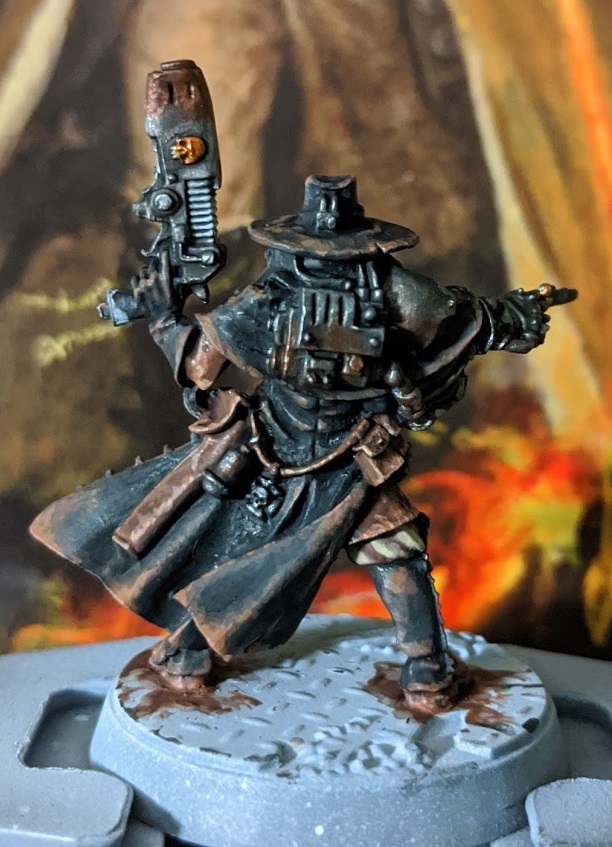
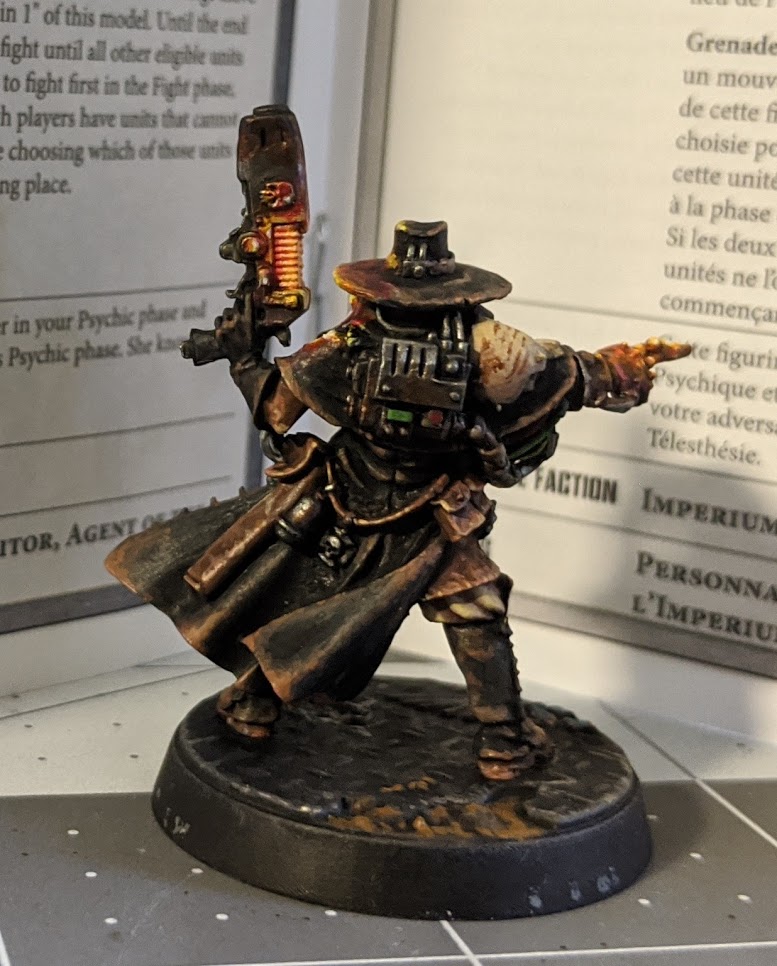
VMC Dark Sand until it reached a level of brightness I liked. In the back view, note that I painted his elbow as brown leather. Mantled coats are frequently sleeveless, and painting it in a different color allowed me to break up the black and separate his glove the main body of his coat.
The steel is a basic recipe:
- Vallejo Mecha Air Dark Steel basecoat
- Nuln Oil wash
- Vallejo Mecha Air Steel on sporadic highlights, rather than solid edge highlights, to lend the metal a more battered and scratched appearance
- Agrax Earthshade applied selectively to a few recesses and the undersides of some areas, to really grunge him up a bit. The tip of his plasma pistol was subsequently hit with a little more nuln oil to give it a more charred look (not shown in this picture)
The little touches of Gold are also simple. It's not a focus, so I just painted then in
Retributor Armor then washed with
Reikland Fleshshade to dull them down.
 Credit: Evan "Felime" Siefring
At this point, most of the colors were on the model and I was able to step back and take stock. In general I liked how it was turning out, but his shoulders were a bit too monotone for my tastes, and the complete lack of color was a bit too much. To tackle both problems, I first used the same colors (
Gorthor Brown and
VMC Dark Sand) that I used on his tunic and pants to paint his shoulder armor. It helps a great deal to use a wet palette for this process, which lets you mix a gradient of colors as you highlight, so you can easily go back and touch up the gradient. Getting a fairly smooth, painterly gradient like this is extremely easy and fits a weathered model quite well. I also hit his headband with the same colors as I'd forgotten it earlier.
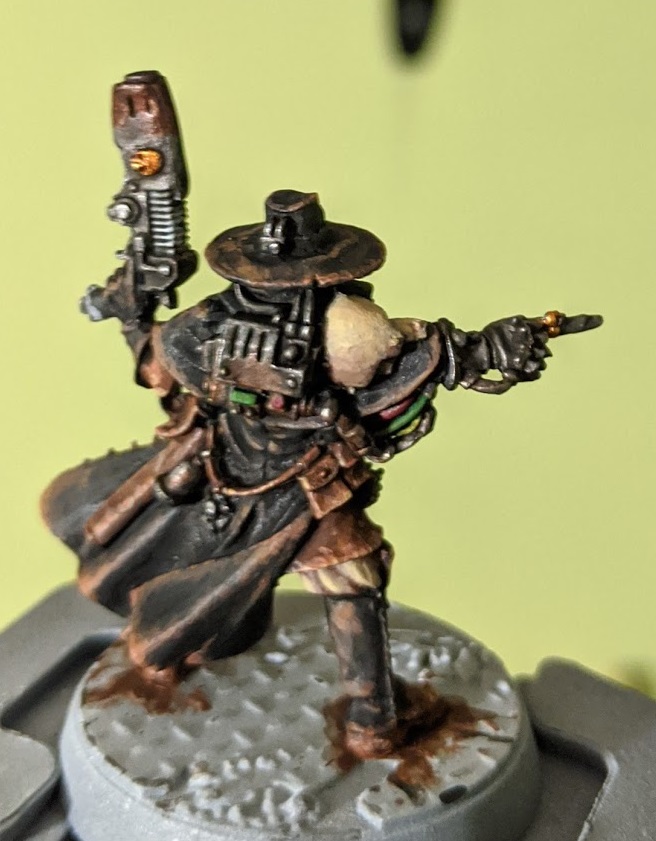
I went in over the wires which had been painted steel to add some color. I watered down
VMA Gory Red, VGA Moon Yellow, and
VGC Fluo Green. As all of these paints are fairly transparent, just glazing one or two coats over the steel color was enough to quickly color the wires without much work.
 Credit: Evan "Felime" Siefring
His shoulder was still looking a little bit plain. I dug out my detail brush and
VMA Burnt Umber. As it's slightly transparent it works well for text that won't stand out too much. I vaguely blocked in a triangle I thought vaguely resembled an aquila and a few lines of text. It helps to still have the color gradient from painting the base color still mixed on a wet palette to touch up with. I figure this little text is a blessing or prayer. A hint at who he might be, but nothing that would mark him out too much from the average imperial citizen.
 Credit: Evan "Felime" Siefring
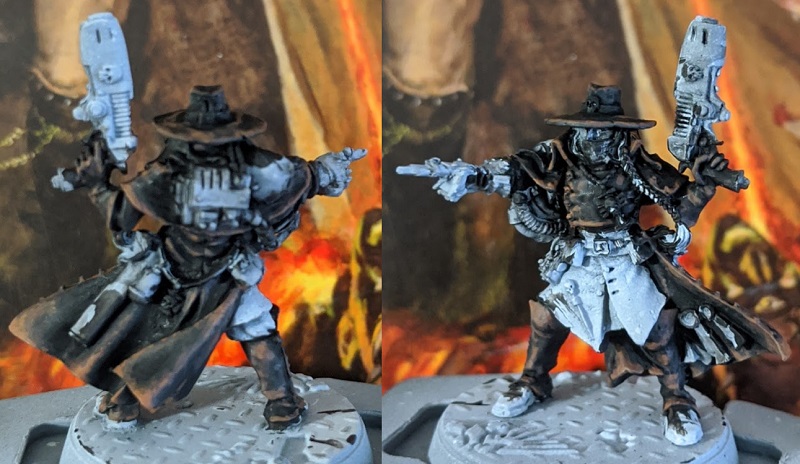
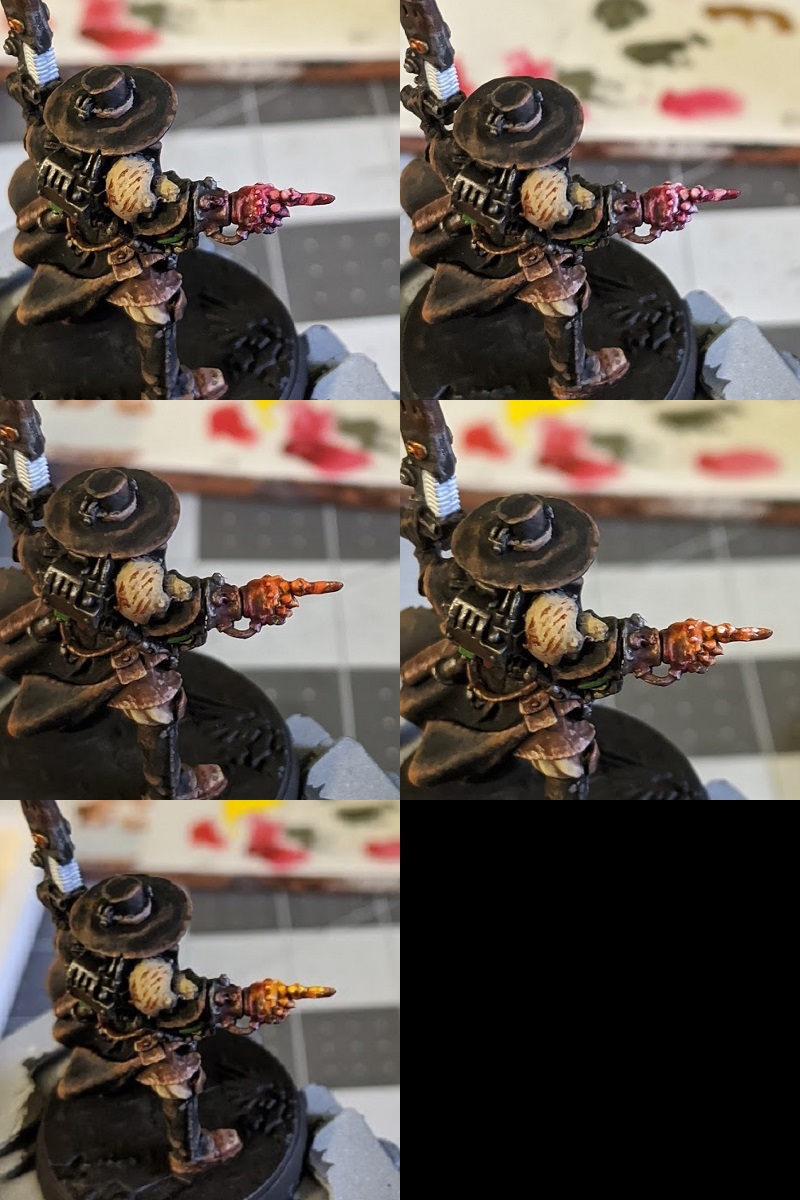
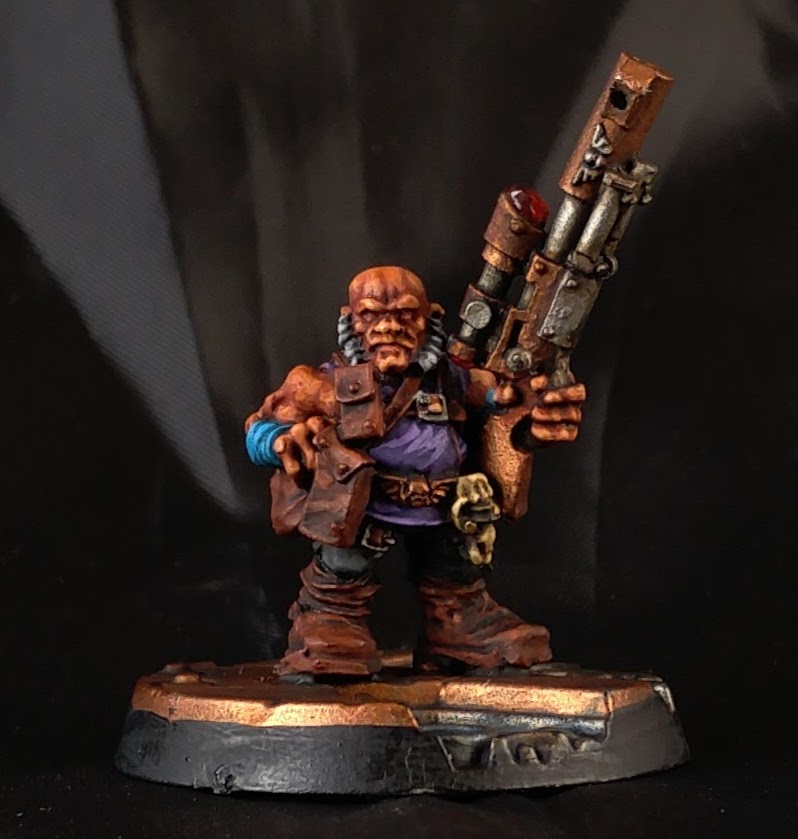
Now we get to the color I was talking about. I wanted to make both his plasma pistol and ring look as if they were glowing. I'd never done OSL before, but luckily I was able to find
a cool guide on some random website. While I didn't follow it word for word, it was really helpful in coming up with a method using the paints I had on hand. I painted his hand first, because if I screwed up, repainting a steel gauntlet was going to be a lot faster than fixing up the entire side of the model. The process I ended up using was as follows:
- Highlight using VMC White on some of the ring and some of the edges facing the ring. (Not Pictured)
- Wash with watered down VGA Gory Red
- Rehighlight a few edges with white, focusing closer to the edge and nearer the glowing ring
- Wash with VGC Orange Fire
- Repeat white highlight, only directly on the ring and the very edges nearby.
- Wash with Golden High Flow Acrylics Hansa Yellow Medium
 Credit: Evan "Felime" Siefring
 Credit: Evan "Felime" Siefring
As I hadn't ruined his hand too bad, I repeated the same steps on the plasma pistol (Basecoating the entire coil white before starting). And... I didn't quite like it. It wasn't bad, but it wasn't great, and didn't immediately sell the effect quite as much as I wanted. So I stepped back, snapped some pictures, and took a break. I shared the pictures on discord, and got some great feedback. SALynne as well as RichyP, the author of the article I linked above gave me some great advice. Armed with that, I got to salvaging the effect.
 Credit: Evan "Felime" Siefring
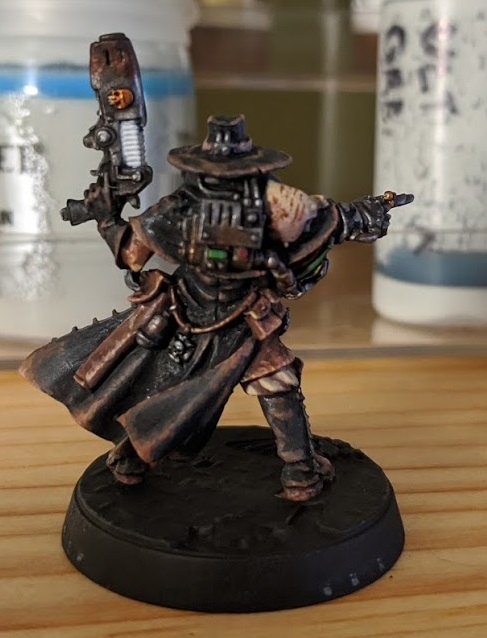
Luckily I had picked up some
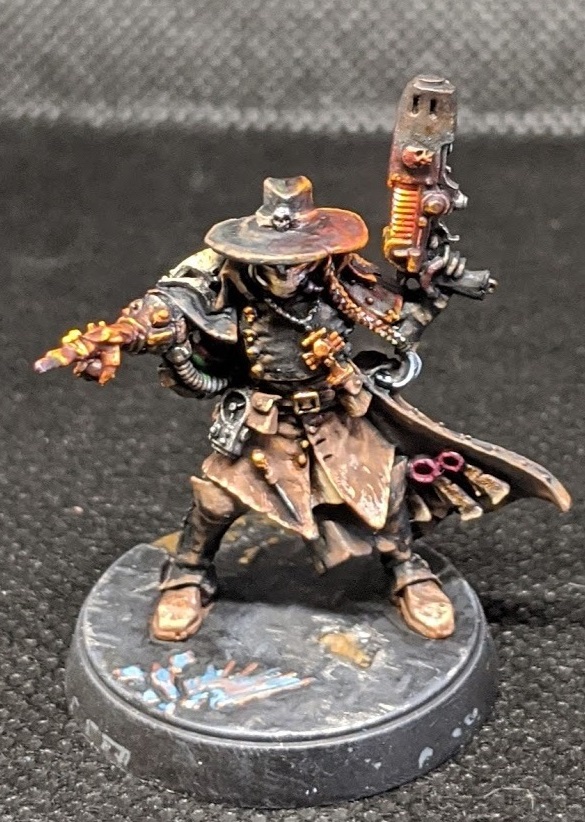
Carroburg Crimson which is absolutely amazing for painting red OSL. Part of the issue I had was that I was missing the deep, colored shadows that really sell that the area is being bathed in clowing light. A few washes with Carroburg helped that amazingly. I also punched up a couple spots closer to the light sources and highlighted the very peaks of the glowing areas with pure white. In the end, I got an effect I am much happier with. The flexibility of only having to paint a single model makes it much easier to experiment and fine tune techniques you're trying for the first time, and inquisitors are great for that!
Before the final images, I'll quickly go over the colors used on the few bits I didn't go over
- Purity Seals: VMC Burnt Red mixed with VGC Warlord Purple for the wax, then mixed with a little bit of white to dot highlights around the edges. VMC Dark Sand washed with Agrax Earthshade and rehighlighted with dark sand for the parchment, and VMA Burnt Umber for the faint lines indicating lettering.
- Hair: VGC Wolf Grey Washed with Nuln Oil, then highlighted with Wolf Grey and with a final bit of Ulthuan Grey at the peaks.
- Skin: P3 Khardic Flesh, washed with Reikland Fleshshade, then rehighlighted with Khardic Flesh mixed with a touch of white.
 Credit: Evan "Felime" Siefring
 Credit: Evan "Felime" Siefring
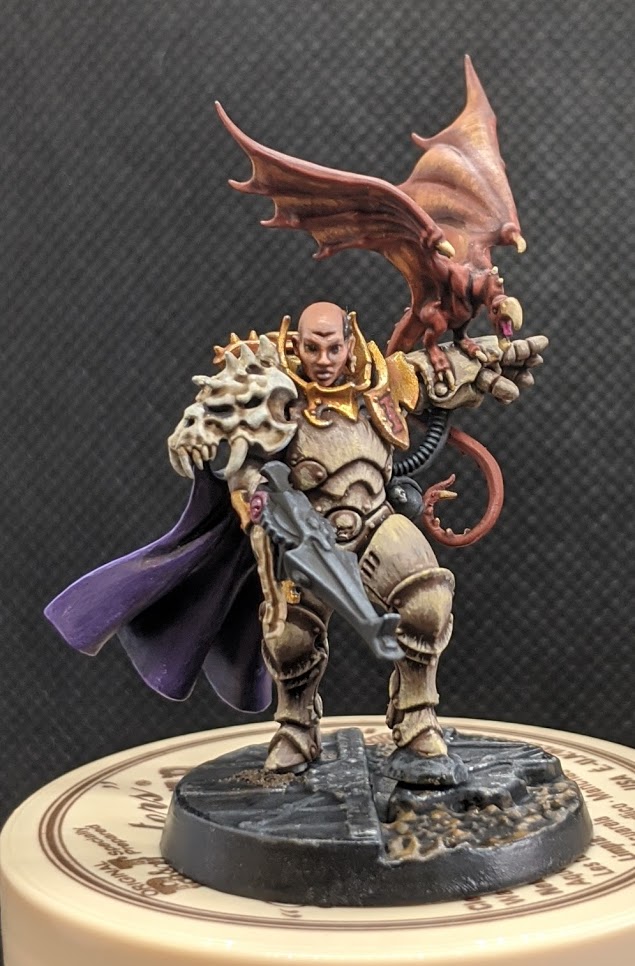
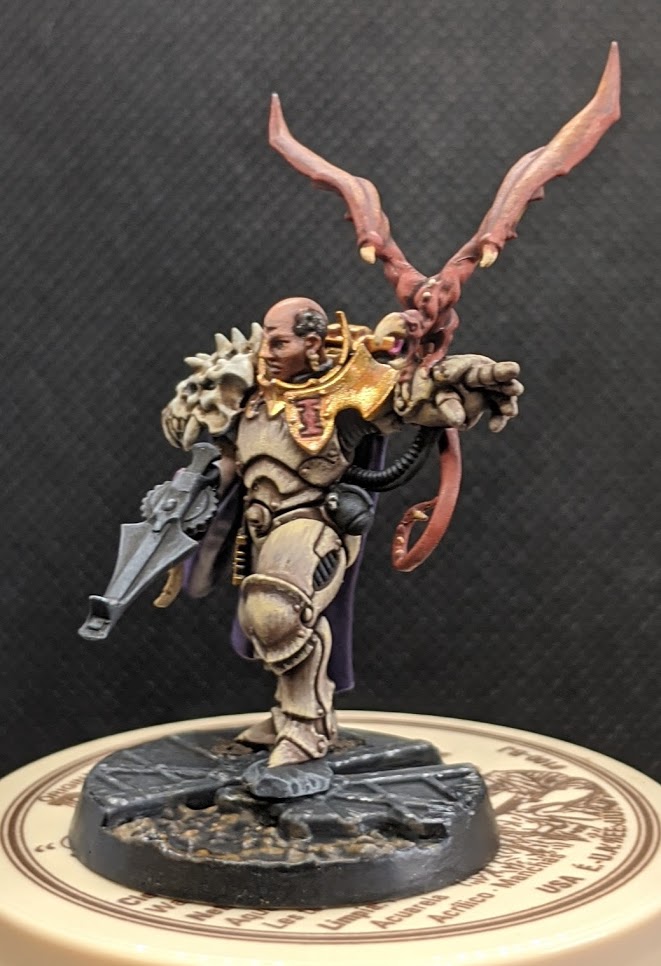
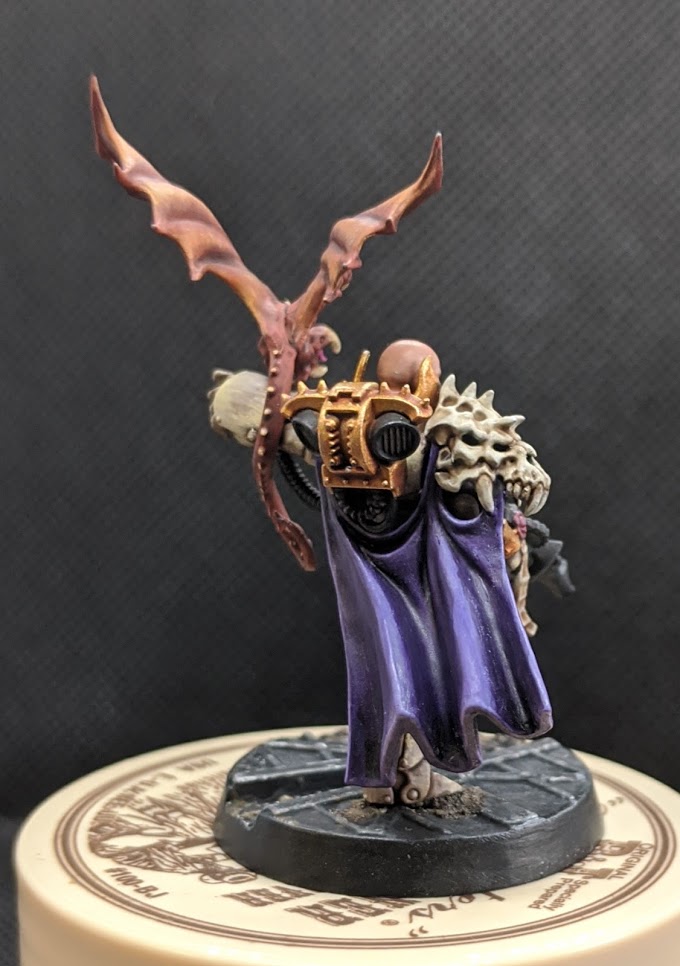
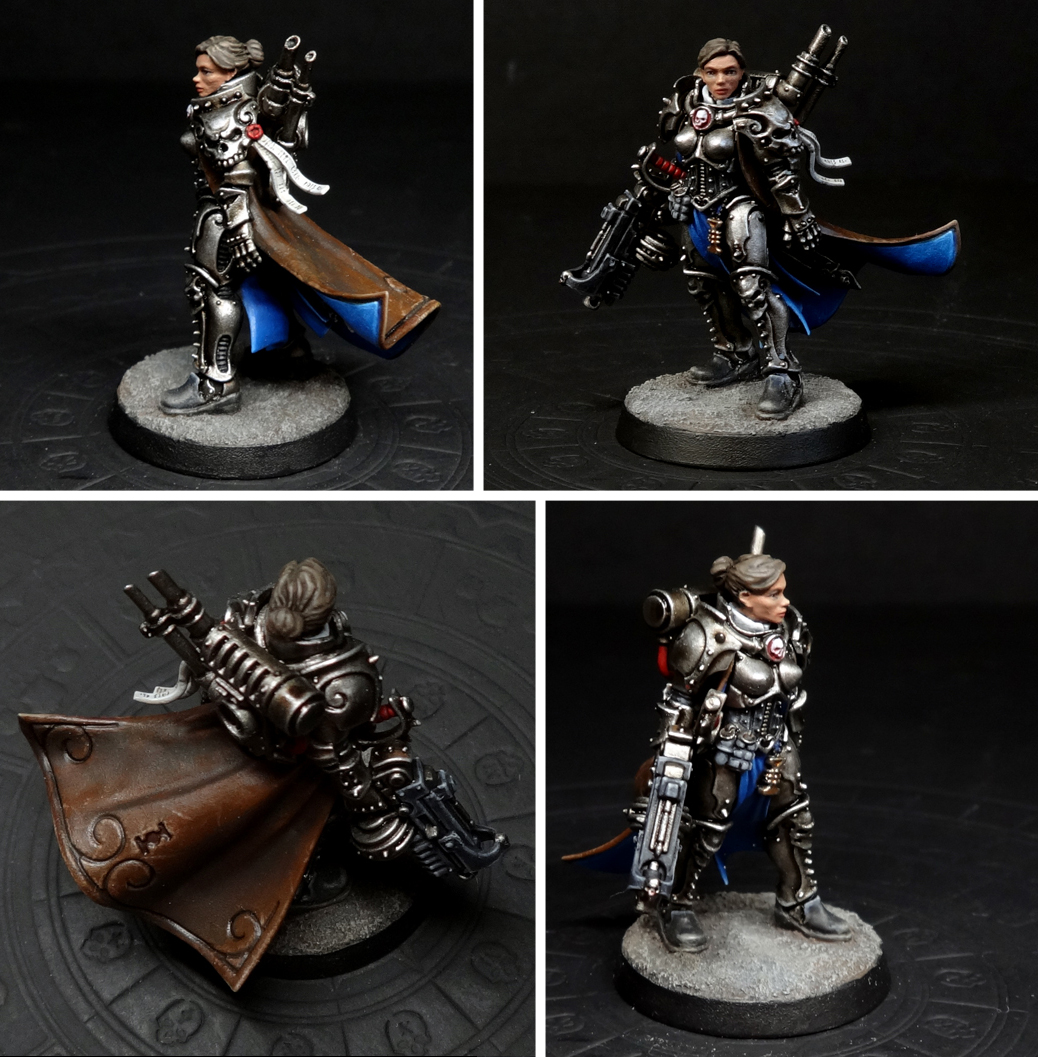
Inquisitor Kyria Draxus
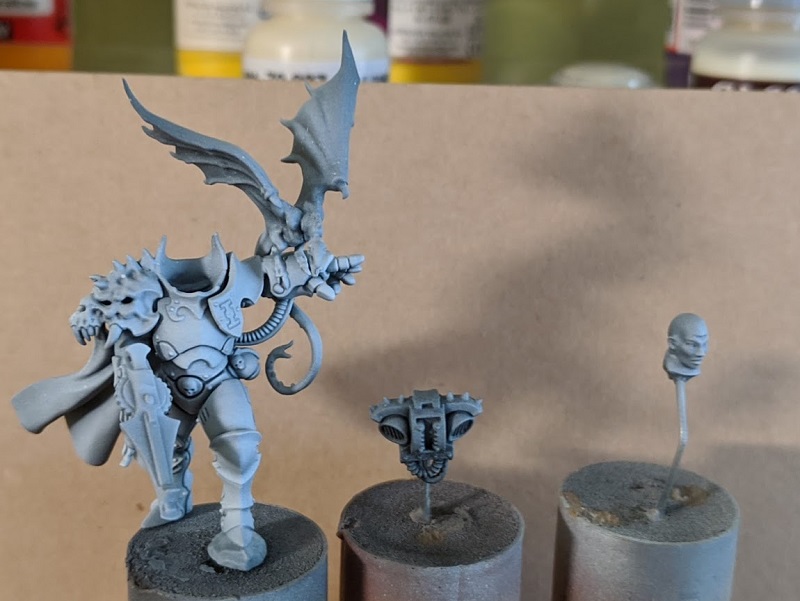
Finally, let's paint a named inquisitor. When I saw Draxus teased, I instantly thought she was an amazing sculpt that the paint scheme didn't quite live up to, and I've wanted to take a crack at it myself ever since. The official paint scheme takes a lot of inspiration from dark eldar for her armor, but I wanted to lean a bit more into the eldar side and really push the depth and contrast of the model with a wraithbone look. (Or what fellow goonhammer contributor Genola has termed 'Wraithaboo')
 Credit: Evan "Felime" Siefring
First a quick word about subassemblies. If I were to do this again, I would probably have painted her shiruken catapult arm separately, but I consider painting heads and backpacks separately pretty essential to be able to get good results in all the crevices.
 Credit: Evan "Felime" Siefring
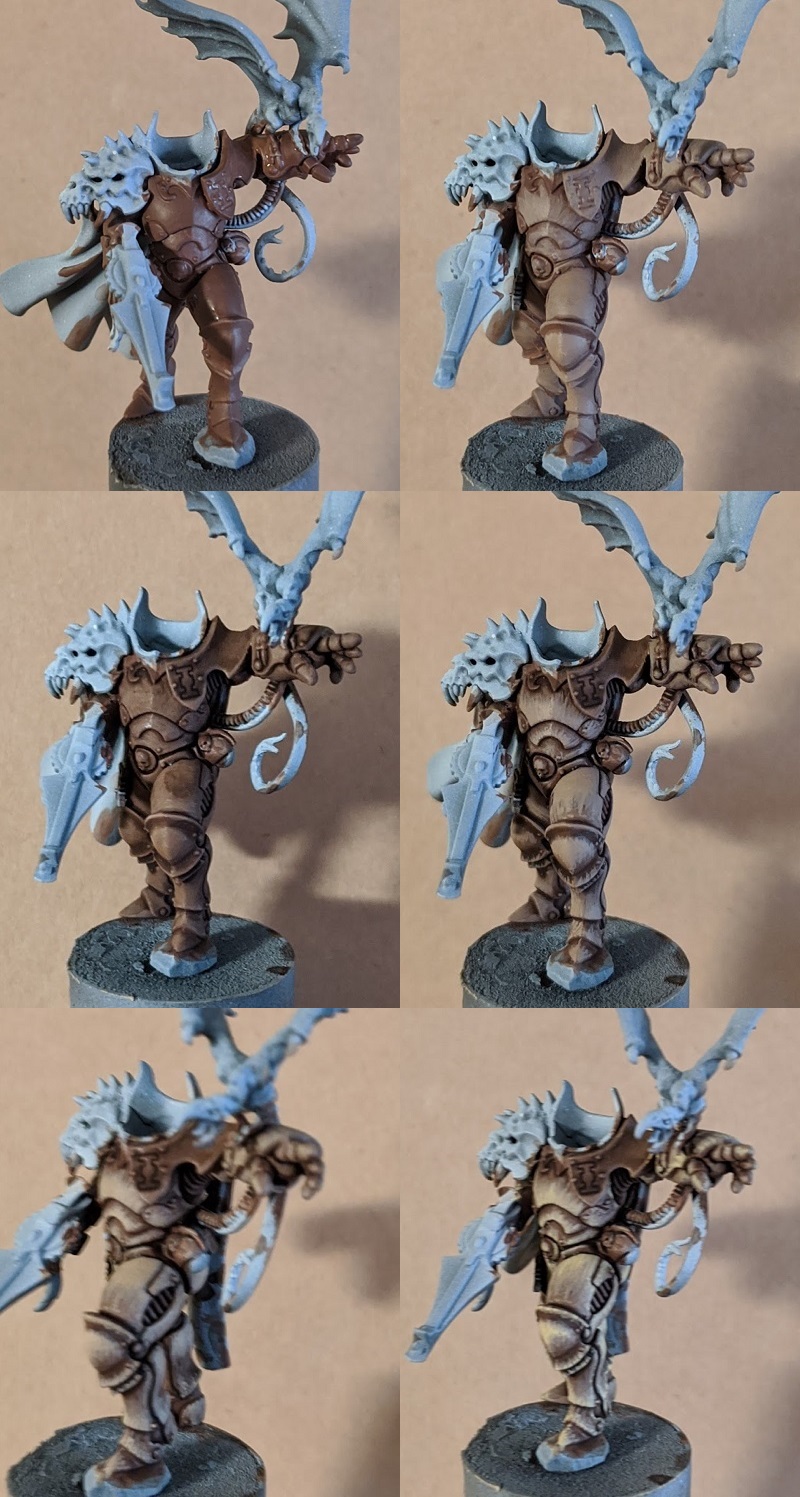
Since it's the centerpiece of the model and scheme, as well as the bulk of the surface area of the model, I started with the bone armor. All throughout this process I worked in striped, feathered highlights, trying to give the armor as much texture and visual interest as possible. Doing the highlights this way was extremely painstaking and took hours, but I feel it was worth it for the main focus of the model.
- Basecoat of Gorthor Brown
- Striped highlight of Gorthor Brown with a small amount of VMC Dark Sand mixed in
- Wash of Agrax Earthshade
- Rehighlight with a similar mix to step 2, slightly less far in
- Add more Dark sand, Highlight further towards the edge
- With pure Dark Sand, dotted highlights along the edges of plates and striped down slightly into the plates in some areas. It's important to maintain the texture with this last layer instead of doing a standard edge highlight, or you'll lose a lot of the effect.
 Credit: Evan "Felime" Siefring
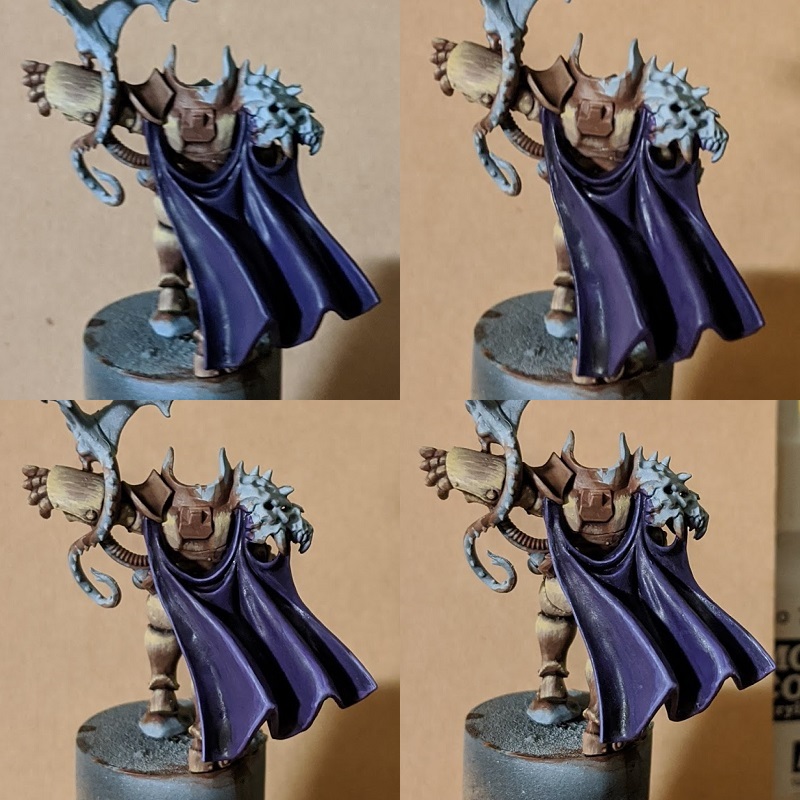
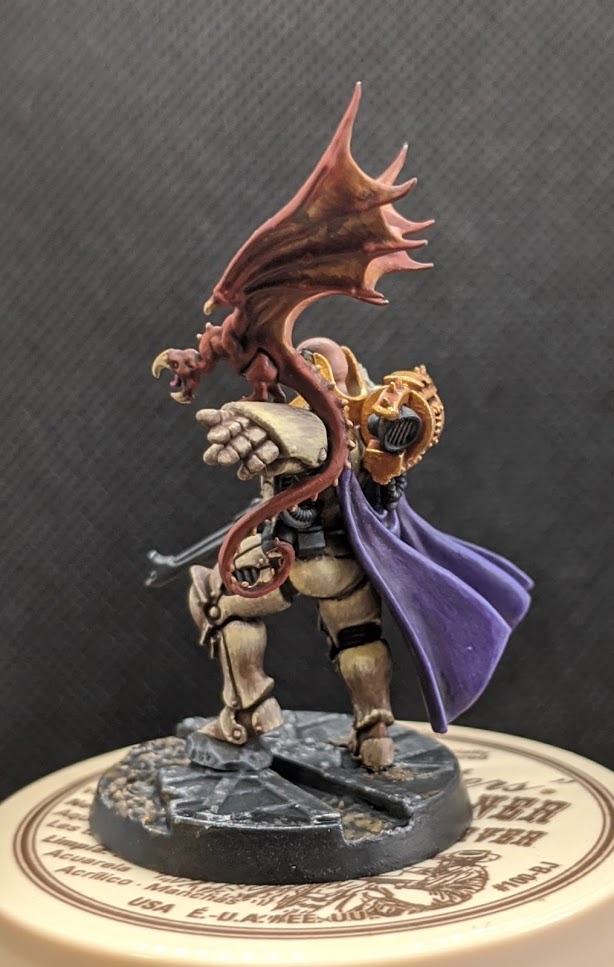
With that done, I moved on to the second biggest part of the model. Many thanks to Atom of the 13th Legion group in DC for his recipe. It makes an amazing purple with fairly little work.
- Basecoat Naggaroth Night
- Broad Highlight Phoenician Purple
- Wash of Druchii Violet
- Rehighlight with Phonecian Purple not quite as broadly
- Edge Highlight with Phoenician Purple mixed with a cool grey. I used VGC Wolf Grey but Celestra Grey or any cool grey would work fine as you're mixing it. I did two highlights of successively lighter mixes to keep the cloth smooth.
 Credit: Evan "Felime" Siefring
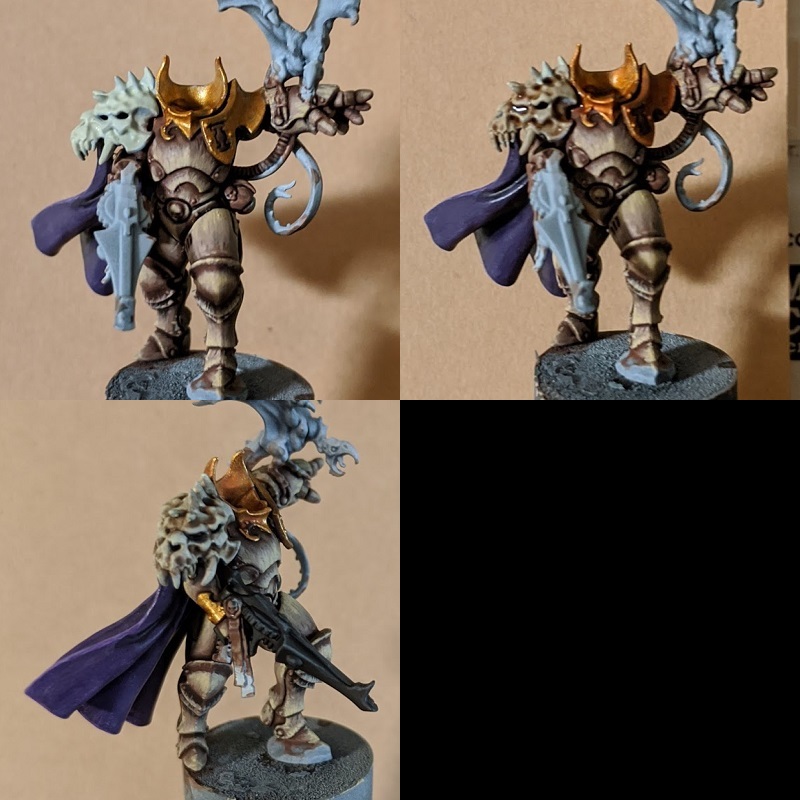
The Gold, Bone and Black are fairly simple. Of note is that apparently the spikes going up beside her head are part of the armor and I didn't notice. Honestly I think it looks better this way, but that's your choice to make.
- Gold: Retributor Armor washed with Reikland Fleshshade and rehighlighted with Retributor Armor. Usually I shade gold with Guilliman flesh, but I wanted to keep more of Retributor Armor's yellow hue instead of tinting it more orange as I think yellow looks good with the bone and purple.
- Bone: I wanted to make sure that the skull didn't blend into the armor, so I went with Deepkin Flesh as a base for a much cooler tone. A wash with Agrax Earthshade and a highlight with more Deepkin Flesh completes the look.
- Black: I didn't do the black this way for any reason other than that I had deepkin flesh on my wet palette. Basecoat of VMC Black with a broad highlight of black mixed with a tiny bit of Deepkin Flesh and then a second edge highlight with slightly more. A few crevices were touched up with Nuln Oil.
 Credit: Evan "Felime" Siefring
 Credit: Evan "Felime" Siefring
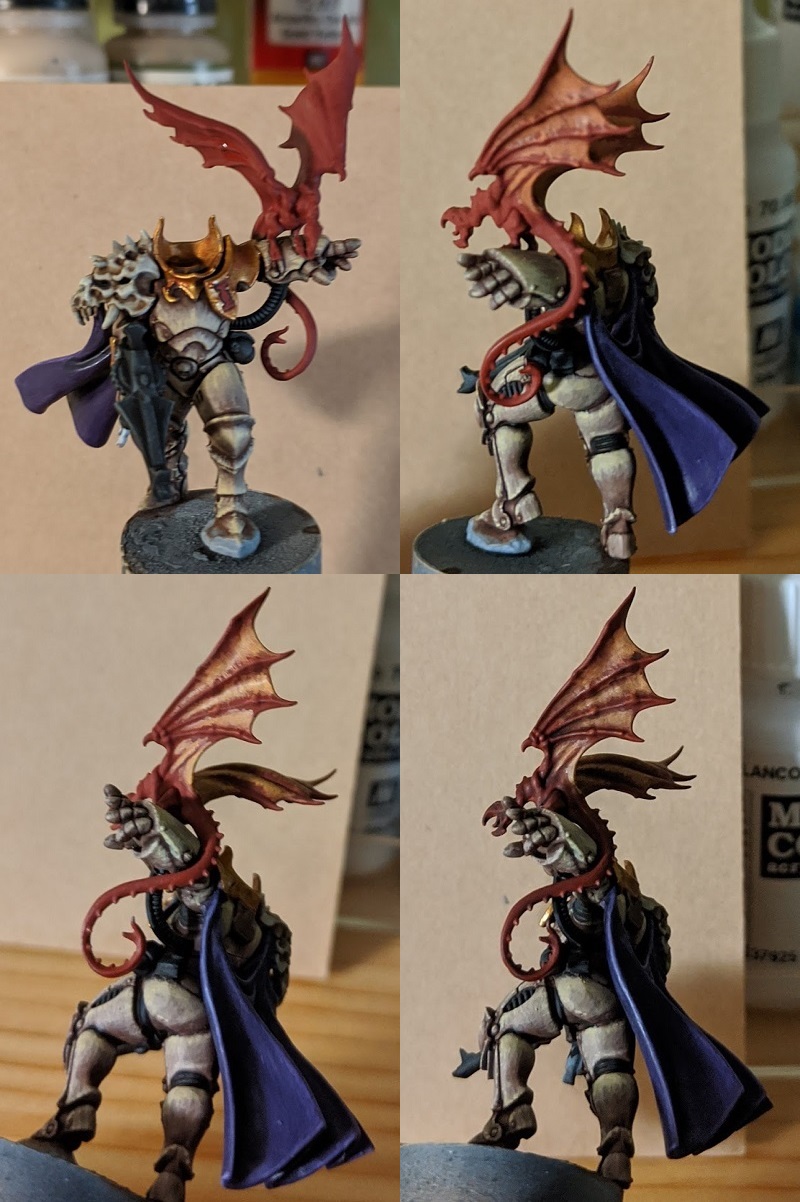
Now we're on to some more interesting stuff. I was originally going to keep the green lizard, but on a whim I slathered some red onto it and fell in love.
- Basecoat VMC Cavalry Brown (Get the inquisition symbol now as well)
- Highlight the wings with stripes of a dark mix of VMC Cavalry Brown with VGC Filthy Brown
- Apply more stripes with much more Filthy Brown in the same mix. It'll be a bit too bold and stark. That's okay. The next step will tone it down.
- Wash the entire creature and inquisition symbol with Agrax Earthshade.
- Rehighlight both in the red areas with Cavalry Brown.
- Apply the tiniest stripes you can manage at the crests of the wing webbing with pure Filthy Brown.
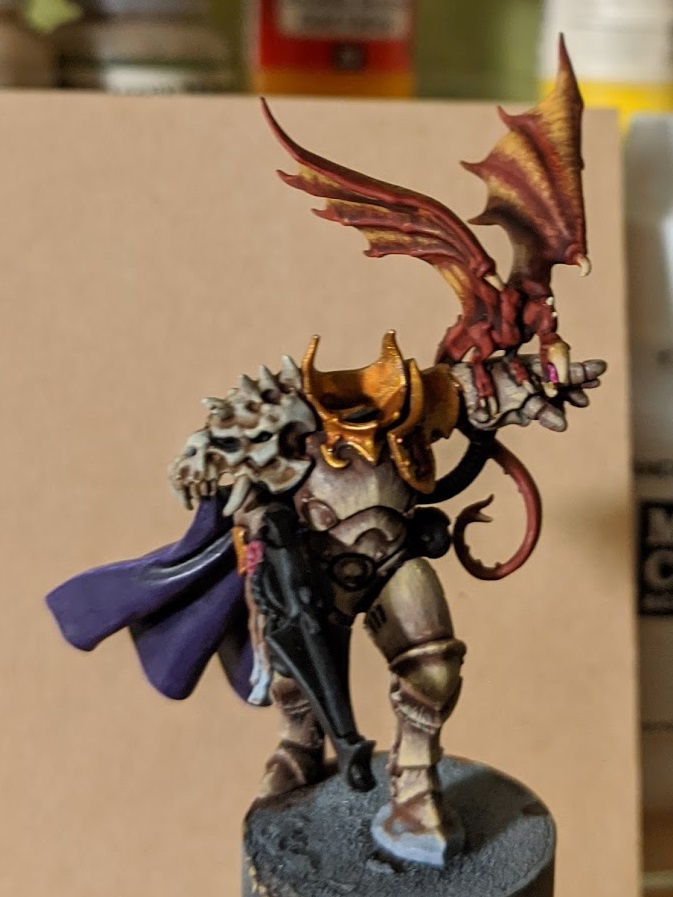
The Talons and spikes were painted with pure
VGC Filthy Brown then highlighted with
VMC Dark Sand.
The tongue was painted with a mix of
VMC Cavalry Brown and
VGC Warlord Purple, then highlighted with pure Warlord Purple. I took the opportunity and used the same mix as a basecoat for the purity seal wax, and highlighted by mixing in a touch of white to the mix.
 Credit: Evan "Felime" Siefring
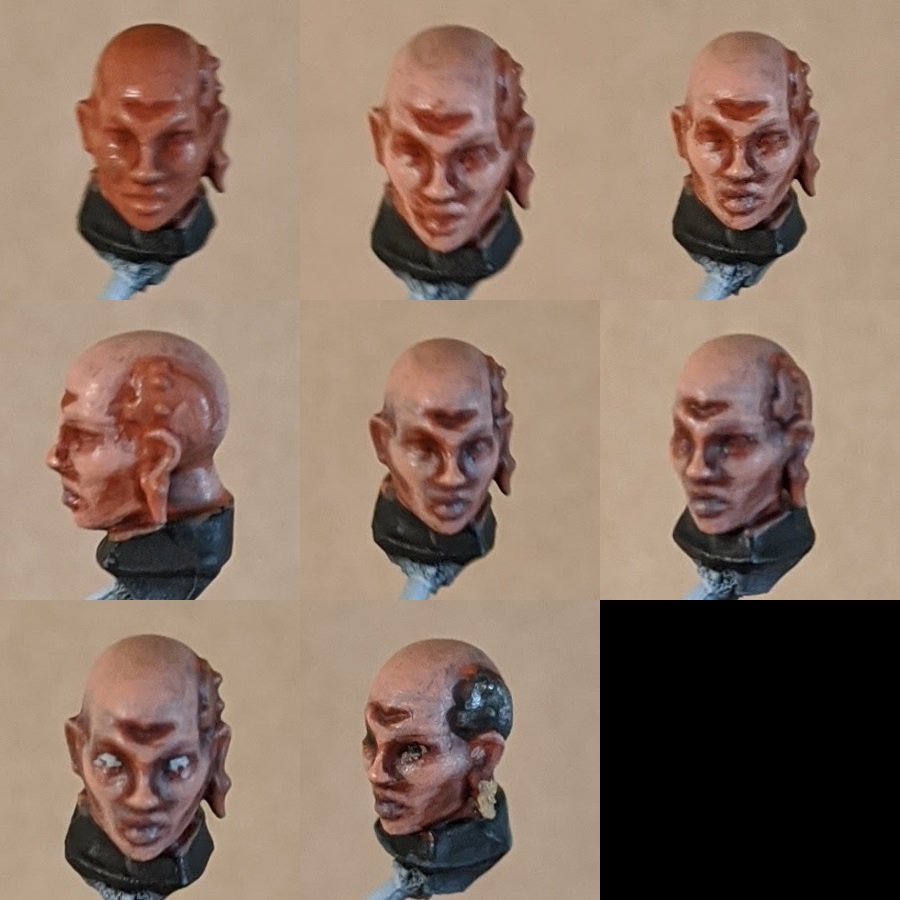
Her face is... well, it's a bit of a challenge. I had to bring my A game to this one. If you'd like to brush up on skin, several excellent tutorials can be found
here. I'll go through the process I used here.
- Basecoat P3 Khardic Flesh and wash with Guilliman Flesh
- Highlight with a mix of Khardic flesh and VMC Pale Flesh
- Mix in more pale flesh, highlight again.
- Selective wash with Reikland Fleshshade to accentuate the features. I concentrated on the eyes, lips, and especially under her cheekbones to really sculpt the face shape. I actually looked at a few contouring tutorials for makeup to help me counteract the slightly... odd features her sculpt has.
- A faint, all over wash with a mix of VMC Dark Prussian Blue and Lahmian Medium. A Blue really helps add in some tonal variation to the skin.
- A very subtle highlight with the same mix as the last flesh color. Very subtle and delicate. Mostly just to reestablish features and catch the highest highlights of her face.
- Sigh heavily as you realize that her features are too subtle and delicate to look good if you don't paint eyes. Get out your best detail brush and get some Ulthuan Grey on there.
- Dot on some black(or whatever dark color is on your palette) then drench your poor attempt at painting eyes in Reikland Fleshshade until it looks vaguely human. Artfully turn the head to the best looking angle for the ultra close up shot you need to take for a painting article.
- I guess also paint some Vallejo Mecha Air Dark Steel on the metal plate and wash it with Nuln Oil. The bone earring is VMC Dark Sand washed with Agrax Earthshade.
Then just paint and attach the backpack with methods we've already covered, and put some
VMA Sand(Ivory) on the purity seal parchment, wash it with
Agrax Earthshade, and you're done.
 Credit: Evan "Felime" Siefring
 Credit: Evan "Felime" Siefring
 Credit: Evan "Felime" Siefring
 Credit: Evan "Felime" Siefring
 Credit: Evan "Felime" Siefring
The only step left is to stick her to a base and post an absolutely egregious number of pictures in your article because of how proud you are of your tiny jewel like object of wonder.
 Credit: Evan "Felime" Siefring

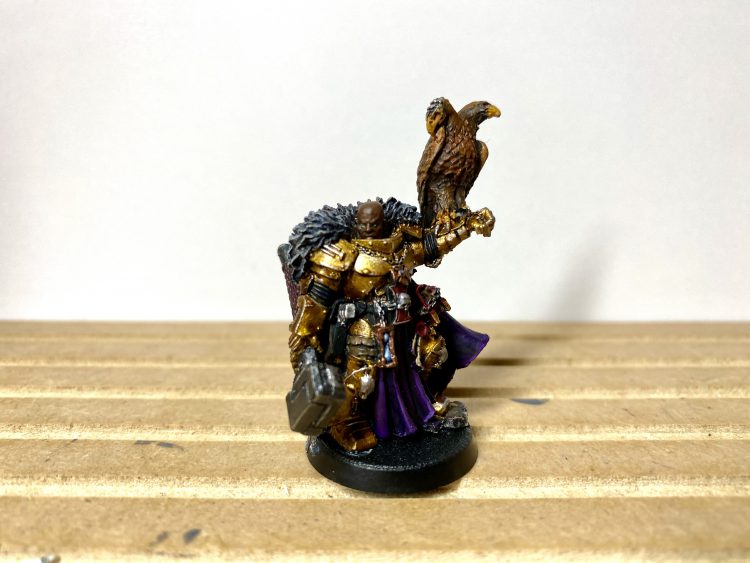
 Inquisitor Karamazov and his warband. Credit: Crab-Stuffed Mushrooms


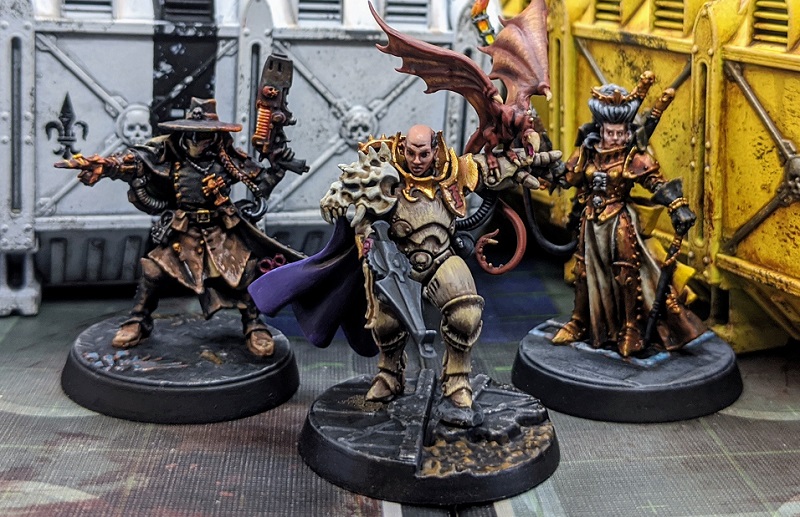
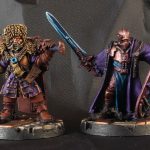
 Nadiya Zelenko, Ordo Hereticus. Credit: Charlie Brassley

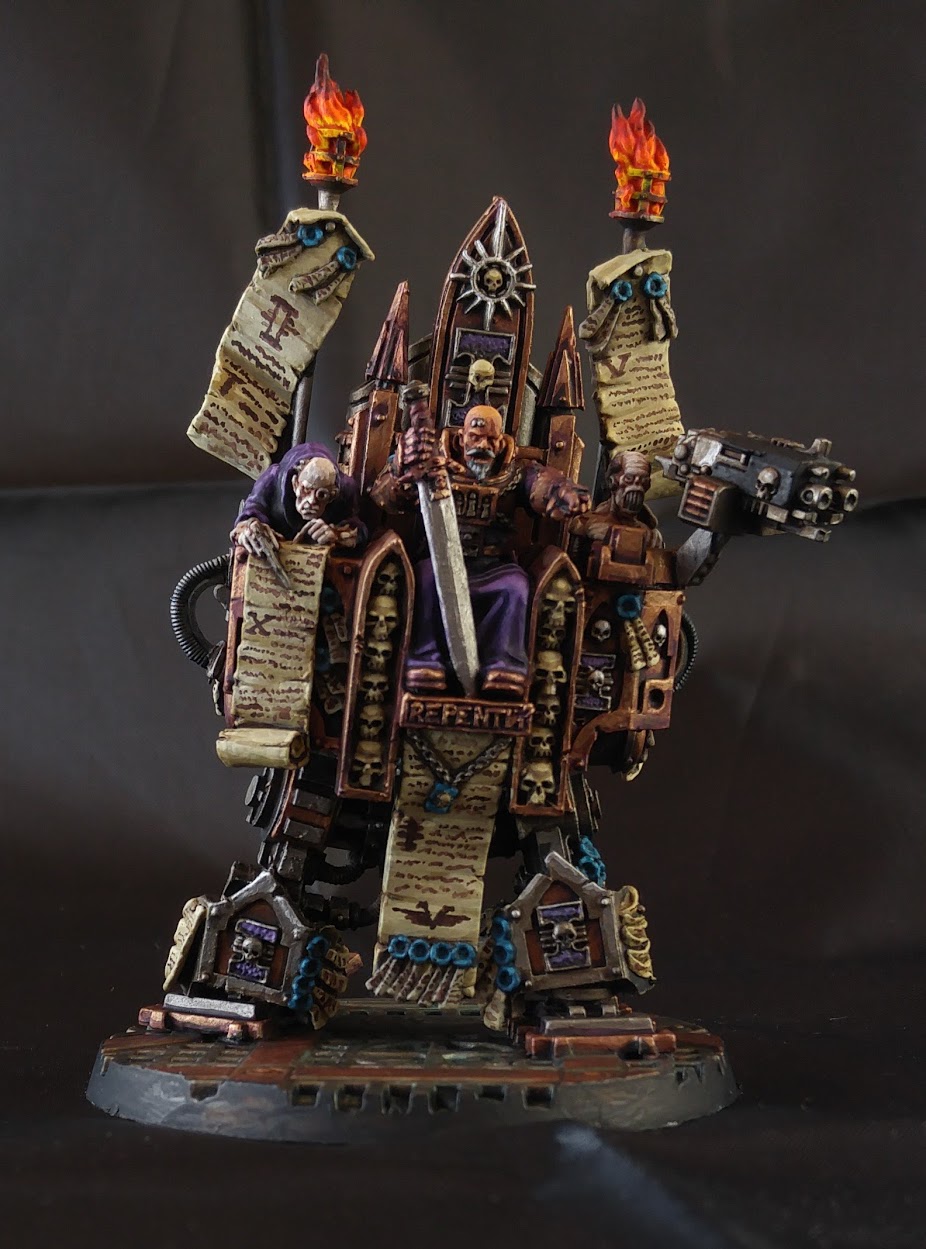 Inquisitor Karamazov by Crab-stuffed Mushrooms
 Inquisitor Karamazov (rear) by Crab-stuffed Mushrooms
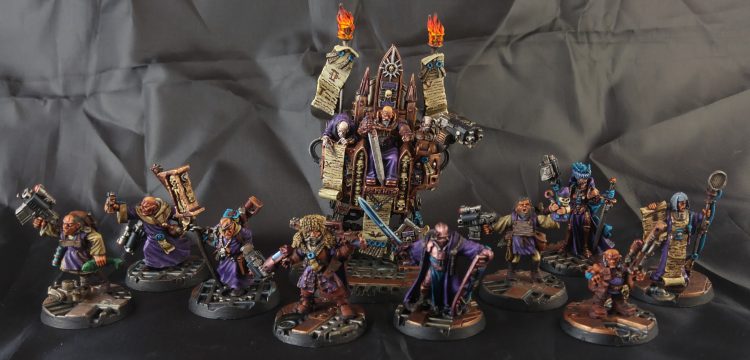
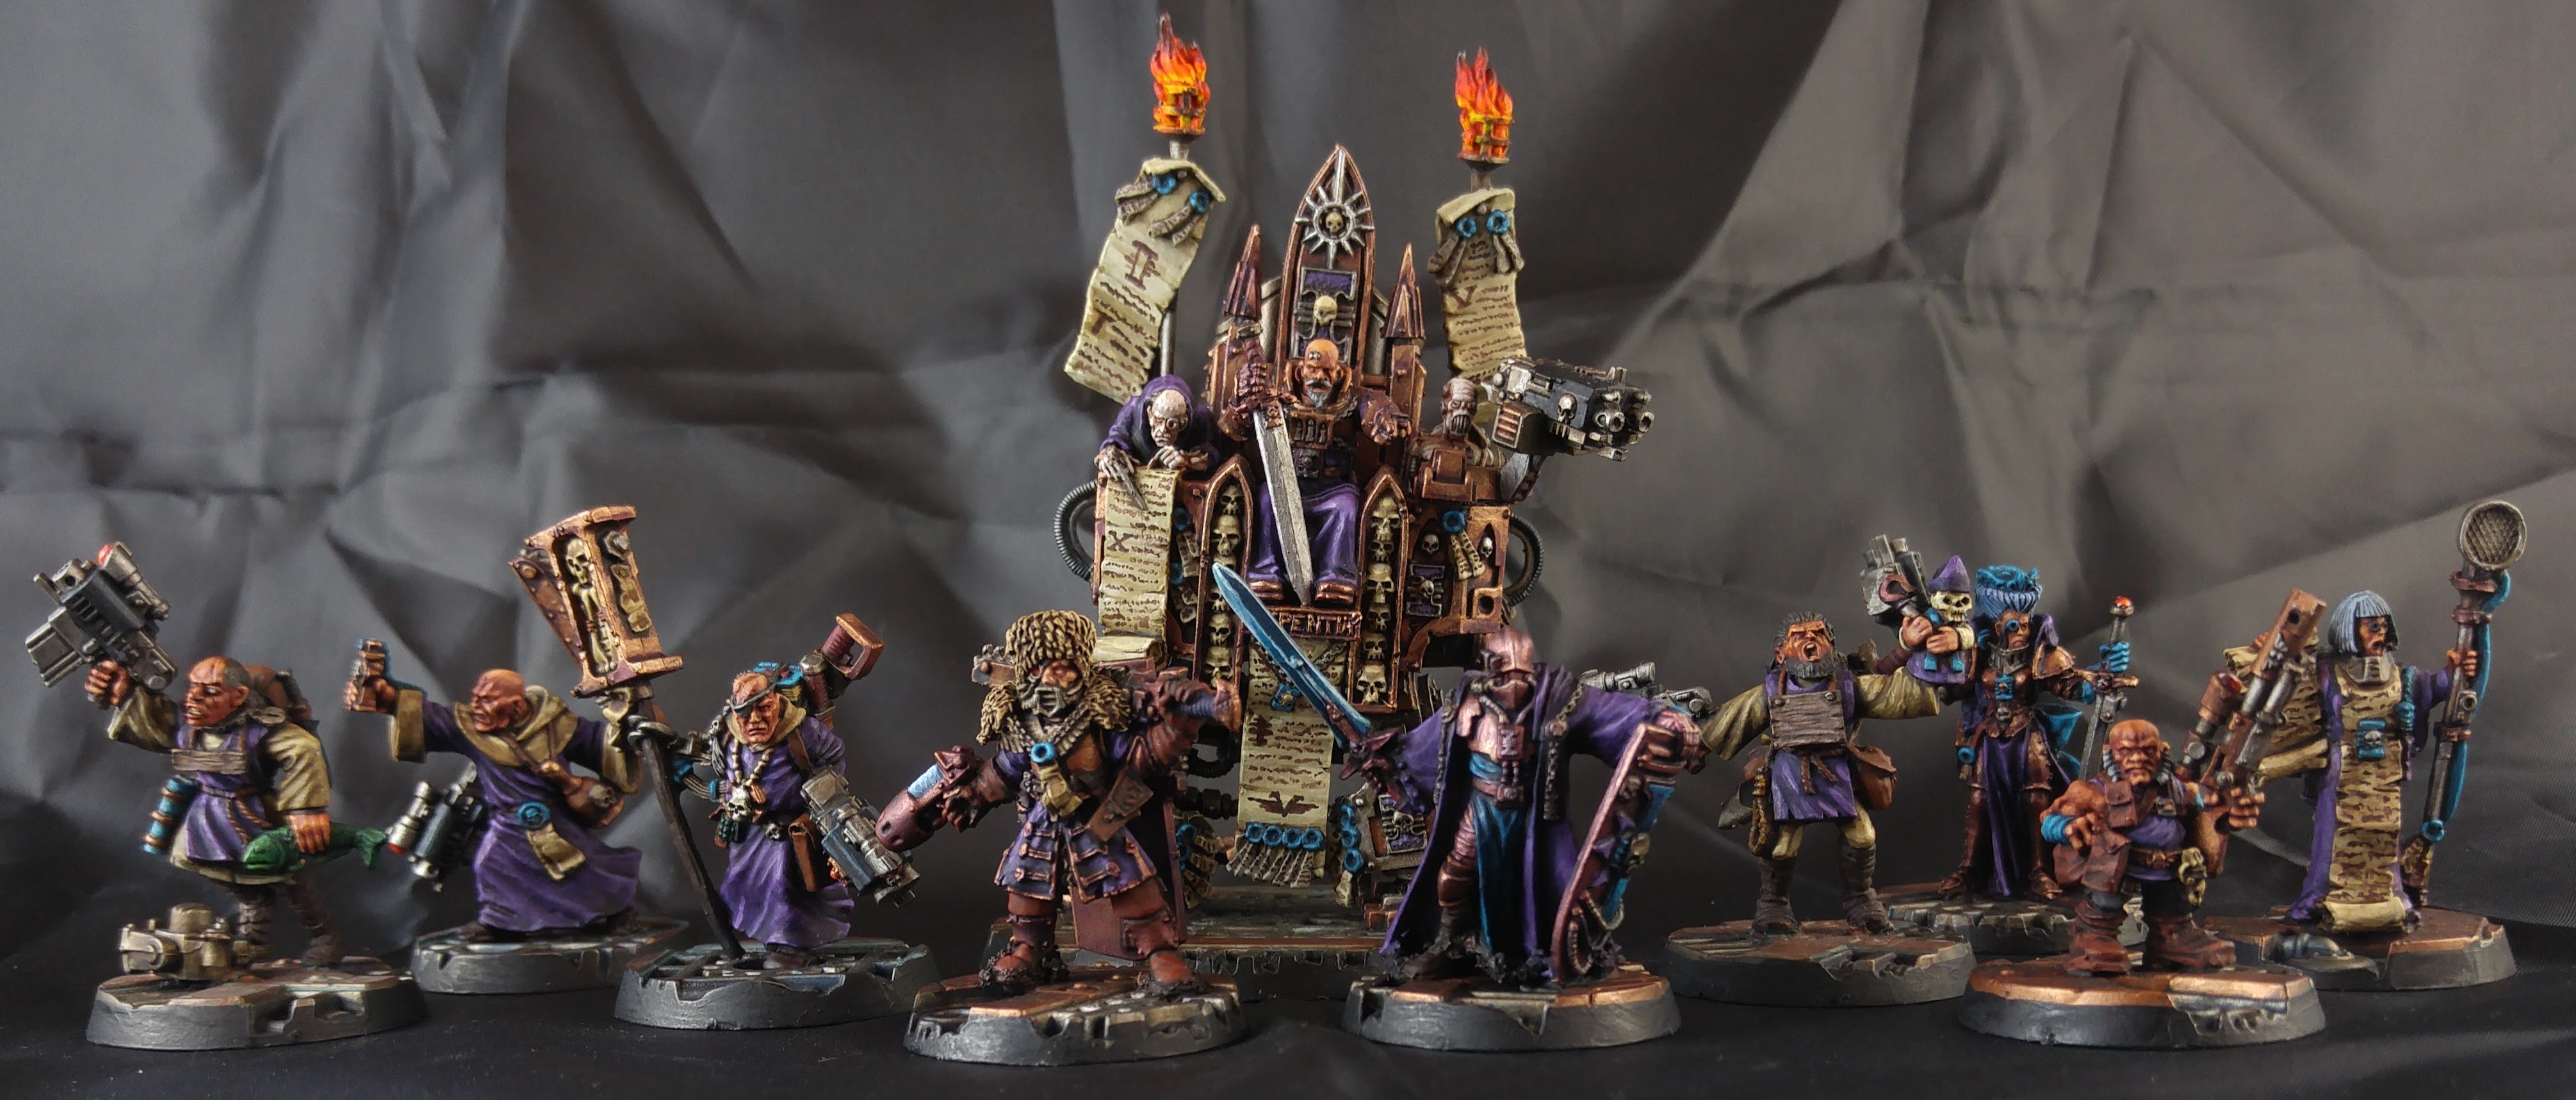 Inquisitor Karamazov and Retinue by Crab-stuffed Mushrooms

 Inquisitor Coteaz Credit: Ryolnir

 Goonhammer App and Patron Updates: April, 2026
 Kill Team Tournament Report: Engage, Party, Repeat's March Madness 2026
 Goonhammer Reviews: Tribal Conquest