If you've played
Fallout: New Vegas or watched the recent TV show, you'll probably have some familiarity with the New California Republic, commonly referred to as the NCR. As a faction resembling a proper nation with a formal military, they've got something rare in
Fallout's wastelands: Uniformity. Once you can paint a handful of different materials and textures, this whole range can come together rather quickly.
What You'll Need
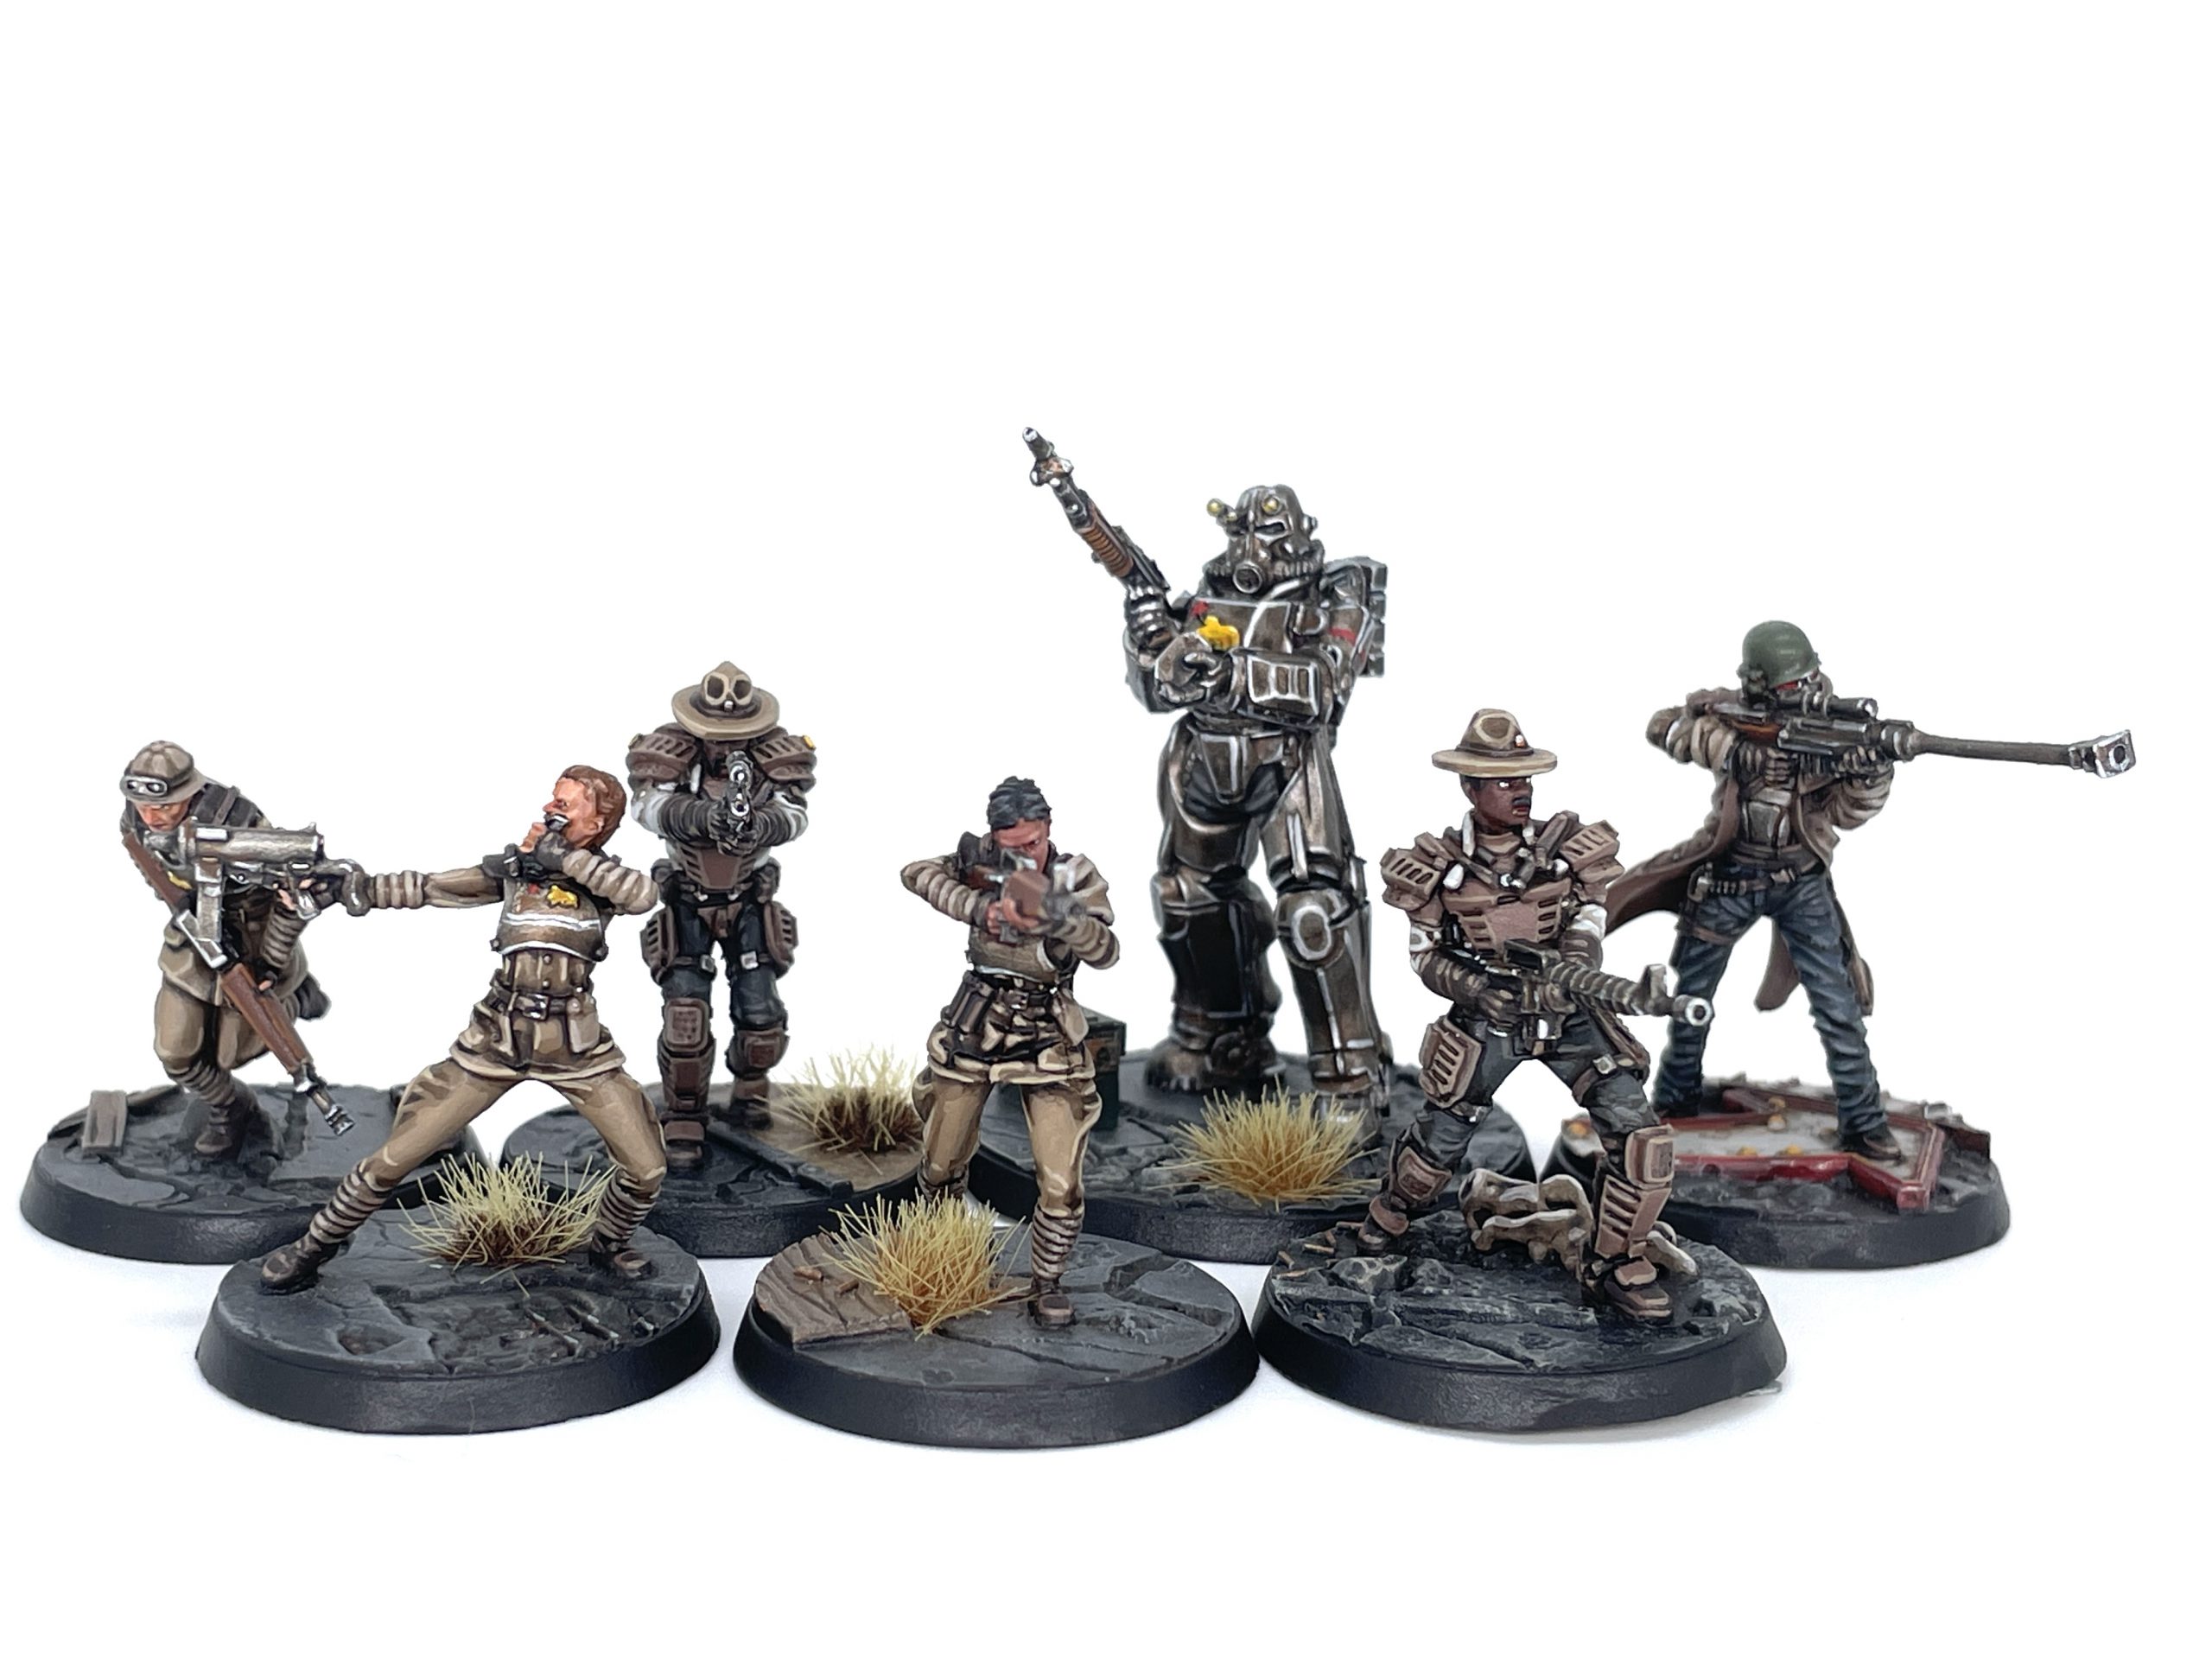
 NCR Core Box. Credit: SRM
I like to treat
Fallout models the same way I'd treat a historical wargame, attempting to match fidelity to the source material. Fortunately, the various uniforms and equipment of the
Fallout games is documented on the
Independent Wiki in exhaustive detail. I consulted their pages frequently while painting the models for this article. You could also just go into the game and grab screenshots yourself; doing field research like this is a lot easier than when researching a proper historical game.
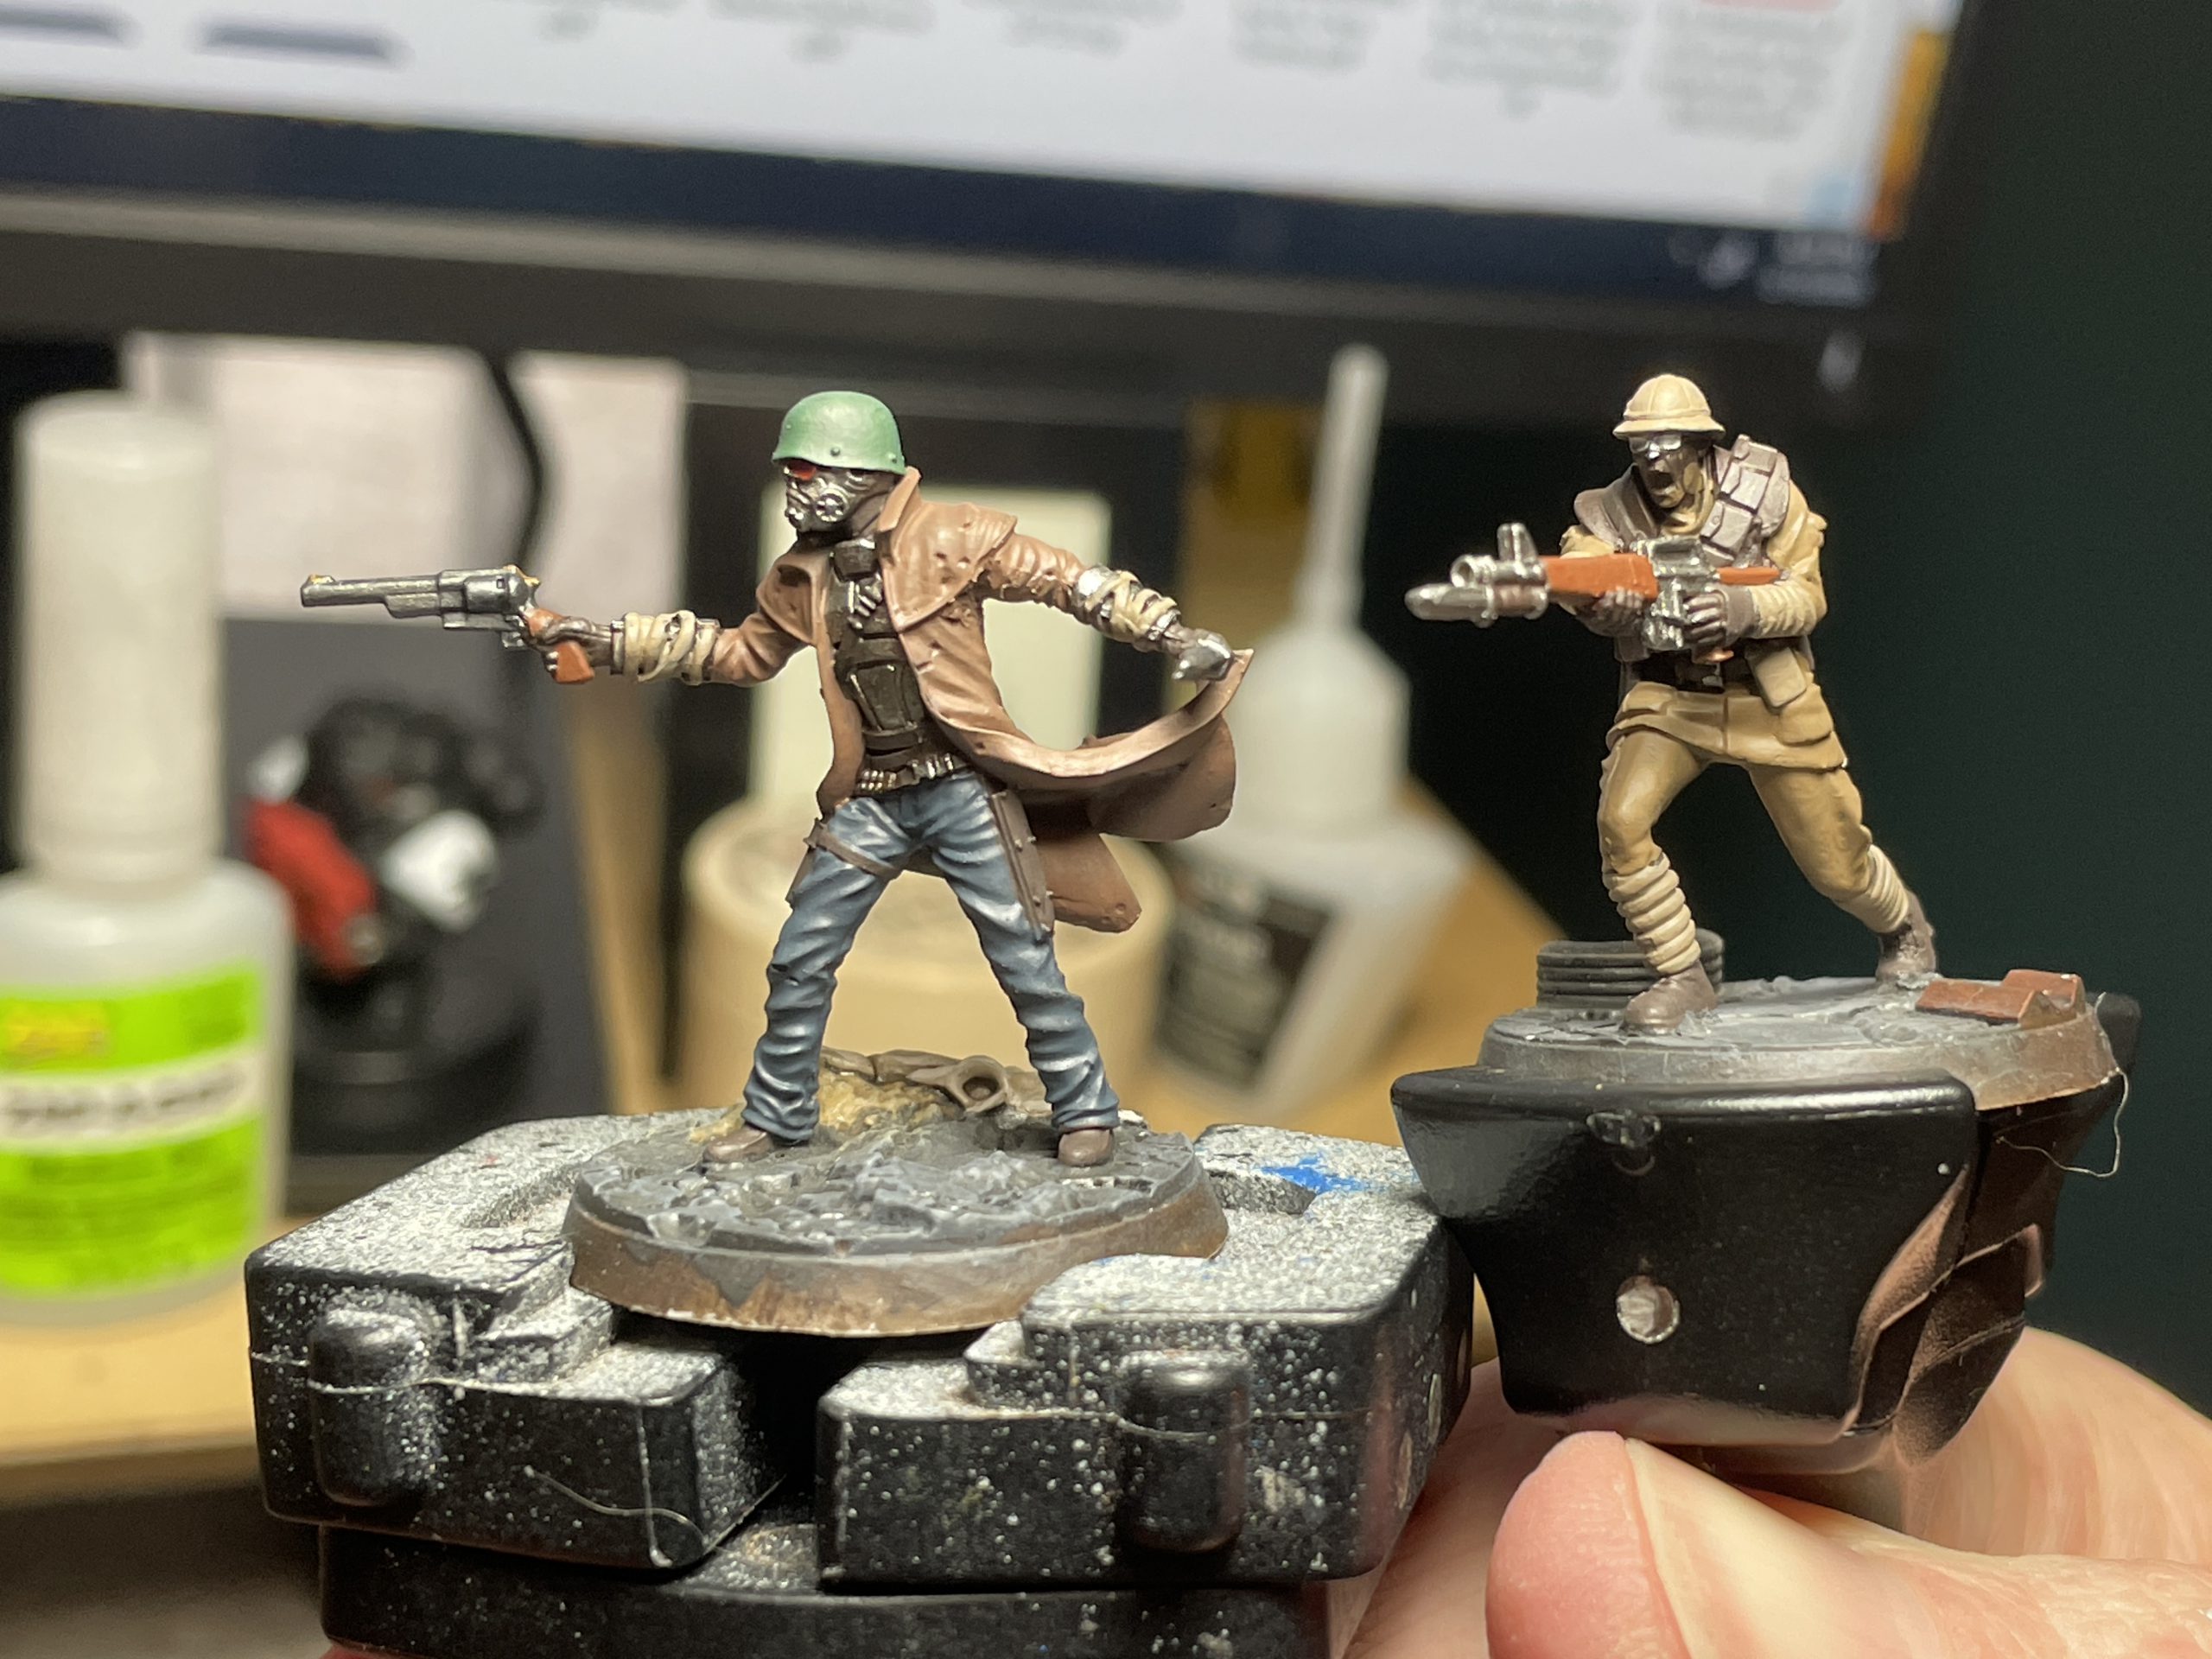
 NCR WIP models. Credit: SRM
One other thing you may notice is that the NCR wears a lot of brown. I primed my models brown. You'll need several browns. Chiefly, you'll need a brown wash to tie the models together. One step you'll see on nearly every color here is a brown wash. I normally like to target my washes more specifically, but while painting these models I liked to block in all the base colors, wash everything brown, then reestablish those base colors while leaving brown in the recesses. Lastly, you'll want a wet palette. I tend to mix a midtone after reestablishing the colors before a final highlight. You could skip this step, but things might end up kind of stark. All paints are
Citadel unless otherwise noted.
Common Details
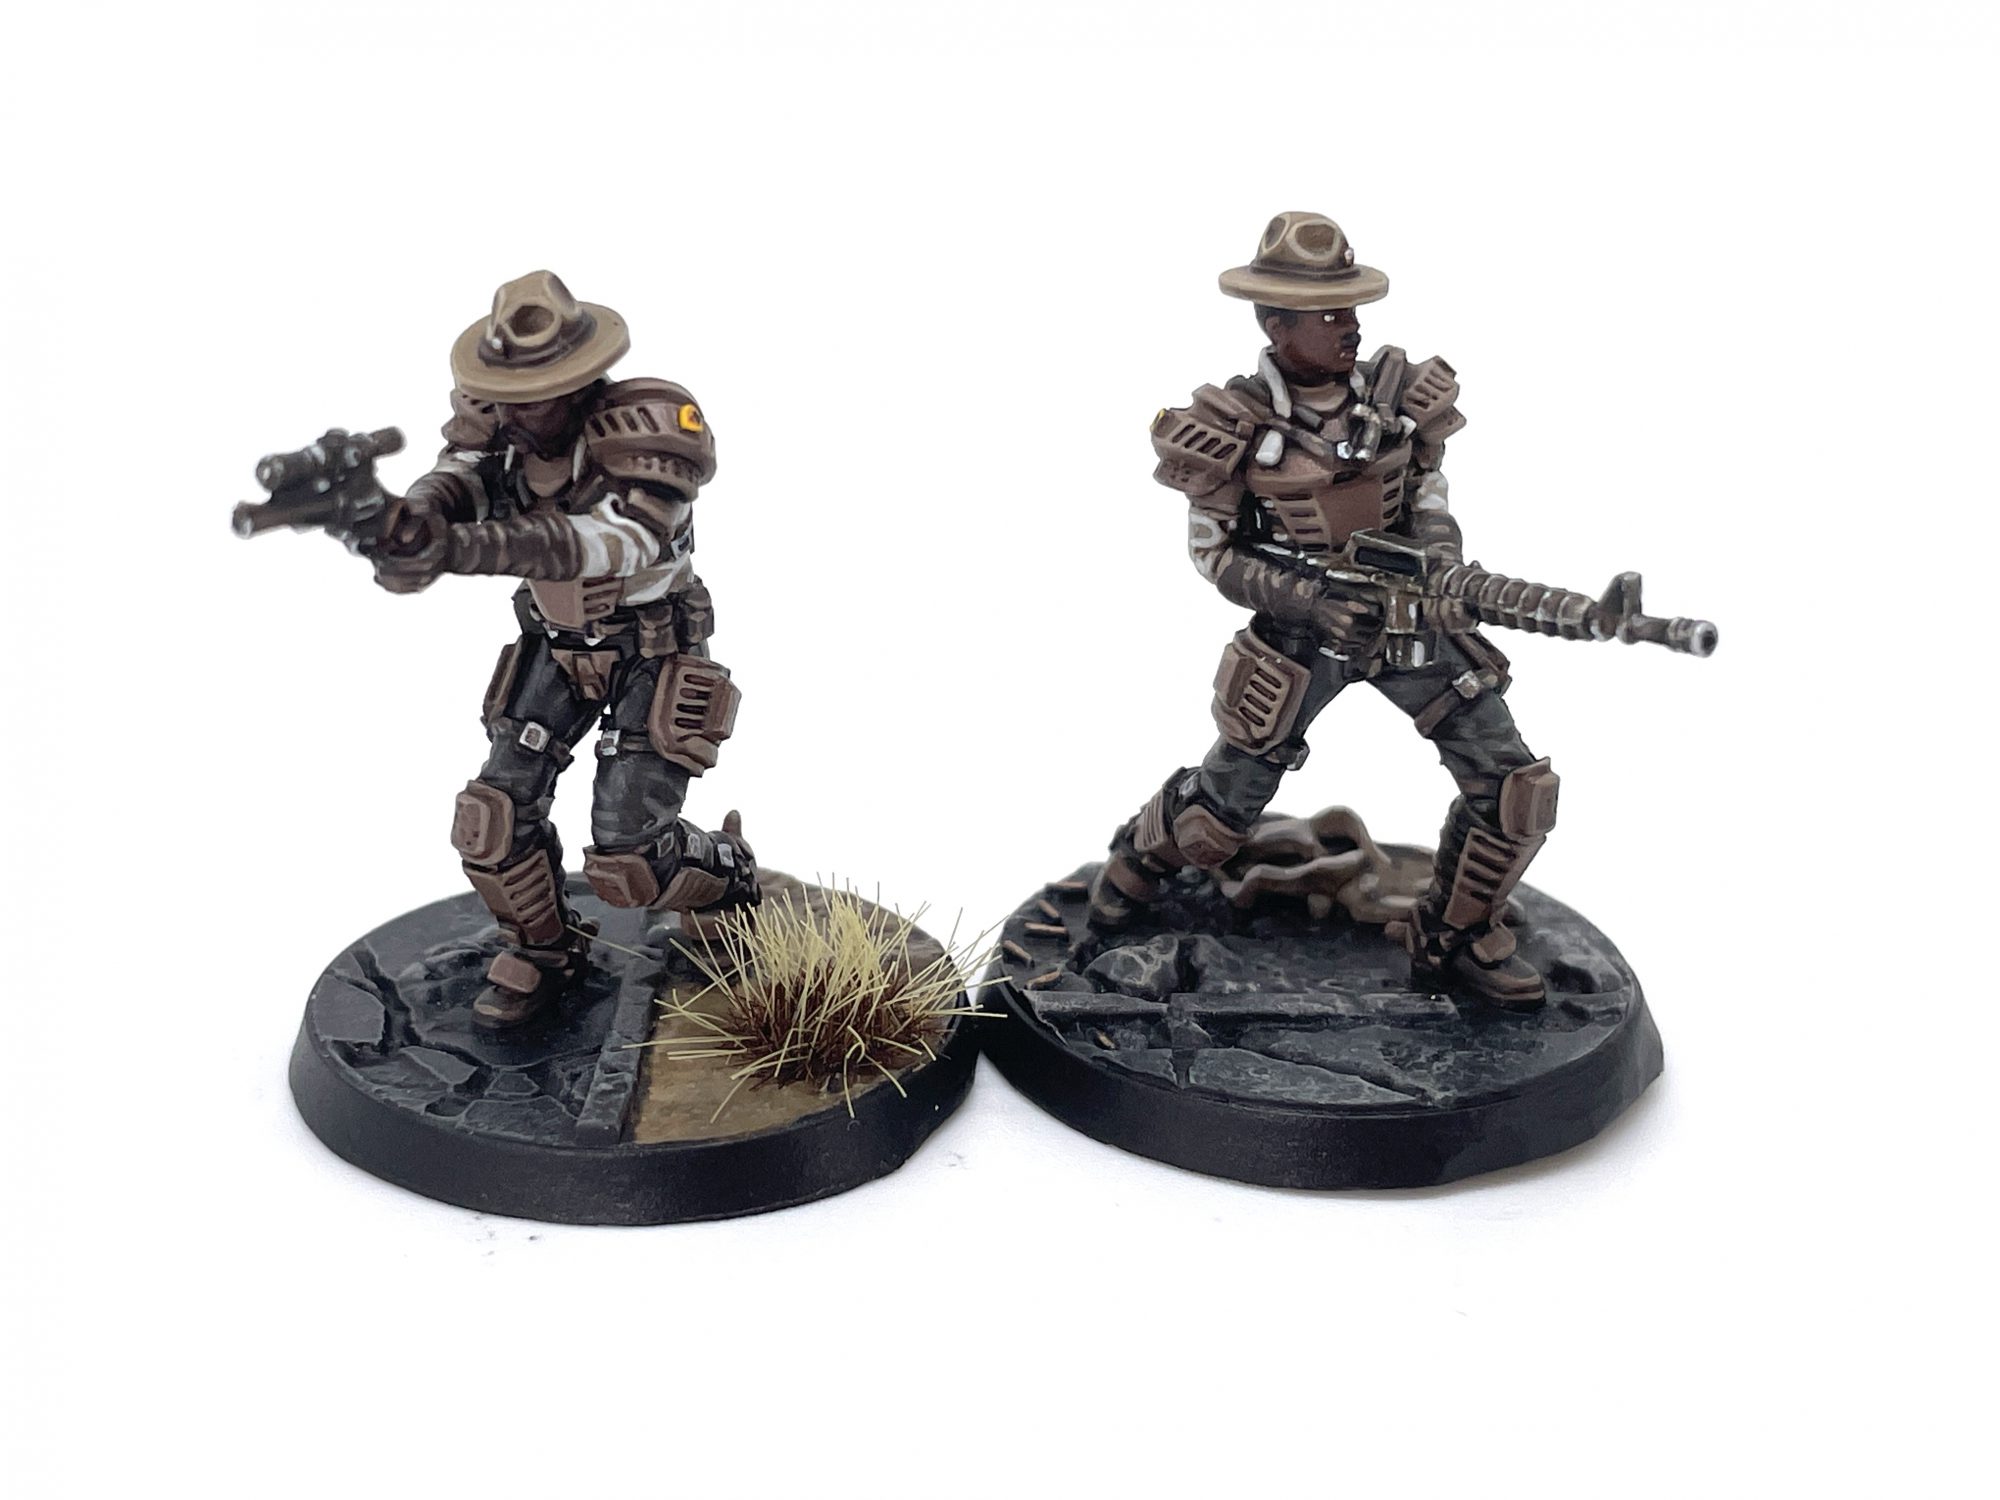
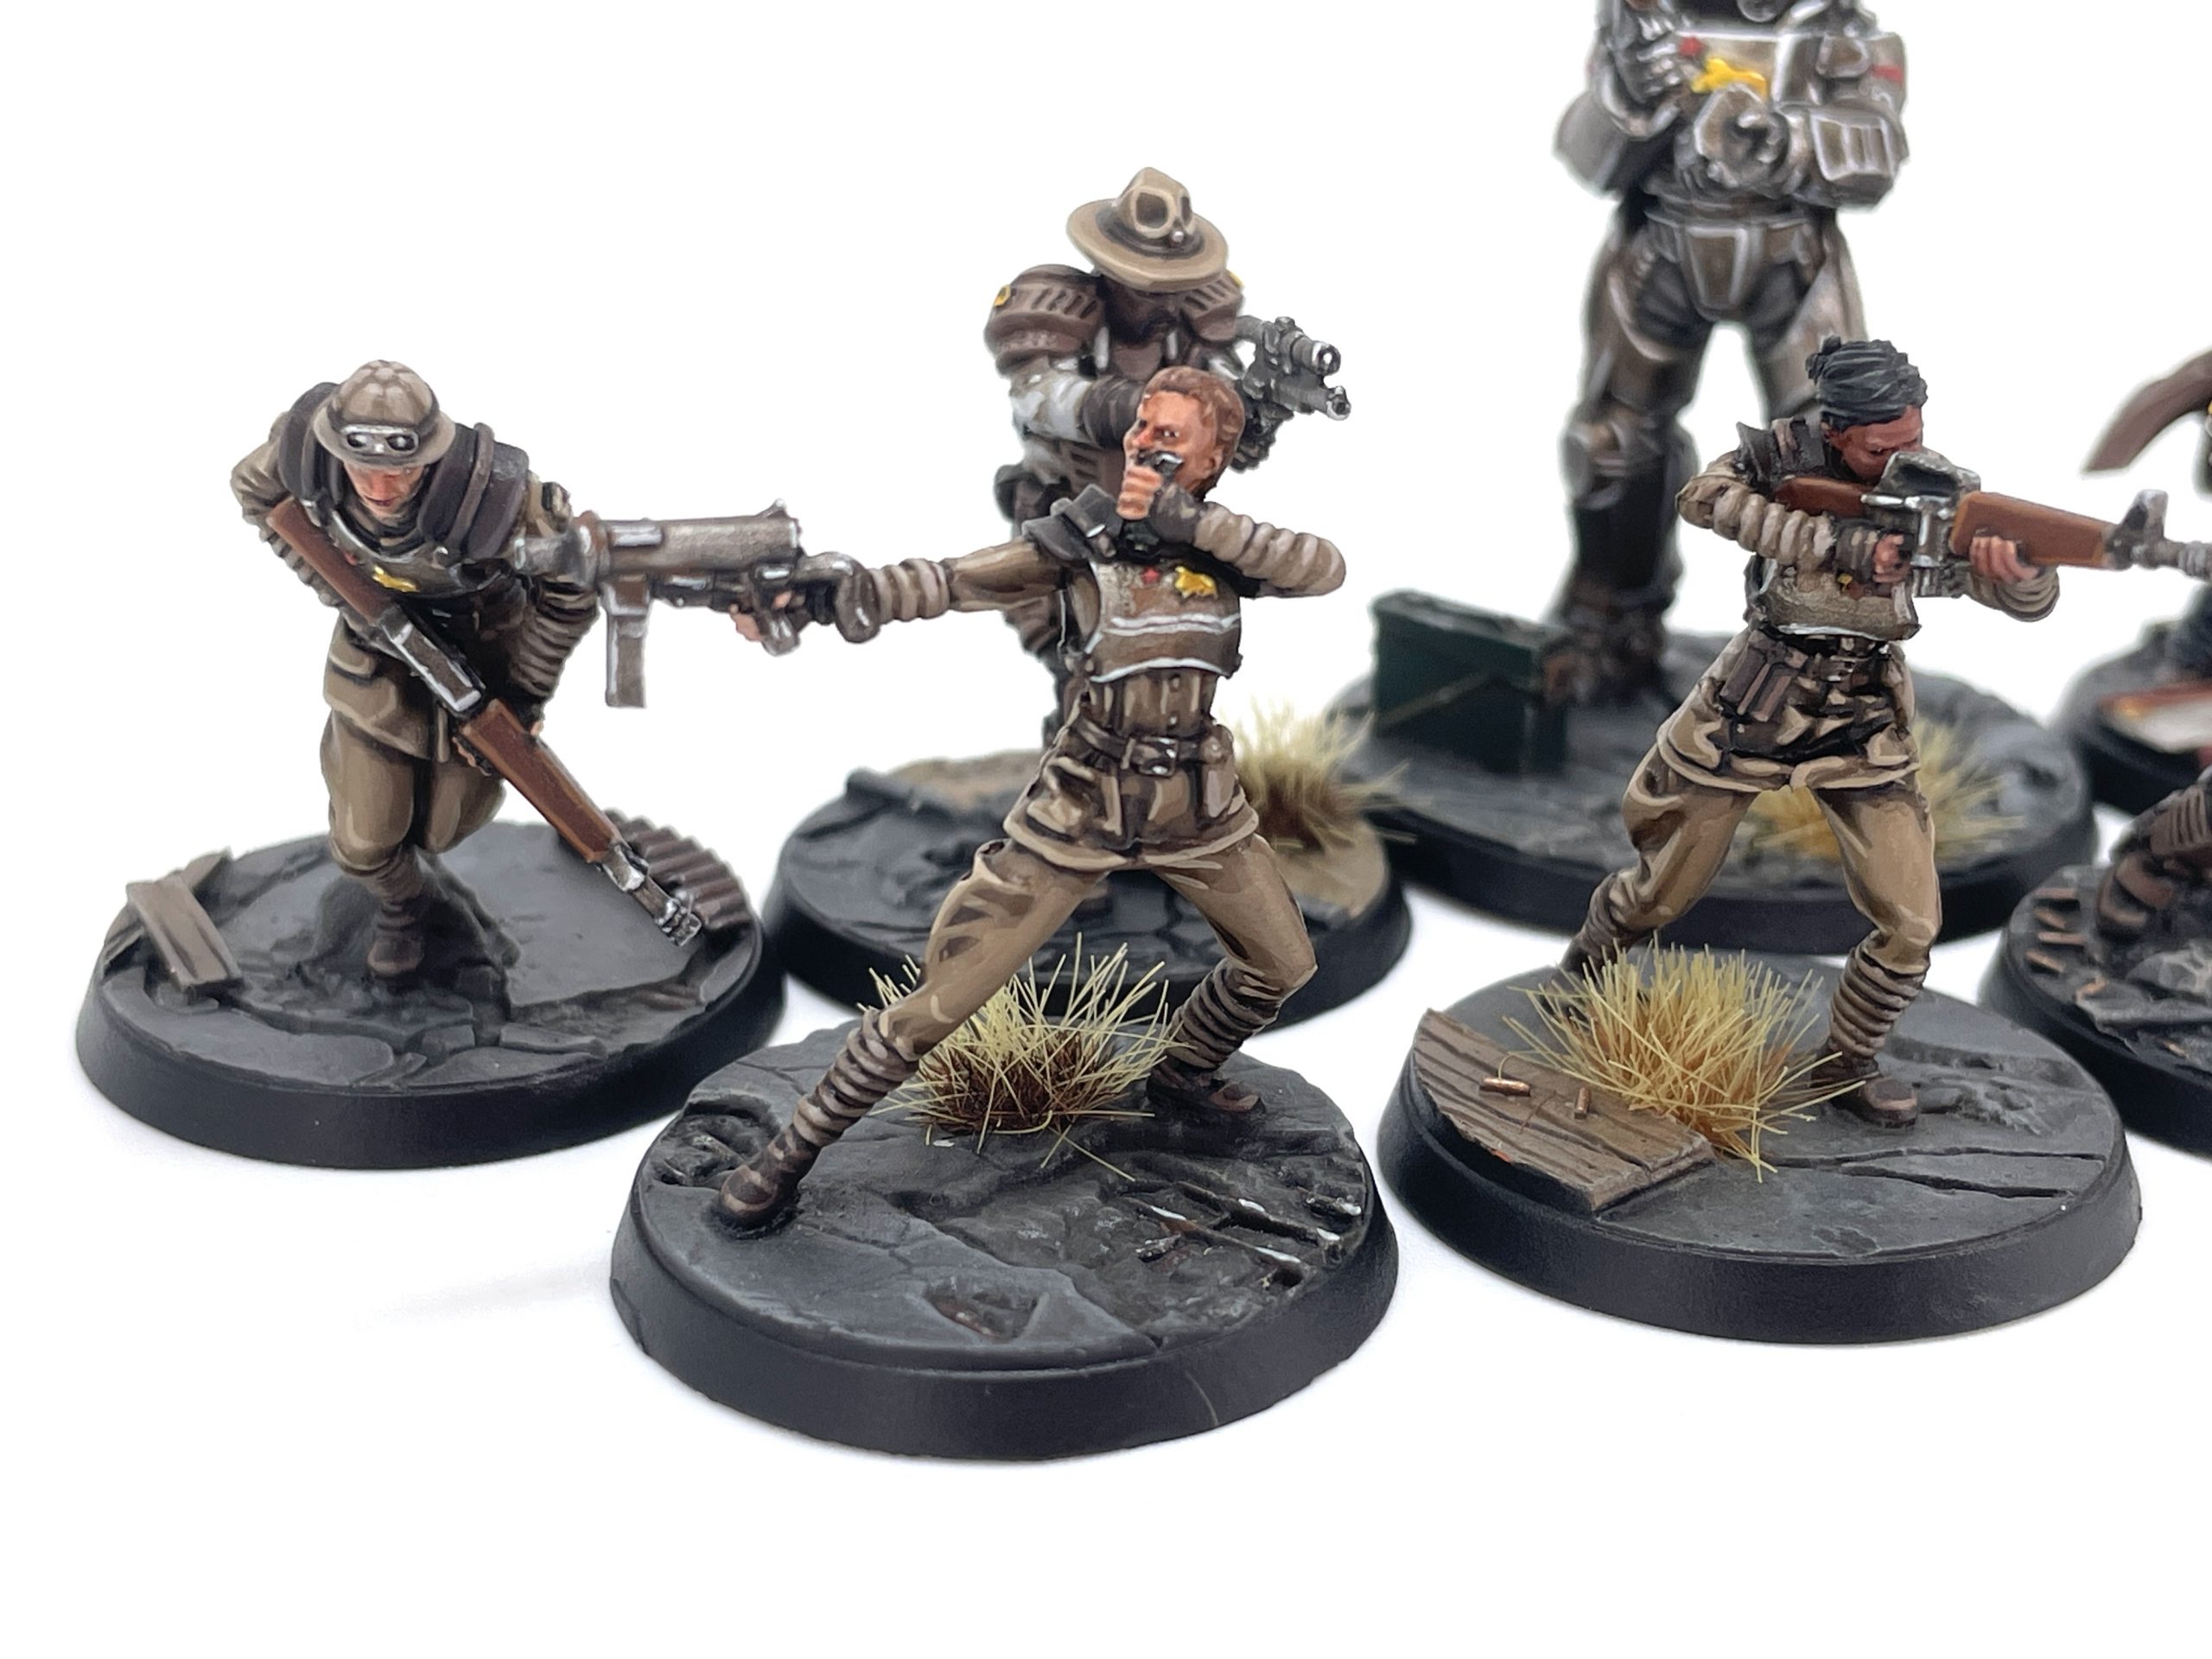
 NCR Troopers. Credit: SRM
A few details are common across nearly every model in the range, and I'll cover those first.
Tan Cloth (BDUs, Ranger Hats)
Every model, save for some Rangers, wears a tan uniform or pants. Starting here will give us a solid start and cover most of the model.
- Layer Steel Legion Drab.
- Wash the entire model Agrax Earthshade.
- Reestablish Steel Legion Drab, leaving the shade in the recesses.
- Make a 1:1 mix of Steel Legion Drab and Karak Stone and apply a highlight, concentrating on raised areas.
- Apply a final edge highlight of pure Karak Stone to the fabric folds and sharp corners.
Cream Cloth (Puttees, Mantles, Helmets, Canteens)
Most NCR models have puttees, the wraps of cloth around their lower legs and forearms. It owes to their uniform inspiration (WW1 Anzacs) and shows up on pretty much every model. I also used this recipe for the mantles worn on some soldiers' shoulders and the cloth-wrapped helmets worn by others. I skipped the color mixing here as the areas tend to be very small, though if you're painting mantles it might be worth a 1:1 layer before the final highlight.
- Layer Baneblade Brown.
- Wash the entire model Agrax Earthshade.
- Reestablish Baneblade Brown, leaving the shade in the recesses.
- Apply a final edge highlight of pure Rakarth Flesh to the fabric folds and sharp corners.
Leather (Straps, Pouches, Gloves)
Every model has leather somewhere - boots, belts, gloves, pouches, whatever. By keeping this uniform, everybody will have at least one consistent detail across them, helping even the more irregular Rangers to gel with the rank and file guys. Sometimes it'll also be easier to just paint these with the highlight color and fill in the center with the darkest color, given how thin the straps can be.
- Layer Dryad Bark.
- Wash the entire model Agrax Earthshade.
- Reestablish Dryad Bark, leaving the shade in the recesses.
- Edge highlight with Gorthor Brown, focusing on the edges and folds.
- Apply a final edge highlight Baneblade Brown to the points and corners.
Darker Leather (Trooper Pauldrons, Civilian Ranger Hat)
You can absolutely paint the pauldrons on your Troopers the same leather as above, but I wanted some slight variation. I also used this brown for the cowboy hat on the Civilian Ranger.
- Layer Rhinox Hide.
- Wash the entire model Agrax Earthshade.
- Reestablish Rhinox Hide, leaving the shade in the recesses.
- Make a 1:1 mix of Rhinox Hide and Karak Stone and apply a highlight to the edges.
- Make a 1:2 mix of Rhinox Hide and Karak Stone and apply a second highlight to the sharpest corners.
Warm Wood (Weapon Stocks)
These Cold War-era weapons tend to have wooden stocks, handles, or bodies, and provide a nice orangey pop of color, while still having a shared palette that looks consistent across a warband. Even though we use Skrag Brown later for rust, it's not as thinned here and will appear different on the models.
- Layer Doombull Brown.
- Wash the entire model Agrax Earthshade.
- Reestablish Doombull Brown, leaving the shade in the recesses.
- Edge highlight with Skrag Brown.
- Apply a final edge highlight Baneblade Brown to the points and corners.
Lenses (Scopes, Goggles)
There are a few rifle scopes and helmets with goggles on them that are easy enough to pick out. You could take this chance to paint some blue or something colorful, but I kept mine neutral in line with the games.
- Layer Grey Seer.
- Wash the entire model Agrax Earthshade.
- Reestablish Grey Seer, leaving the shade in the recesses.
- Apply Ulthuan Grey to the center of the lens.
Rusty Steel (Weapons, Body Armor, Ranger Mask)
Weapons are largely just hunks of metal and paint up quickly. You can add more weathering if you want, but as this is a reasonably well-maintained army, they shouldn't be too rusty.
- Layer Leadbelcher.
- Wash the entire model Agrax Earthshade.
- Make a 3:1 mix of water and Citadel Skrag Brown and paint it into any areas you want to have some rust. Ideal areas would be around rivets or in recesses. You can draw your brush down to simulate water runoff.
- Highlight with Pro Acryl Silver.
Steel Details (Belt Buckles, Buttons)
The buttons and belt buckles on these models are realistic in size, meaning you won't have room for a GW-style multi-stage highlight. Instead we'll just paint, wash, and highlight for the buckles, and simply dot some silver for the buttons.
- Layer Leadbelcher.
- Wash the entire model Agrax Earthshade.
- Highlight with Pro Acryl Silver.
NCR Badges and Logos (Armor Detail)
The two-headed bear and red star of the NCR show up across most of the models in the range in one form or another. There's also some vertical text reading "NCR" that you can occasionally see. While these will also be best applied before that all-over wash, you can paint them afterwards if you want a brighter look. This will also be how we paint the details on the Ranger badges later on.
- Yellow
- Layer Averland Sunset.
- Highlight Yriel Yellow.
- Apply a second highlight of Dorn Yellow to the corners and sharper edges.
- Red
- Layer Mephiston Red.
- Highlight Evil Sunz Scarlet.
- Apply a second highlight of Wildrider Red to the corners.
- White
Skintones (Faces, Hands)
I painted skin last, as it was the one color not getting a dark brown wash. You could lump it in there as well, but I wanted the skin to stand out more. I had four skintones across the collection. You can skip the more colorful washes if you'd like, but I find they add a lot of life to the face. You'll also notice I just pick two skintones and mix between them; you could pick any two really and make the mixes between them. You could also make the mix between the base color and a white if you wanted to go even lighter and less saturated.
- Light Skin
- Layer Cadian Fleshtone.
- Wash all the skin Reikland Fleshshade.
- Wash the nose and lips Carroburg Crimson
- Wash the eyes Druchii Violet
- Reestablish Cadian Fleshtone, leaving the shade in the recesses.
- Make a 1:1 mix of Cadian Fleshtone and Kislev Flesh and apply a highlight, concentrating on raised areas.
- Apply a final edge highlight of pure Kislev Flesh to the point of the nose and sharpest brow lines.
- Medium Light Skin
- Layer Bugman's Glow.
- Wash all the skin Reikland Fleshshade.
- Wash the nose and lips Carroburg Crimson
- Wash the eyes Druchii Violet
- Reestablish Bugman's Glow, leaving the shade in the recesses.
- Make a 1:1 mix of Bugman's Glow and Cadian Fleshtone and apply a highlight, concentrating on raised areas.
- Apply a final edge highlight of pure Cadian Fleshtone to the point of the nose and sharpest brow lines.
- Medium Dark Skin
- Layer Bloodreaver Flesh.
- Wash all the skin Reikland Fleshshade.
- Wash the nose and lips Carroburg Crimson
- Wash the eyes Druchii Violet
- Reestablish Bloodreaver Flesh, leaving the shade in the recesses.
- Make a 1:1 mix of Bloodreaver Flesh and Knight Questor Flesh and apply a highlight, concentrating on raised areas.
- Apply a final edge highlight of pure Knight Questor Flesh to the point of the nose and sharpest brow lines.
- Dark Skin
- Layer Catachan Flesh.
- Wash all the skin Reikland Fleshshade.
- Wash the nose and lips Carroburg Crimson
- Wash the eyes Druchii Violet
- Reestablish Catachan Flesh, leaving the shade in the recesses.
- Make a 1:1 mix of Catachan Flesh and Bloodreaver Flesh and apply a highlight, concentrating on raised areas.
- Apply a final edge highlight of pure Bloodreaver Flesh to the point of the nose and sharpest brow lines.
- Eyes
- Paint the eye P3 Thamar Black.
- Dot the corners of the eyes with Ulthuan Grey.
Ranger Details
 NCR Rangers. Credit: SRM
While the Rangers wear hats the same color as the Trooper uniforms and share metal and leather details with them, they've got a few details of their own with unique armor and cloth colors to work through.
White Cloth (Ranger Shirts, Scarves)
The Rangers wear white shirts and a folded scarf around their neck. As there isn't that much showing, we'll keep it simple with a single highlight.
- Layer Grey Seer.
- Wash the entire model Agrax Earthshade.
- Reestablish Grey Seer, leaving the shade in the recesses.
- Apply a highlight of Ulthuan Grey, concentrating on raised areas and fabric folds.
Dark Grey Cloth (Ranger Pants)
We're going to go for a warm dark grey here to tie into the model's scheme. Similar to the shirts, there isn't that much showing so we'll keep it simple.
- Layer Skavenblight Dinge.
- Wash the entire model Agrax Earthshade.
- Reestablish Skavenblight Dinge, leaving the shade in the recesses.
- Apply a highlight of Stormvermin Fur, concentrating on raised areas and fabric folds.
Ranger Armor
The main texture on these guys is their body armor, worn over their clothes. It's probably best to paint this after their clothes, after working your brush between the plates and straps.
- Layer Gorthor Brown.
- Wash the entire model Agrax Earthshade.
- Reestablish Gorthor Brown, leaving the shade in the recesses.
- Apply an edge highlight of Baneblade Brown.
Veteran Ranger Details
 NCR Veteran Ranger. Credit: SRM
They're the real reason you came to this article and the main reason anyone likes the NCR, you can be honest with me. While they share some common details with the rest of the range, they've got some slouchy jeans, a different colored coat, and an olive drab helmet to tend with.
Denim (Veteran Ranger Pants)
These tend to have a ton of folds so I didn't bother mixing a midtone. Instead I just painted them a raggedy dark blue-grey.
- Layer Dark Reaper.
- Wash the entire model Agrax Earthshade.
- Reestablish Dark Reaper, leaving the shade in the recesses.
- Apply a highlight of The Fang, concentrating on raised areas and fabric folds.
Light Brown Leather (Veteran Ranger Coat)
This is actually the same set of colors as the regular Ranger armor, but looks different enough with a bit of color mixing.
- Layer Gorthor Brown.
- Wash the entire model Agrax Earthshade.
- Reestablish Gorthor Brown, leaving the shade in the recesses.
- Make a 1:1 mix of Gorthor Brown and Baneblade Brown and apply a highlight, concentrating on raised areas.
- Apply a final edge highlight of pure Baneblade Brown to the fabric folds and sharp corners.
Olive Drab Armor (Veteran Ranger Helmets, Ranger Water Packs)
This is really just for the Veteran Ranger helmet. The patrol Rangers also have armored water packs on their backs that you can paint with this recipe too. There are enough random ammo boxes and other bits among
Fallout bases that you'll probably find use for it elsewhere.
- Layer Castellan Green.
- Wash the entire model Agrax Earthshade.
- Reestablish Castellan Green, leaving the shade in the recesses.
- Make a 1:1 mix of Castellan Green and Loren Forest and apply a highlight to the top of the helmet.
- Apply a final edge highlight of pure Loren Forest around the edges and rivets.
Red Lenses (Veteran Ranger Goggles)
You know, the night vision things the dude in the trailer turns on. You could go further with these but I kept them simple.
- Layer Mephiston Red.
- Wash the entire model Agrax Earthshade.
- Reestablish Mephiston Red leaving the shade in the recesses.
- Apply Wild Rider Red to the center of the lens.
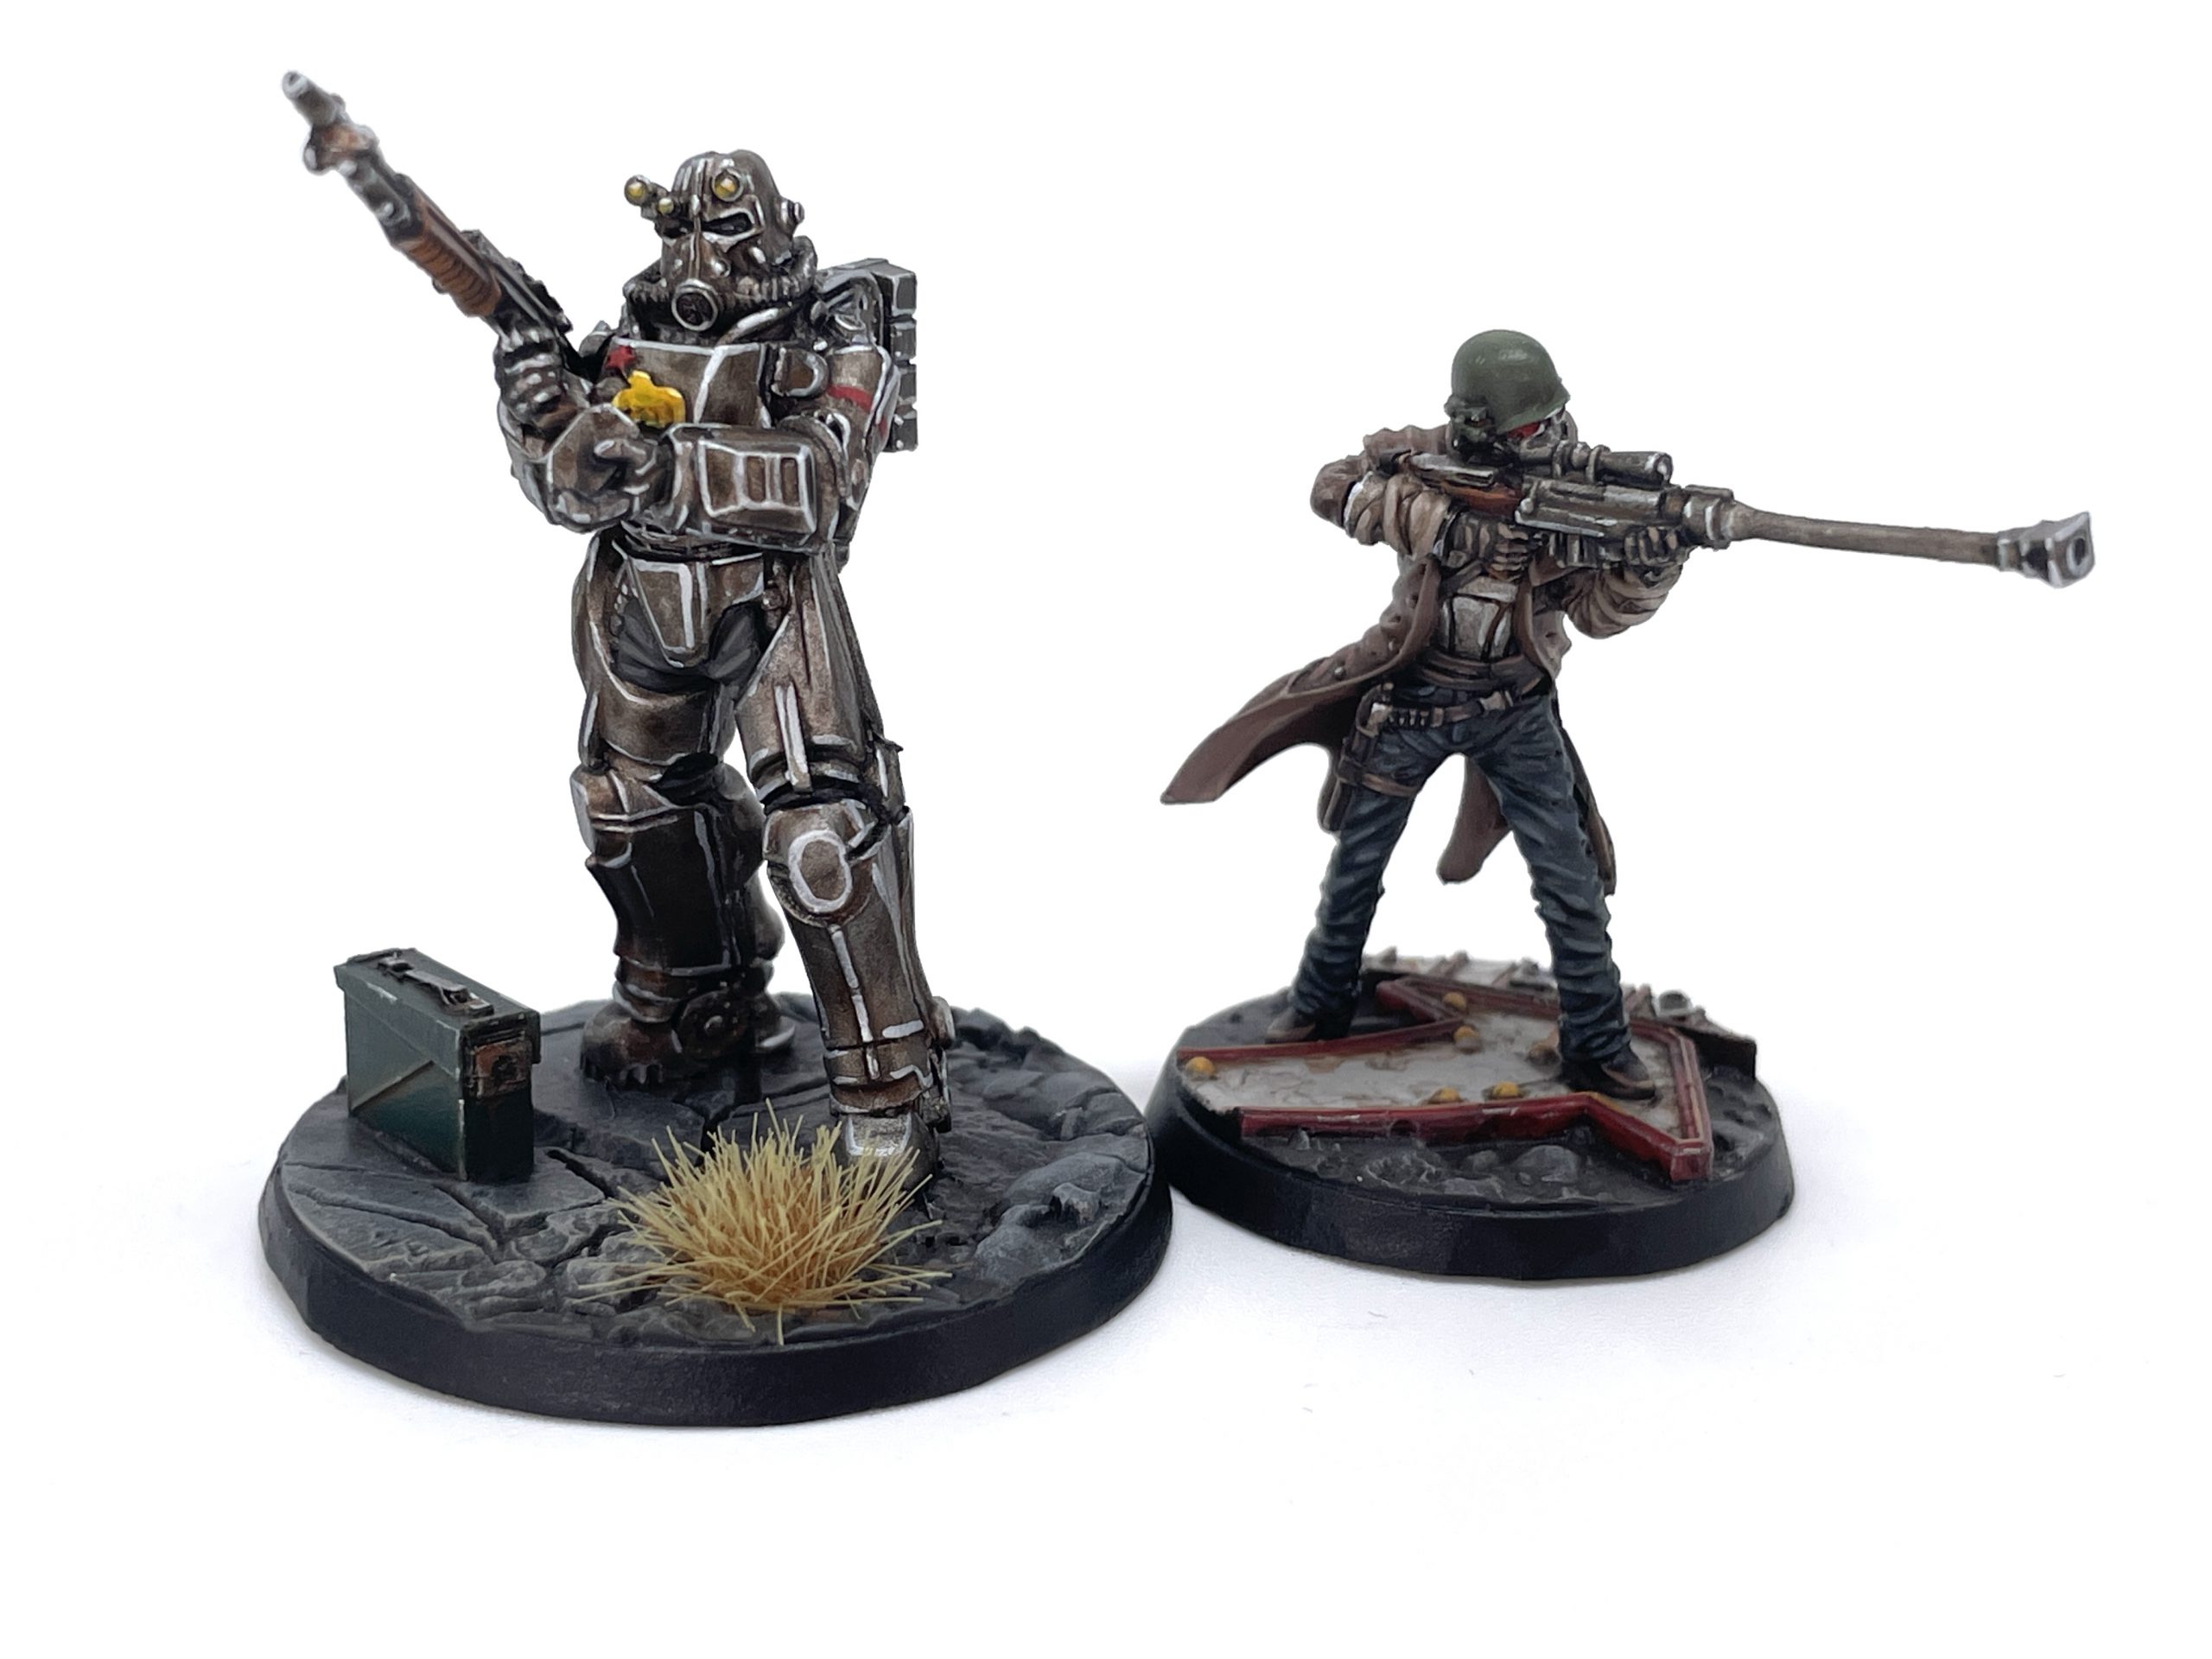
Heavy Troopers
 NCR Heavy Trooper and Veteran Ranger. Credit: SRM
This is more housekeeping than anything too specific. I painted the power armor the same as the
Rusty Steel but with a little more rust, the red banding on the arms the same as the
Badges step, and the undersuit is the same as the
Ranger Dark Cloth. The eye lenses are just
Pro Acryl Coal Black, and the lights on the helmet are
Dorn Yellow. I also applied an extra wash of
Nuln Oil to the batteries on his back for some slight variation.
Character-Specific Details
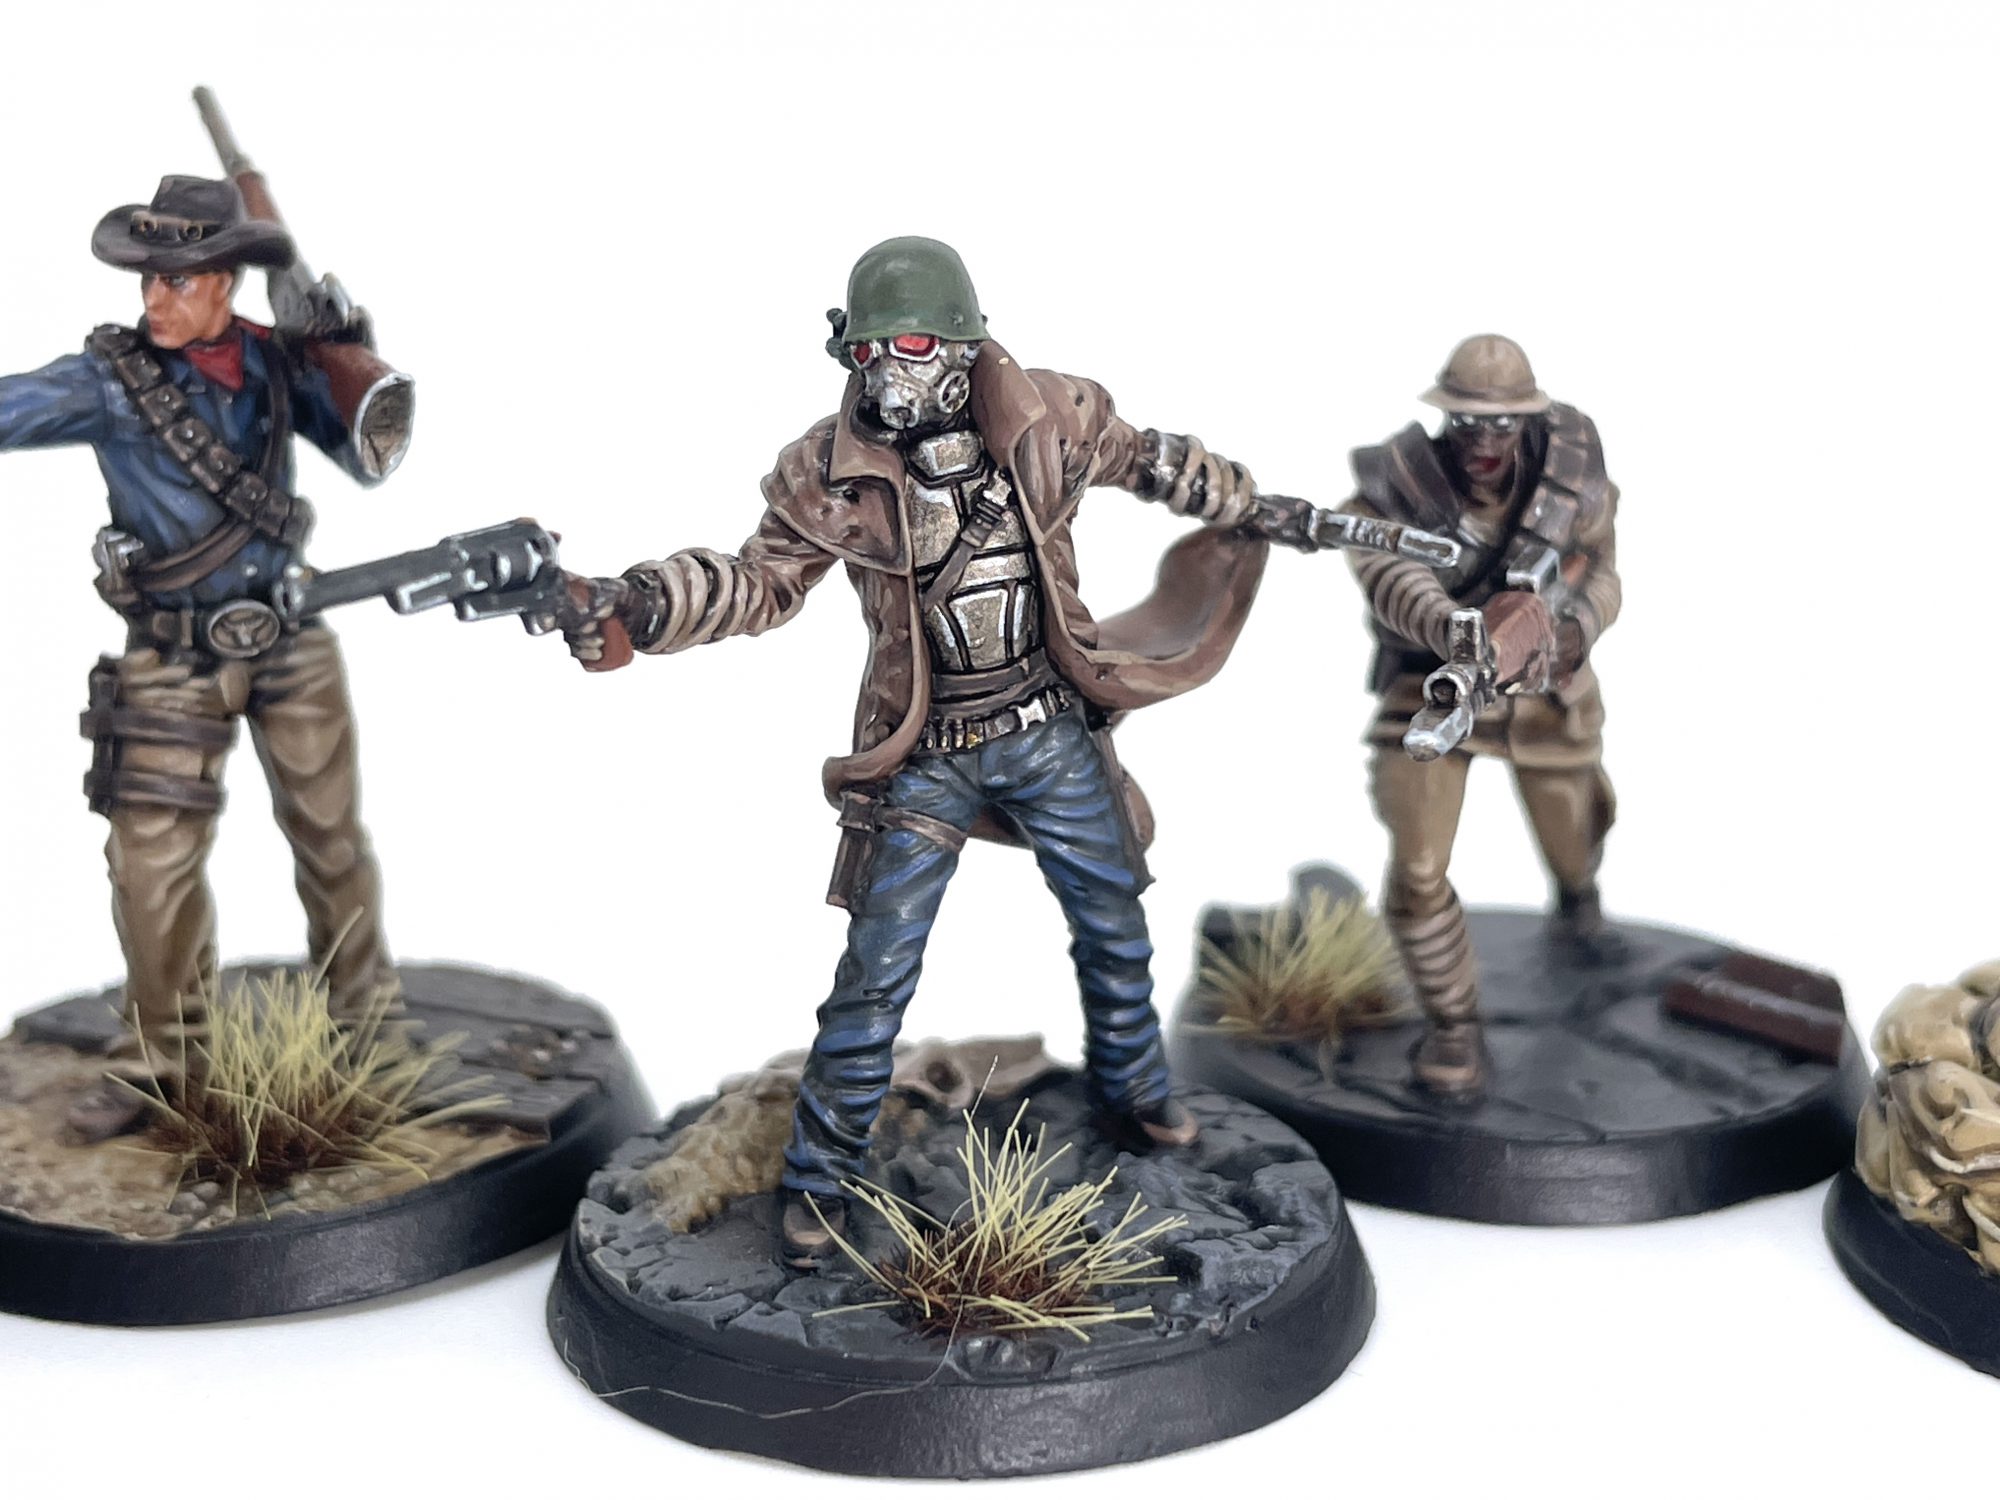
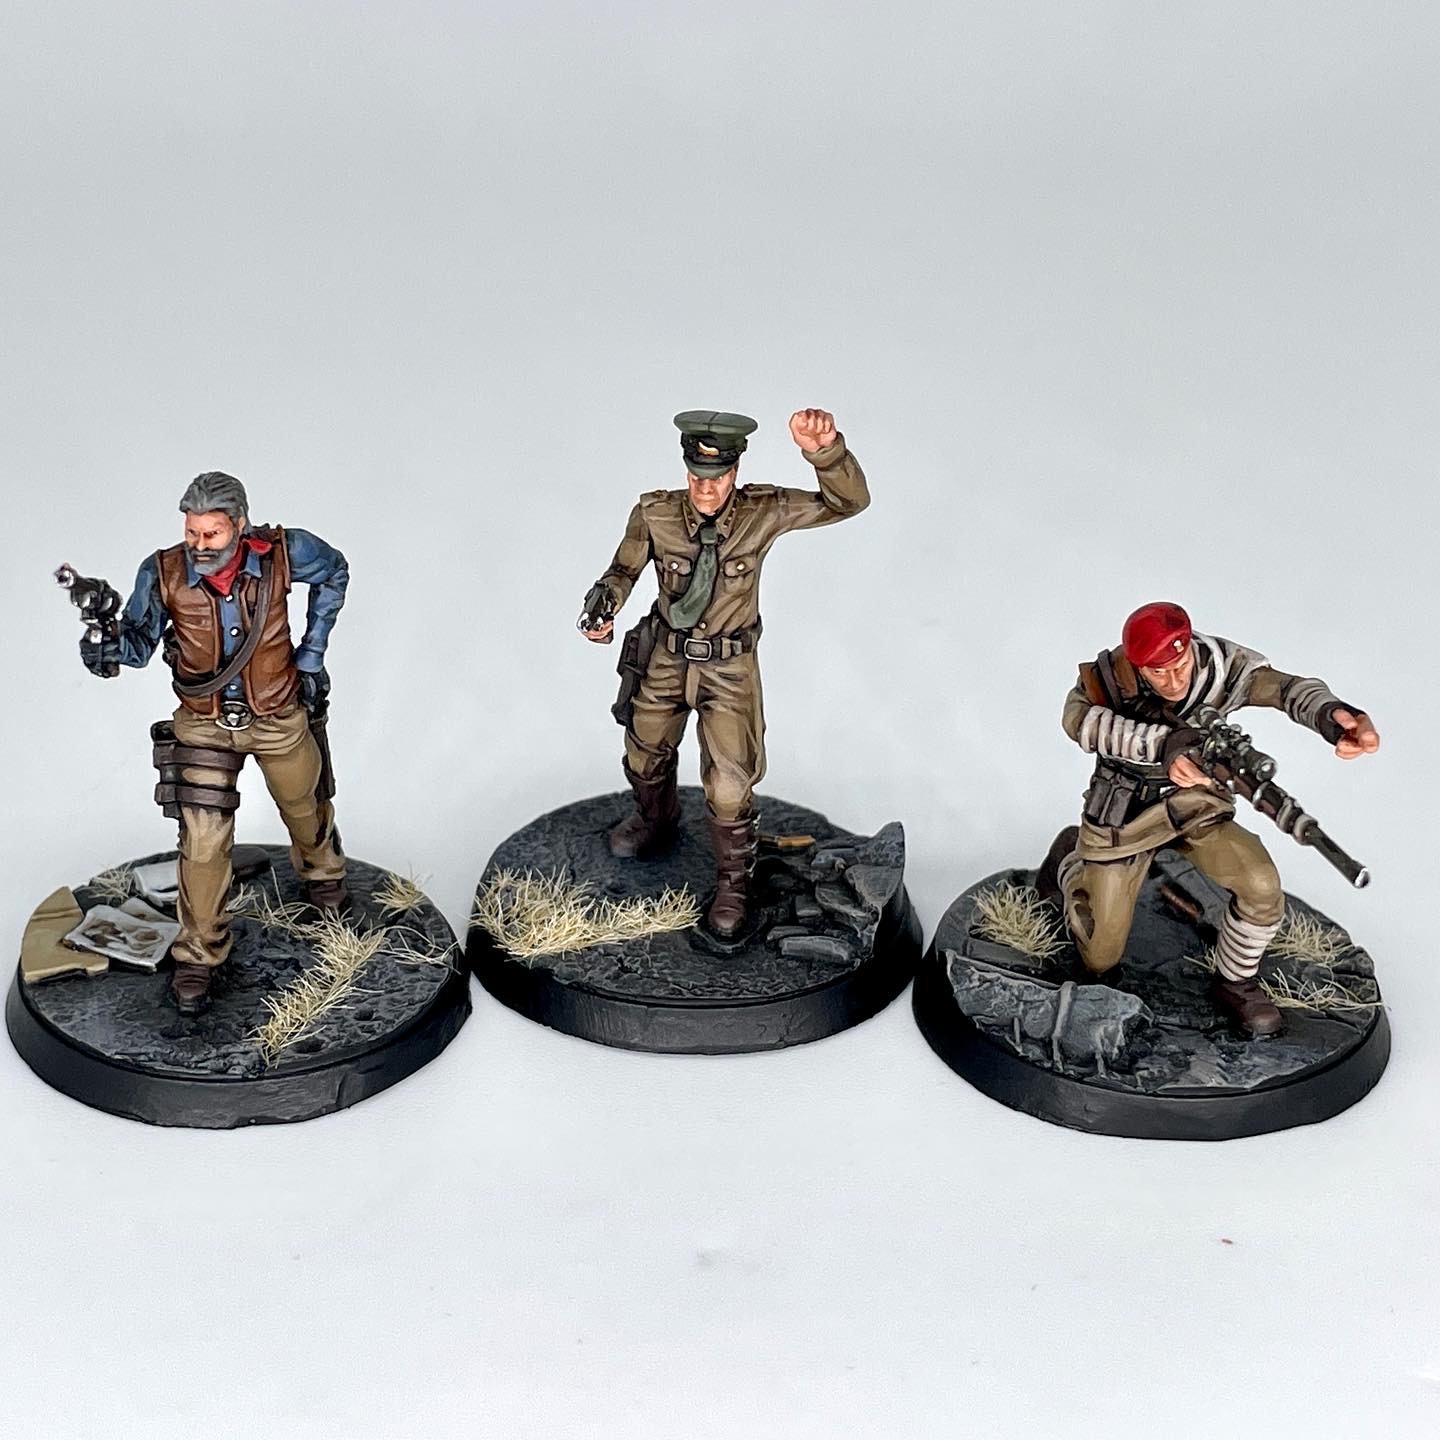 NCR Top Brass. Credit: SRM
Even with a uniform scheme, you've still got a few extra details that don't really fit in with the rest.
Red Cloth (Bandanas, 1st Recon Berets)
There's a few bandanas and berets across the range, appearing on models like Gorobets and Hanlon in the
Top Brass set. For the bandanas you can probably skip the color mixing step, as they're pretty small.
- Layer Mephiston Red.
- Wash the entire model Agrax Earthshade.
- Reestablish Mephiston Red, leaving the shade in the recesses.
- Make a 1:1 mix of Mephiston Red and Wild Rider Red and apply a highlight, concentrating on raised areas.
- Apply a final edge highlight of pure Wild Rider Red to the fabric folds and sharp corners.
Olive Drab Cloth (General Lee Oliver's Hat and Tie, Berets)
While I painted all my berets in 1st Recon red, several NCR officers have green ones. There's also some green cloth on General Lee Oliver it'll be good to cover. You could do a color mix for a midtone on a larger area like a beret, in which case this is basically the same as the Veteran Ranger helmet.
- Layer Castellan Green.
- Wash the entire model Agrax Earthshade.
- Reestablish Castellan Green, leaving the shade in the recesses.
- Apply an edge highlight of pure Loren Forest around the edges and folds.
Blue Cloth (Civilian Ranger Shirts)
There's a single, extremely cowboy-coded Ranger in the NCR Ranger Patrol box, as well as Chief Hanlon from the NCR Top Brass box who both wear a blue western shirt. You could potentially do this for the Veteran Rangers if you wanted lighter jeans too. I went for a color mix for the highlight to keep the color from getting too cold.
- Layer The Fang.
- Wash the entire model Agrax Earthshade.
- Reestablish The Fang, leaving the shade in the recesses.
- Make a 1:1 mix of The Fang and Karak Stone and apply a highlight to the folds of the fabric and cuffs.
Gold (Badges, Ranger Sequoia Details)
These basically just show up on berets, some detailing on the big irons carried by Hanlon and the Veteran Rangers, and Oliver's hat.
Fallout's not really a world with
much gold in it.
- Layer Retributor Armour.
- Wash the entire model Agrax Earthshade.
- Highlight Pro Acryl Light Bronze.
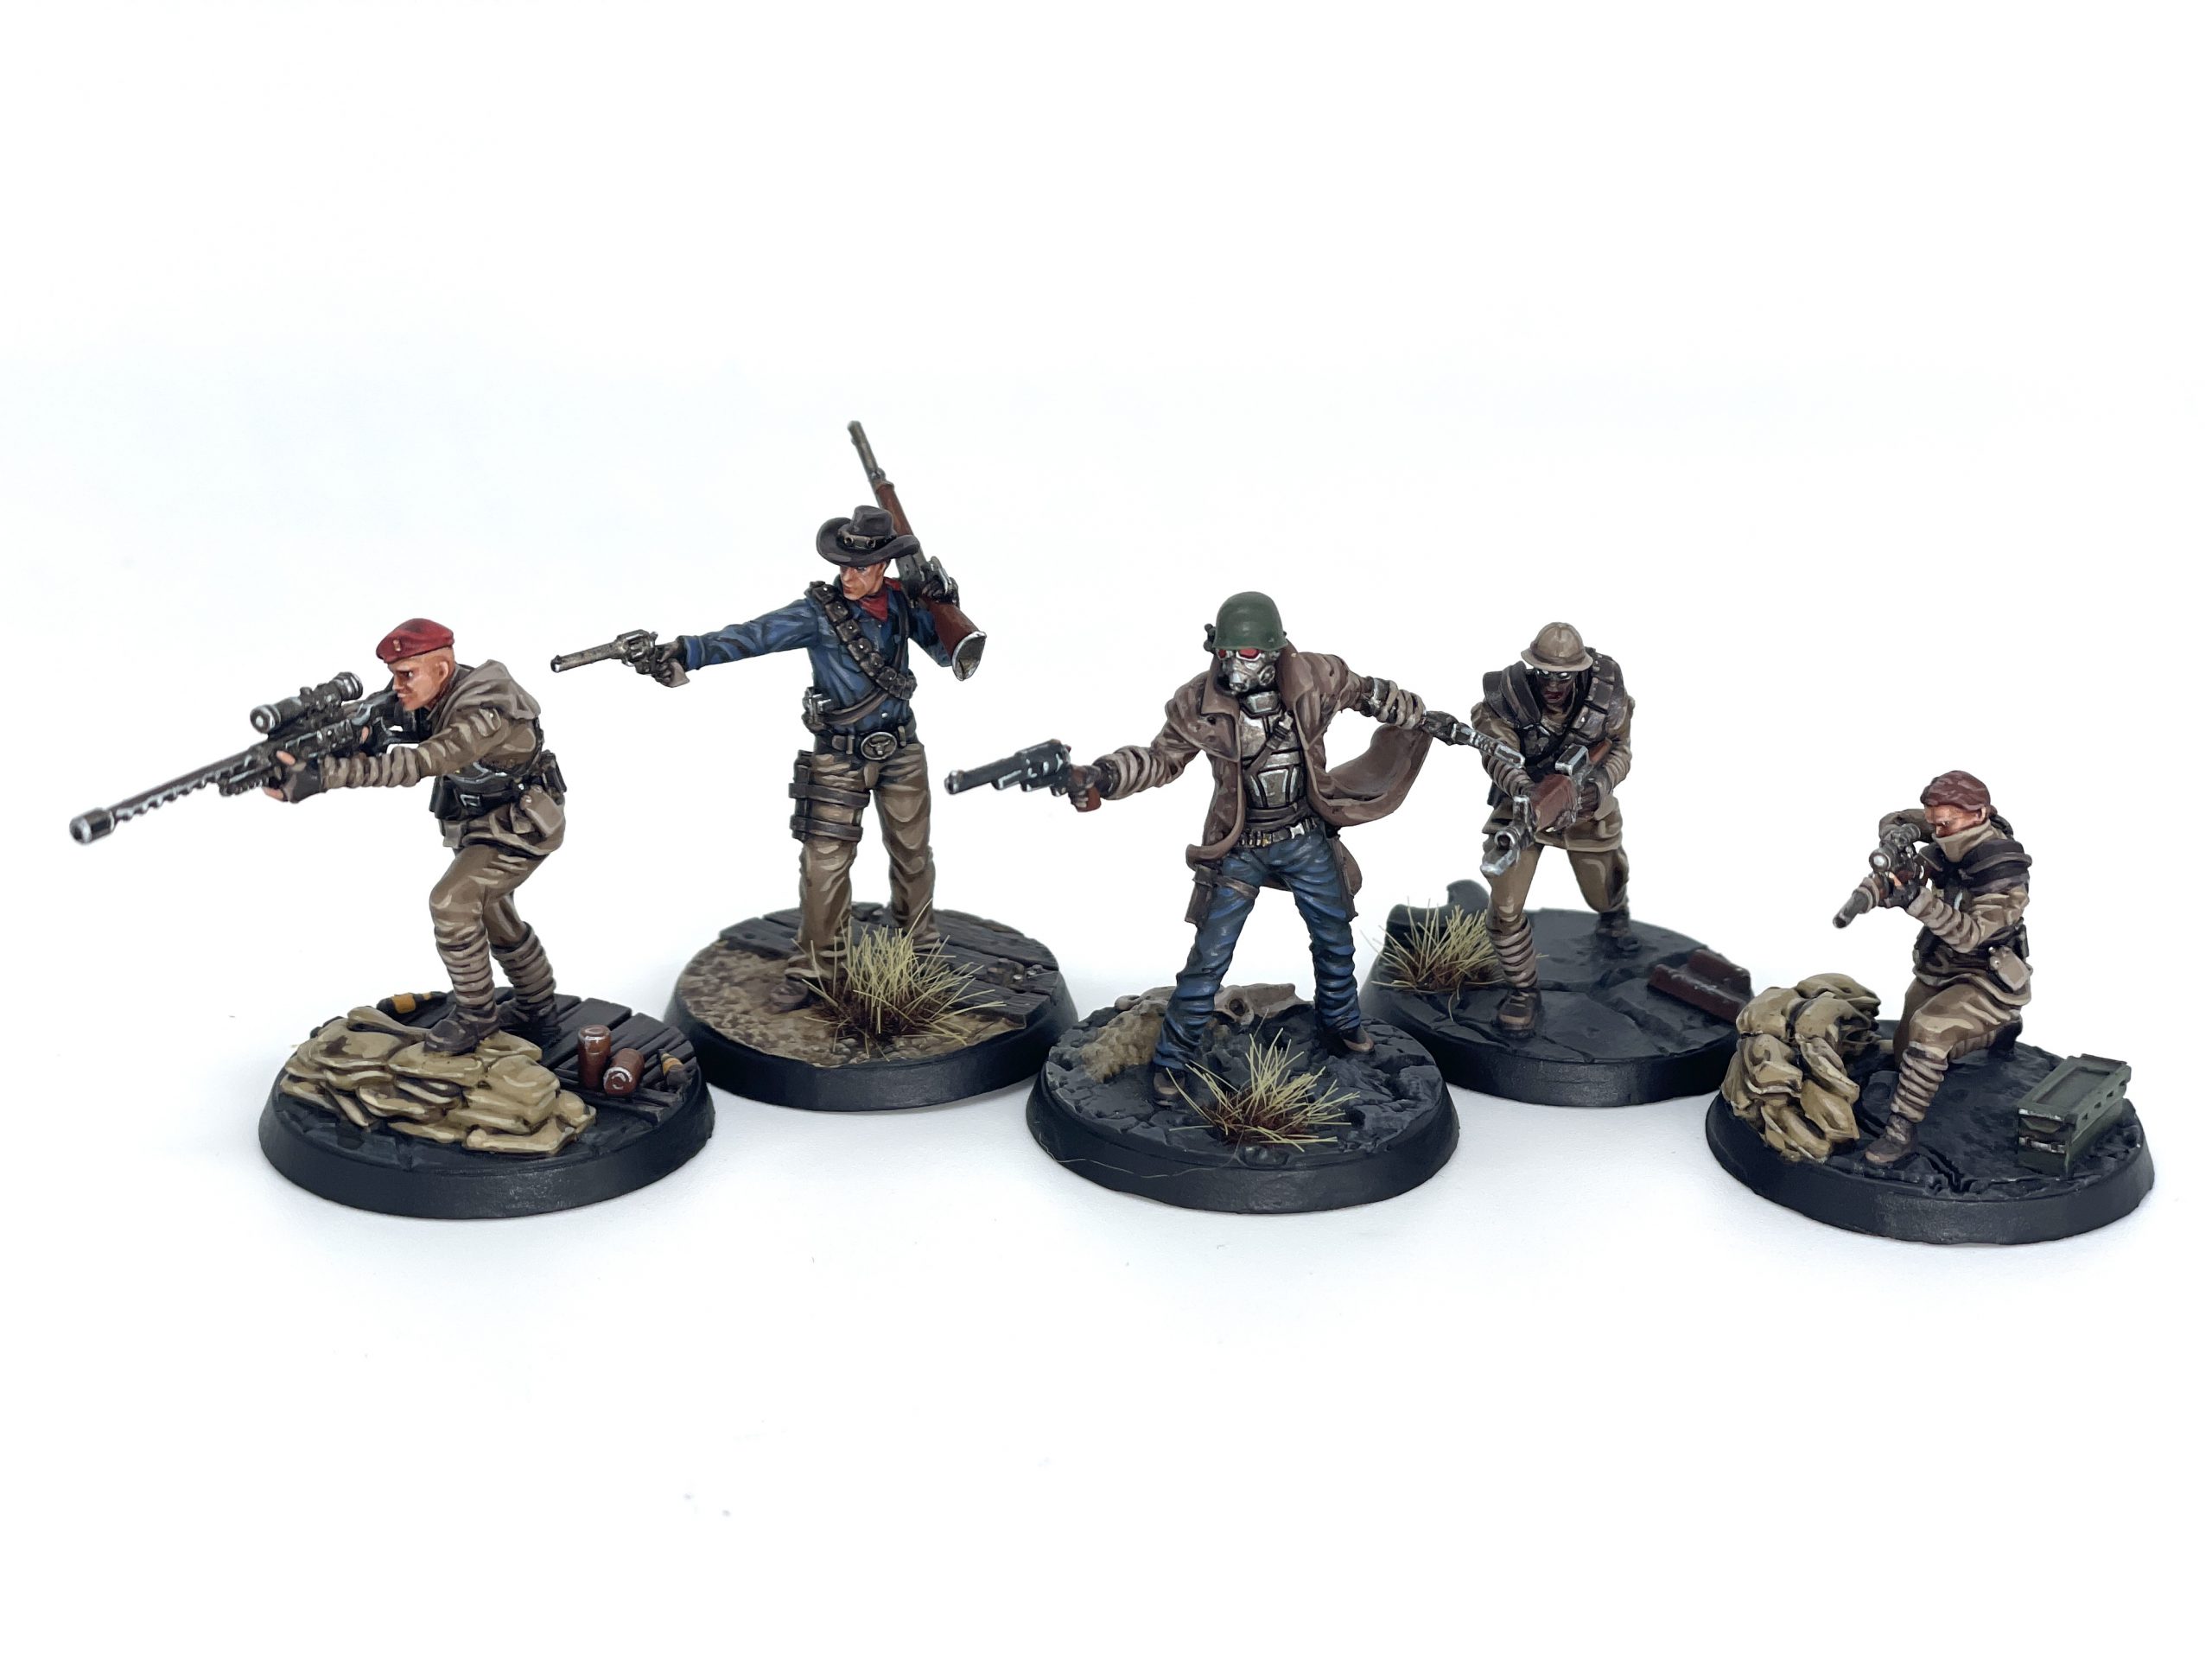
We Won't Go Quietly, the Legion Can Count on That
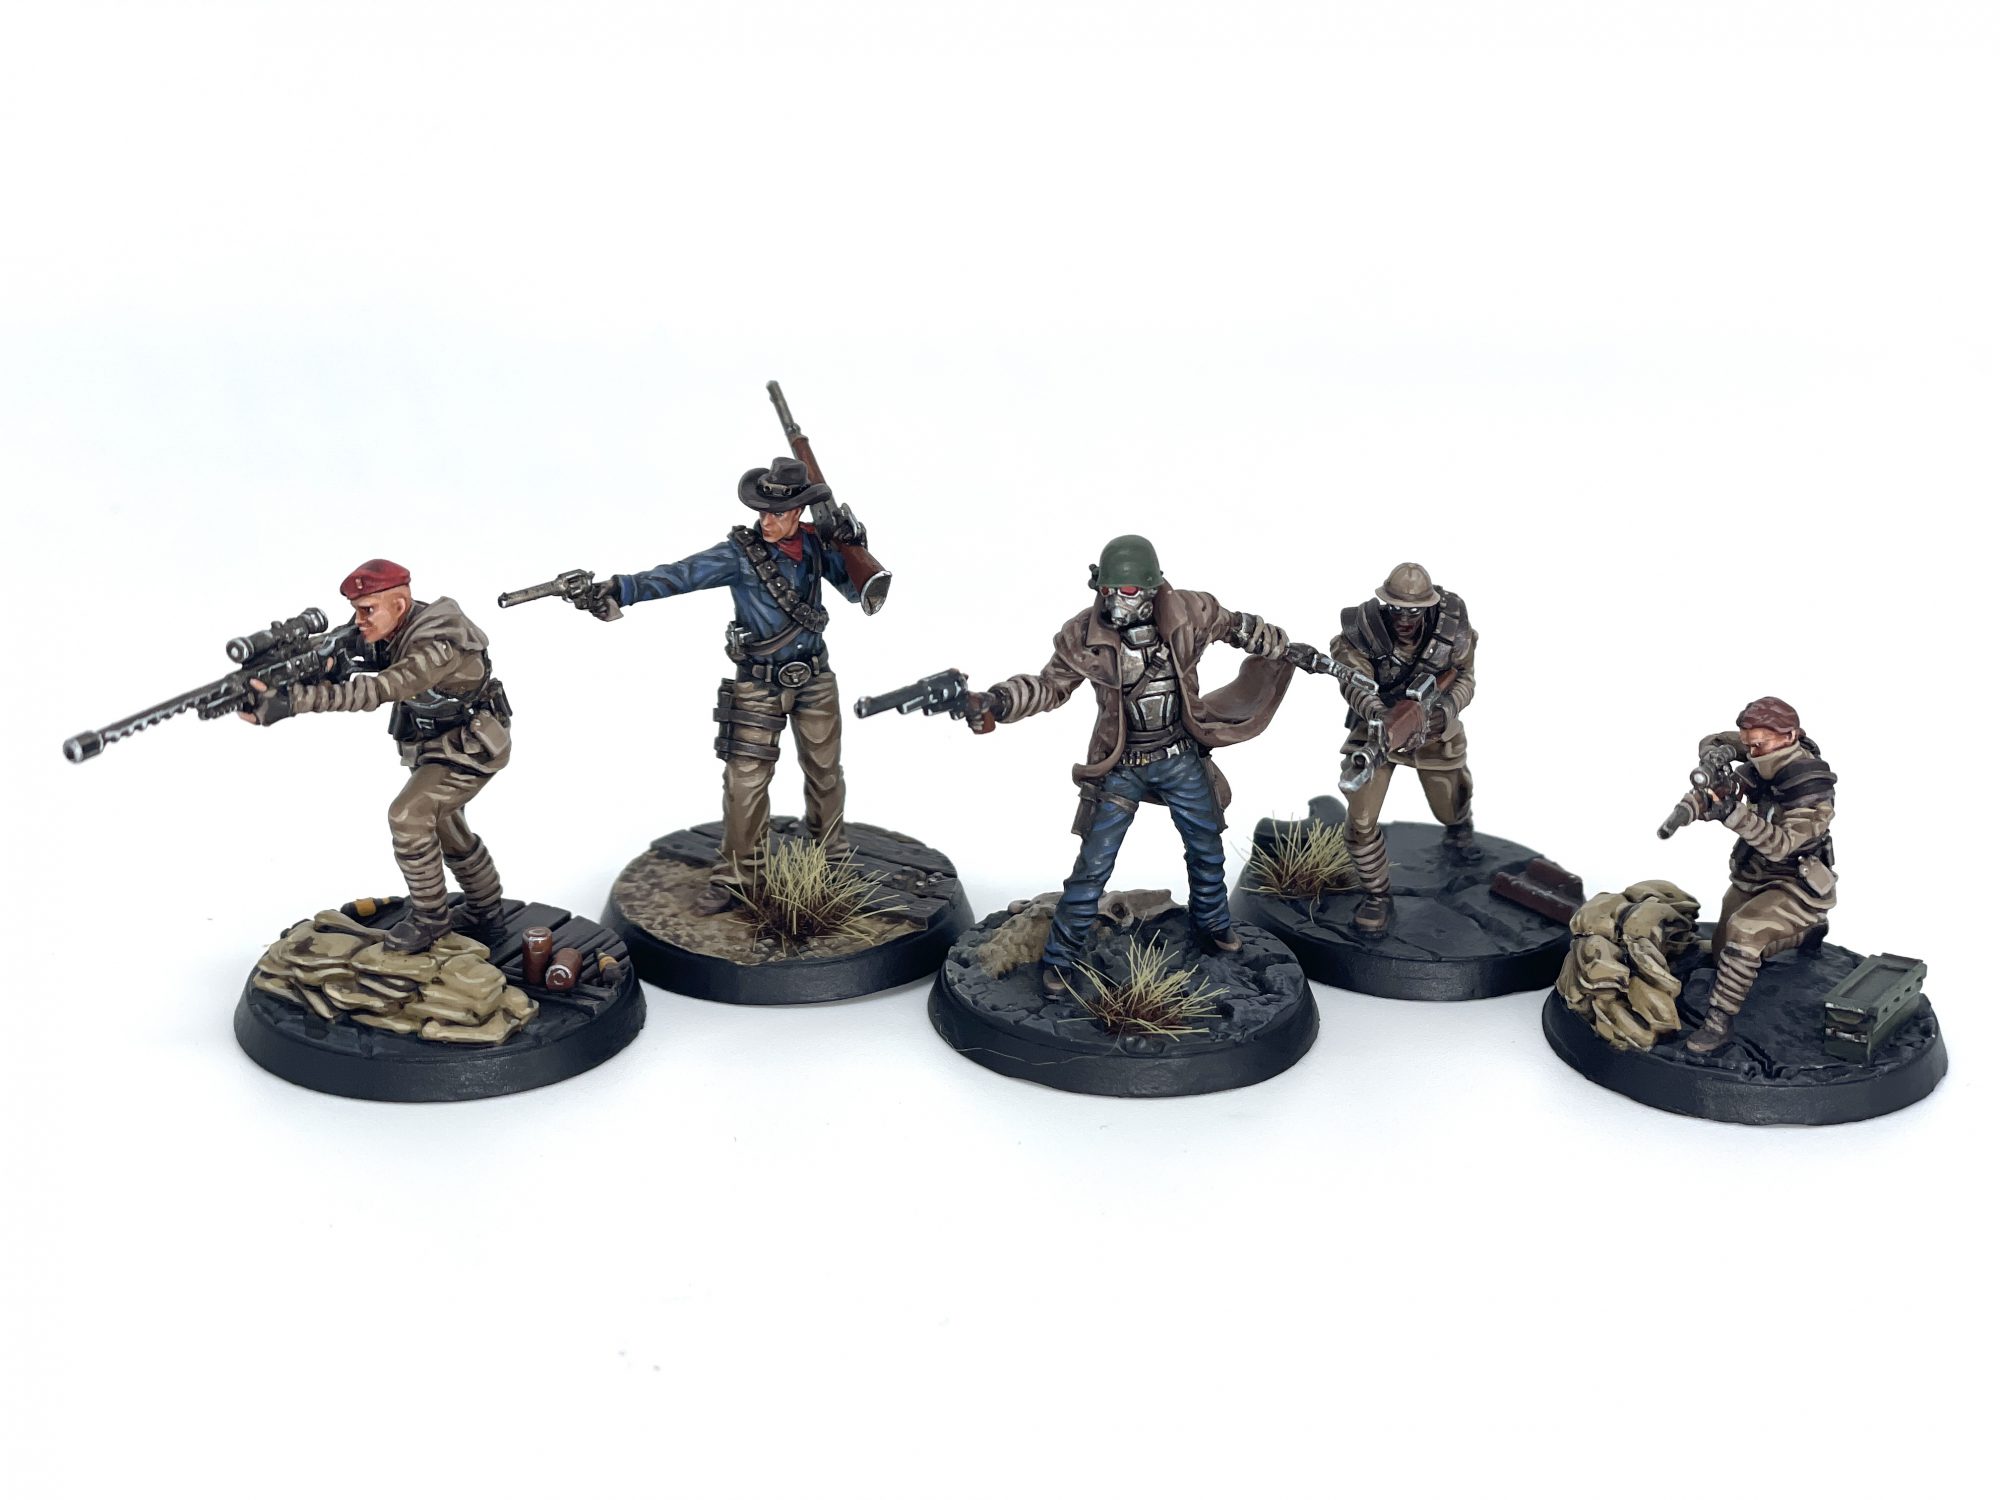 NCR Ranger Patrol. Credit: SRM
With that, you should have pretty much everything you need to paint up your NCR force and stick it to the Legion! While we're still waiting for potential rules to use these guys in
Fallout Factions, we've written
plenty of other good stuff for a would-be wasteland wanderer. We'll also update this article if they make a model of Maximus' sick NCR armor from Season 2. Until then, we'll be patrolling the Mojave, almost wishing for a nuclear winter.
Have any questions or feedback? Drop us a note in the comments below or email us at contact@goonhammer.com. Want articles like this linked in your inbox every Monday morning? Sign up for our newsletter. And don’t forget that you can support us on Patreon for backer rewards like early video content, Administratum access, an ad-free experience on our website and more.Thank you for being a friend.

 NCR Core Box. Credit: SRM
 NCR WIP models. Credit: SRM
 NCR Troopers. Credit: SRM
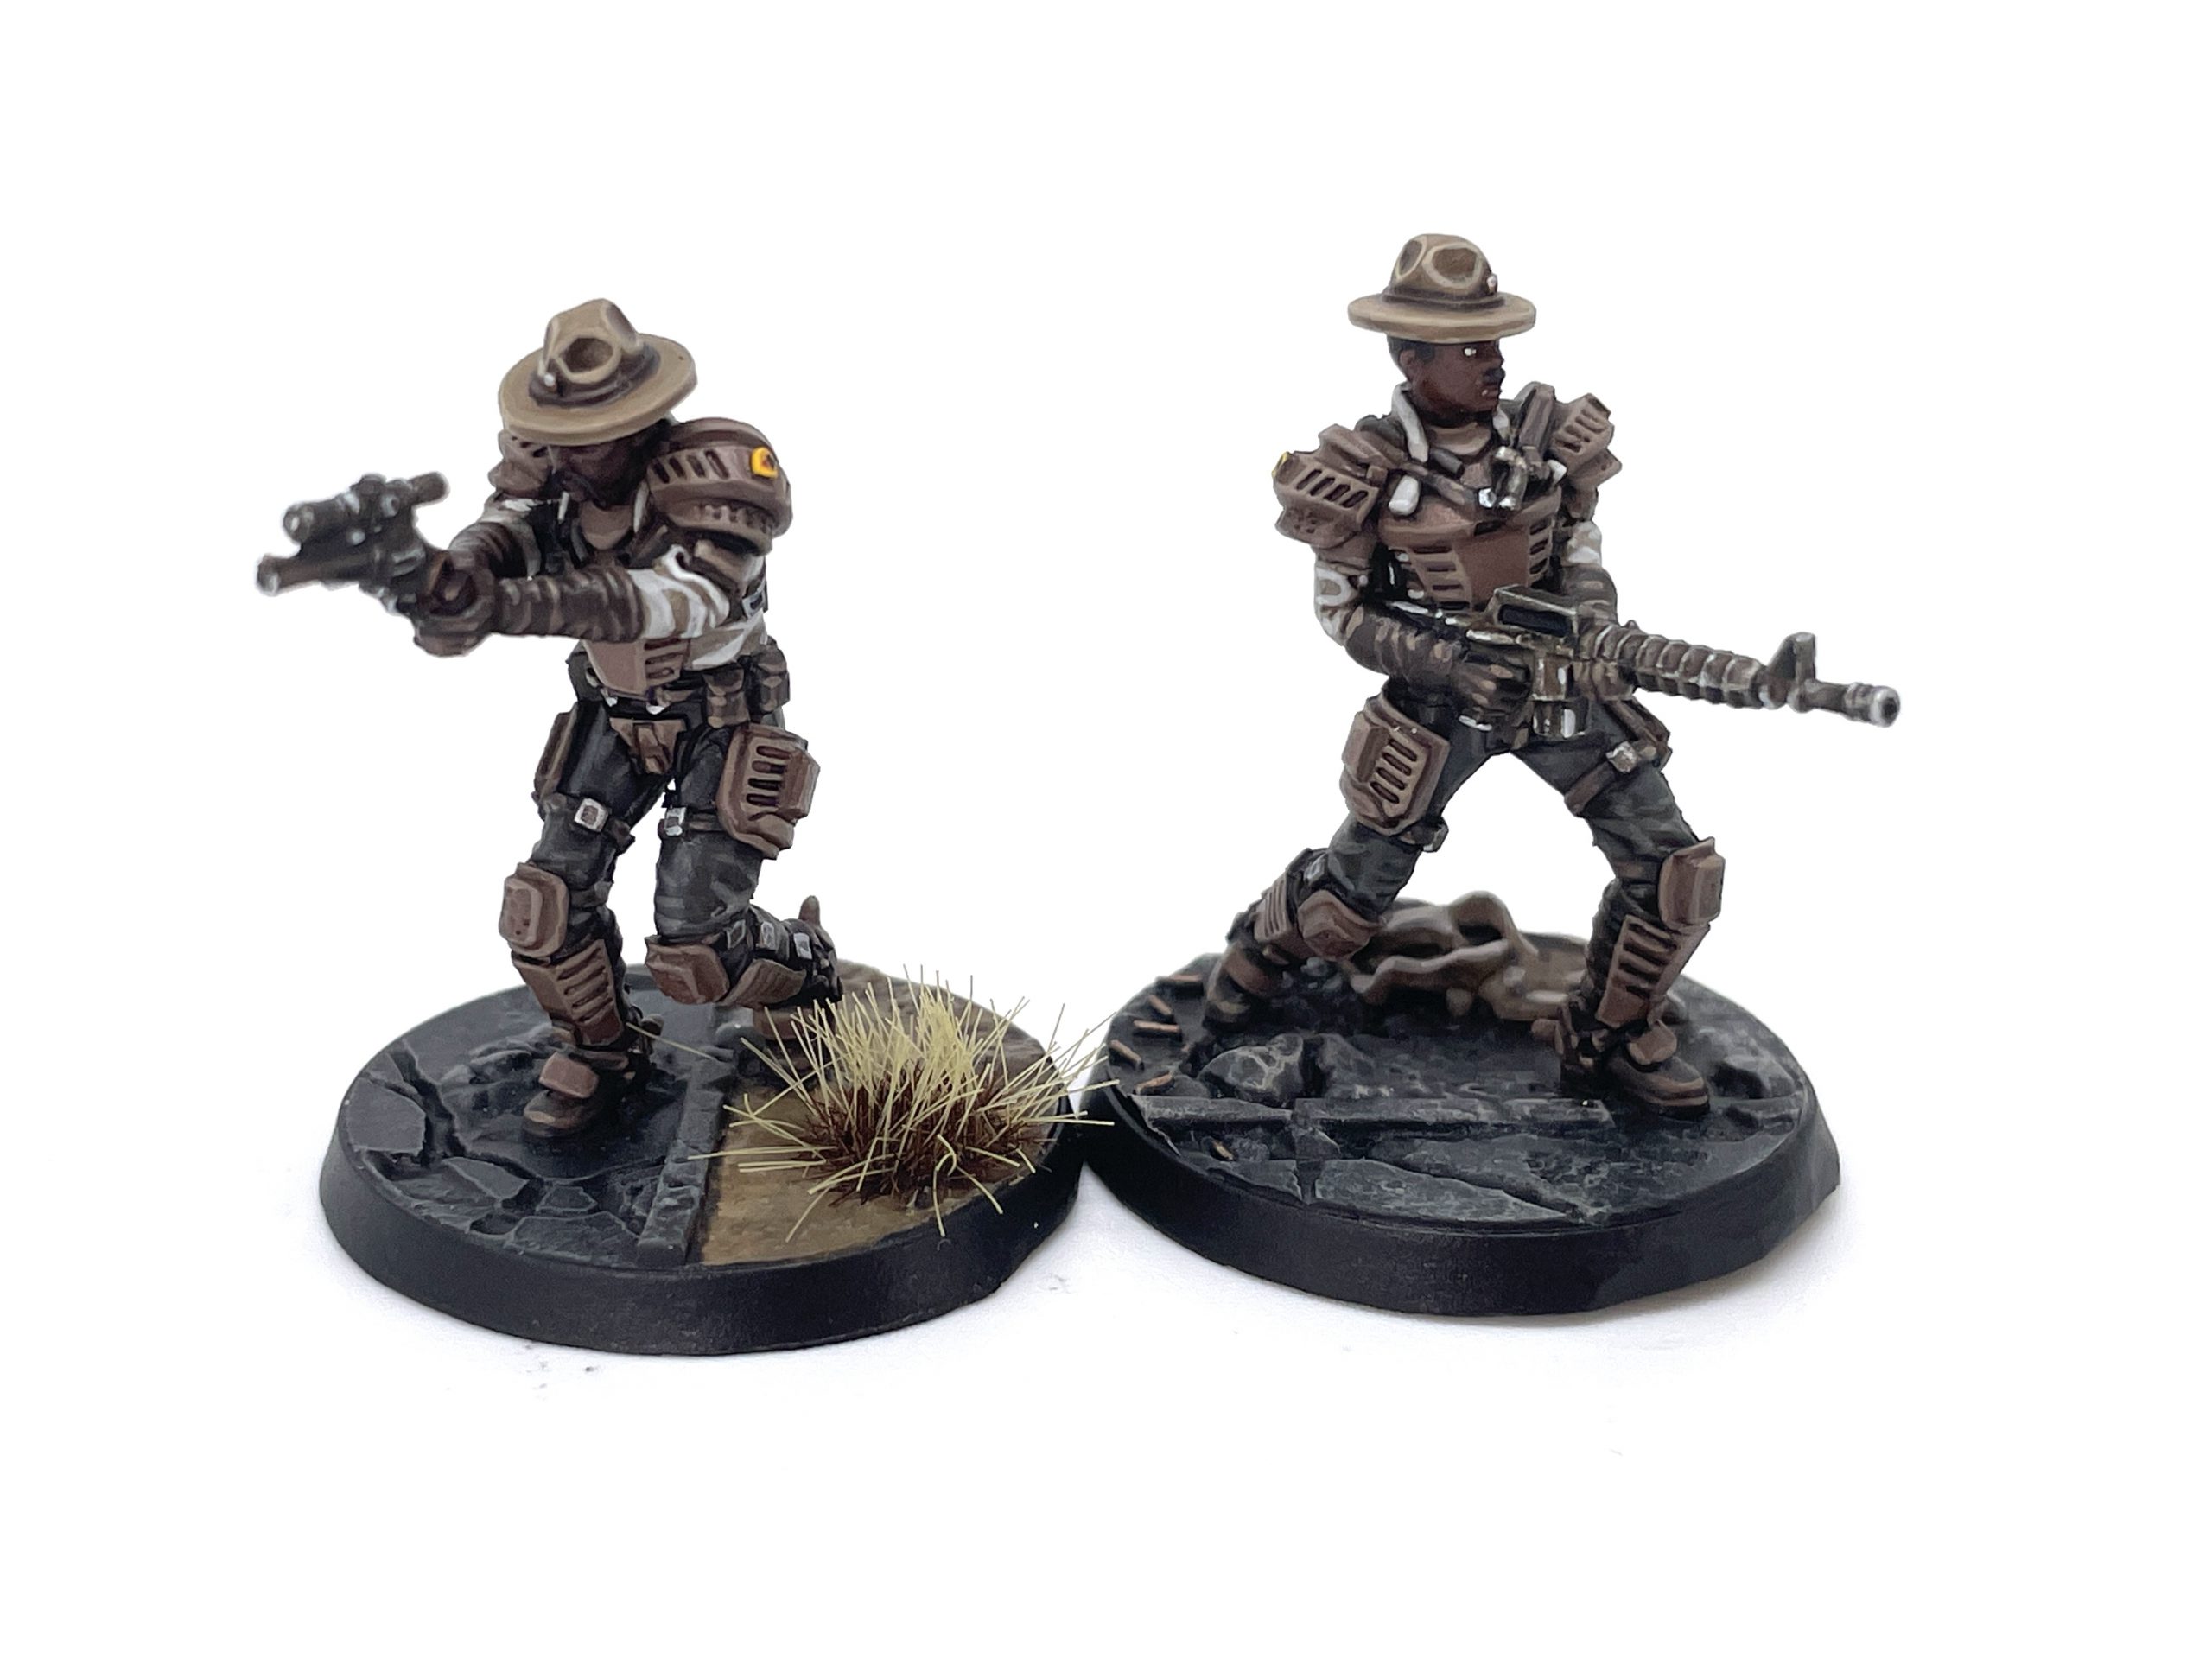 NCR Rangers. Credit: SRM
 NCR Veteran Ranger. Credit: SRM
 NCR Heavy Trooper and Veteran Ranger. Credit: SRM
 NCR Ranger Patrol. Credit: SRM

 Goonhammer App and Patron Updates: April, 2026
 Kill Team Tournament Report: Engage, Party, Repeat's March Madness 2026
 Goonhammer Reviews: Tribal Conquest