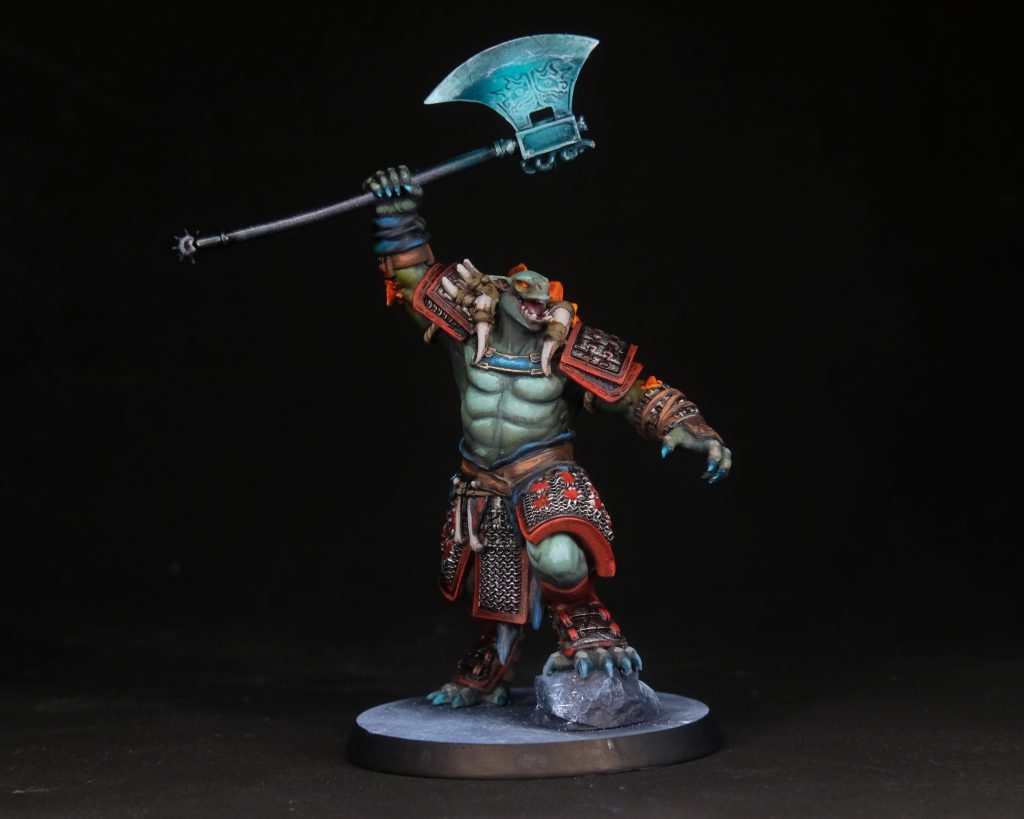
A note up top: I do a lot of my painting with my airbrush; I like the speed and the result, but I acknowledge the fact that airbrushing has quite a steep learning curve and requires outlay for hardware which is out of the reach of beginners. Don't worry though, if you don't have an airbrush (or don't want to use one) and want to follow the tutorial anyway, pretty much everything I describe can be done with a brush; it just takes longer. (NB: The Troll Prowler model is also included in the Goblins warband.)
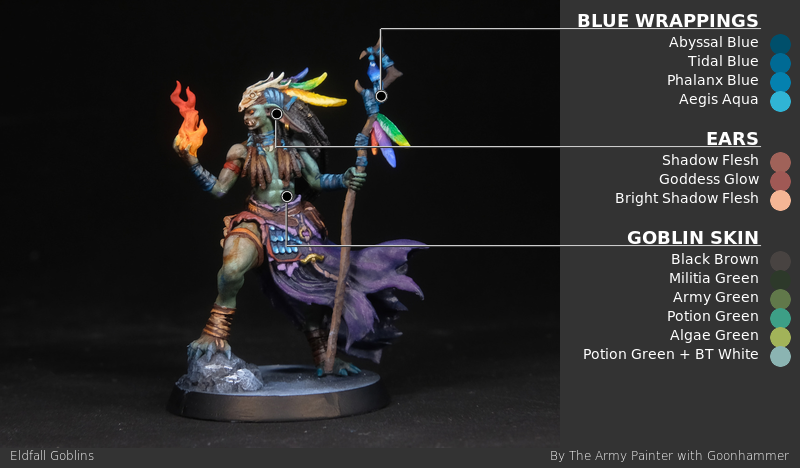
Goblin Skin

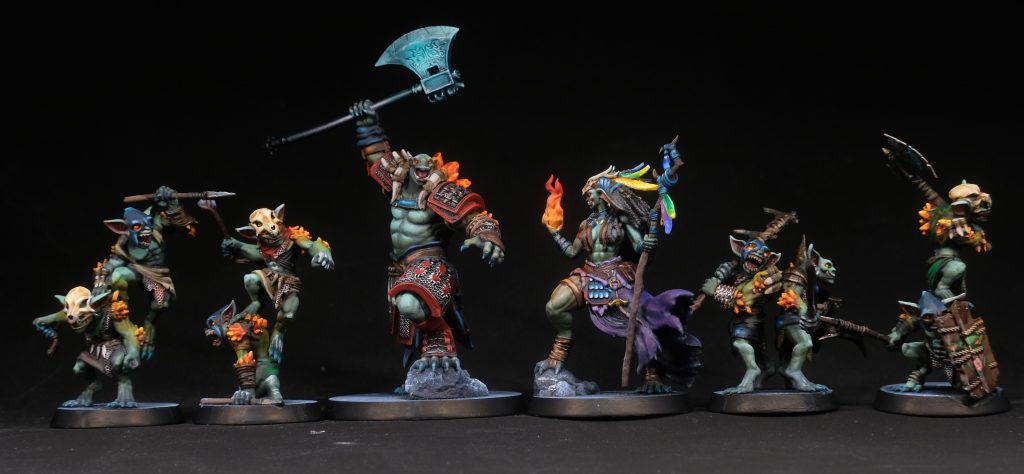
I like these sculpts a lot. The "two small goblins on one base" thing is a very charming and clever way of making it feel like there's a horde of goblins with only a few models. I started by priming the goblins black, followed by an all-over coat of ProAcryl
Black Brown, making sure to cover the black up. The Black Brown provides a nice undercoat for everything else. Once the Black Brown has dried fully, I spray the models with Army Painter Air (henceforth referred to as APA)
Militia Green. Ultimately, I'm aiming for a cold colour scheme, but with slightly warmer shadows.
After the Militia Green is dry, I'll progress up the ladder with APA
Army Green sprayed at roughly a 45-degree angle, following the general zenithal highlighting method. It's one I use relatively often, and the airbrush makes it super easy. You might expect that after the Army Green I'd progress up to the next level - Drab Green, but I'm not going to do that; I'll dodge sideways and use a cold green instead, APA
Potion Green, focused on the most upward-facing parts of the goblin's skin.
Once that's done, I'll use my new favourite technique - airbrushing speedpaints, to solidify the colour in the shadows and build up the contrast. This time I'll use Army Painter Speedpaint
Algae Green, sprayed carefully into the shadows. When I'm airbrushing something like a speedpaint or an ink, I'll rock the trigger back and forth a little to alternate between spraying paint and spraying clean, dry air - this way the speedpaint will dry quickly as it gets laid down, letting me build up the colour in no time at all.
Goblin Ears
I paint the insides of the goblins' ears with ProAcryl
Shadow Flesh, a nice dark pink skin colour, ideal for this kind of application. Once it's dry, I shade the inside of the ears with Speedpaint
Goddess Glow. With all that done, I highlighted the lower parts of the ear with
Bright Shadow Flesh.
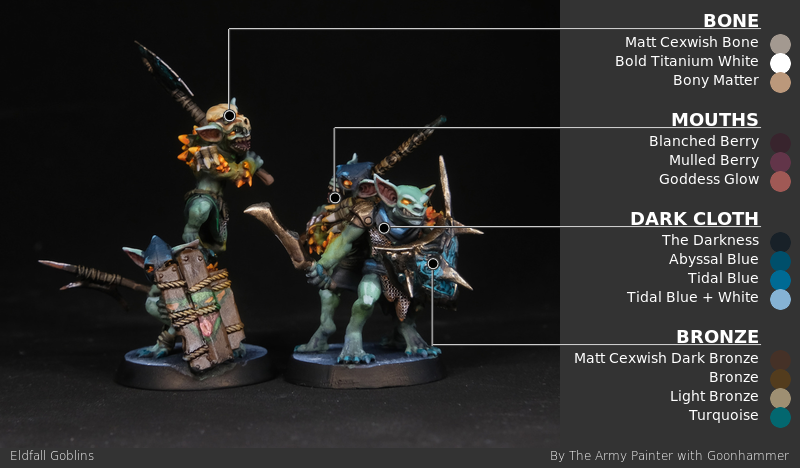
Goblin Mouths
For the insides of the goblins' mouths, their tongues and gums, I basecoat with Army Painter Fanatic
Blanched Berry, a really nice, deep, dark pink colour. I then highlight with a bit of APF
Mulled Berry, before shading with the same
Goddess Glow I used on the insides of the ears. I paint the teeth with ProAcryl
Bone before shading them with a little AP Speedpaint
Bony Matter and highlight with a bit of ProAcryl
Bold Titanium White mixed into the Bone.
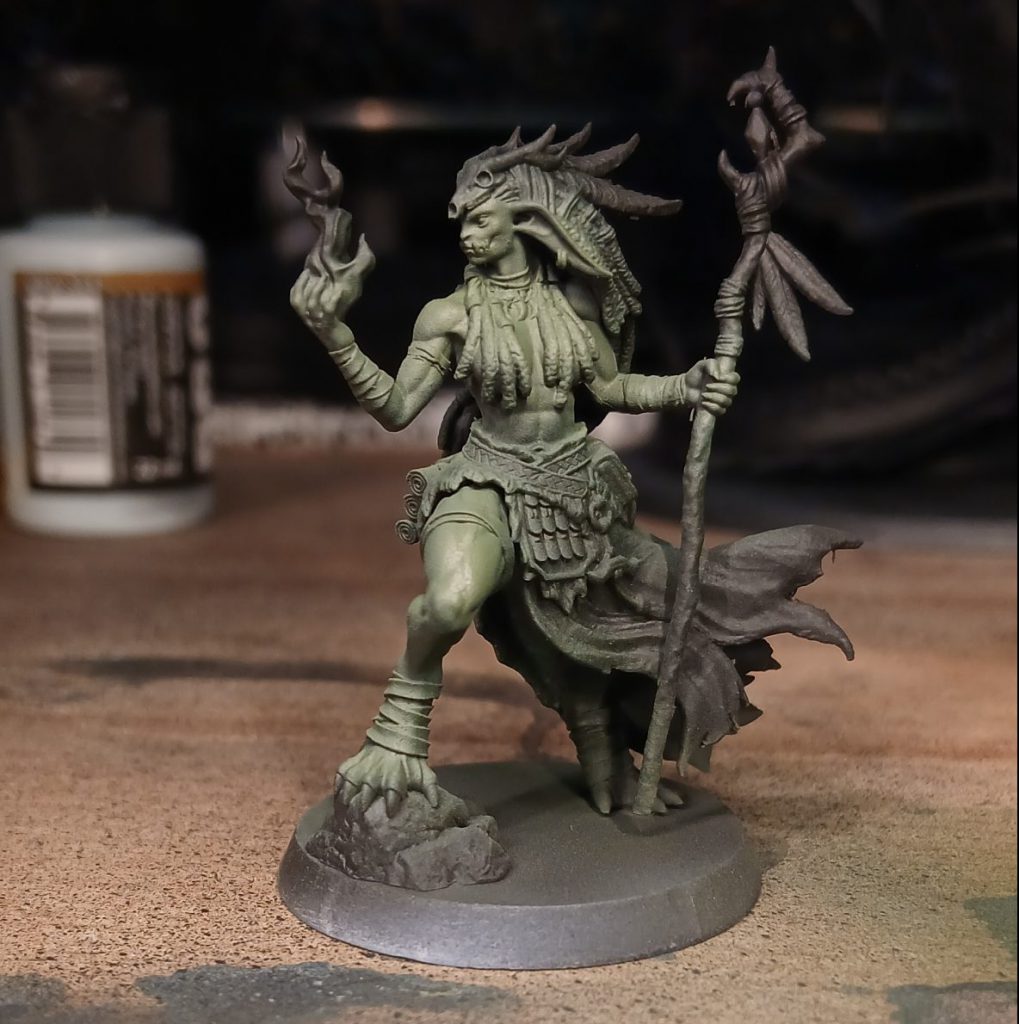
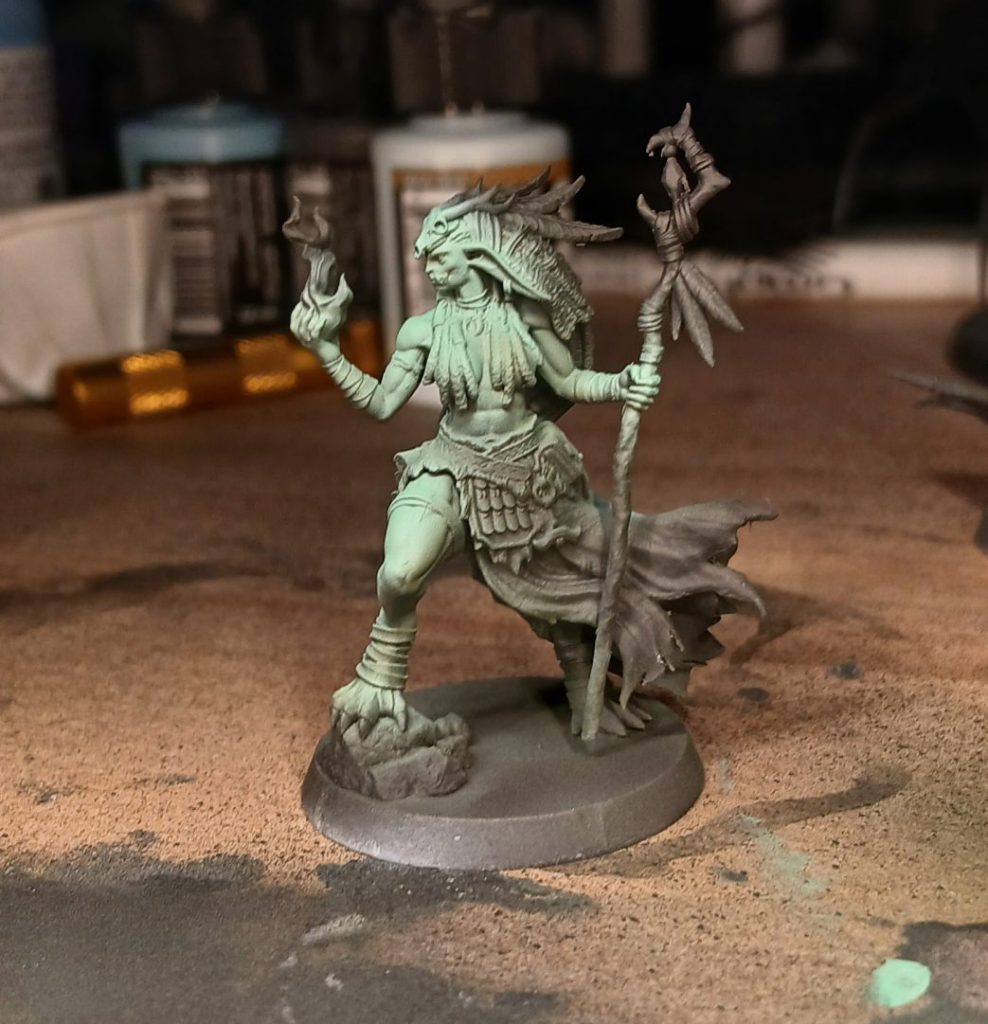
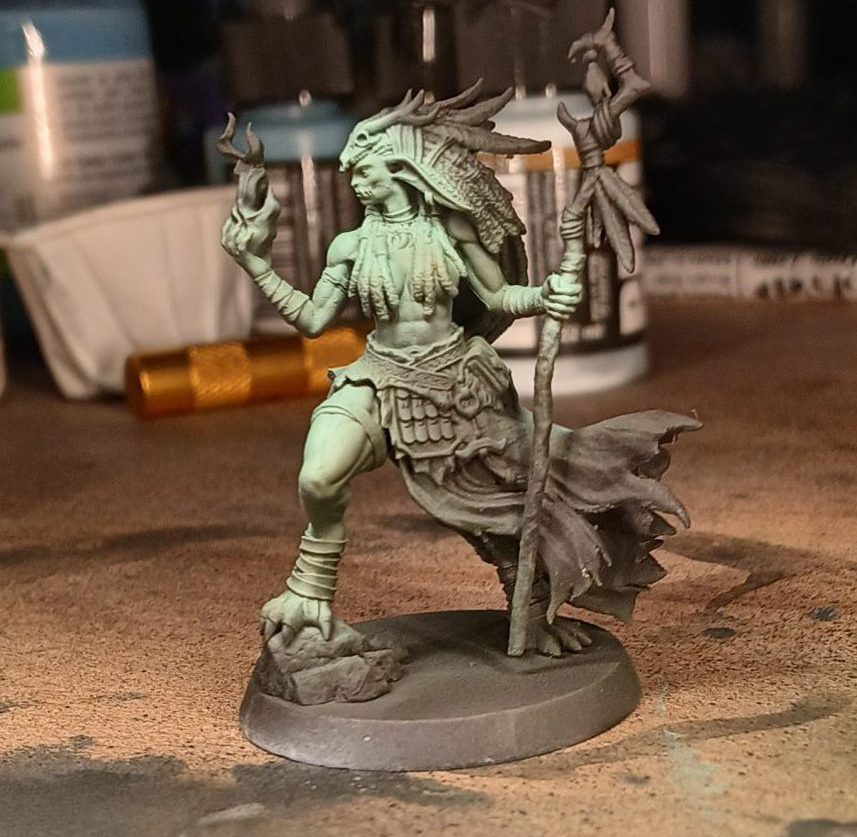
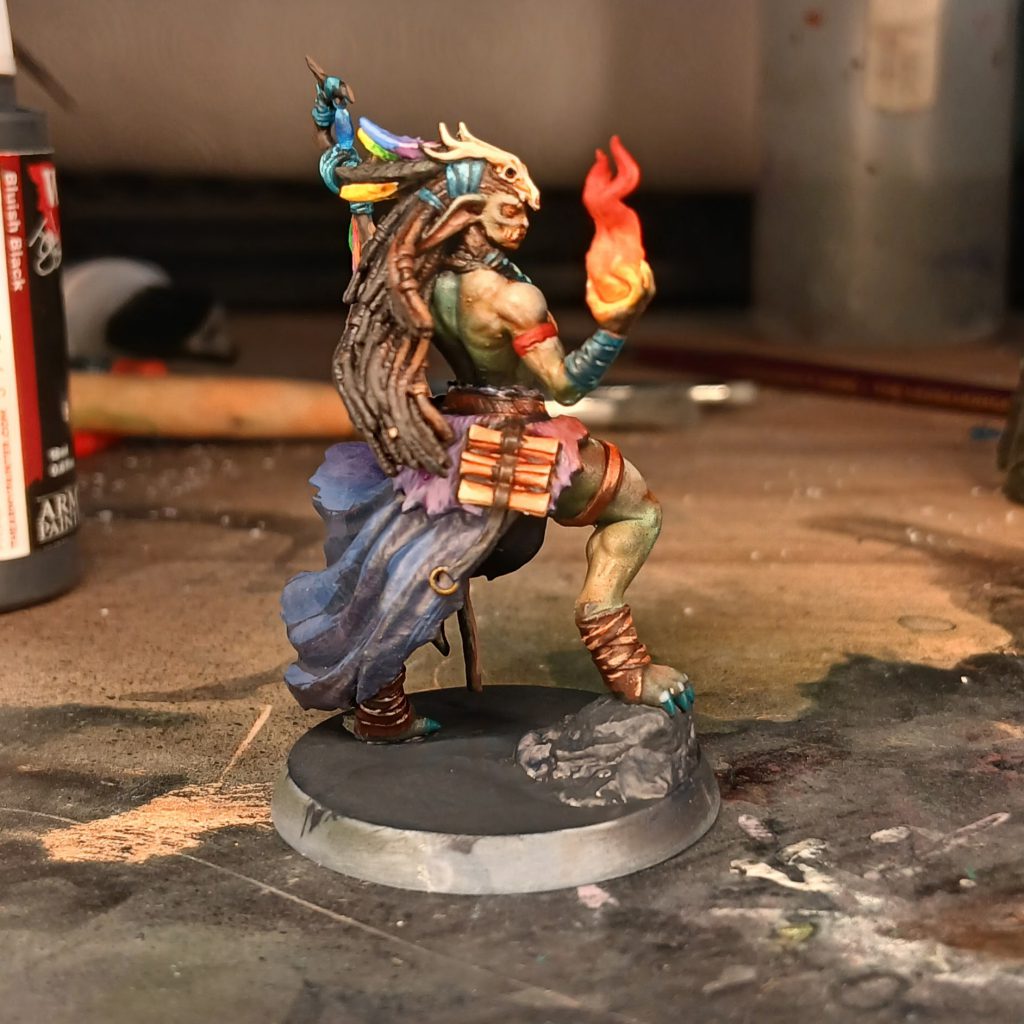
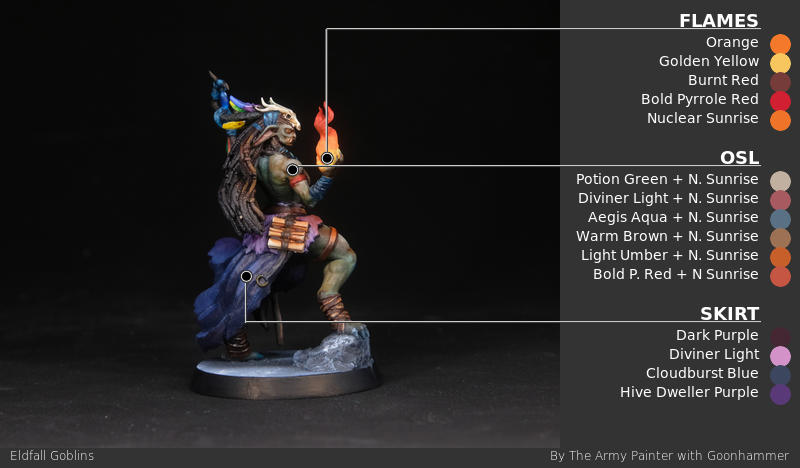
Goblin Shamaness Skirt

The Shamaness has a nice skirt-thing going on here; I start by basecoating it with ProAcryl
Dark Purple, for the fur lining at the waist, I use Army Painter Fanatic (henceforth known as APF)
Diviner Light. I shade this with some Army Painter Speedpaint
Hive Dweller Purple and AP Speed Paint
Cloudburst Blue. Later I'll do some highlights to tie it into the rest of the model, but not yet!
Shamaness Hair
The shamaness has a dreadlocked hairstyle, which I basecoat with ProAcryl
Black Brown and shade with some Army Painter
Grimdark Shadow. To highlight, I mix the Black Brown with some ProAcryl
Bold Titanium White, and very delicately drybrush the strands, starting at the top and leading toward the bottom. For the parts that will be lit by the flame, I highlight with ProAcryl
Warm Brown instead.
Feathers & Accoutrements
The Shamaness is decorated with various feathers, jewels, wrappings and so on. I paint the blue cloth wrappings with Army Painter Fanatic
Abyssal Blue, Tidal Blue, Phalanx Blue, and
Aegis Aqua. I use the same colours to paint the jewels hanging from the belt in front of the skirt, supplemented with a little PA
Bold Titanium White. I paint the feathers in various colours, ProAcryl
Ultramarine, Plum, Warm Yellow, and Army Painter Speedpaint
Bloodmoon Red. The gem hanging from her staff is painted with ProAcryl
Blue,
Sky Blue, and
White.
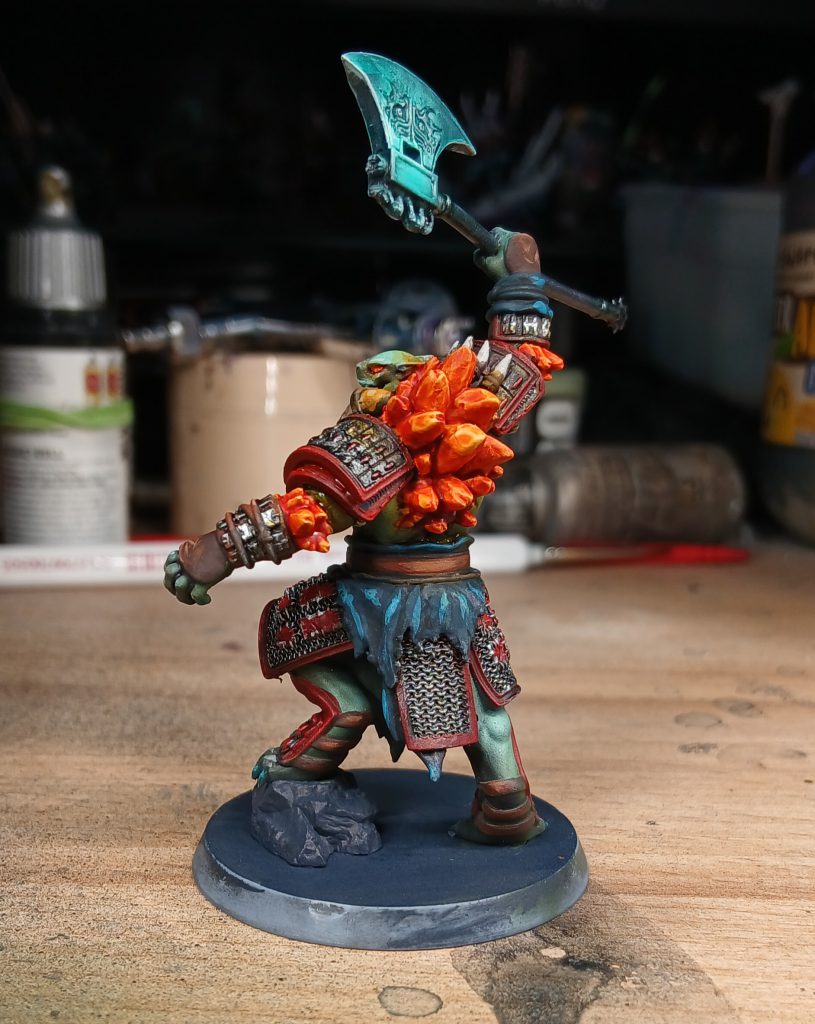
Shamaness Flame & OSL
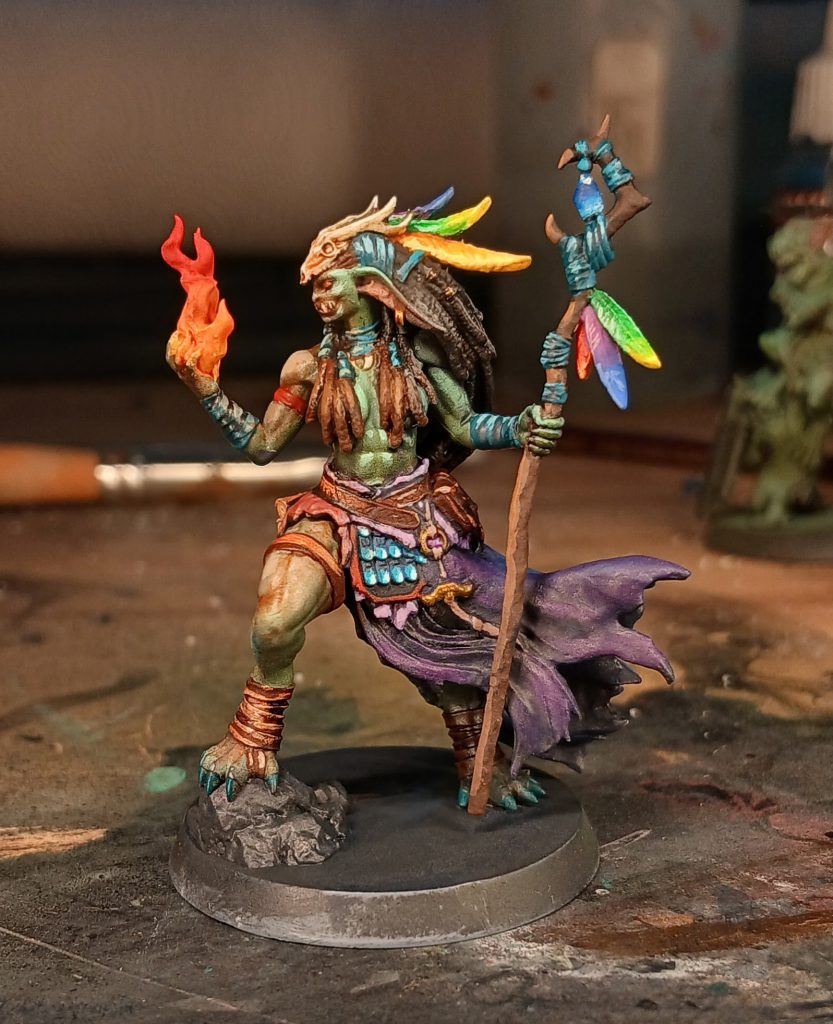
The defining feature of the Goblin Shamaness is, to me, the flame she's holding and the opportunity to turn that into some warm object source lighting (OSL for short). The warmth will provide a nice colour contrast to the general coldness of the green skin, which will be more aesthetically pleasing. I basecoat the flames with ProAcryl
Orange (it takes several coats, so be patient). With a nice solid base of Orange, I paint towards the base of the flame with ProAcryl
Golden Yellow, blending slightly with some orange where the colours meet to create a relatively smooth transition. Likewise, I paint the ends of each strand of flame with ProAcryl
Bold Pyrrole Red and
Burnt Red. With that finished, I glaze carefully with Army Painter Speedpaint
Nuclear Sunrise - clearly, the hue of light doesn't change from place to place, so this will be the foundation colour for my OSL. I achieve this both through very thin glazes of Nuclear Sunrise and through mixing the Nuclear Sunrise with the base paints I used for everything else. For the skin on the face, I opt to glaze very carefully with a hint of Nuclear Sunrise, building up the colour very gradually so as not to obliterate the painting I'd already done; whereas on the top of the shoulder, I choose instead to mix a bit of Nuclear Sunrise with
Potion Green and layer it carefully over the existing Potion Green.
When painting OSL, it's important to check whether you can draw a straight line between the source of your light (the flame) and other parts of the model, if the light source can "see" a part of the model, it should reflect at least some, of the colour of the light. But that's not all; in physics, there's a principle called the Inverse Square Law, which affects whether lighting "reads" correctly or not. The basic principle is this - if you double the distance from the source, the perceived intensity of the light decreases to a quarter of the original, if you triple the distance, it decreases to a ninth of the original, and so on.
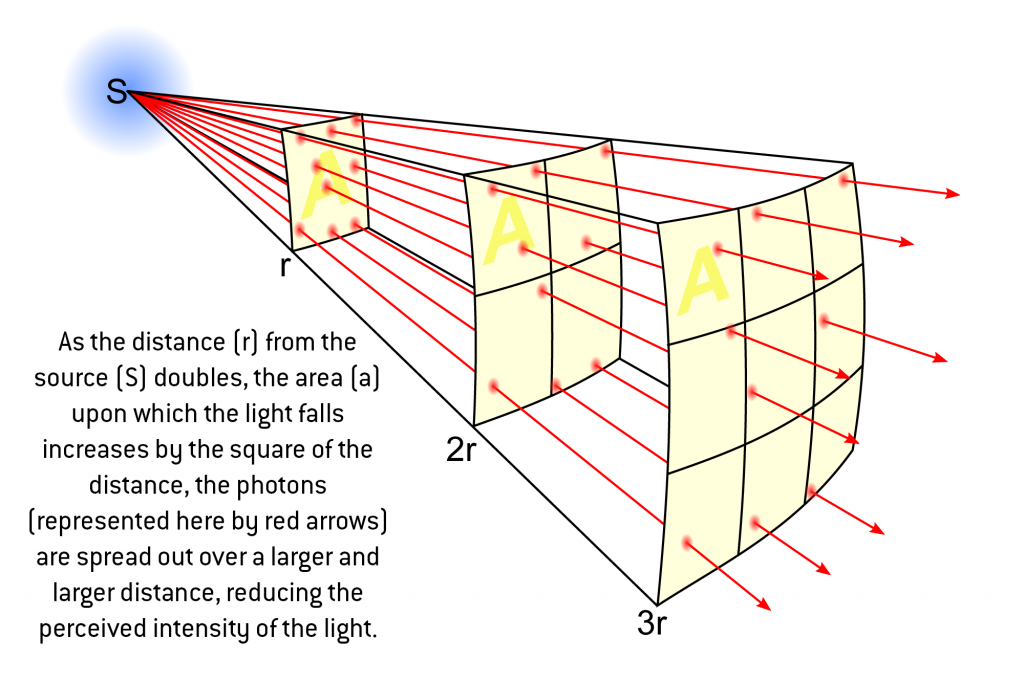
Was that a bit too science-y for a miniature painting explanation? Well, In simple terms, the light should hit all the points radiating from the source to some degree, but the intensity should fall off dramatically.
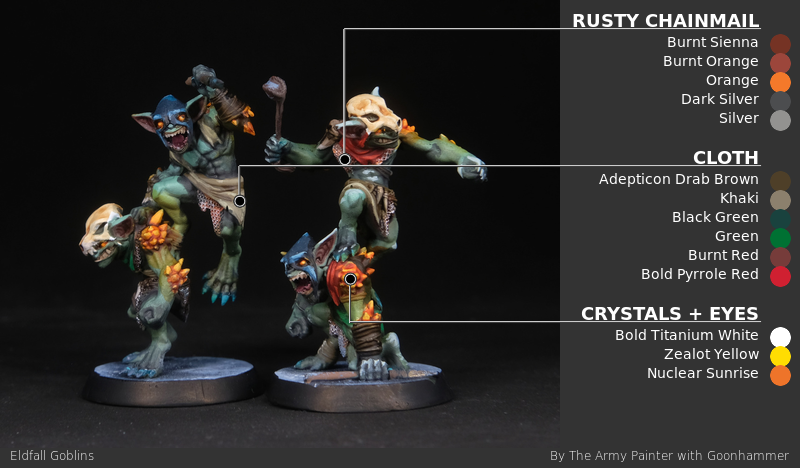
Goblin Clothes

For the clothes of little goblins I use a variety of dark colours - I paint the hoods with Army Painter Fanatic
The Darkness, a really dark Payne's Grey-esque colour. The skirts are variously The Darkness, ProAcryl
Drab Brown, Burnt Red, Black Green, and APF
Tundra Taupe. To highlight these I mix in a bit of
Bold Titanium White, while for the Burnt Red I add a little highlight of
Bold Pyrrole Red.
Goblin Wood
I paint the various wooden items held by the goblins (spear/axe handles, shield) simply with ProAcryl
Light Umber shaded with Army Painter Speedpaint
Dark Wood, that's it! For a bit of fun, I paint a goblin face with his tongue poking out on the shield, they're mischievous after all.
Goblin Bone + Skull Ornaments
The various bone and skull helmets are painted with perhaps the most aptly named paint in my collection, ProAcryl
Bone, rather than being a parchment-esque beige colour it's got a lovely pink undertone that really does look like bone. Once they're done I highlight with a little Bold Titanium White mixed into the bone, and shade with some Army Painter Speedpaint
Bony Matter.
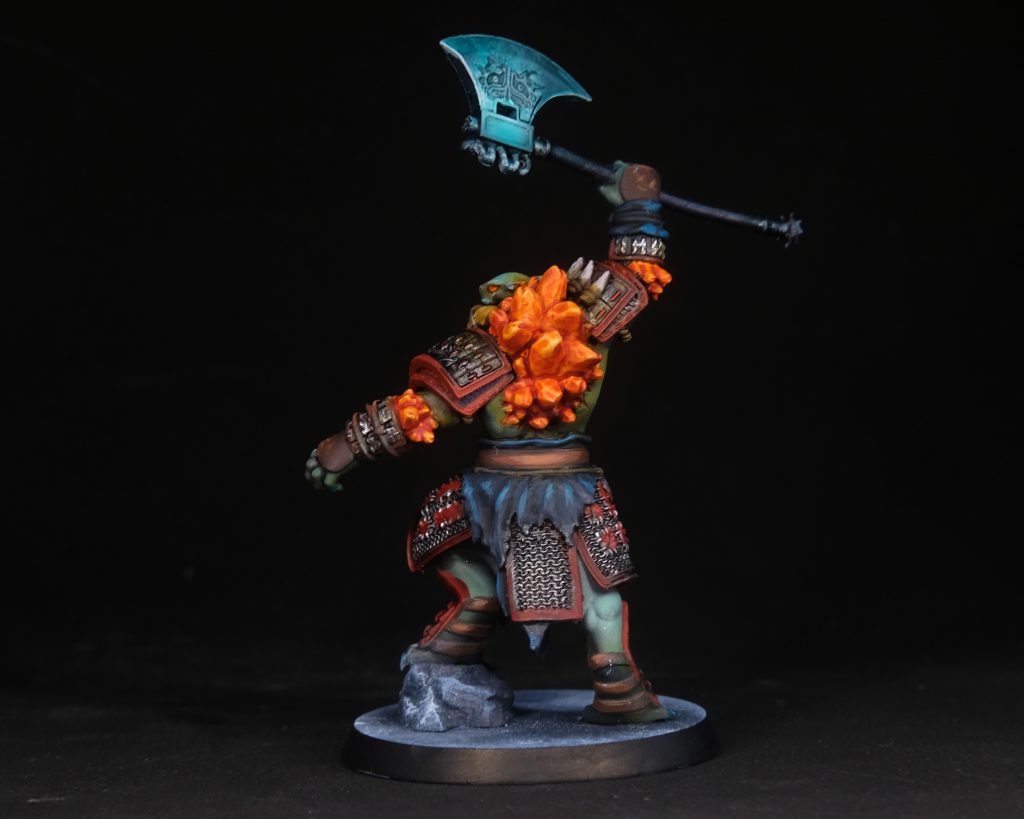
Hobgoblin Champion
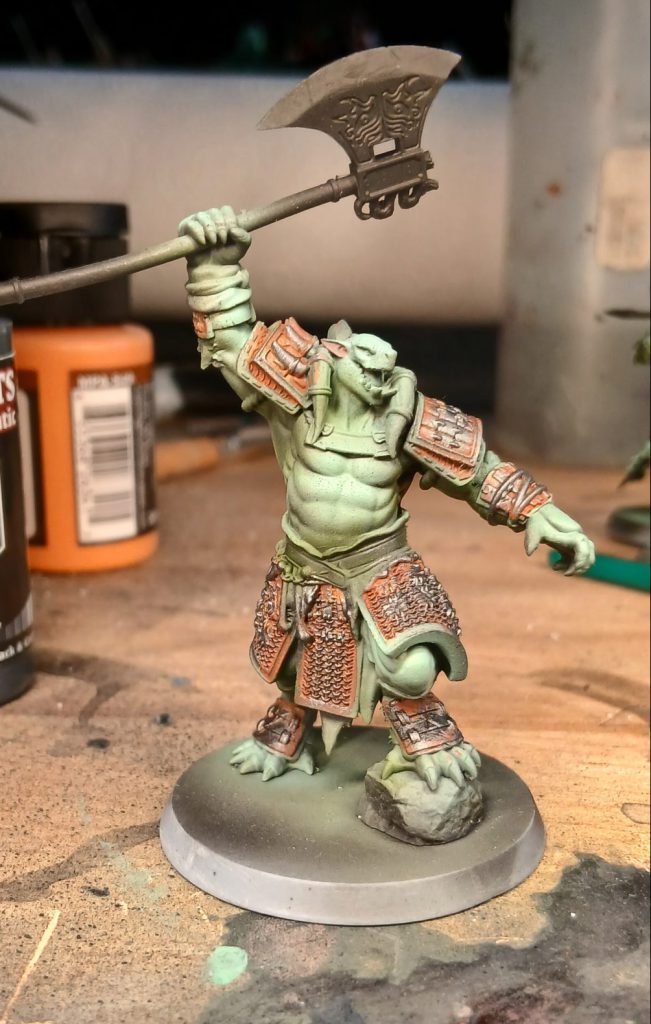
The Hobgoblin's splint armour is painted in the exact same way as the rusty chain of the Blighted Riftspawn, for the sake of completeness, and to avoid writing the same thing twice in slightly different wording, I will basically copy and edit that paragraph here:
I paint the steel a rusted orange colour, beginning with ProAcryl
Burnt Sienna, once that's dry, I paint large highlights on the mail with ProAcryl
Burnt Orange on the upward-facing parts, further increasing the contrast with another smaller highlight of ProAcryl
Orange. Now that the mail is sufficiently rust coloured, it's time to make it look like metal via a drybrush of ProAcryl
Dark Silver. I finish off the metallics with a final highlight drybrush of ProAcryl
Silver.
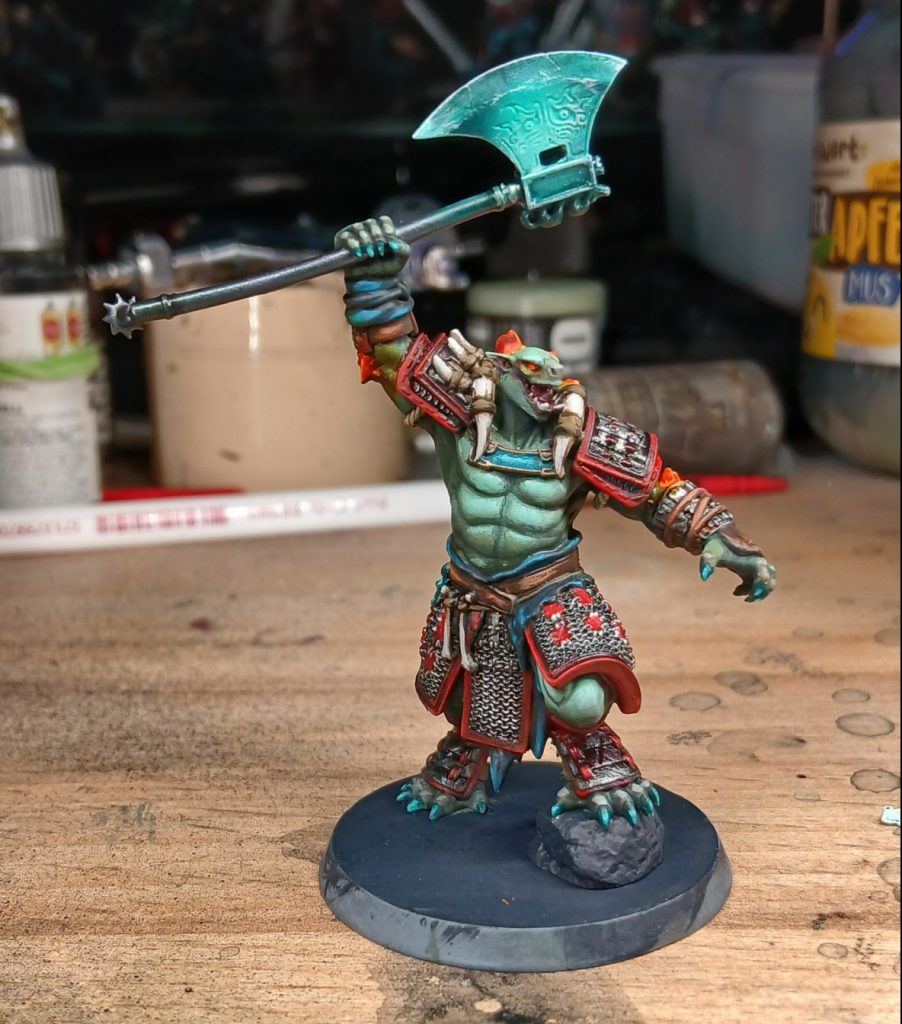
His axe is painted with the airbrush, working from a base of Army Painter Air
Psychic Shock shaded very carefully with a spray of Army Painter Speedpaint
Turnbull Turquoise in a sort of NMM style. With that dry, I run a tiny amount of Turnbull Turquoise into the engraved design of the axe, and edge highlight with some Psychic Shock + White.
Mana Crystals (& Eyes)
Note: Since this technique uses a bit of OSL and glazing over other colours, make sure this is the last, or almost the last, part that you do.
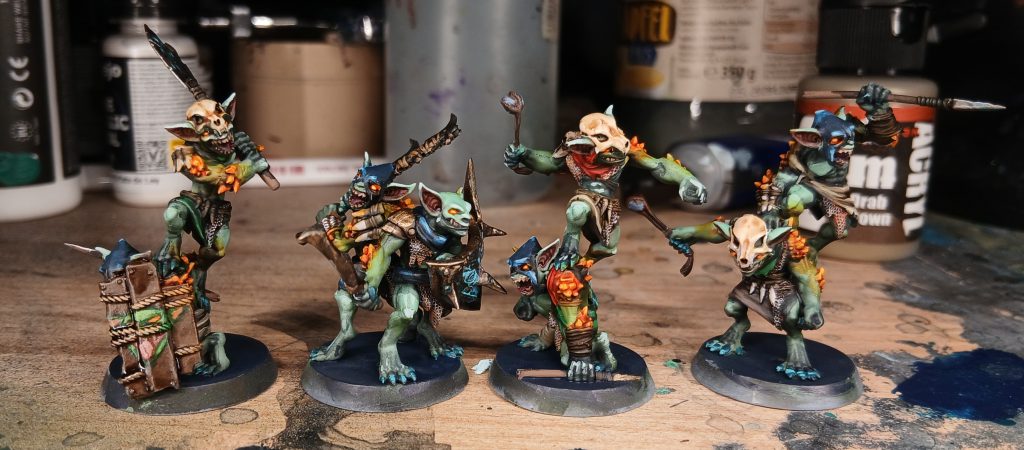
One charming feature of these little goblins (and the large hobgoblin) are the mana crystals erupting from their bodies, you can really paint these any colour you like, but I decided to do something a bit similar to the flame OSL I used on the Shamaness. I basecoated all the crystals (and the glowing eyes) with ProAcryl
Bold Titanium White, making sure to get a nice smooth coverage all over everything - critical for the next steps. You might think that I'd simply go over these parts with the same
Nuclear Sunrise I used earlier, but that's not quite the case. First I paint the entire crystal with Army Painter Speedpaint
Zealot Yellow, since we're using contrast-style paints for this part, the method is to start with the lightest colour and work your way down, after all. Once the crystals and eyes are covered in Zealot Yellow, I take the Nuclear Sunrise and glaze it towards the bottom of each crystal, making sure to get a bit on the skin where it intersects with the crystal. In a similar way to the OSL on the Shamaness, I glaze Zealot Yellow and Nuclear Sunrise on the various materials illuminated by the crystals' glow, using the translucent nature of the paint to adjust the hue and create the illusion of a glow.
 Have any questions or feedback? Drop us a note in the comments below or email us at contact@goonhammer.com. Want articles like this linked in your inbox every Monday morning? Sign up for our newsletter. And don’t forget that you can support us on Patreon for backer rewards like early video content, Administratum access, an ad-free experience on our website and more.
Thank you for being a friend.


 Goonhammer App and Patron Updates: April, 2026
 Kill Team Tournament Report: Engage, Party, Repeat's March Madness 2026
 Goonhammer Reviews: Tribal Conquest