March has been a super busy month when it comes to Umamusume: Pretty Derby, with Trackblazer having taken a good amount of the focus from everyone and certainly turning what we thought we knew about the game on its head. This also was the month with two of the most grueling Champions Meets so far, between the Dirt based Aquarius Cup and the first Trackblazer Era Long Distance race, Pisces Cup (which is currently going on), it may have been easy to miss that the game is also celebrating the first Anniversary events from the original Japanese release schedule. Although we’ve now moved past the 10 free rolls a day and other free bonuses other than some carats, there are a few things that are easy to miss: The Anniversary Missions. There are three separate Anniversary Mission categories, but the third and final one is the most important, and possibly the one that may be easy to ignore if you weren’t aware of it, which would be devastating, because it provides you with a free SSR Selector Ticket!
But don’t worry, I’ve got a quick guide to help you maximize your runs to get the SSR Selector as fast and easily as possible, and you’ve got a good amount of time to do so, with the challenge expiring on April 15. This will also generally help you clear the missions for Parts 1 and 2, and Part 2 has a free Satono Diamond SSR, so there’s even more benefits to running these and making sure that you’re getting in the amount of wins you’ll need.
No Way Around It: Trackblazer
Because these challenges were made to help roll out Trackblazer, there’s really no way to beat around the bush: you are going to have to play Trackblazer to actually complete these challenges. And I know, we’ve talked about how much time it can take and how punishing it can be, but there really isn’t that much required in order to get these challenges done, and once you’ve gotten the hang of Trackblazer, you should be good to go without much more help. If you are still a little wary about what to do with Trackblazer, we do have a handy
guide for you to check out, but overall, just remember a run will take you an hour, and you’re going to be competing in a lot of races.
The good news here is that Part 3’s challenges actually want you to run a lot of races, so Trackblazer makes this far simpler than it seems! You need to complete EVERY challenge in the list to get the final reward, too, so you’ll need to ensure that you’re paying attention to the requirements and ensuring that your runs are taking advantage of Trackblazer’s racing focus to get the wins you need. This will also help with the second half of these challenges, which tasks you with running a lot of Team Trial races, as the better your trainees, the better they’ll do in Team Trials; we’ll talk more about those in a bit for a refresher, but just remember that you’ll need to likely update your Team Trials competitors with Trackblazer era competitors in order to get the wins you’ll need there, too!
Moving the Goal Posts
The goals you’ll want to focus on primarily are
Career Rank B+ or Higher,
Win 10 Graded Races in One Career Playthrough, Win 15 Graded Races in One Career Playthrough, Win 30 G1 Races in Career, and
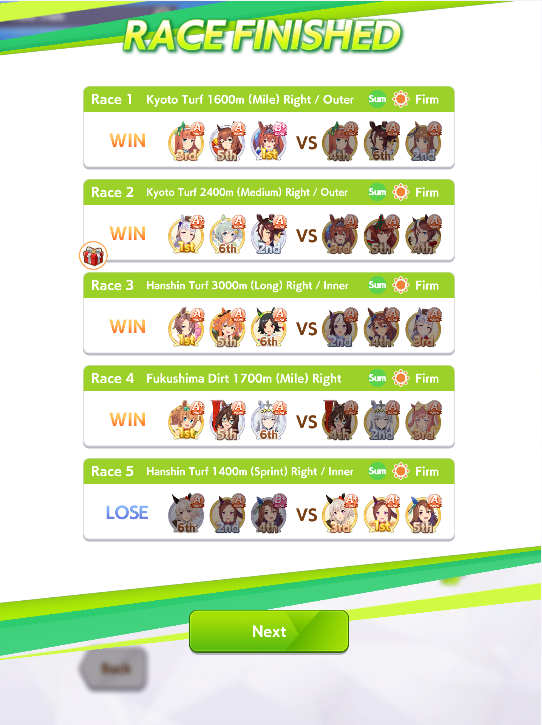
Win 50 G1 Races in Career. Although 30 and 50 might seem like a lot, most Trackblazer runs are going to ask you to run somewhere between 27~40 races, and if you are focusing on G1 Races, 50 should take you around 5~6 total playthroughs. The other challenges will simply fall in line with the focus on G1 races, because you should only ever be running in G3, G2, or G1 Races anyway in Trackblazer; never run in an OP race! So you can easily clear 10 Graded and even 15 Graded in a single playthrough, get a B+ score, and get yourself a fifth of the way to 50 G1s simply by doing an average Trackblazer scenario.
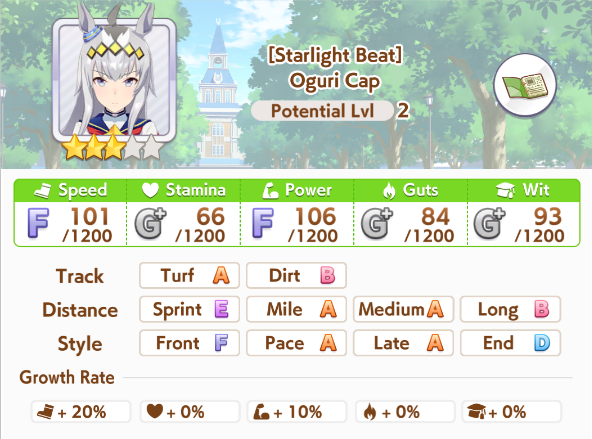 Oguri Cap is considered one of the best all rounder trainees, and it isn't hard to see why: she can run almost any distance and track.
The best way to do this is to select an easy to train Uma like Oguri Cap, who can easily run Miles, Mediums, and Longs; the secret to Trackblazer is having access to these three styles of running, and since the challenge doesn’t have a preference for the type of races you run other than their grades, you should look to a versatile trainee who can run as many races as possible across a single career. If you’re also trying to earn the rewards from Part 2 (Particularly the SSR Satono Diamond Card) this will also help you out because the main gimmick to earning her card is defeating TS Climax Rivals
40 and
60 Times; Rival Races are offered on your schedule, so picking to race a rival in a graded race will earn you progress for both missions! Just remember to commit to G1 Races over Rival Races if you have to pick; get the G1s done first, since they’re fewer and farther between.
The other challenges are
Obtain a Cumulative Career Rating of 50,000 and
100,000, and
Obtain 1,000,000 Fans and
1,500,000 Fans; there’s really no way to get these out of the way quickly, and will simply come just from running more and more careers. You do not have to run these goals in Trackblazer, but there’s no reason not to; although the challenge doesn’t specify which Career Scenario you need to run, you’re always going to get the most Career Rating points and Fans out of Trackblazer over anything else, so even though you may find URA Finale or Unity Cup faster or easier, you’ll actually end up running even more of those careers than if you just committed to Trackblazer. There’s no real trick to these challenges other than to do multiple career runs, so don’t worry about these too much, and instead focus on the other ones above in order to get your required runs in. Assuming your Trackblazer scenario runs all go without failure, you should ideally be able to clear these within 6 total career runs.
Team Trials: Ace Up Your Sleeve
The final set of challenges between you and your voucher involve T
eam Trials. Team Trials is a PVP mode in which you set your 5 teams of 3 against other trainees, divided between Sprint, Mile, Medium, Long, and Dirt. The wording for these challenges is the same except it starts with
Beat the Opposing [Distance/Track] Ace, but that’s not actually any more complicated than it seems; it simply means that you need to win your race against the other team in that style 5 times to get full credit for these missions.
 Just keep running team trials till you get 5 wins in every category; sometimes, you'll lose one. That's fine! Just do it again!
Team Trials are a little odd, however, and if you aren’t used to training or racing them, you may be confused why you don’t seem to win. A lot of Team Trials success is based on the score your trainees receive, and that score is often affected by their Wit (and thus, Skill Activations) more than anything else. While good stats will carry in most cases, Skill Activations are very important in Team Trials, and we have a guide that can give you a few tips if you’ve never really played the mode before. That said, you can probably just brute force these challenges; you don’t have to win by a lot, you just have to win 5 times total in each category, and once you’ve done a few Trackblazer careers, you should probably have a few really solid trainees you can place into the various challenge types to ensure you get there. If there’s one you’re having a lot of trouble with, go into your next Career mode with that in mind and focus on a Trainee who will succeed in that; the hardest overall one to train for is Dirt, but again, Oguri Cap or El Condor Pasa with a solid Trackblazer career run can get that taken care of for you easily.
What Do I Get?
So now that you’ve done all that, you have your Voucher, and you probably now have a new question: Trainer Marcy, what do I do with this thing! Well, that question is… a little complicated, because it actually depends on what your overall Support Deck collection looks like! There is one piece of good news, though: These vouchers do not expire, so once you earn them, you can keep them in your account until you are ready to use them. That means that you can keep it for when you want to break a certain LB on a card with a guarantee while saving Rainbow Crystals for something else, or even to use in tandem with a Rainbow Crystal to ensure you hit MLB on a valuable card.
 HARIKITTE IKOU!! STILL!
You probably shouldn’t use the SSR Selector to simply get an LB0 version of a card, though. Although it might be tempting to do so in order to finally have one of your own, there’s not a lot of benefit to doing that as most LB0 SSR cards don’t really offer the best possible support, and you’ll likely end up borrowing them anyway. Consider this SSR selector an investment into your overall deck depth, rather than width. One of the best things to learn about Umamusume: Pretty Derby is that it rewards patience over dopamine hits, and while it might be cool to say you finally have Kitasan Black, you’ll still need 4 more copies of her; it is more likely that you’ll eventually pull her from other banners, and then you can use the selector to maximize her, rather than sitting with a somewhat useless LB0 card in your deck.
 If you have MLB Kitasan or already have a few LBs for her, Fine Motion is the best 2nd option, with Super Creek 3rd.
I did want to mention that if you were wishing or able to spend money, you can also buy 2 other selector tickets right now during the anniversary: another SSR selector, and one that allows you to pick any 3 Star trainee up through New Year T.M. Opera O. I personally do not suggest spending money on the game for anything other than the daily Carat Pack, but if you were looking to spend money, these tickets do exist… the issue is that you’re paying 20 dollars for a trainee (Which is really never worth it because trainees are mostly about who you like), or a single copy of a card. And as noted above, 20 dollars for an LB0 card to sit in your inventory is a very bad investment, even if it seems like you’d be paying to get a guarantee. Even at picking up an MLB of a card, I think you’d be better off saving your 20 dollars than getting an MLB of a card a bit faster than you would likely have otherwise! But overall, I hope this helps you pick up your free SSR Selector and not miss out on it, and if you have any questions, please feel free to shoot them over to me at
marcy@goonhammer.com, or drop by the Discord and ask me there!
Have any questions or feedback? Drop us a note in the comments below or email us at contact@goonhammer.com. Want articles like this linked in your inbox every Monday morning? Sign up for our newsletter. And don't forget that you can support us on Patreon for backer rewards like early video content, Administratum access, an ad-free experience on our website, and subscriber-only content covering competitive Warhammer 40K!Thank you for being a friend.

 Just keep running team trials till you get 5 wins in every category; sometimes, you'll lose one. That's fine! Just do it again!

 Goonhammer App and Patron Updates: April, 2026
 Kill Team Tournament Report: Engage, Party, Repeat's March Madness 2026
 Goonhammer Reviews: Tribal Conquest