Trackblazer has finally landed in Global on Umamusume: Pretty Derby, and although not quite as devastating as it was initially considered, much of the discussion about the scenario is that it plays so differently and so arduously compared to other scenarios that it is not only draining–each run takes at least an hour on max speed–but frustrating when your time and work results in a trainee that seems worse than the ones you’ve been raising for the past 9 months. Don’t worry, even my learning curve, or re-learning curve, with Trackblazer has resulted in a guide that can hopefully help you figure out how and what you need to do, and begin to work towards training your new trainees for upcoming Champions Meetings or Team Trial updates as those you compete with start pushing the bar from A to A+ in Unity Cup to S, S+, and even UG ranked trainees.
Although we talked a bit about the
scenario and the importance of
Race Bonus to your Support Deck in previous weeks, this week I’m taking a step by step approach to show you exactly how you should, or could, approach Trackblazer. I am not going to sugarcoat it: Even with this approach, you are going to have some pretty rough runs and some subpar trainees. You are going to likely eat through your supply of Retry Clocks and your own, actual, human patience. I am not stressing for dramatic effect that I actually do not like this scenario and never did, and my time with the game will be lessened for a while till I can be rid of it. Let’s get into exactly how and why that is first.
Blazing Your Candle at Both Ends
Trackblazer requires an inordinate amount of juggling for training, scheduling, and inventory management that the game previously did not require; some of that is welcome, because it helps the game feel new and fresh, and much of it can initially be overwhelming. What items are good? When should you race? Are you racing too much, or not enough? When should you train, and what do you actually train when you do? Why are Guts cards suddenly good, when everyone said they were bad? Let’s try and set up some of the general concepts of what you’re looking for, even just from your selection of trainees.
 Not only do you want 30~40 Wins, you want a lot of victories over Rivals.
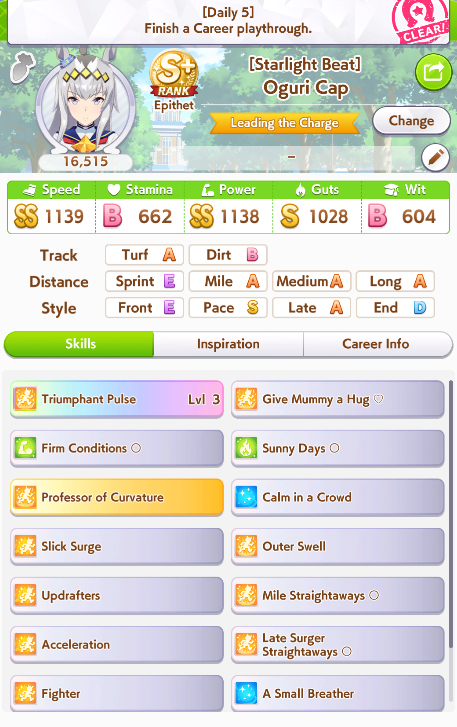
The average, community/expert opinion on how many races you should be running in Trackblazer is somewhere around 30~40 races. Yes, you read that correctly: 30~40 races is the sweet spot, 3 of which are the final races in the game, meaning you at minimum need 27 more races in your schedule, and at maximum, 37. This means that your trainee needs to run a variety of races, and that can truly limit who you can effectively train “the best” in Trackblazer to the level of racing enough to generate good results. Sprinters or Dirt racers, for example, are going to struggle to take advantage of the Scenario without some sort of Sparks in either Mile or Turf to help them widen their variety, and this is also why Oguri Cap (both versions) is considered one of the most viable trainees in the Scenario: She has Mile and Medium A, Long B, and Turf A and Dirt B. With a single Long Spark alone, Oguri can run almost any race aside from Sprints, meaning she can also compete in a huge variety of races, whereas a Sprinter like Sakura Bakushin O will be heavily limited to Sprints and Miles only.
 You can get some mileage out of Trainees that have Bs in certain things, but you really want to try and get A in Mile, Medium, and Long. Junior year is almost all Miles, while Mediums make up the majority of G1s.
Although some of the critique of the mode is that it takes away individual Trainee stories for a broader, group story, the real bummer can be that your favorite trainee just is not fun or easy to train in the scenario at all, which heavily limits who you can play the game with; in a game in which much of your trainee selection comes down to preference, being smacked in the face that you will need to heavily manipulate Sparks just to effectively hit your goals to train your favorite can already start things off roughly. Then, once your career starts, the actual training and management aspect becomes a somewhat overwhelming process that can truly confuse familiar players.
So, in essence, just understanding that Trackblazer requires you to understand the game at a higher level and invest a lot of your actual time into it can really make the return on enjoyment feel very much not worth it; just while working on this article I had a run that went not even sideways in a way that early runs would go that would send players comically crashing out on social media; I just felt like I’d wasted an hour of my time, except for the fact that it allowed me to collect screenshots.
Support Deck Options: Guts or No Guts
A big option for Trackblazer is to lean either heavily into Guts heavy decks, or decks that don’t rely on Guts; in some ways, this tends to be divided on “are you training for Long Races or not”, as the heavy Stamina requirements of Long races don’t match with the functionality of Guts oriented decks. Guts, as a training option, trains Guts, Power, and Speed, meaning that grow 3 stats with one action. Since you will train very infrequently in Trackblazer, this can be an amazing opportunity to grow these three stats, and allows you to also take advantage of turns where you have energy for training and aren’t selecting Wit training.
An example of a Guts deck is below, and even here you have a few options:

For example, I’ve selected Makitanefukukitaru or Fine Motion in equal measure for my friend selection, but generally I opt for MLB Kitasan Black, 2-3 Guts, and 2 Wit cards. If I feel like I need or would rather have the stats, I’ll choose Matikanefukukitaru, as she provides an exceptional amount of stats and works very well in Trackblazer. The general concept of this deck relies on Haru Urara Guts and Admire Vega Guts, often supplementing with a third card like Yukino Bijin Guts, as these three provide great race bonus, stats, and Guts training growth, meaning that when their friendship trainings are maxed, you can get some gigantic results out of them. Kitasan provides the same value she always provides, albeit slightly less here, but her skills, events, and other stats make her still a must have. The other options are really going to depend on what you feel you’re lacking; I tend to find that a single Wit card doesn’t give me enough Wit, so I really prefer double Wit cards, but obviously play to what you have and what you can access.
 I'll be honest, I tried this one and had okay-ish success. I'd recommend trying Riko instead of Satono Diamond.
The other option involves supplementing your deck with the fact that you’ll need Stamina, and as you may have noted from trainings in the past, training Speed and Stamina at the same time can be a hassle since the two stats do not compliment one another. In this scenario, you may want to opt for Super Creek for Swinging Maestro, 2 Speed Cards, 2 Wit cards, and Riko Kashimoto. Although Riko’s value isn’t quite as high as it was before, you may remember that her card provides a lot of Stamina and Guts growth, as well as energy recovery, mood adjustments, and some solid skills. In this deck, Riko acts as a second Stamina card and something of a Guts card, but the major problem with Riko is that her Race Bonus of 10% requires her to be MLB; most players stopped at LB3, which is 8%, but it can be easy to get to 50% even with that sort of small problem.
 While this doesn't seem to add to 50%, cards like Special Week have an extra 5% that is added from the card's perk, meaning this is actually 51% total.
 Alternatively, this is just a lot simpler math.
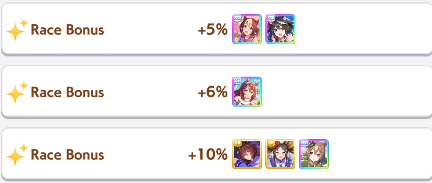
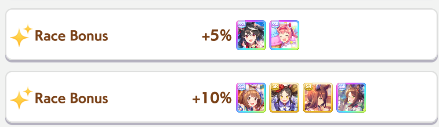
The real lesson here is that you want to ensure that your deck provides 50% Race Bonus, and settle on whether your trainee needs to be trained to run primarily Long Distance races in their Veteran roles (like Team Trials or Champions Meetings), or can run something shorter like Miles, Mediums, or even Sprints, which means you can opt for more Guts Card heavy decks. No matter what, both types of deck archetypes really want 2 Wit Cards to help hit the 700 Wit minimum that is generally expected for Skill activations.
Junior Year: Make Friends
Something that hasn’t changed much in the Scenario/Career Mode is that your Junior Year should be spent on Friendship training. What this means is that you want to select stats to train that have the most available Friends, focusing on those who have the lowest Friendship bars to help grow these friendships towards Rainbow bonuses as fast as possible. This has always sort of been the “correct” way to play, but in some cases it matters more here than in other scenarios, as Junior Year is also the most training you will ever do in Trackblazer in one stint! Following this, training will often be during Summer, and other times you may only train for one or two days at a time in-between racing or potential rest periods.
It is important not to gamble too heavily in Junior Year also; if you find that there is a training that seems “good” but has a high risk of failure (even defining anything above 15% as high, frankly), you are likely better off resting and resuming your training afterwards if Wit training is not a viable option (essentially, no one is on Wit). This rotation can have a lot more impact on your overall career run than it might seem, if only because doing well here means you start reaping the bonuses from your Support Cards faster, and also can spend less time in Training trying to get over that hump.
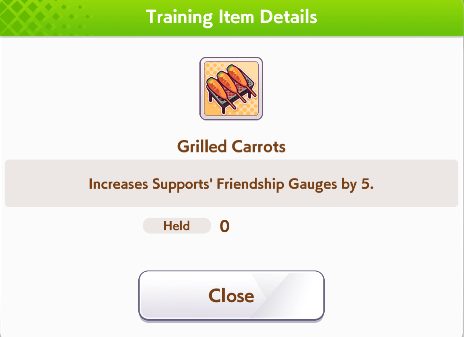 Gotta be honest, I'd eat this.
There is an item that can help you, assuming it shows up in your shop early (or, essentially, after your Debut Race), known as Grilled Carrots. Grilled Carrots provides a flat +5 to ALL Friendships that are not Director Akikawa or Etsuko Otonashi. Getting this item early in your run is always worth the investment, and you can try to consider buying it into your Classic Year also if you have the extra Coins to spend on it, but anything after your first Summer is probably not worth picking up anymore; if you made it that far without getting your Friendships into Rainbow Training territory, something really went wrong with your overall Career run.
Scheduling Torture
After this, your Classic and Senior years work roughly the same, in that you’ll want to schedule races to help meet the expected race requirements of a successful run (around 30~40, remember). Your trainee will start to suffer if you run 3 races in a row, and will suffer even greater if you continue past 3; sometimes you can luck out and run 3 races without getting a Mood down or other effect, but generally it is risky (but can be rewarding) to gamble on running 3 big races, particularly in Classic Year before Summer, and in both years potentially leading into the Arima Kinen in December.
I’ve included a few screenshots below of a proposed schedule that I run for my trainings, and no, these aren’t exaggerated:
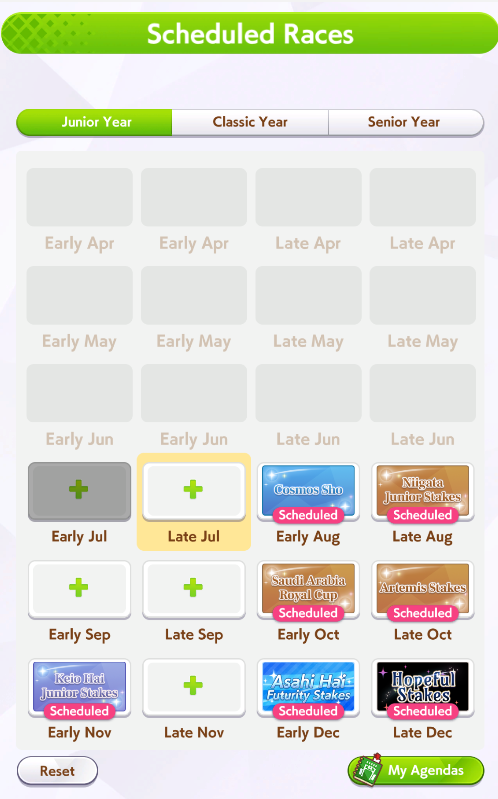 Junior Year can be hell if you aren't trained to run Miles well, and Hopeful Stakes is mandatory. You MUST run this race. In this particular run, I actually ended up running a race on Late Jul and dropped my Early Aug race, so also note you need to be mindful.
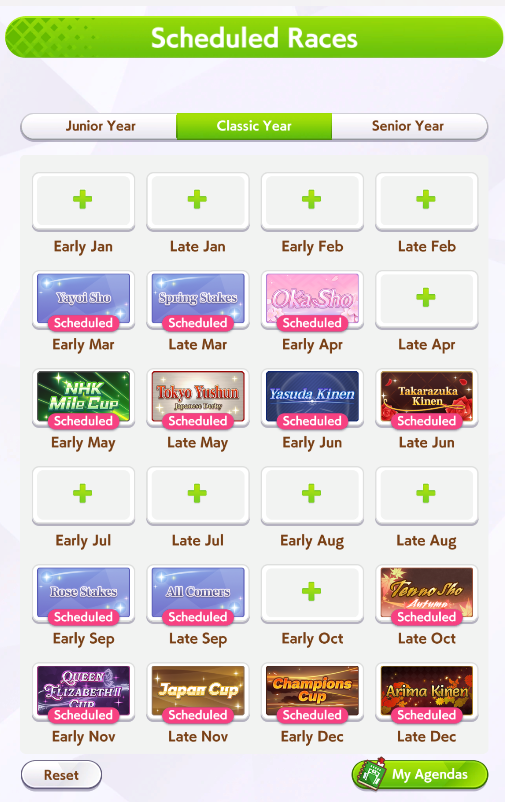 Here, I ended up adding some races to the first week but had opted to leave it blank; the second week I dropped the Spring Stakes and then also the NHK Mile Cup, tanking the mood drop for 3 races in a row. We don't talk about the last week.
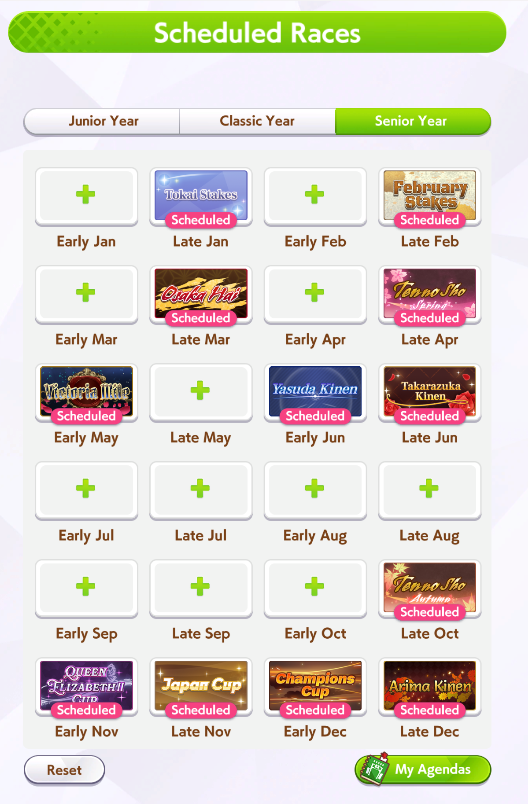 Senior Year can actually be a hassle because you have very few good options; you may want to try and opt for a Triple Crow run (Satsuki Sho, Japanese Derby, Kikua Sho) or Triple Tiara (Oka Sho, Japanese Oaks, Shuka Sho). You also can attempt in Senior Year by running the Triple Crown in Spring (Osaka Hai, Tenno Sho, Takarazuka Kinen), and the Autumn Crown (Tenno Sho, Japan Cup, and Arima Kinen).
However, the important thing to note here is that I didn’t run all of these races, and instead took advantage of seeing when the most valuable races–G1s–would be held and then work around those. In periods in which there were few valuable races, I would often rotate between seeing what training I could pick or what race I could run. The general valuation of races is G1 > G2 > G3, and you should never run an OP race after your Debut Race for any reason. Of particular importance is the 4 race block right before Classic Summer, and what I generally suggest is trying to run 3 of those 4, particularly the last 2; if you have to take the 3 race penalty, you can always do a day of resting in Summer Vacation to restore your energy and mood.
 Also, after races, always choose the top option no matter what. The gamble for lower Energy consumption is not worth it.
Shopping For Fun and Profit
The Store is the final piece of Trackblazer that I wanted to expand on. I mentioned Grilled Carrots, but there are numerous other items you want to pick up and some you want to avoid falling for. It can be difficult at first to know what is worth having or when to even have them. First, stat books, scrolls, and the like are always worth it; these provide flat permanent stat buffs and are often cheaply priced compared to other items. Later in your scenario these can even provide double digit returns on stats.
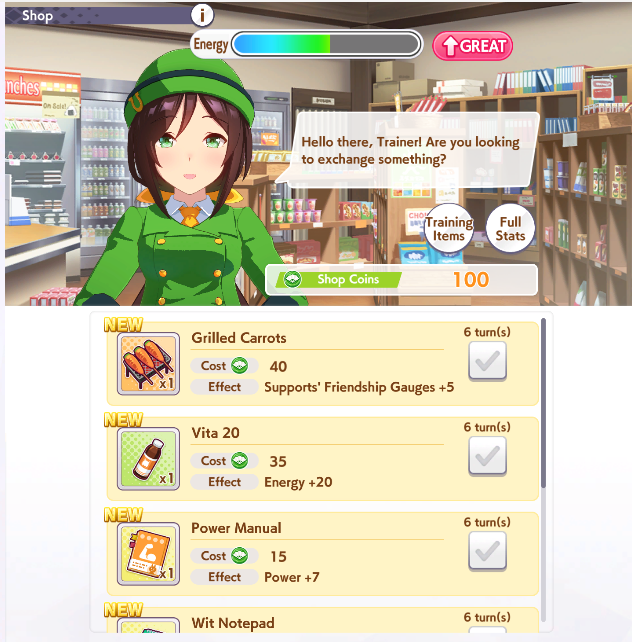
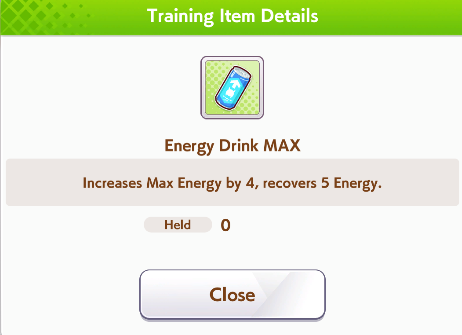
After that, things get a little murkier. Energy restoring drinks are good, except that you’ll need to judge their cost versus return; often the drink that returns 20 Energy is priced at 20 coins, but the other drinks tend to be higher cost for more energy, and sometimes that investment isn’t worth the coins you have on hand when a rest period could do about the same or better. The exception is the Grass drink; when consumed, it restores 100 Energy, but lowers your mood by 1, which can be paired with another consumable, the Cupcake, to negate the mood drop. These two items together are godsends for your energy restoration, so always pick them up when you can find them in your shop and save them for when you can combine the two of them together.
 You want 3 of these at the end of your career; you can carry 5. Feel free to use the others on big races like the Arima Kinen, but always have 3 for the end of your career.
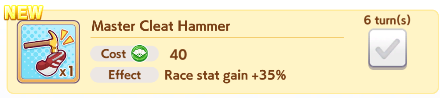
Cleat Hammers are an item that provide extra stats for races, and come in two varieties: One that gives 20% bonus, and one that gives 35%. You can hold 5 of any item, and you always want to have 3 Master Cleat Hammers in your inventory for the final Twinkle Star Series at the end of your scenario; any more you find should be saved for G1 races like the Arima Kinen; using Master Cleat Hammers on the Twinkle Star Series returns a whopping +60 to ALL stats after winning them. A similar item provides a boost to trainings, and you’ll want to keep an eye out for the ones that return 40% and 60% on trainings, saving them for Summer.
 Green Juice and a Cupcake is a great mix, if not appealing.
The Good Luck Charm Item is another must buy, as it prevents you from failing a training. That’s right, you can even train at 0% energy with a 99% failure rate and still get the benefits from it using this item, and having them around for Summer trainings or late Senior Year trainings in which you’ll find high value but possibly high risk trainings. The final training reward items are leg weights, which are attached to each specific stat (Power, Stamina, Speed, Guts) and which when used also boost the return on your training session at the cost of more energy. These are also, as you may have guessed, useful for Summer, but you should only really buy them in stats you plan to train during Summer; for example, if you’re doing a Guts deck, you really want to look for Guts Weights for Summer.
The Character Shuffle Whistle allows you to reorganize your training offerings; if you find that your Support Cards aren’t where you’d like them to be, the Whistle lets you reroll them; it is often cheap and easy to pick up, and saving them for days when you absolutely want to, or have to, train can ensure that you get better results than suddenly everyone being on a stat you have no intention of training at all.
 Only get Energy Drinks if they come with Recovery effects too.
Now, let’s talk about items you may want to buy, but don’t need to horde. Energy Drinks aren’t really worth it unless they both expand your Energy AND restore some energy; simply expanding your energy when it is already empty doesn’t really do anything for you, and isn’t worth investing coins into. There are items that will give you specific stats, such as Charming or Hot Topic, and these should be roundly ignored; they are never worth picking up or learning. There is one exception, which is the Scholars Cap that gives you Fast Learning. The problem with this cap is that it is exceptionally rare in the shop rotations (I’ve never seen it myself), and can sometimes show up when it is far too late to benefit you (such as Senior year).
There are also items that cure bad ailments, and these can be helpful to be mindful of if you plan on running 3 races in a row or more; one of the most common is Skin Outbreak, while others can appear that you can cure with an item immediately. But generally, stocking up on these items just to have them isn’t really worth it, because you’re investing money into something that may NOT happen, and thus you’ve wasted a limited resource on; instead, be mindful of shop refresh rates and when and how you plan to be activating or requiring items. Every time you win a race the shop has a chance to add limited items, most of which are determined by the quality of the race you ran (so, again, focus on G1s).
Finally, avoid things that say “Training Level+1”. These are never worth the money, and you shouldn’t be training enough to want to have high level training facilities anyway; unless you have literally nothing else to spend coins on and the scenario ends in two turns, these are never going to be worth the money you put into them over simply saving your coins for better shop refreshes.
Practice Makes Perfect, and Also Jack a Dull Boy
So, let’s recap: Your Junior Year should be spent training friendships for maximum returns, hoping to get some close to Orange (the Rainbow range) or very close by the end of your Junior Period. After your debut race, you’ll want to schedule out the bulk of your racing schedule through the remainder of your Junior, Classic, and Senior Year, often using the remaining gaps of Junior year to finish any bulk trainings while trying to run a few G2 races if possible and the Hopeful Stakes in December for sure.
After this, you’ll proceed through Classic and Senior year mostly the same way: racing, then training on off days or when you need to take a racing break, resting on days in which neither is viable, and stockpiling valuable items for race and training returns, particularly for Summer trainings. While doing that, focus on buying stat related items after races, managing your energy, and overall preparing for bigger spikes in your stats through planned training sessions instead of simply mashing the training button, and you’ll soon understand the flow of Trackblazer.
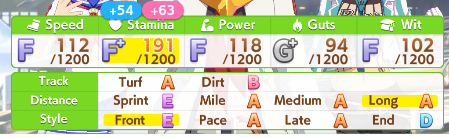
 Perhaps this will sound mind boggling if you are a new or casual player, but this is a *middling* result for Trackblazer.
The sad reality here is that you may go “wait, that’s it”? And… yes, kind of. The problem, as mentioned earlier, is that Trackblazer requires a ton of actual IRL time to complete a single run. I am not exaggerating when I say that a single run will take 1 hour of IRL time, and that is if you are doing that and nothing else. There is also a lot of potential for misplays and bad decisions that can totally tank a run even if they don’t seem it; forgetting to use a 60% training item during Summer can be the legitimate difference between a successful and wasted run that now you hope provides you with sparks for future runs.
The flow of Trackblazer is the hardest part, and once you understand it, you can at least start producing better quality trainees. The problem is that flow requires time, and it can be very draining or even frustrating to play, so also remember that this is a game you are choosing to play; if I can be very honest, I have already greatly reduced my own time with the game because I need to manage my expectations and needs and don’t want to spend hours on a game not having fun; I’ve averaged about one run a day and left it at that. Hopefully, this guide will better get you going and if you have any questions, please feel free to shoot them over to me at
marcy@goonhammer.com, or drop by the Discord and ask me there! Until then, I wish you the best of luck with Trackblazer!
Have any questions or feedback? Drop us a note in the comments below or email us at contact@goonhammer.com. Want articles like this linked in your inbox every Monday morning? Sign up for our newsletter. And don't forget that you can support us on Patreon for backer rewards like early video content, Administratum access, an ad-free experience on our website, and subscriber-only content covering competitive Warhammer 40K!Thank you for being a friend.

 Goonhammer App and Patron Updates: April, 2026
 Kill Team Tournament Report: Engage, Party, Repeat's March Madness 2026
 Goonhammer Reviews: Tribal Conquest