Faces! We've all got one. Well, apart from Faceless Jim who comes into my bedroom at night and stares at me while I sleep, but I don't think he's reading this article (at least, I hope not; if you are reading this Jim, you need to start paying your share of the rent).
But how do we
paint them? Unless you're the kind of person who insists on putting full-face helmets on every model you paint, you're probably going to have to paint faces at some point, but faces are tricky things. Since we're humans (mostly), our brains are hardwired to seek faces
everywhere, even in random patterns (this is a phenomenon called pareidolia). As a result of this biological urge, when we glance at a miniature with a face (or even a face
shape on a helmet), it's the first thing we look at and focus on.
I'm keewa, your prescient pigment-pushing pareidolic, pumped and primed to prattle about painting faces. Let's kick off today by having a mini art lesson - first things first, stand up from your desk and go and look at your face in the mirror, I mean
really look at your face, pay attention to the various structures and the way the colour of your skin isn't at all uniform. Go on, I'll wait.
What you saw when you gazed at your mug in the mirror is something you're probably so familiar with that it barely even registers, nice haircut by the way. Most art lessons are focused around drawing the face on paper - we don't need to draw anything, that work has already been done for us by the sculptor, so we can focus on the colours and volumes of the human face (and elves, dwarves, and so on - presuming they follow the general gist of humanoid anatomy). Our faces have different zones of colour within them based on various factors; including the amount of blood vessels close to the skin, the general structure of our skin itself - the layers of fat and structures underneath the outer layer, and the general health of our skin itself.
We can broadly categorise these as three distinct areas based on the hue shift they create in the colour of our skin. These principles are pretty much universal across all people, not specific to one racial or ethnic group, so you can apply them to any face you paint - we're all people, after all. So we'll steal a little trick from portraitists to make our faces better - colour zones.
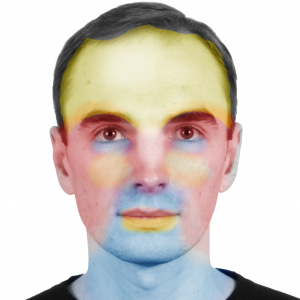
Colour Zones
 By Inc ru - Own work, CC BY-SA 4.0, https://commons.wikimedia.org/w/index.php?curid=39588382
Our model will be this gentleman that I found on Creative Commons; I'll use his photo to demonstrate the location of the colour zones.
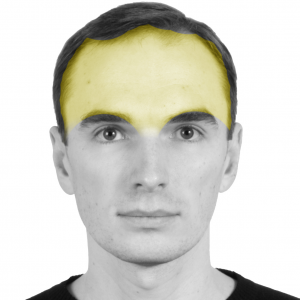
The first of these zones is the forehead; that big, flat, shiny dome at the front of your face, which can be big or small depending on where your hairline ends up. It doesn't matter how bald you are - the forehead is typically both brighter and a bit more
yellow than the rest of the face. Why? Well, the skin there is very flat, and there aren't a huge amount of blood vessels.
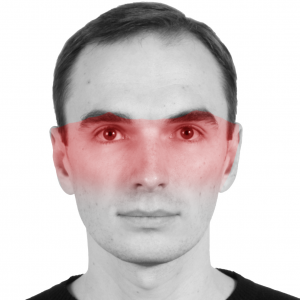
Speaking of blood vessels, we arrive at our next zone, the middle third, or thereabouts, of the face is dominated by areas with a lot of blood vessels close to the surface of the skin. You can think of these as the areas where we blush the most, or those that get the reddest when we're out in the cold, the nose, the cheeks, the ears, et cetera.
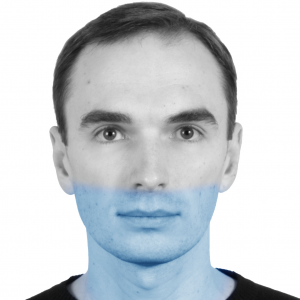
Finally, we have the blue, or cyan zone, the bottom third of the face and chin are typically more blue than the other areas, with a colder cast and a darker appearance. If people are going to have stubble, this is where it'll be.
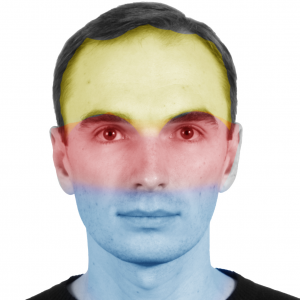
Putting them all together we get a simple map of the colour zones of the human face. When you come to paint faces, mixing a small amount of the colour from the zone in question into your ordinary skin paints should bring them to life much more effectively than the ordinary Base/Shade/Highlight approach. For most miniature painting applications, this sort of map will be just fine, but it looks a bit unnatural doesn't it? It's broadly right, but there's something wrong with it. For more advanced applications, we can refine our map so it's even more "natural".
So we take our simple map and make some tweaks. To start with, the nose of the bridge is desaturated slightly, along with the upper part of the forehead. The reddish blush tone is extended down the cheeks and applied to the lips, as well as a bit of the eyebrow-area. The blue tone is added to the under-eye area and the area under the nostrils. Some yellow is added to the tops of the cheeks and the labii inferioris underneath the mouth. Obviously this is very exaggerated, but our model is looking more... realistic in where the colours are placed on his face.
This approach gives us much more realistic looking skin than the Barbie-doll monochrome skin we get from just painting one skin tone, shading with the same hue, then highlighting again with the same hue. If you remember
back when we talked about colour theory, slightly changing the hues moves us around on the colour wheel, which creates additional interest through application of colour contrast. You can follow this approach by painting the colour zones first and then glazing over with a flesh colour, by mixing a little of each colour into the basic skin tone as you go, or by glazing over completed skin.
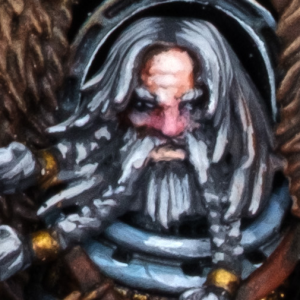
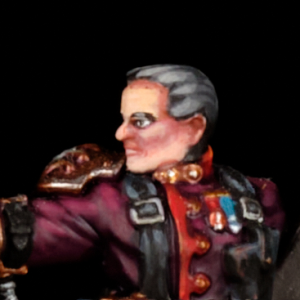
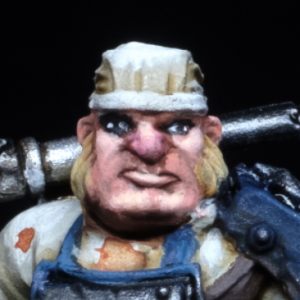
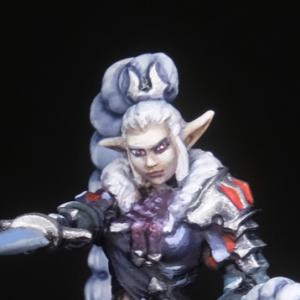
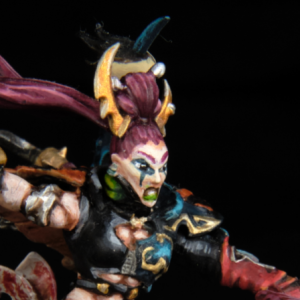
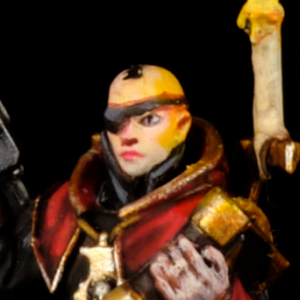
A few of the faces I've painted where you can see the colour zones in action - looking at Logan for example, the very red nature of his cheeks implies that he's in a cold environment (or that he drinks too much Mjod). The yellowness of the forehead of the Imperial Officer is clear against the blush of his cheek too.
Lips
We could probably write a whole article just about makeup by itself (and probably will in the future) but for now, let's focus on the lips. Ordinary, unadorned lips are pretty easy to achieve. Take your base skin tone mix and add a tiny bit of red. Paint this only on the bottom lip - if you try and paint both bottom and upper lips you run the risk of your model either looking like a clown or a pantomime dame. The same is true when painting lipstick, use any colour, but make sure to keep it only on the bottom lip, and highlight with a little of the main colour mixed with some white for that shiny look.
Eyes
Eyes are the devil, and I won't sit here and pretend that I'm some hot-shit eye painter, as you can clearly see from the photos above, that would be a lie. But I can tell you a way to get passable eyes on your miniatures that will look fine in any situation that isn't a close-up, magnified photo on the internet. Since eyes are probably the thing that's easiest to irrevocably screw up, it's a good idea to paint them first, so that if you do mess up, stripping and starting again isn't the worst thing in the world.
 Note:
Note: Unless the model is constructed in such a way that you
have to put it in during construction, I typically paint my heads separately and add them to the model at the end, I find this way considerably easier and get much better results using it. I glue them to toothpicks and stick them in a wine cork to help with this, it's so much easier to access all the parts of the head and face if you can move it around like that, though you will be susceptible to jests from your extremely ribald colleagues who'll tell you "you forgot to put the head on!!" every time you post a progress picture. Plus, having a cork covered with heads on sticks on your desk is a little strange.
Okay, so how do we paint these passable eyes? There are a few methods. I'm sure they have names but I like to call this one the Line technique.
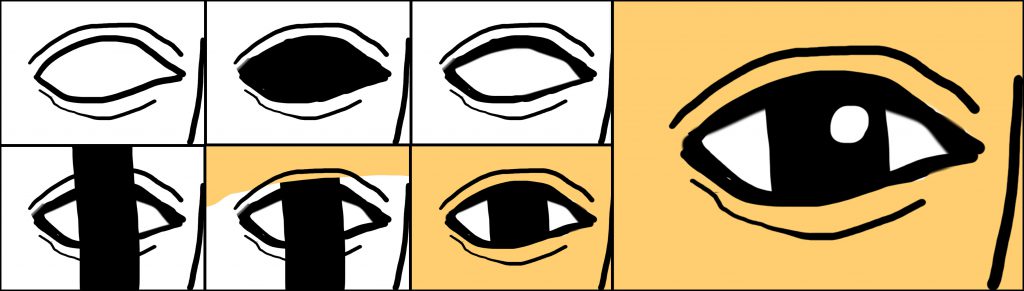
- Paint the area inside the eyelids with black or a dark brown, depending on how extreme you want the eyeliner look to be.
- Paint the white of the eye inside the previous colour, leaving a sliver around the edge between the sclera and the eyelids.
- Paint a stripe of black paint down the middle of each eye (it's much easier to paint a line than it is to place a dot accurately).
- Paint the rest of the skin around the eye socket and the eyelids.
- Optional, difficult step - Put a tiny tiny dot of white in the upper left or right corner of the black stripe you painted.
- Do not touch them ever again, leave them exactly as they are.
The next eye-painting technique is the one that's been in every painting guide for the past 30 years or so, I actually don't like it much, I'd rather use the line technique or a different one. The resulting pupil shapes are a little too.. lizard-y(?) for my tastes.

- Paint the eye black.
- Paint two white dots on either side of the middle.
- Paint the skin.
As I say, I don't really like this one. Dotting the white parts of the eyes takes a good amount of brush control & you have to deal with white paint drying on your brush if you use one that's too small.
 My third method is the one I prefer - using a fineliner pigment pen. You might have heard these referred to as Micron pens (those are the ones made by Sakura). I use the ones by Staedler because they’re easier to get hold of where I live. The method is pretty straightforward: paint the eye in the same way as the line method up until step 3, then gently apply a dot with a size 0.1 pen. That’s it! If you're feeling a bit feisty, once it's dry you can put a little bit of white to simulate the reflectiveness of the eyeball. Even better, if you mess up, all you have to do is flood the socket with water and wipe the ink off, soak it up with your brush,1 and try again once it’s dry. The ink takes awhile to dry and set fully, so there’s a little room for experimenting without having to paint the white bit *again* and risk clogging up all the detail.
Now, of course, your real eye isn't just black and white; if you feel like truly losing your mind, you can paint the iris whatever colour you like. If you're painting larger-scale figures, this will be necessary, but on the kind of scale we mostly work at, it's pretty much only for showing off.
My third method is the one I prefer - using a fineliner pigment pen. You might have heard these referred to as Micron pens (those are the ones made by Sakura). I use the ones by Staedler because they’re easier to get hold of where I live. The method is pretty straightforward: paint the eye in the same way as the line method up until step 3, then gently apply a dot with a size 0.1 pen. That’s it! If you're feeling a bit feisty, once it's dry you can put a little bit of white to simulate the reflectiveness of the eyeball. Even better, if you mess up, all you have to do is flood the socket with water and wipe the ink off, soak it up with your brush,1 and try again once it’s dry. The ink takes awhile to dry and set fully, so there’s a little room for experimenting without having to paint the white bit *again* and risk clogging up all the detail.
Now, of course, your real eye isn't just black and white; if you feel like truly losing your mind, you can paint the iris whatever colour you like. If you're painting larger-scale figures, this will be necessary, but on the kind of scale we mostly work at, it's pretty much only for showing off.
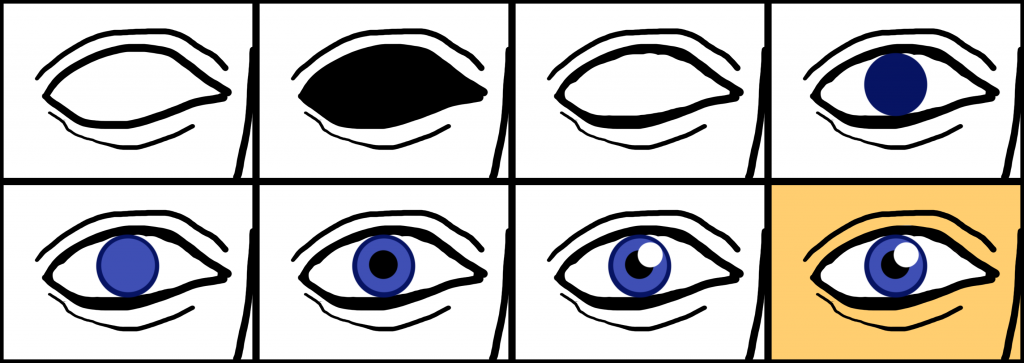
- The same as the other eyes up until the whites.
- Paint the iris with a darker version of your desired final eye colour.
- Paint inside the dot you painted previously with a smaller circle of the final eye colour.
- Dot the pupil with some black (or a fineliner pen).
- Add a nice reflective catchlight with a dot of white.
- Paint the skin around the eye.
If you want to take it even further:
7. On the opposite side of the iris to the white catchlight, paint a lighter version of the iris colour, use a few layers to make it smoother.
8. On the highlighted part of the eye, paint some very very fine bright lines to enhance the reflective texture of the iris.

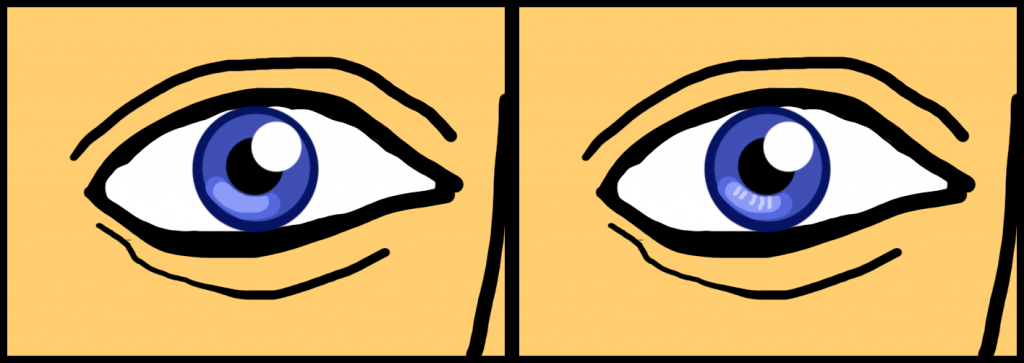
 Pictured: Models the kind of scale wherein you can paint detailed eyes.
If you're painting a load of horde-esque troopers for the table, you may not want to take the time necessary to paint eyes, which is valid. At most gaming levels, you probably won't really be able to see them anyway, you can just shade the general area and leave it at that and your mass of troops will look just fine.
Have any questions or feedback? Drop us a note in the comments below or email us at contact@goonhammer.com. Want articles like this linked in your inbox every Monday morning? Sign up for our newsletter. And don’t forget that you can support us on Patreon for backer rewards like early video content, Administratum access, an ad-free experience on our website and more.
Thank you for being a friend.


 Goonhammer App and Patron Updates: April, 2026
 Kill Team Tournament Report: Engage, Party, Repeat's March Madness 2026
 Goonhammer Reviews: Tribal Conquest