Welcome to Hobby 102: Blood, Gore and Slime, now including Vomit! I'm not going to attempt to tell you golden-demon-subtle ways of doing Blood, Gore and Slime because, frankly, that's boring. Instead, this is the world of over-the-top movie effect nonsense, and how you can use blood effects paints for much weirder things than adding a little sheen to your chainswords.
Content warning: It's worth saying right now that a lot of the effects you can achieve for painting blood, gore and slime look absolutely disgusting, so after the first two examples it's going to get a bit grody in here. This also includes toe tank images, with good reason. If you're looking for how to put some blood spatter on your weaponry, without finding out how to model mashed up brains or bloody vomit, stop at the picture of the World Eater.
Second, additional editorial content warning: We're not kidding about the toe tank. It's a tank made (conceptually, not literally) out of a human toe. The toe hasn't had a great time.
References
This isn't the dark old days of the internet so I'm not going to recommend you hunt out gore and horrific pictures to find out what this should all look like. If you do want to get some reference pictures though, you should look at makeup effects. There's a lot of great sources on Insta, but my go-to is always
Rob Smith, a true master of movie prosthetics and oceans of fake blood. If you want over the top monster gore, look up Tom Sullivan, the mad genius behind the effects of the Evil Dead movies.
Materials
Blood and Slime effects tend to be fairly gelatinous, viscous and glossy paints. I'm using the Army Painter Blood and Gore bundle, which contains:
- True Blood
- Dark Blood
- Oozing Vomit
- Disgusting Slime
- Warpaints Stabiliser
- Gloss Varnish
- I've added the Warpaints Retarder in here too - very useful!
On top of that, for the particularly bloody among you, you'll want some thickening agents to create various types of gore:
- Army Painter Battlefield Basing: Snow
- PVA Glue
- Superglue
- Glue Stick
- Water Effects
A wide paintbox is useful, but the key ones to have on hand are:
- A deep blue (I'm using Army Painter Regal blue)
- A dark brown (Oak Brown)
- A highly pigmented black wash (Army Painter Oil Stains)
- An Off-white or beige (everyone should own Army Painter Ancient Stone, honestly)
Blood and Gore Swatches
Effects paints tend to act a little differently to standard acrylics, and can mix in some odd ways. As you'll usually be adding blood and gore effects to fully painted models, it's important to get things right straight away. You don't want to have to strip a perfectly good model because the blood effect has accidentally mixed with the vomit into a reasonable facsimile of human waste. Knowing how each paint you're using interacts with everything else is a key step to getting controlled blood and gore effects above and beyond just sponging them on (which is also a good option!). To do this, I make swatches of each effect paint on white and black to test coverage and tone, and each effect paint with the thickening agents. That ends up looking something like this:
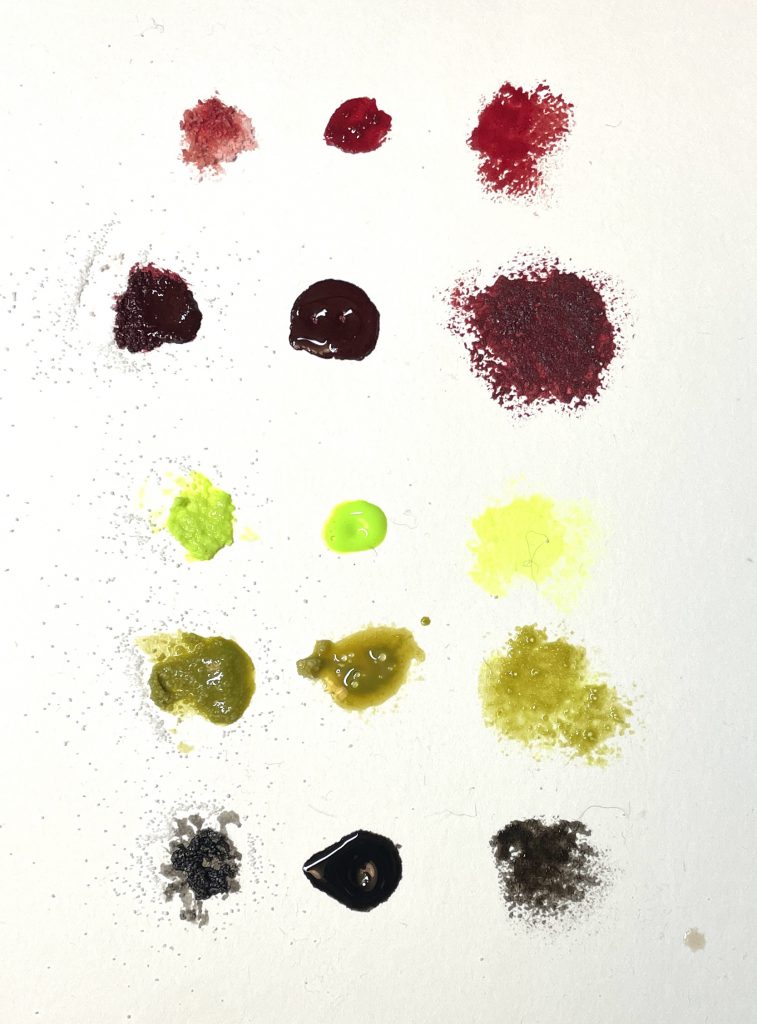 Left to right: Snow texture, painted, sponged
Top to bottom: True Blood
Dry Blood
Disgusting Slime
Oozing Vomit
Oil Stains
Blood and Gore Effects
We can think of the "neat" effects paints as fresh blood, slime, bile, and vomit. That's the liquid stuff coming straight out of a cut or mouth as appropriate. Mixing the paints lets you paint one dripping into another, or something like a stomach wound or bloody acidic maw where the two will interact. The thickeners all look very different, and give you a wide toolbox to play with. I hope you can immediately see where different looks will come in handy.
It's important to remember that blood can be all sorts of different colours. True Blood is bright and punchy - good for fresh blood, arterial spray and recently acquired wounds. Dry Blood is, as you'd expect, older, darker blood that's been around the block a few times, and also works well for adding the illusion of depth to wounds. Mixing some blues in will give you a solid look at venous blood - not quite that blue in practice, perhaps, but on the mini you want a bit more contrast. If you're mixing non-effects colours in, remember to add gloss varnish too to regain that sticky, glossy look.
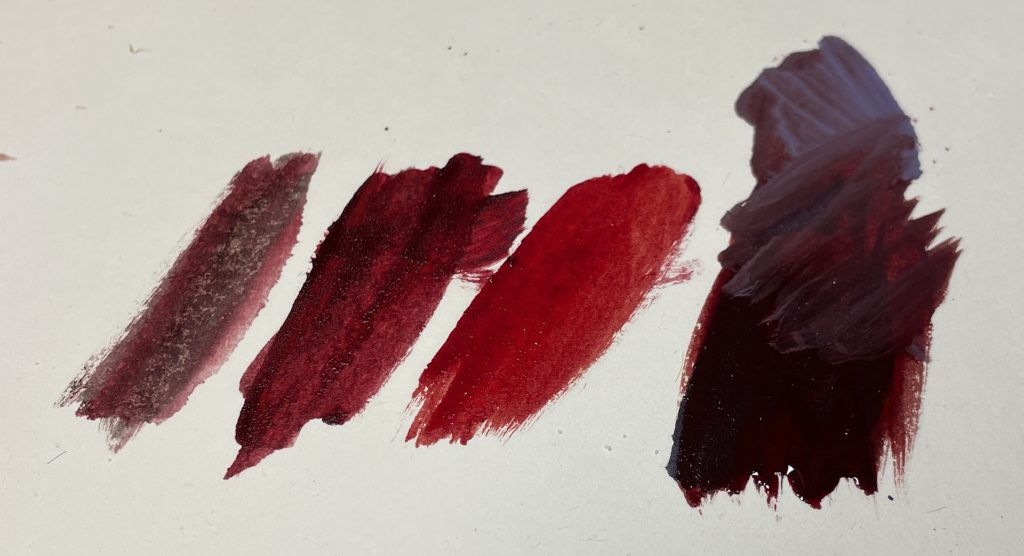 L-R:Oil and Blood
Dry Blood
True Blood
Dry Blood with Regal Blue
Blood and Gore Effects
Easy Blood, Gore and Slime
There's two main blood effects out there - a splash/spray and seeping blood. Seeping blood is for exposed flesh, open wounds, gutshot casualties and the like, while splash/spray is for axes, the skin and clothes of close combat monsters and guillotine dioramas.
Seeping Blood
Seeping blood is deceptively difficult! You'd think just painting blood effects on would give a good look, but getting it to look right is a bit tricker. Let's have a look at this biomechanical dreadnought horror:
 Blood and Gore Effects
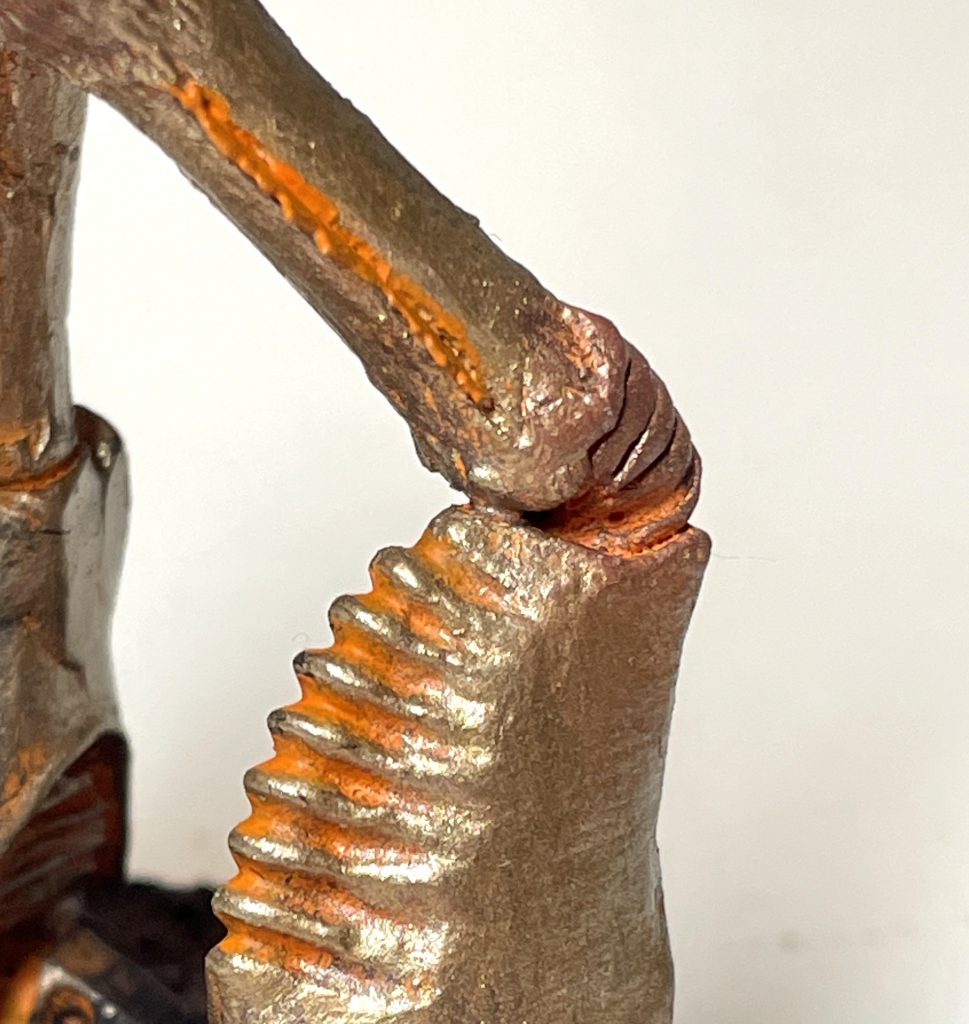
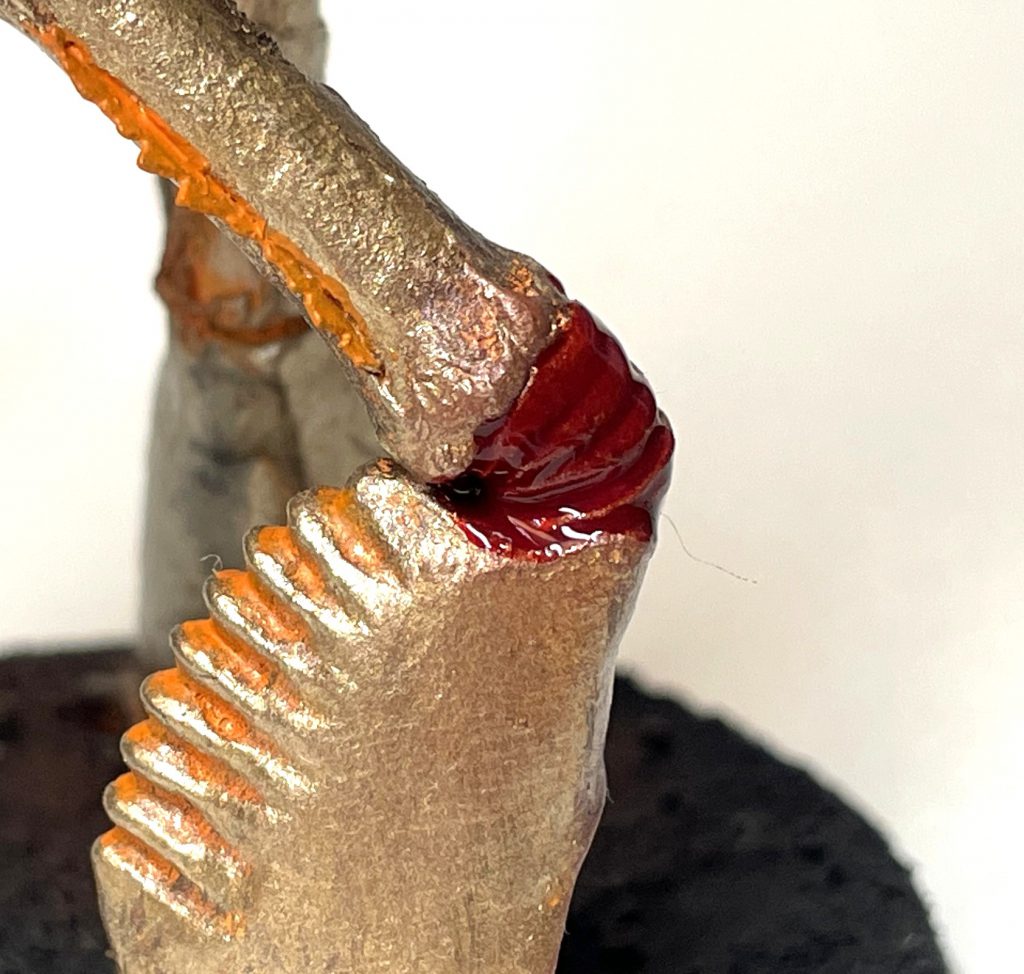
And particularly, its knee:
 Blood and Gore Effects
This is an ideal place for seeping blood - an exposed joint of rubbery, folded flesh, a deep crevice and a gap between two crustacean-style armour plates. I start off with a layer of Dry Blood in the open joint, and then immediately add a very thick layer of True Blood with about 80:20 Drying retarder in it. I want to have time to work this blood - I'm not going to add any more on, so that everything seeps naturally from this point.
 Now that's thick! Blood and Gore Effects
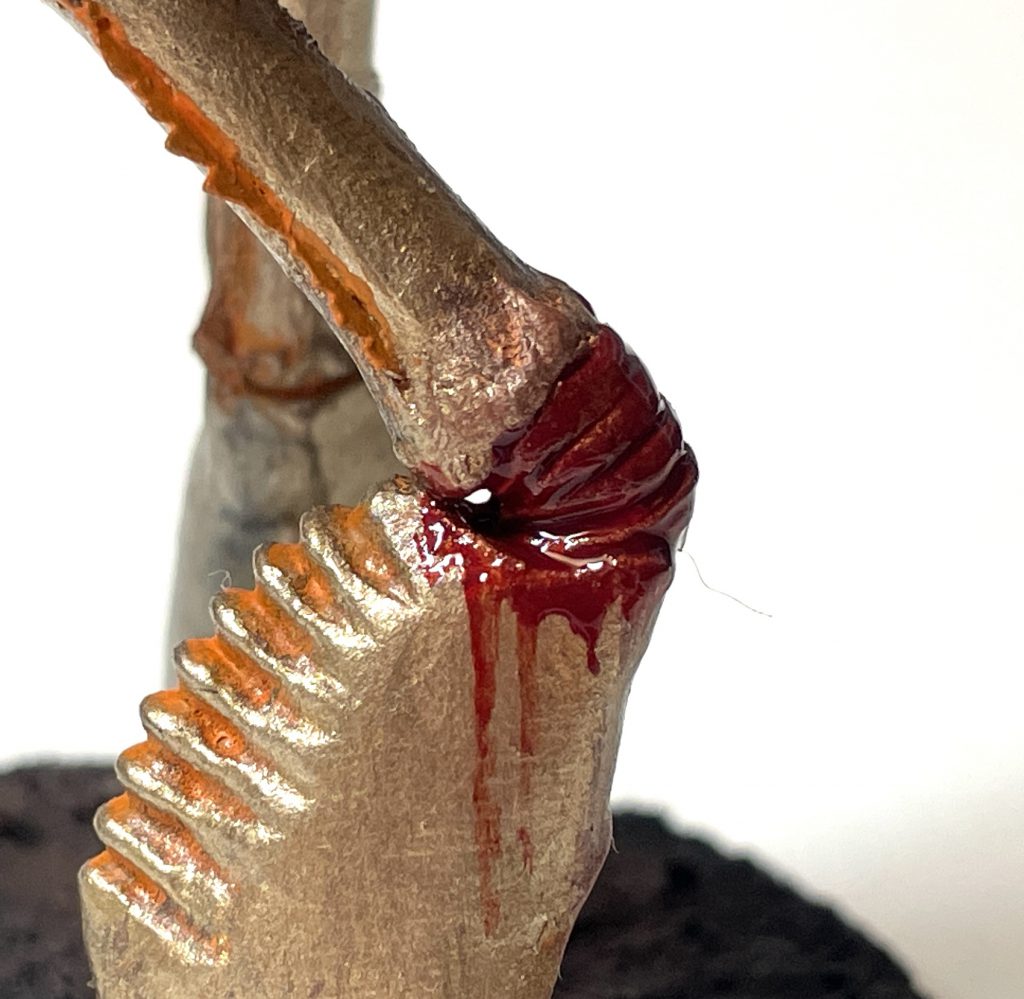
Then take a fine brush and just agitate the watery, glossy blood you've added until it spills over the edge. Once it's naturally started to well up, encourage it along the way with quick, light vertical brush strokes. You want these to just catch the edge of any welled-up paint, forcing it to run down the leg, and then follow it with the brush to create the length of drip you're looking for:
 Blood and Gore Effects
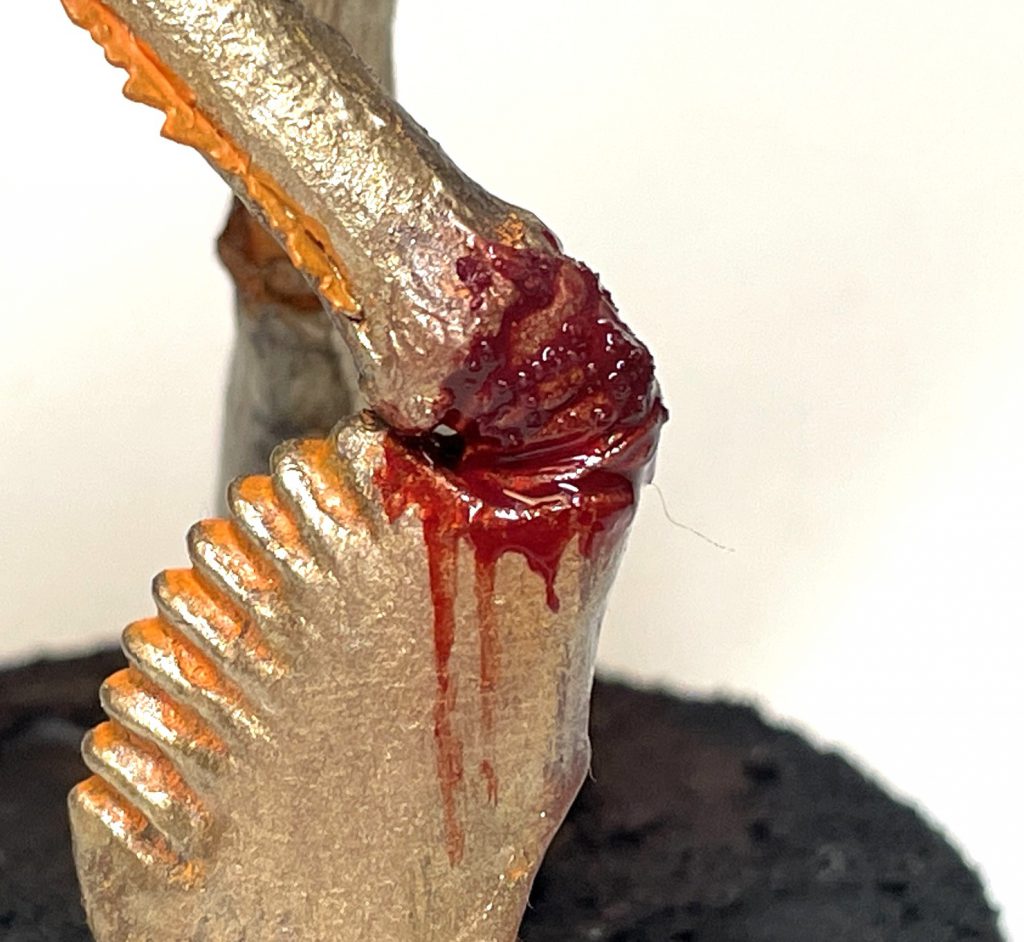
Instead of choosing where you want the paint to leak down by forcing it, we've added enough fluid for the paint to naturally follow any angles or imperfections that it can find, adding to the verisimilitude of the effect. At this point I like to add a little texture - here sprinkling a very little bit of Battlefield Basing Snow (it's ubiquitous in this article!) into the open wound. The snow quickly absorbs the paint, pulling it away from raised areas, giving you a muscle-through-blood look:
 Blood and Gore Effects
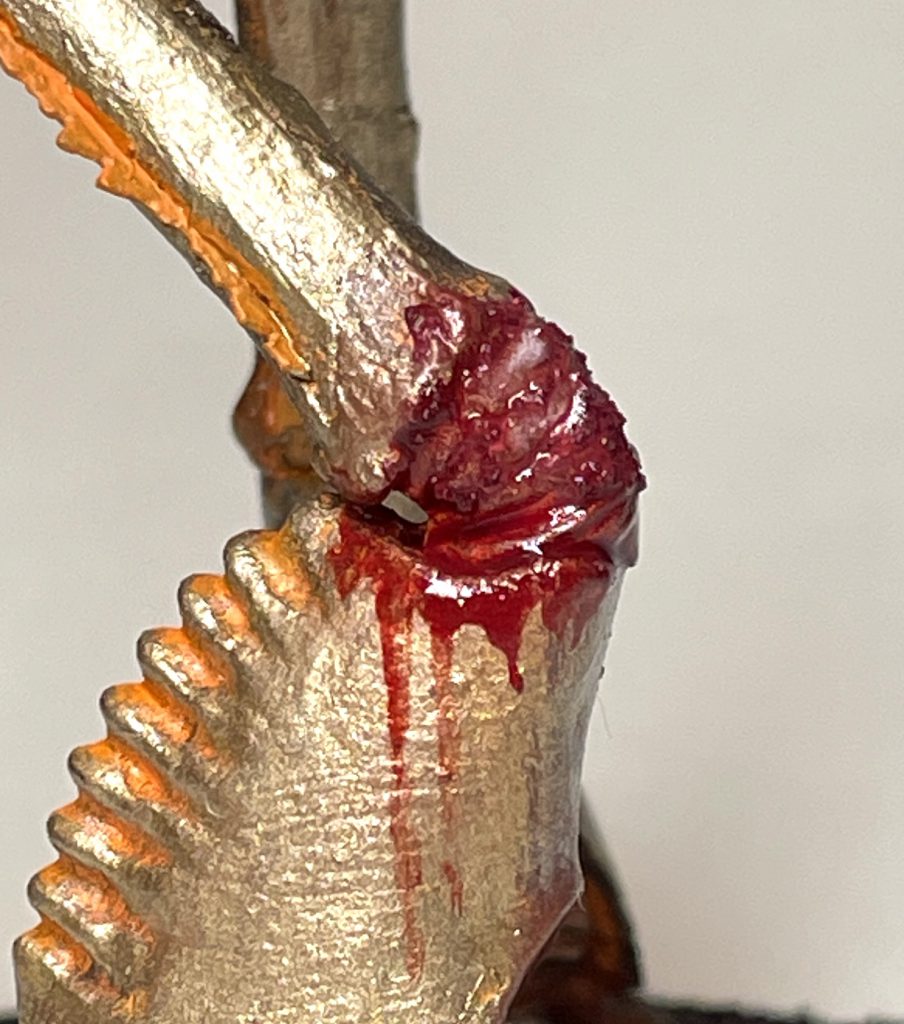
You can push this further with the tiniest bit of highlighting, while everything is still wet. This is just a little off white very carefully dabbed on with a fine brush. It'll mix ever so slightly on its own, so you can just dot it on:
 Blood and Gore Effects
If this dries matte, paint (or drop) gloss varnish over the top to pick it back up.
Sprayed and Splashed Blood
If you want blood spray everywhere on your models, there's two things to think about: direction and timing.
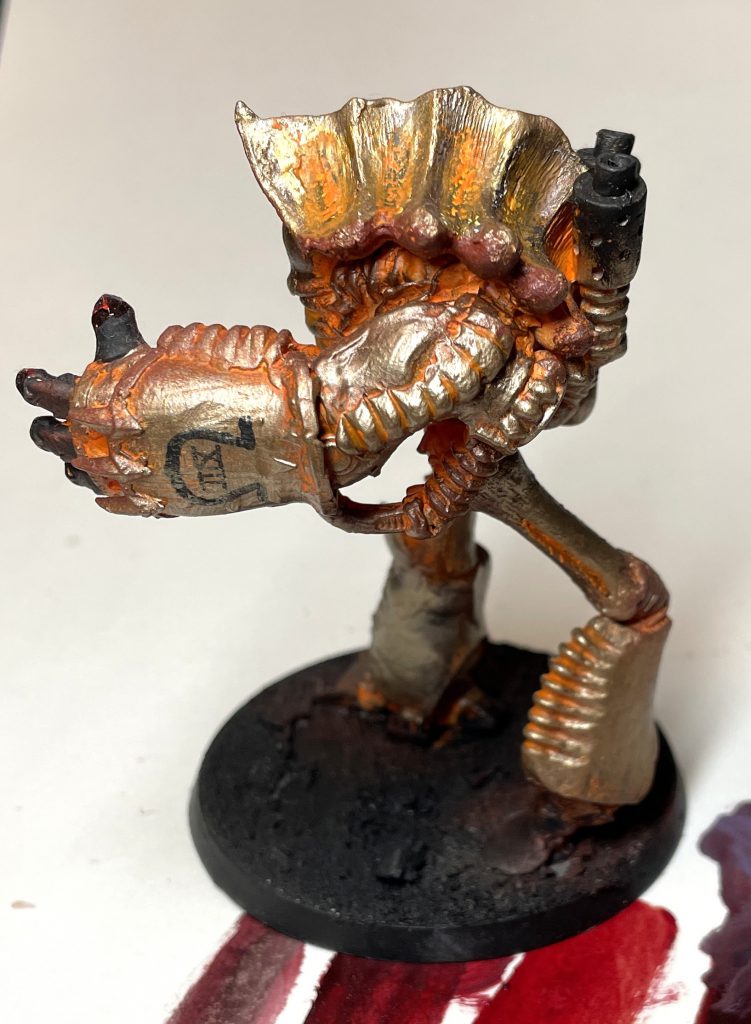
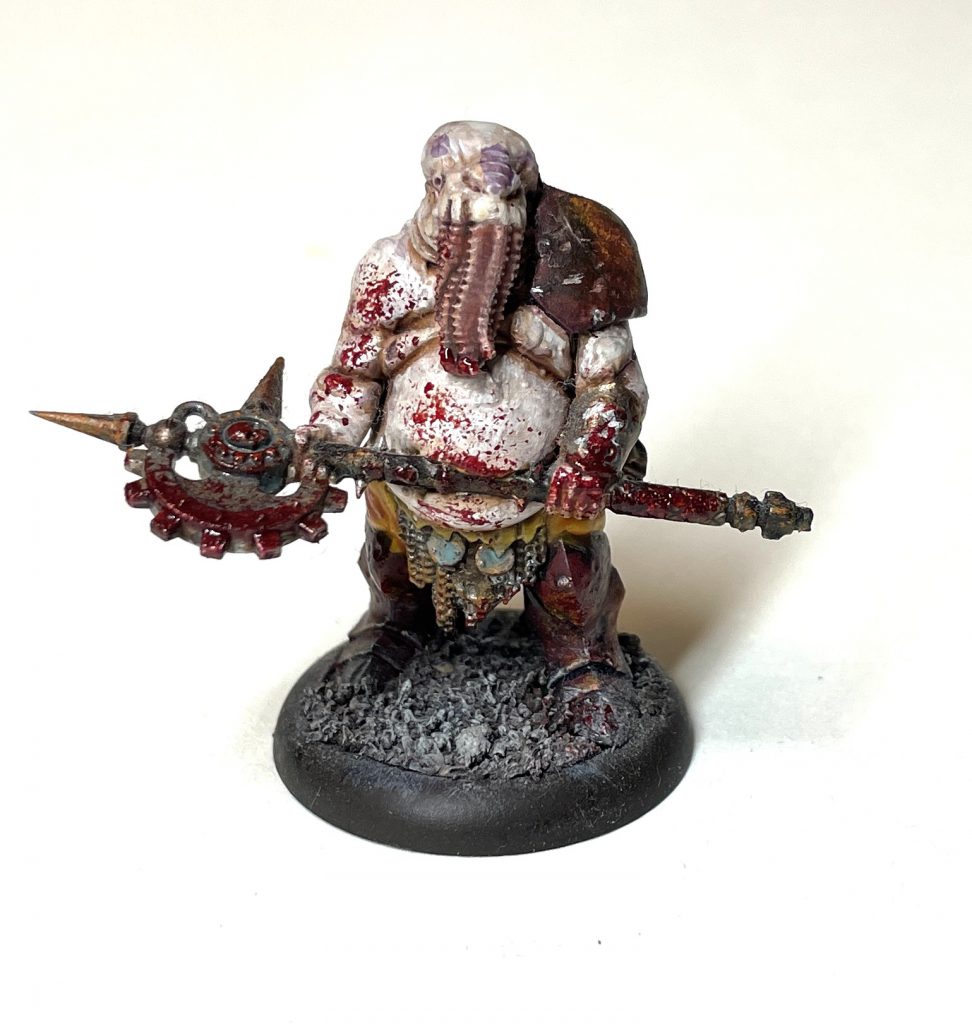
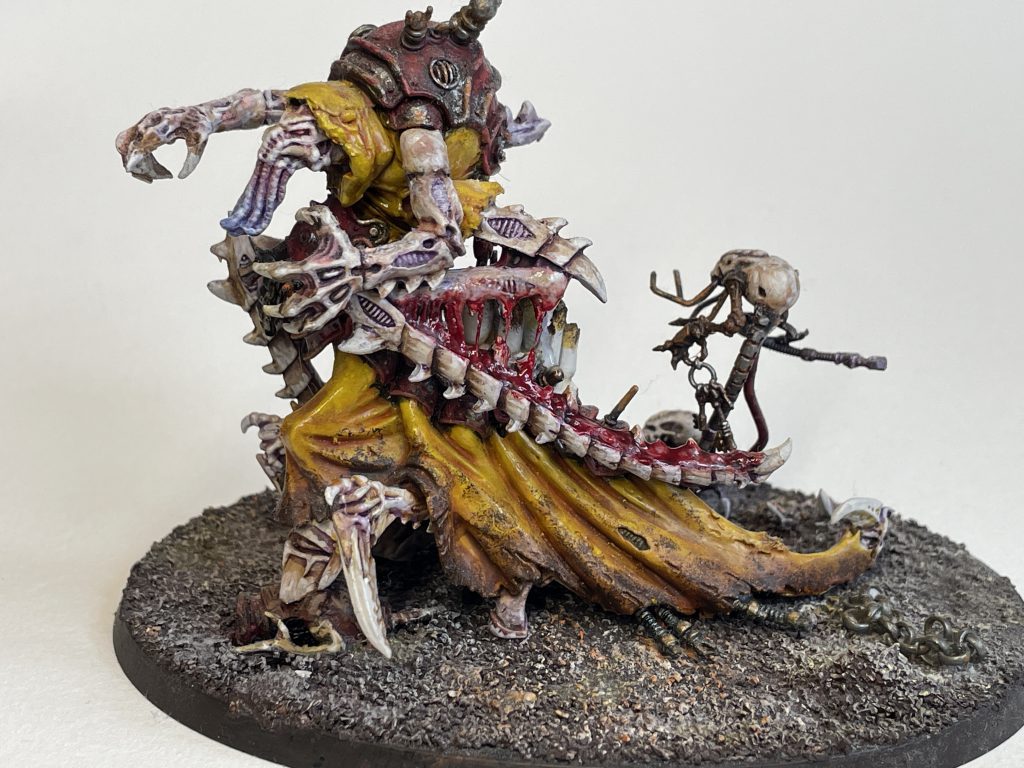
Imagine your model hitting someone with an axe. The blood is going to end up on the axe, on the leading arm, all over the front and not so much on the back - concentrating in areas where blood has escaped from the axe wound, not finely misting the entire model in an even coat. If they've hit one person with an axe recently, the blood will be very bright. If they've been hitting someone with an axe all day, there'll be fresh and drying blood. I want my Genestealer Locus to look like he's been at this all day:
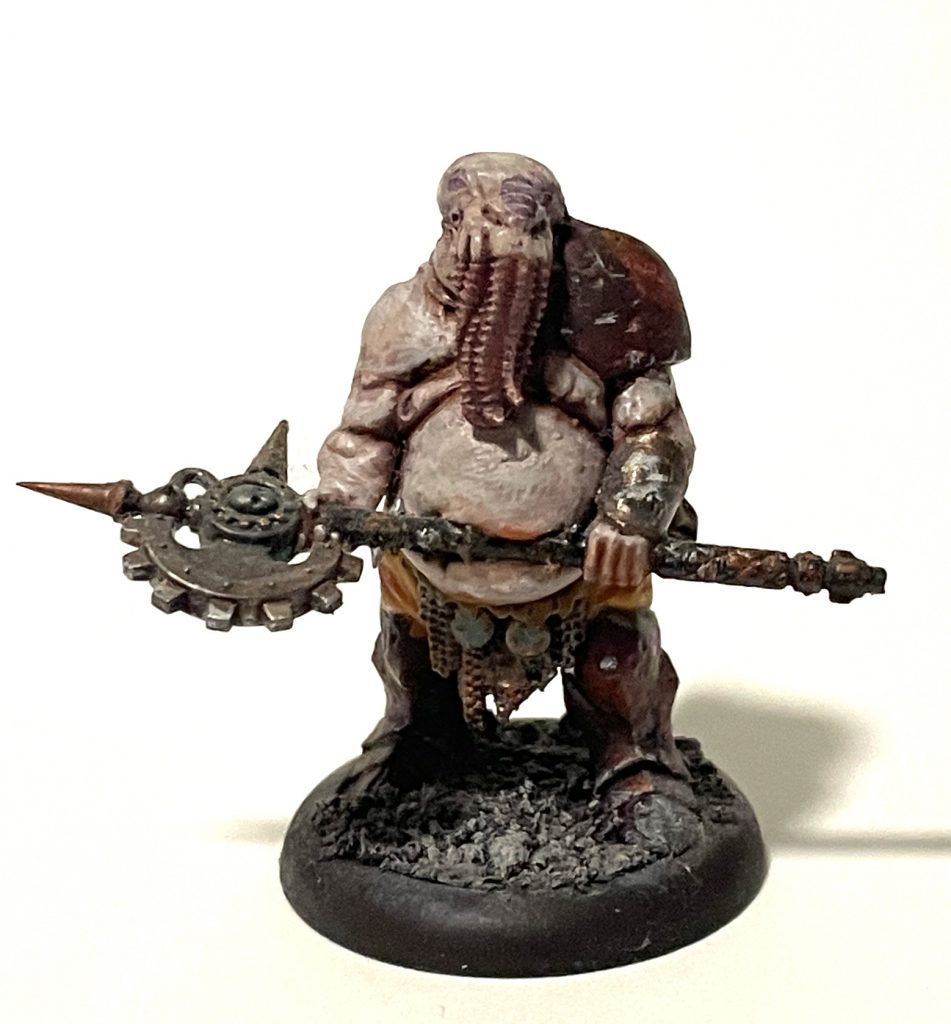 Genestealer Locus Blood and Gore Effects
The absolute easiest way to do this is to just hit your model with a True Blood caked sponge, focusing on the areas around the axe.
 Step 1. Blood and Gore Effects
After that, fill in a little Dry Blood with the brush where blood may have pooled and dried, then add a little more with the sponge, adding a bit of depth:
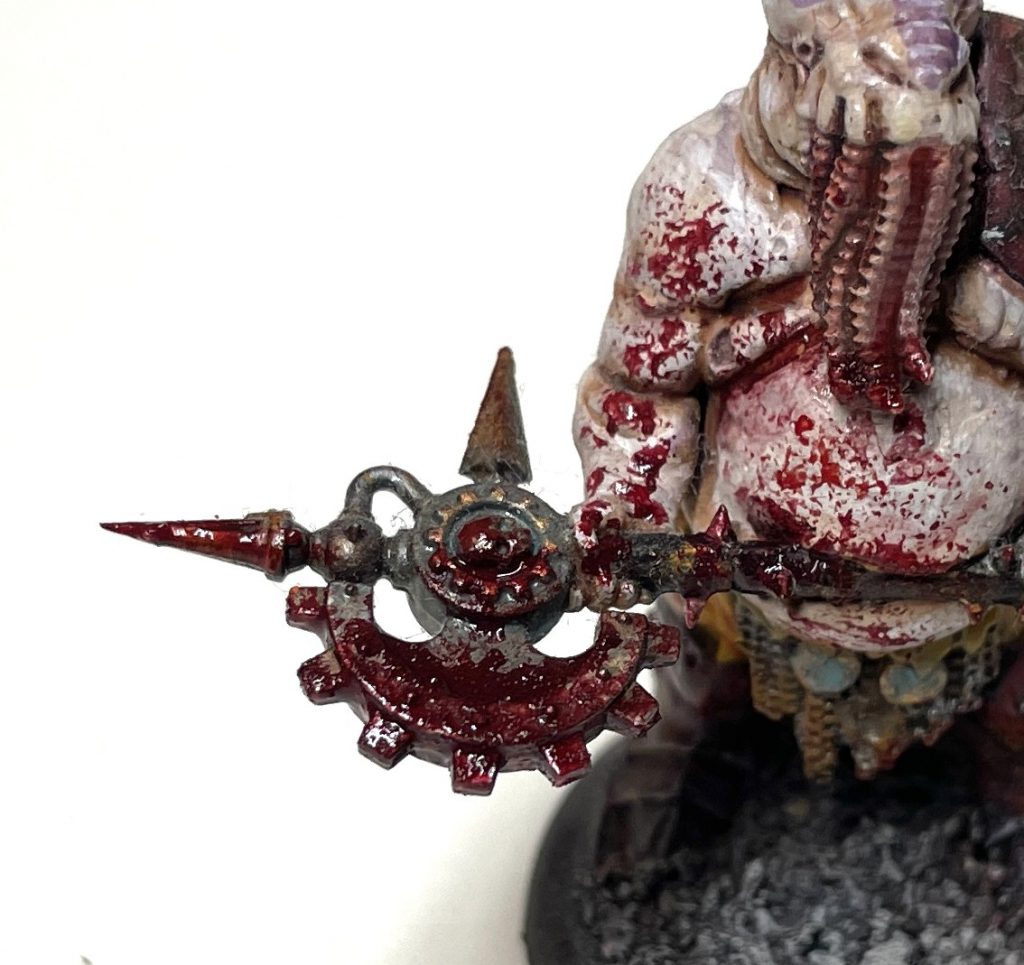 Blood and Gore Effects
You could stop there! But here comes the Snow effects again. This is a horrible, toothed axe that's poorly maintained and jagged, so I want to add some matted flesh and hair into the blood effects (I'll be honest, the hair didn't work). Wet your brush, dip it into the snow and dab it into the blood effects before they dry:
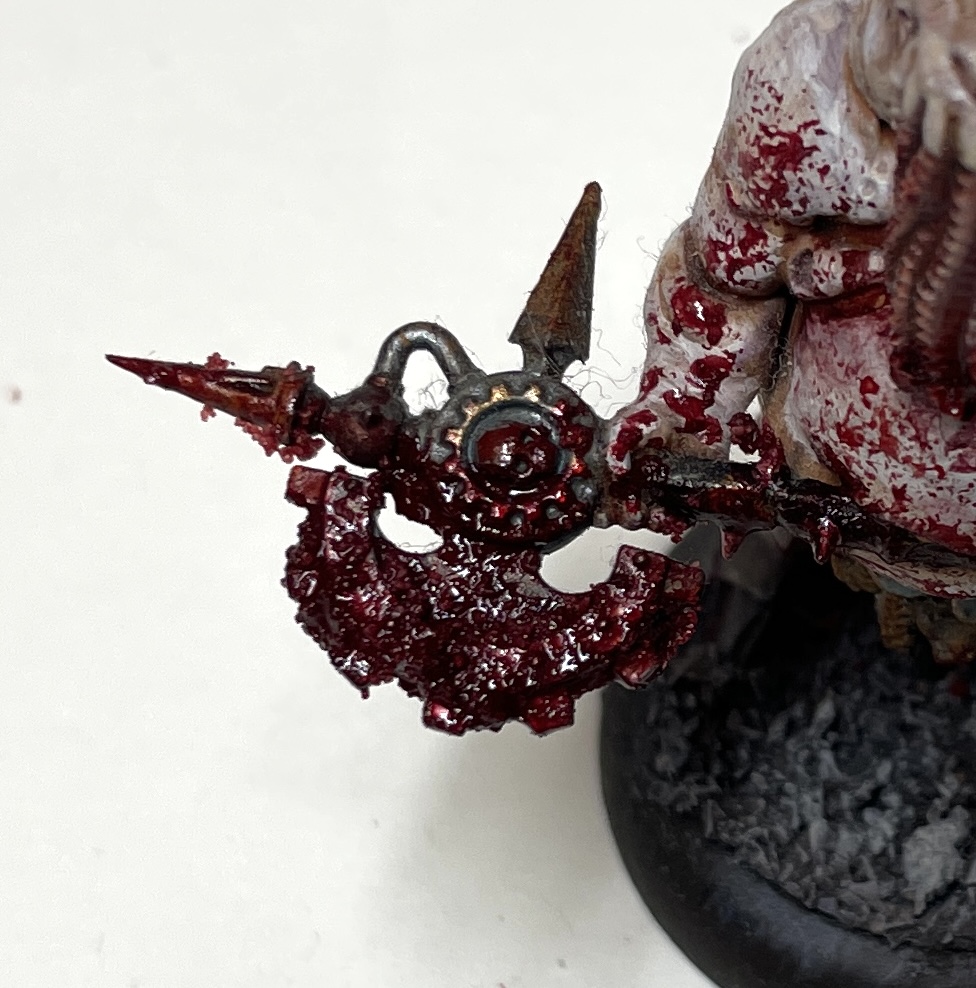 Blood and Gore Effects
This will dry quite pink and matte as the snow absorbs the paint, so another quick pass with true blood and gloss varnish will give you a delightfully gory, long-lasting effect.
Painting Blood
You can, of course, add blood effects with a brush. I find this particularly effective on mouths and other large cavity spaces. This is extremely simple: add Dry Blood first, then a heavy blob of True Blood. Agitate it and swirl it around with a brush or stick, and drag the blobby mess around the model where you'd like it to go. I do this a lot, so here's some examples:
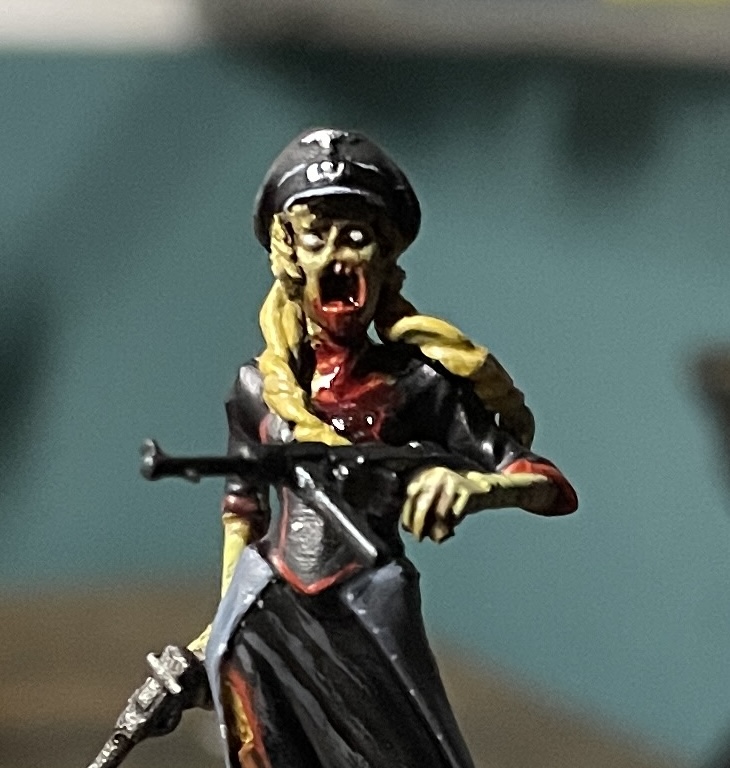 An undead fascist
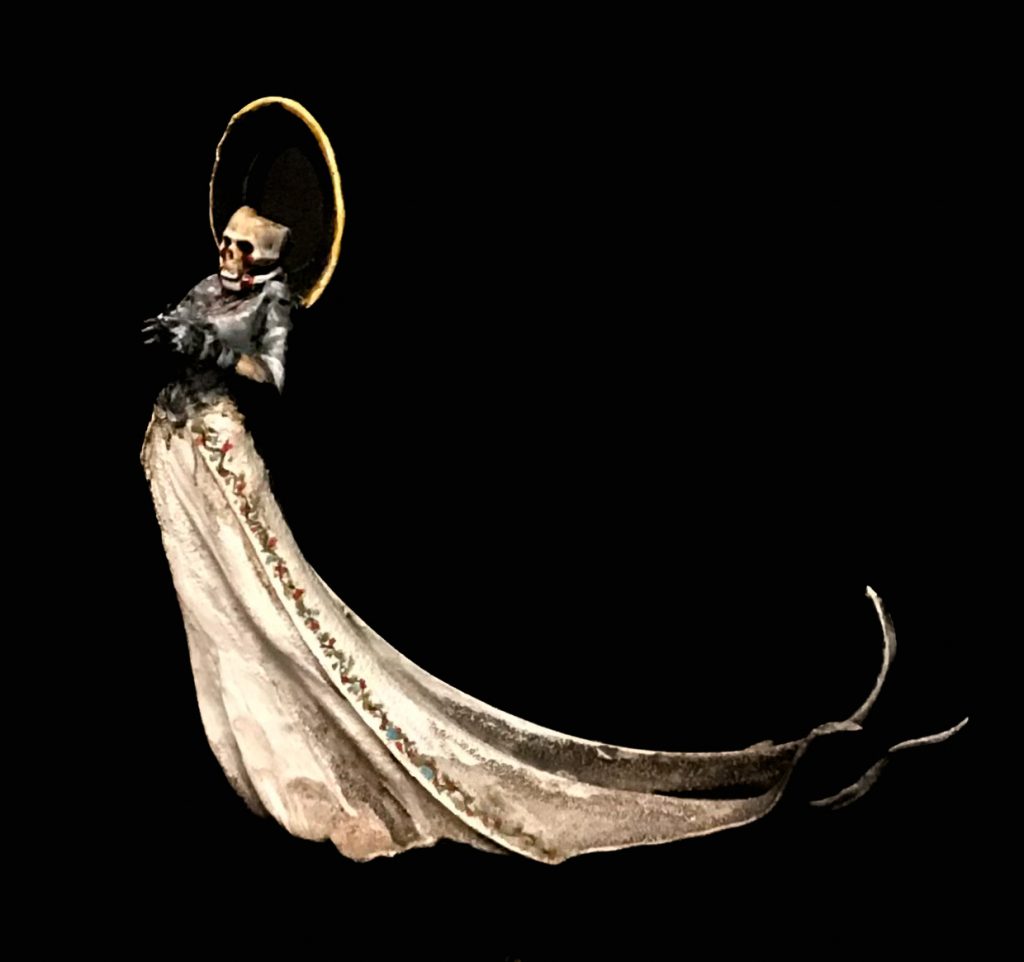 Toff for Turnip 28 - the Saint of Yams. Credit: Lenoon
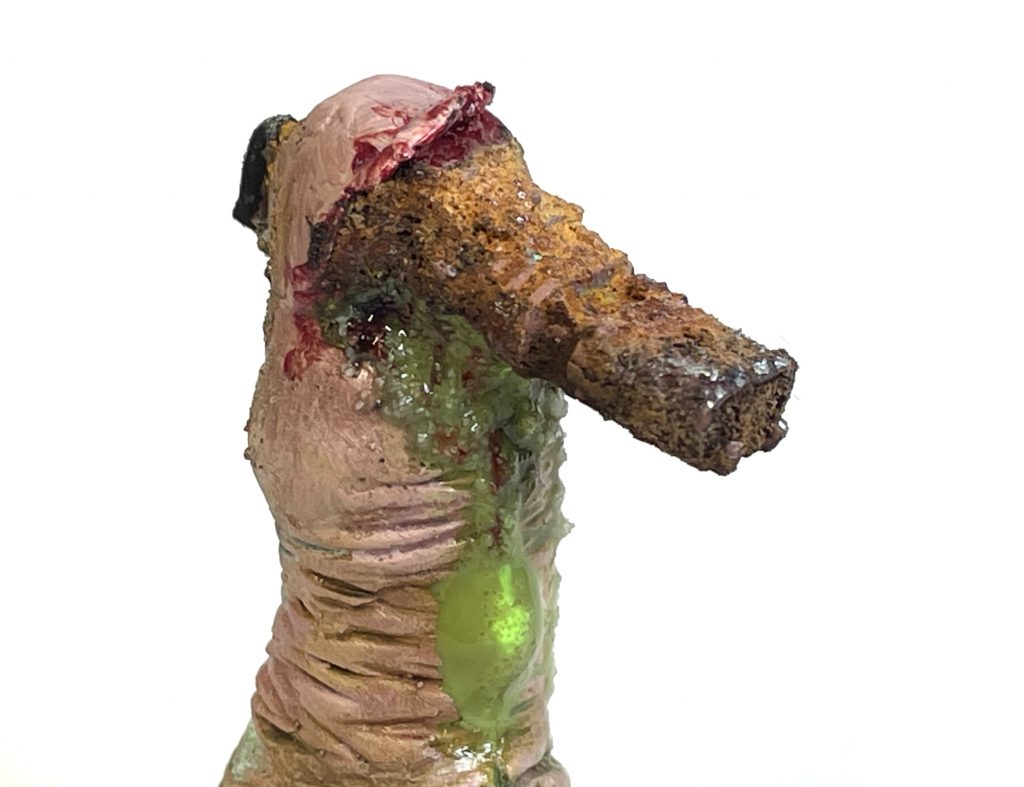
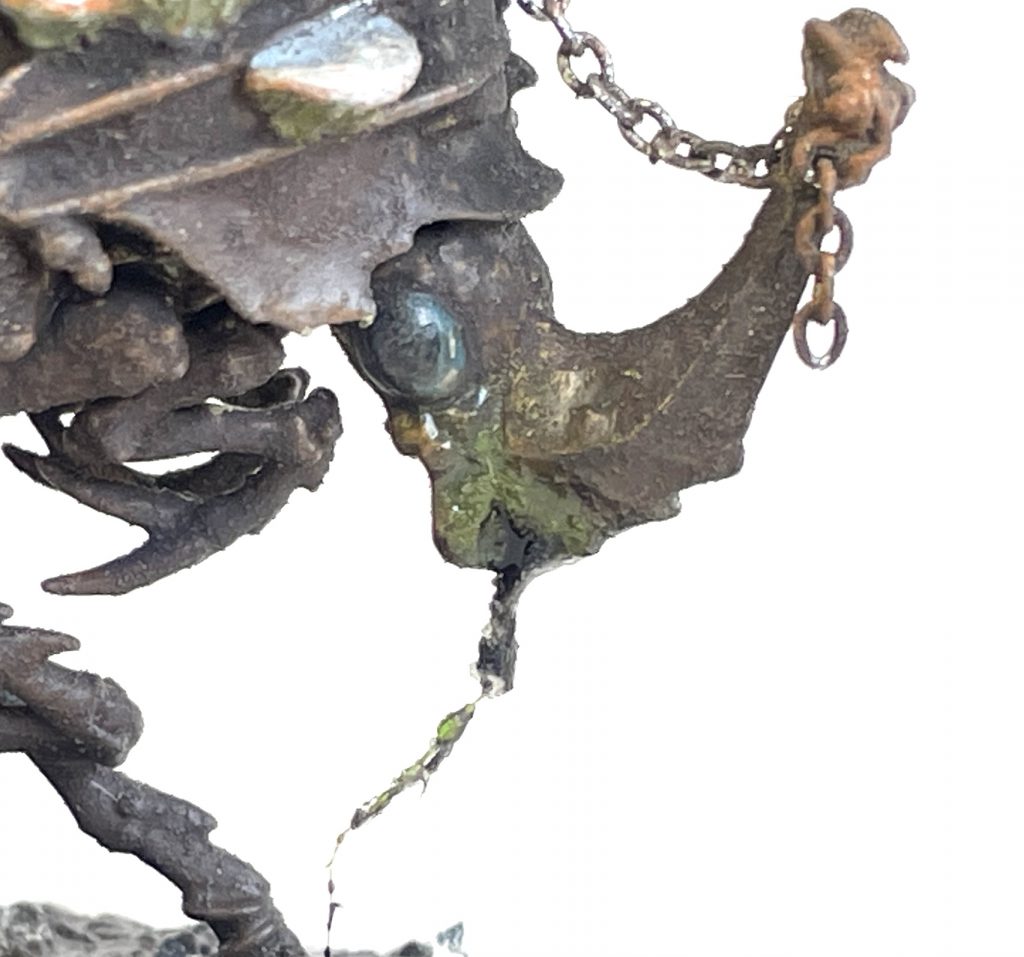
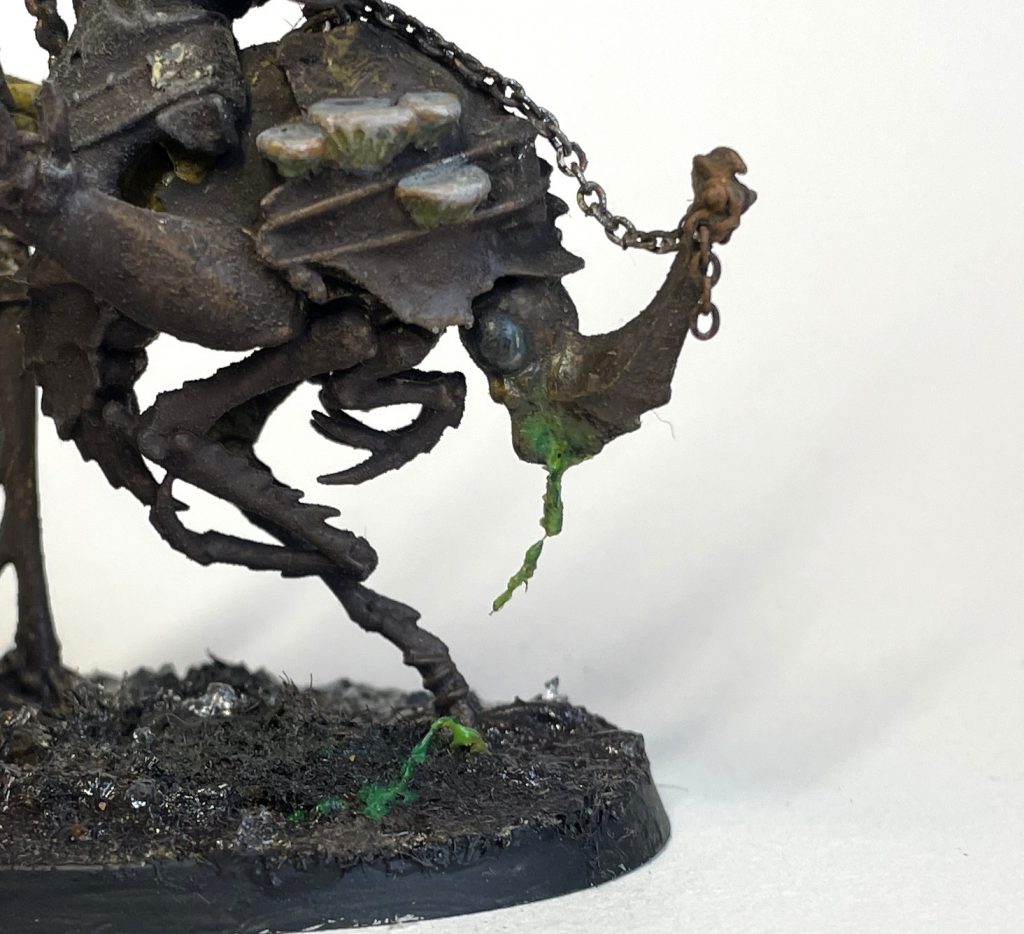
Straightforward Vomit
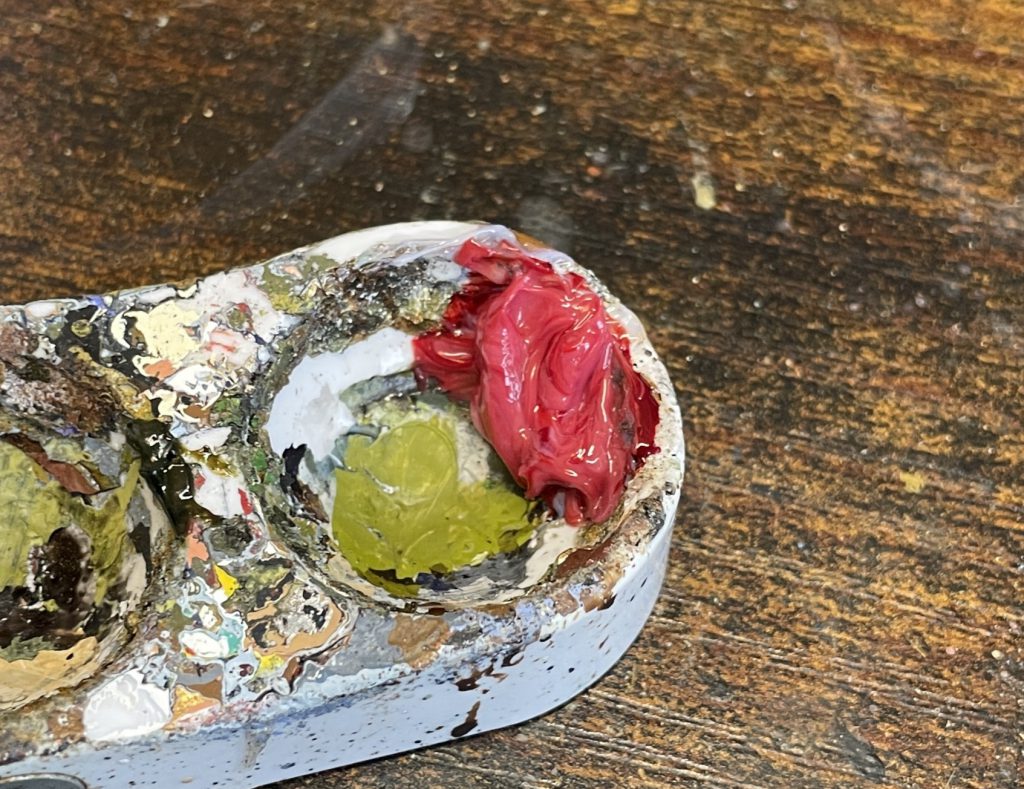
Ooze, slime, vomit and mucus can all be applied in similar ways to blood effects, simply switching up the colours for a dark and light version of your vomit tone. Army Painter Oozing Vomit and Disgusting Slime have quite a significant difference between the two, so a mid-point is handy - I mixed up some other greens with the Army Painter Gloss Varnish to create something appropriate.
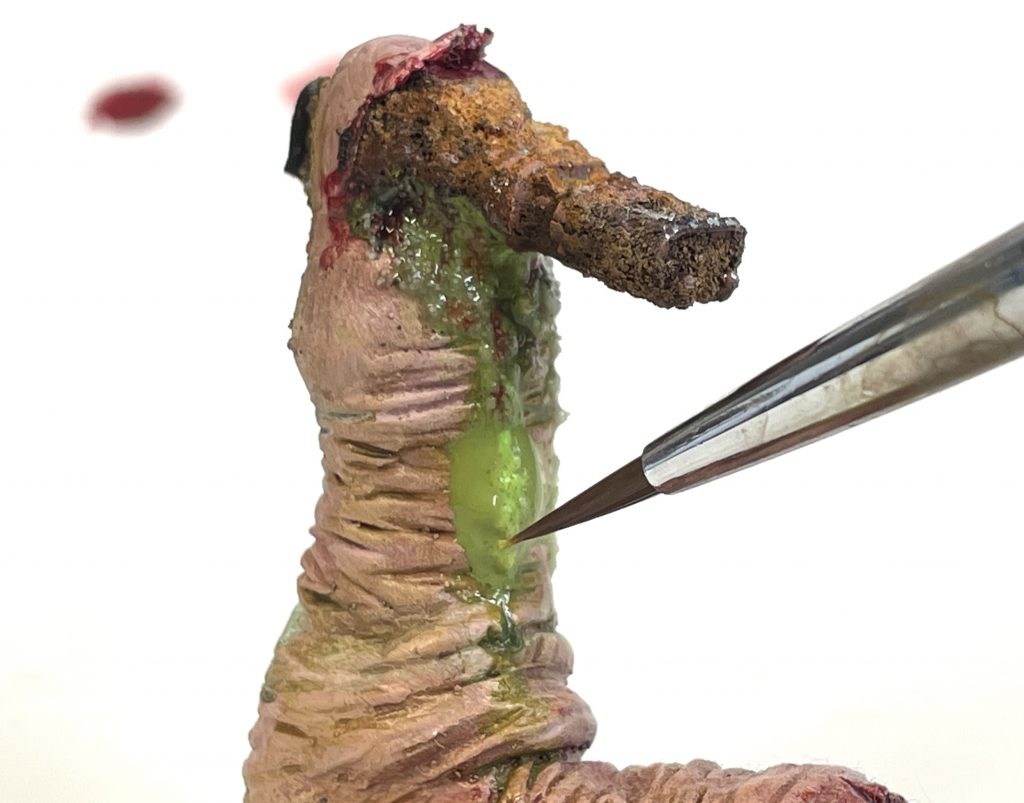
You can paint or sponge this on as you like, but slime paints tend to have a bit less coverage than blood, so consider an undercoat of lighter tones under your vomit. Follow the same two-step pattern, dark then light, and really glob it on.
Loading...
We'll return to that toe tank shortly, but for now a warning. Everything beyond this is increasingly disgusting. Here's a happy little World Eater to form a protective gap.
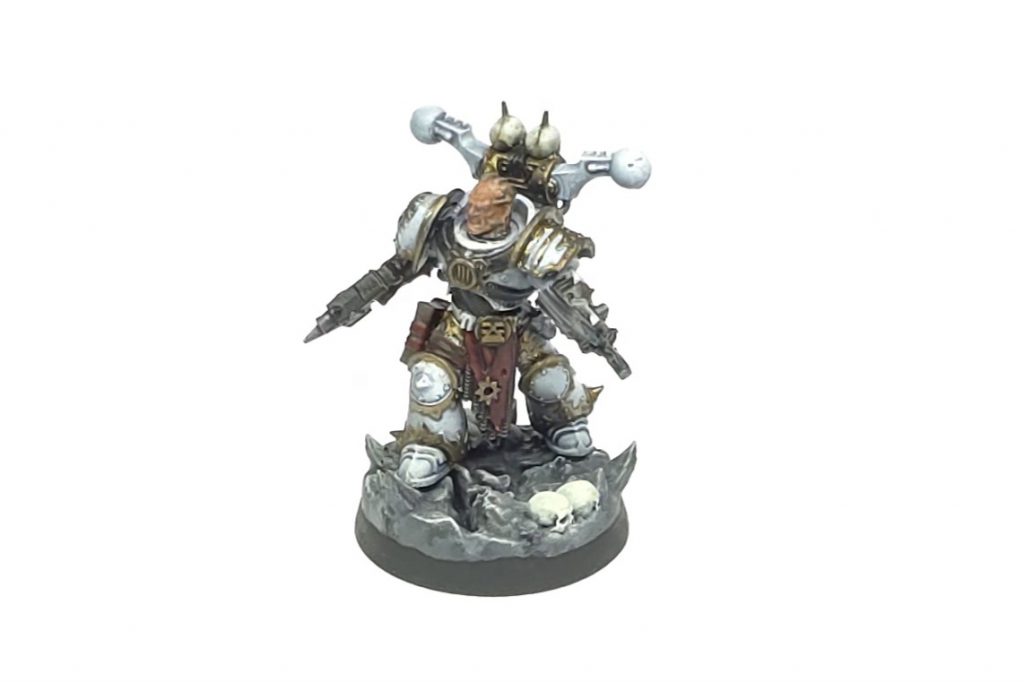 Credit: Jake Bennington
Chunky Vomit
You can up your horrific vomit look by adding texture (snow, again), PVA or Glue Stick. Vomit tends to be pretty chunky unless it's thin, stringy bile, blood or the results of a midnight Fray Bentos, so just keep adding in more and more texture until you're happy with it.
 Blood and Gore Effects
Before any of this dries, try adding some spots of colour - black, orange and yellow tend to work well - with the point of a fine brush. You can also add strings of bloody phlegm easily, using some blood effects and a detail brush:
 Blood and Gore Effects
Now we're starting to look horrendous! As vomit/slime effects dry, they tend to get very thick and gloopy - ideal. You can use a brush to spread colour around, and then a needle or cocktail stick to sculpt the slowly drying paint into long, thin, strands, or crusted peaks:
 Blood and Gore Effects
Here, adding a big glob of Disgusting Slime into the Vomit/PVA mix means that you can play around with the shape of the Disgusting slime as it dries. With a different consistency and drying time to the surrounding paint, I've teased it into horrible chunks, to good effect.
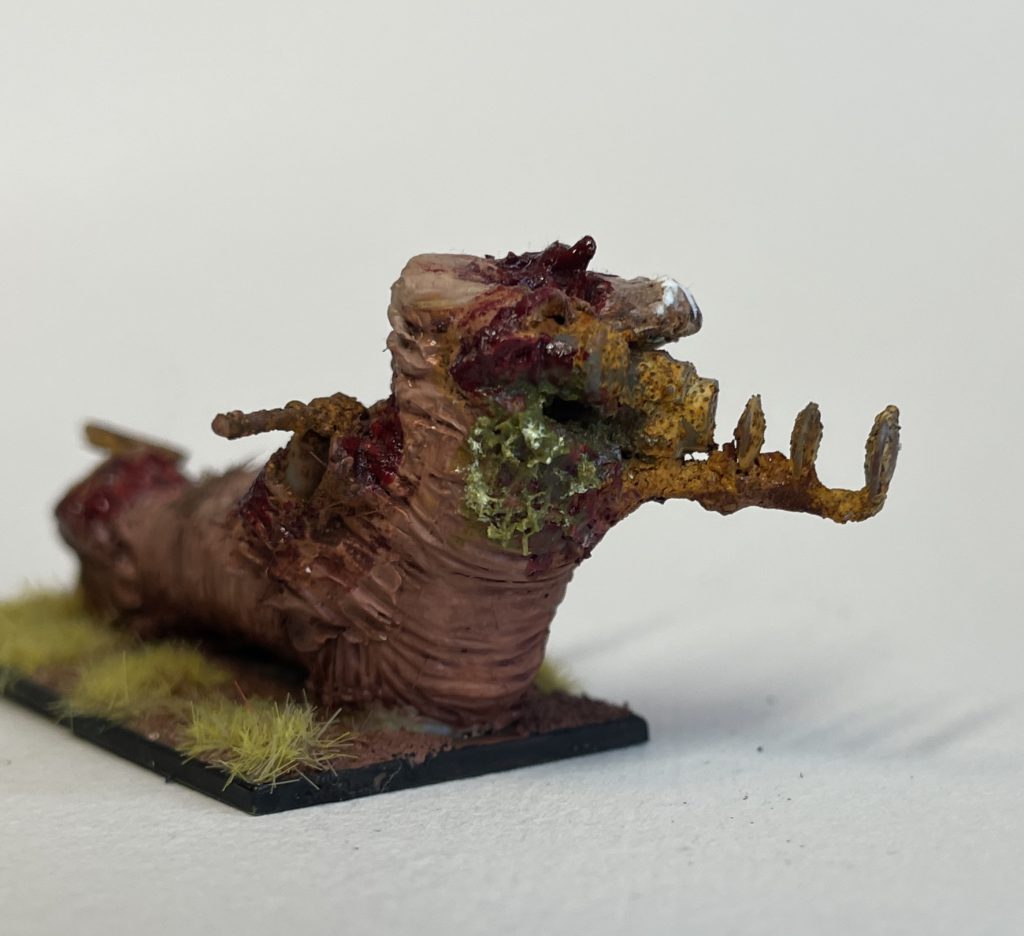
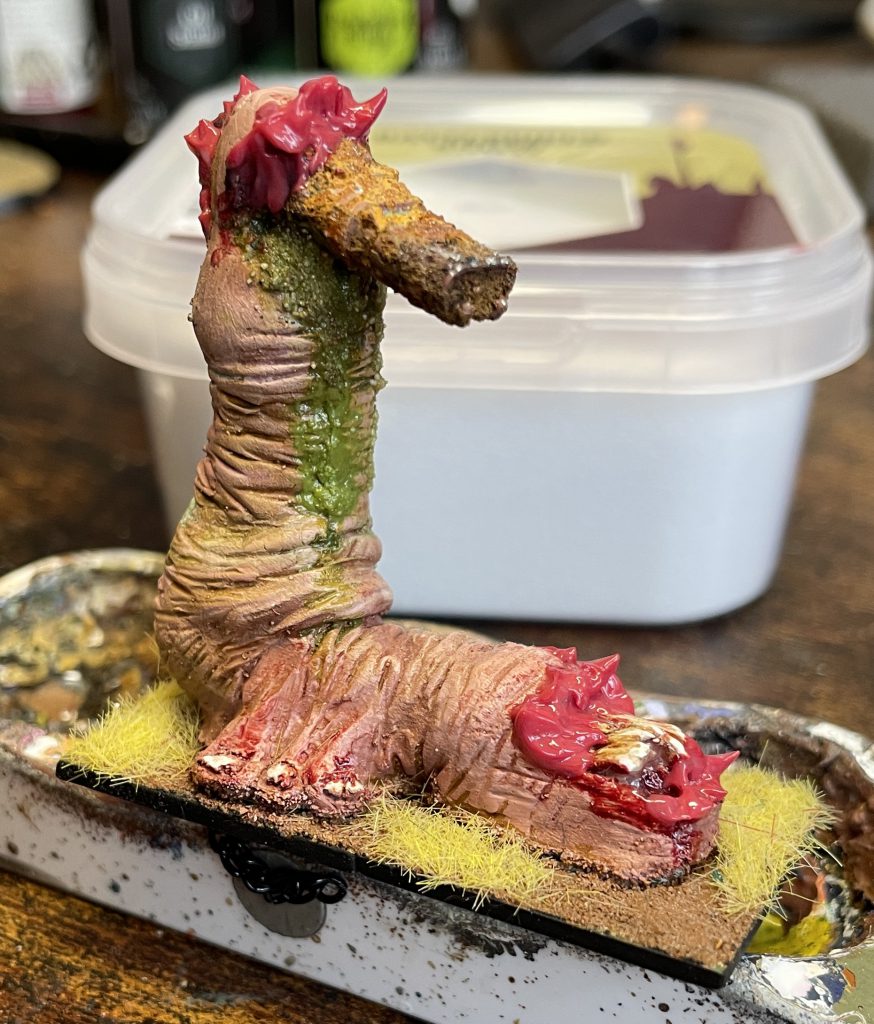
You can combine blood effects and this technique for vomit to create a good infected/pus-filled flesh effect. Here you want to colour the snow basing material green before adding it into wet blood effects. Paint will bloom out of it, leaving the snow granules brighter than the murky surrounds. This would also work well for depicting scale-appropriate mushy peas.
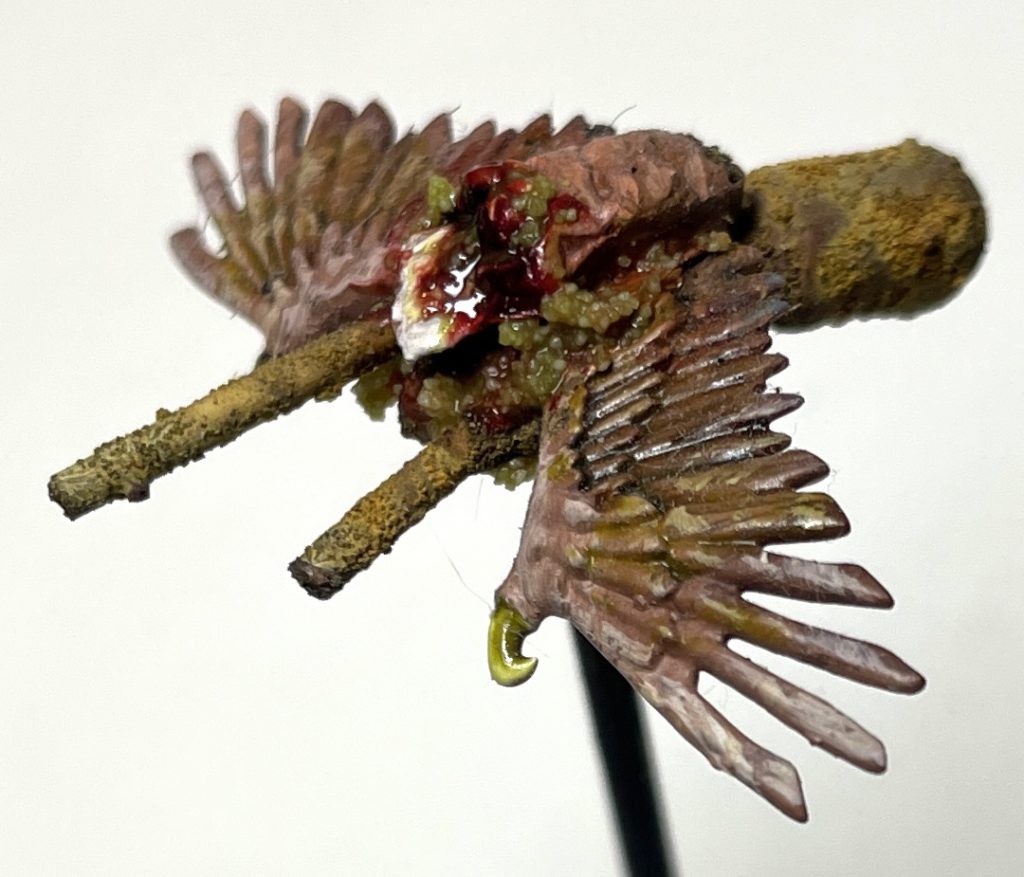 Blood and Gore Effects
Stringy Slime
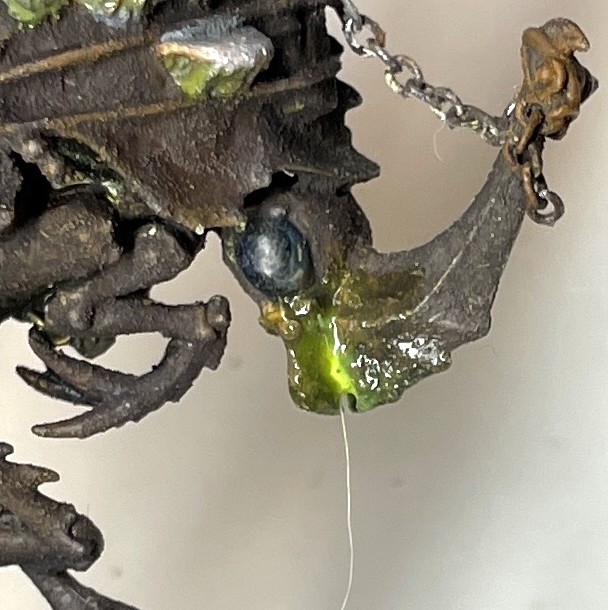
There are a couple of ways of doing stringy slime that I find useful and quicker than the traditional Uhu/Hot Glue gun approach (because I don't own either).
For an incredibly quick approach, stick a hair - I use cat, because as you've no doubt noticed, it is all over the place in my hobby space - into the mouth or other area you'd like the string to fall from. Make sure the mouth is nice and gooey looking already, with a high gloss finish. You want that high gloss for the next step.
 Now with Cat Hair! Blood and Gore Effects
Next, squeeze out a drop of superglue onto the top of the hair and quickly (and I mean quickly) use a pin to run it down the hair. If you've made the mouth nice and glossy, it will largely run onto the hair and start to form irregular, crusty clumps. Once the super glue is dry, you can add more slime/vomit effects to create a nice, sticky looking trail of mucus.
 Post superglue I decided to paint it black? which ruined the effect? Blood and Gore effects
 Blood and Gore effects
For slime/blood/mucus/whatever stretching between two surfaces, I use my trusty glue stick. Scoop some off the top, glob it onto the surfaces (top and bottom) and wait for it to get tacky.
 Blood and Gore effects
Once it is, break out your cocktail sticks and gently stretch the glue up and down between the two gaps. This creates a much more ragged effect than a Hot Glue gun, making it better for torn and tearing flesh. Once it's all dry, add the gloss varnish and the paint to suit:
 Blood and Gore effects
Dried Vomit and Scabs
Dried Vomit and Scabs are tricky to do conventionally, so I don't bother. Instead, the trusty superglue+paint combo does a lot of the work for me. Add superglue to the area you'd like to scab up, then overlay this with paint. Don't use a brush, as this is a sure fire way to ruin any brush you use.
 Superglue, pointed out for some reason. Blood and Gore effects
The superglue will dry quickly, forming a crust - but before it's entirely dry, start raking it up with a pin to form ridges, peaks, and other crusty textures. The nice thing about this technique is that the pin removes bits and adds them on elsewhere - those tiny fragments of superglue are still sticky, so you start to build up a nice, multi-layered texture.
 Quickly, stab it with a pin! Blood and Gore effects
You can keep doing this as long as you'd like, and with patience and clever superglue placement, can create large encrusted open wounds which is very satisfying!
 Of course, I just went crazy with the sponge. Blood and Gore effects
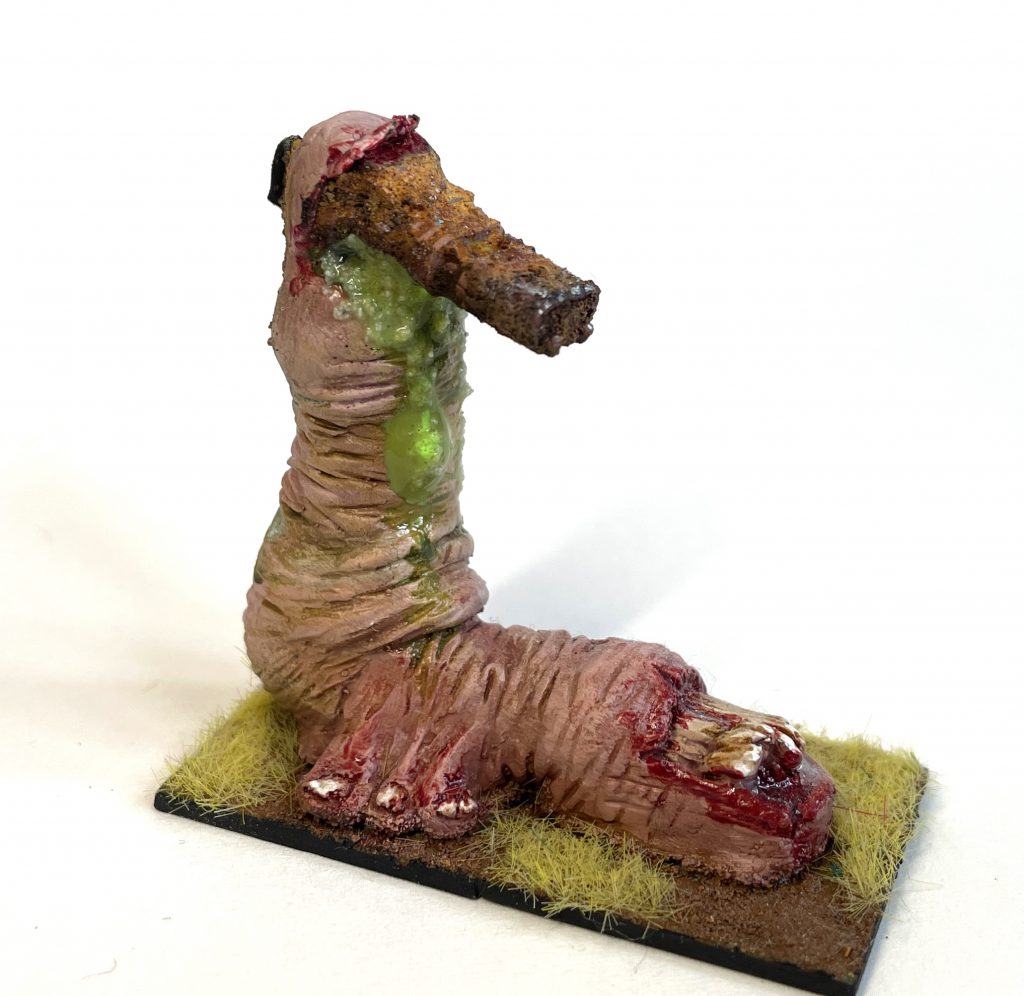
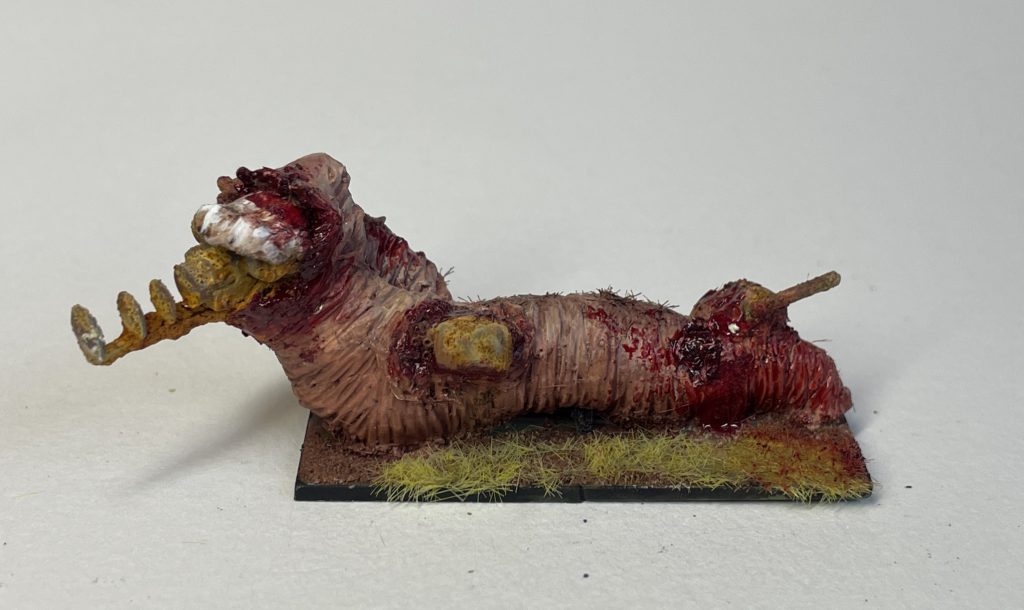
Turning our toe-worm around, I've done the same with vomit effects to create a lovely crust of dried sick:
 Blood and Gore effects
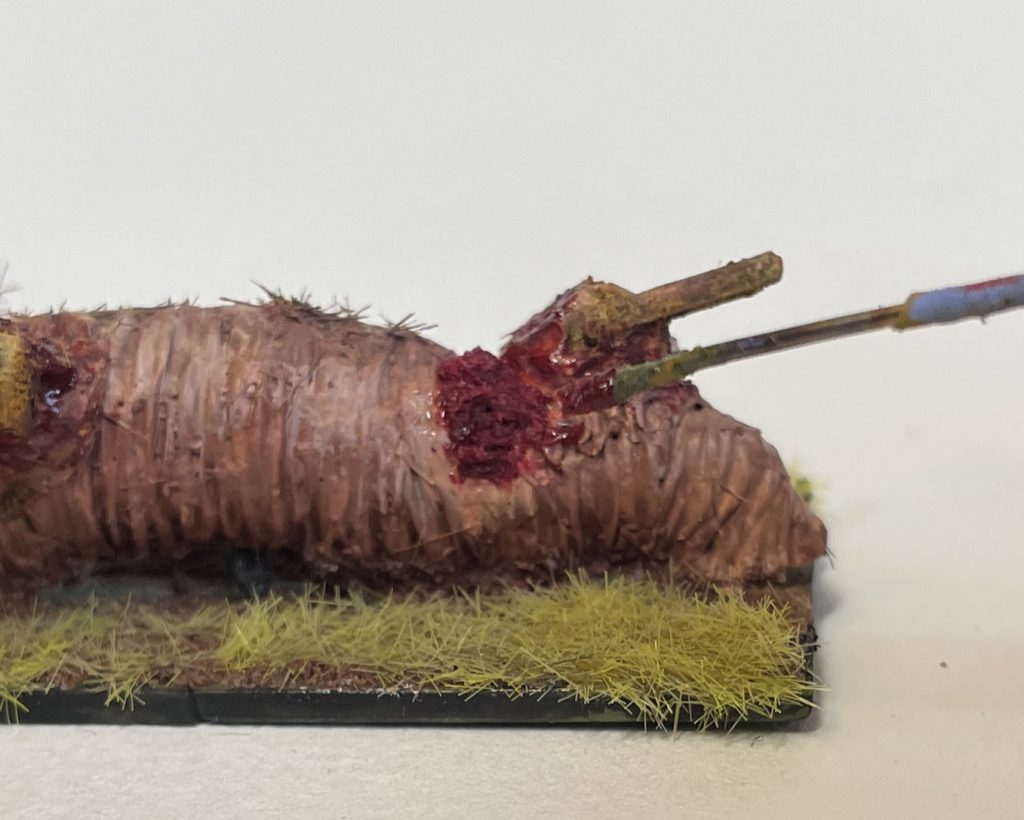
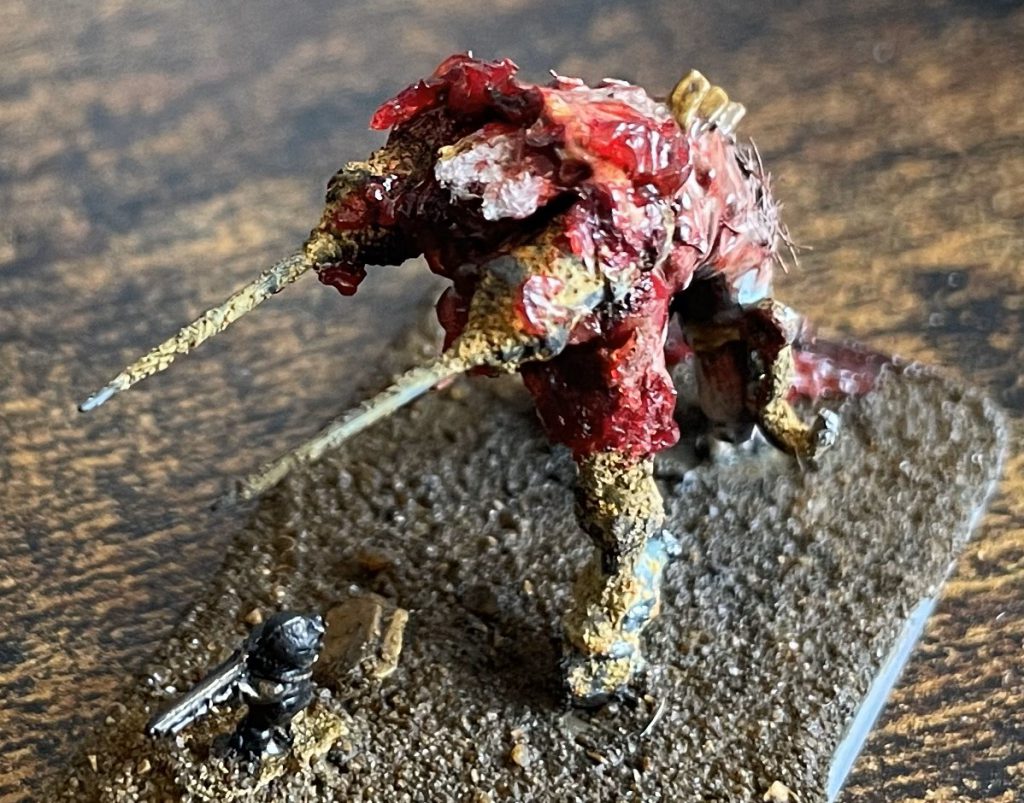
Exploded Flesh - The Abject Horror of Water Effects
No matter what you can do with Snow and PVA, Really bloody/vomity effects are best served with water effects. This is a very simple process.
Scoop out the water effects, mix them with Dark Blood, and slather them onto your model. Aim for quite an opaque look, as the water effects will dry clear:
 Blood and Gore effects
This will dry darker than you'd think, so either during the drying or when fully dry, add on a layer of True Blood. As I've said many times before in this article, then poke it with a stick!
 While drying, it will look like this. Blood and Gore effects
I'm under fairly strict instruction to never talk about the Toe Tanks again, so if you'd like to get a bit more detail on this one, check out my
toe tanks article for a lot more, and worse, examples. The results are genuinely horrifying, and you can keep adding water effects to build up some spectacular volume and height, perfect for bullets exploding out the back of your models, or long torrents of sick.
 Now that's horrible! Drying
Disgusted Yet?
There are many, many other ways of doing blood and slime effects. I haven't even started on washes (ok, just thin it out and wash it on), or tricks with varnish and isopropyl alcohol, but until I can practice enough with them to master those ones too (perhaps Hobby 201?), I'll stick to what I know.
Ultimately, ridiculous gore and sick aren't painterly effects you should dab on with a tiny brush and take your time over. They're visceral, horrible, textural elements to your paint jobs, so the best advice is to try it out and experiment. Perhaps there's use for corn starch here for thicker but less granular blood, or for using enamel pin washes of black and yellow for streaky vomit, or even worse horrors I can barely imagine. It's a space where you can't really go too wrong, and if you ever think there's such a thing as too much, just watch a non LOTR Peter Jackson film, and be assured that you could go even further!
Have any questions or feedback? Drop us a note in the comments below or email us at contact@goonhammer.com. Want articles like this linked in your inbox every Monday morning? Sign up for our newsletter. And don't forget that you can support us on Patreon for backer rewards like early video content, Administratum access, an ad-free experience on our website, and subscriber-only content covering competitive Warhammer 40K!Thank you for being a friend.


 Goonhammer App and Patron Updates: April, 2026
 Kill Team Tournament Report: Engage, Party, Repeat's March Madness 2026
 Goonhammer Reviews: Tribal Conquest