First and foremost, big thanks to Games Workshop, who provided us with a preview copy of this set for review.
Alongside the Liber Custodes release is a new battlegroup box featuring all new plastic kits, some of which have made the move over from resin. In this review the Goonhammer team talk about their impressions of the new sculpts, the ease and options for assembly, the new and expanded representation in the Custodes range and many, many different options for painting gold (and other colours, that are not gold).
Shield Captain
 Shield Captain - Credit: keewa
Assembly
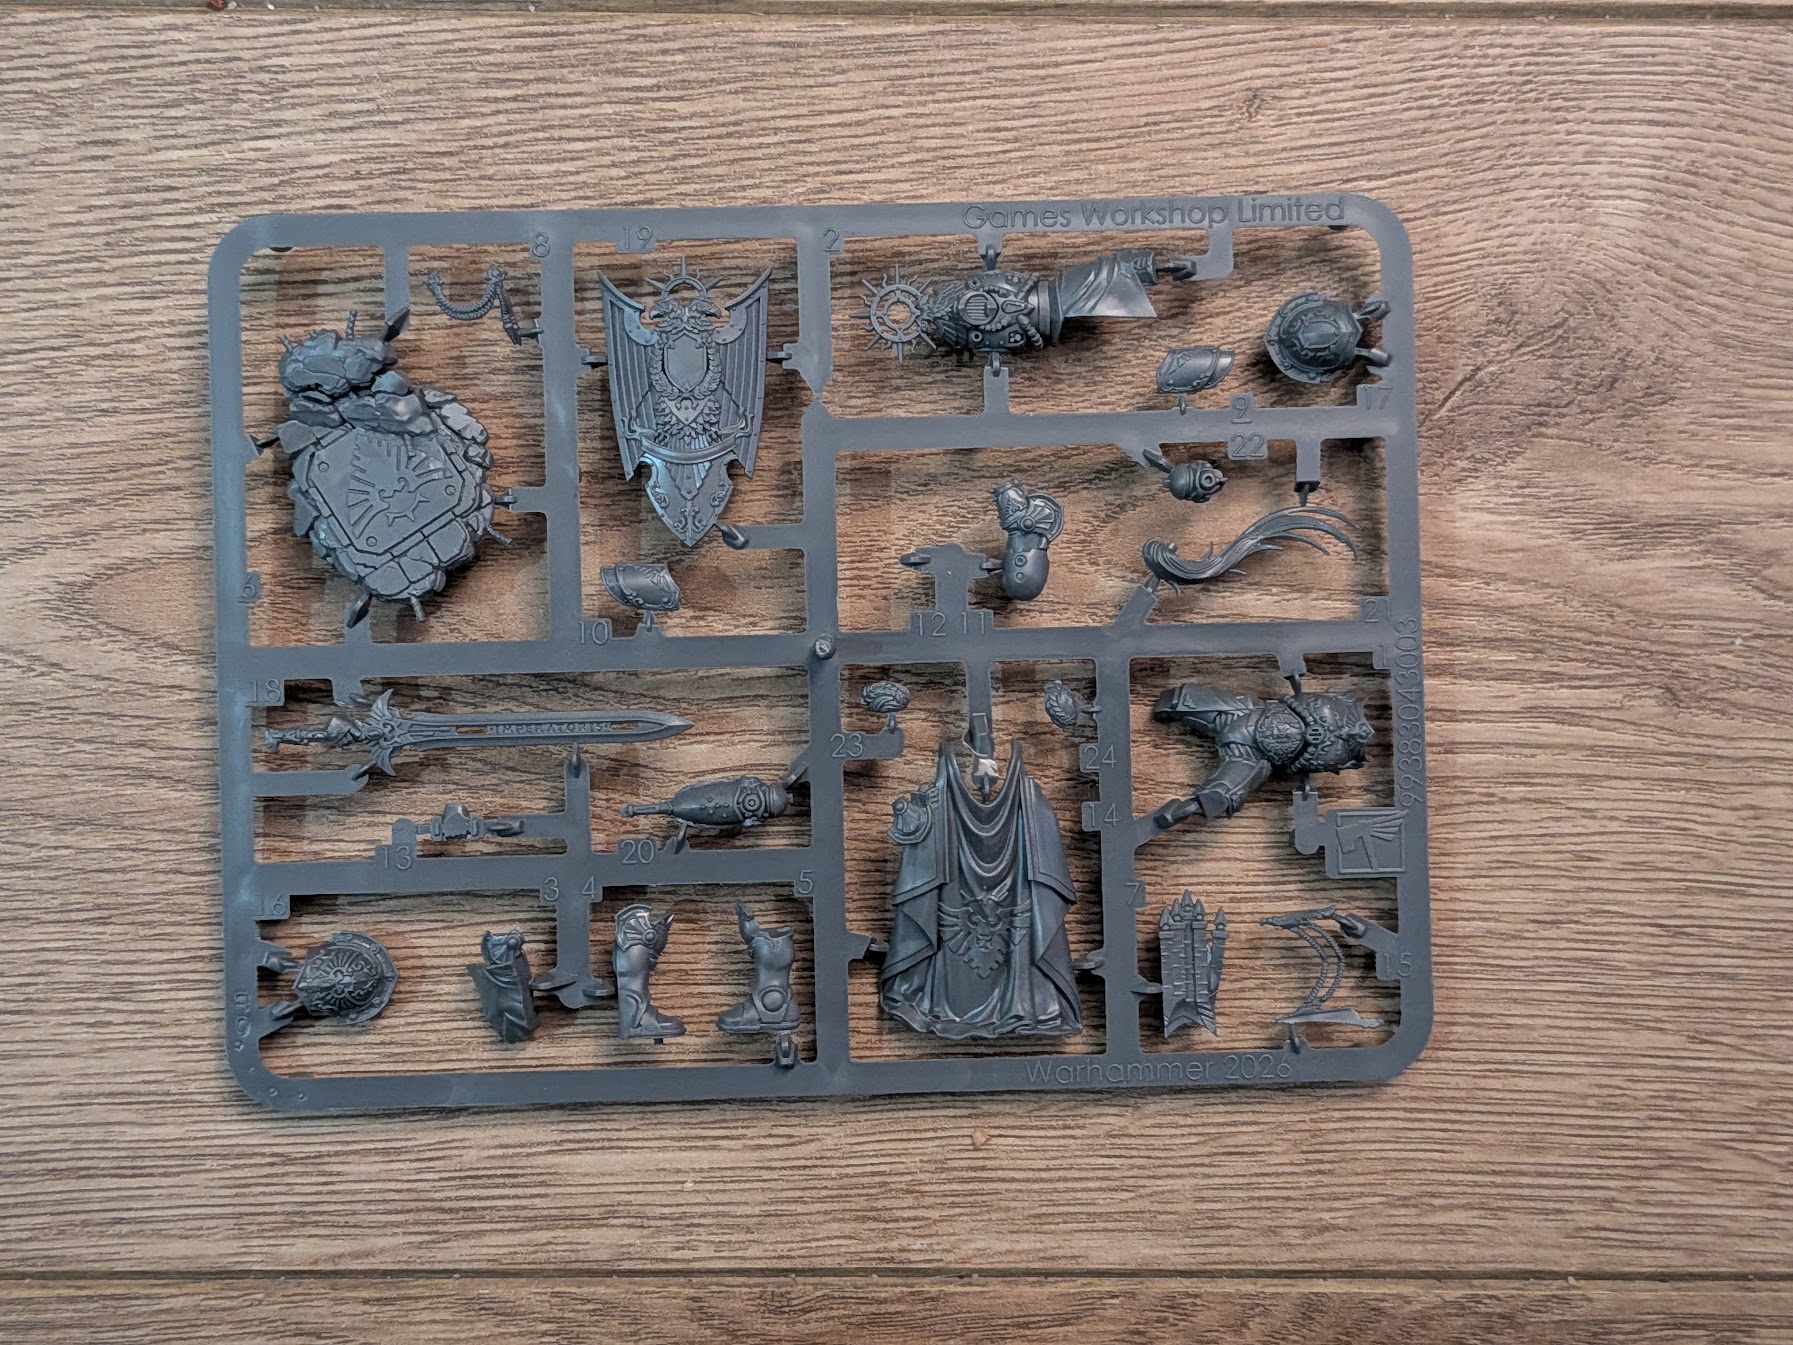 Custodes Shield Captain sprue
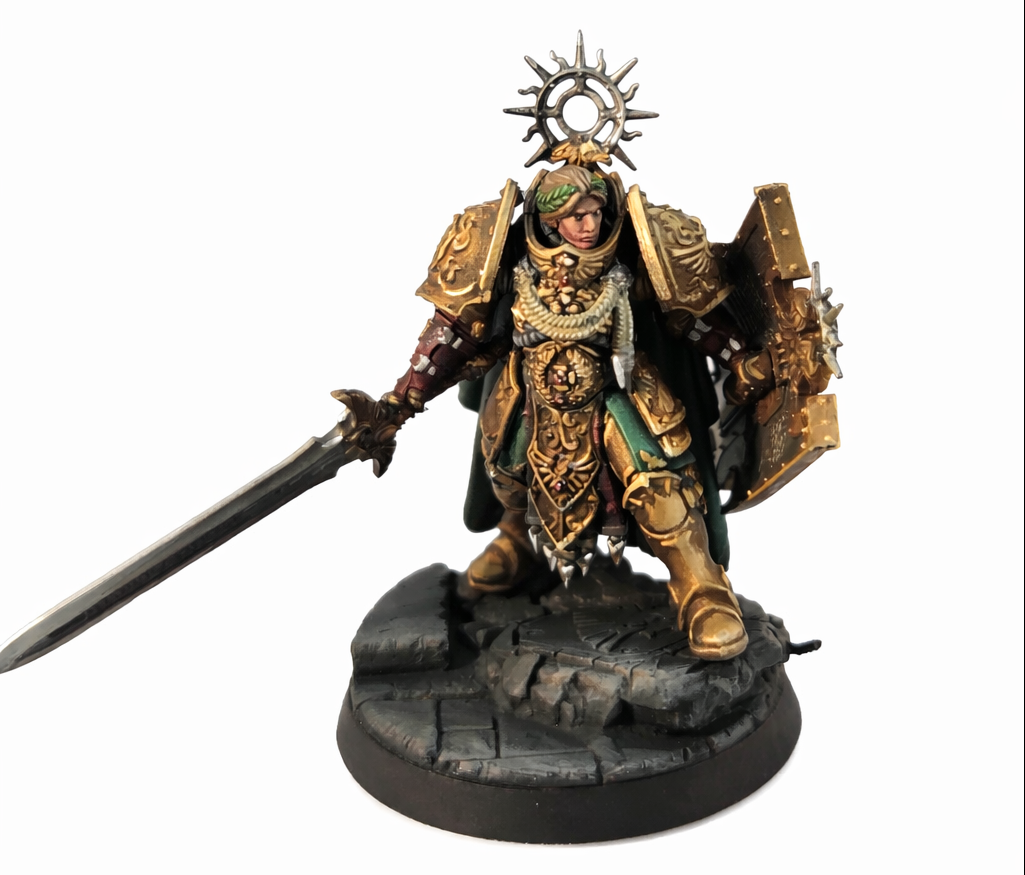
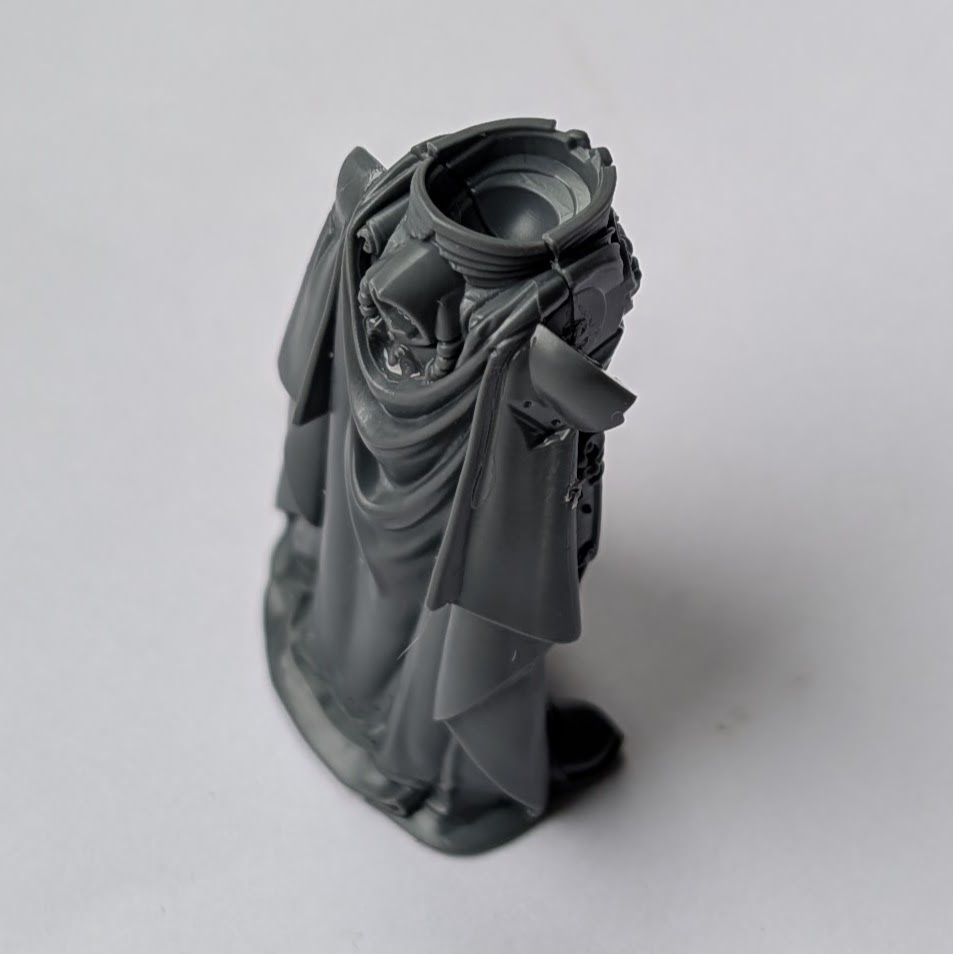
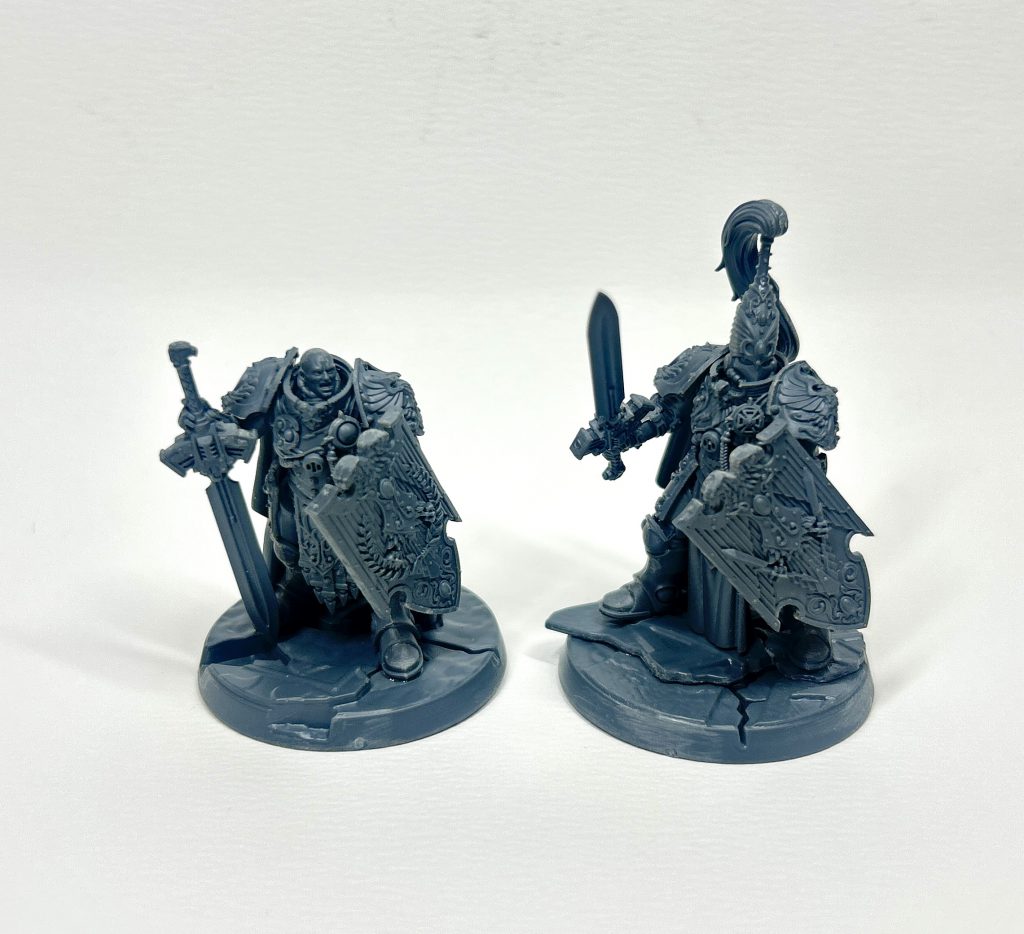
NotThatHenryC: The Shield Captain is on a single sprue. You get two heads, with hat on or off, and no other options. The Liber lets her swap her sword and shield for an Eternity Spear but you aren’t given one and it would be a non-trivial job to convert. That option is probably intended to be represented by the old resin model.
I had a couple of issues building the model. The bare head is in three parts, so the gold wreath she’s wearing can be cast really nicely, though some of us had issues getting these bits all lined up. The hip plates are separate and it’s not entirely obvious where these go, but also not terrible if they shift position slightly.
The cloak fits in a precise way on the scenic base, but only if all the many joints at places like her knees are perfectly lined up. If you want to paint in sub-assemblies, make sure to dry-fit everything rather than assuming it will fit together when done.
Custodes Shield Captain sprue
NotThatHenryC: The Shield Captain is on a single sprue. You get two heads, with hat on or off, and no other options. The Liber lets her swap her sword and shield for an Eternity Spear but you aren’t given one and it would be a non-trivial job to convert. That option is probably intended to be represented by the old resin model.
I had a couple of issues building the model. The bare head is in three parts, so the gold wreath she’s wearing can be cast really nicely, though some of us had issues getting these bits all lined up. The hip plates are separate and it’s not entirely obvious where these go, but also not terrible if they shift position slightly.
The cloak fits in a precise way on the scenic base, but only if all the many joints at places like her knees are perfectly lined up. If you want to paint in sub-assemblies, make sure to dry-fit everything rather than assuming it will fit together when done.
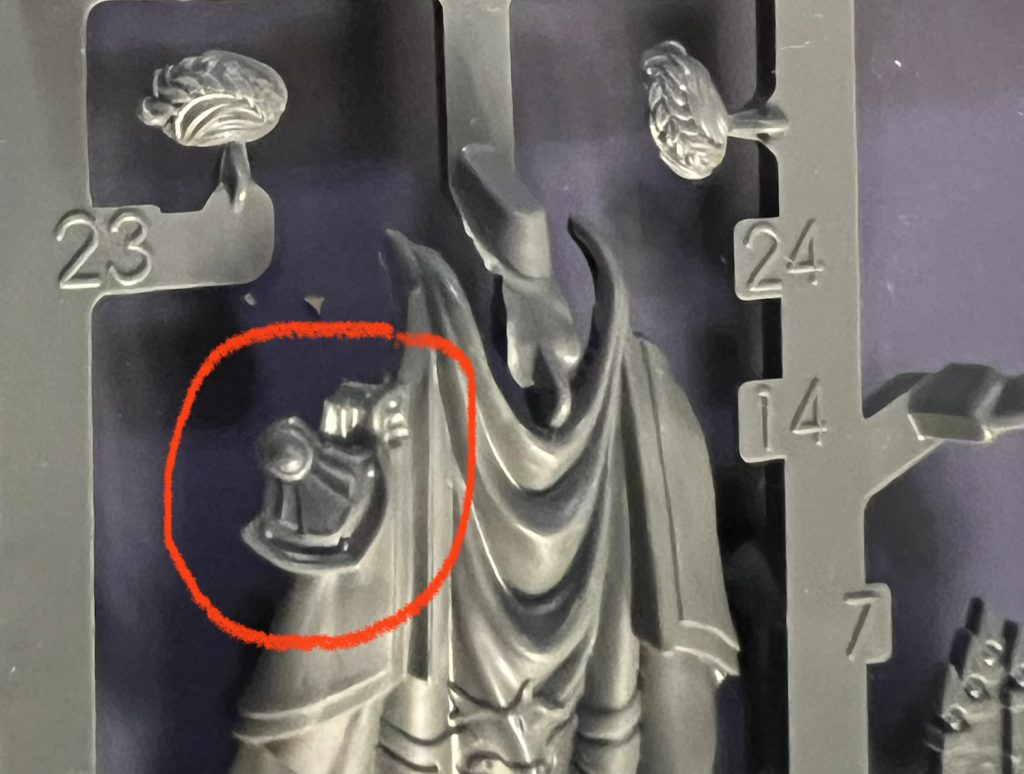 Custodes Shield Captain cloak and hair detail.
This model is not designed to be re-posed or altered in any way, which is a shame as she’s the only Command option available for Custodes, meaning armies may well have more than one of them. Part of the left elbow is attached to the cloak though, so you’ll have to do some cutting if you want to change that pose. That actually helped me as my model’s left arm was lost in the warp but I was able to make do with one from an old Custodian.
Custodes Shield Captain cloak and hair detail.
This model is not designed to be re-posed or altered in any way, which is a shame as she’s the only Command option available for Custodes, meaning armies may well have more than one of them. Part of the left elbow is attached to the cloak though, so you’ll have to do some cutting if you want to change that pose. That actually helped me as my model’s left arm was lost in the warp but I was able to make do with one from an old Custodian.
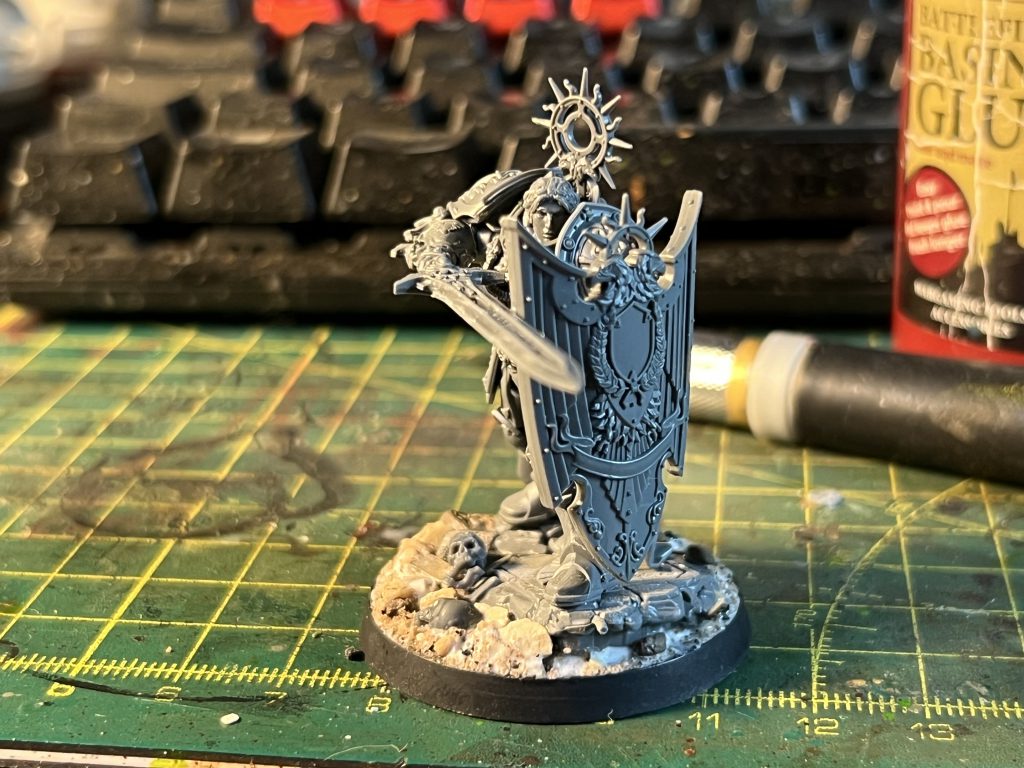 WIP Legio Custodes Shield Captain. Credit: NotThatHenryC
Given that every Custodes player will have at least one Shield Captain, and because GW apparently doesn’t want me to, I decided to change the pose of my captain. I chopped up some spare arms from the older kits but used detailed pieces, like the elbow armour and gauntlets, from the new one. I wanted to go for more of a fighting pose than the “recruitment poster” she starts out as. Bringing the sword closer to the body also allowed me to play around with OSL. The legs and body were built as they came but I removed the peg from the neck joint so I could turn her head.
WIP Legio Custodes Shield Captain. Credit: NotThatHenryC
Given that every Custodes player will have at least one Shield Captain, and because GW apparently doesn’t want me to, I decided to change the pose of my captain. I chopped up some spare arms from the older kits but used detailed pieces, like the elbow armour and gauntlets, from the new one. I wanted to go for more of a fighting pose than the “recruitment poster” she starts out as. Bringing the sword closer to the body also allowed me to play around with OSL. The legs and body were built as they came but I removed the peg from the neck joint so I could turn her head.
 Shield Captain- @blakelaw
Blake Law: Big fan of the new custodes shield captain. The sculpt is awesome. It suffers from the same issues GW has had in the last couple releases- a bunch of parts for minimal gain. I can get past that, as the end product is excellent. One thing that definitely hurts the build a bit is that the left arm is sculpted into the torso. This limits the ease of access to convert this lady into a blade champion or the likes. It could be done (I almost did, but decided displaying the model as is on release was better), but it will require a lot of work resculpting the shoulder.
Keewa: The bare head is in three pieces, why is the bare head in three pieces? There’s no benefit to the bare head being in three pieces. It’s not better than the normal GW bare heads (one piece, usually attached to the sprue on the neck ball join). If anything, it’s worse. This will be a recurring theme throughout the rest of this Battlegroup box. She’s mono-pose, which is kinda disappointing, as everyone else has already said, if you need to make two, they’re going to be identical, which will look rather silly.
One thing that bugs me is that both her sword and shield are about 50% too big, yes, they’re superhuman pinnacles of human perfection, but even so, you want some level of realism and suspension of disbelief, and it is somewhat jarring to have her one-handing a sword almost as big as she is, accompanied by a shield that’s like a foot-thick fridge door.
Shield Captain- @blakelaw
Blake Law: Big fan of the new custodes shield captain. The sculpt is awesome. It suffers from the same issues GW has had in the last couple releases- a bunch of parts for minimal gain. I can get past that, as the end product is excellent. One thing that definitely hurts the build a bit is that the left arm is sculpted into the torso. This limits the ease of access to convert this lady into a blade champion or the likes. It could be done (I almost did, but decided displaying the model as is on release was better), but it will require a lot of work resculpting the shoulder.
Keewa: The bare head is in three pieces, why is the bare head in three pieces? There’s no benefit to the bare head being in three pieces. It’s not better than the normal GW bare heads (one piece, usually attached to the sprue on the neck ball join). If anything, it’s worse. This will be a recurring theme throughout the rest of this Battlegroup box. She’s mono-pose, which is kinda disappointing, as everyone else has already said, if you need to make two, they’re going to be identical, which will look rather silly.
One thing that bugs me is that both her sword and shield are about 50% too big, yes, they’re superhuman pinnacles of human perfection, but even so, you want some level of realism and suspension of disbelief, and it is somewhat jarring to have her one-handing a sword almost as big as she is, accompanied by a shield that’s like a foot-thick fridge door.
Painting
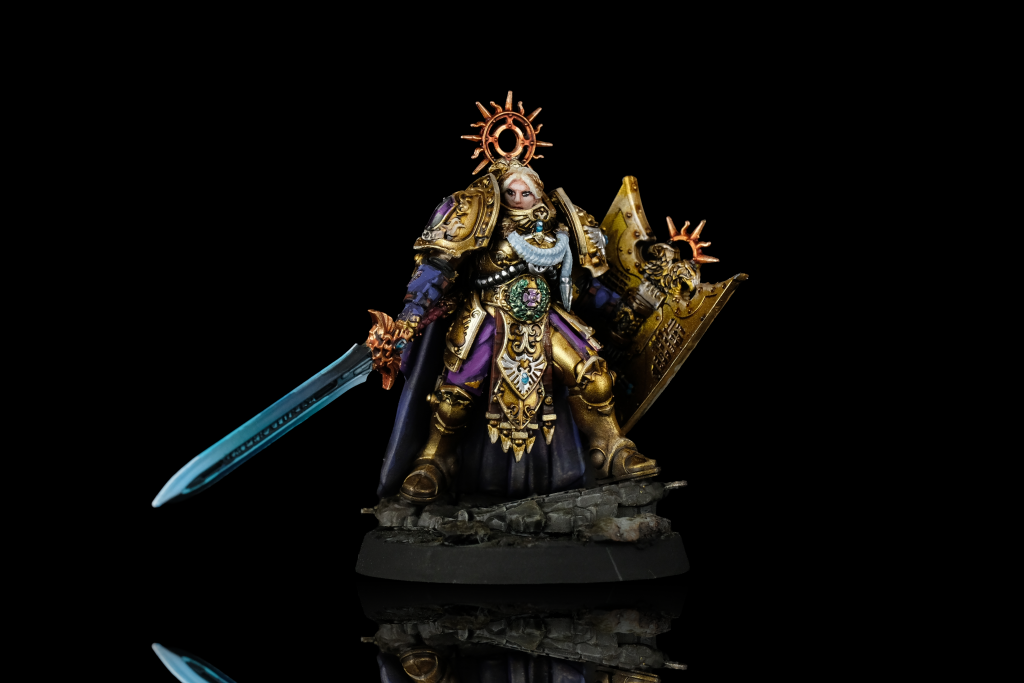
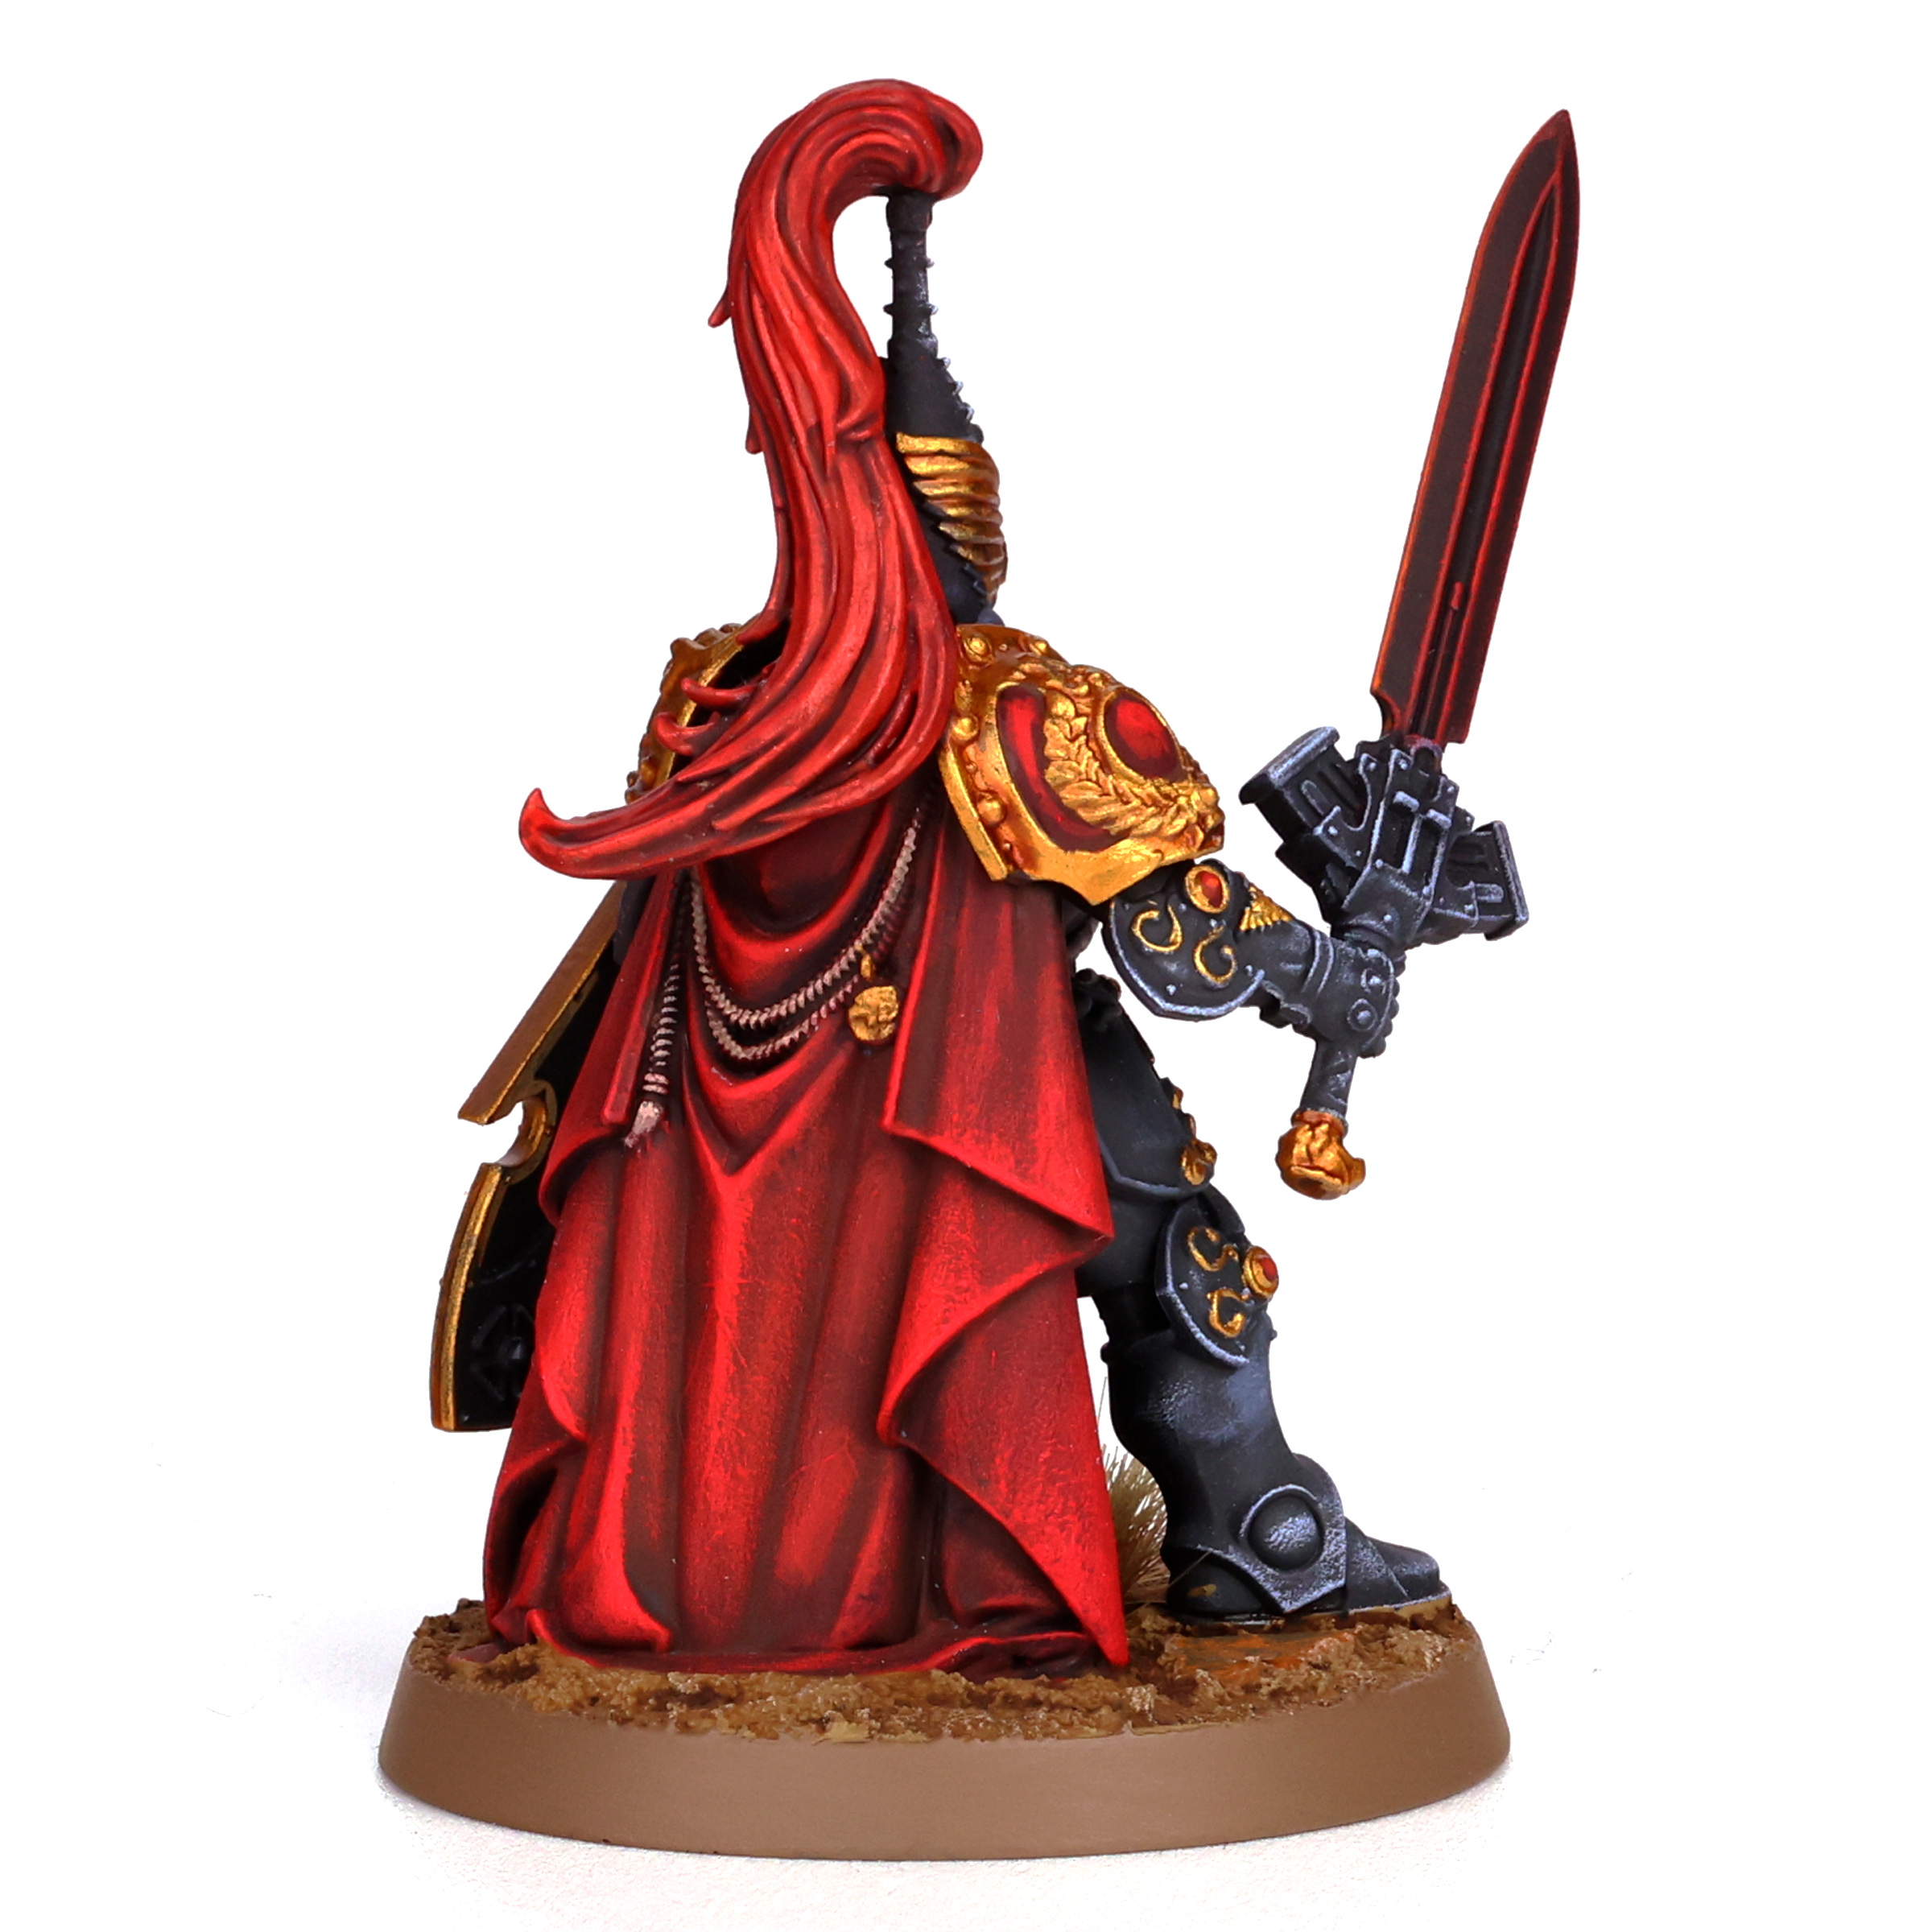
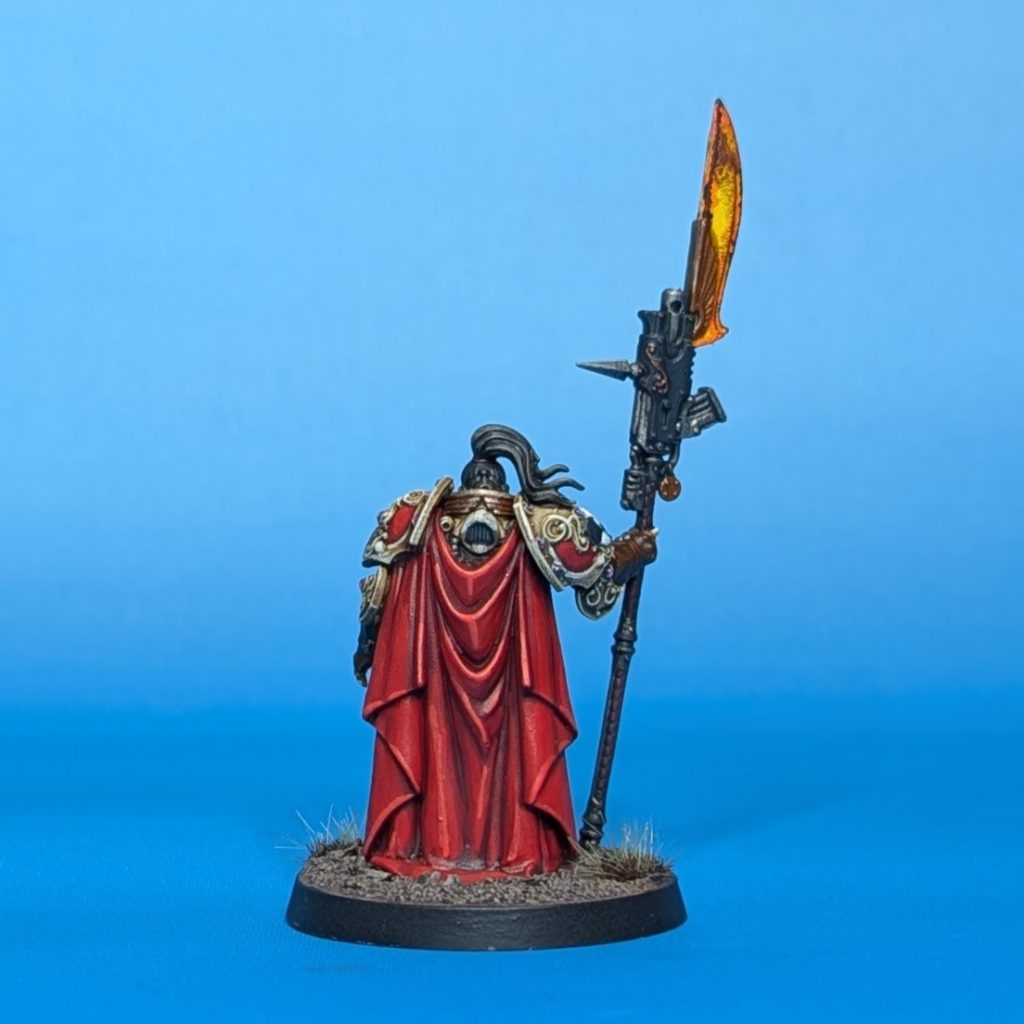
NotThatHenryC: Some people have experimented with interesting colour schemes but I decided to go for the classic “walking presidential ballroom” scheme. This allowed me to try out the new Vallejo TMM gold and silver paints, which I was happy with. She’s very shiny.
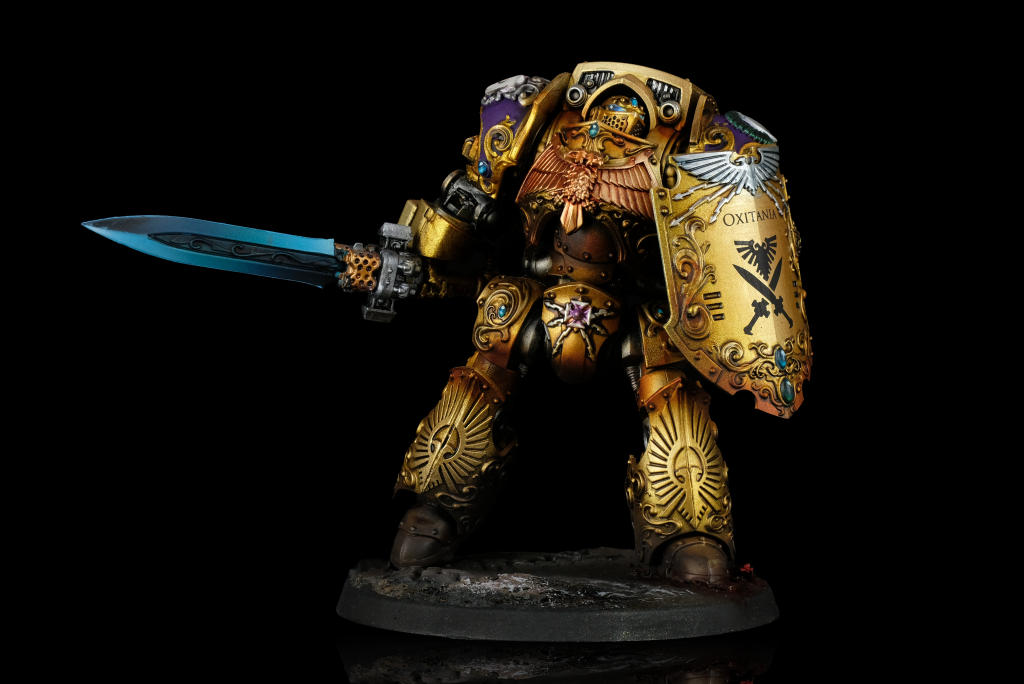
 Legio Custodes Shield Captain. Credit: NotThatHenryC
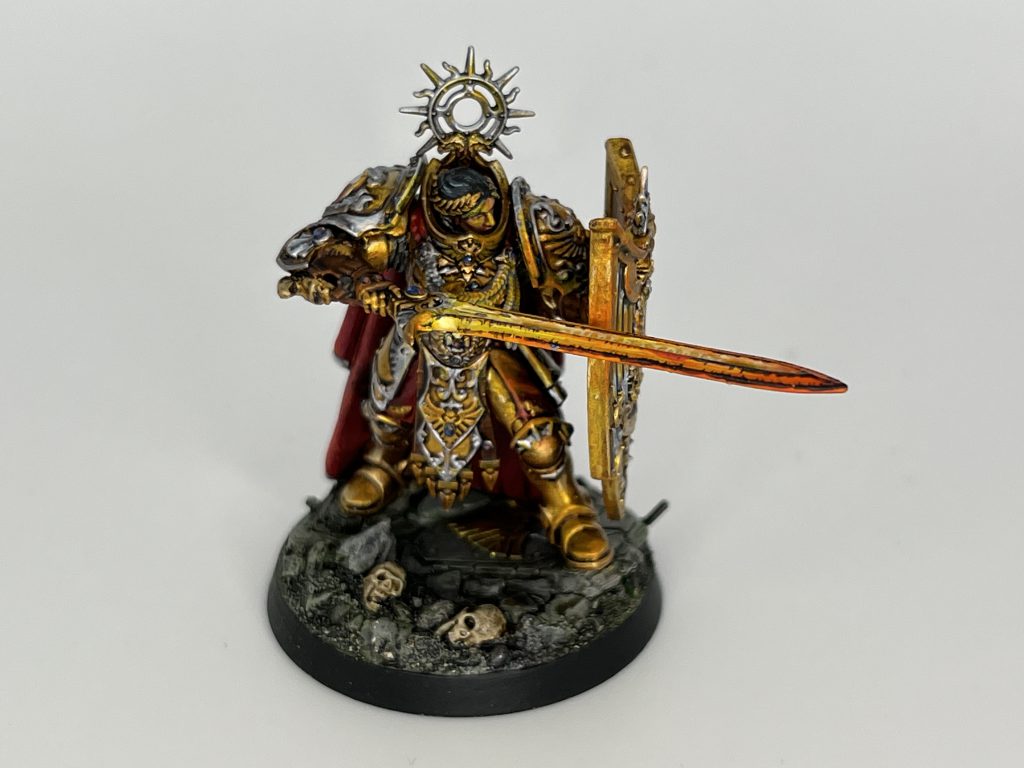
The Captain’s Eternity Blade has the “Aflame” rule, which I’ve represented by painting it like it’s really hot. I painted it Wraithbone and then blended a transition from Bad Moon Yellow to Magmadroth Flame. The recesses got a wash of Dorn Yellow thinned with contrast medium and I then painted the edges and some chips in black.
I used the same Bad Moon/Magmadroth blend for some bits of OSL on the model, in places like the edge of the shield. There’s a little of this on her face, the rope on her chest and where I thought the light would catch on the armour. The gems also have a tiny orange dot facing the sword, as well as a white one at the top.
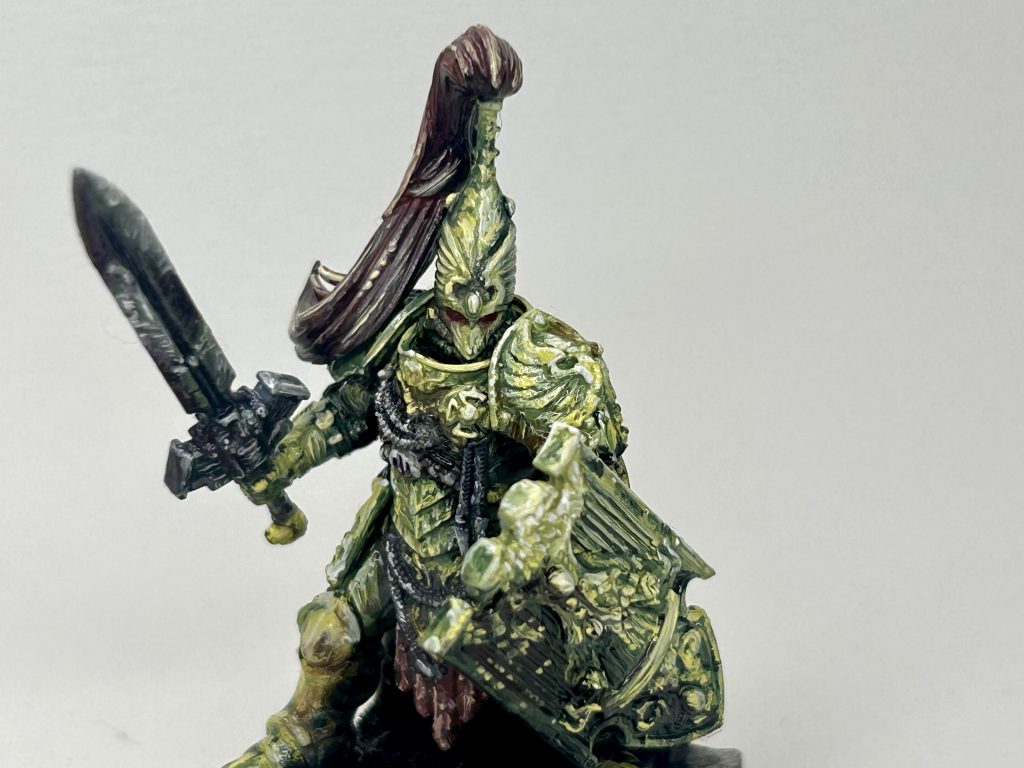
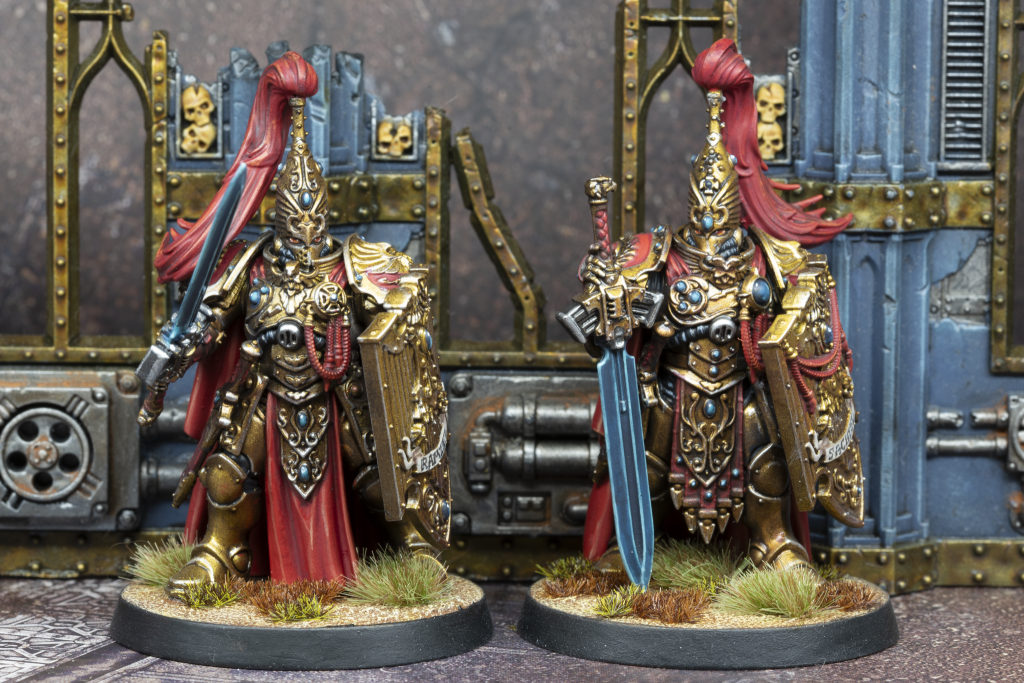
Blake Law: In preparation for painting custodes, I have been working this gold/teal scheme hard. You can see my article on the Underworlds models, where I executed something very similar. The gold is a base of s75 Decayed Metal worked up to S75 viking gold. The highlight is monument 's bright gold. I like to do very mild finishes of citrine alchemy on the edges to give a little shine off it. I worked in a 50/50 diluted GW leather contrast paint as the lining of the gold. Then I finished it off with burnt umber ink and AP fanatic sepia wash. As part of my final lowlight, I always give a little bit of paynes grey ink where the shadow sits.
For the skin, I used Monument all the way. I used shadow flesh progressed to dark warm flesh, to bright shadow flesh. I used a dilute of their flesh wash to give some additional shade, then rehighlighted.
For the teal, I used the Army Painter Fanatics teal progression. I started at their darkest shade in the progression, took it to pharaoh, and then finished with amulet (the 3rd from brightest). I found amulet is the most saturated of the teals, so it pops a lot harder than the upper colors in the progression.
Keewa: She paints up easily enough. The only major quibble I have is with the underside of the cloak, which is very difficult to reach if you’ve glued her onto her hero rock. Other than that, she’s not really any different to the other custodes, just with a bigger shield and a few more fancy accoutrements.
Legio Custodes Shield Captain. Credit: NotThatHenryC
The Captain’s Eternity Blade has the “Aflame” rule, which I’ve represented by painting it like it’s really hot. I painted it Wraithbone and then blended a transition from Bad Moon Yellow to Magmadroth Flame. The recesses got a wash of Dorn Yellow thinned with contrast medium and I then painted the edges and some chips in black.
I used the same Bad Moon/Magmadroth blend for some bits of OSL on the model, in places like the edge of the shield. There’s a little of this on her face, the rope on her chest and where I thought the light would catch on the armour. The gems also have a tiny orange dot facing the sword, as well as a white one at the top.
Blake Law: In preparation for painting custodes, I have been working this gold/teal scheme hard. You can see my article on the Underworlds models, where I executed something very similar. The gold is a base of s75 Decayed Metal worked up to S75 viking gold. The highlight is monument 's bright gold. I like to do very mild finishes of citrine alchemy on the edges to give a little shine off it. I worked in a 50/50 diluted GW leather contrast paint as the lining of the gold. Then I finished it off with burnt umber ink and AP fanatic sepia wash. As part of my final lowlight, I always give a little bit of paynes grey ink where the shadow sits.
For the skin, I used Monument all the way. I used shadow flesh progressed to dark warm flesh, to bright shadow flesh. I used a dilute of their flesh wash to give some additional shade, then rehighlighted.
For the teal, I used the Army Painter Fanatics teal progression. I started at their darkest shade in the progression, took it to pharaoh, and then finished with amulet (the 3rd from brightest). I found amulet is the most saturated of the teals, so it pops a lot harder than the upper colors in the progression.
Keewa: She paints up easily enough. The only major quibble I have is with the underside of the cloak, which is very difficult to reach if you’ve glued her onto her hero rock. Other than that, she’s not really any different to the other custodes, just with a bigger shield and a few more fancy accoutrements.
Custodian Guard
Loading...
Assembly
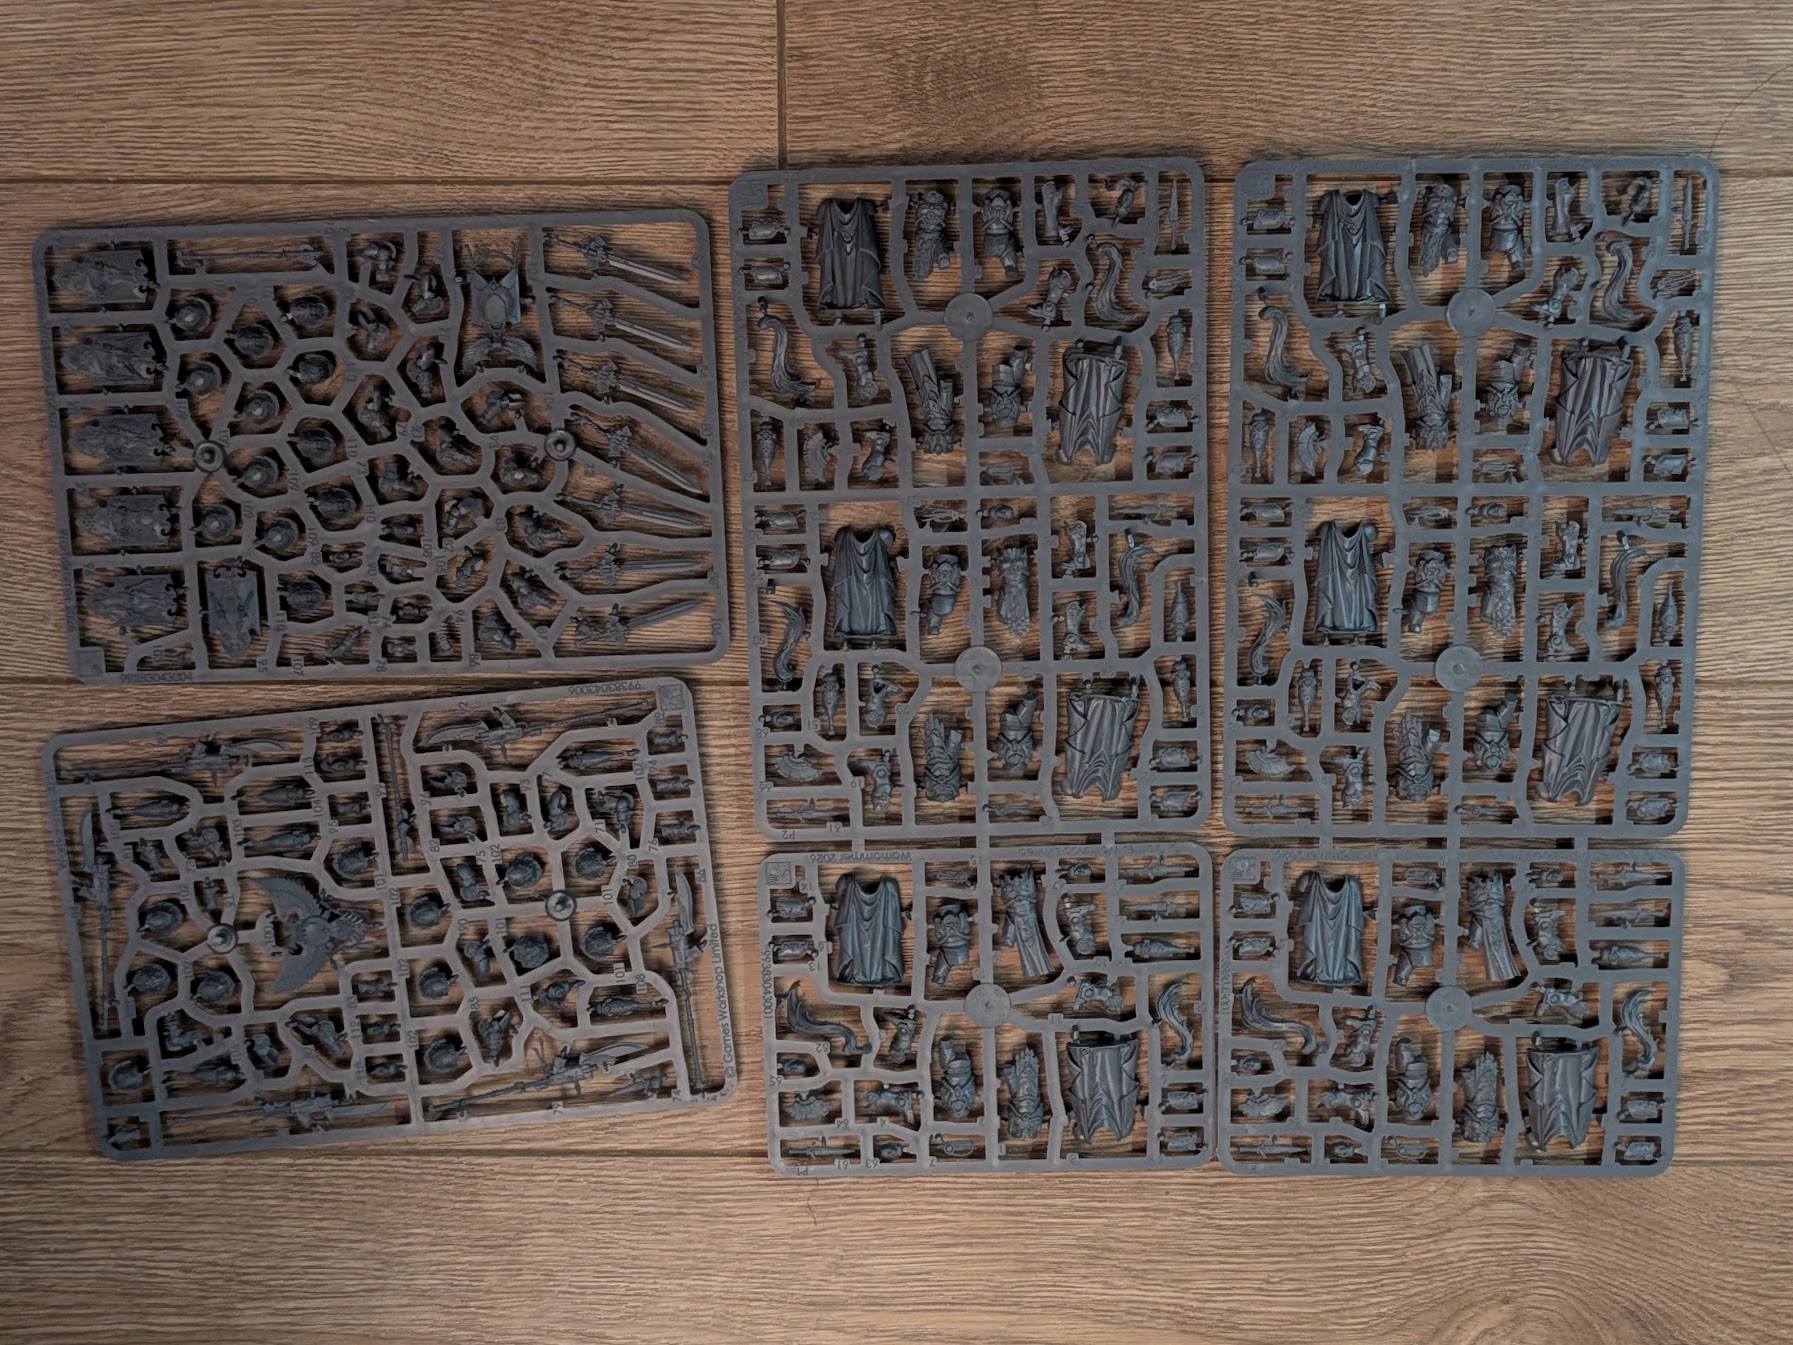 Plastic Custodes sprues
Crabstuffed Mushrooms (Joey K)
Plastic Custodes sprues
Crabstuffed Mushrooms (Joey K)
The Good
We finally have actual plastic models for female Custodes. I was curious how Games Workshop would approach this: Would they copy the Stormcast Eternals? Would they avoid sculpting anything distinct at all? Would they go overboard with anatomy?
Instead, the designers took a thoughtful middle path: The female Custodians blend seamlessly into the squad. Assuming you go with a helmet option, you would need to look closely to spot the differences.
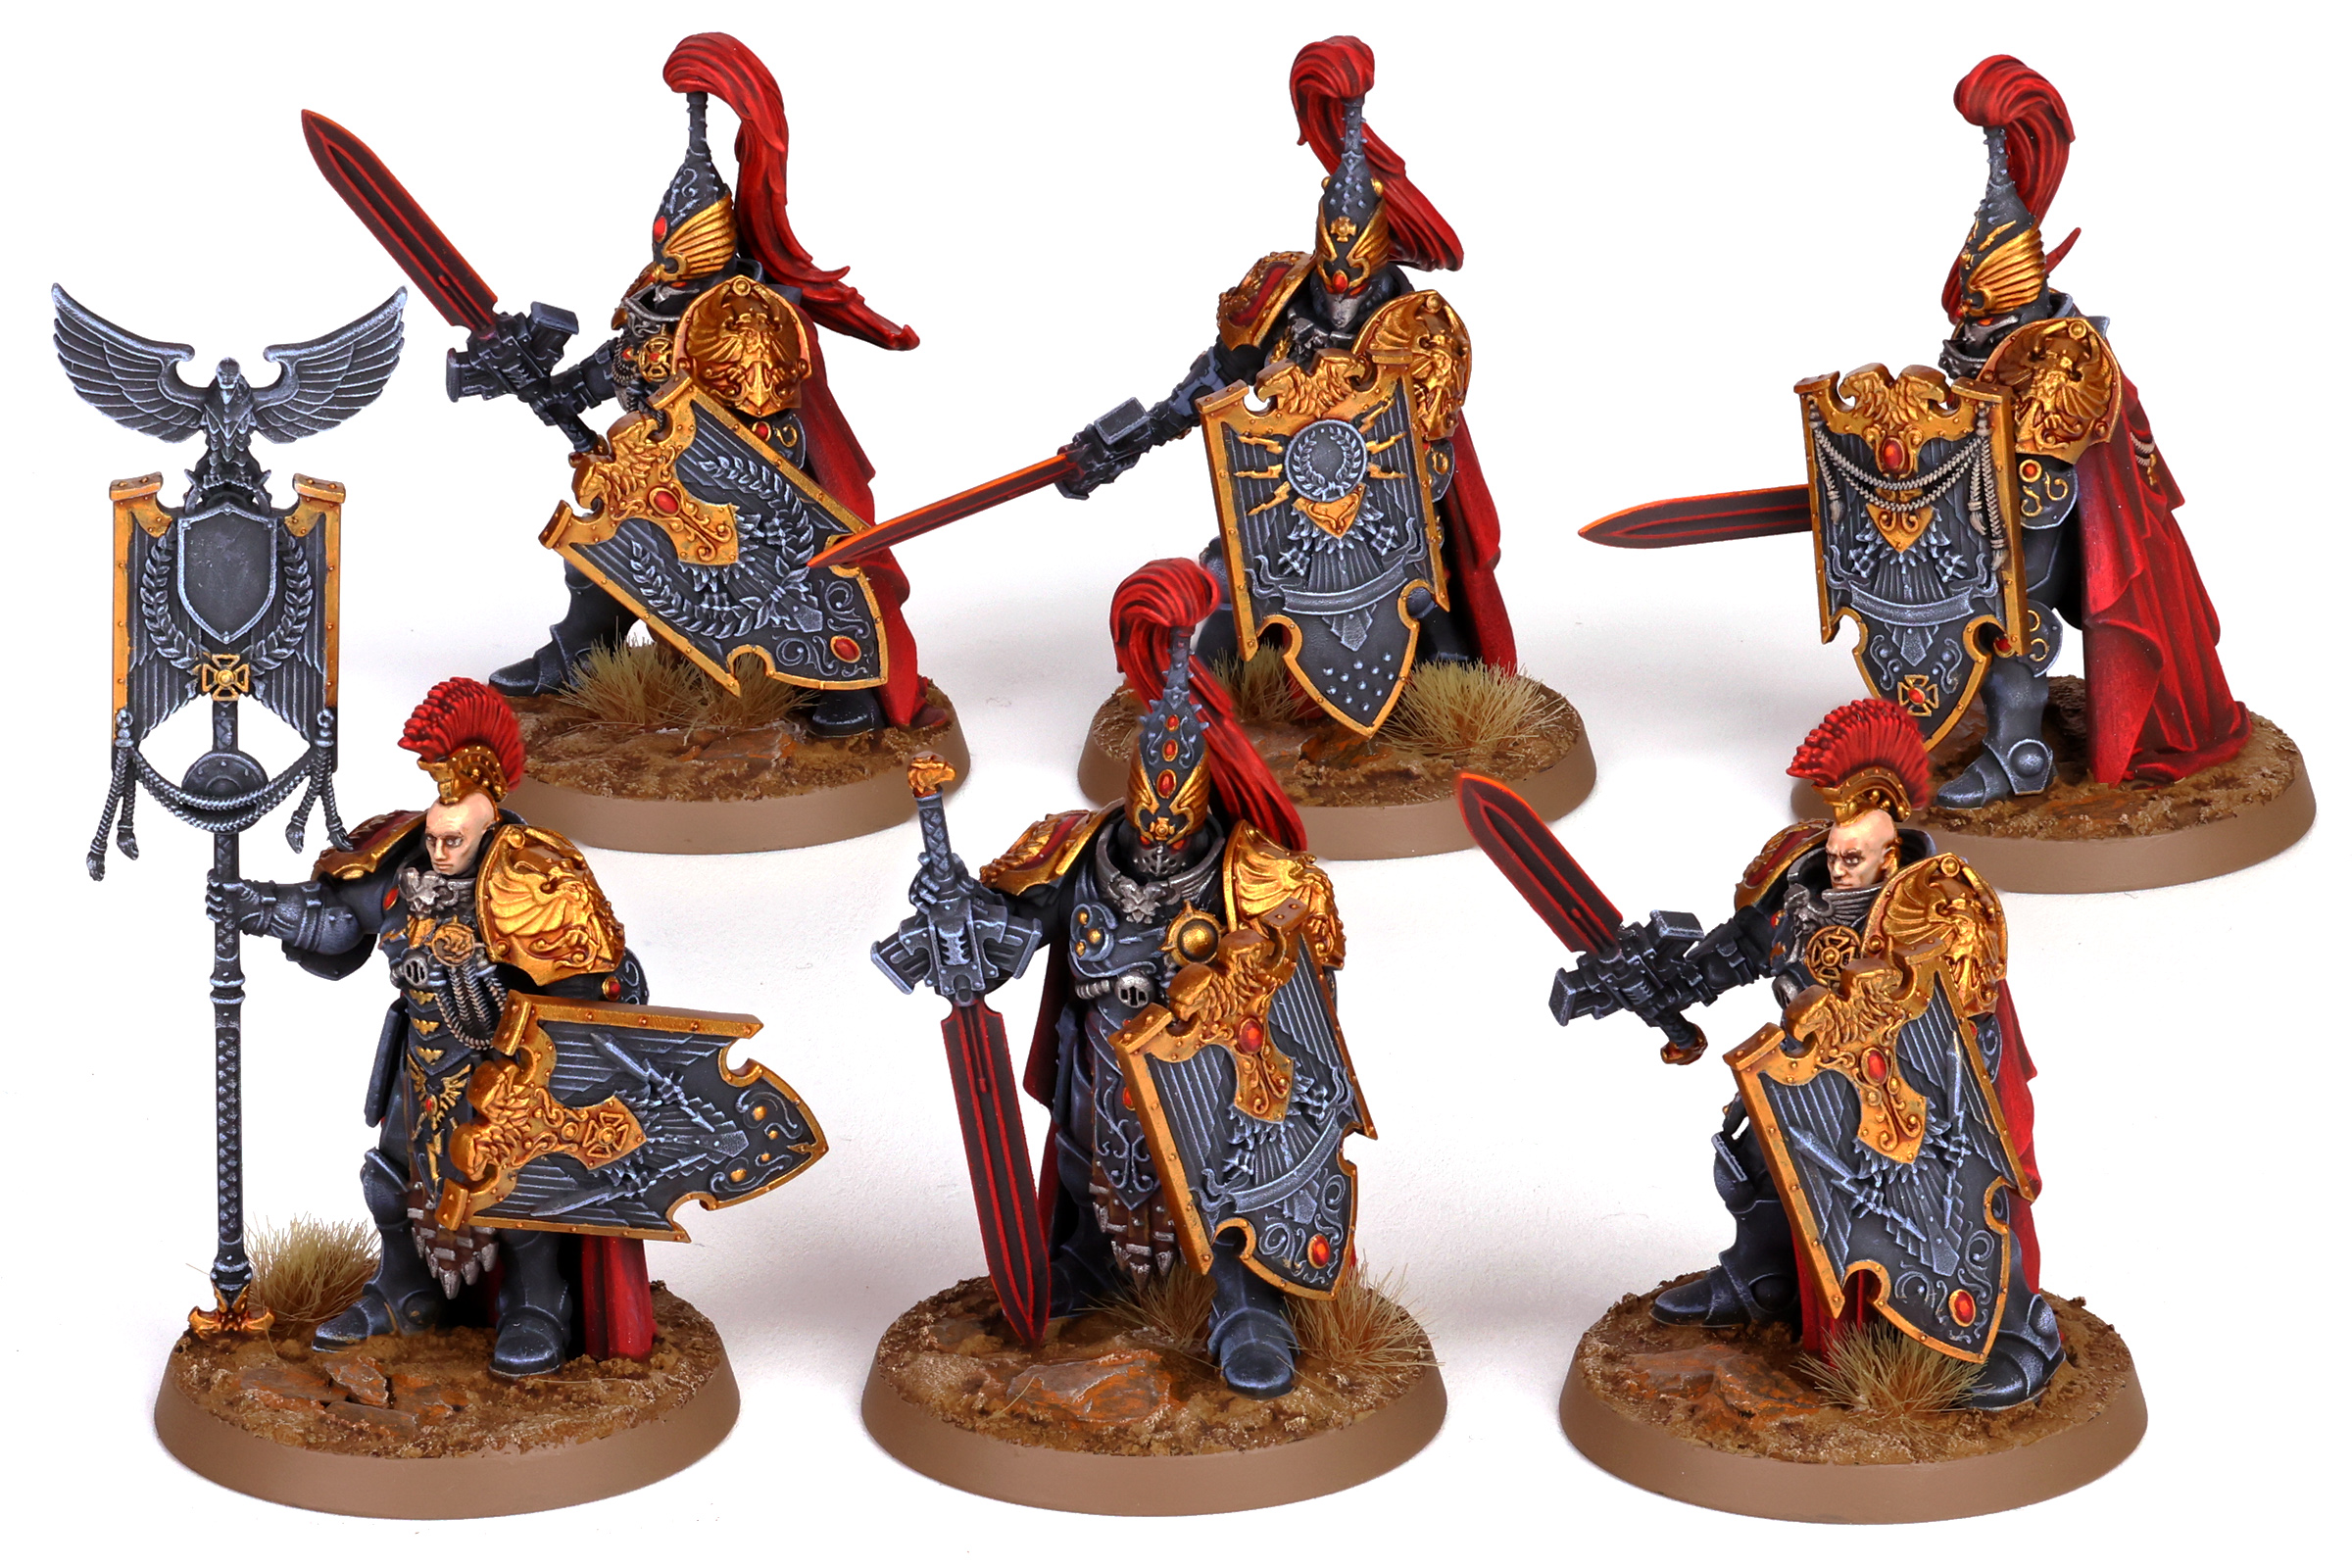
 Legio Custodes Solar Watch painted by Crabstuffed Mushrooms (Joey K)
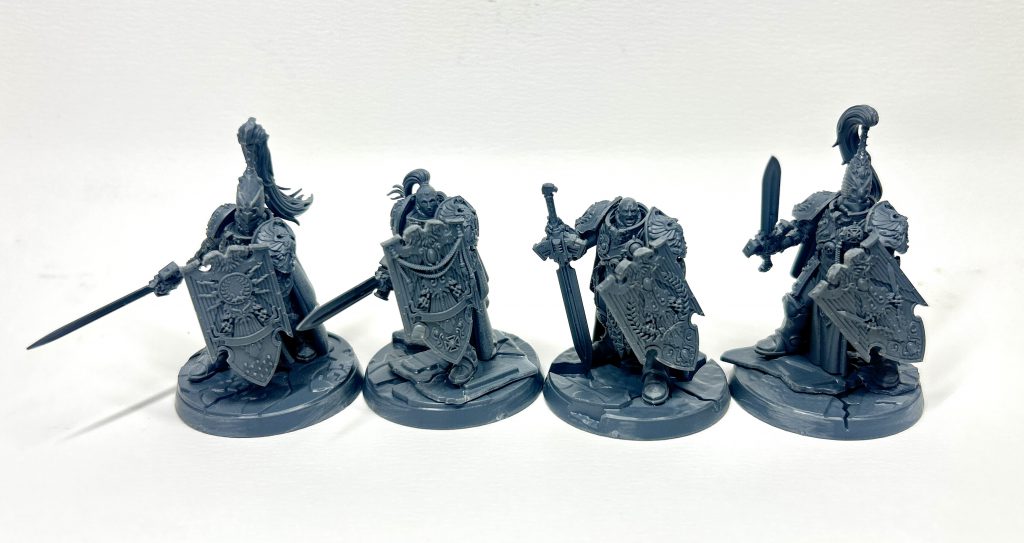
Once assembled, the whole unit looks fantastic. The slimmer aesthetic abandons the old “Himbo Custodes” silhouette and leans closer to John Blanche’s artwork: tall, elegant, and imposing without being bulky. They’re still clearly superior to their mass‑produced cousins in power armor:
Legio Custodes Solar Watch painted by Crabstuffed Mushrooms (Joey K)
Once assembled, the whole unit looks fantastic. The slimmer aesthetic abandons the old “Himbo Custodes” silhouette and leans closer to John Blanche’s artwork: tall, elegant, and imposing without being bulky. They’re still clearly superior to their mass‑produced cousins in power armor:
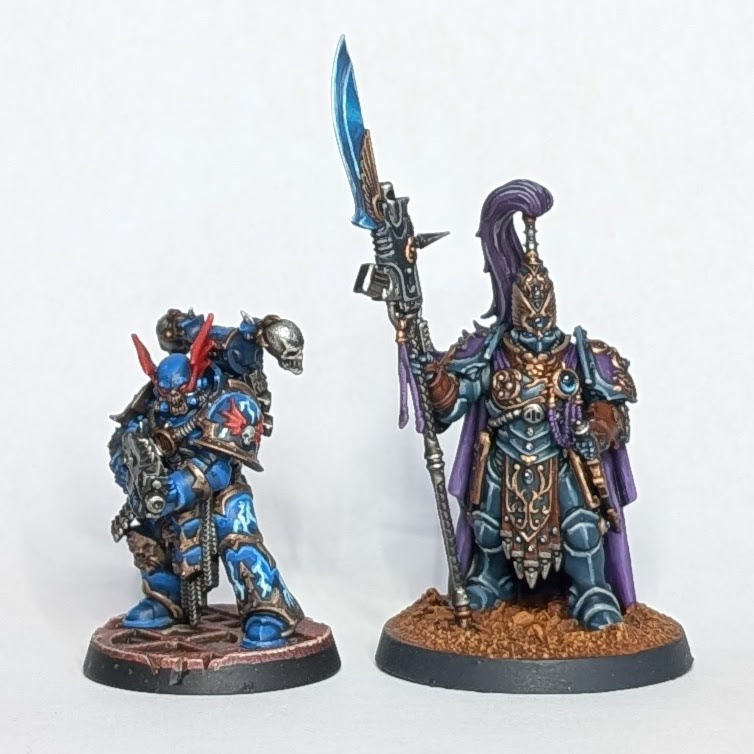 Legio Custodes compared to Night Lords Chaos Space Marine painted by Crabstuffed Mushrooms (Joey K)
 Legio Custodes compared to previous Adeptus Custodes and Night Lords Chaos Space Marine painted by Crabstuffed Mushrooms (Joey K)
The Bad
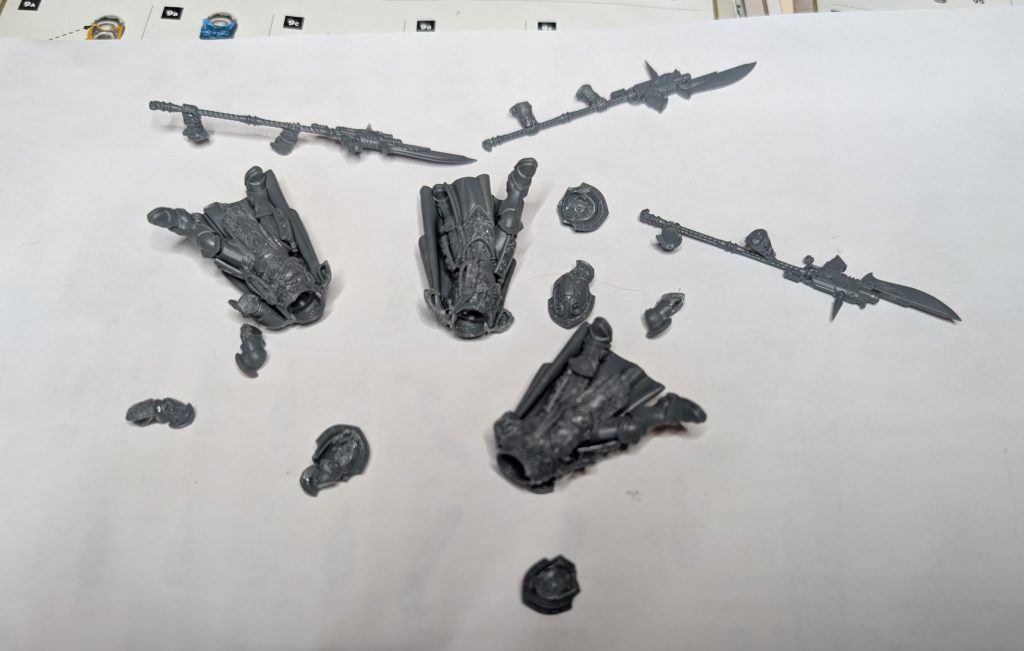
That slimmer aesthetic comes with a price: tricky assembly. Several components are extremely delicate: ponytails, wrists, hands, spear shafts, each a separate piece that demands careful, patient gluing. Use plastic glue sparingly or you’ll melt away the detail.
The Capes (A Whole Saga)
The capes deserve their own section because they nearly broke me.
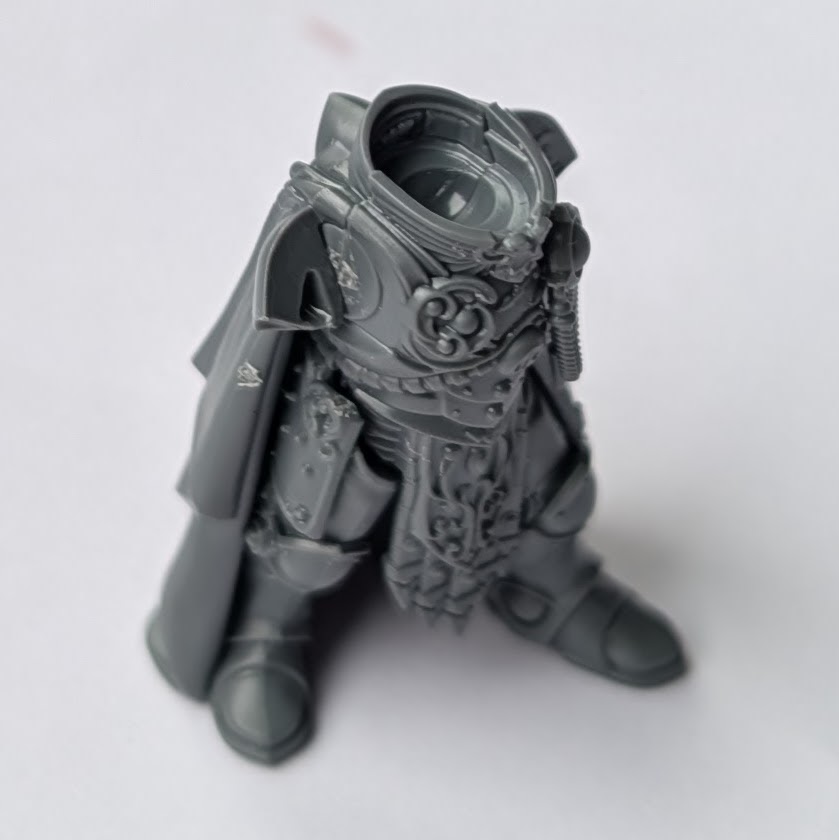
 At first glance, they look interchangeable. They are not (at least not all of them). Each cape corresponds to a specific pair of arms, which corresponds to a specific pair of hands, which corresponds to a specific spear. If you mismatch any of these combinations, you will get frustrated.
To make matters worse, the capes don’t sit flush against the back until the arms are glued on. If you force the cape to fit first, the arms won’t align. If you glue the arms first, the cape suddenly makes sense. It’s a puzzle, but the kind where the pieces don’t make it obvious.
Not pictured: Me prying models apart after realizing I’d paired the wrong arms with the wrong cape.
At first glance, they look interchangeable. They are not (at least not all of them). Each cape corresponds to a specific pair of arms, which corresponds to a specific pair of hands, which corresponds to a specific spear. If you mismatch any of these combinations, you will get frustrated.
To make matters worse, the capes don’t sit flush against the back until the arms are glued on. If you force the cape to fit first, the arms won’t align. If you glue the arms first, the cape suddenly makes sense. It’s a puzzle, but the kind where the pieces don’t make it obvious.
Not pictured: Me prying models apart after realizing I’d paired the wrong arms with the wrong cape.
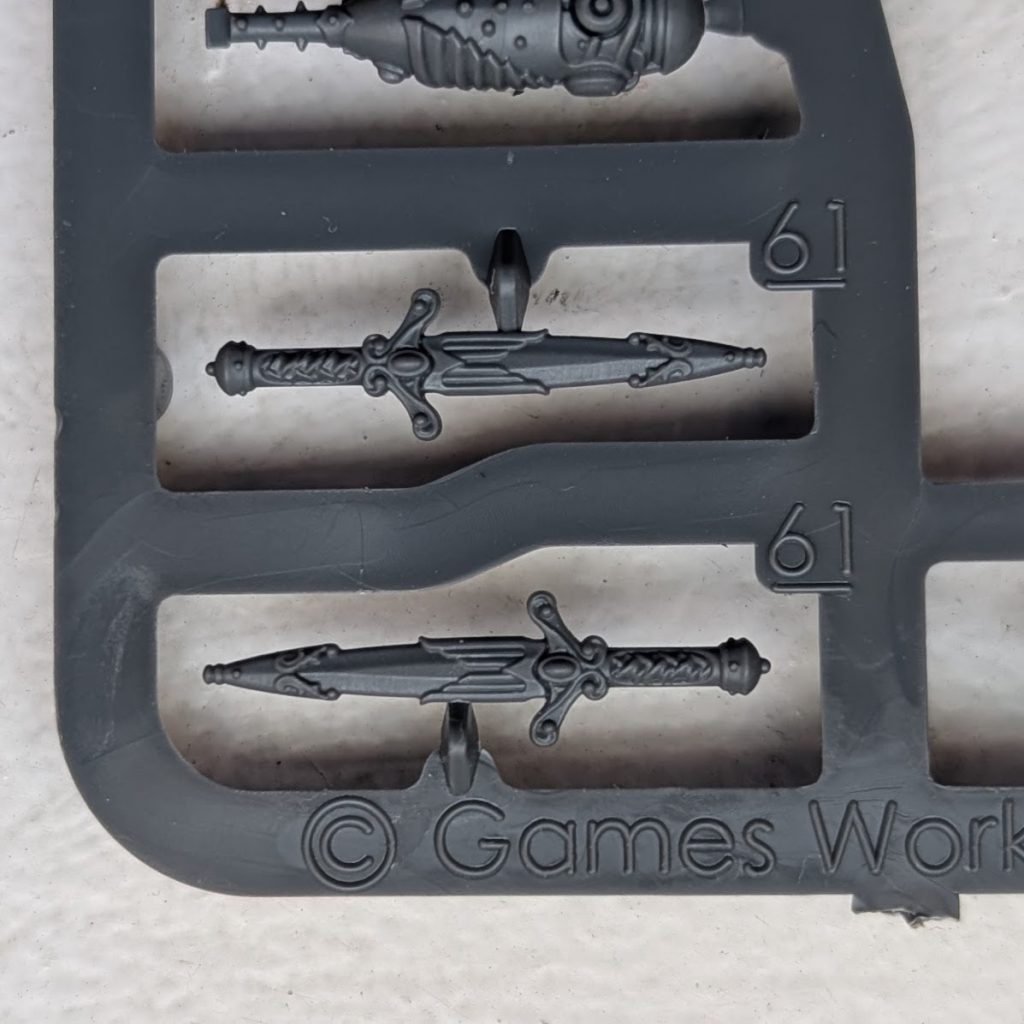
The Misericordia (a coda of misery)
Lastly, the Misericordias. The name is a warning: There’s no slot or indentation to fit them on the model easily. You dab glue on the back and hope it sticks. I recommend skipping them entirely.
 Keewa: These guys look fantastic, we love ourselves some Femstodes and although there are not enough bare heads to make an all-female troop (more on that later) their inclusion is very welcome. You can see, if you look closely, which bodies are intended as “female” and which not (the female bodies are slightly more slender, and have a subtle-but-still-obvious-enough amount of boobplate, we’re not talking Stormcast Eternals or Sisters level of sculpting, but it is there if you look. The models look great, although there’s tons of detail it’s sort-of-belied by the fact that a lot of it can be the same colour without too much trouble.
However.. The capes, Jesus Christ, the capes, for some ungodly reason, the designers at GW have decreed that Custodians must have long capes that include half of the mounting point for the arms and shoulder pad. There is no reason whatsoever for this, and I do not understand it - believe me, I have spent time thinking “why would they do this” and I have come up entirely empty. As Joey has said, each cape corresponds to one body, which corresponds to one specific weapon/shield arm option. Each arm, in turn, has three pieces to it. There is no need for any of this, it feels almost like GW is punishing you for choosing to build these things. you will go insane if you are not following the instructions like they’re religious doctrine. Used the wrong part somewhere, because they all look sort of the same? Good luck fixing it, you are cooked, your house of cards has a fault on the foundation.
Side–note, the capes trail and bunch on the ground, which makes them flat on the bottom, if you’re basing these you better choose something flat, or you’re going to have the bizarre situation whereby your capes are bunching up on thin air. Why not make the capes shorter??
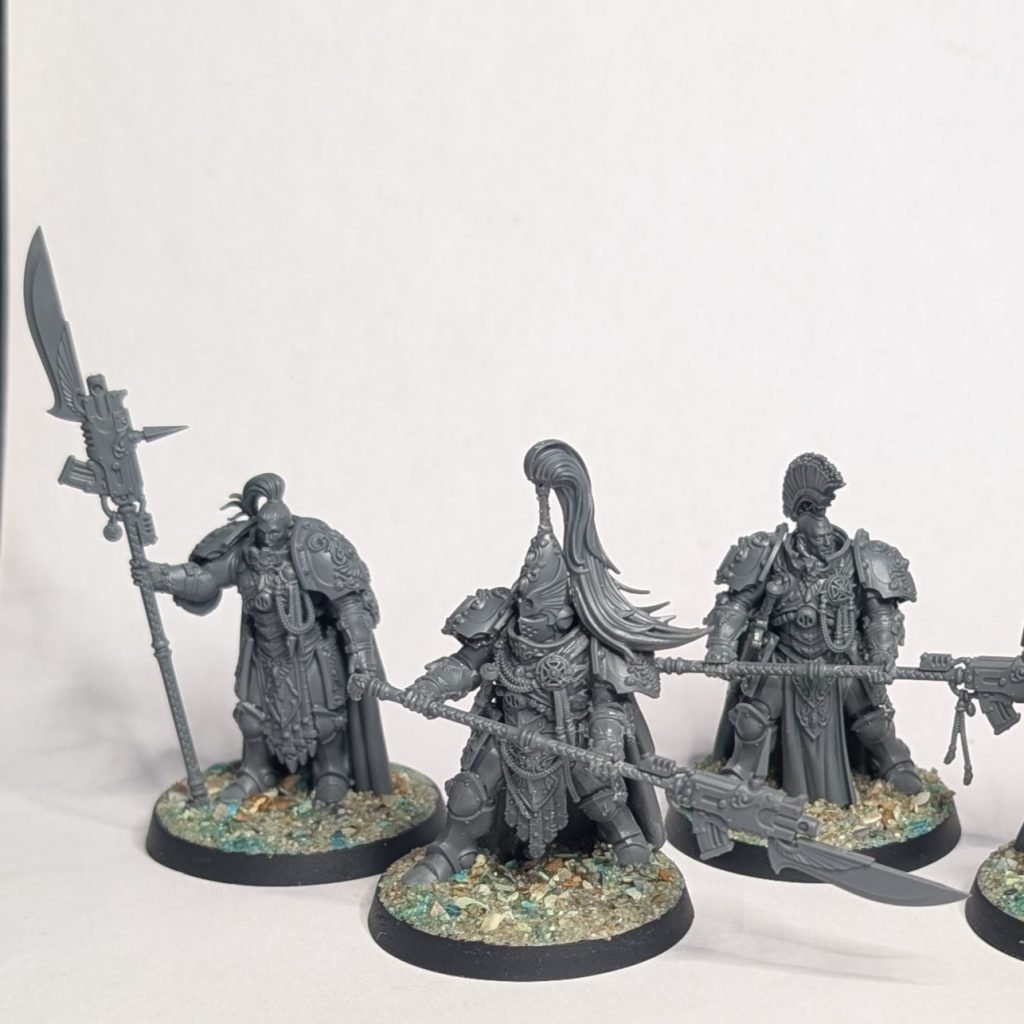
You will long for the days when a Space Marine was 2 torso pieces, some legs, and two arms. These things are fiddly in the extreme. The spears also have a fairly critical design flaw - let me explain. There are two models that are sort of standing somewhat at-ease holding their spear (or the large eagle banner pole) in one hand. The critical error here is that the place on the spear-haft where it is meant to glue to the arm has a sort of divot cut out of it, this divot seriously undermines the stability of the pole, akin to a tree being felled that has a big chunk cut out of it, it bends super easily and even if you’re careful it is absolutely going to break and you’ll be in the very unenviable position of having to glue a spear pole back together (something that is both painful and always looks bad to me).
About that banner - the spearstodes have a large metal eagle on a stick (described as a vexillfer when it should be an aquilifer but ok) this piece is big, and it fits on the banner pole by a single very, very small connection point. You know how they did flags sometimes in Warhammer Fantasy where they’d have a banner pole and the top part it was sort of cut in half lengthways with half on the banner and half on the pole? They work pretty well, really. This has one of those, but it’s tiny, maybe two milimetres if I’m being generous. It’s not remotely big enough to support the weight of this piece. The standard bearer for the swordstodes has exactly the same arm and pole arrangement, and the same split-shaft connection point, but the additional braid hanging from the banner also connects to the pole - those two connection points (along with the smaller banner) make it vastly more stable. I fully do not understand why they didn’t do the same thing on the huge eagle banner, it’s just such a weird mistake.
Rounding out my litany of complaints by echoing Joey, the Misericordia don’t have any obvious connection point, you’re just sort of jamming them onto the cuisses and hoping for the best (and with a sort of bitter realisation that it makes them pretty difficult to paint.
Keewa: These guys look fantastic, we love ourselves some Femstodes and although there are not enough bare heads to make an all-female troop (more on that later) their inclusion is very welcome. You can see, if you look closely, which bodies are intended as “female” and which not (the female bodies are slightly more slender, and have a subtle-but-still-obvious-enough amount of boobplate, we’re not talking Stormcast Eternals or Sisters level of sculpting, but it is there if you look. The models look great, although there’s tons of detail it’s sort-of-belied by the fact that a lot of it can be the same colour without too much trouble.
However.. The capes, Jesus Christ, the capes, for some ungodly reason, the designers at GW have decreed that Custodians must have long capes that include half of the mounting point for the arms and shoulder pad. There is no reason whatsoever for this, and I do not understand it - believe me, I have spent time thinking “why would they do this” and I have come up entirely empty. As Joey has said, each cape corresponds to one body, which corresponds to one specific weapon/shield arm option. Each arm, in turn, has three pieces to it. There is no need for any of this, it feels almost like GW is punishing you for choosing to build these things. you will go insane if you are not following the instructions like they’re religious doctrine. Used the wrong part somewhere, because they all look sort of the same? Good luck fixing it, you are cooked, your house of cards has a fault on the foundation.
Side–note, the capes trail and bunch on the ground, which makes them flat on the bottom, if you’re basing these you better choose something flat, or you’re going to have the bizarre situation whereby your capes are bunching up on thin air. Why not make the capes shorter??
You will long for the days when a Space Marine was 2 torso pieces, some legs, and two arms. These things are fiddly in the extreme. The spears also have a fairly critical design flaw - let me explain. There are two models that are sort of standing somewhat at-ease holding their spear (or the large eagle banner pole) in one hand. The critical error here is that the place on the spear-haft where it is meant to glue to the arm has a sort of divot cut out of it, this divot seriously undermines the stability of the pole, akin to a tree being felled that has a big chunk cut out of it, it bends super easily and even if you’re careful it is absolutely going to break and you’ll be in the very unenviable position of having to glue a spear pole back together (something that is both painful and always looks bad to me).
About that banner - the spearstodes have a large metal eagle on a stick (described as a vexillfer when it should be an aquilifer but ok) this piece is big, and it fits on the banner pole by a single very, very small connection point. You know how they did flags sometimes in Warhammer Fantasy where they’d have a banner pole and the top part it was sort of cut in half lengthways with half on the banner and half on the pole? They work pretty well, really. This has one of those, but it’s tiny, maybe two milimetres if I’m being generous. It’s not remotely big enough to support the weight of this piece. The standard bearer for the swordstodes has exactly the same arm and pole arrangement, and the same split-shaft connection point, but the additional braid hanging from the banner also connects to the pole - those two connection points (along with the smaller banner) make it vastly more stable. I fully do not understand why they didn’t do the same thing on the huge eagle banner, it’s just such a weird mistake.
Rounding out my litany of complaints by echoing Joey, the Misericordia don’t have any obvious connection point, you’re just sort of jamming them onto the cuisses and hoping for the best (and with a sort of bitter realisation that it makes them pretty difficult to paint.
Painting
Crabstuffed Mushrooms (Joey K): We did an article on painting Custodes back in 2020 and it still holds: https://dev.tabletopbattles.com/how-to-paint-everything-adeptus-custodes/, but read on to see some of the lessons we’ve learned since then!
Custodian Sentinels
 Custodian Sentinels- @badusernametag
Badusernametag: I feel like I need to prefix anything I say here by pointing out that I am clearly, firmly and consistently a traitor. I have no love for the false, corpse Emperor of mankind and the closest I’ve come to a loyalist army in Heresy is an Istvaan Loyalist World Eaters army, which barely counts!? I’m pretty keen on both the grim AND the dark though and when I saw the previews of the new Custodes range I will admit to being impressed by the new sculpts, especially their proportions, the helmets, weapons and of course the representation of women being made clear and at the forefront.
Custodian Sentinels- @badusernametag
Badusernametag: I feel like I need to prefix anything I say here by pointing out that I am clearly, firmly and consistently a traitor. I have no love for the false, corpse Emperor of mankind and the closest I’ve come to a loyalist army in Heresy is an Istvaan Loyalist World Eaters army, which barely counts!? I’m pretty keen on both the grim AND the dark though and when I saw the previews of the new Custodes range I will admit to being impressed by the new sculpts, especially their proportions, the helmets, weapons and of course the representation of women being made clear and at the forefront.
 Custodian Sentinels- @badusernametag
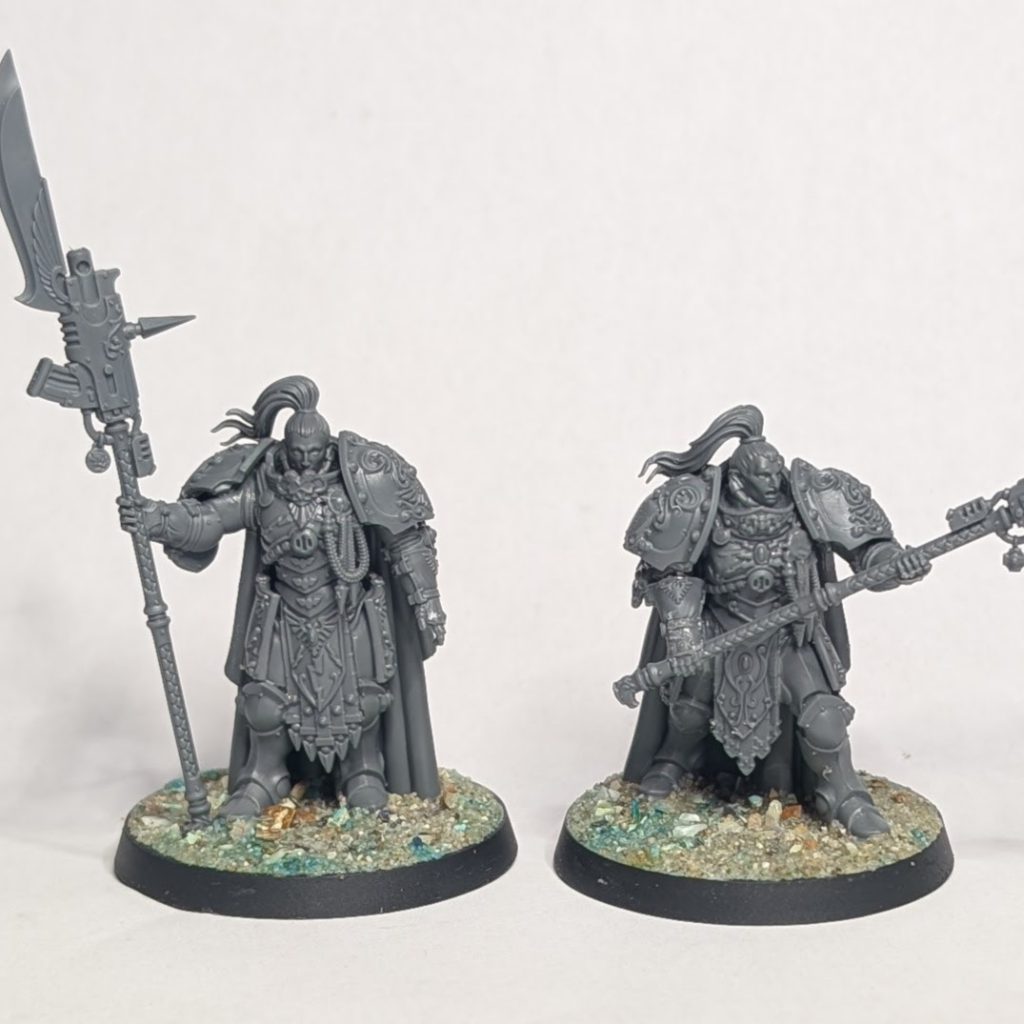
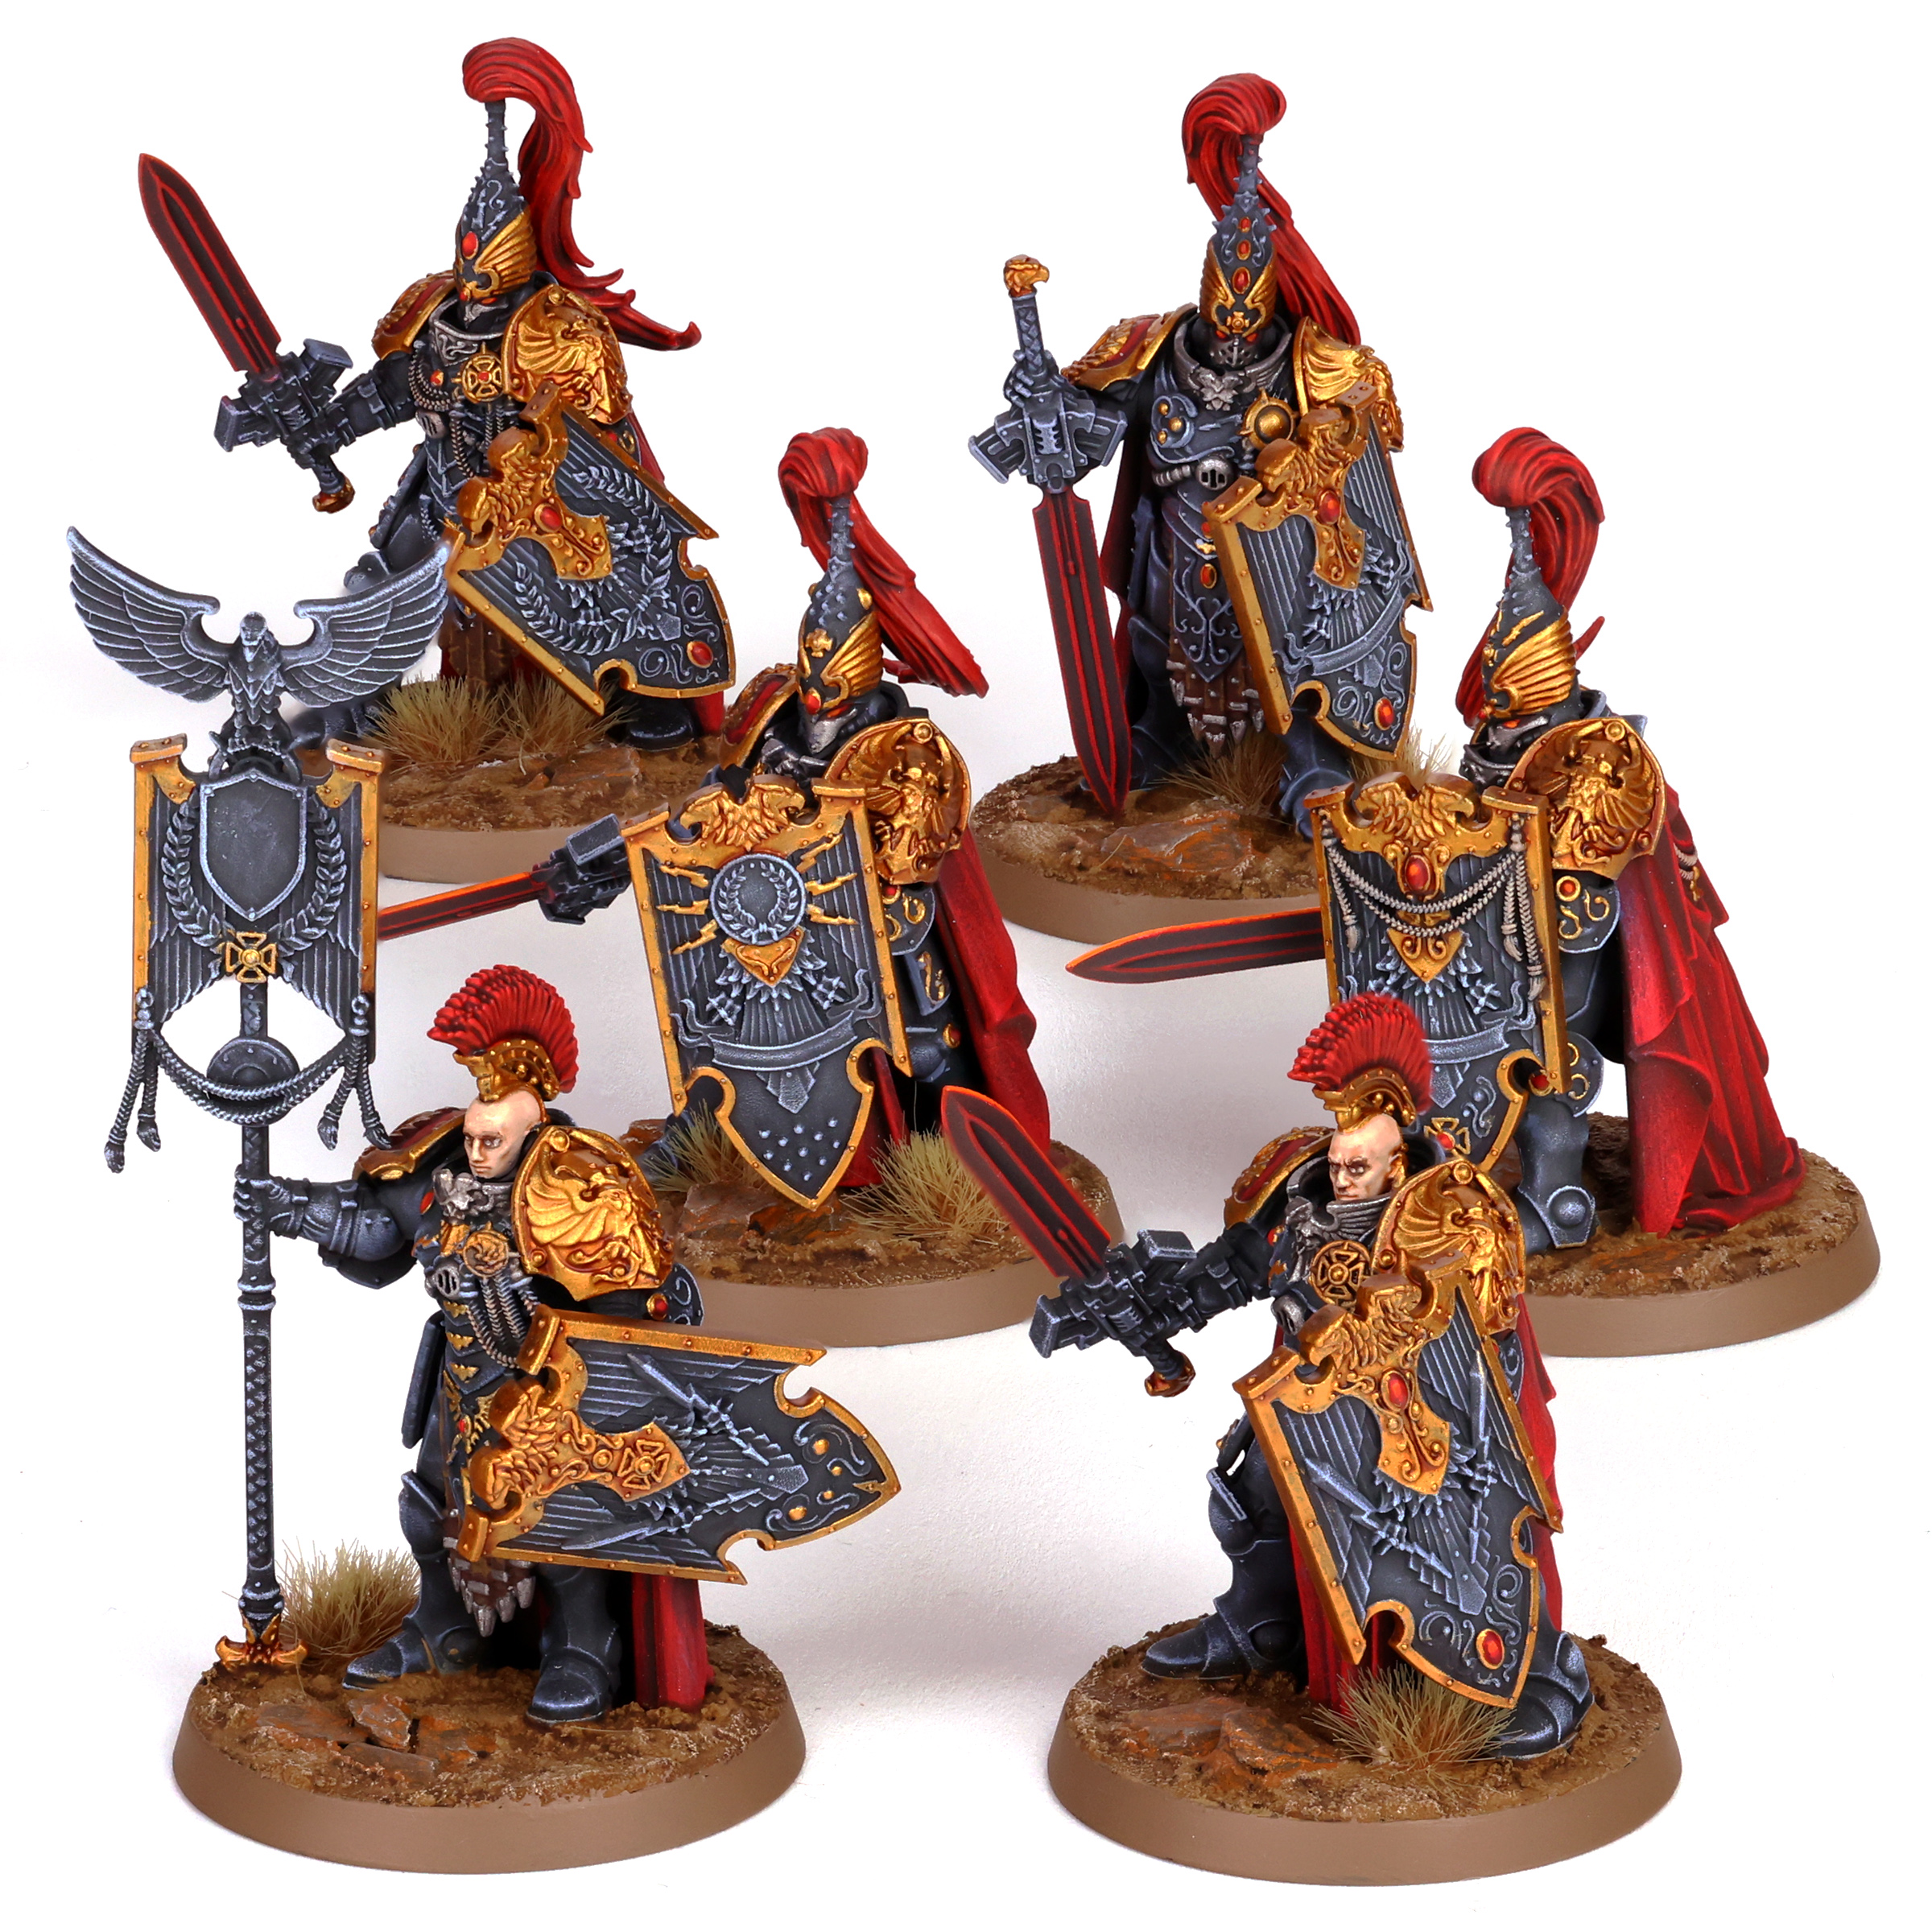
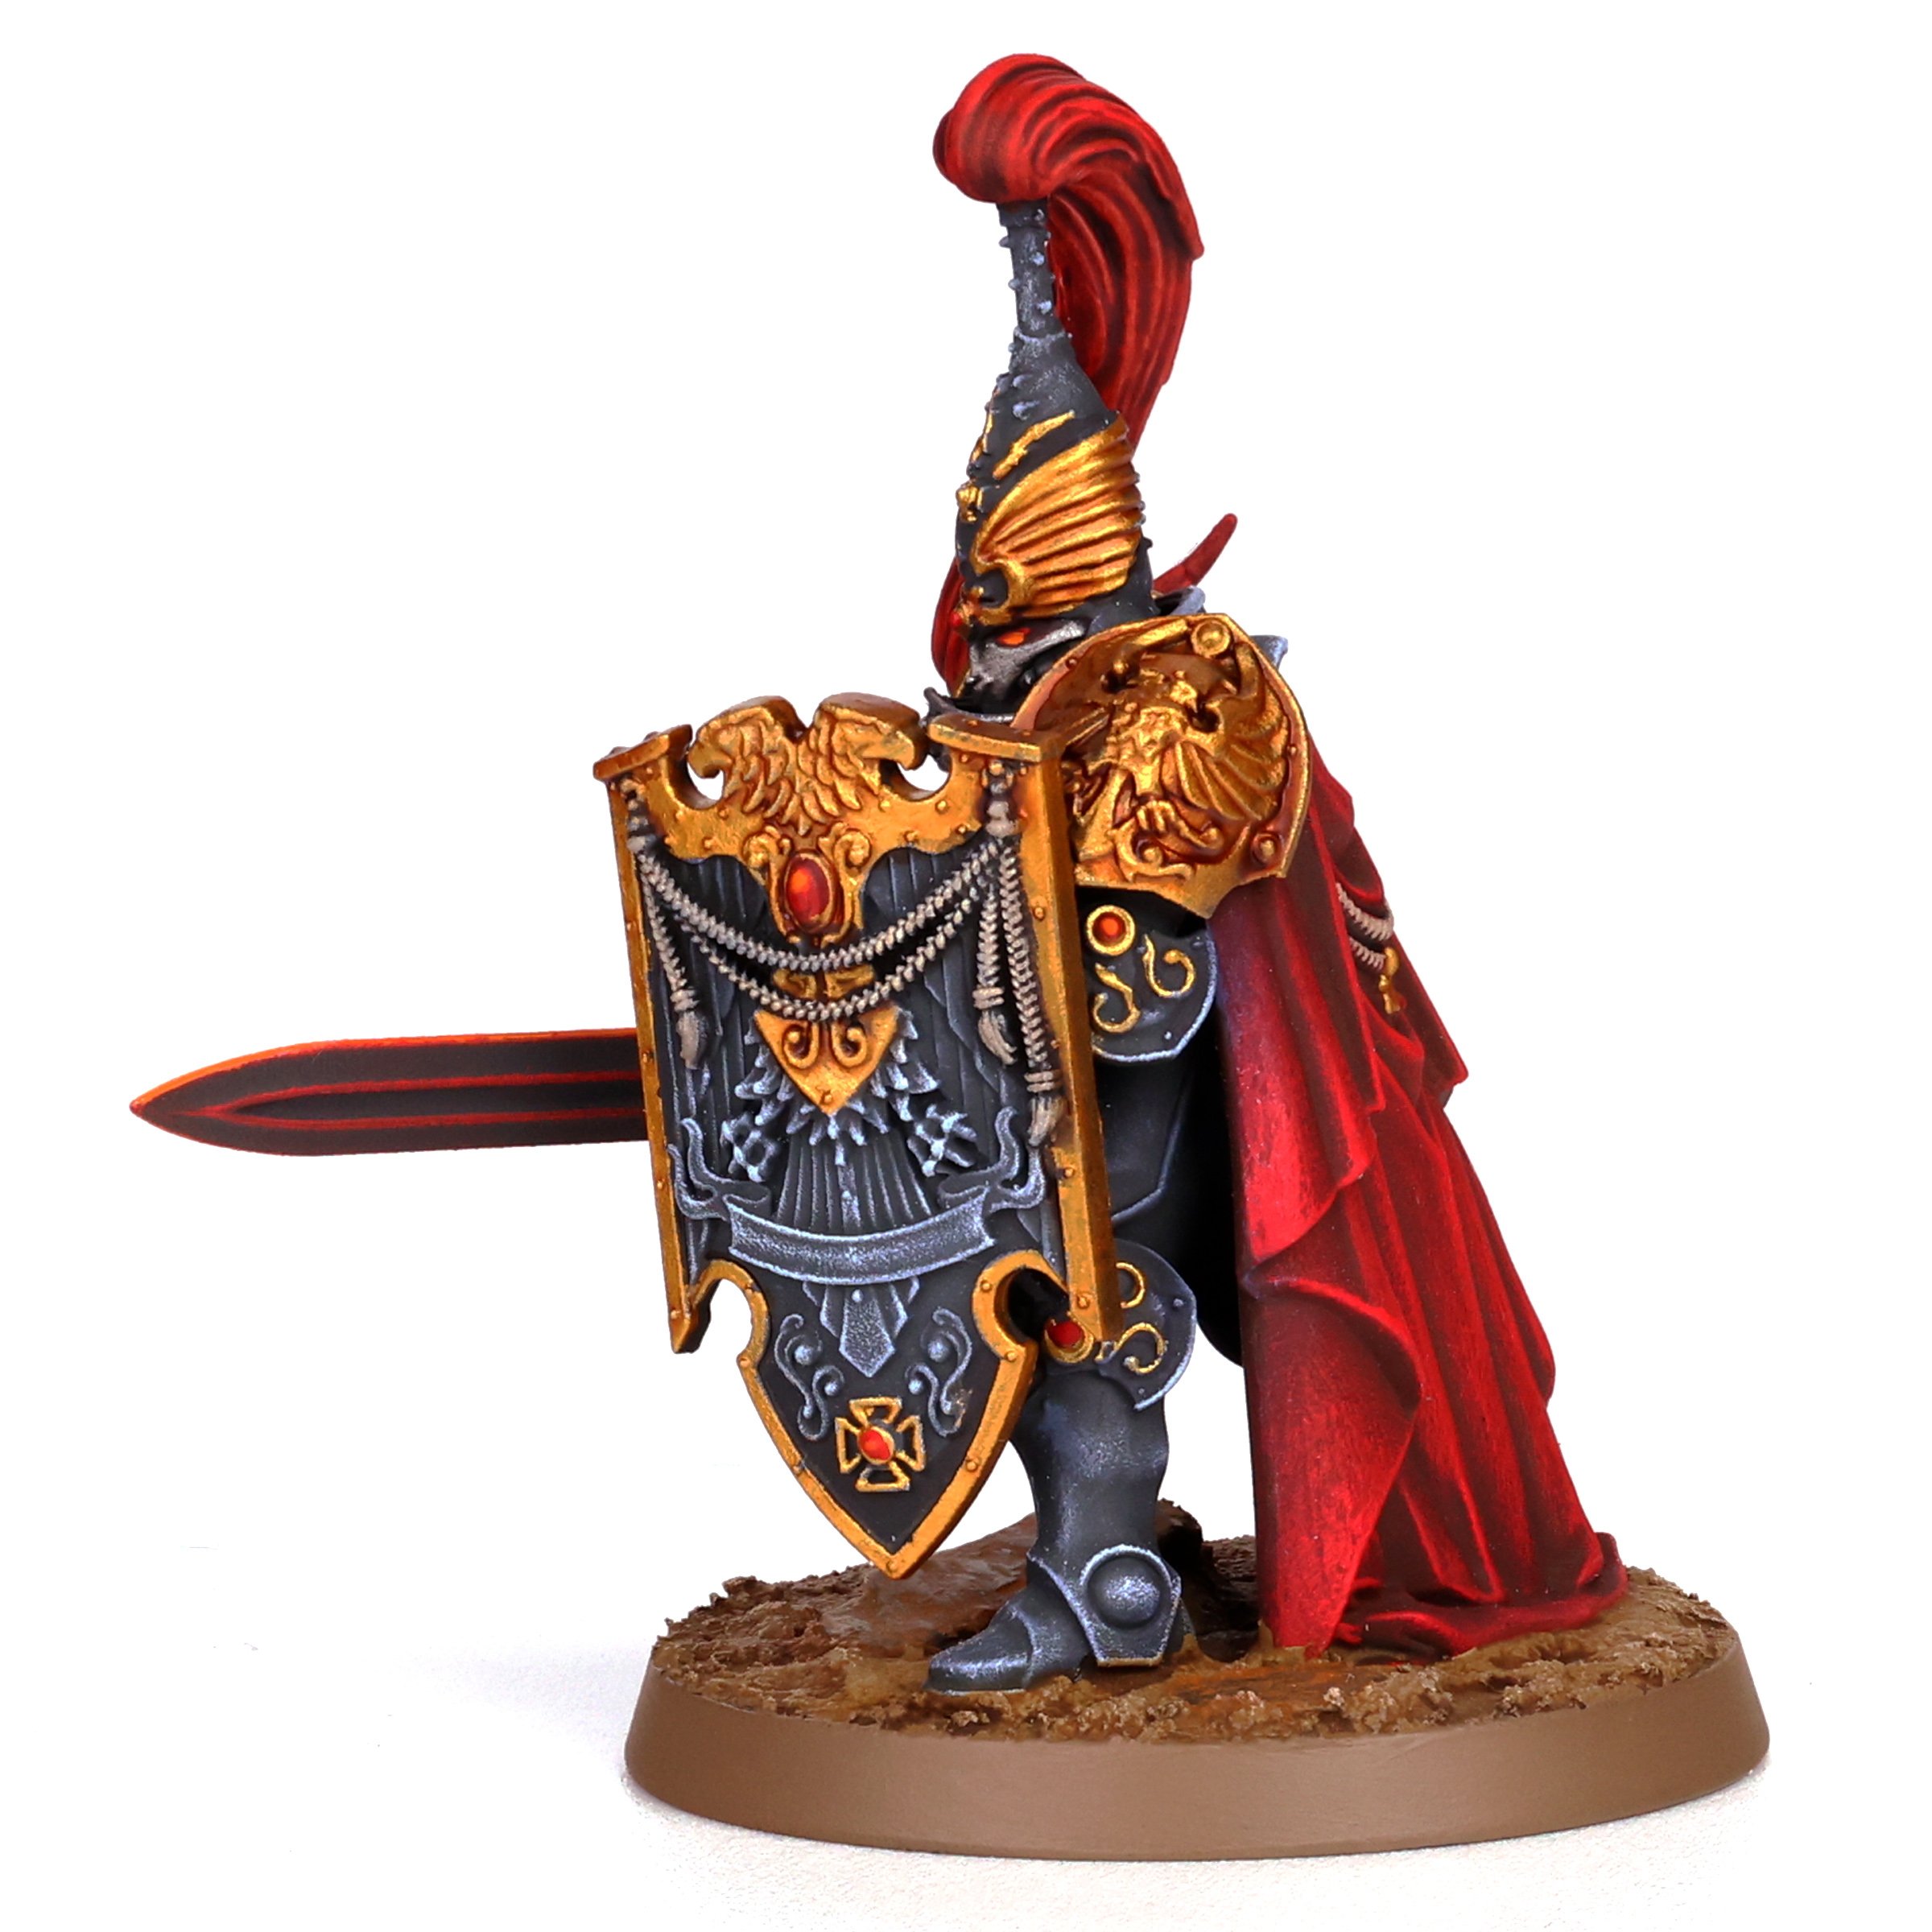
These are good designs. The sculpts are spot on and finally Custodes have the stature befitting their grandiose representations in the fluff. The tall helmets are elegant, weird and pure grimdark nonsense. I was never a fan of the old Custodes, but they have nailed it here. We can’t talk about the overall design without mentioning the advanced and progressive decision by GW to make some (the majority in the Sentinels at least) of the Custodian Guard women. Obviously this representation in Heresy is amazing for the game and the community, and to make the toughest and best fighters in the galaxy equally any gender is precisely as it should be. Whilst I am still baffled that they have explicitly made Spesh Mureens male, if you want to make more female space marines (I do) then you have some help here to do so! As the kits come with more female heads than male and you will have spares. Huzzah! I was surprised to see that the bodies/torsos are explictly male/female, as I feel there could have been more ambiguity that would’ve allowed more customisation and exchange of parts etc. Also some of the female bodies feel a little narrow for the pauldrons and weapons. Gender neutral bodies could’ve been a move here, although I appreciate that could have reduced the impact of the representation.
Custodian Sentinels- @badusernametag
These are good designs. The sculpts are spot on and finally Custodes have the stature befitting their grandiose representations in the fluff. The tall helmets are elegant, weird and pure grimdark nonsense. I was never a fan of the old Custodes, but they have nailed it here. We can’t talk about the overall design without mentioning the advanced and progressive decision by GW to make some (the majority in the Sentinels at least) of the Custodian Guard women. Obviously this representation in Heresy is amazing for the game and the community, and to make the toughest and best fighters in the galaxy equally any gender is precisely as it should be. Whilst I am still baffled that they have explicitly made Spesh Mureens male, if you want to make more female space marines (I do) then you have some help here to do so! As the kits come with more female heads than male and you will have spares. Huzzah! I was surprised to see that the bodies/torsos are explictly male/female, as I feel there could have been more ambiguity that would’ve allowed more customisation and exchange of parts etc. Also some of the female bodies feel a little narrow for the pauldrons and weapons. Gender neutral bodies could’ve been a move here, although I appreciate that could have reduced the impact of the representation.
 Custodian Sentinels- @badusernametag
Pendulin:
Custodian Sentinels- @badusernametag
Pendulin: I'm a fan of big golden boys. Who wouldn't be. So I was eager to get my hands on these, and they do not disappoint.
 Custodian Sentinels. Credit: Pendulin
To be clear, the existing Custodes models are as great as ever, but these new ones are a bit more detailed while not being any more difficult to build than the old kits. They really are some standout models for a faction that really needs every model to stand out on the battlefield.
 Custodian Sentinels. Credit: Pendulin
Assembly
Badusernametag: For extremely complex and detailed models these go together very easily indeed. The basic body of each model is eight parts (front-back-leg-leg-grieve-grieve-foof-cape) and this assembly is future simple. After that there are not many options here. Of the six, only one of the builds has an option, this is to have the vexilla or not. The vexilla bearer can also have a choice of Misericordia or sword, but that is it. Theres no more options here and the variety comes from the choice and postitioning of the head alone. Having built two straight from the instructions (in order to get phoenix’s quickly) I thought I had a crack at mixing the remaining arms and bodies up, as I looked like this was possible. Sadly due to minute differences in arm alignments and connecting pieces I was wrong and without some work these are essentially mono-pose models. Given that it’s capes are resting on the ground and also moulded into the arms, pauldrons, weapons etc it would actually be some work to kitbash or even modify these at all. Now maybe you have so few in an army that it wouldn’t matter, but I think this is a real shame. This kit is ostensibly a multipart kit, but in reality they may as well be push fit. It all aligns just so and that is the pose you get. Now don’t get me wrong they’re lovely models, but if you were expecting some variety please don’t be disappointed.
Whilst a little disappointed by the lack of options for modelling here I am overall impressed by the sculpts and may get some more when the box drops. Feel like it would be a fun little project.
 Custodian Sentinels- @badusernametag
Pendulin:
Custodian Sentinels- @badusernametag
Pendulin: As mentioned, these models assemble quite easily. My only real complaint is that the connection between the helmet and the hair is extremely thin. It holds well enough with some plastic glue, but it's definitely on the thin side, so use caution.
 Custodian Sentinels. Credit: Pendulin
Other than the thin connection between helmet and hair, it's a solid, durable model with an easy build. It would be great if there was a bit more (or really, any) customization options. But that's what kitbashing it for, I suppose.
Painting
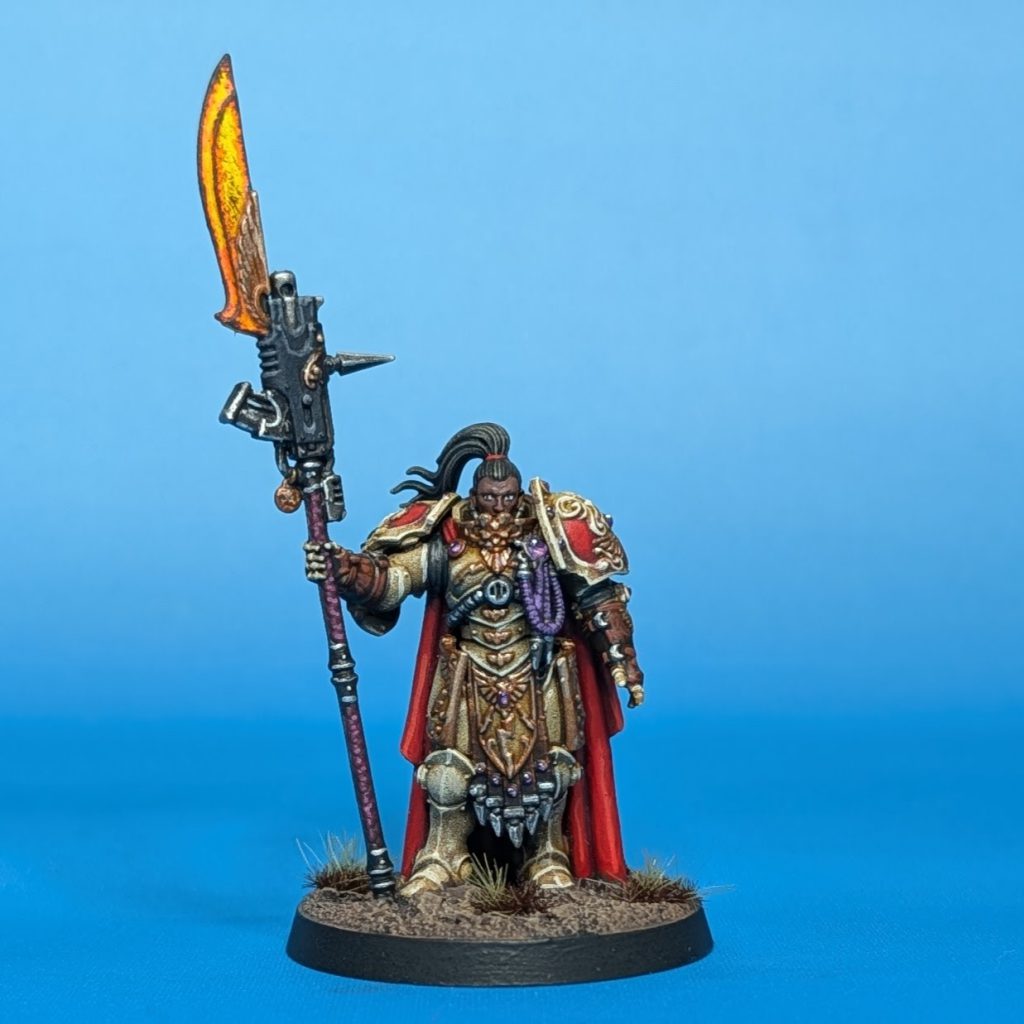
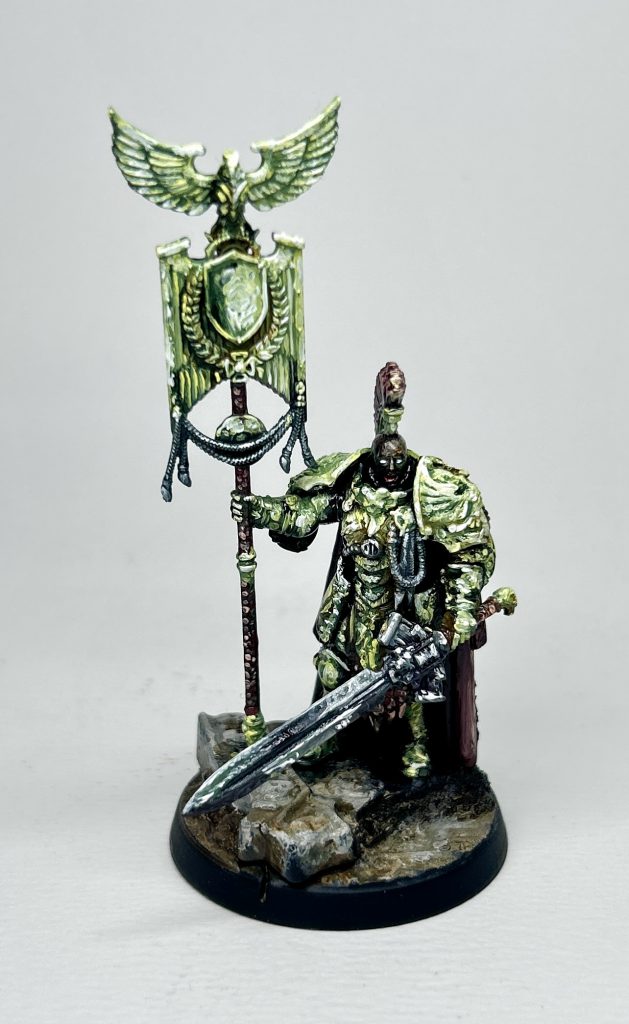
 Custodian Sentinels- @badusernametag
Gold. Gold is a tricky little thing to paint nicely and you often see lacklustre (pun intended) Custodians waddling about the tables of events. Especially tricky if you paint purely in oil paint with no real metallics in addition! Initially I thought I’d try some very ochre NMM metal here (which I’ve been enjoying lately on some oldhammer goons), but when the Yellowish Green Ural started winking at me out of my paint tin I could resist. Gold is often criticised for being too yellow or green, so what if it was intentionally painted in yellow and green?? So I’ve gone for the traditional Custodes scheme of Gold/red, but with a different take, suing altertnative hues and saturations.
I did my best to turn the contrast here up to the maximum and consider all the tones and hues you might see in metal. So there is brown, red, green, purple and yellow all mixed in there. With an emphasis on really high contrast and deep shadows falling away from one solid point of bright light. The shining light of the god Emperor’s radiance perhaps? The red, metal and stone on the bases are intentionally completely de-saturated, allowing the glowing metal armour to really shine (puns, yes, puns)
Main colours here are:
Custodian Sentinels- @badusernametag
Gold. Gold is a tricky little thing to paint nicely and you often see lacklustre (pun intended) Custodians waddling about the tables of events. Especially tricky if you paint purely in oil paint with no real metallics in addition! Initially I thought I’d try some very ochre NMM metal here (which I’ve been enjoying lately on some oldhammer goons), but when the Yellowish Green Ural started winking at me out of my paint tin I could resist. Gold is often criticised for being too yellow or green, so what if it was intentionally painted in yellow and green?? So I’ve gone for the traditional Custodes scheme of Gold/red, but with a different take, suing altertnative hues and saturations.
I did my best to turn the contrast here up to the maximum and consider all the tones and hues you might see in metal. So there is brown, red, green, purple and yellow all mixed in there. With an emphasis on really high contrast and deep shadows falling away from one solid point of bright light. The shining light of the god Emperor’s radiance perhaps? The red, metal and stone on the bases are intentionally completely de-saturated, allowing the glowing metal armour to really shine (puns, yes, puns)
Main colours here are:
- Yellowish Green Ural
- Medieval Yellow
- Atrament Black (black/green)
- Caput Mortum
- Payne’s Grey
- Brown pink
- bluish grey
- White
Basically blocked out all the gold areas in a 50/50 mix of Ural and Atrament to provide a base layer of shading. Then started highlighting from the chosen light source in Ural, through medieval yellow to White. Then the other way, shading the hidden areas in Atrament and casting shadows in brown. Really fun and impressionistic brushwork and some expressive impasto lighting made this really joyful to paint. Keen to get my hand on one of the bigger models now so I can test this on some big panels.
 Custodian Sentinels- @badusernametag
 Custodian Sentinels- @badusernametag
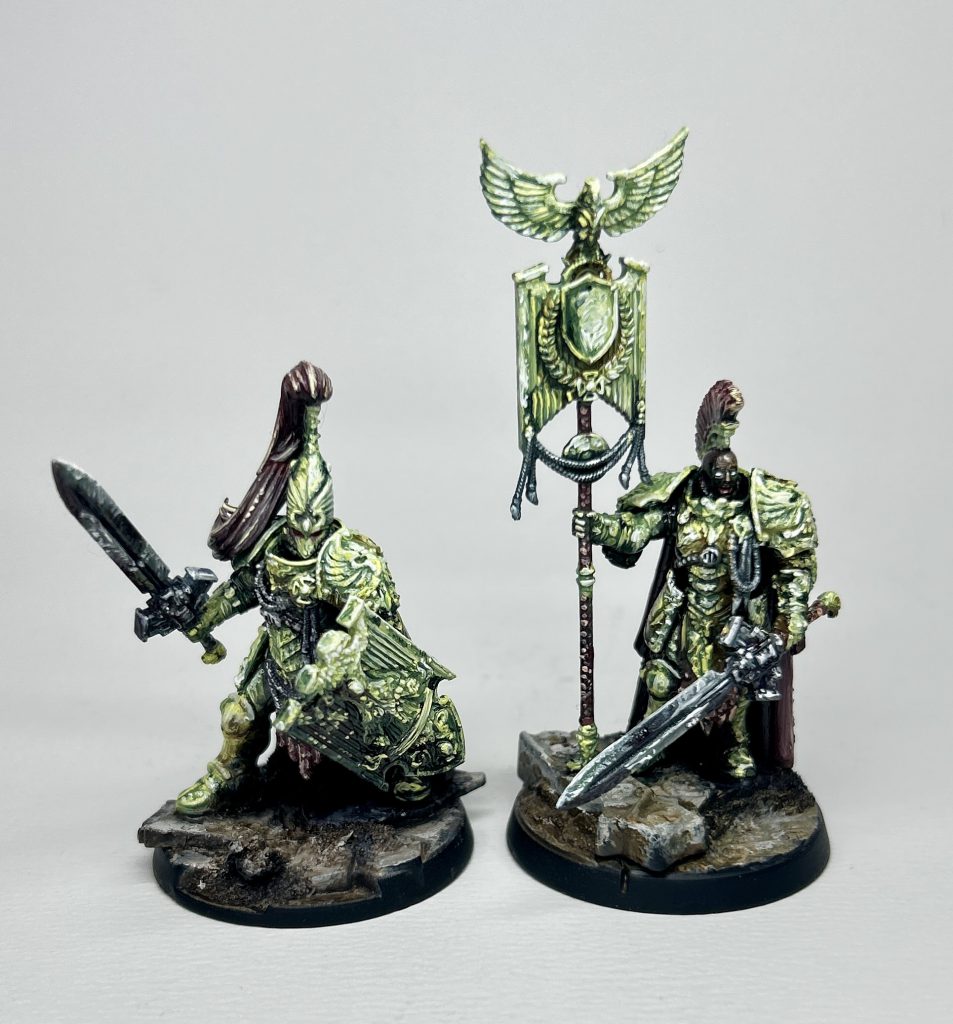
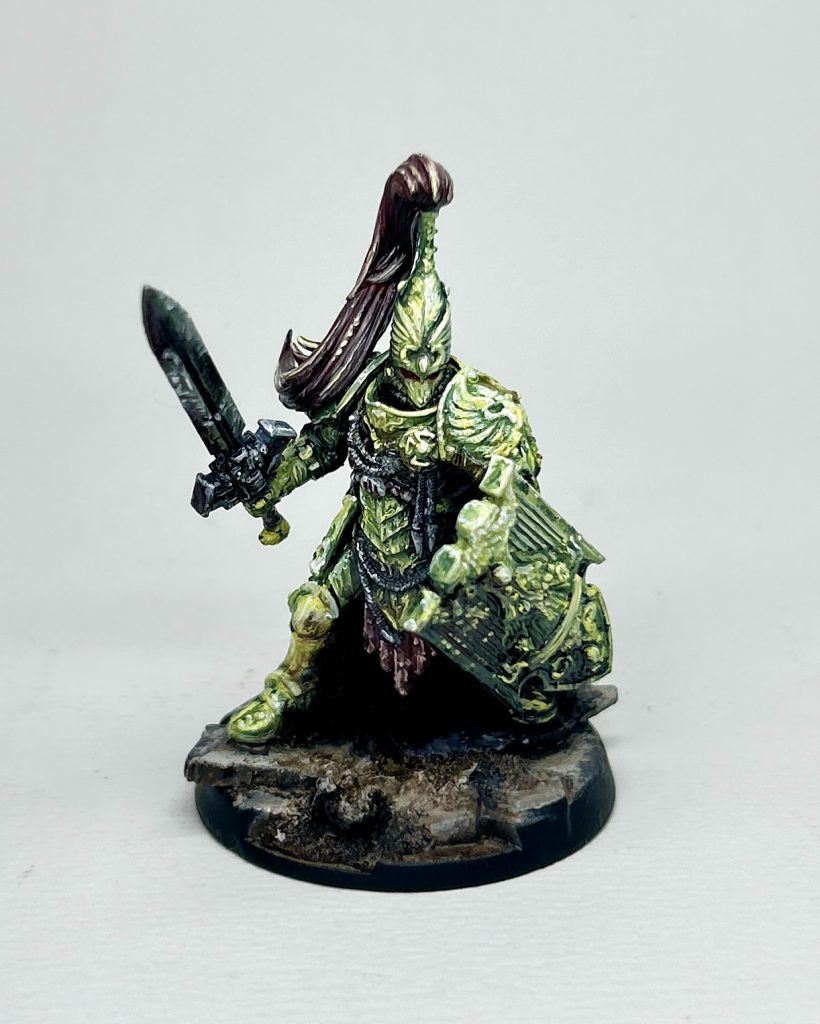
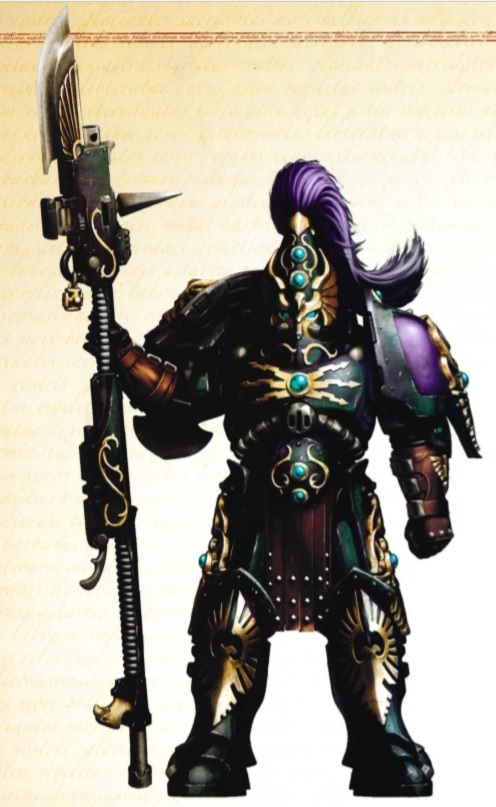
Crabstuffed Mushrooms (Joey K) I went with alternate schemes from gold, starting with the Dankanatoi featured in The Horus Heresy Book Eight: Malevolence, arguably the dankest of scheme of all:
Custodian Sentinels- @badusernametag
Crabstuffed Mushrooms (Joey K) I went with alternate schemes from gold, starting with the Dankanatoi featured in The Horus Heresy Book Eight: Malevolence, arguably the dankest of scheme of all:
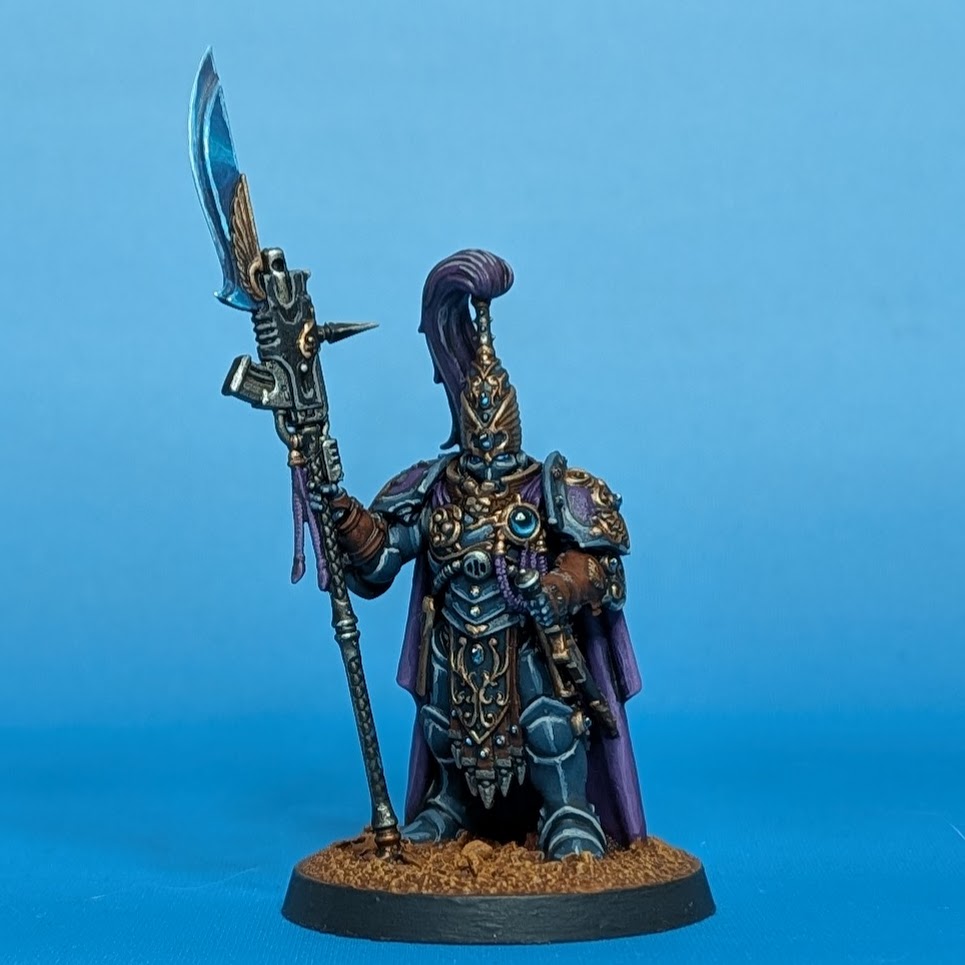
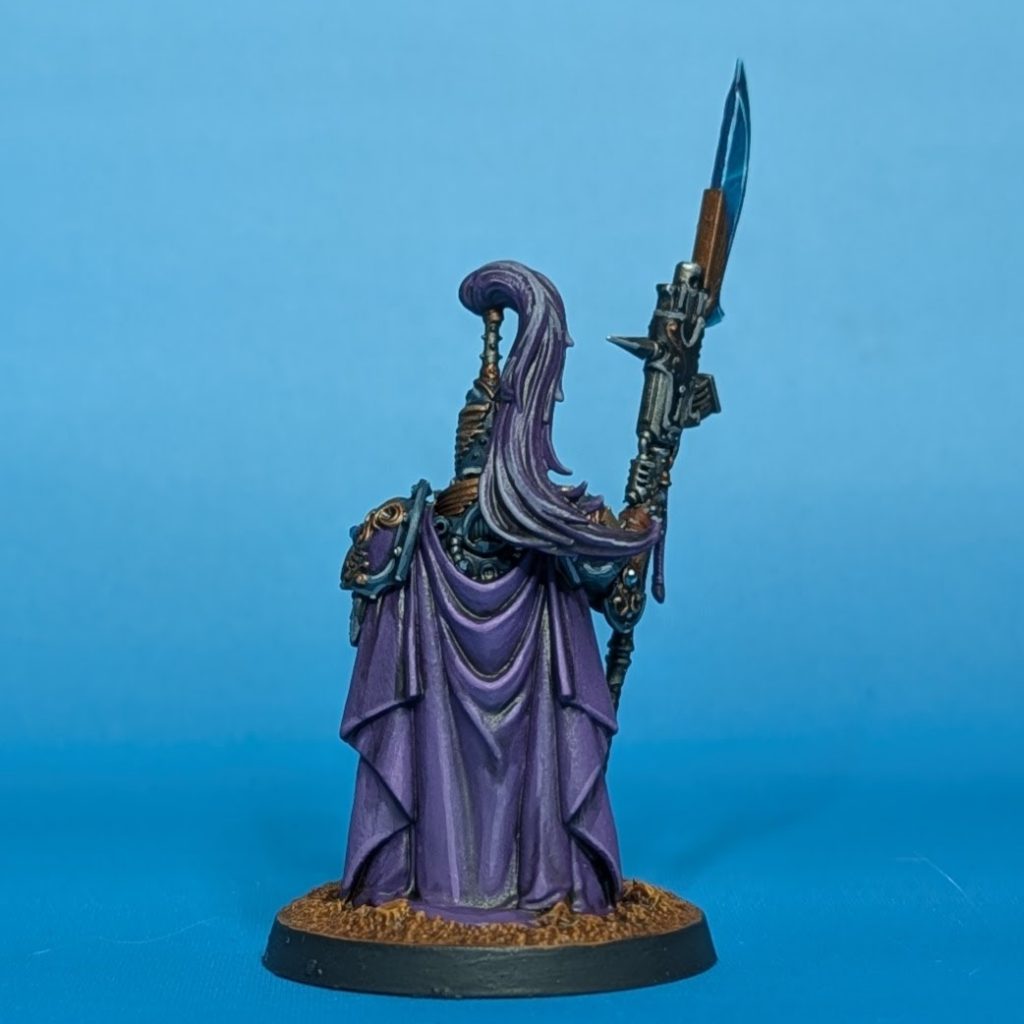
- I applied all of the basecoats to the model before giving it a wash of diluted Nuln Oil in the recesses. You could also use Basilicanum Grey if you dilute it with Contrast Lahmian Medium (50/50 dilution).
- I basecoated the armor with Incubi Darkness, followed by highlights of Thunderhawk Blue and Fenris Grey.
- The jewels / gemstones were painted in the Goonhammer style, starting with a dark basecoat of 50/50 Caledor Sky and Corvus Black, followed by highlights of Temple Guard Blue, Baharroth Blue and a 50/50 mix of Baharroth Blue and White. A dot of white was applied in the top corner to mimic a reflection.
- The gold was Balthasar Gold highlighted with Runelord Brass.
- The purple cape was Xereus Purple highlighted with Genestealer Purple. I used Fulgrim Pink mixed with Genestealer Purple for the final highlights.
- The purple hair was similar, but the final highlight was Warpfiend Grey to distinguish it from the cape.
- The gauntlets / gloves were Doombull Brown, washed with Nuln Oil and highlighted back with Doombull Brown. I didn’t spend much time on these, to be honest. Who’s looking there?
- The spear haft was painted Leadbelcher, washed with Basilicanum Grey and highlighted Stormhost Silver.
- The spear blade was basecoated Kantor Blue and highlighted with Sotek Green followed by smaller highlights of Temple Guard Blue, Baharroth Blue and a little bit of White mixed into the last highlight of Baharroth Blue.
- I picked orange for the base color to complement the dark blue of the armor. The ground was painted Doombull Brown, highlighted by Skrag Brown followed by a lighter highlight of Balor Brown. The base rim was painted Corvus Black.
I also painted a Solar Watch model, but I wasn’t proud of my method for the base armor. If you want something easier, I recommend following the tutorials from style="font-weight: 400;">WarHipster, style="font-weight: 400;">Tabletop Ready or our very own Jack Hunter!
Legio Custodes Solar Watch painted by Crabstuffed Mushrooms (Joey K)
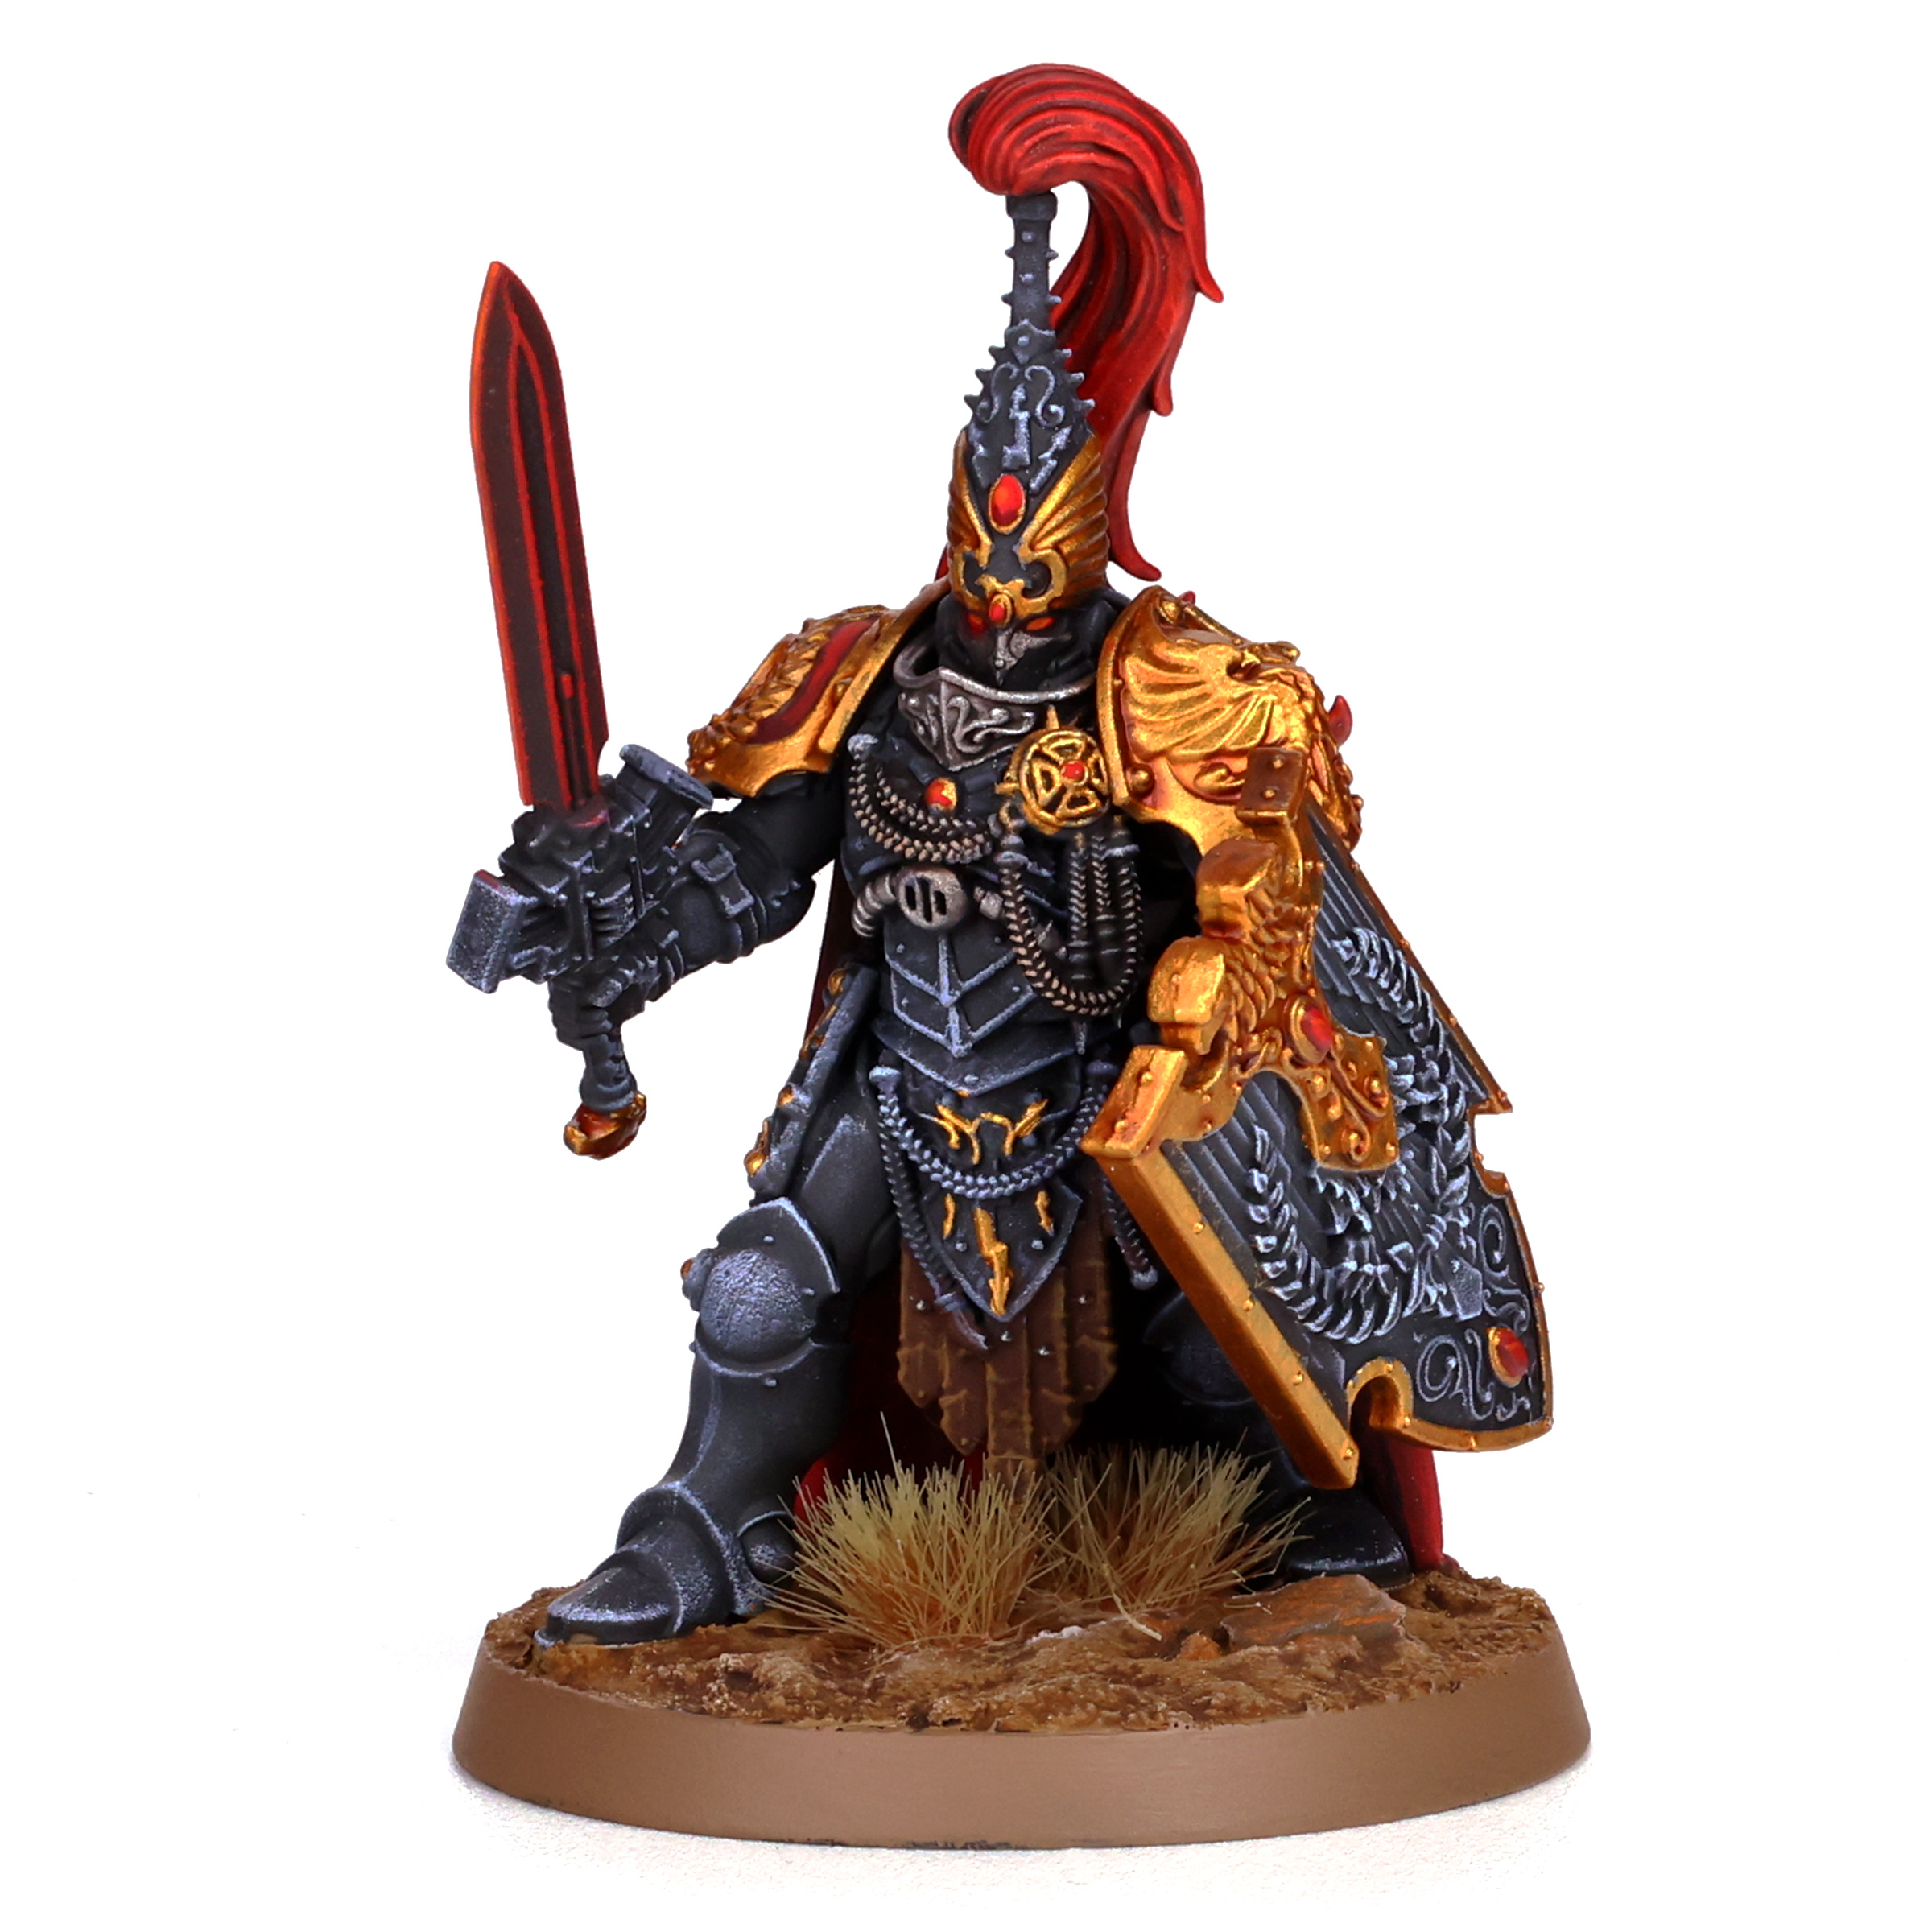
- The model was primed with Army Painter’s Oak Brown spray paint, followed by a second prime of Zandri Dust, this was then drybrushed with Screaming Skull, followed by a wash of Skeleton Horde. Once dry, the armor was highlighted with Screaming Skull.
- The cape and shoulder pads were based with Flesh Tearers Red, then mostly painted Mephiston Red, followed by highlights of Evil Sunz Scarlet and Wild Rider Red, the edges were highlighted with Trollslayer Orange.
- The jewels / gemstones were painted in the Goonhammer style, starting with a dark basecoat of Corvus Black mixed with Xereus Purple, highlighted with Genestealer Purple followed by Fulgrim Pink with a dot of White in the corner to mimic a reflection.
- The face was painted similar to the style="font-weight: 400;">WarhammerTV tutorial, based with Catachan Flesh, washed with a diluted mix of Druchii Violet and Lahmian Medium. The skin was re-highlighted with Bloodreaver flesh, followed by a highlight of Knight-Questor Flesh.
- The eyes were based with Grey Seer followed by dots of Corvus Black for the pupils. Mistakes were cleaned-up with the base skin color.
- The gold was Balthasar Gold highlighted with Runelord Brass.
- The spear haft was painted Leadbelcher, the grip was painted Screamer Pink and then the whole thing was washed with Basilicanum Grey and highlighted Stormhost Silver.
- The Spear blade was based with White and washed with Imperial Fist Yellow contrast paint. I used a tiny bit of sponge to apply Trollslayer Orange to the blade edges followed by a lighter sponge highlight of Rhinox Hide along the edges.
 Custodian Sentinels. Credit: Rich Nutter
Pendulin:
Custodian Sentinels. Credit: Rich Nutter
Pendulin: I went with my standard Shadowkeepers scheme, with a couple tweaks. The original tutorial is available at
How To Paint Everything: Adeptus Custodes Shadowkeepers.
 Custodian Sentinels. Credit: Pendulin
Broadly speaking, the only change I made is that I drybrushed the
Sombre Grey and
Wolf Grey for these models. Previously I did manual edge highlights of those colors, and I felt that a careful drybrush would better hit to look I wanted.
Custodian Sentinels. Credit: PendulinAnd instead of using Mephiston Red, I painted the cloaks with a drybrush of
Vallejo Game Color Bloody Red. It's a lot brighter and more saturated, which gives the cloaks a bit more pop.
Additionally, this time I washed all the gold with
Reikland Fleshshade, and not Nuln Oil or Agrax Earthshade. I wanted to tie the gold in with the cloak, so a reddish wash on the gold brought them together.
Caladius Annihilator Grav-tank
Loading...
Assembly
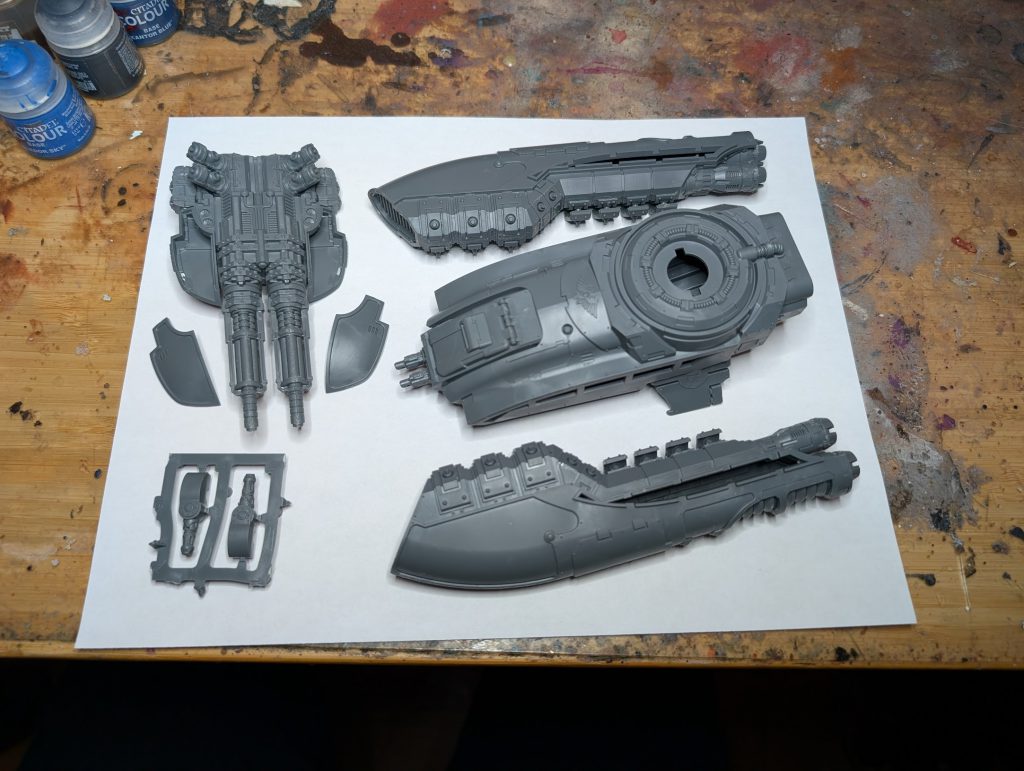
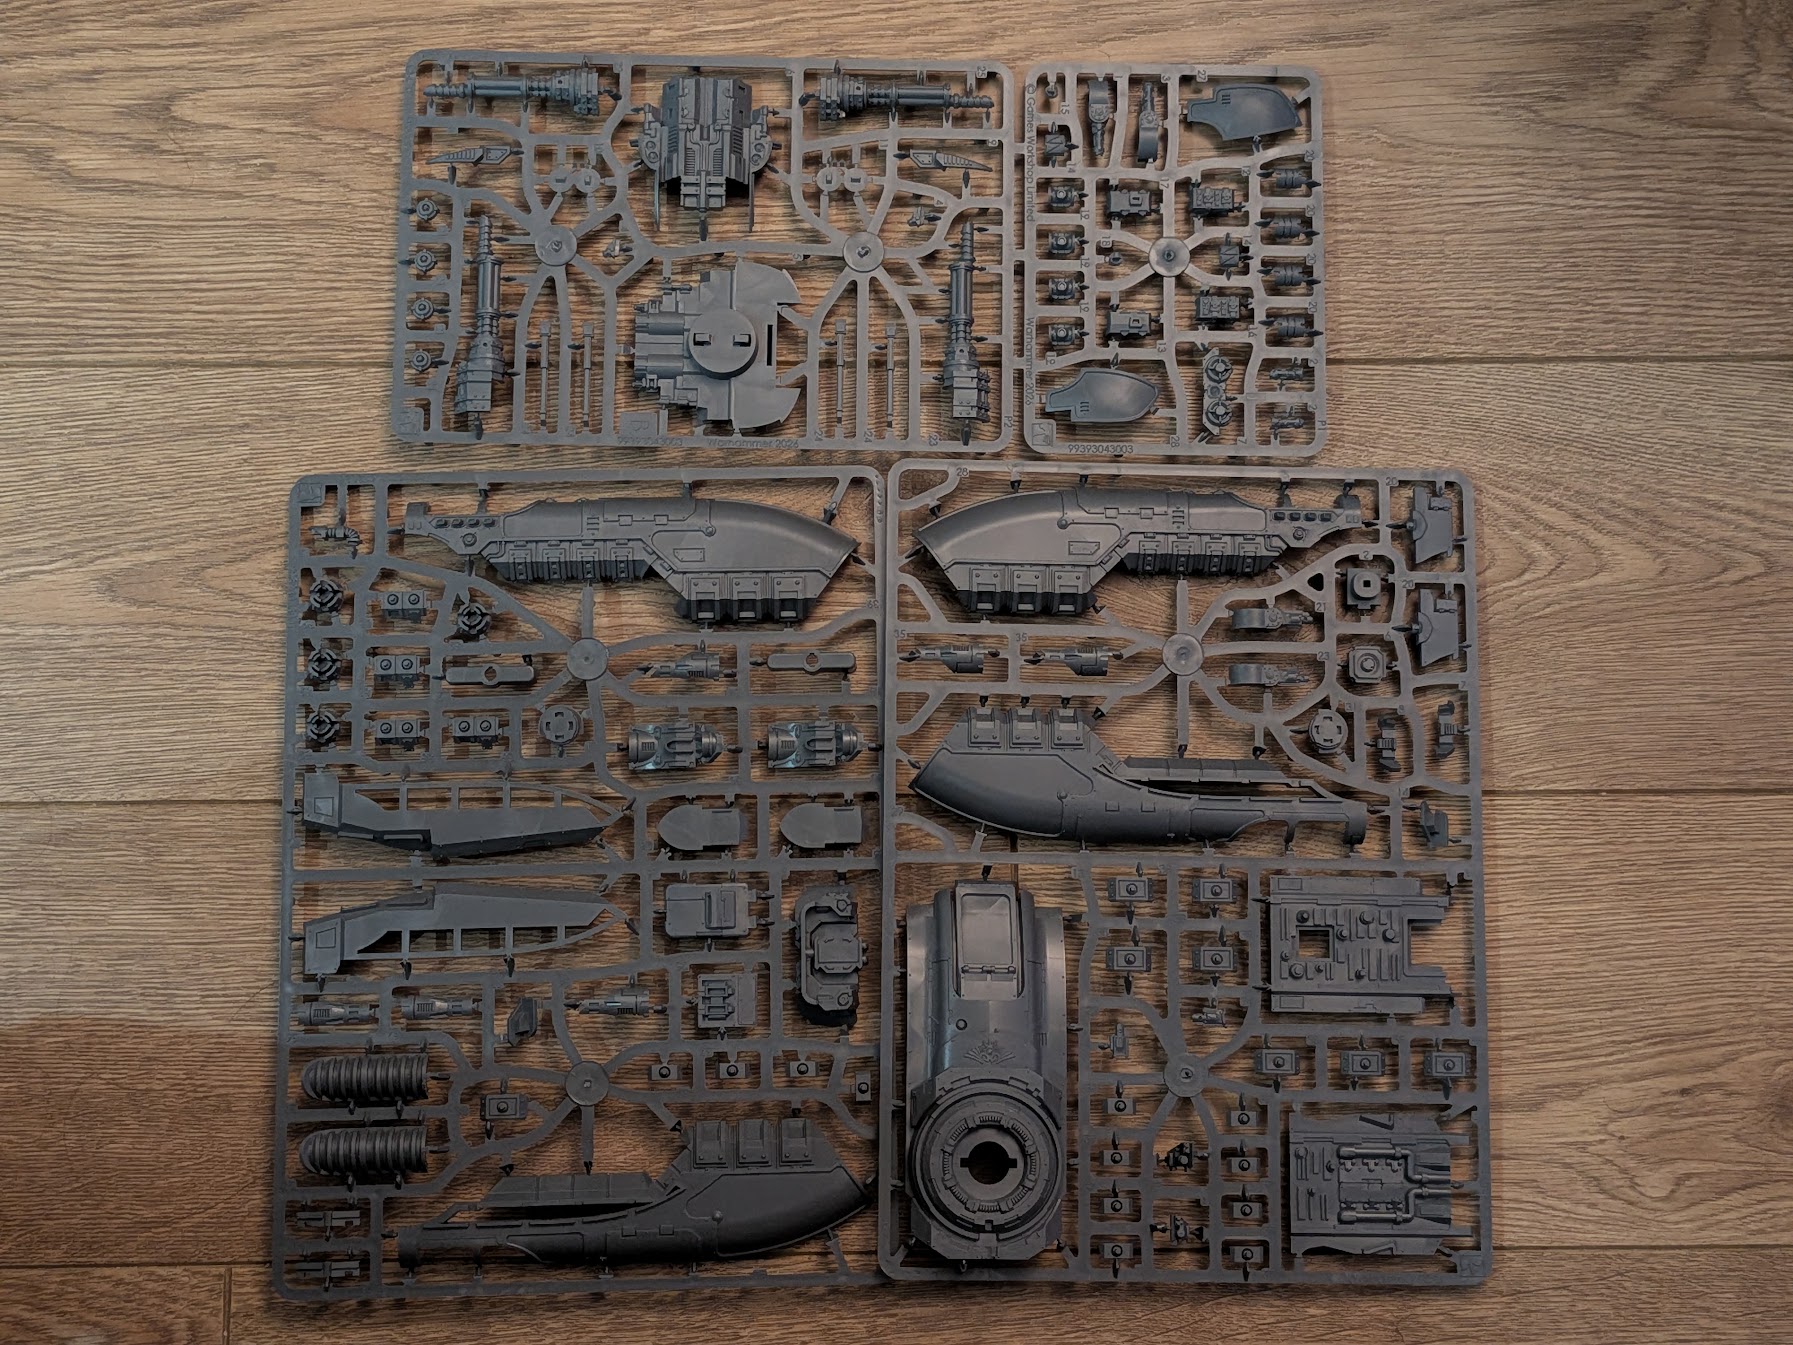 Plastic Caladius sprues
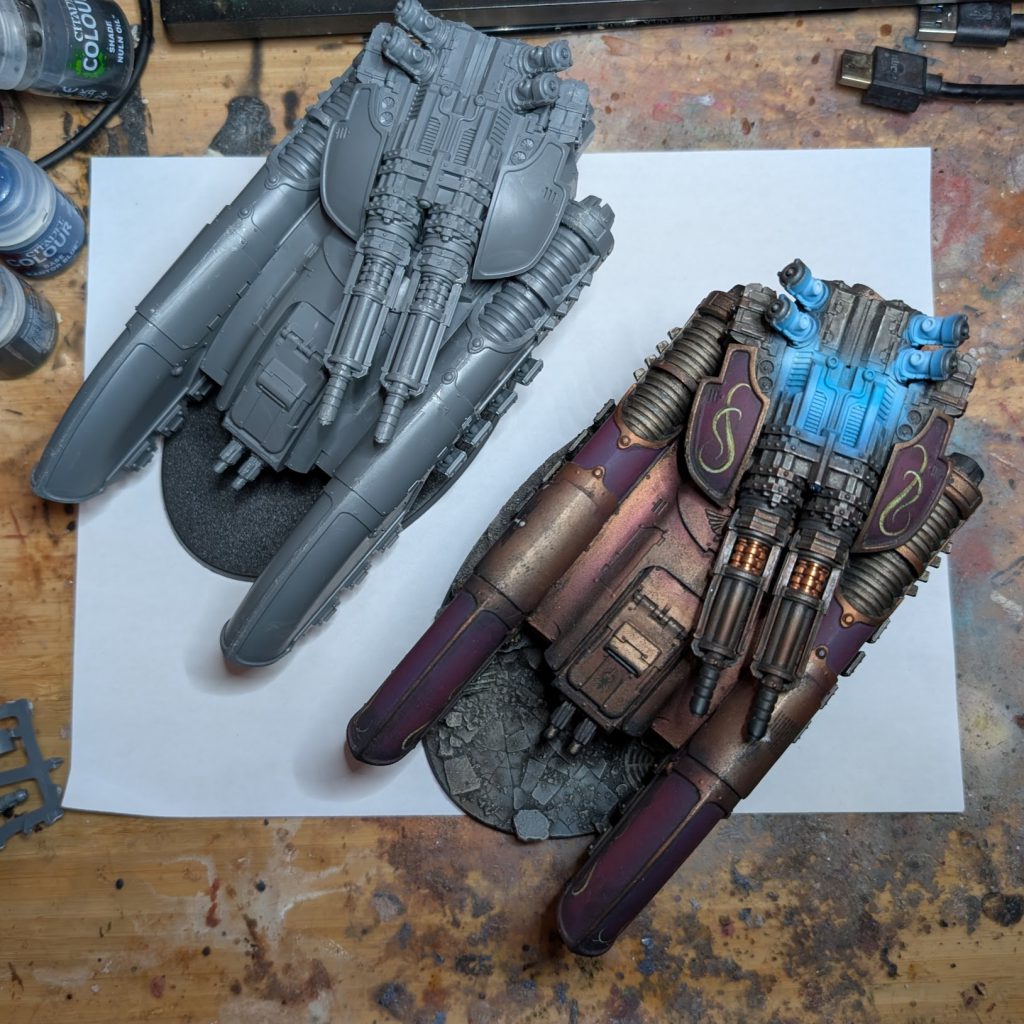
 Original Resin Calladius compared to newer Plastic Calladius. See if you can figure out which is which!
Crabstuffed Mushrooms (Joey K): For anyone who worked on the resin versions, assembling the plastic Horus Heresy vehicles has been a breeze. Not only was it easier to work with and more intuitive to assemble, but I marveled at how light. No more lugging huge bricks of resin!
The plastic Calladius is nearly identical to its resin predecessor in size but comes on a smaller 170x105mm oval base (similar to the Boomdakka Snazzwagon), making it easier to transport. The resin version originally came with a larger 170 x 109mm oval base. They’ve also updated the turret slot, but I don’t recommend painting this part or it will be a tight fit:
Original Resin Calladius compared to newer Plastic Calladius. See if you can figure out which is which!
Crabstuffed Mushrooms (Joey K): For anyone who worked on the resin versions, assembling the plastic Horus Heresy vehicles has been a breeze. Not only was it easier to work with and more intuitive to assemble, but I marveled at how light. No more lugging huge bricks of resin!
The plastic Calladius is nearly identical to its resin predecessor in size but comes on a smaller 170x105mm oval base (similar to the Boomdakka Snazzwagon), making it easier to transport. The resin version originally came with a larger 170 x 109mm oval base. They’ve also updated the turret slot, but I don’t recommend painting this part or it will be a tight fit:

 The model fits snugly on its new plastic stem. I ended up glueing mine but you can leave it unglued to make it easier for transport:
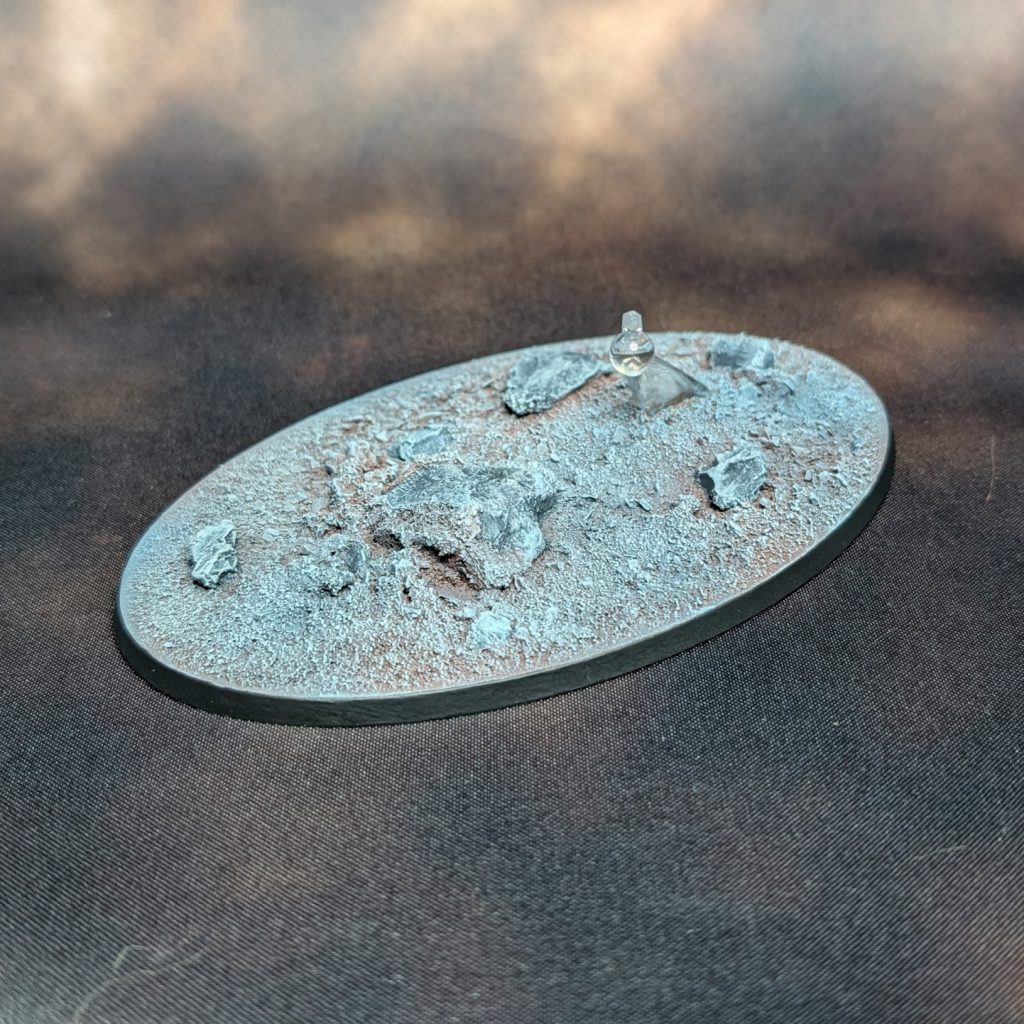 When assembling the model, I glued the nacelles to the model lightly with super glue so I could pull them off after priming:
 Keewa: Ok I complained a lot before but this thing goes together nicely, there weren’t really any points during the construction where I started swearing and ranting, which, in context with the other kits, means that this one is practically a breeze. The detail is nice and clean without being overwhelming, GW resisted their impulse to add a ton of filigree and for that I am grateful. The flying stand has a nice ball with a big old peg on it so you’re not left trying to get the damn thing to sit straight, thanks for that GW!
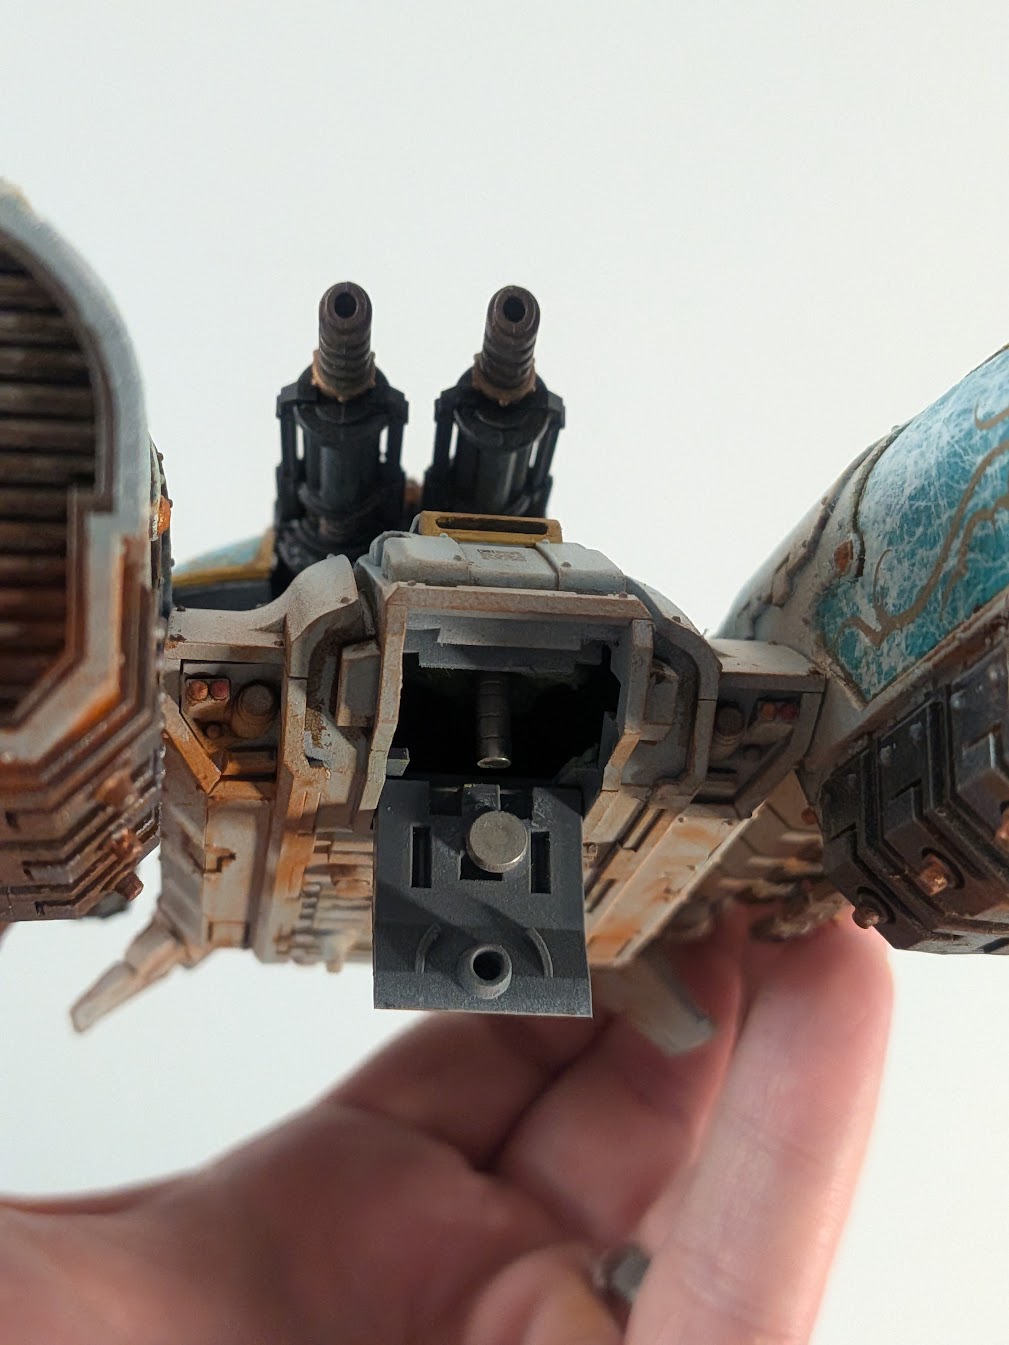 Say "aaaaaaaaargh"
Soggy: I haven't had anything to really add much ontop of what has been said so far until now,
due to my compulsion to magnetise all the things. You can choose not to glue the hatch underneath the cockpit, allowing you to change the only weapon option and use magnets or blue tack to hold it in place. While this probably makes little to no zero difference on the tabletop, the option is there.
Painting
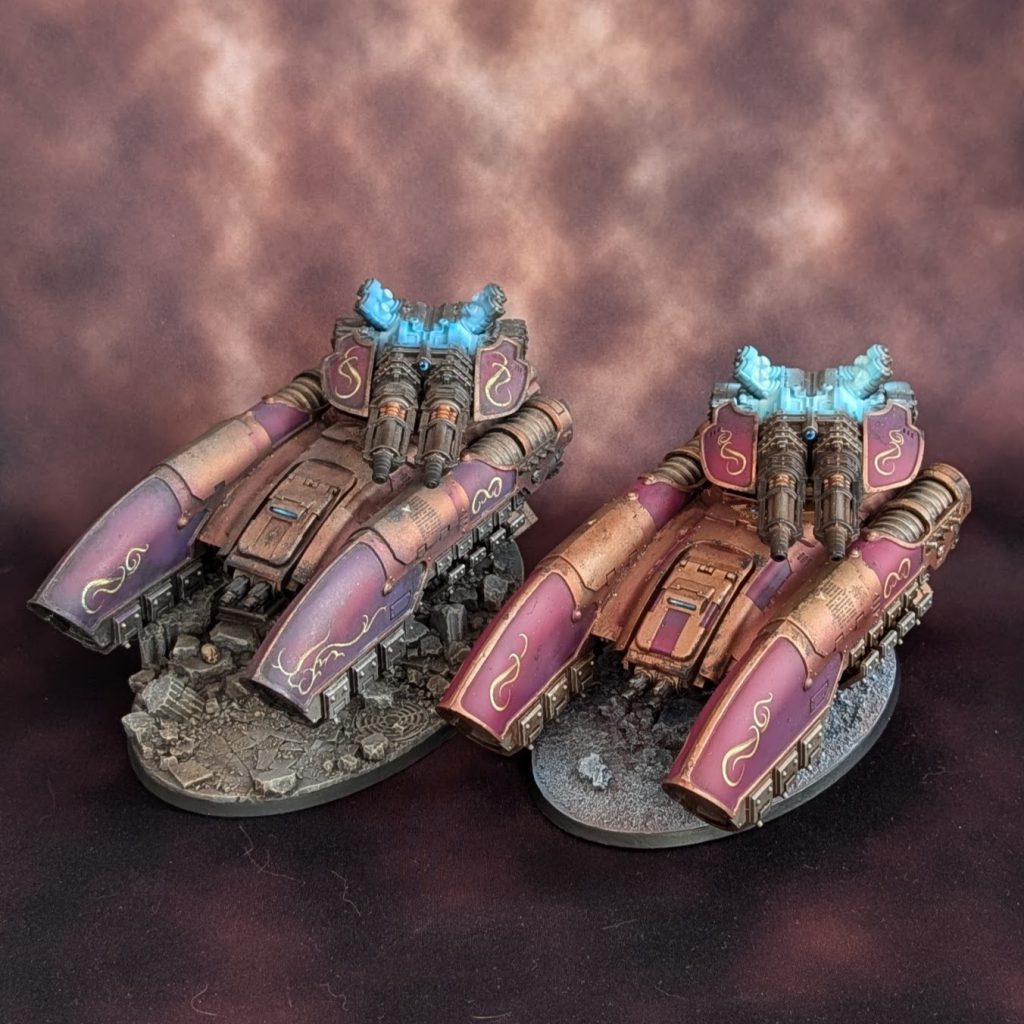
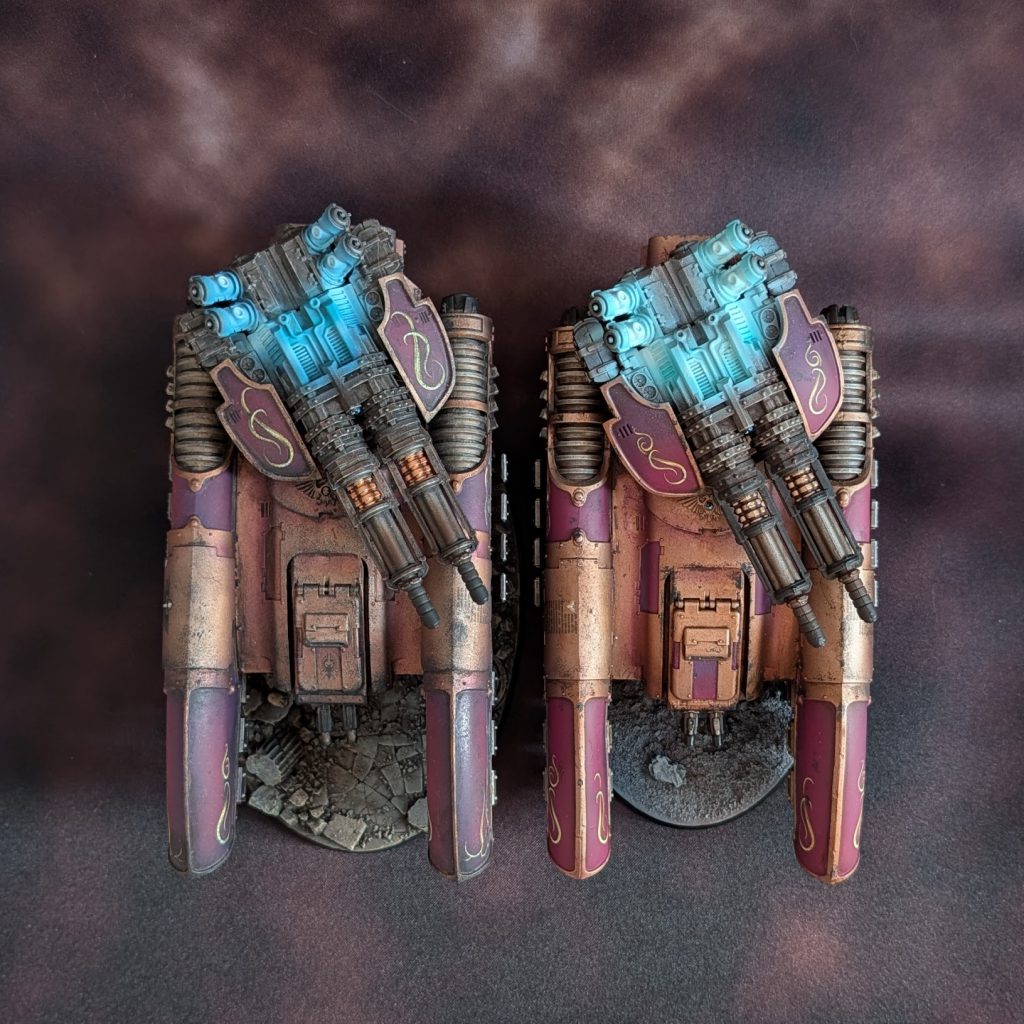
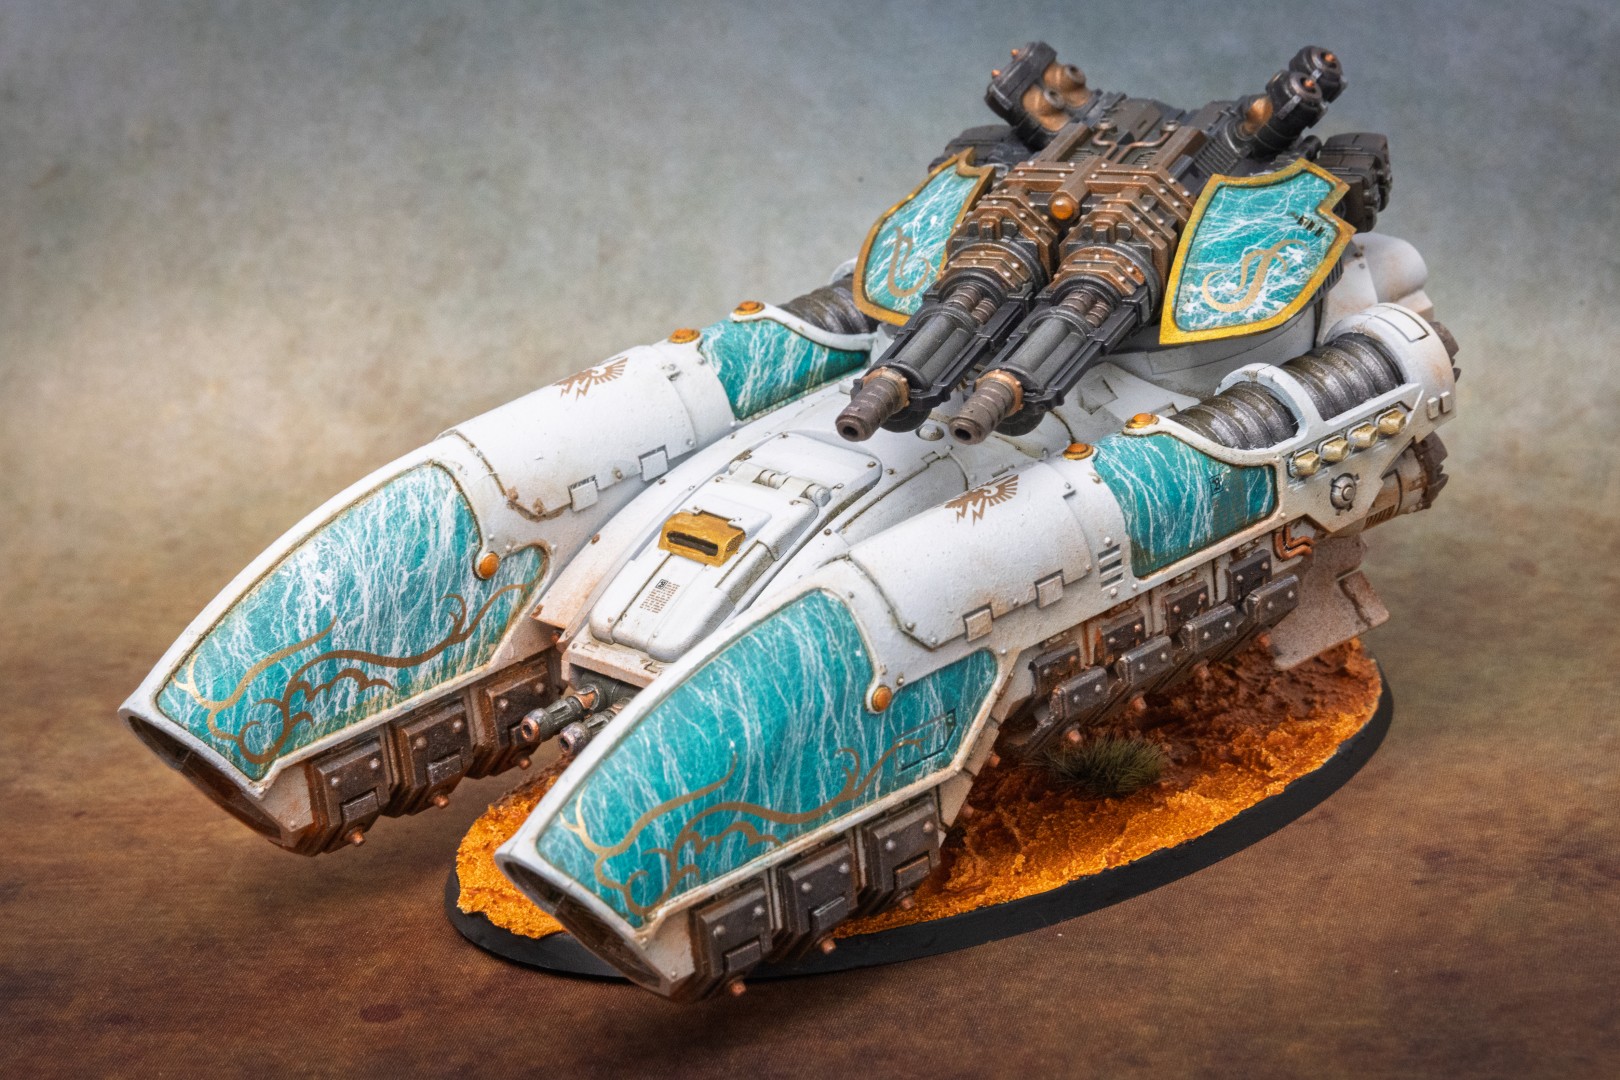
 Legio Custodes Grav-Tank (pre-weathering) by Crab-stuffed Mushrooms
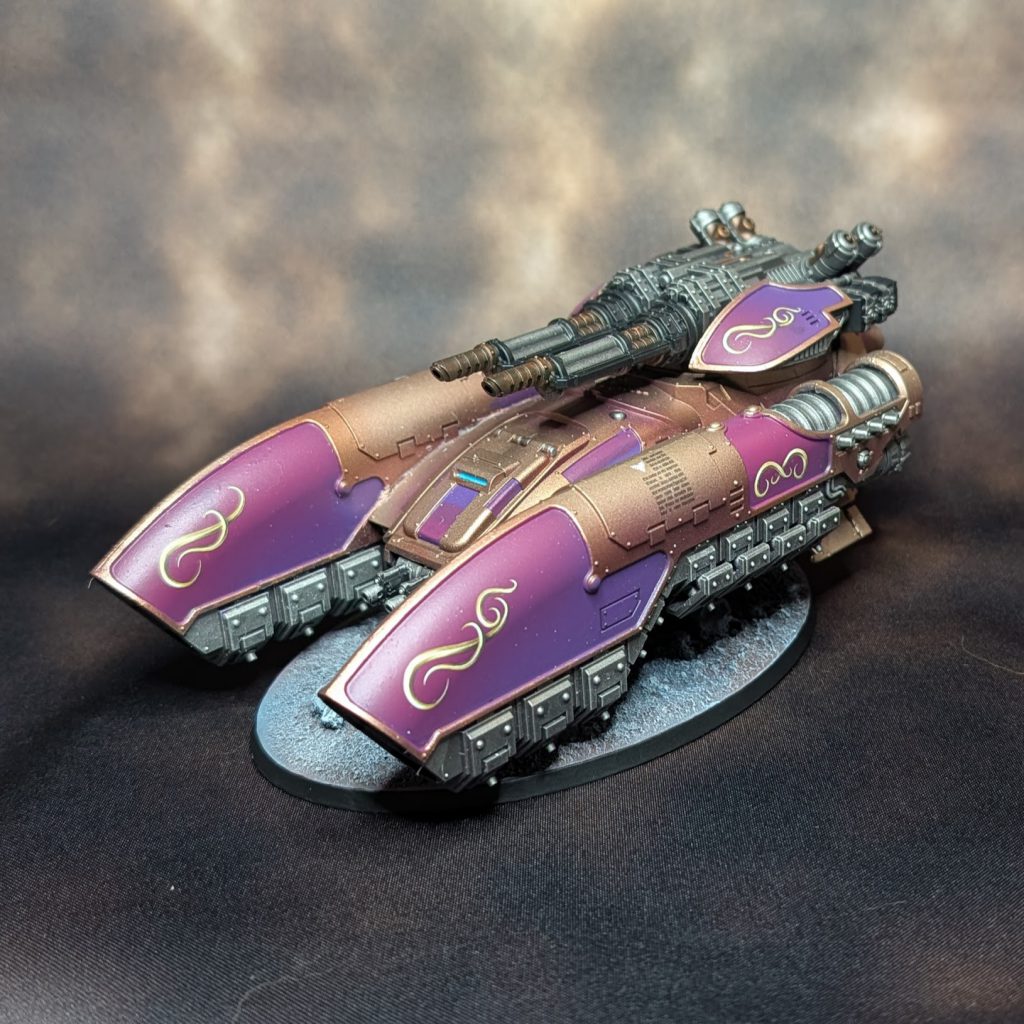
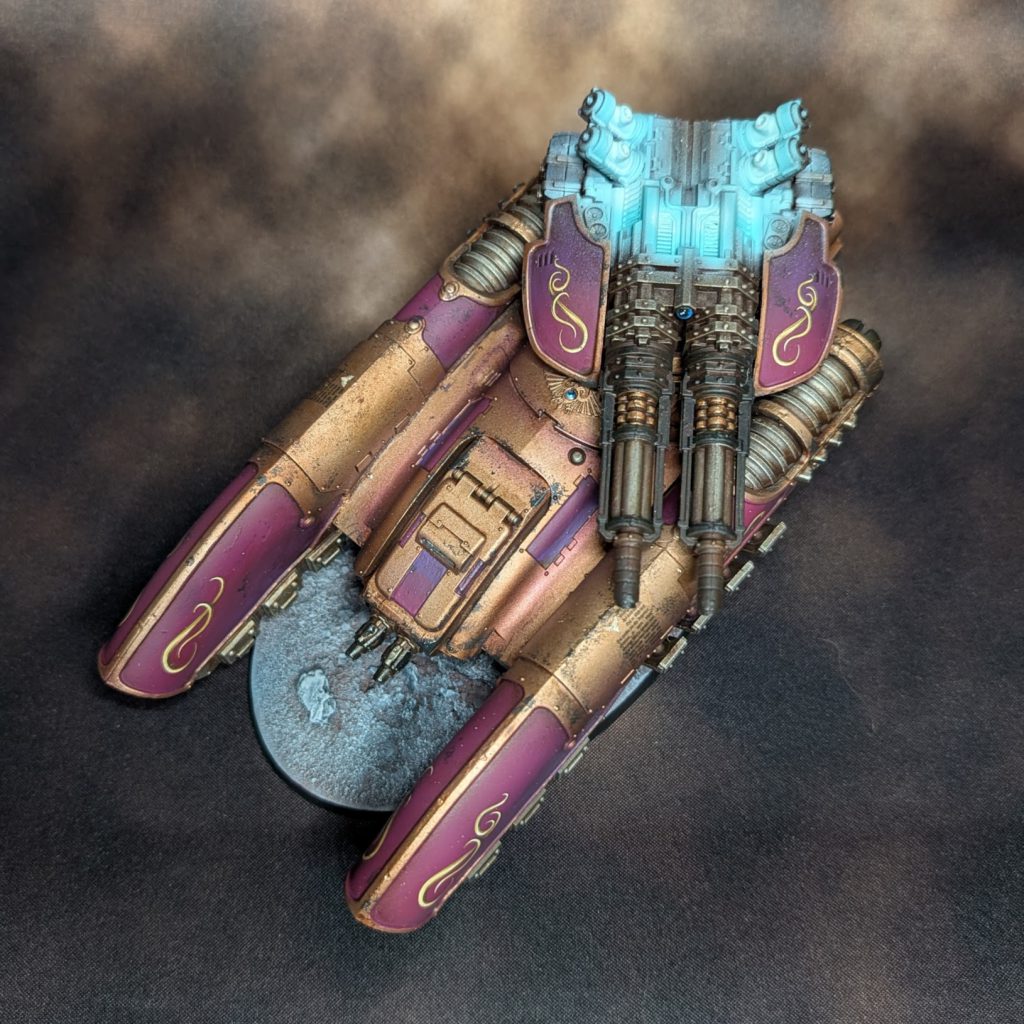 Legio Custodes Grav-Tank (post-weathering) by Crab-stuffed Mushrooms
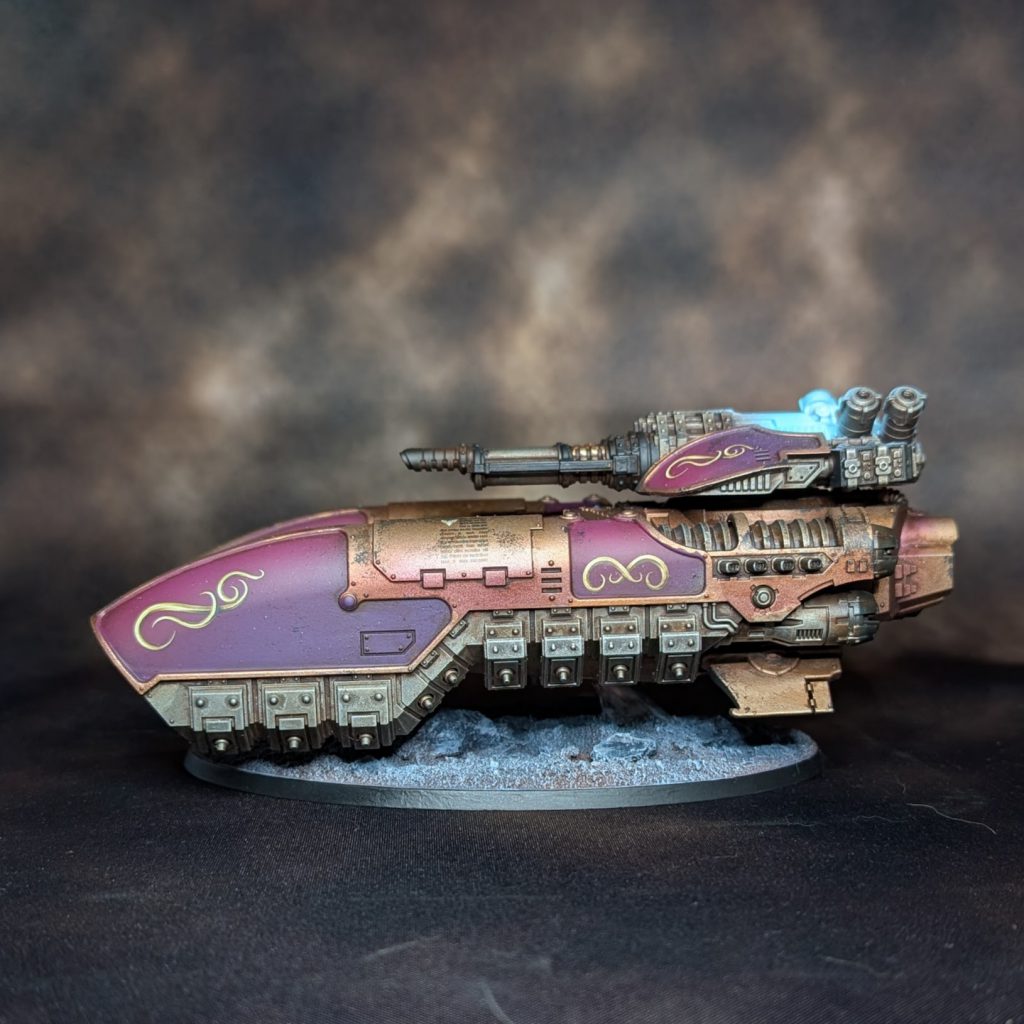 side view of Legio Custodes Grav-Tank (post-weathering) by Crab-stuffed Mushrooms
Crabstuffed Mushrooms (Joey K) I used my army scheme with this puppy: After priming black, I used Army Painter Warpaints Air Greedy Gold as the base color with GW’s Runelord Brass as a highlight, shaded with Eidolon Clear in the recesses (you can use diluted Magos Purple or Druchii Violet as an alternative). The base purple is Xereus Purple highlighted with Army Painter Warpaints Air Witchbane Plum.
The transfers / decals that come in the box are a less detailed version of the original Forge World transfer sheet. I had some leftovers from the latter and opted to use those instead. Goonhammer has some great tutorials for applying decals but if you want a quick run-down:
side view of Legio Custodes Grav-Tank (post-weathering) by Crab-stuffed Mushrooms
Crabstuffed Mushrooms (Joey K) I used my army scheme with this puppy: After priming black, I used Army Painter Warpaints Air Greedy Gold as the base color with GW’s Runelord Brass as a highlight, shaded with Eidolon Clear in the recesses (you can use diluted Magos Purple or Druchii Violet as an alternative). The base purple is Xereus Purple highlighted with Army Painter Warpaints Air Witchbane Plum.
The transfers / decals that come in the box are a less detailed version of the original Forge World transfer sheet. I had some leftovers from the latter and opted to use those instead. Goonhammer has some great tutorials for applying decals but if you want a quick run-down:
- Cut the transfer out of its sheet, the cut doesn't have to be exact, give yourself a little room to hold the transfer without touching the detail.
- Use a pair of reverse tweezers to hold the transfer before you remove it from its backing.
- Using the tweezers, dip the transfer in water and wait for it to loosen up (you can test this by prodding it with a brush). I wait about 30-40 seconds depending on the size of the transfer.
- Before removing the transfer from water, pull out some Micro Set and apply this to the area of the model you'll be applying the transfer to. This will eat into the back of the transfer to help it adhere better to the surface.
- Before the Micro Set dries, remove the transfer from the water while still holding the tweezers, hover the transfer over the area you want to apply. Using a brush, gently slide the transfer off by pulling the backing away from the transfer using your tweezers.
- If the Micro Set is not yet dry, you can adjust the angle and position of the transfer (if needed) using a brush or the tip of a make-up applicator.
- Once you're happy with the position of the transfer, you can use Micro Sol to help eliminate any bumps or folds.
- Once the transfer is fully dry, spray the area with gloss varnish to remove the "edges" of the transfers and make them invisible to the naked eye.
- Once you've given the transfer a chance to dry, you can spray matt varnish over the gloss to make it less shiny.
Weathering is optional and you can learn more about this process through
existing Goonhammer tutorials (I've included a photo pre-weathering if that's your preference). Ifif you'd like to add some battle damage, you can sponge
Corvus Black against the edges to simulate some wear and tear. I then used
Burnt Umber oil paint mixed with Odorless Mineral Spirits as a wash over the entire model. I let this dry overnight (it won't be fully-dry for at least a day), before wiping off the excess with an old sock or cloth. Once I removed the excess, I gave the remaining oil paint an additional day to dry. Lastly, I sealed everything with a spray of matt varnish.
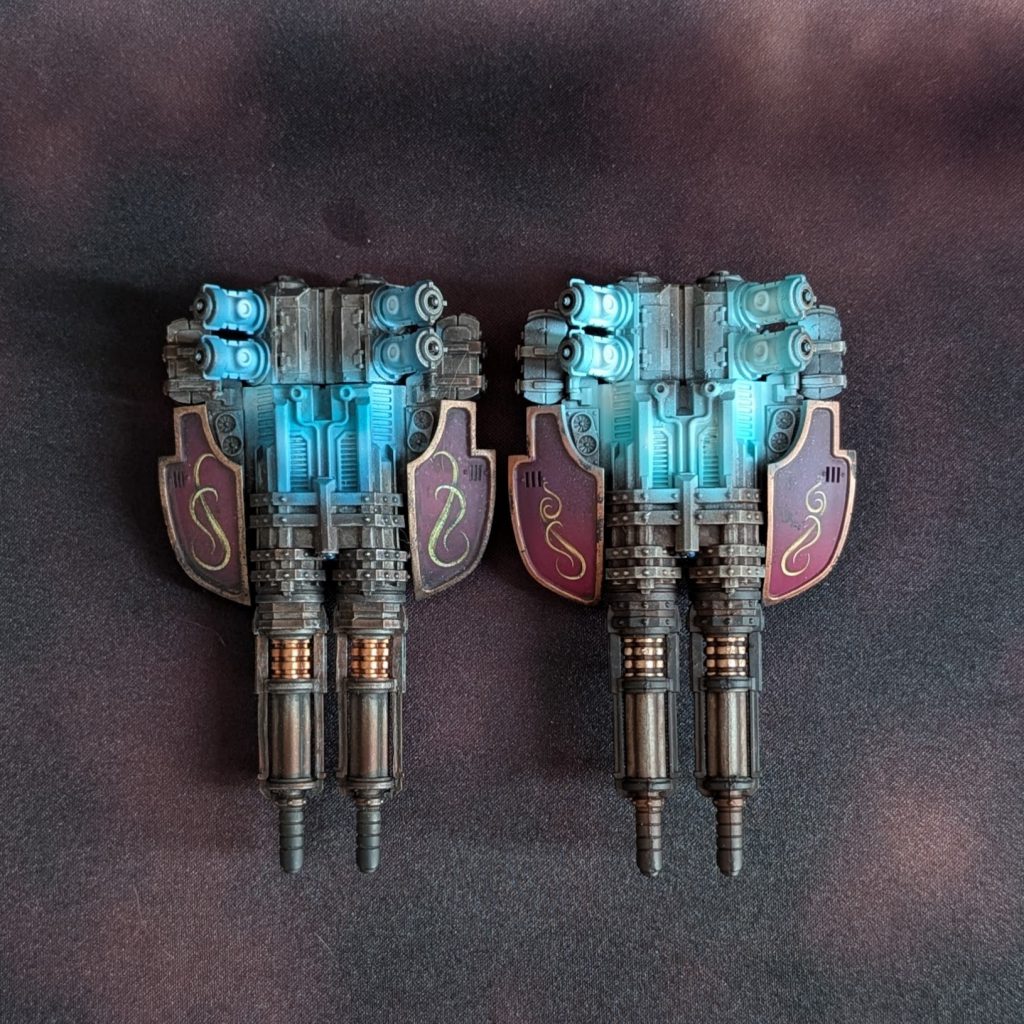
The OSL on the turret was first airbrushed white, followed by Army Painter Warpaints Air
Phantasmal Blue, followed by a final, smaller highlight of white.
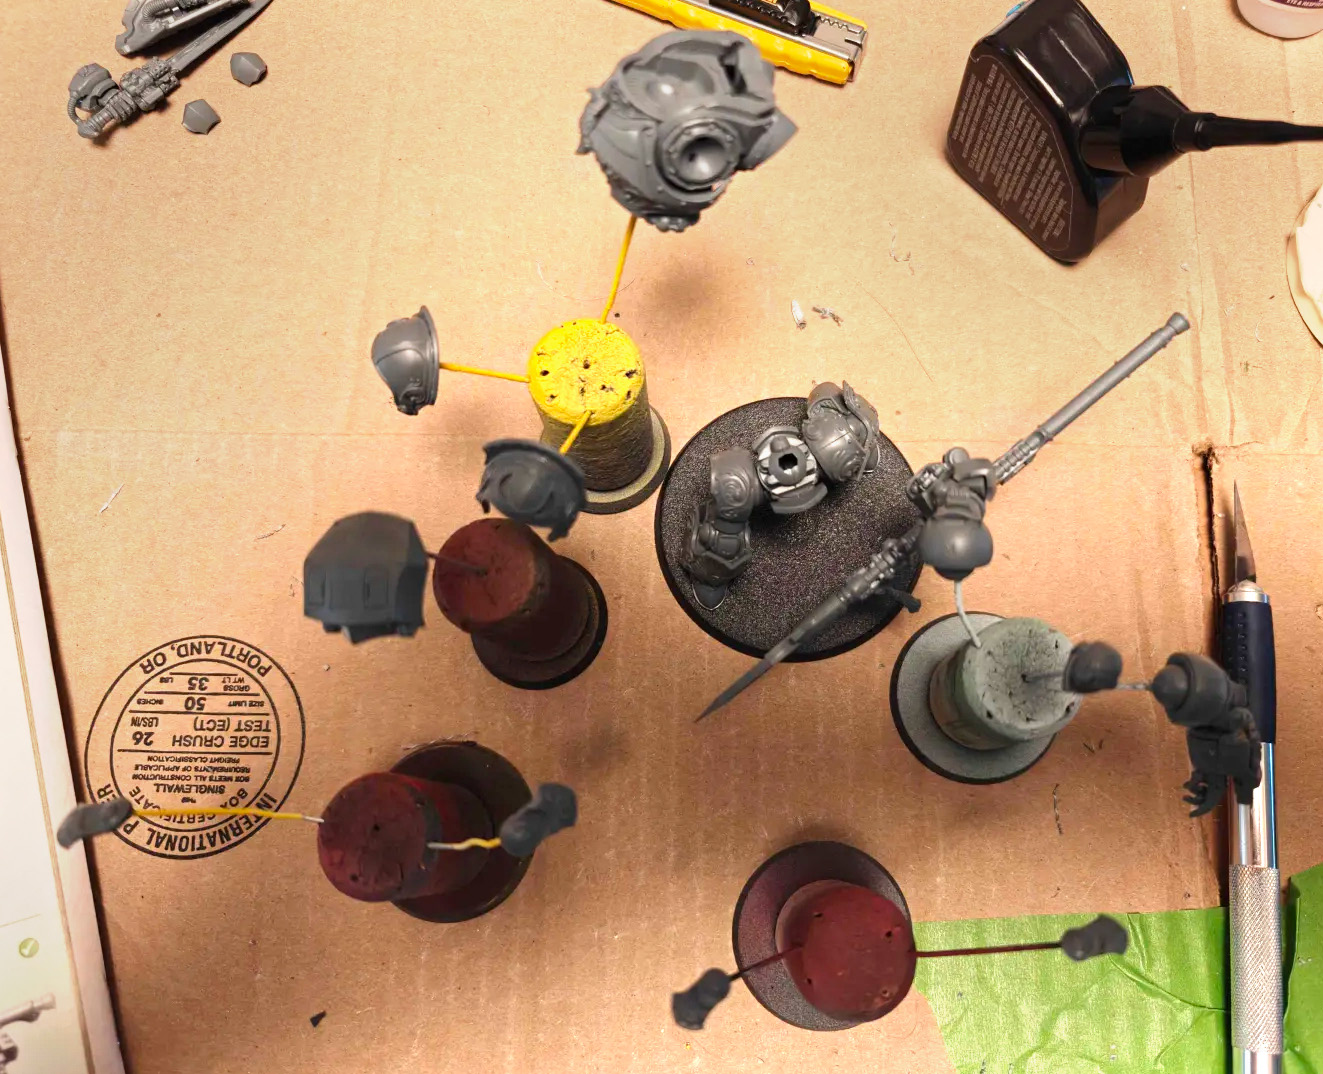
Custodes Contemptor Dreadnought
Assembly
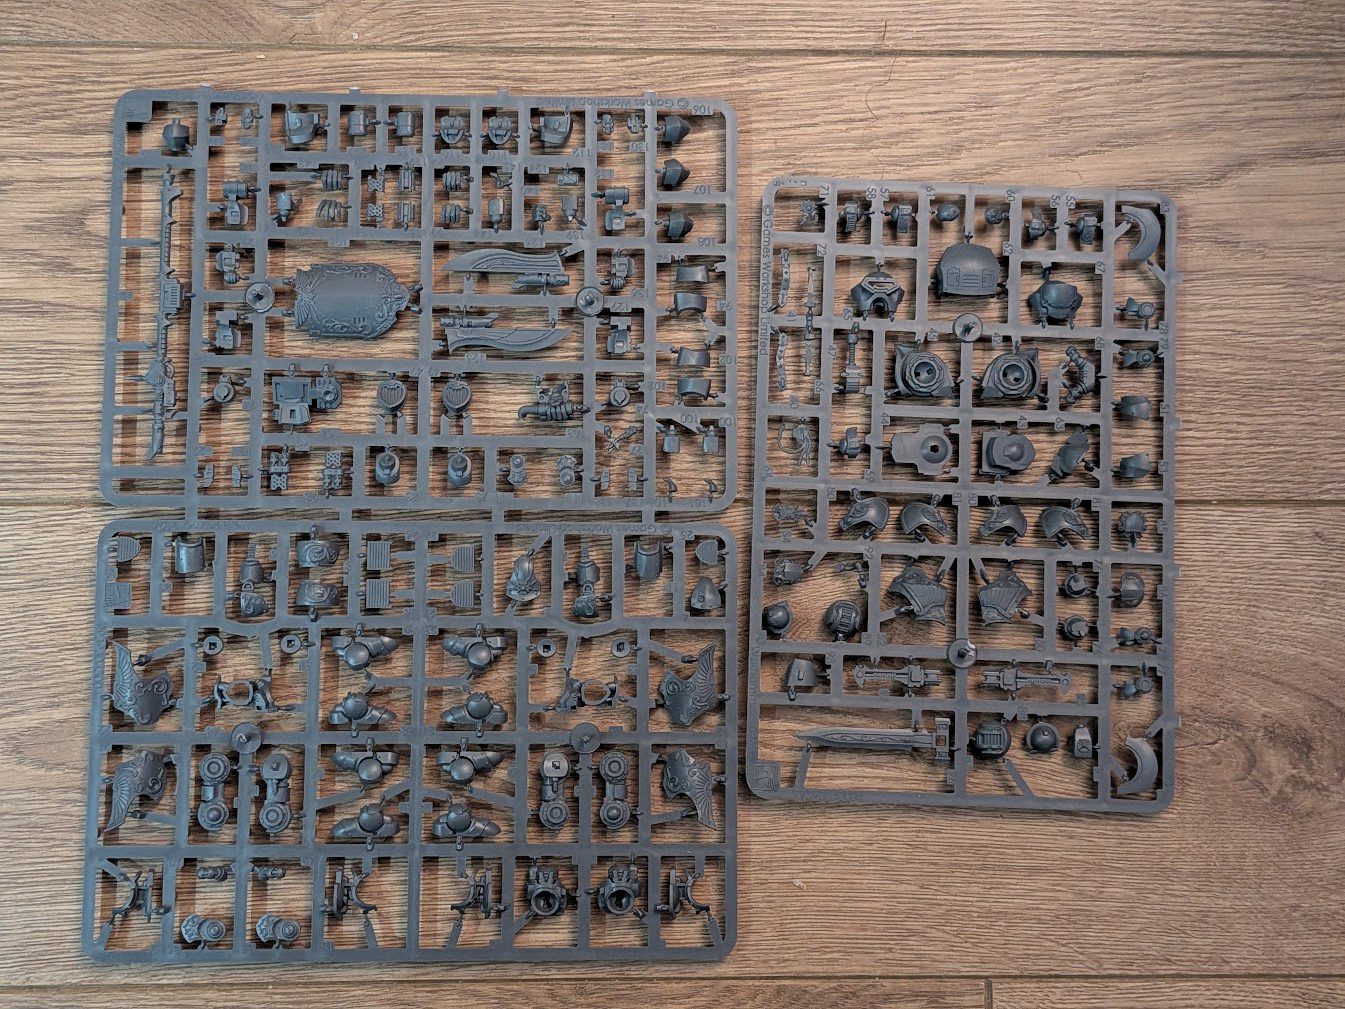 Plastic Custodes Contemptor Achillus/Galatus sprues
Blake Law: Okay so buckle in on this assembly. This thing is the rube goldberg of warhammer assemblies. I have never seen so many parts in a kit before. It is endless. You will do a subassembly, and then cover that subassembly up. That being said, I love the end product. An absolutely beautiful model. There was some question on posing the model, so I decided to push it and see. It's really not too bad. In my opinion, any plastic can be cut and manoeuvred easily.
For this particular pose, I had to cut the tab behind the knee joint, which allowed full 180 degree rotation to move the lower leg. I then cut the mid section so that the pseudo ball and socket were loose. That's the largest issue with repose. This is a bit of work. You will need to be careful, since a lot of detail sits there. And you will need to putty up the “ball” portion to make a true ball and socket. Overall, it can be done with alittle effort.
I think the end result is really fun, and I can't wait to do an entire army of these guys. Trust me, the sprue gives you enough parts to endlessly make different ones.
Plastic Custodes Contemptor Achillus/Galatus sprues
Blake Law: Okay so buckle in on this assembly. This thing is the rube goldberg of warhammer assemblies. I have never seen so many parts in a kit before. It is endless. You will do a subassembly, and then cover that subassembly up. That being said, I love the end product. An absolutely beautiful model. There was some question on posing the model, so I decided to push it and see. It's really not too bad. In my opinion, any plastic can be cut and manoeuvred easily.
For this particular pose, I had to cut the tab behind the knee joint, which allowed full 180 degree rotation to move the lower leg. I then cut the mid section so that the pseudo ball and socket were loose. That's the largest issue with repose. This is a bit of work. You will need to be careful, since a lot of detail sits there. And you will need to putty up the “ball” portion to make a true ball and socket. Overall, it can be done with alittle effort.
I think the end result is really fun, and I can't wait to do an entire army of these guys. Trust me, the sprue gives you enough parts to endlessly make different ones.
 Custodes Contrmptor- @blakelaw
Keewa: Familiar keewa cursing, building this model is absolutely nuts, I do not understand it one bit - I feel in the core of my being that no dreadnought kit should have 120 pieces and 80 steps to build. Please forgive my hopping onto a soapbox (when am I not?), but it sometimes feels as though Games Workshop has identified the burgeoning growth in Lego sets for grown-ups and has decided that people actually enjoy the building part of putting their models together, after all, if people enjoy following the instructions on Lego, surely they enjoy doing the same for Warhammer. Let me speak for what I assume are the majority of Warhammer-oriented people: We do not. Sticking models together is a necessary chore we do in order to get to the good stuff. We all agree that mould-lines suck, but I’m not convinced that avoiding them (although they’re still there, they’re not quite so egregious) is worth the effort of sticking together this many pieces. I was building and muttering to myself, “why isn’t this just one piece?” and, ok, maybe I’m a grumpy sod, but other people have also identified the problem with the ballooning number of pieces required to put together Warhammer models (Saturnine Terminators/Praetor anyone?).
That said, this is certainly a handsome model, with lots of character and verve.
Jack:
Custodes Contrmptor- @blakelaw
Keewa: Familiar keewa cursing, building this model is absolutely nuts, I do not understand it one bit - I feel in the core of my being that no dreadnought kit should have 120 pieces and 80 steps to build. Please forgive my hopping onto a soapbox (when am I not?), but it sometimes feels as though Games Workshop has identified the burgeoning growth in Lego sets for grown-ups and has decided that people actually enjoy the building part of putting their models together, after all, if people enjoy following the instructions on Lego, surely they enjoy doing the same for Warhammer. Let me speak for what I assume are the majority of Warhammer-oriented people: We do not. Sticking models together is a necessary chore we do in order to get to the good stuff. We all agree that mould-lines suck, but I’m not convinced that avoiding them (although they’re still there, they’re not quite so egregious) is worth the effort of sticking together this many pieces. I was building and muttering to myself, “why isn’t this just one piece?” and, ok, maybe I’m a grumpy sod, but other people have also identified the problem with the ballooning number of pieces required to put together Warhammer models (Saturnine Terminators/Praetor anyone?).
That said, this is certainly a handsome model, with lots of character and verve.
Jack: Somehow this single dread took me
multiple days to build. Now admittedly that's not multiple 8 hour work days, but it still probably added up to 6-8 hours on a single dread. There are just so many pieces to build into small subassemblies. I went with one of the two stock poses for the legs, as both options are decent depending on where you want the weight to be, so assembling them was only marginally annoying - the feet were a little iffy when trying to get them aligned correctly, but not awful. Assembling the arms on the other hand was a chore. I'm not a big fan of the stock pose for the spear, so I wanted to try to do something where the dread is actively chopping with it. Building the arms and elbows ended up causing me a huge headache, as there are so many individual subassemblies - posing an arm requires holding six different pieces together to test the fit, and there are multiple different elbow armor options depending on the exact angle you want the arm at, but the pieces and instructions are unclear on what the actual differences are other than through test fitting.
On the up side, it looks like it shouldn't take much effort to magnetize between the spear and the sword/shield. A little green stuff to fill a void in the forearm and you should be able to magnetize to the elbow - there are enough duplicate pieces to build everything. Magnetizing the wrist guns on the other hand does look like a pain given their small size.
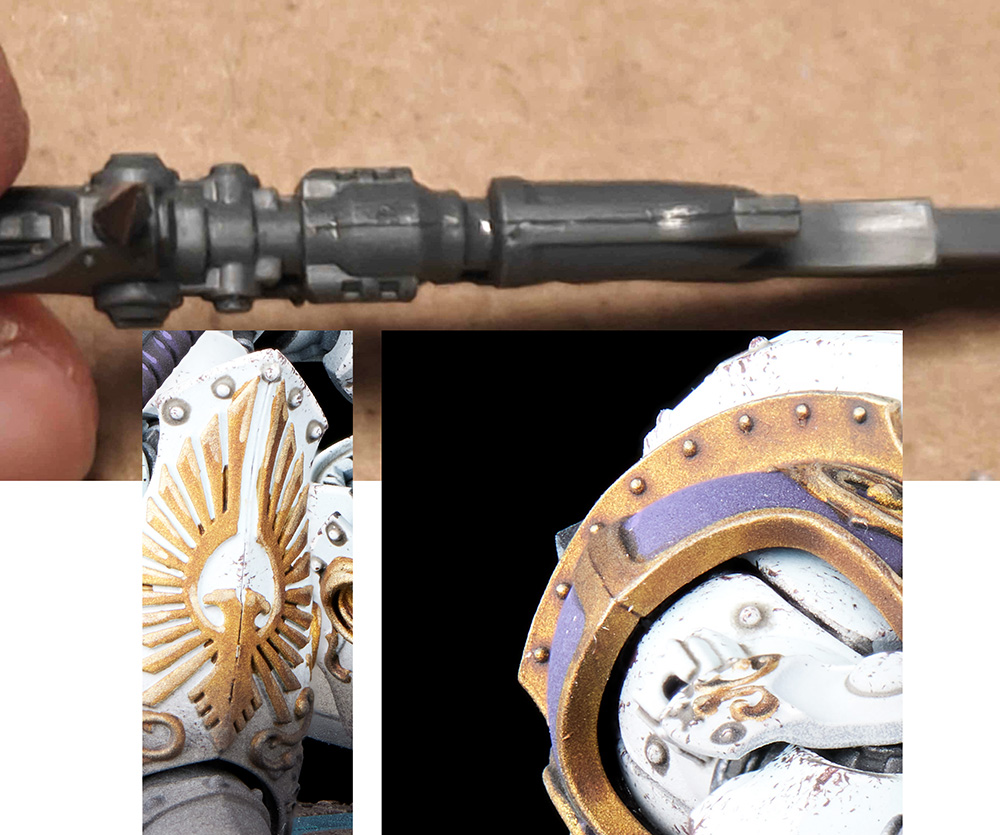
One other aggravating thing about the love for high part count is that while it's great at avoiding mold lines or detail loss from lack of undercuts, it means there are seams all over that you have to be very careful with. The above image is just a subset of the seams on this model.
Also, I know I've seen the resin one assembled with the spear held in both hands. I can't find a way to do that with the plastic kit.
Soggy: Being a cheapskate, I opted to magnetise both of the arms so I could swap between the two variants but was incredibly unhappy with my pose - I'd like to blame the issues mentioned by previously above.
Painting
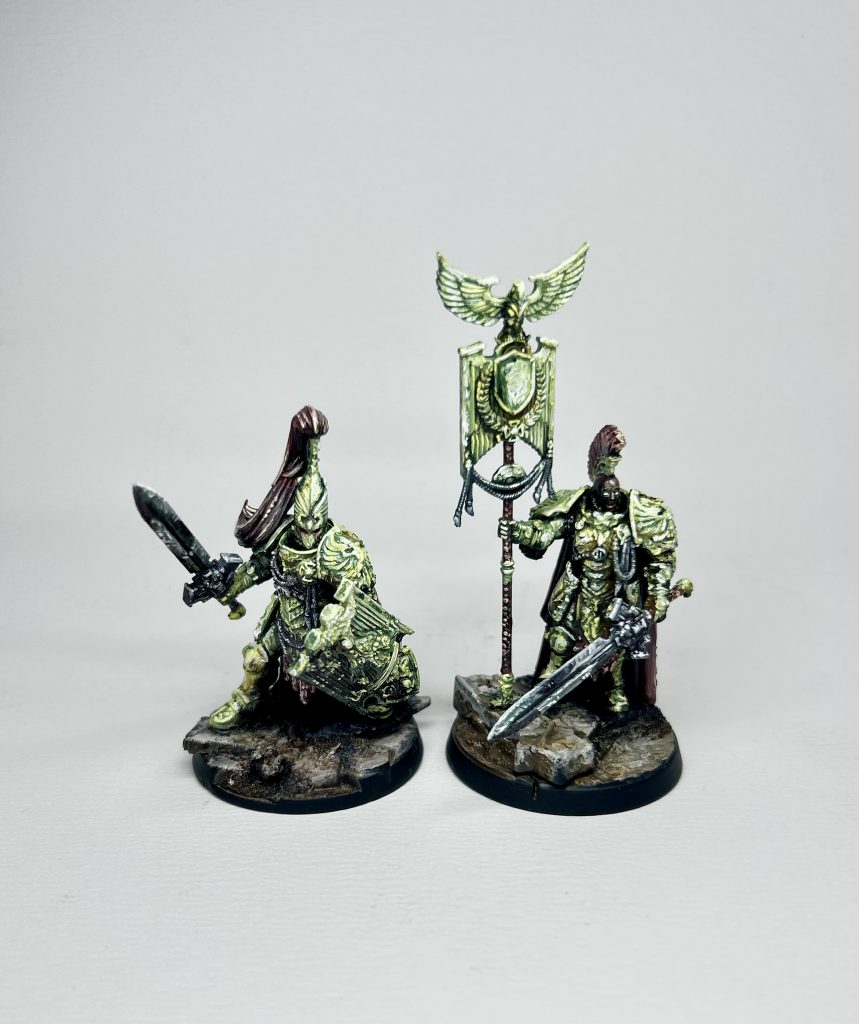
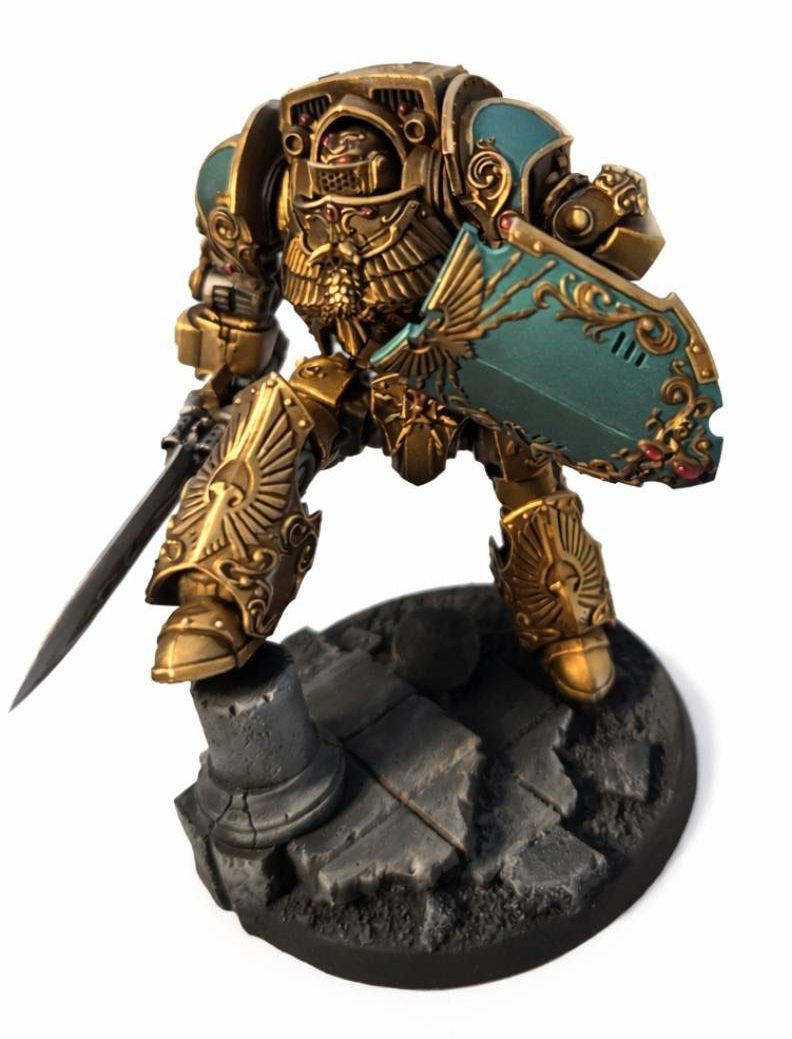
Blake Law: This was the model that got me wanting to play 40k again. Absolutely stunning sculpt, and it was a joy to paint. Really no bad notes here, it holds detail amazing and your options for approach are endless.
I did the same gold progression as I did for the shield captain (see above). The teal is also the same. I airbrushed it on and painted in the gold for this guy. This is mainly because teal is just harder to get right by brush. The little gems are monument pyrole red worked up with AP fanatic ice yellow, and worked down with coal black. Goonhammer has an exceptional guide for painting gems, which I actually used for this piece!
The base is an easy drybrush. Just the AP fanatic cool greys progression. As long as you space them out where they aren't near the same shade, you can generate a really nice stone appearance.
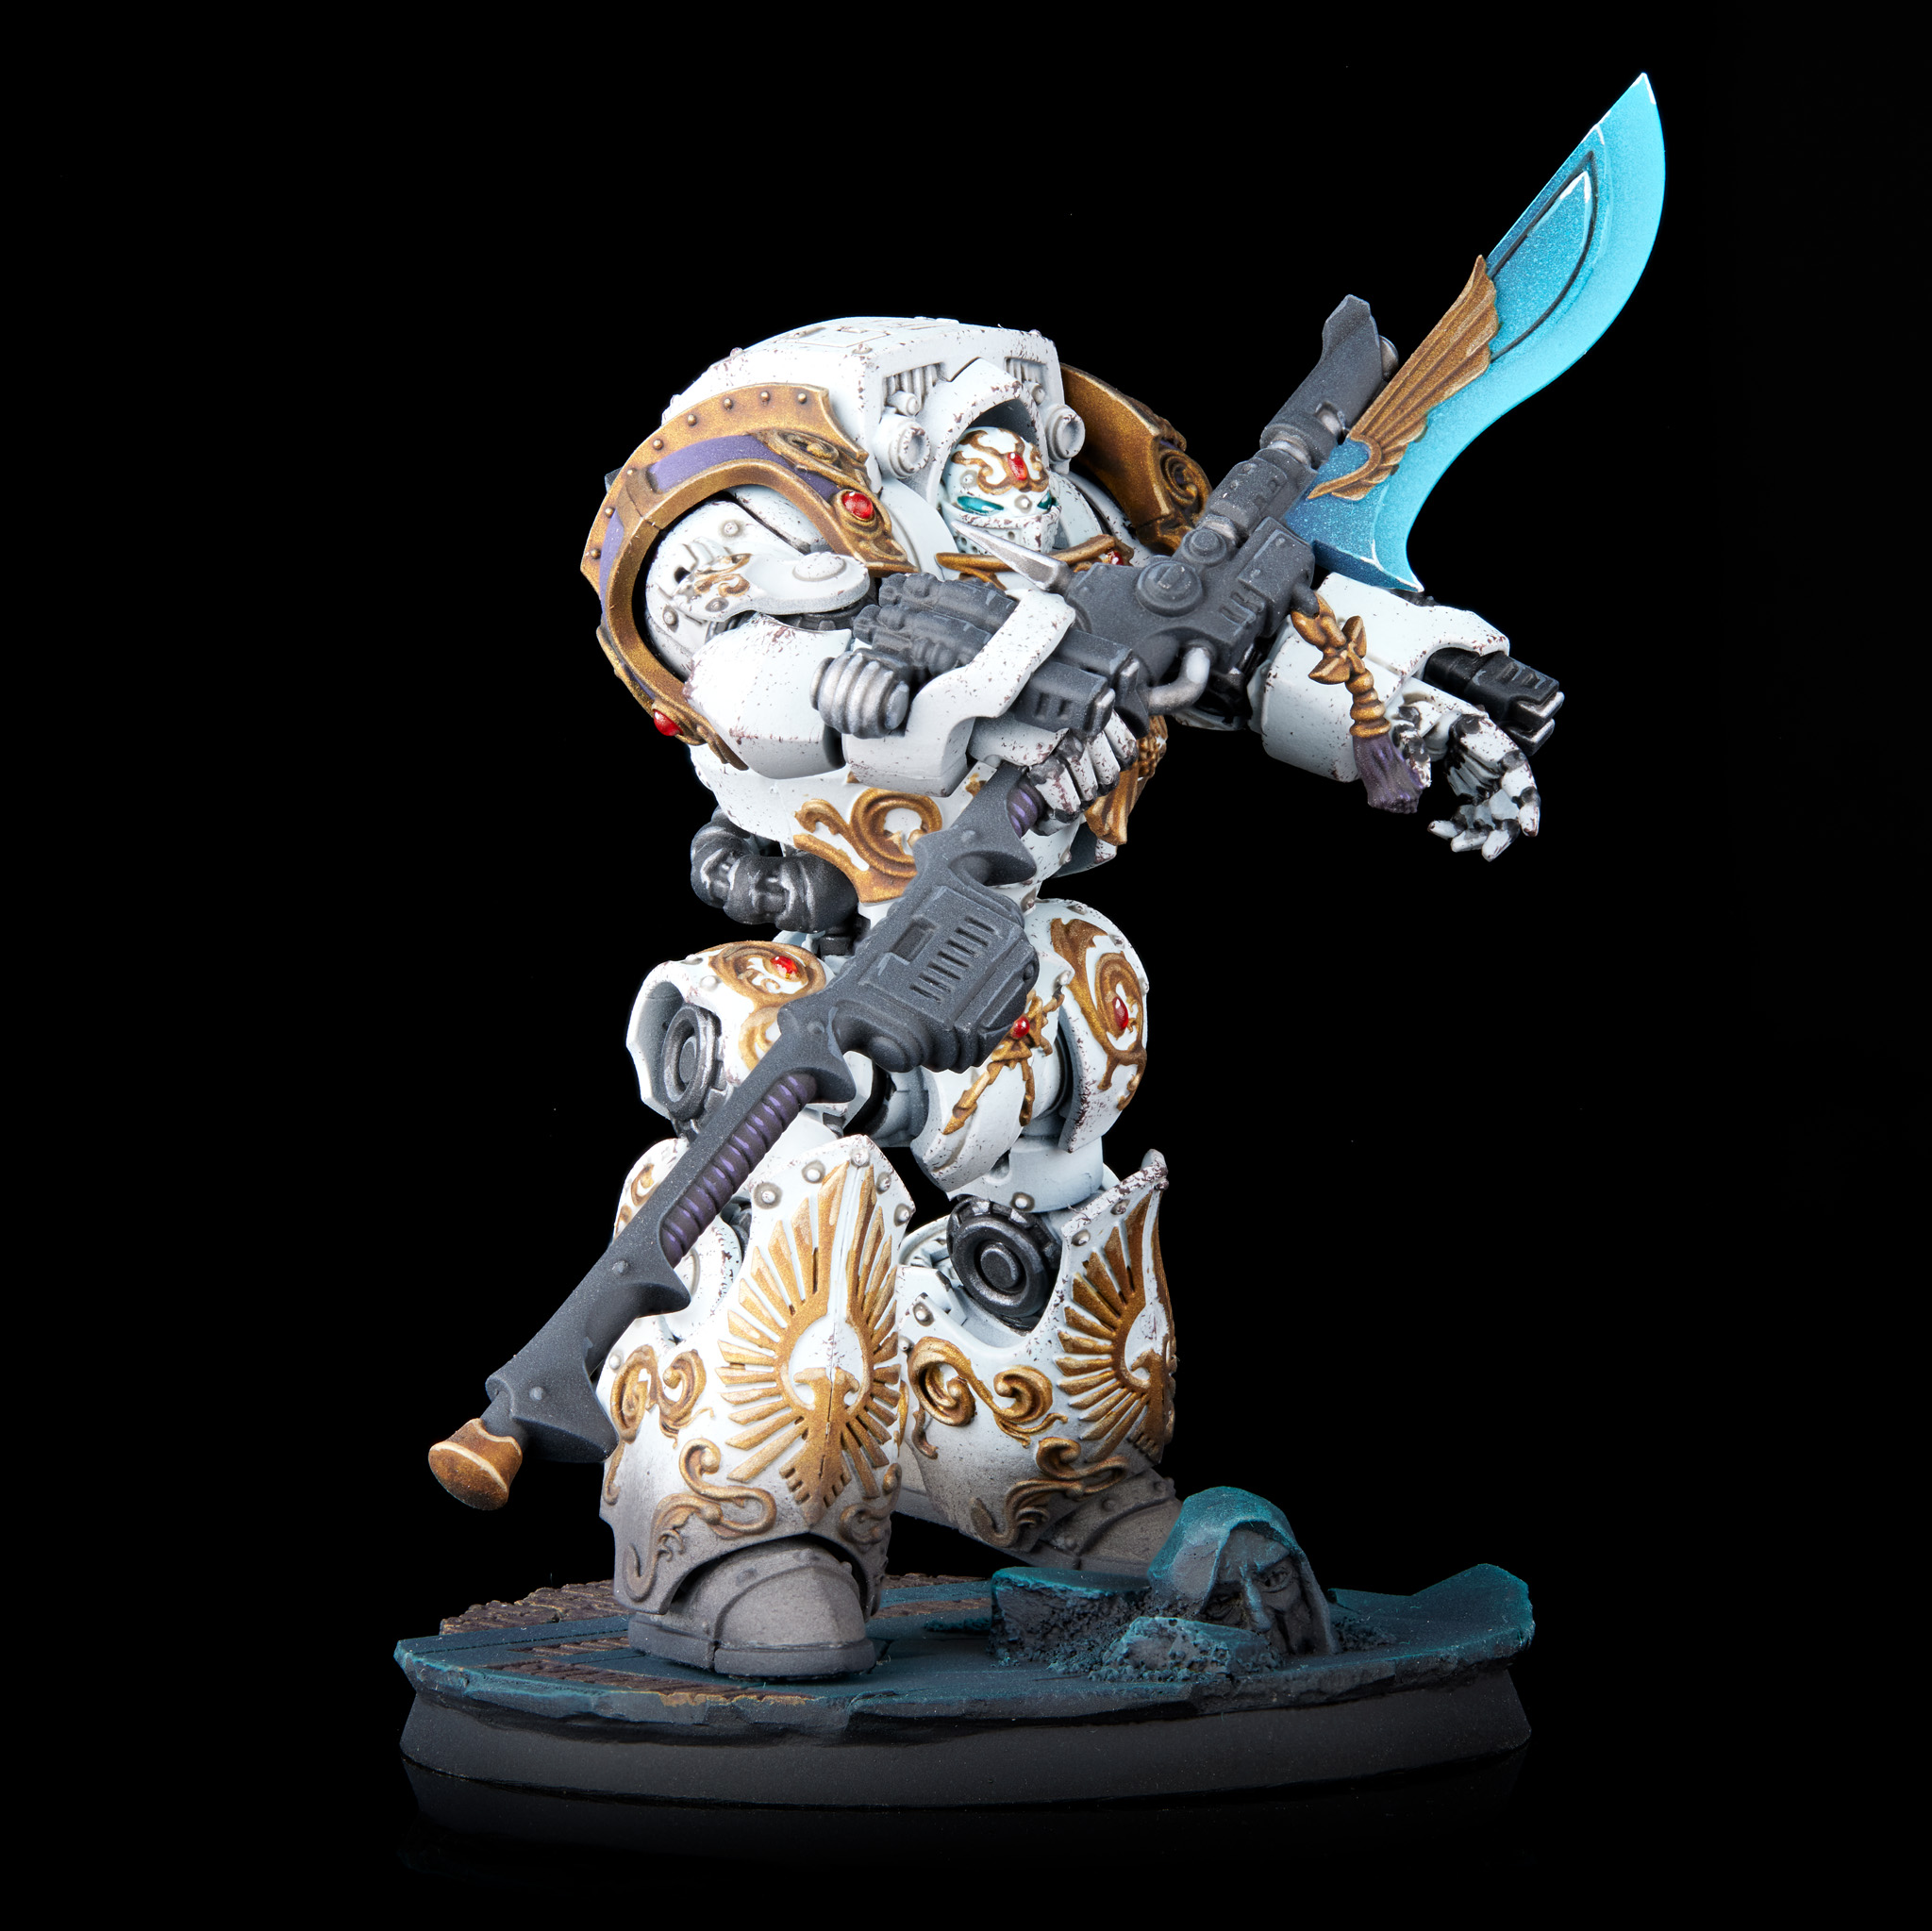 Adeptus Custodes Contemptor Achillus. Credit: Jack Hunter
Jack:
Adeptus Custodes Contemptor Achillus. Credit: Jack Hunter
Jack: This model was a pain to paint, but unlike with assembly we can lay 90% of the blame on me. White and gold is just time consuming as hell, particularly because of the huge amount of filigree. There were a couple spots at the bottom of the torso and on the shoulder pads where I wasn't 100% sure what parts were filigree and what parts weren't, but it did end up working out ok.
I kept the model in as many subassemblies as possible - the legs were completely built, as were the arms, but I kept the top of the torso, the head, the shoulder pads, and the knee/elbow armor separate. Working with white, gold, and dark metals made it more difficult to go back and correct mistakes, so I wanted to keep access as open as possible.
The white is a simple zenithal of ProAcryl Bright Neutral Grey up to ProAcryl White Blue, then highlighted with white and pinwashed with nuln oil. I used the new Vallejo TMM range for the gold and silvers - gold started with Arcane Gold base, a first highlight in Imperial Gold base, washed with Imperial Gold shade, then highlighted with Imperial Gold light. The silvers were done with either the Obsidian Black or Sterling Silver sets, depending on whether I wanted dark or light metal.
 Calladius Grav Tank. Credit - Soggy
Conclusion
The new Custodes Battlegroup is a solid foundation of a new army or to complement an existing one for those fighting in the Age of Darkness or the Forty-First Millennium. We're always here to see armies become more accessible with the advent of plastic kits, even if they are a bit tricker to assemble.
Have any questions or feedback? Drop us a note in the comments below or email us at contact@goonhammer.com. Want articles like this linked in your inbox every Monday morning? Sign up for our newsletter. And don't forget that you can support us on Patreon for backer rewards like early video content, Administratum access, an ad-free experience on our website, and subscriber-only content covering competitive Warhammer 40K!
Thank you for being a friend.

 Goonhammer App and Patron Updates: April, 2026
 Kill Team Tournament Report: Engage, Party, Repeat's March Madness 2026
 Goonhammer Reviews: Tribal Conquest