I first dipped my toes into 3D printing with the Ender 3, full of grand ideas to recreate epic battlefields on the tabletop. Armed with naïveté, test prints, bed leveling frustration, and the help of a supportive engineer friend, I eventually managed to produce a basic set of buildings and a crane. The learning curve for the Ender 3 was steep. I upgraded to the Bambu Lab A1 earlier in 2025 to try to get ahead of the tariffs. I knew it would be night and day compared to the Ender, but I was blown away by Bambu’s out-of-the-box usability.
The Bambu Lab P2S is the future of tabletop gaming. It is easy to set up, simple to use, and creates prints that are damn near flawless. Bambu Labs is setting the standard for home hobby printing and will help usher in a new era of flexibility and options in our community of artists, hobbyists, and gamers. The P2S is Bambu Labs' midrange flagship printer, and they spared no expense.

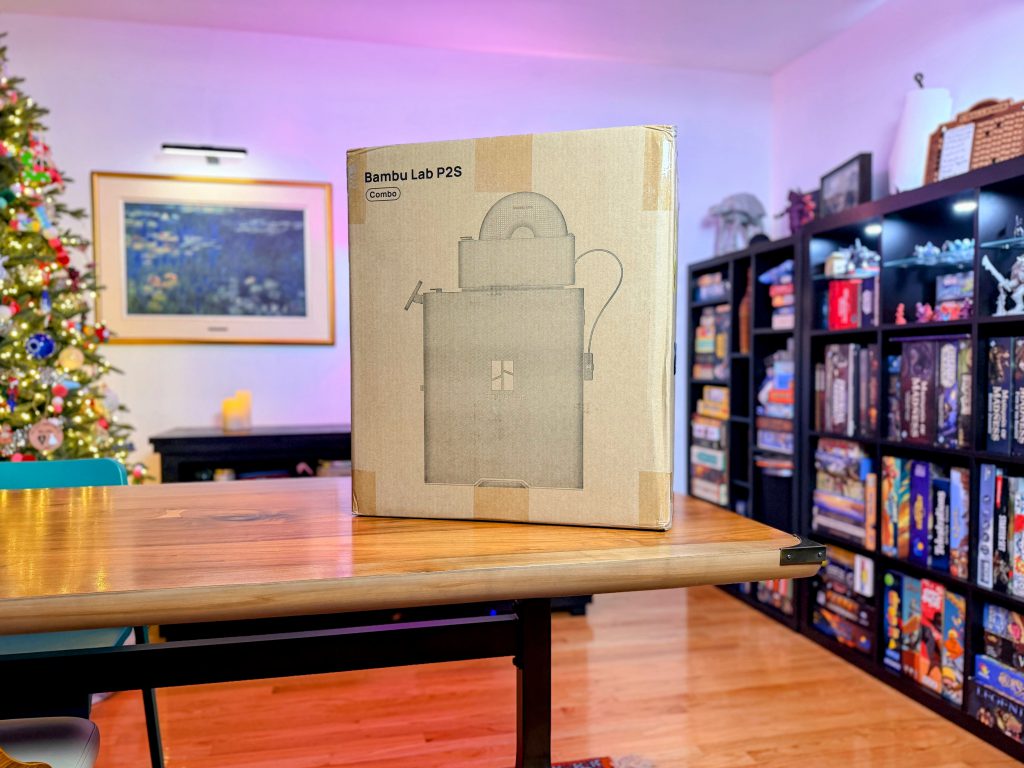
What's in the Box
 Happy Holidays from Bambu.
The P2S Combo headline specs are solid and clearly aimed at hobbyists and professionals alike: 256 x 256 x 256 mm build volume gives you plenty of room for terrain, vehicles, and larger multipart prints. While features like automatic bed leveling, Auto Flow Dynamics Calibration, and AI-powered failure detection do a lot of the heavy lifting behind the scenes. You don't realize you need those bells and whistles until you receive that first text alert and understand why they are included.
The 5-inch touchscreen is responsive and intuitive. Being the second generation of an already polished product, it is definitely an upgrade. Some of the quality-of-life features, like cold-air cooling and active-vent filament drying, help keep your output consistent during large, longer print runs. Connectivity and ecosystem integration align with what we have come to expect from Bambu and are extremely well-polished. It's a substantial machine, but its built-in handles on the bottom left and right make it manageable. It's large enough to feel serious without completely dominating your work/hobby space.
[table id=131 /]
You can find more detailed technical specifications
here.
Setup and Assembly of the P2S
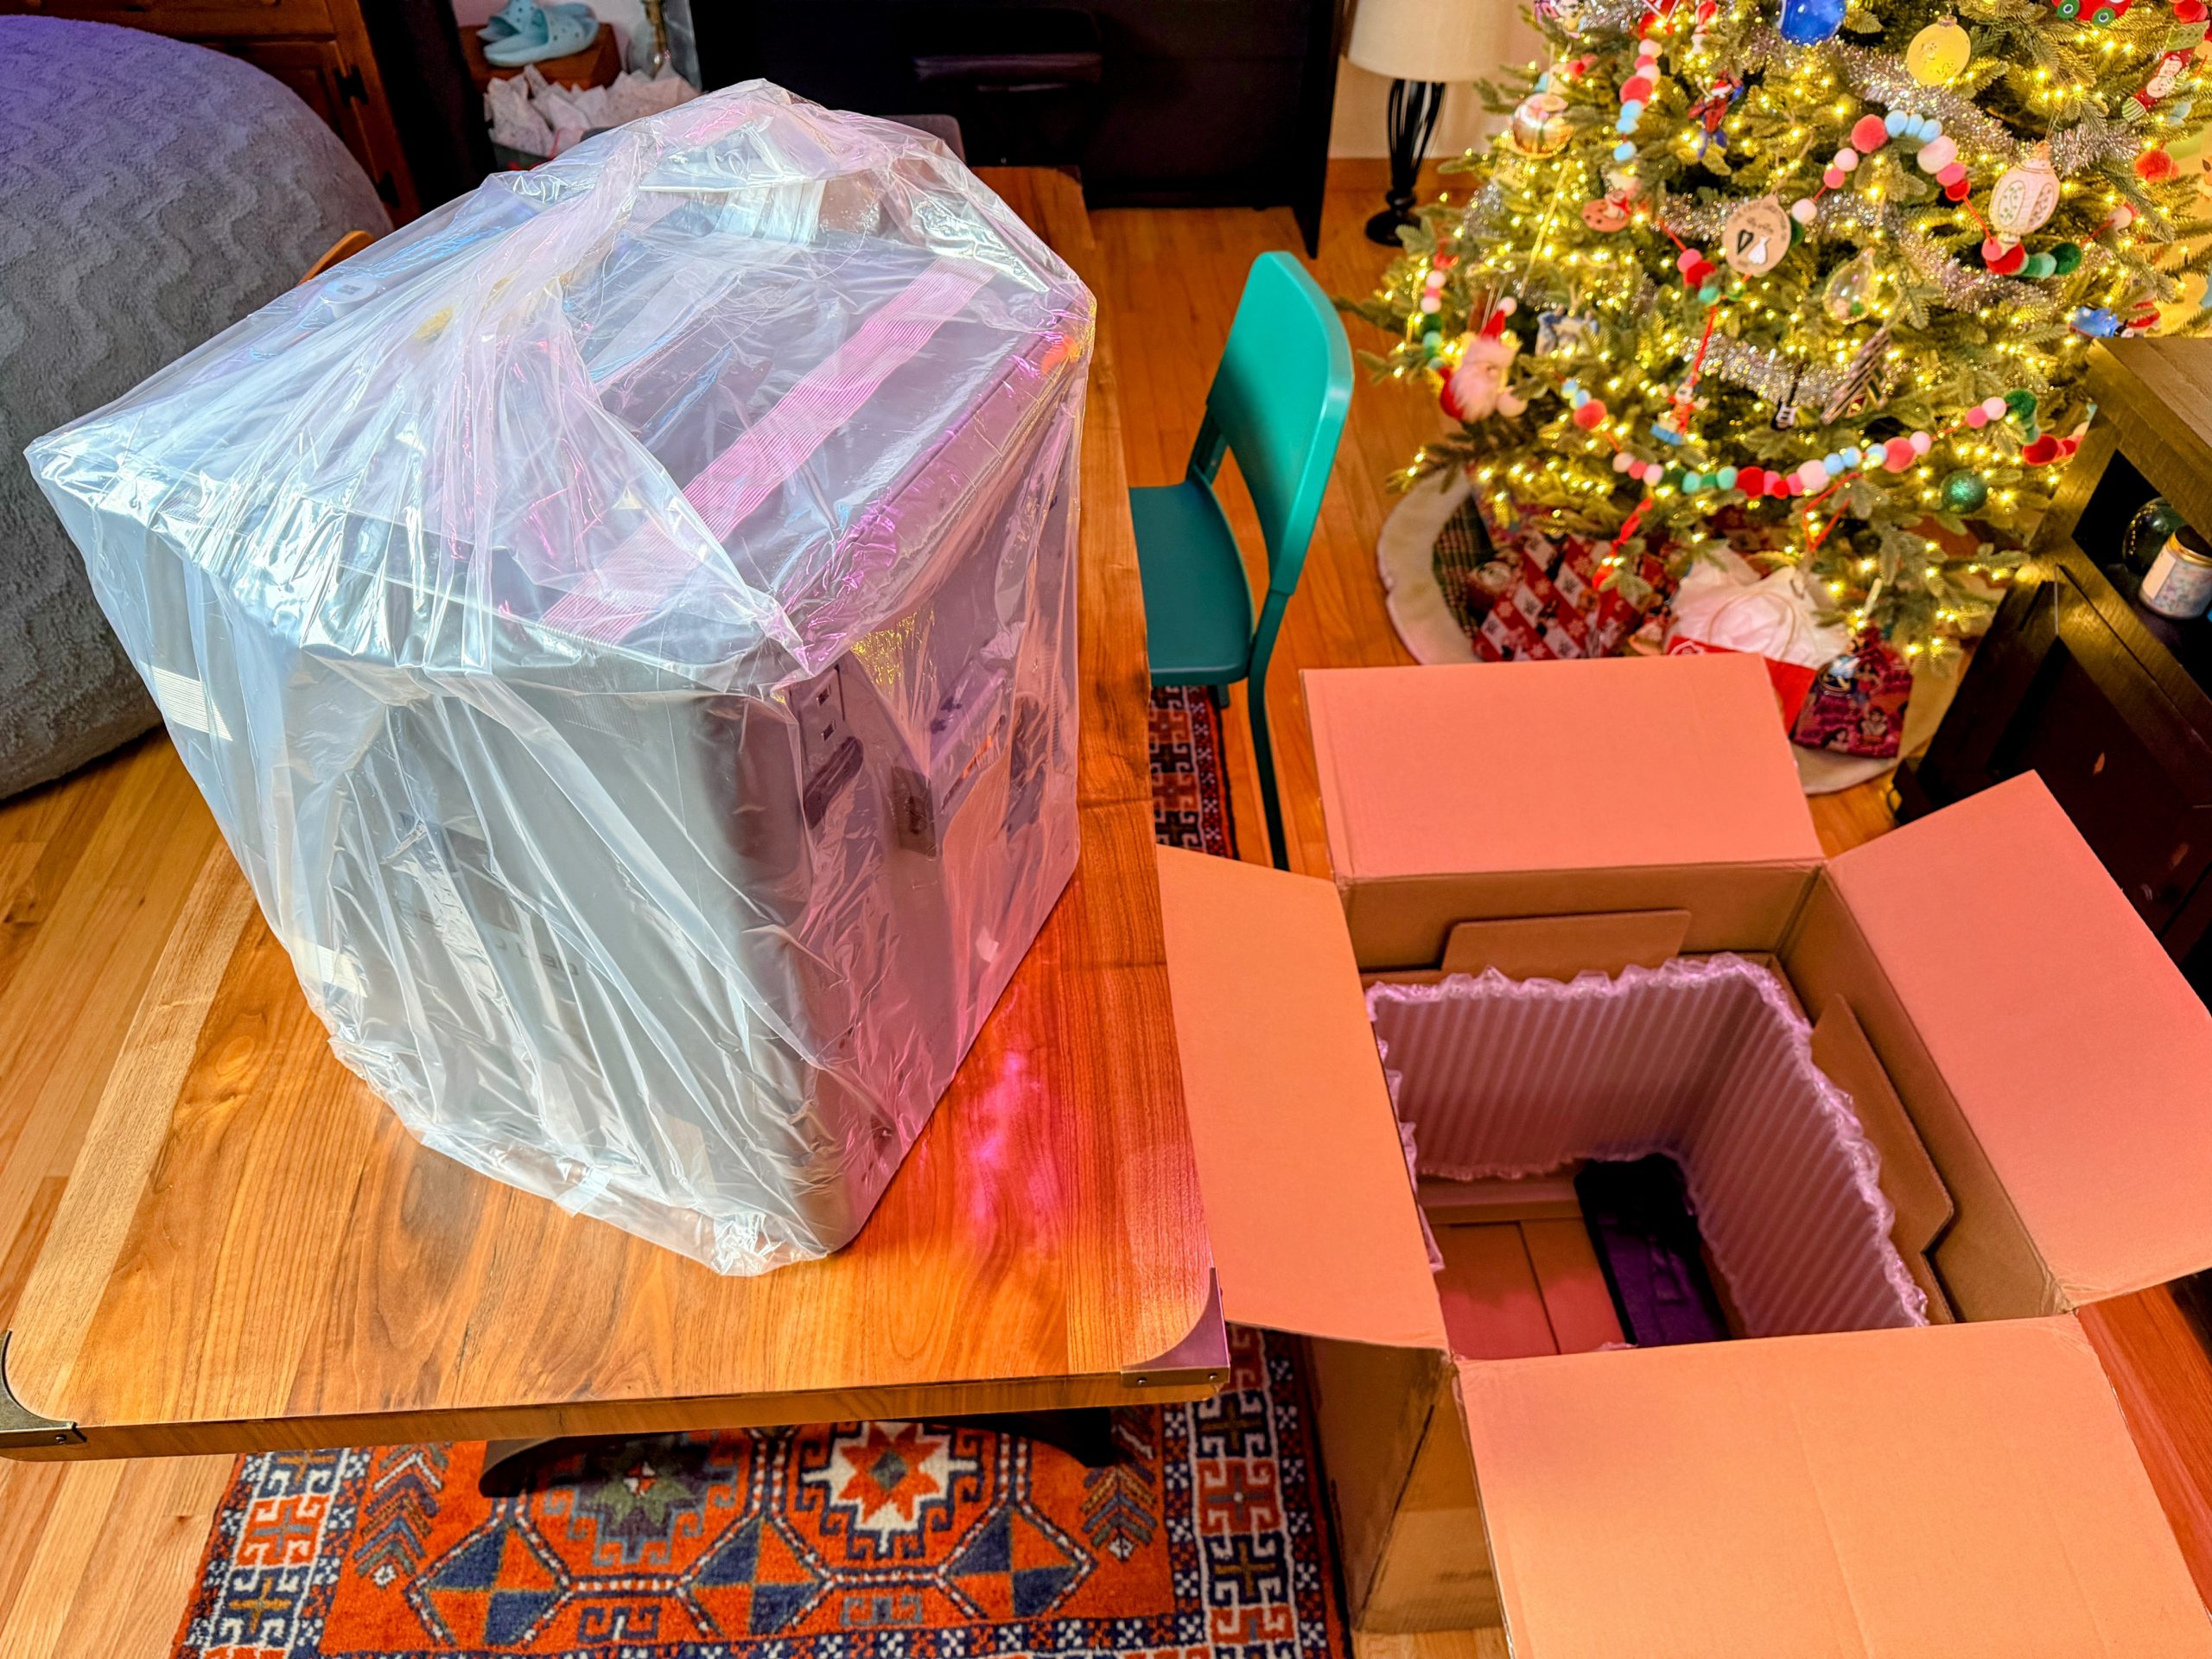
The Bambu Lab P2S combo ships in a box just under 47 pounds. While a single human can lift this, Bambu put sturdy plastic handle holes on the sides of the box for easier team lifting. Once you open the box, you are greeted by all the accessories you need to set up and maintain the printer. The guide situated on top is detailed and easy to follow. Removing the first layer of foam that snugly secures this beast reveals a giant, heavy-duty plastic bag surrounding it.
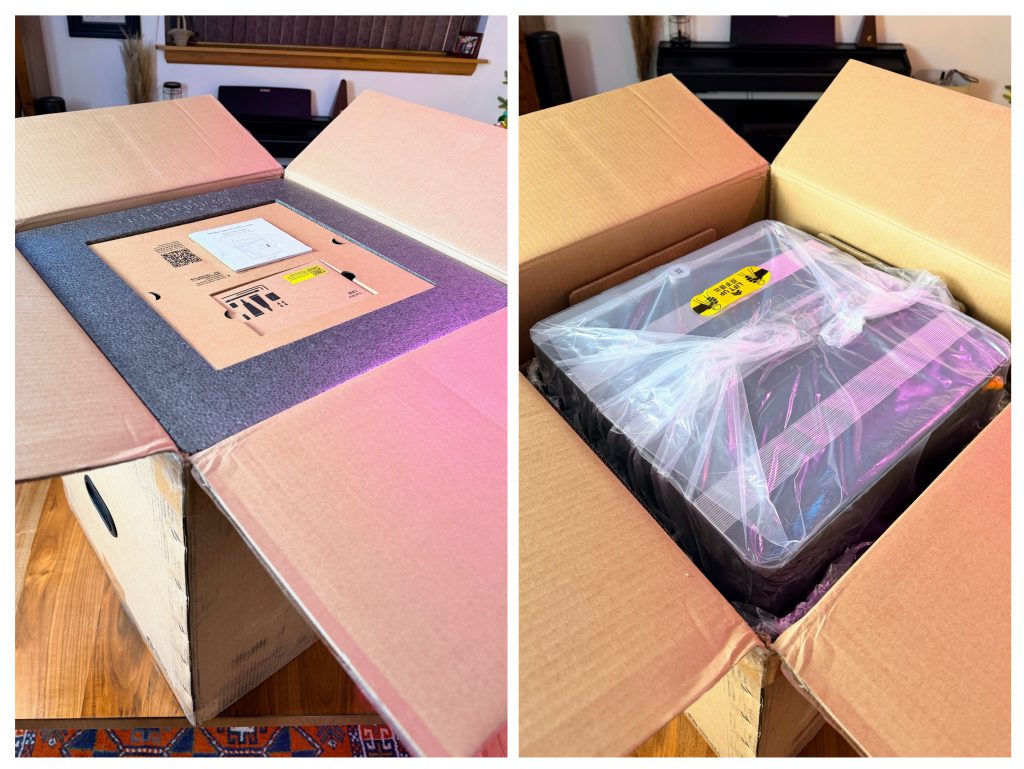 First and Second Layers of Unboxing
A yellow sticker tempts you to deadlift this chungus; in plastic we trust!
Moving the box onto the floor and gently lifting the machine back onto the table using the plastic scrunched handles was easier than expected.
 The plastic bag holds strong during the removal of P2S from the box.
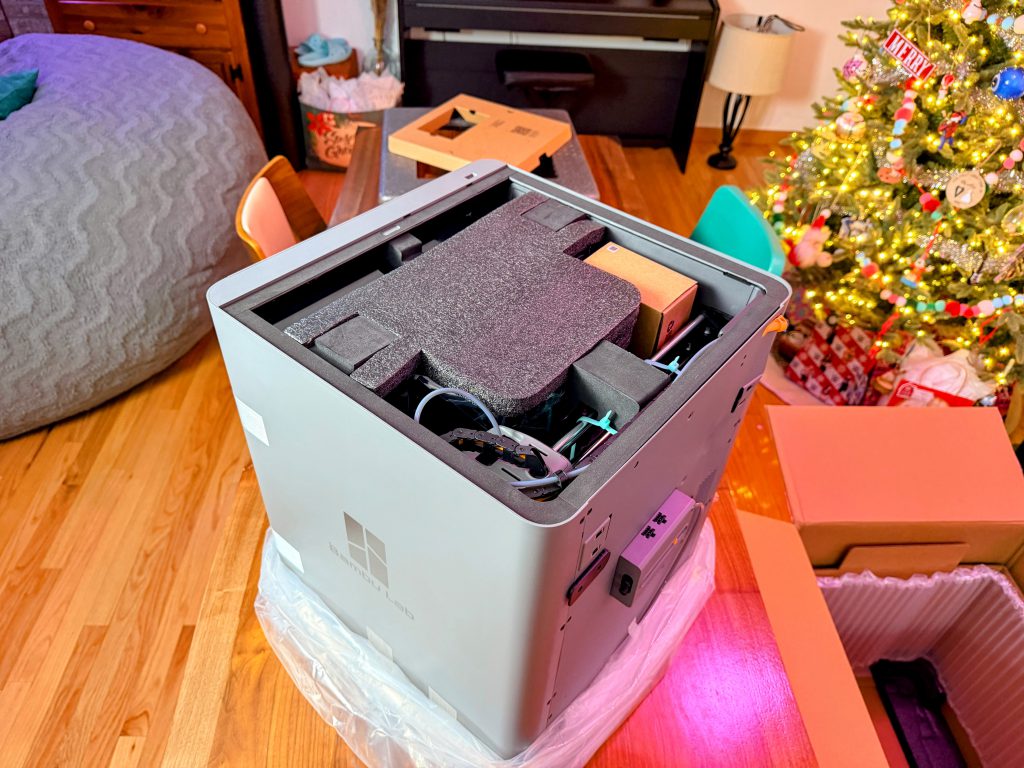
Following the instructions to remove the plastic bag and the top glass to get to the machine's contents, you begin unraveling why this thing weighed so much. Utilizing every inch of space for either parts or foam allows the machine a snug fit. Nothing moves.
 Belly of the Beast
The main compartment of the P2S hides the AMS. It pulls out smoothly once the foam pieces are removed.
 AMS 2 Reveal
Using the included allen wrench, you release the bed from a plastic chassis that is included for transport. Additional setup includes plugging in the front screen, removing the plastic, and connecting all the plugs and tubes. All of this is addressed in detail in the included instruction manual, which you can check out
here.
Setting up the Bambu P2S from the doorstep to powering on was 45 minutes. There were software calibrations that took some time, but nothing too concerning. You want to make sure the bed is level and that the firmware is up to date. As long as you are following the instructions, the process is simple for beginners.
 P2S Mobile Alerts
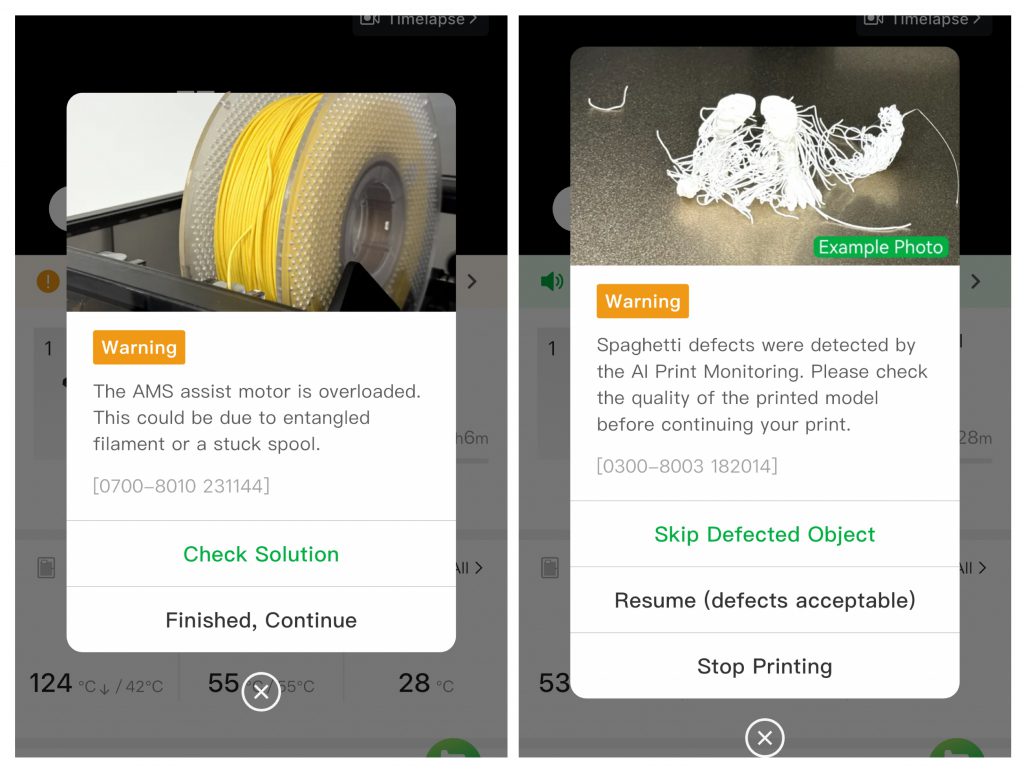
This machine is extremely user-friendly. It works great right out-of-the-box and can be fine-tuned to most any printing material on the market. The upgraded 1080p camera makes it easier to get a quick glance at your progress, and it is a huge upgrade compared to previous models. This will also help the new AI features for detecting spaghetti, nozzle clogs, and tangled spools. These may seem like a frivolous upgrade, but after getting hit with two different notifications during test prints, I can say these are absolute benefits.
Ventilating Fumes
Early reviews have noted that there is no solution for venting. The P2S features an upgraded cooling system and does everything it can to deliver the best print. However, it doesn't seem like much thought was put into where the fumes and smells can go. There is no direct out fan or vent, and the air escapes from a few spots. This should be done in a well-ventilated room if you are using different types of plastics with strong smells or toxic fumes.
Bambu Labs Ecosystem
I very much enjoy the ecosystem that Bambu offers. The
Bambu Handy app has an enormous library of free 3D prints, with hundreds added daily. The app is free to try, and I highly recommend it. When you first boot up Bambu Handy, you get served with a personalized 'For You' area based on your searches and history. There is also an area to view 'Trending' community prints, which is great for getting ideas and use-cases that you may not have thought of yet. You can also utilize the search function to type in whatever your heart desires, and most likely someone has shared a print file. These are all found under the tab 'Models'.
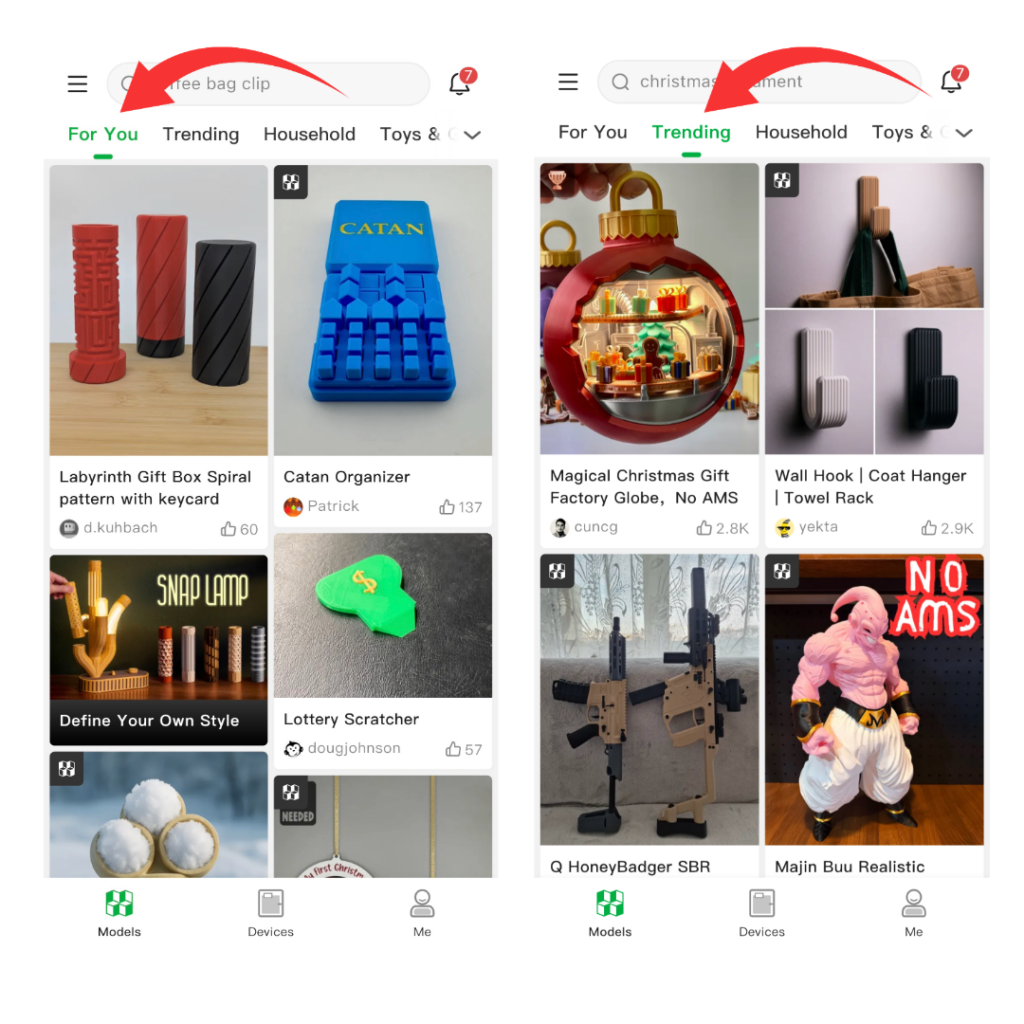 Bambu Handy App 'For You' and 'Trending'
At the bottom, you switch to 'Devices', which shows up-to-date outputs for your current print, like progress, temperature, and filament. This is also where you can view the camera. Lastly, you have a tab called 'Me.' This is where you can edit your account information and where you access your 'Liked' and 'Saved' prints. Additionally Bambu Lab features a learning center that provides 3D printing knowledge that is helpful to beginners and experts alike right in the app.
The
Bambu Studio software covers most of what a beginner to intermediate hobbyist would need, from splicing to coloring for the AMS. Both the app and the software connect to your Bambu Lab account and let you monitor and output across platforms. By clicking 'Prepare to Print', you will wirelessly send your chosen file to your machine.
There is, however, a need for consistency across the Bambu App and desktop software. The mobile app lets you choose the exact type of filament you are using by brand and then subtype, whereas the desktop only lets you choose Bambu or ‘other.’ If you are only utilizing the mobile app, you cannot access the 'Flush into Object' option that can be utilized when using the AMS, cutting down on waste. Keep in mind these are mild agitators, nothing serious, and shouldn't be a deterrent to purchasing.
P2S Use-Cases & Test Prints
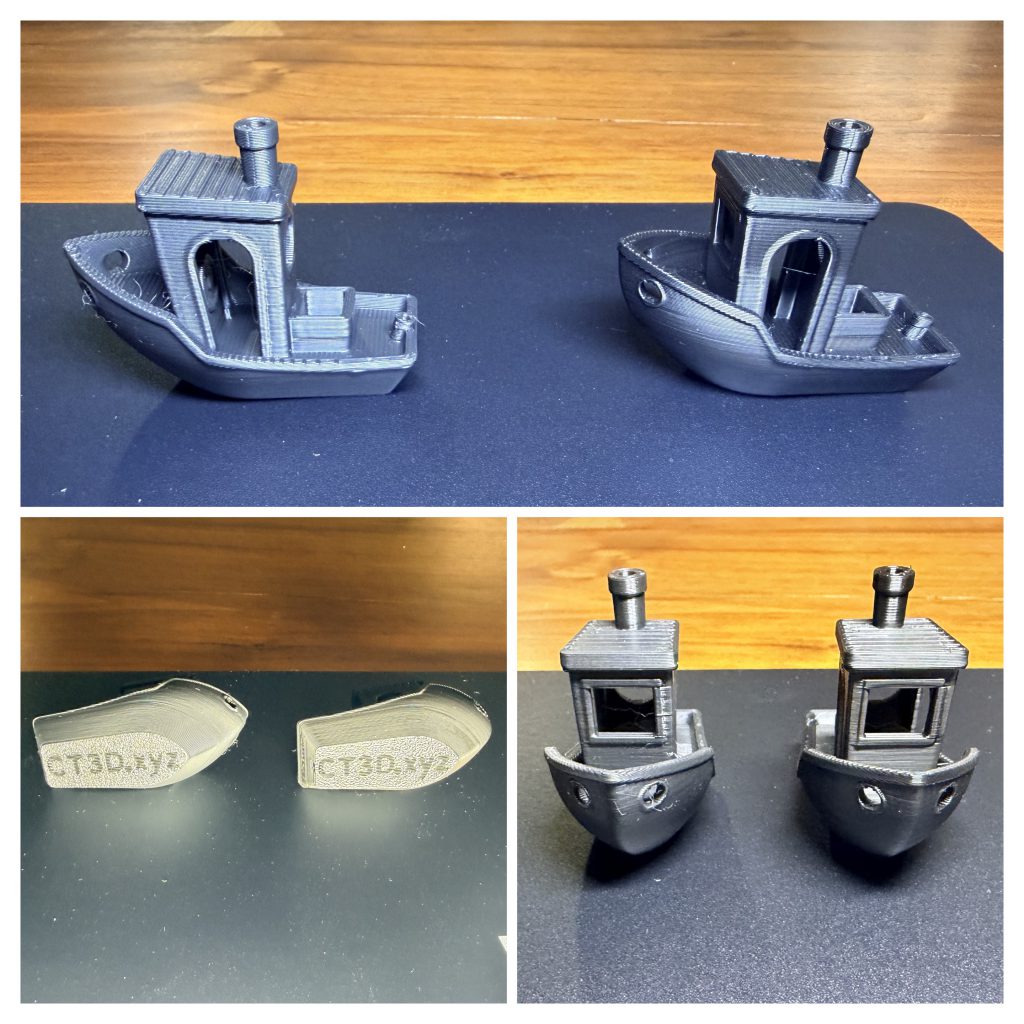 P2S Benchy on Left, A1 Benchy on Right
This little tug boat will steal your heart. Using the staple-first production, we have a Benchy. Very few flaws and little difference between the P2S and A1. I noticed a bit more stringing of the filament on the P2S, but it can be easily brushed off. There are additional test prints you can utilize to hone in your setup, but for beginners, this thing is ready to rock out-of-the-box. I compared a few of the outputs, as seen in the above photo, and the difference is negligible. While I did create dupes of each use-case on the A1 and the P2S, it wasn't worth documenting as they are so equally matched in quality to the naked eye.
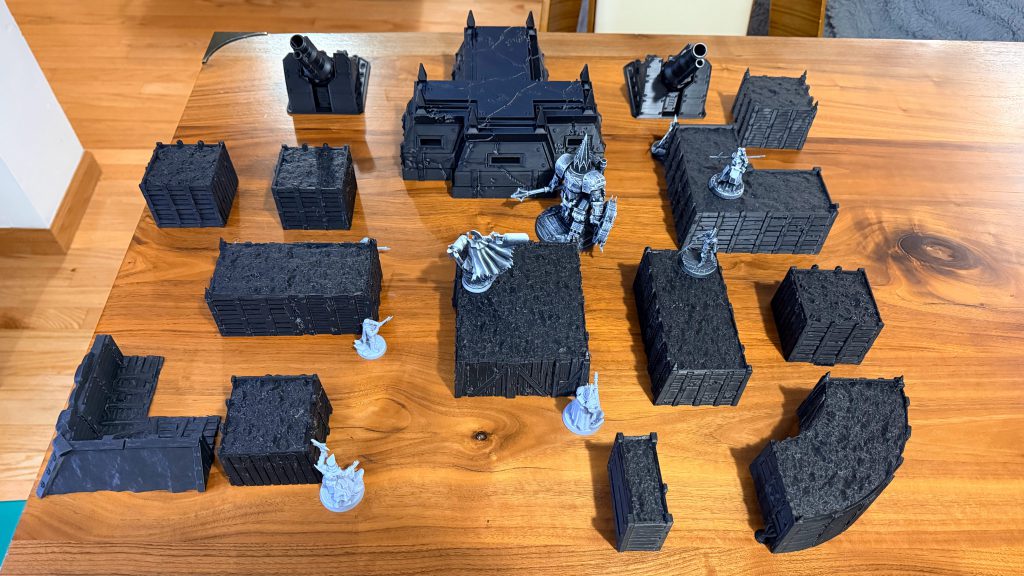
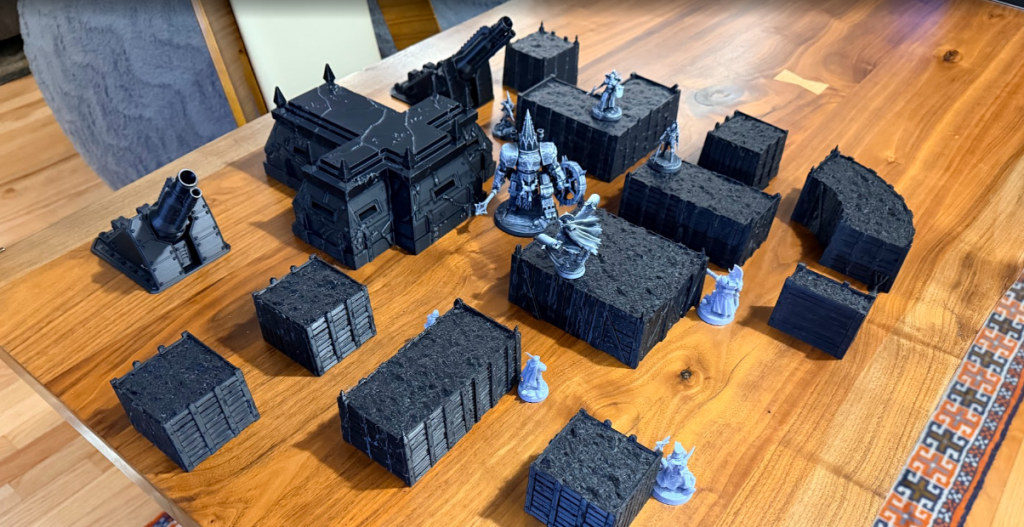
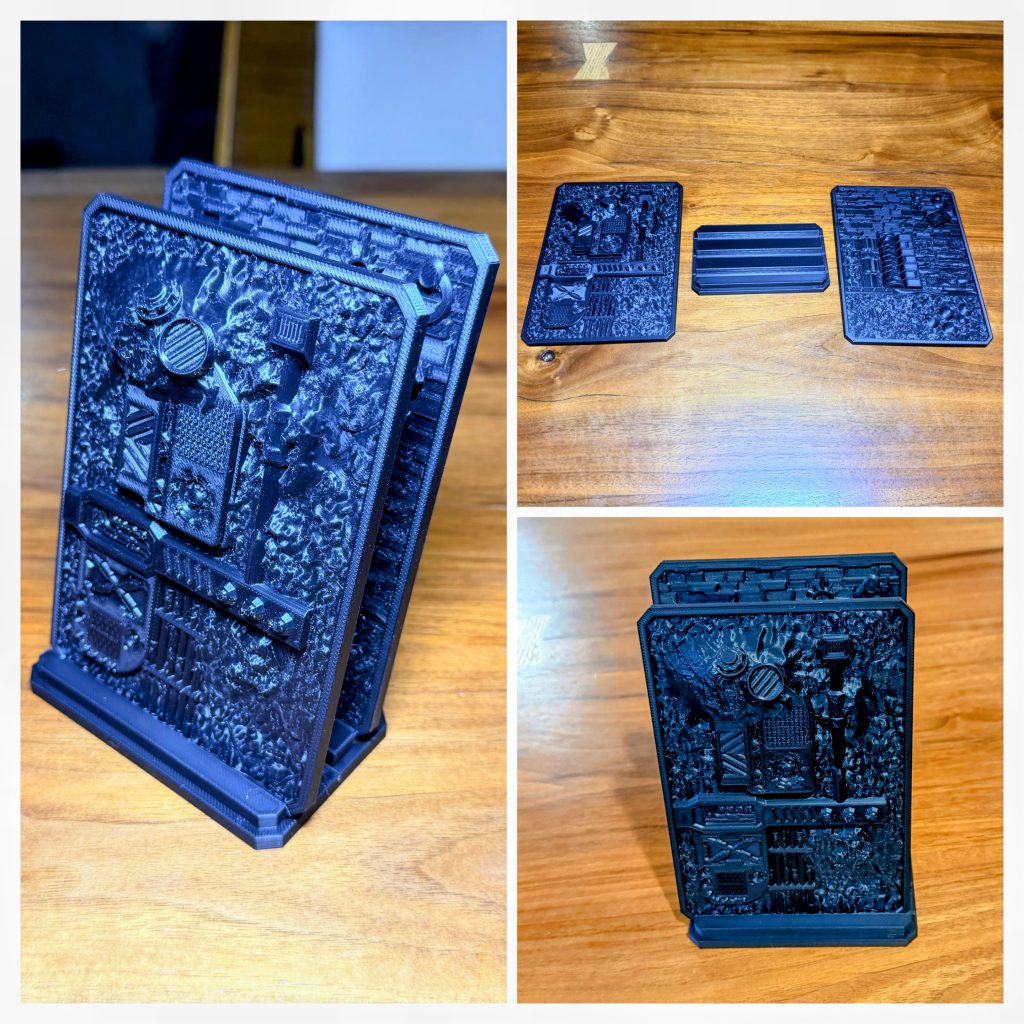
Large Format & Terrain Printing
Large Terrain Piece
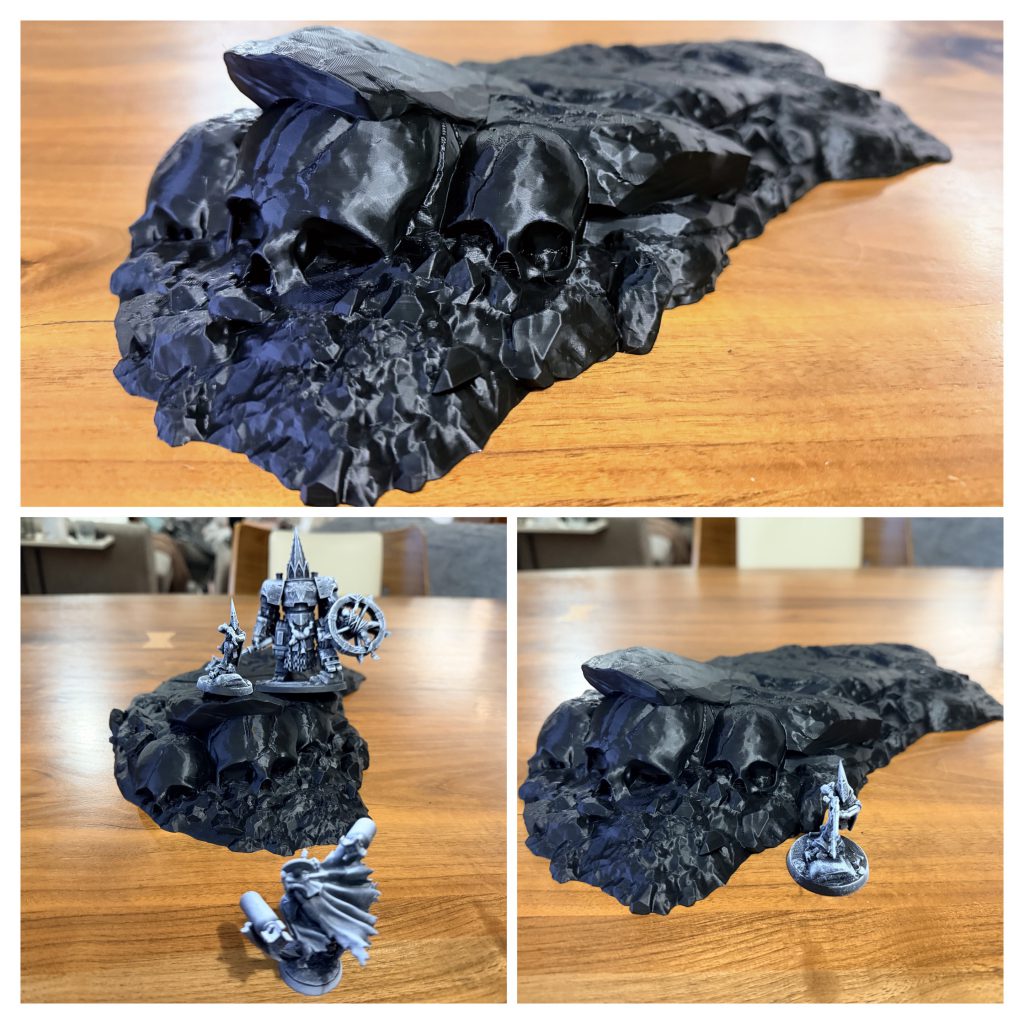 Ashkaris Wasteland Large Skull Rock formation
One of my favorite terrain creators right now is Sacrus Mundus. They are creating a wide range of diverse and detailed terrain. I chose a rock hill with skulls as the test because it looks hardcore. It comes from the Ashkaris Wasteland Sepulchre release, and I highly recommend checking out their Patreon
here.
Sacrus provides both a full version and a split version. I chose to print it in two pieces due to its size. I will combine them for these comparisons. Below are a few other large terrain pieces I have printed using the P2S from Sacrus Mundus.
 Sacrus Mundus larger terrain pieces with miniatures for scale.
Terrain Set Pieces / Scatter Terrain
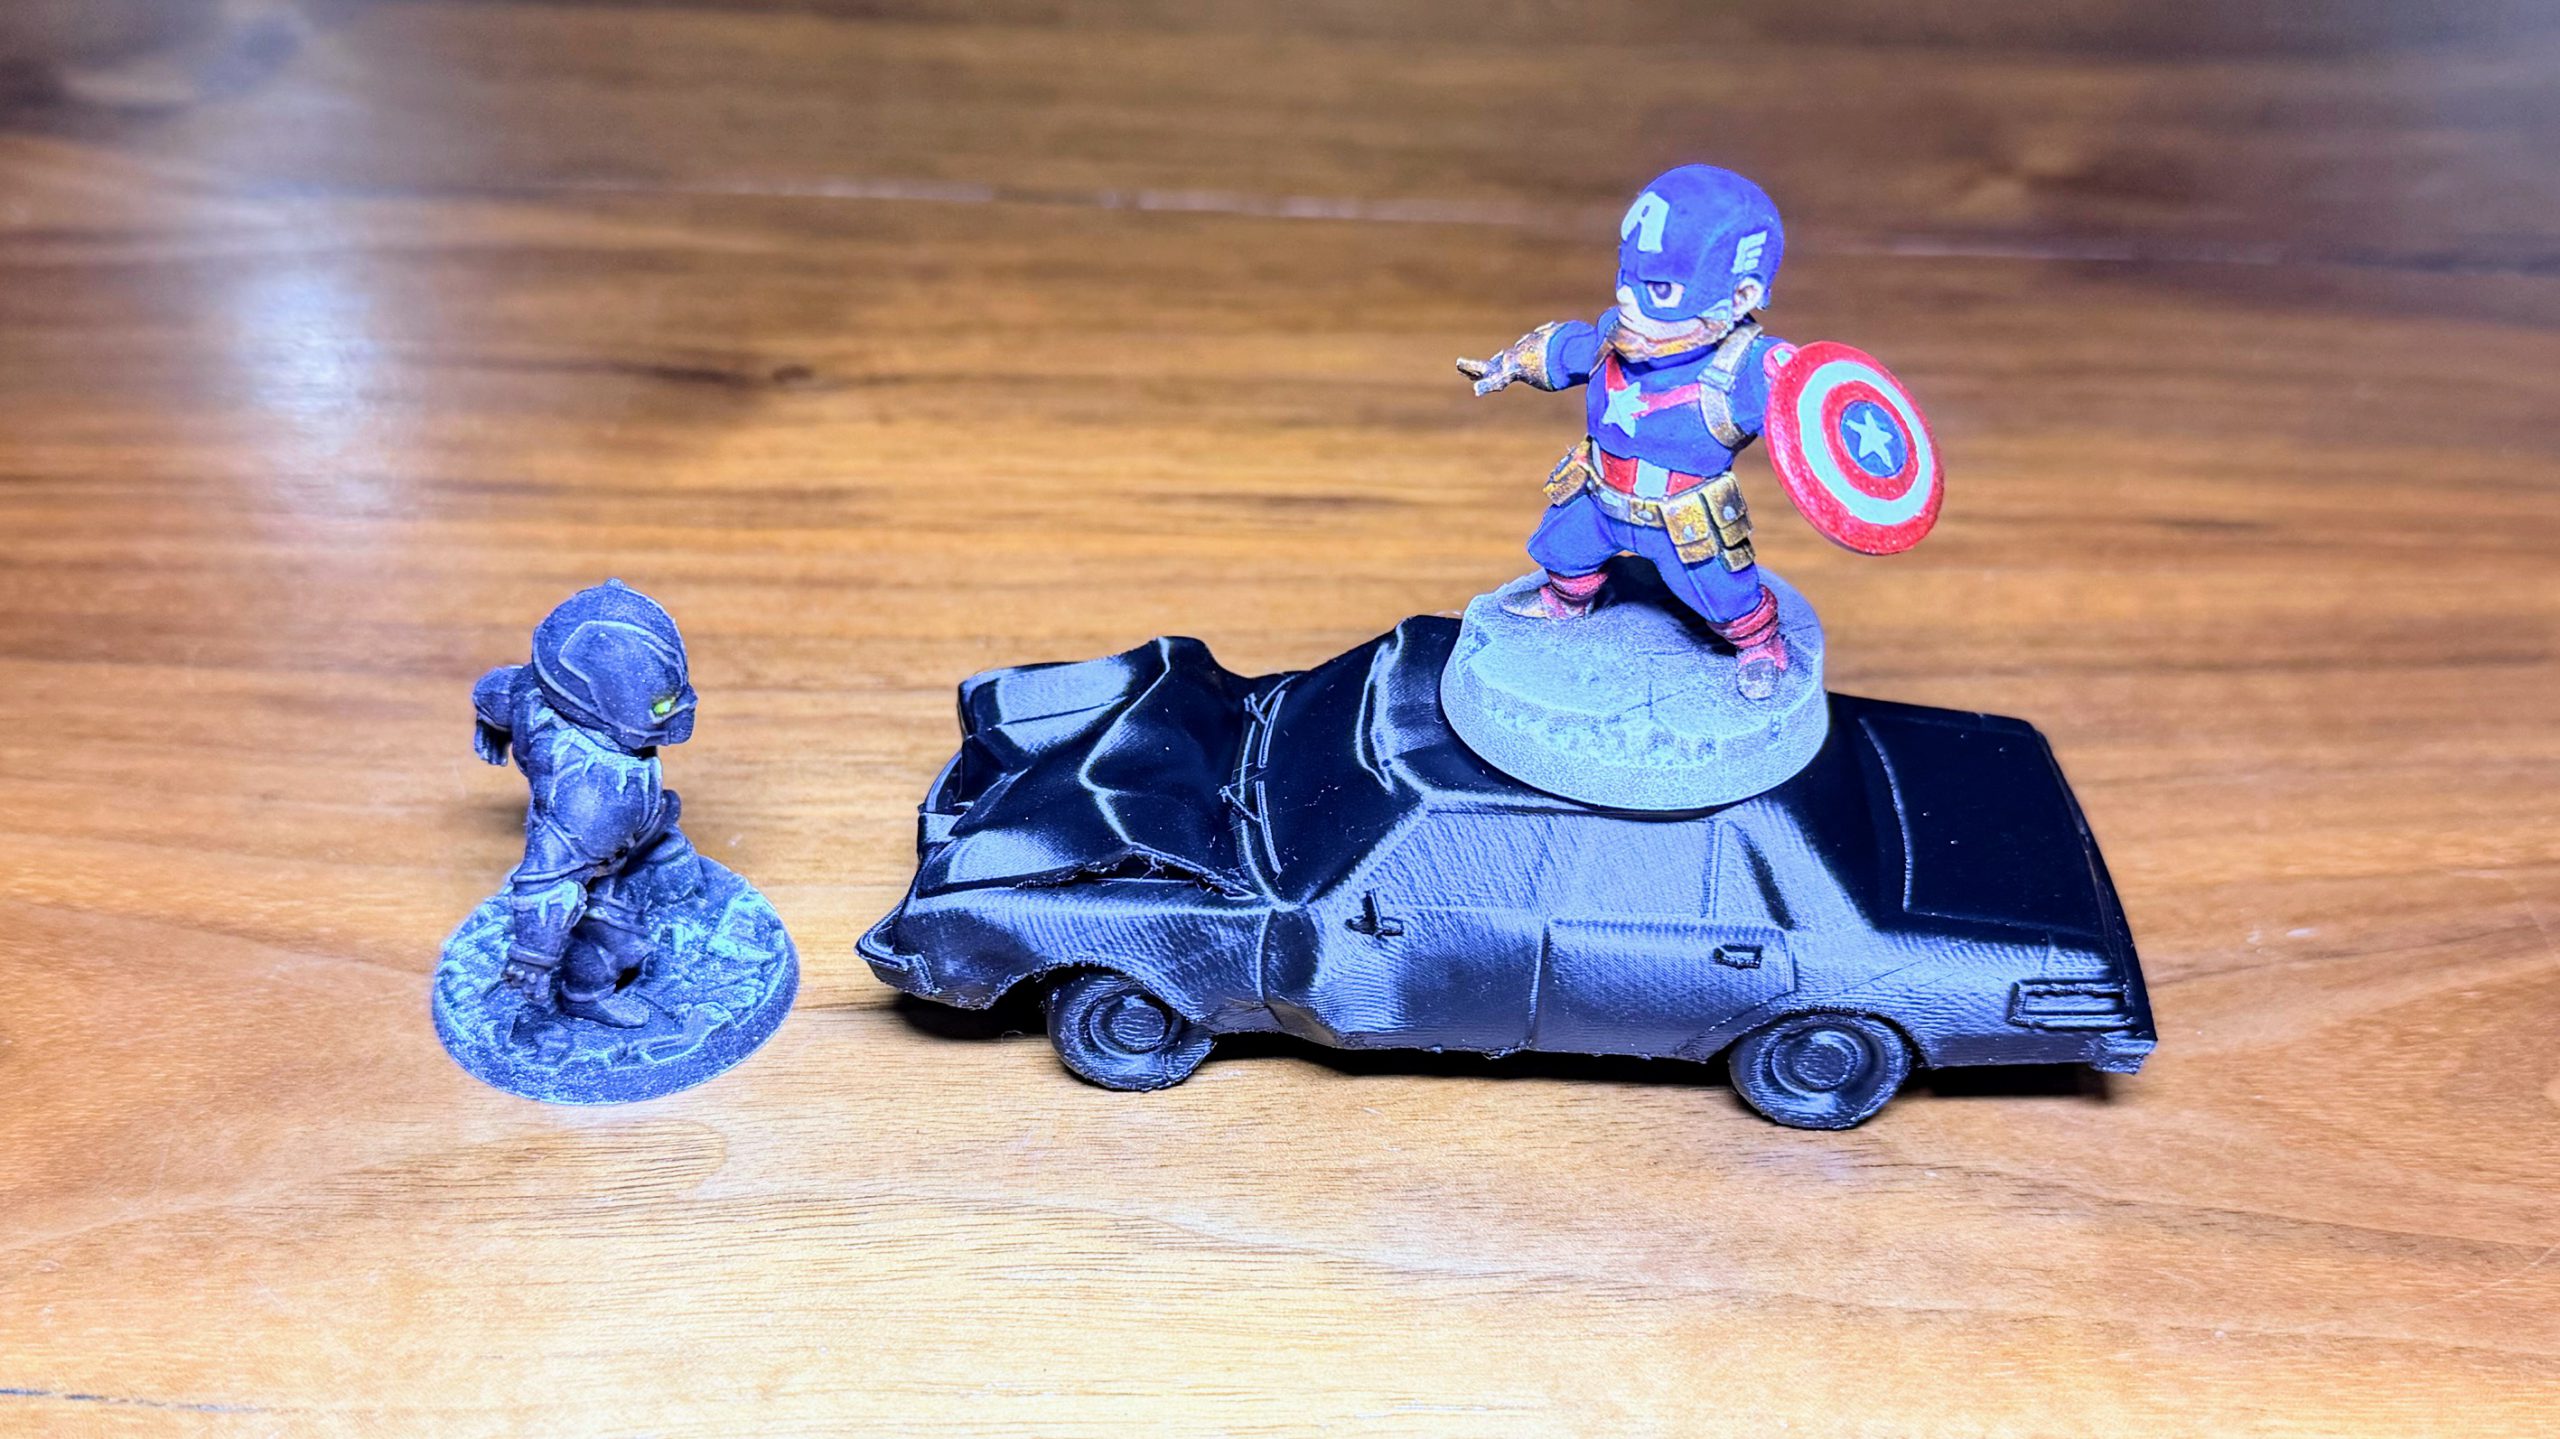
 Crashed Car *not to scale
C27 Studio has released a wide array of characters, ranging from Marvel, Star Wars, and Aliens. They also release terrain and set pieces relating to different themes, from modern cities to underwater kingdoms. I chose a crashed car to test and showcase the P2S. You can grab this car
here.
Beyond Trenches of Despair
Letting this machine spit out larger terrain pieces can quickly fill up the battlefield. With the
recent launch of fully blocked-out trenches, this process can be sped up significantly. Here are few options to show how a full board could be printed with little effort.
Cannon & Bunker & Trenches! Oh My!
Functional Hobby Prints
Dice Tower
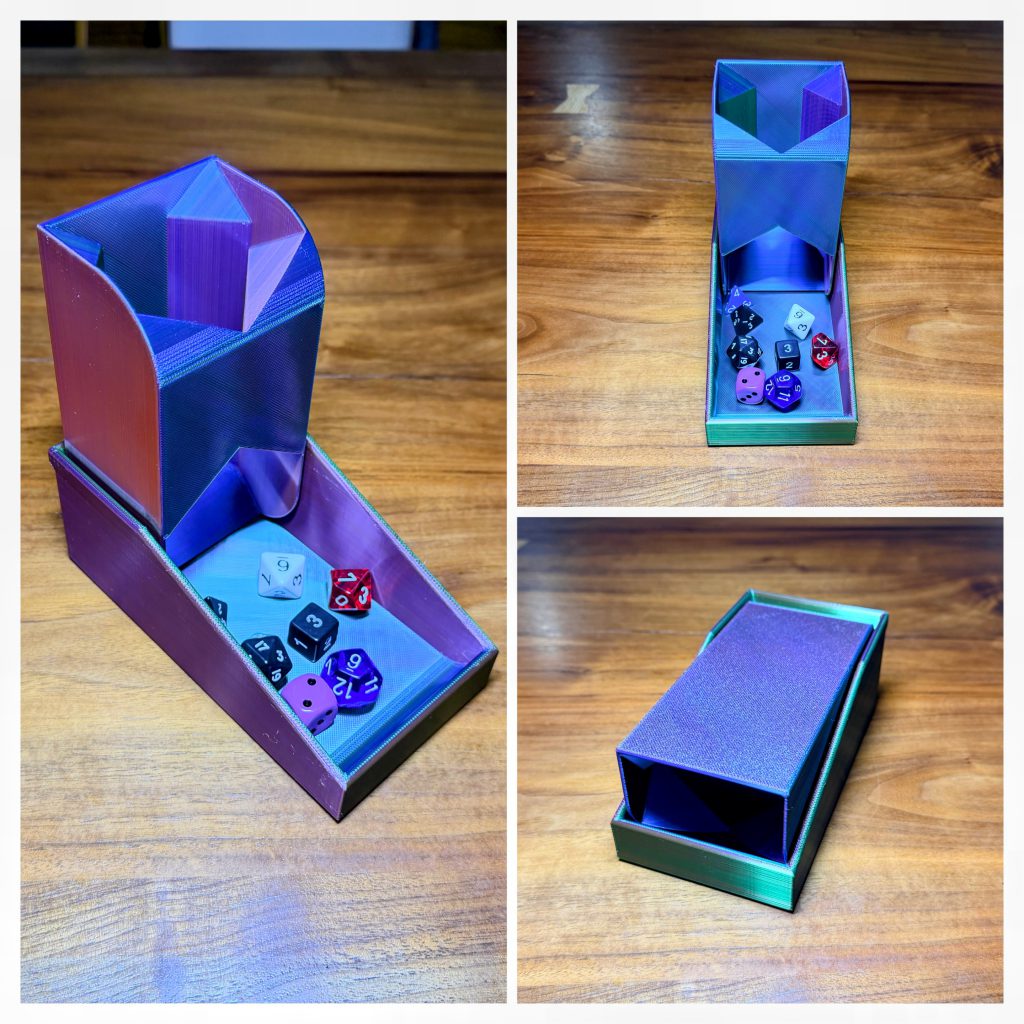 Triple Color Silk PLA Filament Used
There are many dice towers found on the Bambu Handy app. I chose this
minimalistic compact folding dice tower for ease of travel and storage. This may be one of my favorite things I have printed.
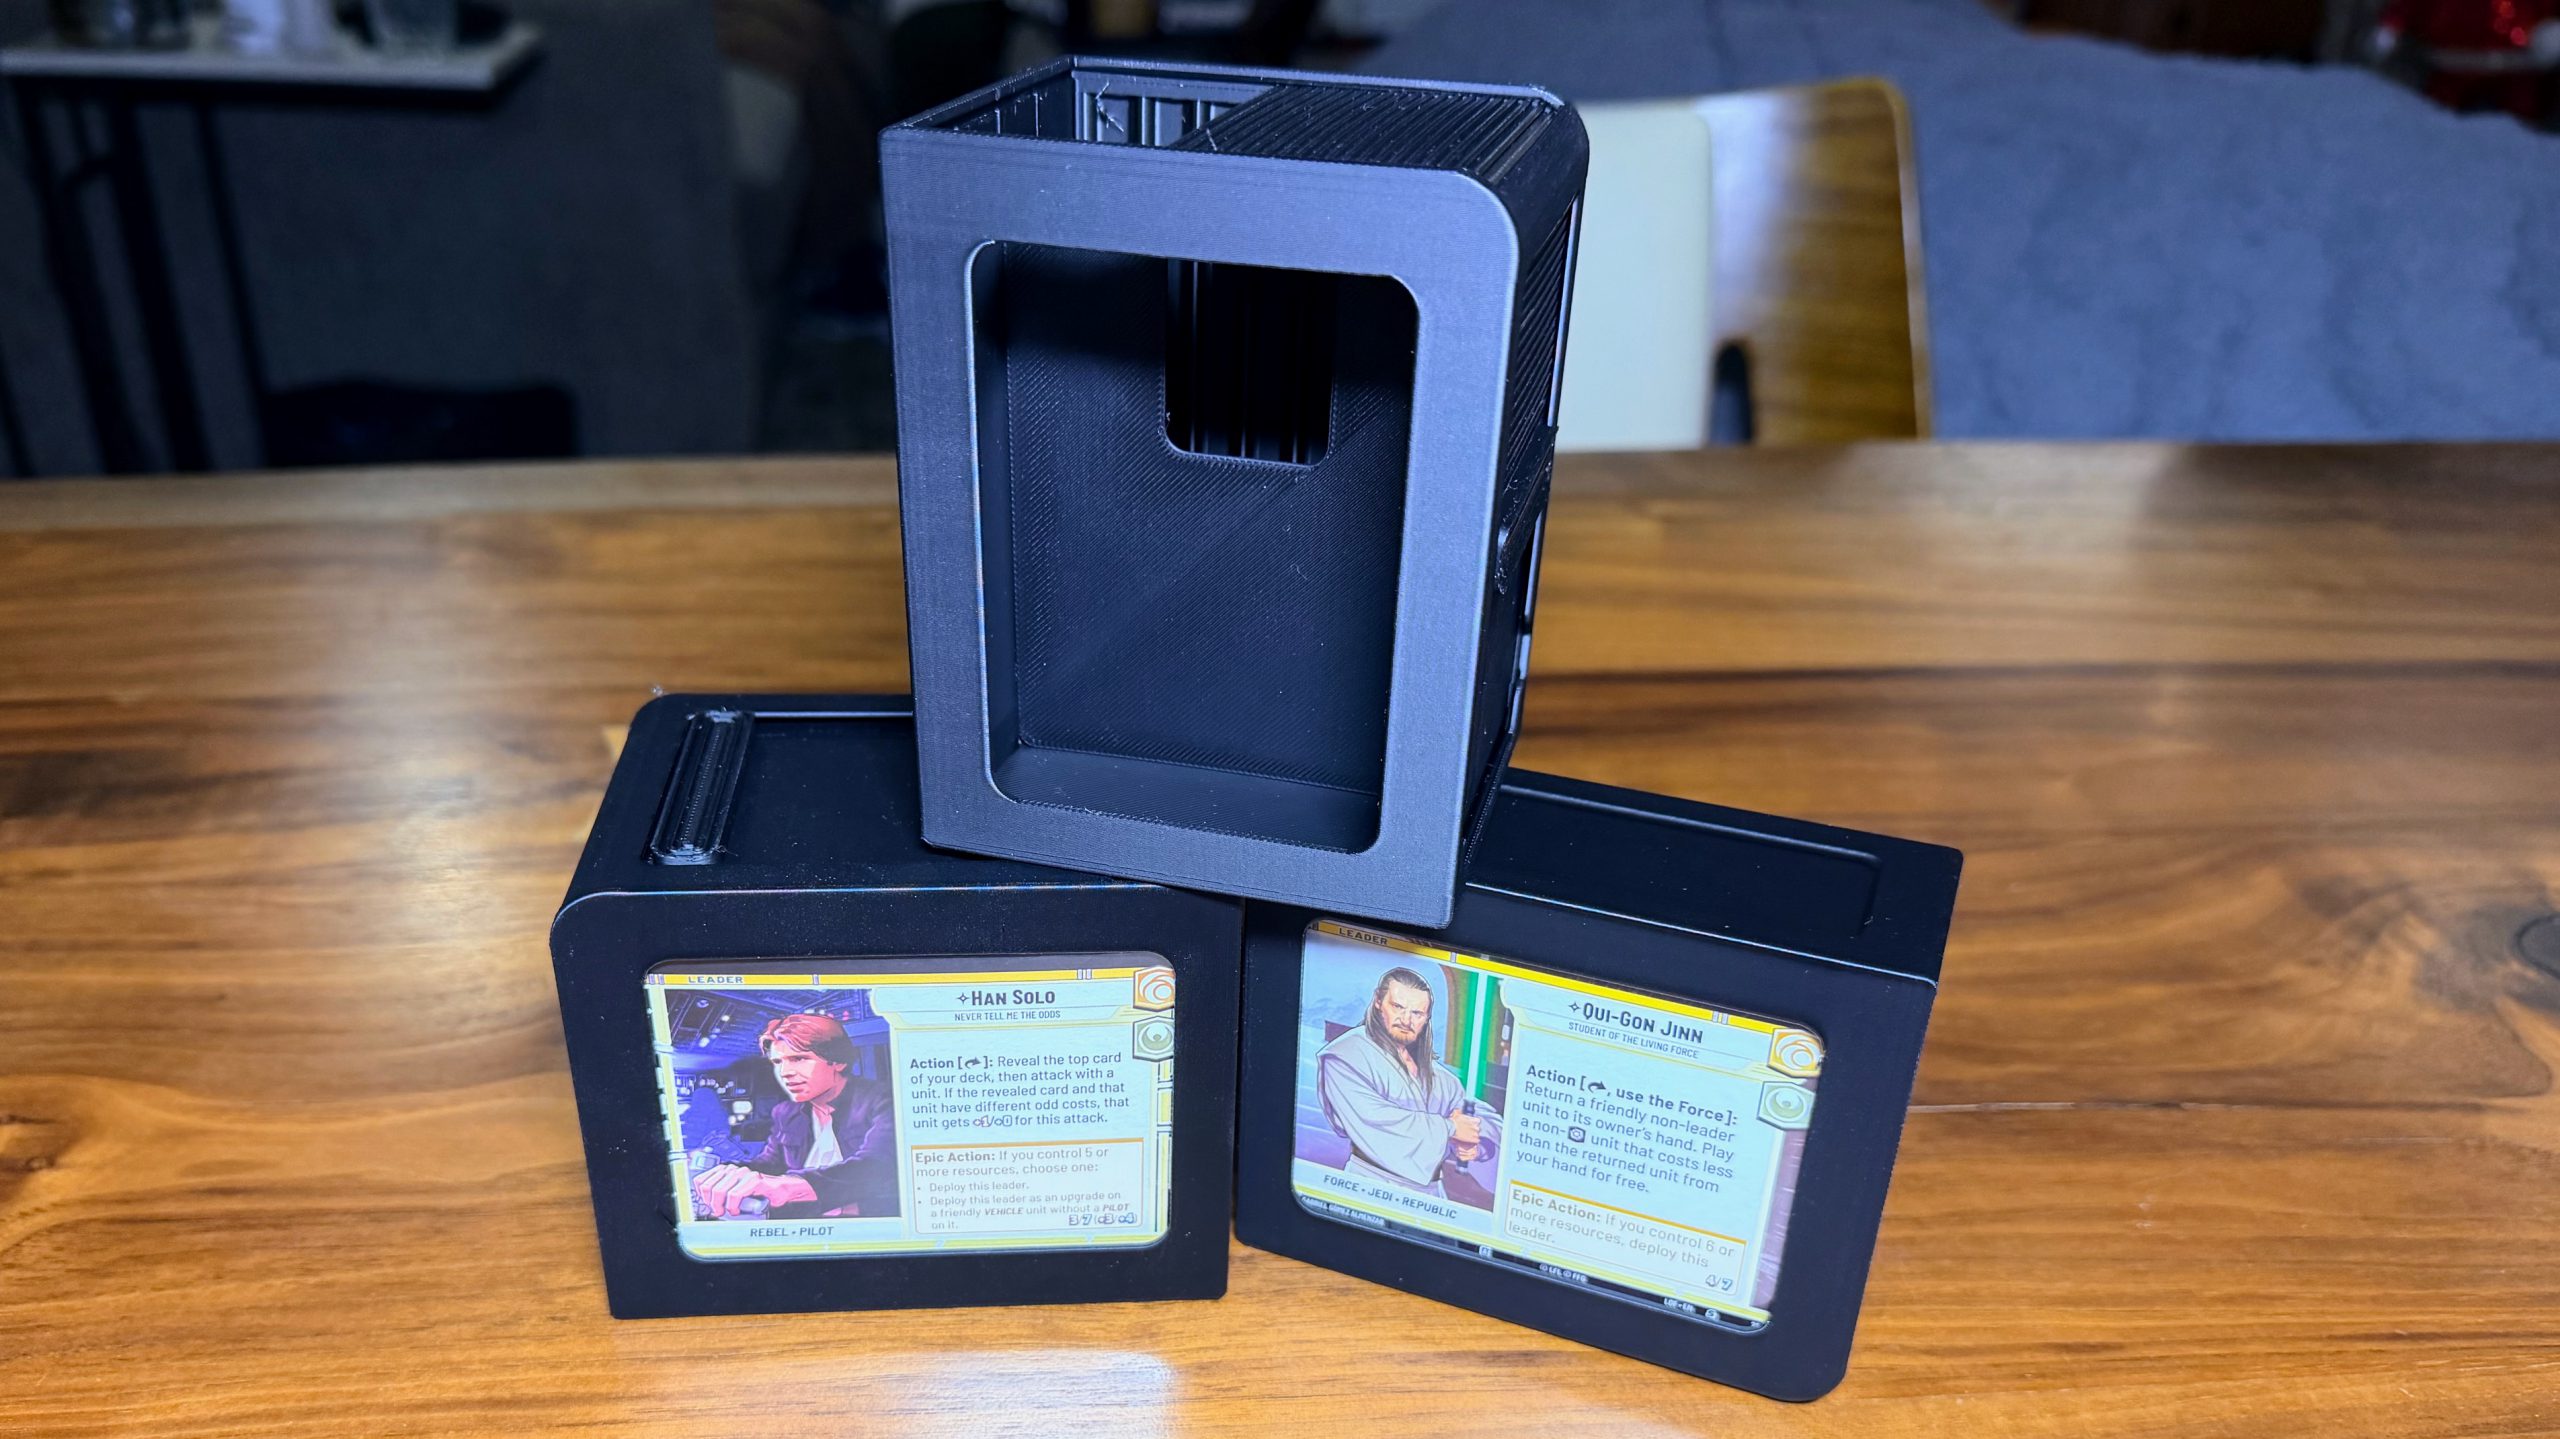
Deck Box
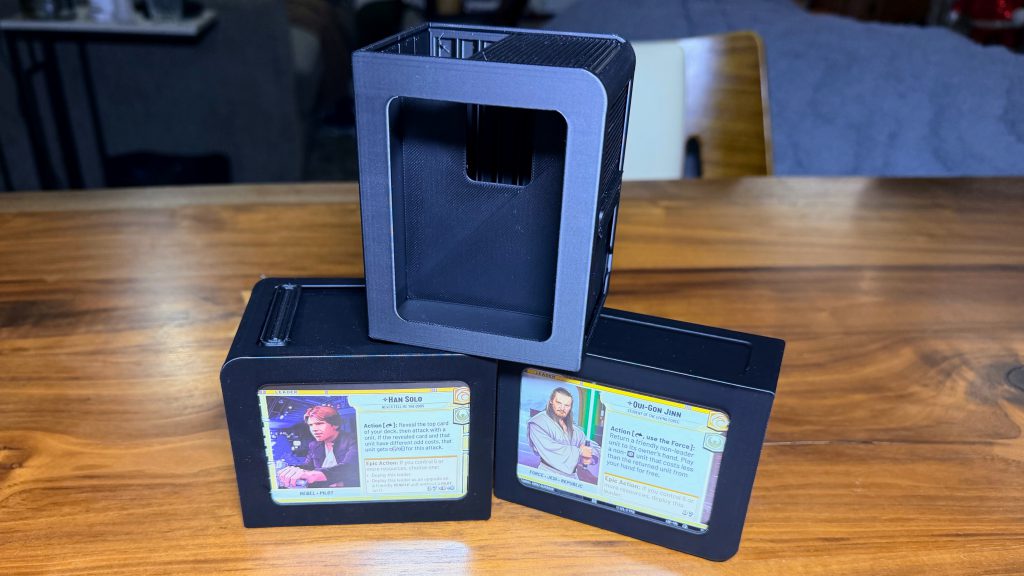
No matter what LCG/TCG/CCG you play, you are always in need of a deck box. I chose these sleek deck boxes with a front window for clear identification of which deck is housed inside. The top is similar to a roll top desk and comes in two sizes. You can find it
here through the Bambu Handy app.
Dry Brush Palettes
Every painter should have a dry brush palette. Check out these Saucermen Studios palette
here. Spray on a little primer, and you are good to go.
Board Game Inserts
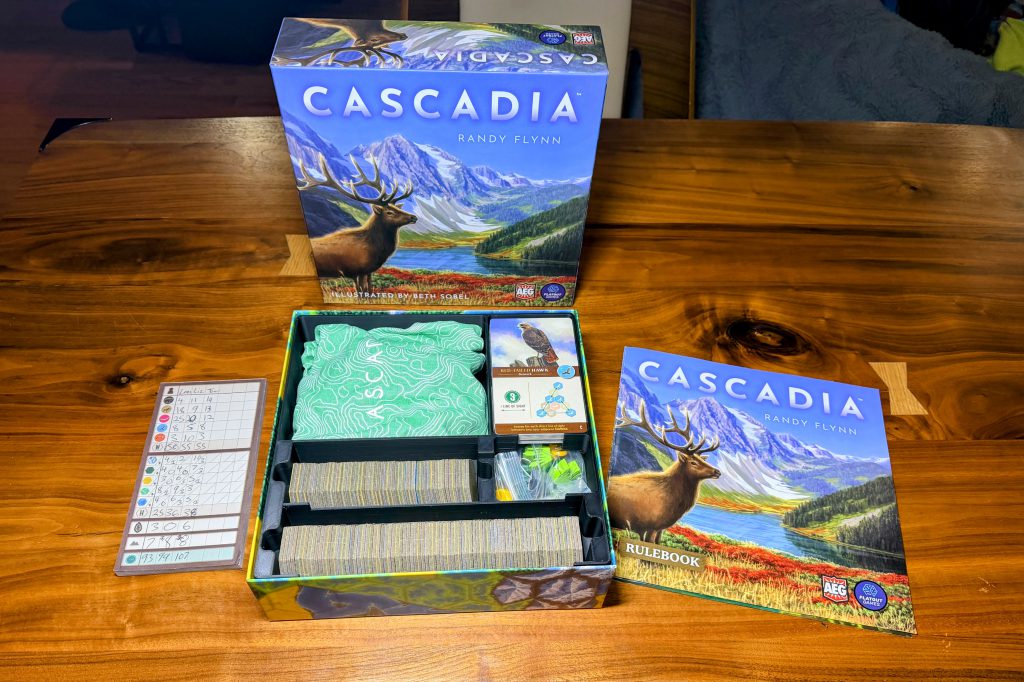 Cascadia Insert Plus Expansion
When my friends and I first started collecting board games, we would make foam inserts. This was a time-consuming process with exacto knives, glues, and pins. Now, you can simply plug your favorite game title into the Bambu Handy app and get printing. This is for Cascadia with the parks expansion searched through the Bambu Handy app
here. This size print was possible because of the P2S's large bed size coming. This allowed it to be printed in one giant insert.
Miniatures & Detail Work
Miniatures
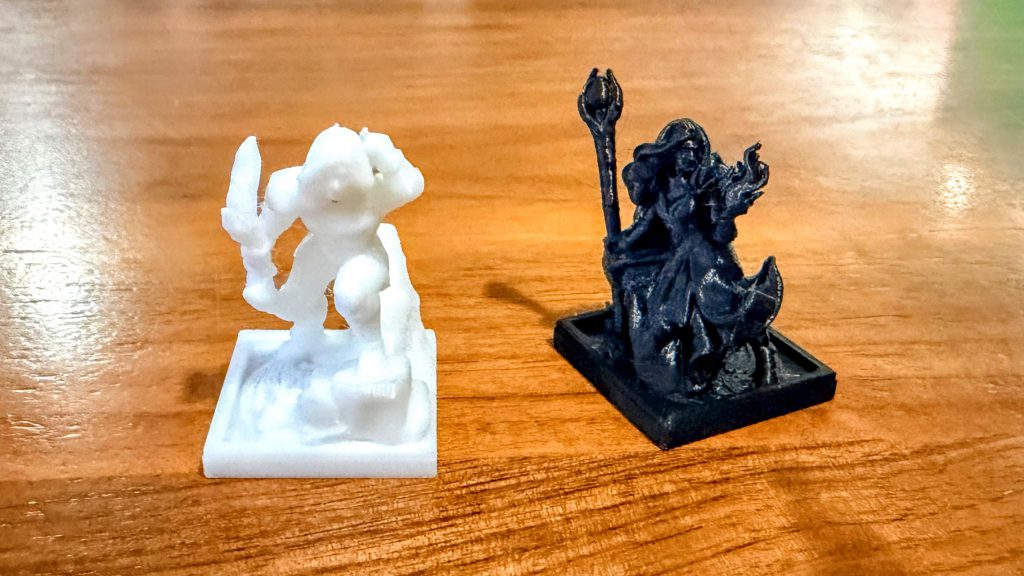 P2S Miniature Tests
You can find prints for the .4 nozzle through the Bambu Handy app. The ones I printed can be found
here. After a few tests with smaller-scale, detailed miniatures (like Trench Crusade), the out-of-the-box Bambu with the 0.4 mm nozzle is not optimized for such small creations. During the tests, details and overhangs get missed. Strong support scarring and sub-optimal overhangs can create some visual issues. This is fine for proxies, but it is not winning any awards at Adepticon.
I am aware of a
community of artists and digital engineers working hard and sharing their knowledge on how to do this. I am currently learning and testing, and once I have it mastered, I will share another article with best practices. It can be done, but it is not something that can be done with beginner knowledge.
Grimcute
Just in time for winter,
Found Family Adventure Crafts drops an adorable penguin dressed up in some sort of space ‘Marina’ suit. December Patreon included this little penguin plus an adorable bear, fox, and seal. They are donning their winter attire for the brisk temps up in Antarctica and are not joining the great Emperor…Penguin.
AMS & Multi-Color Prints
Holiday Cheer and AMS
 Beholder Ornament with little green eyebrows
Found Family Adventure Crafts came on the scene in 2023, and I subscribed to their Patreon shortly after. I was looking for some whimsical prints in a sea of Grimdark and Syfy. They drip with the whimsical aesthetic of Gravity Falls, The Owl House, and Amphibia. BEHOLD an adorable and delicious looking DnD cookie ornament. I colored quickly using Bambu Studio in just a few minutes.
New to the AMS 2 attachment, I decided to give the Beholder holiday ornament a test run, and hand-painted it using the color tools inside
Bambu Studio. There’s a bit of a learning curve at first, but after a few minutes, it started to click. Once I was confident all the colors were assigned the way I wanted, I sent it off to print. The final result had a few green artifacts bleeding into the white frosting near the eye, though interestingly, they didn’t show up in the sliced preview. With a more detailed pass over the render, I could have caught it and tried again, but this felt more like a minor imperfection than a true failure.
That experiment also highlighted one of the trade-offs of multi-color printing with the AMS: waste. Using models that aren’t optimized for color transitions can generate a surprising amount of what the community lovingly refers to as “AMS poop.” On the plus side, the actual color changes were impressively smooth; on the downside, the amount of purged filament adds up quickly. In the grand scheme of PLA costs, it’s pocket change, but it’s still worth paying attention to.
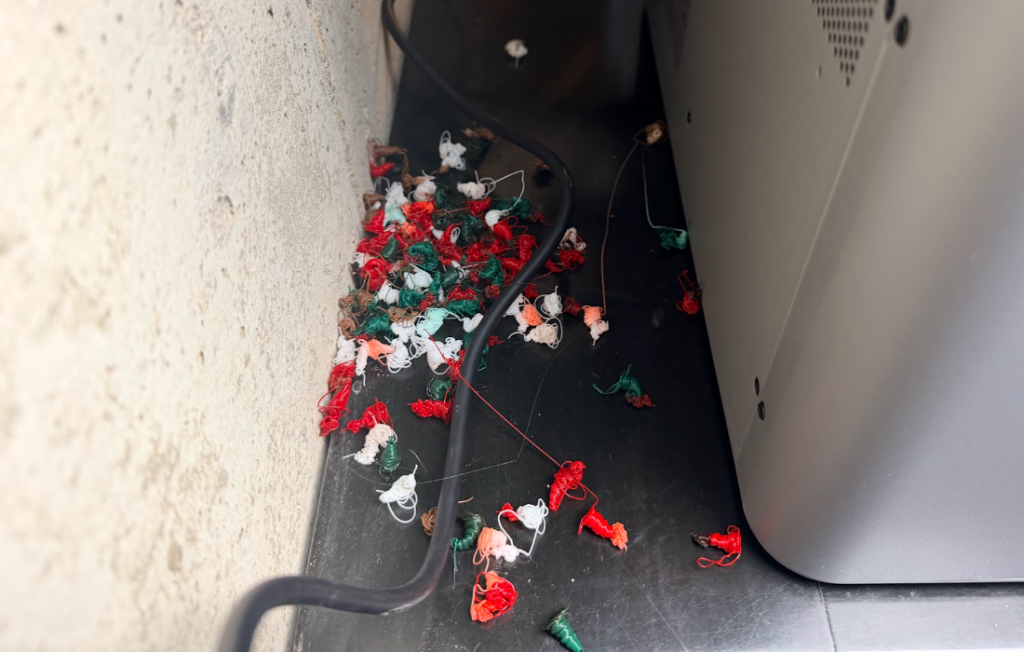 Bambu AMS Poop
The amount of waste you generate also depends heavily on your workflow. If you’re printing directly from the
Bambu Handy app, you’re largely at the mercy of how the creator set up their color changes. Some do a great job minimizing waste, while others clearly prioritize the end result over efficiency. Working in
Bambu Studio gives you more control, including the option to flush into the object rather than produce a pile of tiny purge pellets.
Sports Ball Memorabilia
 Go Cardiac Bears
We all have that one family member who loves a particular team. Now, you can win them over by gifting them a badass chain. You can find this one through the Bambu Handy app
here.
Gag Gifts
 67 holiday ornament
You can be the star at all the holiday gatherings with fun, silly, and even annoying gag gifts. Celebrate
Dictionary.com's 2025 Word of the Year with a new ornament to remember your time with Gen A. IFYKYK. Find this gem
here.
P2S v. A1
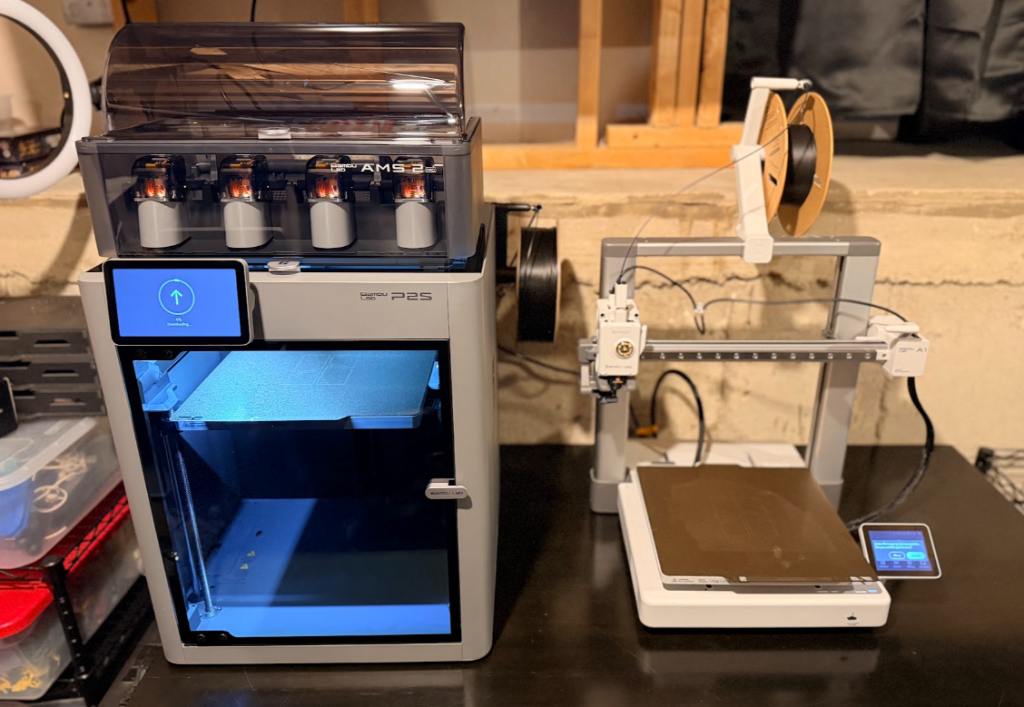 Bambu P2S compared to A1
Both printers are comparable for flat objects, with the same layer lines and precision. Where the difference comes is HOW it prints. The A1 moves the bed back and forth and has been dubbed a ‘bed slinger’. The nozzle will travel up and down along the Z-axis and left and right along the X-axis, while the bed moves quickly along the Y-axis. This slings the bed back and forth to allow the nozzle to reach all of the print space.
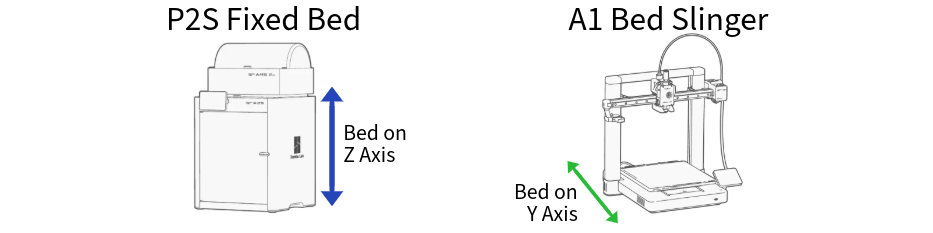 X, Y, and Z-axis reference from Bambu Lab software
The P2S’s bed moves along the Z-axis layer by layer, and the nozzle moves along the X and Y-axes. The lack of a jarring plate and bed movement allows larger, taller prints to adhere better and stay on the plate for a longer period of time. This boils down to fewer failed prints with minimal support material from the P2S.
Minimizing layer lines does have its downside. I conducted a test by printing the roof of the bunker flat on the bed, then printing it at 45-degree X and 35-degree Y angles to fight against the layer lines. The supports were added by
Bambu Studio, and I was impressed with the minimal amount needed to hold it in that position. Fourteen hours later, I had a smooth, beautiful roof. While the layer lines are barely visible to the naked eye, when you compare them in the photo, it becomes apparent that printing the roof in the tilted position minimized almost all layer lines. Is five hours of extra time worth the lack of layer lines?
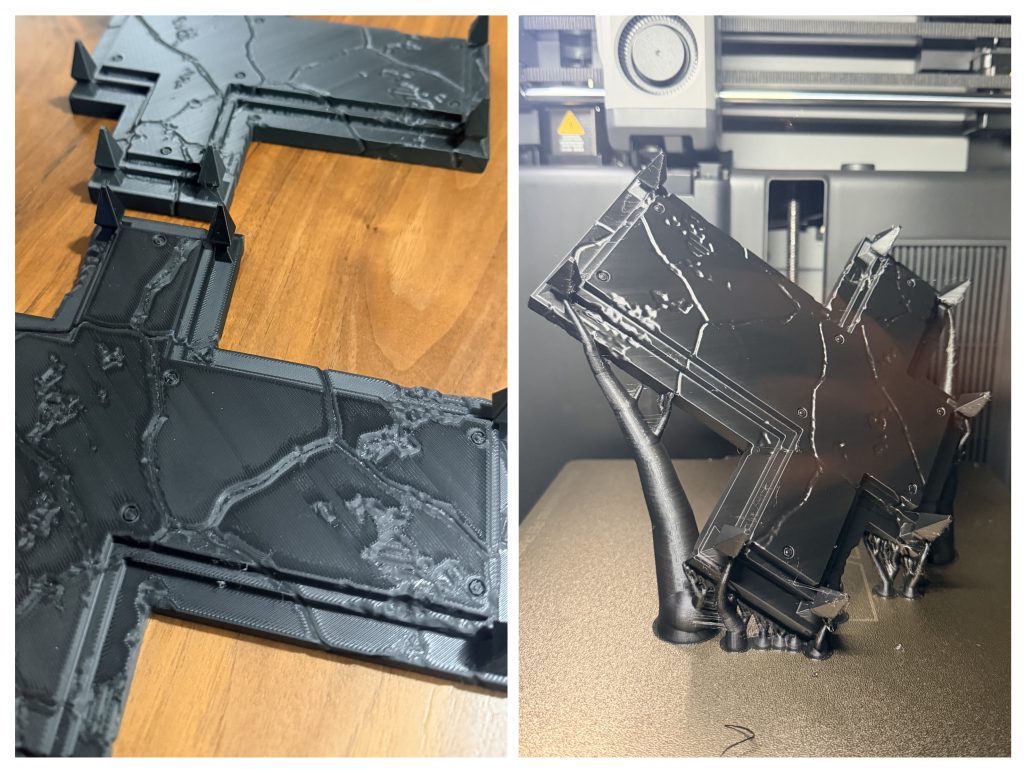 Bottom Left Printed Flat; Top Left and Right Printed at 45 Degrees
[table id=132 /]
Final Thoughts
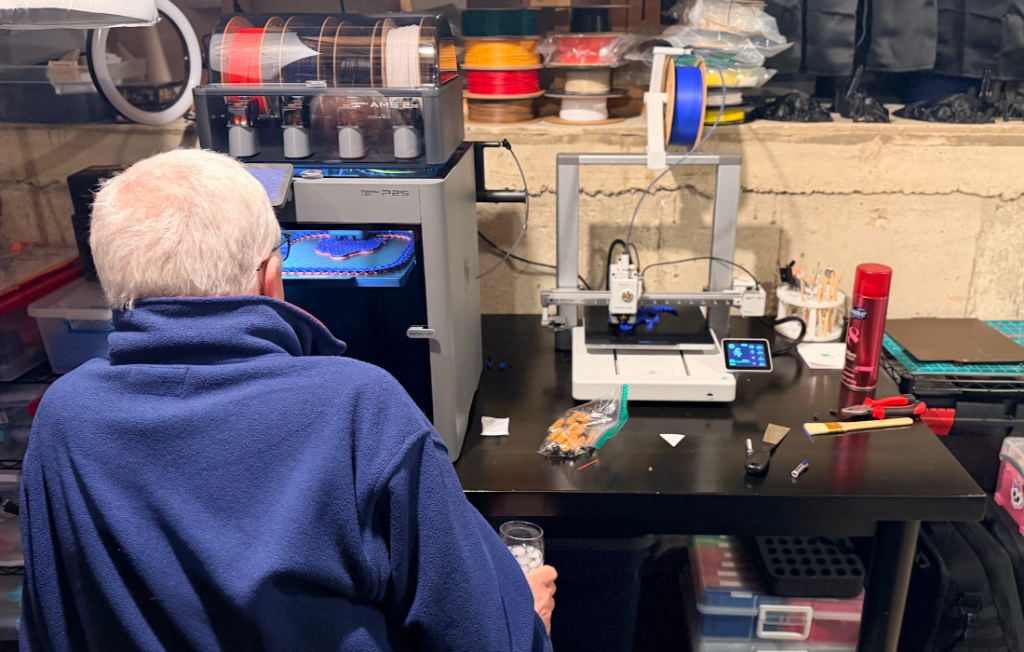 Watching the Bambu P2S Print a Sports Ball Chain
The P2S comes across as an engineering marvel. "We thought about the whole experience" should be their tagline. Compared to the Bambu A1, the P2S is a clear step up in refinement and capability. While the prints are very close in quality, you are getting added power, smarter automation, and a more robust feature set that rewards users who want to push their prints further.
The AMS 2 is a treat, offering detailed spool detection and seamless loading and automation. I found myself mesmerized by the loading process, and I could sit and watch the resin change every time. While having guests over for the holidays, I noticed they would also sit and watch it print (FIL pictured above). I have convinced at least two families to dip their toes into the 3D printing hobby, thanks to Bambu P2S.
If you are on the fence about purchasing a 3D printer, this should be your sign to pull the trigger. Everyone, from a beginner to an expert, can find value in this beautiful machine. The P2S Combo can produce anything your hobby gamer mind can imagine, from terrain to organizers; there is almost nothing this beast cannot produce. You can find your next 3D Printer
here.
Thank you for being a friend.

 The plastic bag holds strong during the removal of P2S from the box.
 Belly of the Beast
 AMS 2 Reveal
 Crashed Car *not to scale
 Cascadia Insert Plus Expansion
 P2S Miniature Tests

 Goonhammer App and Patron Updates: April, 2026
 Kill Team Tournament Report: Engage, Party, Repeat's March Madness 2026
 Goonhammer Reviews: Tribal Conquest