Welcome back to my mini-series on the smaller skirmish form of Conquest: First Blood. Through this, I’m going over how the game plays and each faction that you can place on the table, their strengths and weaknesses, and how to field them. In today’s long-awaited faction focus, we will be looking at one of the OG factions in Conquest: Dweghom, who recently have gotten a new coat of paint in their latest update.
If one looks at a dwarven faction, one would think that the following are probably true: They are slow, they are resilient, but once they connect, they hit really hard. The same can be said for the ‘dwarven’ faction in Conquest (though if you call them dwarves, there will be about 20 commenters going, ‘Um, actually’), just from their aesthetics alone: The heavy armor, the giant axe and what’s that? A giant flaming construct fueled by a primordial incarnation of war that will be hurled towards the enemy? The Dweghom are not your typical dwarves.
How to best utilize this slow and resilient faction? What are the best sub-factions? Should I buy the Found since I heard it’s the best ranged unit in the game?
 Strengths:
- Pure stats
- The ‘Awakened’ mechanic
- Aura of Death
Weaknesses:
- Expensive
- Slow
- Dwarven (You either are into the dwarven aesthetics or you will not like this army)
Army Abilities
 Credit: Harbinger from the Conquest Discord
Awakened
This is a new faction ability if you have dabbled in Dweghom before. The flavor of this ability is that a Dweghom can reach an elevated state by performing certain deeds on the battlefield. While this ability is similar to the one they have in Last Argument of Kings (LAOK), the methodology that they use to ‘awaken’ in FB2 is different.
In this iteration, a Dweghom regiment is awakened by performing one of four heroic deeds:
- Destroying an Enemy Regiment in the turn where they perform a Charge or volley action.
- Suffering no wounds during a Clash Action.
- Destroying a Character or Officer Model.
- Destroying an enemy Monster Regiment.
While some of these tasks might be difficult, focusing your build or playstyle so that you can awaken on key turns will be the cornerstone of the Dweghom strategy. And what do you get for these troubles?
You will earn a powerful once-per-game ability based on the battlefield role of the regiment. Clans will be able to perform an additional clash or volley action, Tempered may heal regardless of casualty token and Ardent may ignore their little legs and perform an additional march action.
There are, of course, special rules and abilities that can make a regiment awakened without performing these deeds, but we will go through them as we talk about each regiment!
Relentless Aggression
This ability basically boils down to your unit not losing some of their fighting potential if you go down a few models from taking hits. For each casualty token removed, you may add +1 attack to a leader model with a cap of +3. This neat little ability negates the drawback of having infantry because of their terrible scaling once they are down a few models. While you should not bank on this ability too much for turning the tides, it is still a powerful ability to have passively.
Battlefield Roles
More of a flavor than an army rule. Thematically once the Dweghom is freed from their draconic overlords and are now free to choose their own future. They kinda disagree on a direction for their faction. Do they want to stay in the mountains, do they want to further their elemental prowess or do they invent a religion?
Characters
 One thing to say about the Dweghom character stats is that they are all quite chonky, all of them having above-average wounds (with the exception of the Tempered Sorcerer, who should NOT be hanging out too forward). Hell, their Ardent Kerawegh is quite the decent front-line combatant himself! The Dweghom want to be forward and, if possible, snipe the enemy officers or characters with Challenge!
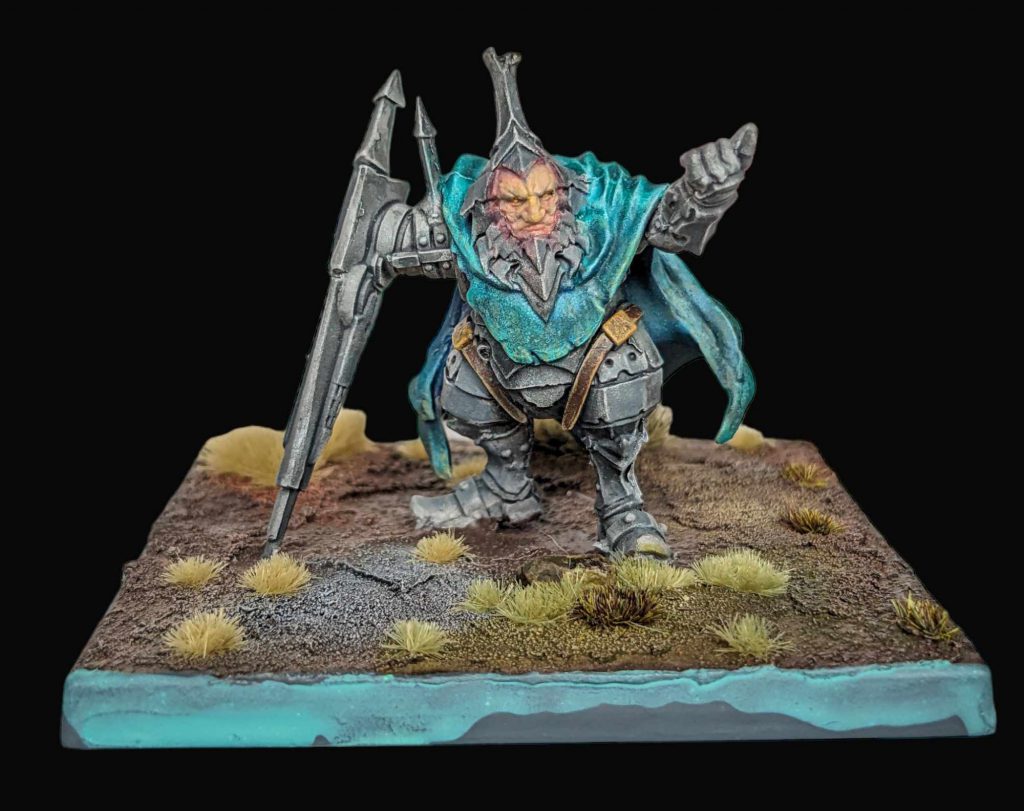
Hold Raegh
 Credit: Harbinger from the Conquest Discord
The signature tough guy with big axe and an even bigger beard! The Hold Raegh is an excellent combatant with 5 attacks, wounds, 4 defense and 5 resolve. He wants to support his troops in the middle of the board while he goes on and take down an undefended flank (if he gets there, no thanks to his meddling speed 5)
His main schtick is the The Mnemancers Will Want to See This ability. The flavor behind this is that he wants the Mnemancers (think of them as being the Dweghom scribes) to record the deeds of the Hold Raegh on the battlefield, so he can also bring them at a discount using the Mnemancer’s Apprentice ability. Talk about greasing the palm!
Collusion aside, he doubles the seizing powers of models that are claiming the same objective as Hold Raegh, and he himself counts as three for the purpose, meaning he will most likely win the seizing game against another similarly powered regiment.
To support his gameplay, he has access to three powerful commands: Pillars of Stone removes the vulnerability of Dweghom to cleave by giving a regiment with shield Hardened (1); Not the Largest We Have Slain marks a brute, cavalry or monster and gives them a -1 to their Resolve; and lastly Resilience enables a unit to ignore the first time they are broken.
Credit: Harbinger from the Conquest Discord
The signature tough guy with big axe and an even bigger beard! The Hold Raegh is an excellent combatant with 5 attacks, wounds, 4 defense and 5 resolve. He wants to support his troops in the middle of the board while he goes on and take down an undefended flank (if he gets there, no thanks to his meddling speed 5)
His main schtick is the The Mnemancers Will Want to See This ability. The flavor behind this is that he wants the Mnemancers (think of them as being the Dweghom scribes) to record the deeds of the Hold Raegh on the battlefield, so he can also bring them at a discount using the Mnemancer’s Apprentice ability. Talk about greasing the palm!
Collusion aside, he doubles the seizing powers of models that are claiming the same objective as Hold Raegh, and he himself counts as three for the purpose, meaning he will most likely win the seizing game against another similarly powered regiment.
To support his gameplay, he has access to three powerful commands: Pillars of Stone removes the vulnerability of Dweghom to cleave by giving a regiment with shield Hardened (1); Not the Largest We Have Slain marks a brute, cavalry or monster and gives them a -1 to their Resolve; and lastly Resilience enables a unit to ignore the first time they are broken.
Bergont Raegh
Add everything you know about the Hold Raegh but now he’s riding a giant lizard. They are basically the same in terms of stats, just losing out on the Resilience command ability.
Ardent Kerawegh
 Credit: Harbinger from the Conquest Discord
At a glance, the Ardent Kerawegh seems like every other battle priest from every faction. At there's some truth to that, but even in the Dweghom, the battle priest will bonk you with his massive sword. Having 5 attacks and Flurry to re-roll misses means that he’s no slouch in combat; it's just that a lowish defense of 3 means that he will need a Veteran Hold Thanes retinue or two to keep him alive.
Flaming Oratory is his signature ability, giving you an incentive to build a mono-ardent list by giving each model with the Ardent battlefield role Tenacious—discarding one failed defense roll. This makes them incredibly resilient! Not only that, whenever he casts it these religious zealots will also get +2 to the march regiment. Talk about being the first out of the church.
But wait, there’s more. Righteous Assault gives every infantry unit +1 march during the first 2 rounds of the game. Alright, I might have lied a little when I say the Dweghom are slow. The Ardent Kerawegh adds a coat of red to all their armor!
Oh crap, we’re not done with the speed boost yet? Moaghm Dorh! is an incantation that gives an additional X to the charge distance. And if it’s an Ardent - adds +2.
Let’s theory craft here. A flame berserker regiment can charge up to: 5 (march) + 1 (Righteous Assault) + 2 (Flaming Oratory) + 7 (Moaghm Dorh + bonus for being Ardent) + 2 (unstoppable) = 17! A 17” charge range. Talk about sending some zealot missiles to your opponent’s deployment zone.
Credit: Harbinger from the Conquest Discord
At a glance, the Ardent Kerawegh seems like every other battle priest from every faction. At there's some truth to that, but even in the Dweghom, the battle priest will bonk you with his massive sword. Having 5 attacks and Flurry to re-roll misses means that he’s no slouch in combat; it's just that a lowish defense of 3 means that he will need a Veteran Hold Thanes retinue or two to keep him alive.
Flaming Oratory is his signature ability, giving you an incentive to build a mono-ardent list by giving each model with the Ardent battlefield role Tenacious—discarding one failed defense roll. This makes them incredibly resilient! Not only that, whenever he casts it these religious zealots will also get +2 to the march regiment. Talk about being the first out of the church.
But wait, there’s more. Righteous Assault gives every infantry unit +1 march during the first 2 rounds of the game. Alright, I might have lied a little when I say the Dweghom are slow. The Ardent Kerawegh adds a coat of red to all their armor!
Oh crap, we’re not done with the speed boost yet? Moaghm Dorh! is an incantation that gives an additional X to the charge distance. And if it’s an Ardent - adds +2.
Let’s theory craft here. A flame berserker regiment can charge up to: 5 (march) + 1 (Righteous Assault) + 2 (Flaming Oratory) + 7 (Moaghm Dorh + bonus for being Ardent) + 2 (unstoppable) = 17! A 17” charge range. Talk about sending some zealot missiles to your opponent’s deployment zone.
Tempered Sorcerer
The actual squishy spellcaster dwarf is here, with pretty standard stats for a spellcaster; bring some retinue if you want them anywhere near the frontline. Other than the spell-slinging abilities, the sorcerer brings two army wide rule in the form of Infernal Guardians where they are incentivized to ring inferno automata that can now actually score thanks to them losing feral. The other one is Fire and Ruin making Fire-forged re-roll hits of 6, making them that much more accurate.
However, most of the incentive you have for bringing this literally on fire guy is the spells. Where the previous incarnation only making them have access to one school of magic, now they have access to 3!
Fire School
Coruscation is your standard ‘firebolt’ type of spell: You point to an enemy regiment, and it deals damage based on the success. A Fiery End is more utility in that it can mess up with healing as well as any abilities that rely on casualty tokens. Firewall is a spicy one, where it punishes a horde of infantry by dealing extra hits if they have a number of models greater than 8.
Magma School
Magmatic Seep is an interesting spell that acts as both deterrence for the enemy and a chance for your own regiment to become awakened (if you can withstand the fires of your own magma that is!). Pyroclast is a spell that scales based on the enemy’s defense increasing the amount of hits based on that. And lastly, Eruption is good at picking off squishier target from afar due to its ability to bounce to another target
Earth School
More of the utility school compared to the other two. Roots of Stone removes any debuff to march and the penalty to the second march action to the target regiment. Broken Ground is a hit and debuff to their march, which is quite fascinating to slow down regiments. The last and most interesting spell is Rock Shaping;
wound prevention in this game is almost borderline too good, and the sorcerer can hand it out each round. In theory this shrugs off 3-4 hits from the enemy, and also, since wound prevention also prevents the morale test that comes along with it, it potentially saves even 2 wounds in the process. Neat!
Hellbringer Sorcerer
Bring everything you like about the sorcerer, and now he’s riding a giant shooting lizard. Go figure.
Tempered Spellshaper
 Credit: Habaguero from the Conquest discord
Now this is a fairly interesting character in the Dweghom army. Stats-wise they are a bit of a mixed bag, with good defensive stats but middling offensive stats. However, what is scary is that they have natural terrifying (2) as well as Aura of Death (4), which means that once he is in combat, the enemy can potentially suffer a lot of damage.
Now mostly you will be taking the Spellshaper for two abilities: Final Transformation which gives them three actions per turn, enabling them to go march, march, charge if you so desire (though with speed 5...good luck!), and Dull Blades
Credit: Habaguero from the Conquest discord
Now this is a fairly interesting character in the Dweghom army. Stats-wise they are a bit of a mixed bag, with good defensive stats but middling offensive stats. However, what is scary is that they have natural terrifying (2) as well as Aura of Death (4), which means that once he is in combat, the enemy can potentially suffer a lot of damage.
Now mostly you will be taking the Spellshaper for two abilities: Final Transformation which gives them three actions per turn, enabling them to go march, march, charge if you so desire (though with speed 5...good luck!), and Dull Blades, a powerful single-target debuff
. Let’s talk about it.
One big concept that you will soon learn in a game of First Blood is engagement range. The concept itself is fairly wonky, but once you play a game or two, you will soon understand. Essentially each model projects a 1” bubble from themselves in which, in order for the enemy to engage them, they have to ‘charge’ towards that bubble. If you are outside of the engagement range, you can be shot at; on the other hand, some abilities only trigger in engagement range.
Therefore, removing them via this ability means you are essentially negating that one scary model that your opponent has. No counterplay, no nothing. You pick one model and they suddenly cannot perform any clash nor charge action. This ability has been nerfed from the previous edition, now it only targets one enemy—but hoo boy, removing that one scary Crimson Tower might be worth its weight in gold.
Oh, yeah, they also have some spells on top of that.
Temper Blades is your standard re-roll on 6 to a friendly regiment, and Ferric Expansion is a cute spell, essentially turning one of your monsters into a walking shield so that the infantry within their engagement range cannot be targeted via volley. Living Metal is a heal that is more powerful on a tempered regiment, and lastly Oxidize is a niche spell to remove the decay ability. Right now it’s mostly used against Spires, but who knows if there will be other uses for it in the future.
Lost Ancestor
Okay. Let’s get it out of the way.
This character is basically a Jojo character disguised as a Dweghom. So let’s call it Jogodosh Jornestar. I don’t know, don’t @ me.
A brute character with all the perks that come with a brute: namely, a larger number of wounds, a higher amount of attack, an impact attack, and a slightly faster movement compared to its comrade.
A melee monster in its own right, with the high amount of attack, aura of death, and fearlessness—not to mention they can also do the three actions per turn with the additional benefit of counting as six models for seizing objectives.
Oh it also has some funky command abilities and spells too, neat!
Elemental Fury is a buff that increases the attack characteristic of one single model. A potential +6 attack is not something to scoff at. Wisdom of the Ancients is basically Hold Raegh’s resilience, but in a bubble. Born of Fire and Heat is a neat ability to turn off an enemy’s Aura of Death while empowering your own by +3. And Repel Blow negates Dweghom’s biggest fear: cleave.
Infantry Units
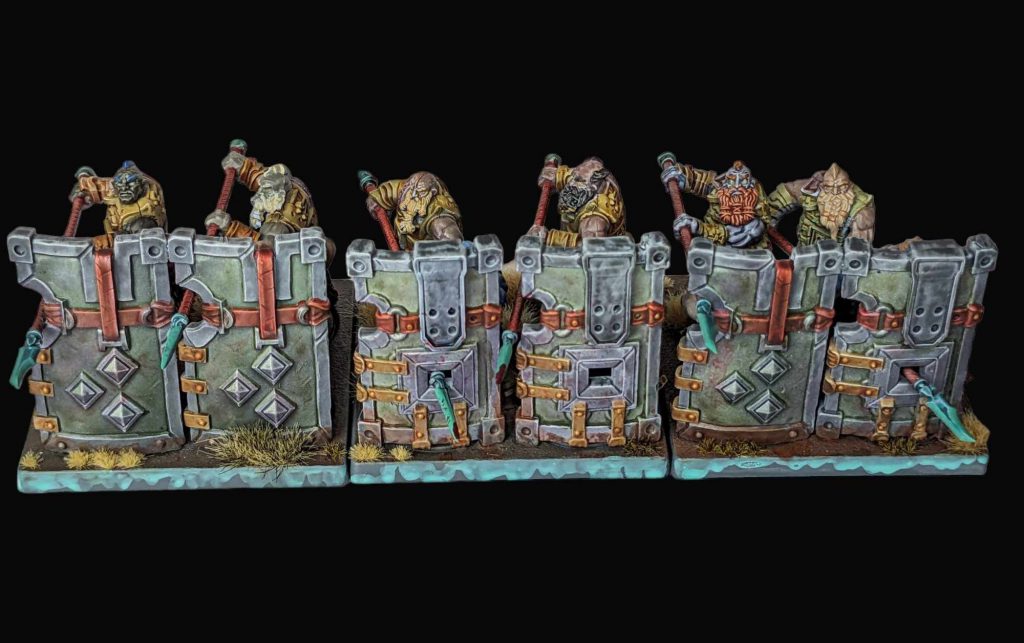
Hold Warriors
Every faction has them: the standard spear and shield. But vanvan, they are not wearing spears. Well, hammer and shield. Close enough! These come in with a tenacious flavour so they are that much more resilient in combat compared to the other option. Only downside is that they cost 100 points, which is quite expensive for a standard troop.
Hold Ballistae
 Credit: Habaguero from the Conquest discord
Hold, warrior with a crossbow! Literally. They even have the shield with them. They do pretty decently in a firefight, though, with their midrange at 15, barrage 2, and armor piercing. Not to mention that they have defense 3, where every other ranged unit is defense 2 or even 1.
Credit: Habaguero from the Conquest discord
Hold, warrior with a crossbow! Literally. They even have the shield with them. They do pretty decently in a firefight, though, with their midrange at 15, barrage 2, and armor piercing. Not to mention that they have defense 3, where every other ranged unit is defense 2 or even 1.
Hold Thanes
Expensive but with an elite stat line. Two attacks coupled with their cleave 1 and a good clash profile make them a very efficient brawler should you be in a position to do so. These guys should be your main infantry units with just how ubiquitous they are.
Dragonslayers
 Credit: Habaguero from the Conquest discord
Currently the most expensive infantry option that the Dweghom has, and let’s see what they are. Solid in all the stats that mattered, including cleave (3) to take care of pesky...anything. And Fiend Hunter to re-roll because why not! Though they have an additional two new benefits now in the current iteration of the rule: 1) Free standard bearer, which gives them unstoppable and 2) Show ‘em How It’s Done!
Credit: Habaguero from the Conquest discord
Currently the most expensive infantry option that the Dweghom has, and let’s see what they are. Solid in all the stats that mattered, including cleave (3) to take care of pesky...anything. And Fiend Hunter to re-roll because why not! Though they have an additional two new benefits now in the current iteration of the rule: 1) Free standard bearer, which gives them unstoppable and 2) Show ‘em How It’s Done!,
an ability that makes another regiment awakened if they kill something -- thereby making chain awakening possible. They are premium for their point cost, but certainly they have a very solid place in the army.
Flame Berserkers
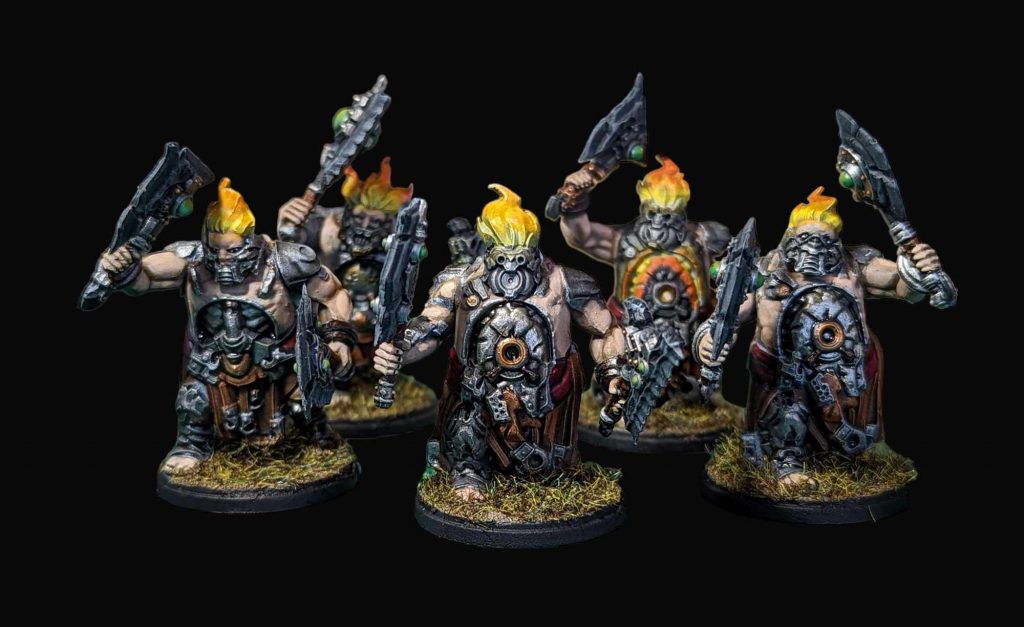 Credit: Harbinger from the Conquest Discord
Wow, these guys are on fire (please don’t kill me editor). They recently got nerfed slightly with the reduction of their Aura of Death and Feral on top of that, but for their troubles, they get an increased attack profile with two attacks and unstoppable to add to their increased charge range. They are still unfortunately only speed 5, so they might need some help getting there (see: Ardent Kerawegh).
Credit: Harbinger from the Conquest Discord
Wow, these guys are on fire (please don’t kill me editor). They recently got nerfed slightly with the reduction of their Aura of Death and Feral on top of that, but for their troubles, they get an increased attack profile with two attacks and unstoppable to add to their increased charge range. They are still unfortunately only speed 5, so they might need some help getting there (see: Ardent Kerawegh).
Initiates (Pikes) + (Shield)
 Credit: Habaguero from the Conquest discord
These guys should be taken as a pair when you are able to. Pike Formation increases the attack of the Pikes within the engagement range of the Shield. The Shield Formation does a fairly decent job of cosplaying as warriors but with one important twist: Implacable. This ensures that they cannot get hit by impact attacks, making them a good choice in a brute/cavalry heavy meta. Try them out; for around 180 points you can get 8 guys and they will serve decently in your list.
Credit: Habaguero from the Conquest discord
These guys should be taken as a pair when you are able to. Pike Formation increases the attack of the Pikes within the engagement range of the Shield. The Shield Formation does a fairly decent job of cosplaying as warriors but with one important twist: Implacable. This ensures that they cannot get hit by impact attacks, making them a good choice in a brute/cavalry heavy meta. Try them out; for around 180 points you can get 8 guys and they will serve decently in your list.
Magmaforged
Now this is a difficult unit to evaluate for a couple of reasons. Their stats are fairly decent for their point cost, but their sets of abilities hint that they are more of a utility unit? Aura of Death makes for a passive damage dealer, and coupled along with Molten Aura makes them a support unit for the rest of your army.
Wardens
Similar stats to their clan counterpart but with an ardent flavor. Adding Fearless might be clutch against terrifying heavy army or the Old Dominion in general. Now they also have 2 attacks each! Making them a fairly good option if you want to have a mono ardent list.
Brute
No cavalry for Dweghom, sad.
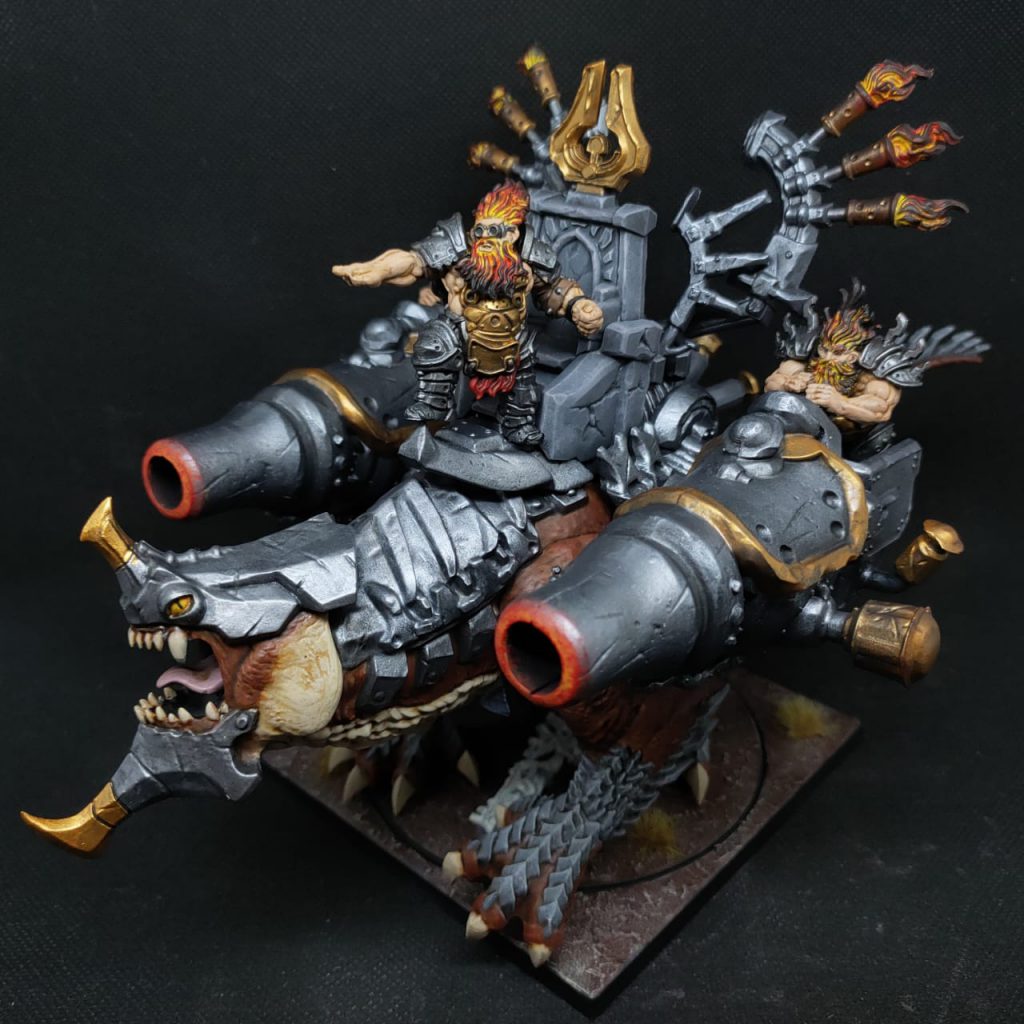
Inferno Automata
Aura of Death (5) is insane—until you realize the rule for Burn Bright ensures that the aura is reduced by the amount of wounds. Definitely a conscious effort to nerf the Aura of Death spam that was prevalent in the previous edition. Overall this unit is fairly solid; speed 7 with fairly durable stats makes them able to cap objectives early and threaten the backline. Just don’t expect these guys to endure a full charge from an offensively oriented unit.
Steelforged
Generally considered the better option for a front-line brute, they trade aura of death for an increased amount of attacks. And with a defense of 4, they can take a fair amount of punishments before going down. Also they have the ardent sub-faction, which if you bring a pair of them you could potentially revive one using the awakened ability.
Lost
They are the most expensive option for a melee brute, and they come with all the bells and whistles. High defense, high amount of wounds, and passive damage in the form of aura of death as well as cleave 2! If you have a spare amount of points, definitely consider these guys.
Found
I see you have Found the best brute in the Dweghom army (editor don’t remove this line, please). But seriously, this is probably the best ranged brute in the game by far. Statsline is unimpressive other than the 3 defense and 4 wounds which means that they won’t die in one single shootout but if you can let them fire for a round or two, the damage potential is insane.
They can choose three options for shooting, and all of them are equally good: Cluster Bombs punishes large swathes of infantry, making them a potential barrage 6 against 9 or more targets. Incendiary is the fire and pray ability, giving them natural barrage 7 but without the ability to take aim. And lastly, considered the best mode is Armor Piercing. The shot is only 3 but it can potentially deal up to 6 wounds with a natural ability to remove armor by 3.
Monsters
Ironclad Drake
The melee variant of the tamed drake and this one is a fairly tough beast. At 12 attacks with cleave (2), these guys are a melee monster and their signature ability - Clad in Iron - ensures that they have a ‘feel no pain’ save to not suffer any wounds. Even the wounded profile is still a fairly powerful stat line with 7 attacks, but their armor is now gone.
Hellbringer Drake
 Conquest Last Argument of Kings Credit: Magos Sockbert
The ranged variant also has a still somewhat decent melee profile as well. Their signature ability Overcharge is able to ‘store’ some charges so that they can increase their barrage or to increase the armor-piercing value, meaning you can potentially shoot for 12 on the second round. Even if they are wounded, they are still shooting at barrage 8.
Conquest Last Argument of Kings Credit: Magos Sockbert
The ranged variant also has a still somewhat decent melee profile as well. Their signature ability Overcharge is able to ‘store’ some charges so that they can increase their barrage or to increase the armor-piercing value, meaning you can potentially shoot for 12 on the second round. Even if they are wounded, they are still shooting at barrage 8.
Stoneforged
 Conquest Dweghom Stoneforged credit: Bair
A unique monster without any wounded profile! This means that it will remain resilient and hard-hitting until the very last wounds. Quite an expensive monster for their cost so let’s see what it brings to the table.
18 wounds with a non-degrading 12 attacks is powerful at a glance. Cleave (2) is good to ensure that they can win the monster brawl. The unique ability is Unstable Alloys that allows them to combo with the steelshaper character. Essentially when they receive a decay - they can ‘convert’ it into a ranged attack. A flavorful ability that needs some work-around.
And then you get the unique action Tectonic Slam
Conquest Dweghom Stoneforged credit: Bair
A unique monster without any wounded profile! This means that it will remain resilient and hard-hitting until the very last wounds. Quite an expensive monster for their cost so let’s see what it brings to the table.
18 wounds with a non-degrading 12 attacks is powerful at a glance. Cleave (2) is good to ensure that they can win the monster brawl. The unique ability is Unstable Alloys that allows them to combo with the steelshaper character. Essentially when they receive a decay - they can ‘convert’ it into a ranged attack. A flavorful ability that needs some work-around.
And then you get the unique action Tectonic Slam,
which can just destroy an objective marker—very important for objective games, which normally need multiple actions over multiple rounds to get rid of it.
Officers
Dweghom officers are expensive; one of the unfortunate side effects of their faction being all elite is that they have to adjust the cost of the officers accordingly.
Herald of Fire
The gimmick of this officer is that it can declare a challenge with a penalty that the enemy will be provoked by as if they were challenged by a character. With cleave 2 and relentless blows, it can potentially challenge a character unit and walk away with only a dent or two.
Herald of Stone
Defensive Formation turns an already strong block of shield infantry into something even more sturdy giving them +1 defense.
Herald of Magma
 Credit: Habaguero from the Conquest discord
Using
Enveloped in Flames to give an aura of death (1) will be the name of the game for this officer. It can turn on its own regiment if they do not already have innate aura of death, making his regiment aura of death (3) which isn’t too bad.
Mnemancer Apprentice
Carved in the Annals of Aghm turns a regiment double for the purposes of seizing powerful ability if you simply just want to cram into an objective zone in order to seize them.
Building a First Blood Dweghom List
The key thing about building a Dweghom list is to take a look at each of the subfaction/battlefield roles and how to set them up to awaken. Dweghom wants some amount of ranged attacks to compensate for their low speed, and then you want the heavy hitters in the form of Dragonslayers.
Clans wants more heavy focus on defensive units and having a strong infantry core, tempered wants to have at least a brute model or two to benefit from the healing and the ‘resurrect’ once per game, and ardent definitely is the speediest out of all the sub-factions.
Dweghom monsters are quite powerful for their power cost, the ranged drake in particular fits the archetype of both a ranged unit as well as a powerful monster.
Consider the following as a ‘guideline’ for a Dweghom list:
- 1-2 Subfaction units: Warden / Thanes / Berserkers
- 1-2 Objective Holders: Warriors
- 1-2 Heavy Hitters: Dragonslayers
- 1 Missile Troops: Found
Sample Dweghom list:
=== First Blood ===
Dragonslayer [985/1000]
Dweghom
* Hold Raegh [15]: Steel Enhancements
* Found (1) [140]:
* Dragonslayers (4) [220]:
* Hold Thanes (8) [430]: Standard Bearer, Herald of Stone
* Hold Warriors (8) [180]:
It’s a fairly bog-standard Dweghom list using Clans battlefield role as the main backbone of the army. With the Thanes and Warriors, you will have 2 core infantry regiments to work with and alongside the Herald of Stone, the extra defense will help in making them awakened. Once the game drags on, the Dragonslayers can awakened some units and then using the once-per-game ability to clash again with the awakened regiment, it can create a chain effect that will destroy the enemy.
Final Thoughts
The Dweghom are an interesting army in the sense that they are the true ‘elite infantry’ faction in Conquest. Slow, steady, and resilient (and expensive) they thematically fit in that dwarven gameplay while also being aesthetically pleasing to the eyes.
Until next time!
As always if you want to get 10% off and support Goonhammer you can make your Conquest purchase by clicking here. You’ll also need to enter code “goonhammer” at checkout.
Have any questions or feedback? Drop us a note in the comments below or email us at contact@goonhammer.com. Want articles like this linked in your inbox every Monday morning? Sign up for our newsletter. And don’t forget that you can support us on Patreon for backer rewards like early video content, Administratum access, an ad-free experience on our website and more.
Thank you for being a friend.


 Goonhammer App and Patron Updates: April, 2026
 Kill Team Tournament Report: Engage, Party, Repeat's March Madness 2026
 Goonhammer Reviews: Tribal Conquest