The Inner Sphere is a big place. Not Warhammer 40,000 big, but pretty big nonetheless. The worlds of the Inner Sphere naturally vary wildly in their native (or artificially-induced) biomes, and the risk of a firefight on a planet that reminds you of home aside from the hostile megafauna has never been enough to keep the powers that be from smashing some ‘Mechs together there. For actual BattleTech
games, however, picking a good set of maps is often a critical part of making the experience enjoyable for both parties. To that end, CGL’s map packs have been split between design philosophies that I would define as “highly functional” or “narratively engaging,” with Grasslands, Deserts, and City being more useful in pickup games, while Battle of Tukayyid and Alien Worlds are much more geared towards acting as campaign setpieces (Savannah, being largely a remaster of old-school FASA maps, is unique in that it’s a little of both).

This brings us to the new Map Pack: Volcanic and Map Pack: Glacier. As the names suggest, one pack is oriented around an active volcanic region, while the other takes place in and around a glacier (specifically, the surface of Misery from
Wolves on the Border). Both map packs also form a single “BFM”-scale map composed of 16 standard map sheets, though you’ll need to buy two copies of a given map pack in order to do so. Is it worth doing that? Well, that depends.
The Heat Is On
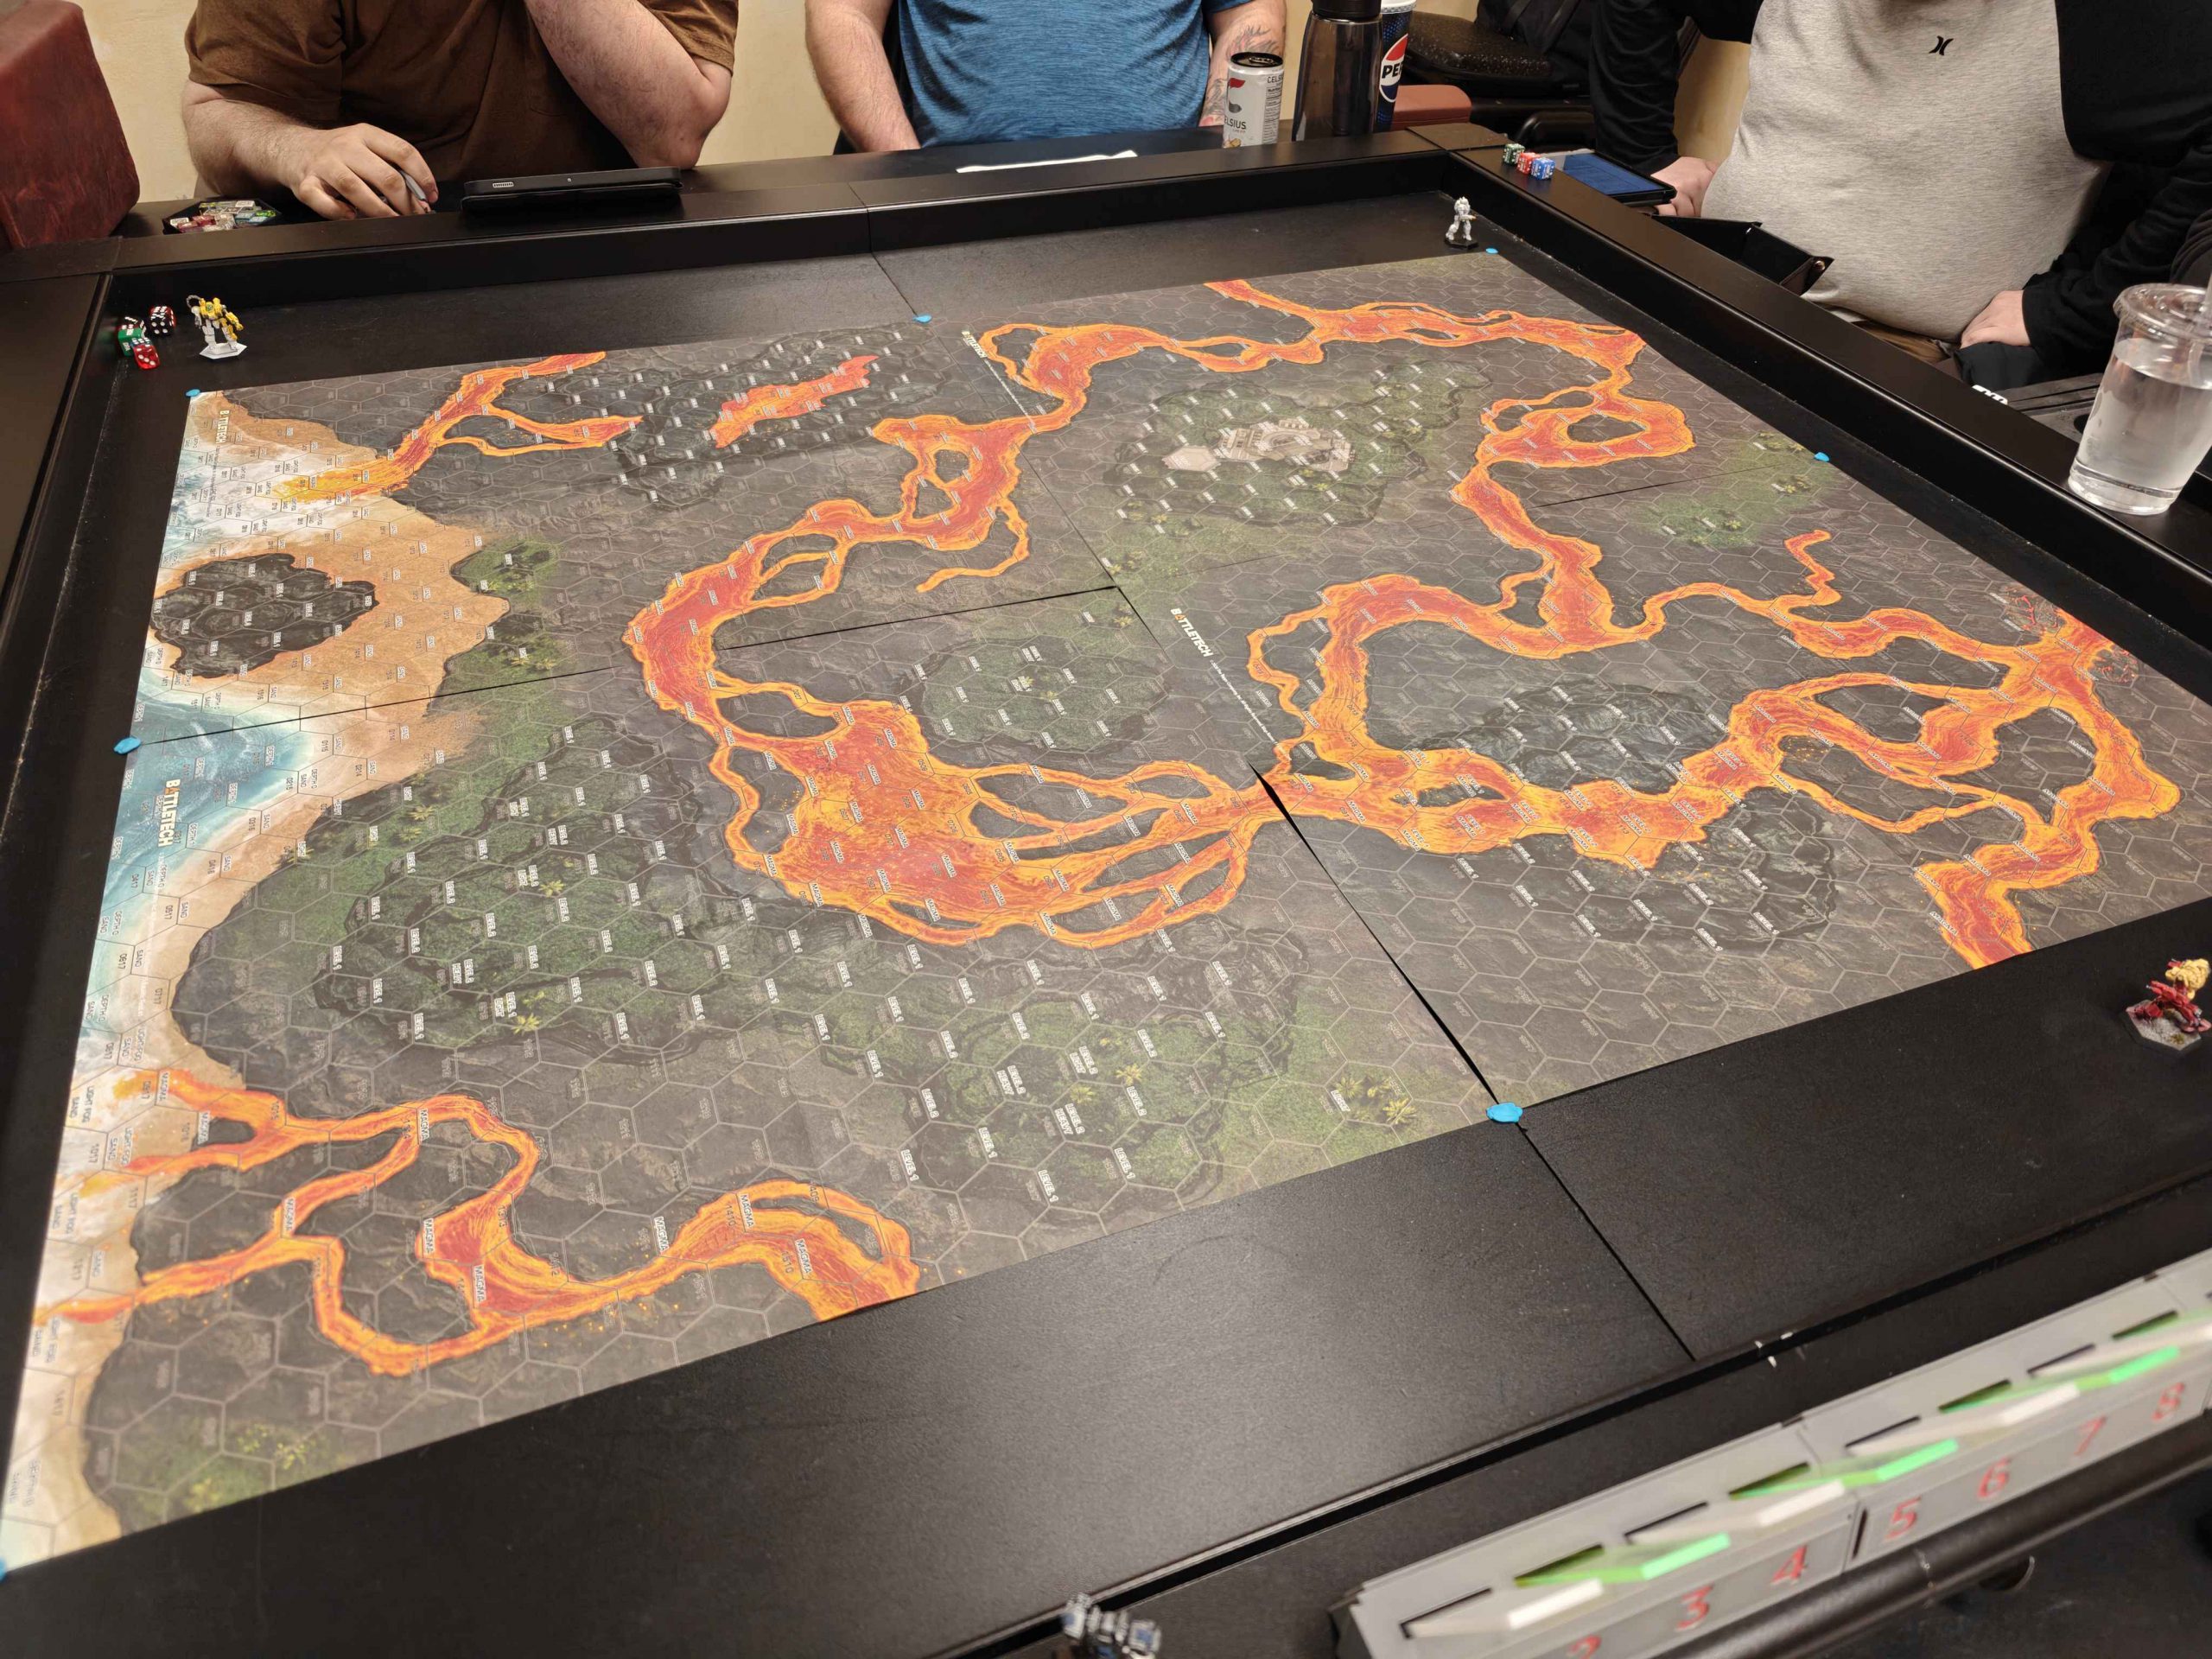
If there’s one thing I can say with absolute certainty about Map Pack: Volcanic, it’s that it falls firmly into the “narrative” side of the equation. The entire map is criss-crossed with active magma hexes, flowing from the “northern” half into the “southern” half, where the lava flows onto a beachhead and into the ocean. As one might expect, Tactical Operations rules are
very much in play here, though an included rules sheet provides most of the relevant details for crust and magma hexes (for sand and light fog, however, you’ll need to break out TacOps: Advanced Rules; thankfully their presence here is minimal).
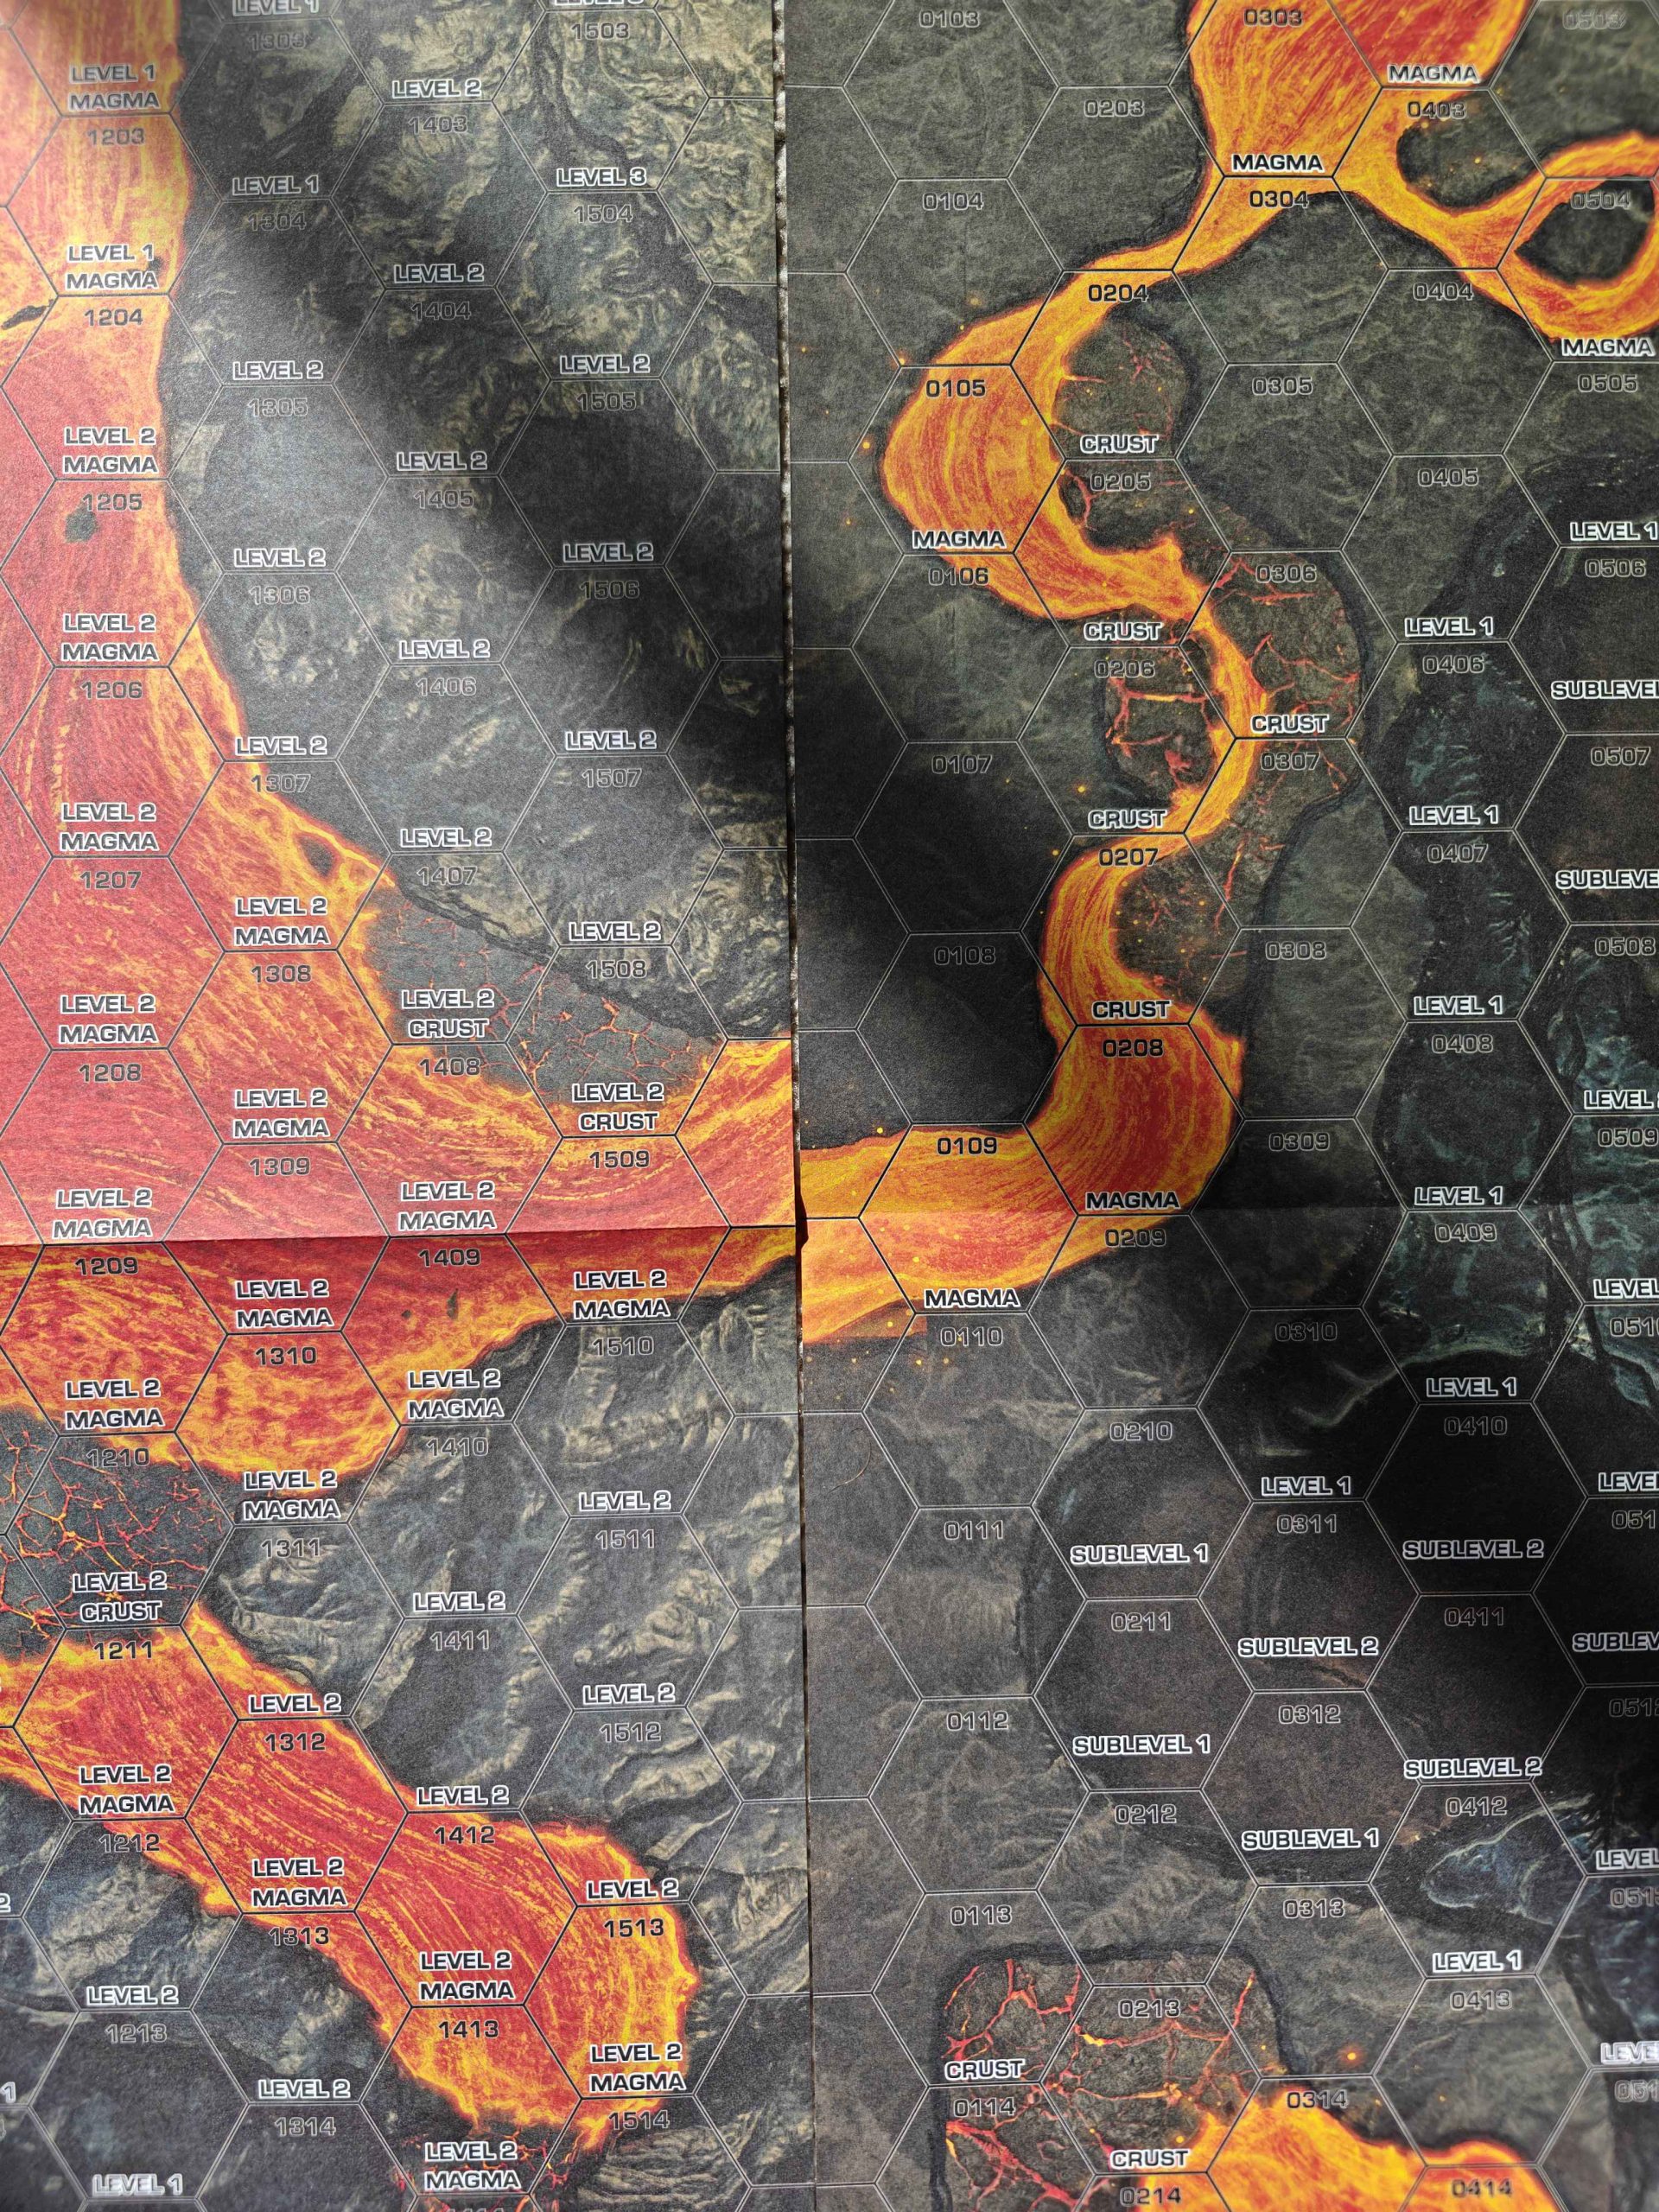
Crust isn’t super common, but on many mapsheets it gives you what will probably be your best option for crossing lava without needing jump jets. It’s not without risk – even units that can cross crust hexes (namely, ‘Mechs and tracked vehicles) have the potential to “break through” the crust and immediately turn it into a Depth 1 hex of magma, which destroys anything that
isn’t a ‘Mech instantly
and applies 2D6 damage to each exposed location
and applies additional heat that
ignores the external heat cap. Fun!
The northern part of the map set is built around a magma dome vent that serves as the centerpiece for four full mapsheets, and has both higher elevations and significantly higher density of magma hexes than the other sheets. This is, frankly, the worst part of the map pack. Some map sheets are almost half-covered in magma hexes, and while you do get a punchboard sheet of crust, building, and bridge tokens to create pathways, it’s far from ideal. The elevation changes are also not well-defined by the art, which gave me some flashbacks to trying to play Crystalline Canyon from Map Pack: Alien Worlds. There
are some funky ideas here that might be enjoyable under the right circumstances, namely the two “Lava Tubes” maps that give us some honest-to-Kerensky tunnels, but I can’t see these being in anything close to regular rotation for pickup games.
The southern half of the map is better, but not dramatically so. There’s still more magma and crust hexes than I think most players would like to see, but the elevation changes are a bit more readable, the magma flows are a little narrower, and – thank the Great Father – we have some actual goddamned
trees for cover here. Not a lot of them, but they’re there! The art can still be a bit confusing with these maps, as some hexes with a clear magma flow through them are unmarked and thus treated as clear terrain, but I’ll take these over the mess that is trying to read the elevation changes near the magma dome.
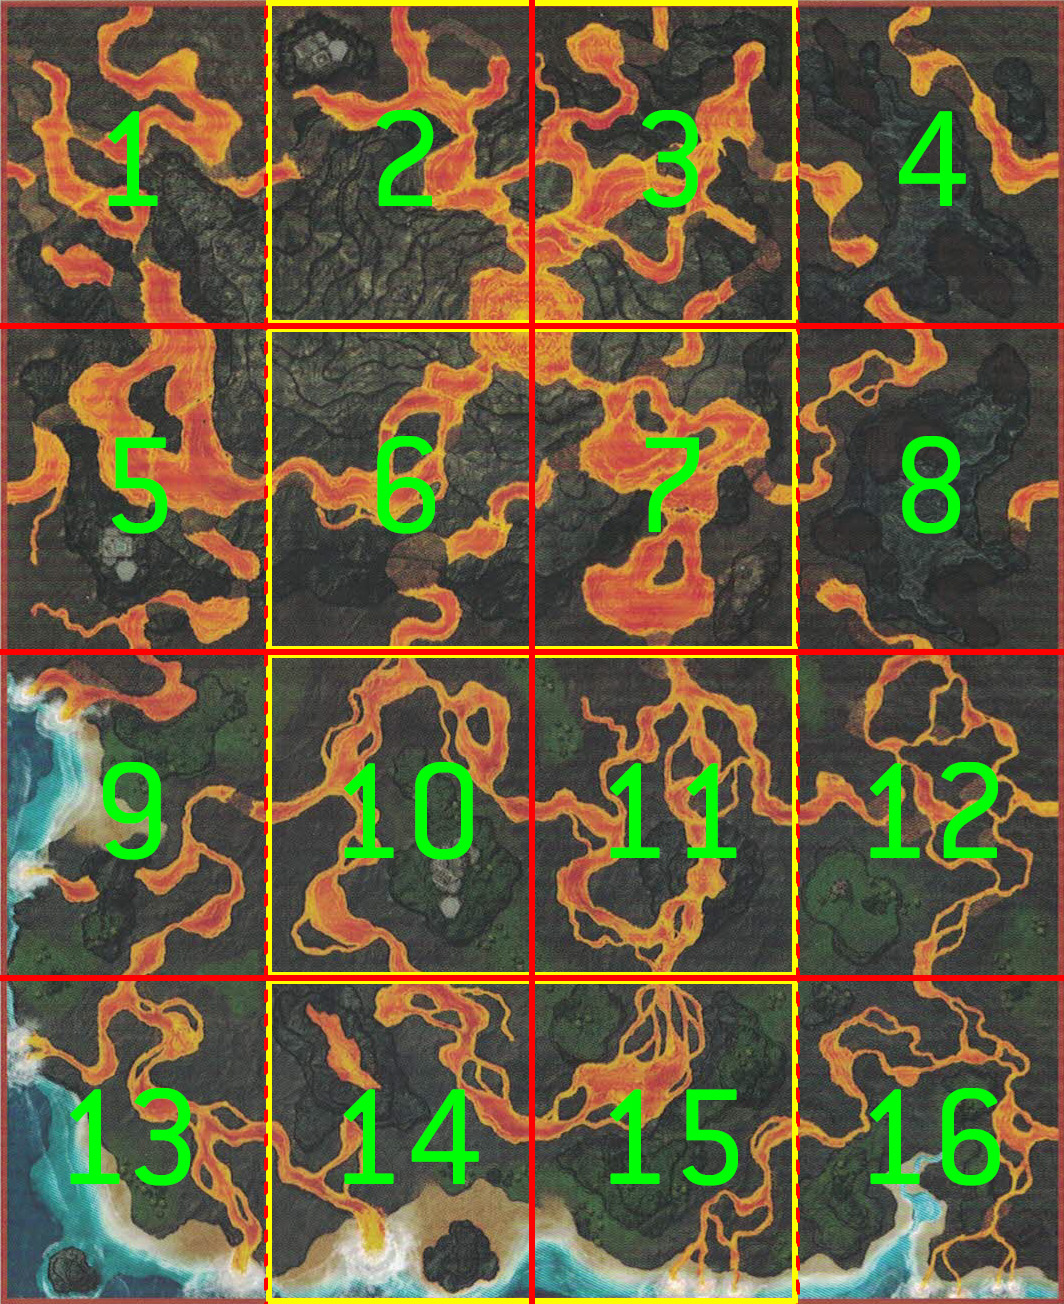
With the maps all laid out, the one burning question that I had beyond “who the hell wants to fight here and why?” was “why are the maps printed this way?” As it turns out, there’s a peculiar layout to these maps that I found hard to explain, so I’ll let Jack handle it.
 Jack:
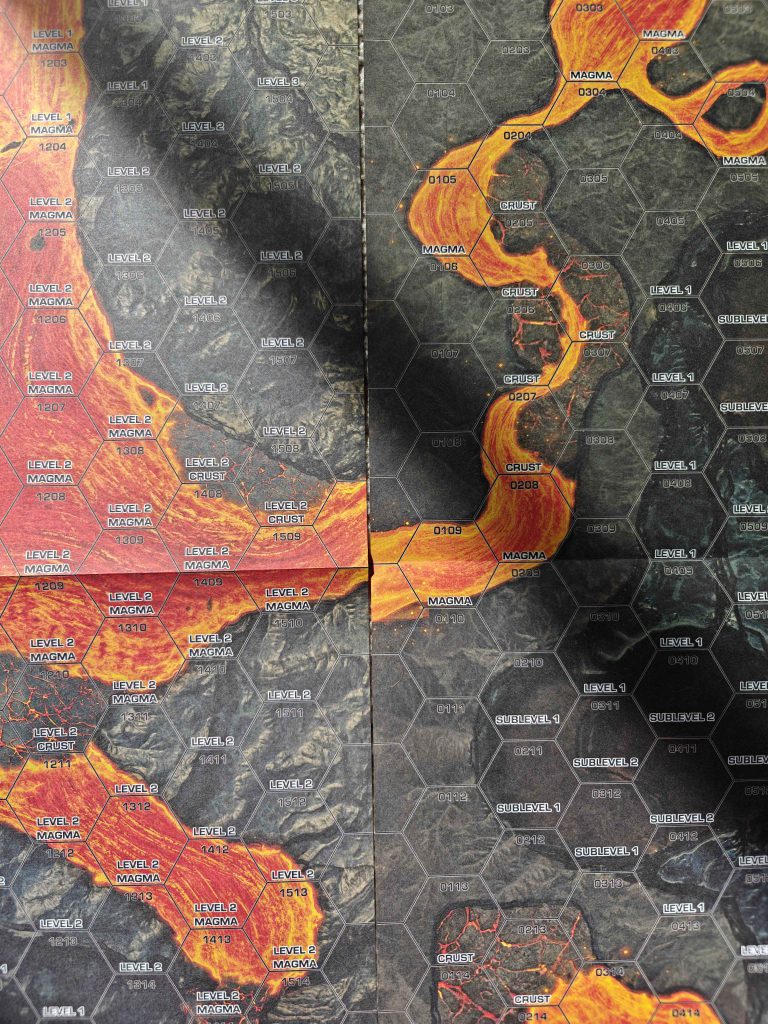
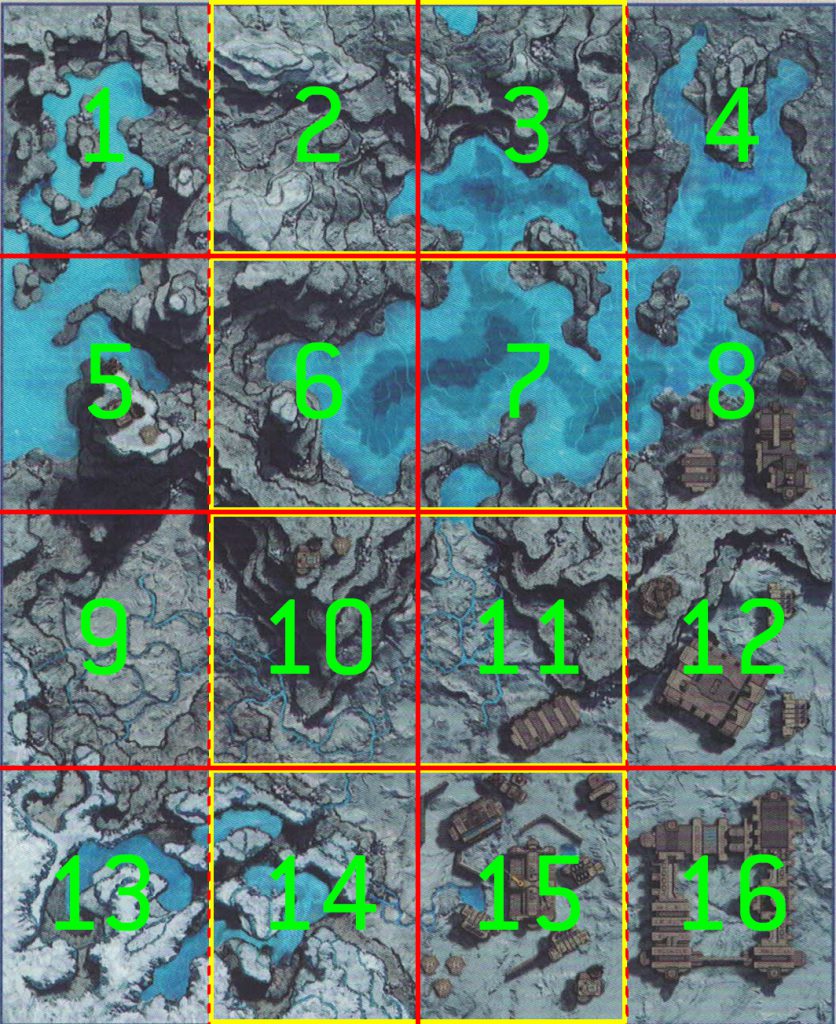
Jack: The map pack takes 16 mapsheets to form the full bigger-than-BFM map, and there are 8 double-sided mapsheets included in a pack. This is perfectly fine and completely expected, but they were printed in a bizarre order. Looking at the diagram above, I’ve divided the full map down into the 16 sheets, each labeled 1-16. Adjacent sheets are printed on opposite sides of the same piece of paper - so if you take mapsheet 1 and flip it over you get mapsheet 2. There’s no way to line mapsheets 1 and 2 up to get a standard size 2x1 map without buying a second pack. Outlined in yellow are the four 2x1 maps that you can create using a single pack - 2&3, 6&7, 10&11, and 14&15. If you flip all those sheets over, you end up with 1, 4, 5, 8, 9, 12, 13, and 16. None of those can be combined on their long edges without hills or other features becoming misaligned.
 Volcano map misalignment if used out of order
Purchasing this pack I’d expect to be able to put eight different 2x1 maps together rather than just four, and to make it worse the combination of the four is a very long narrow map. Simply having printed this so that mapsheets 1 and 9 were on opposite sides of the same paper would’ve completely solved the problem, allowing you to build the complete north or south side of the map at a time and giving you eight different 2x1 maps to use. It’s incredibly limiting for what’s clearly a narrative-focused map pack, and it doesn’t seem intentional - the neoprenes, when they release, will be for the obvious 2x1 map sections, combining mapsheets 1&2, 3&4, etc.
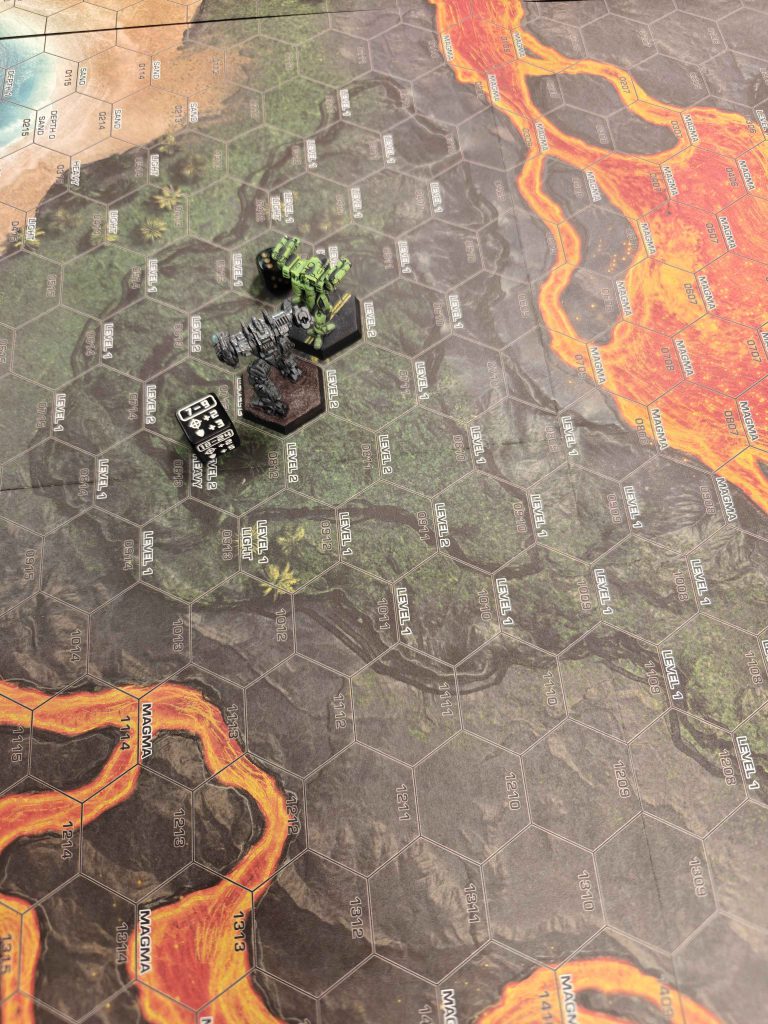
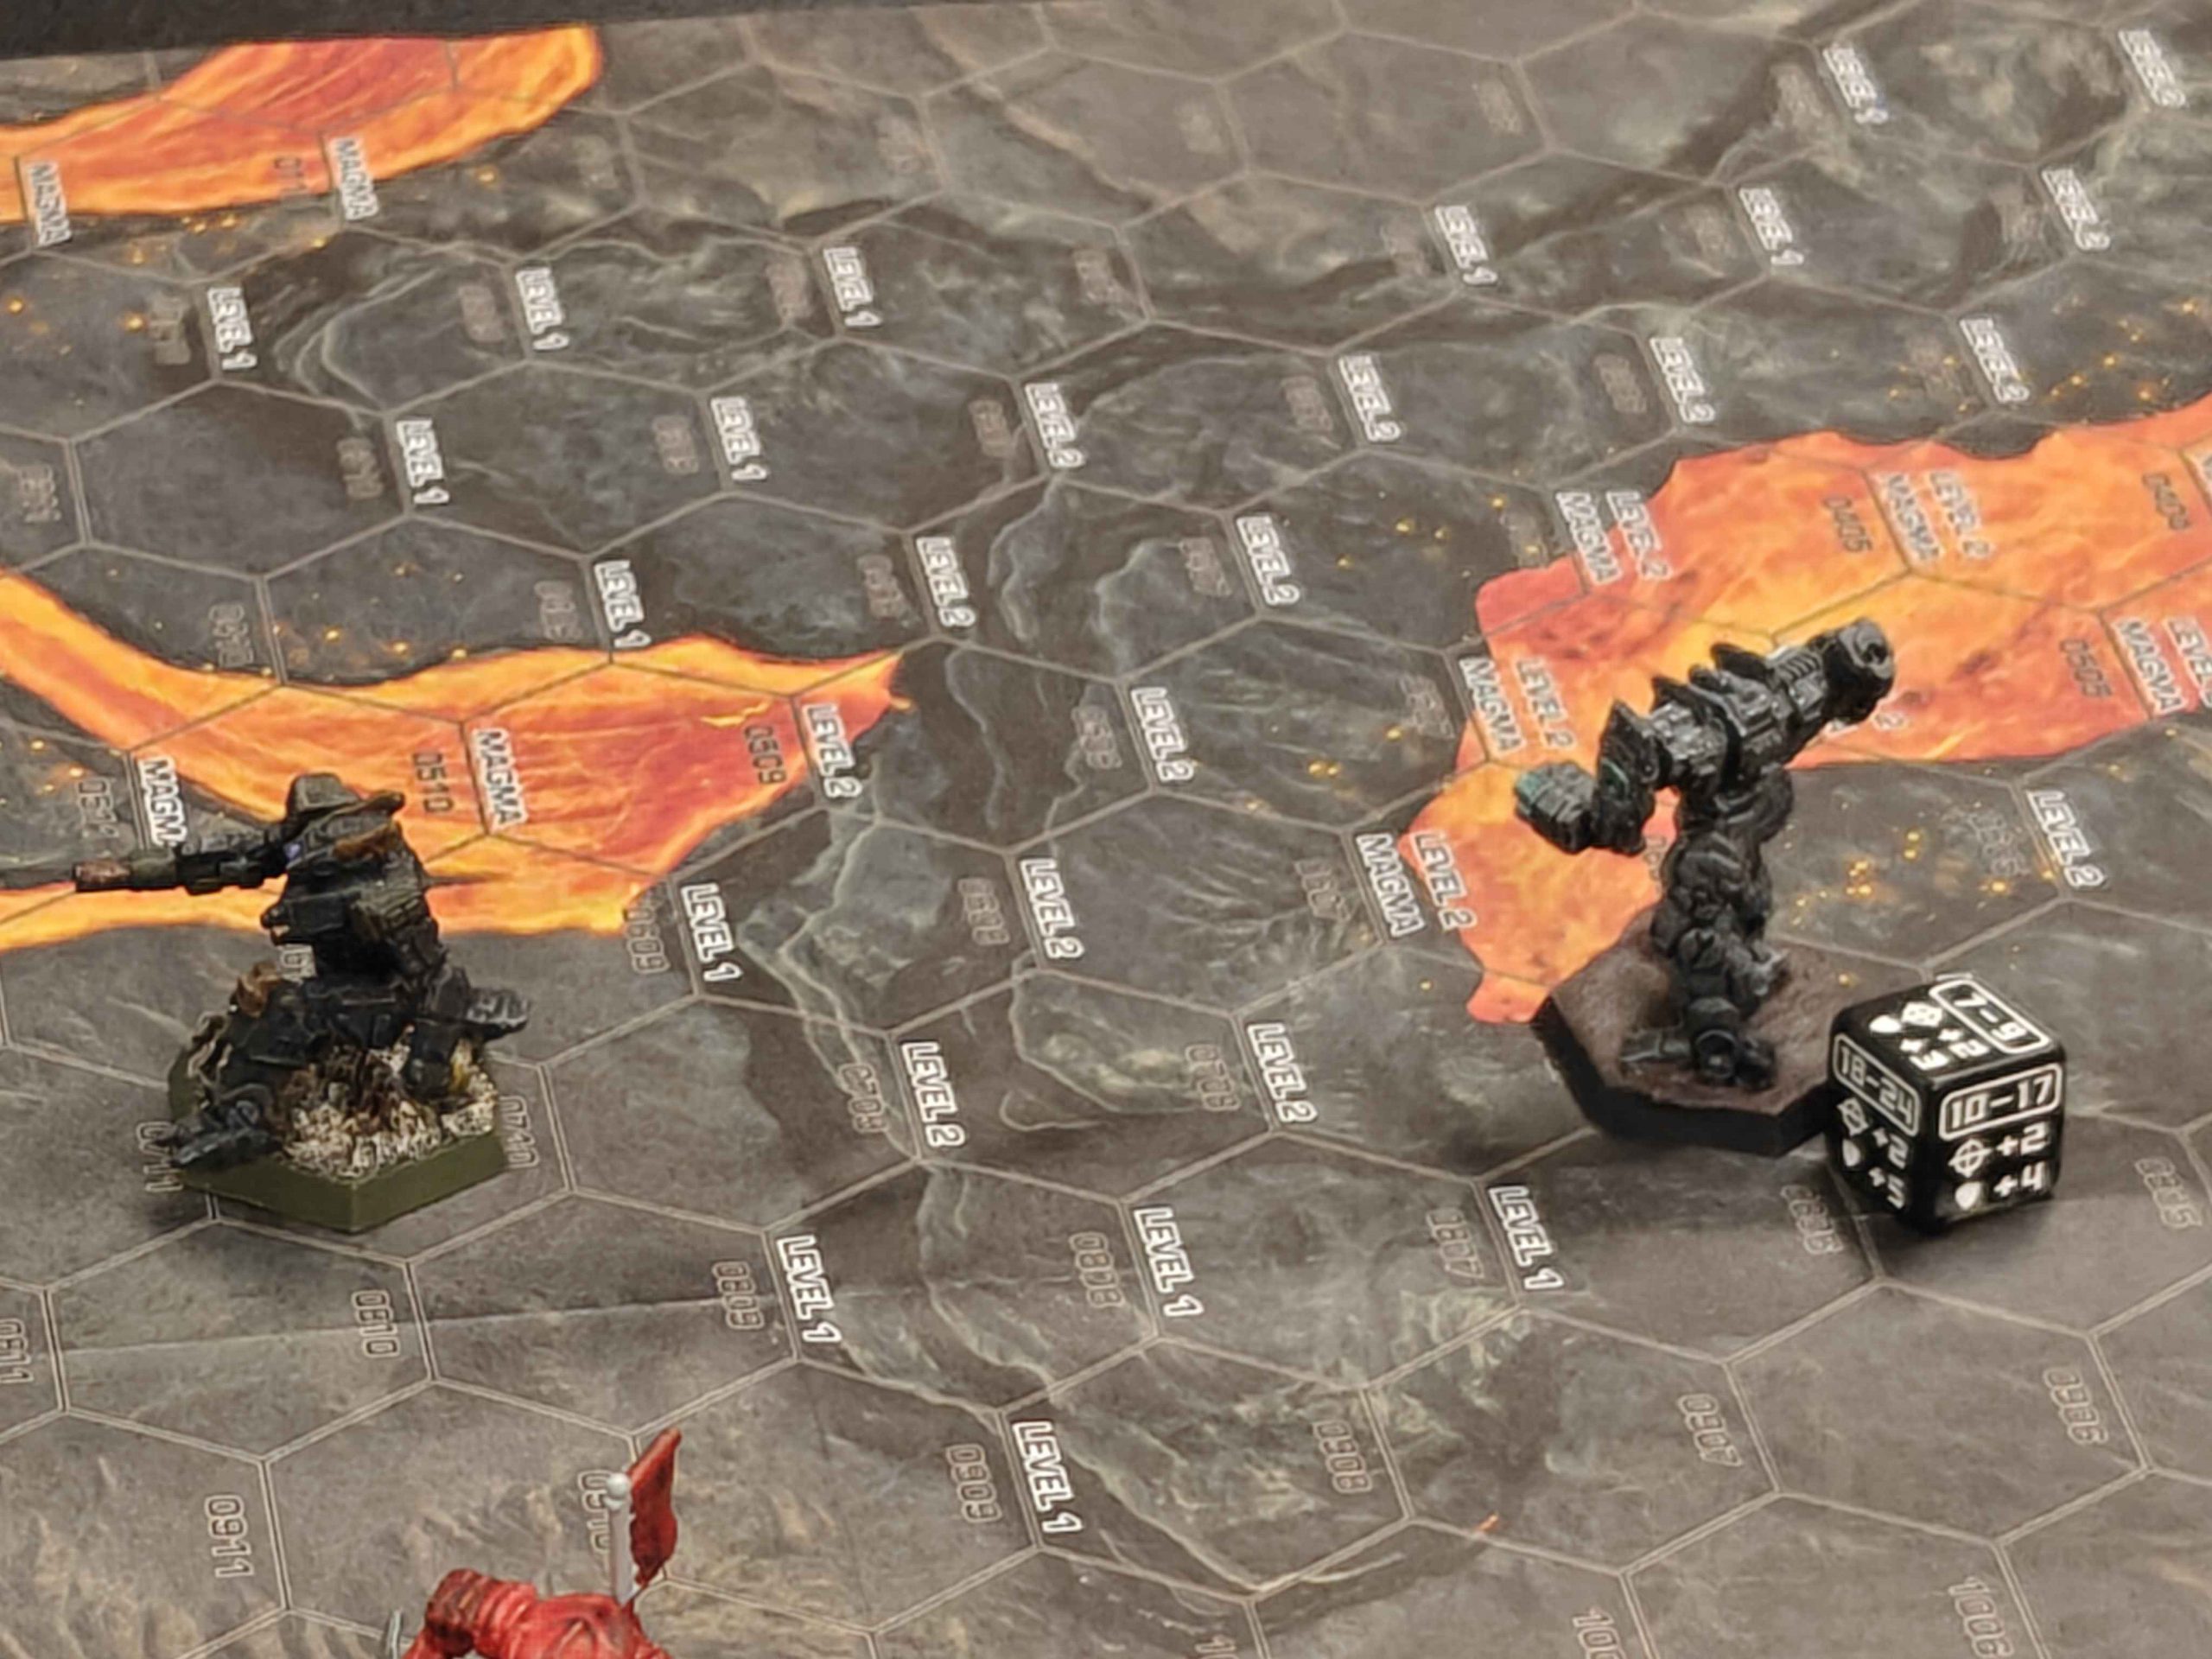
I played on the southern 2x2 combination (10, 11, 14, and 15), and it was not a particularly good map for gameplay, especially if you have any non-jumping light mechs. There’s too much magma, not enough space to cross it, and it’s far too deadly to even exist near it. 2d6 damage to each leg, automatically, makes it something that a light mech can do once ever. But what’s worse is that you can’t stand next to it, because getting charged, pushed, or DFAed into the magma is an instant existential threat. You take 2d6 to each exposed location immediately on moving into the hex. If that move involves falling, that’s every single location including both front and rear torsos and the head. It’s considered an attack, so this would also be a consciousness roll.

Subsequently, you start your next movement phase in the magma, and have now taken 4d6 damage to the head, which is a 76% chance of death (not counting the so far 2 pilot hits/consciousness checks). With a +4 PSR, you’ve also probably failed the seatbelt check (so we’re looking at a 7+ consciousness roll at best) and failed to stand up. Standing next to a magma hex is not something that should ever be done, which dramatically limits the number of hexes on the map that you can end a turn in, and means that while light mechs are in trouble because they risk their legs melting while trying to cross, slow mechs don’t have the movement speed to avoid standing near the magma.
It’s a very good looking map, but we had trouble identifying elevation changes and woods hexes from across the table as there’s not a lot of contrast. What hills and woods that do exist on this combination weren’t enough to break up sightlines, with the hills being large areas of mostly elevation 1, so you couldn’t hide behind them or use them for partial cover.
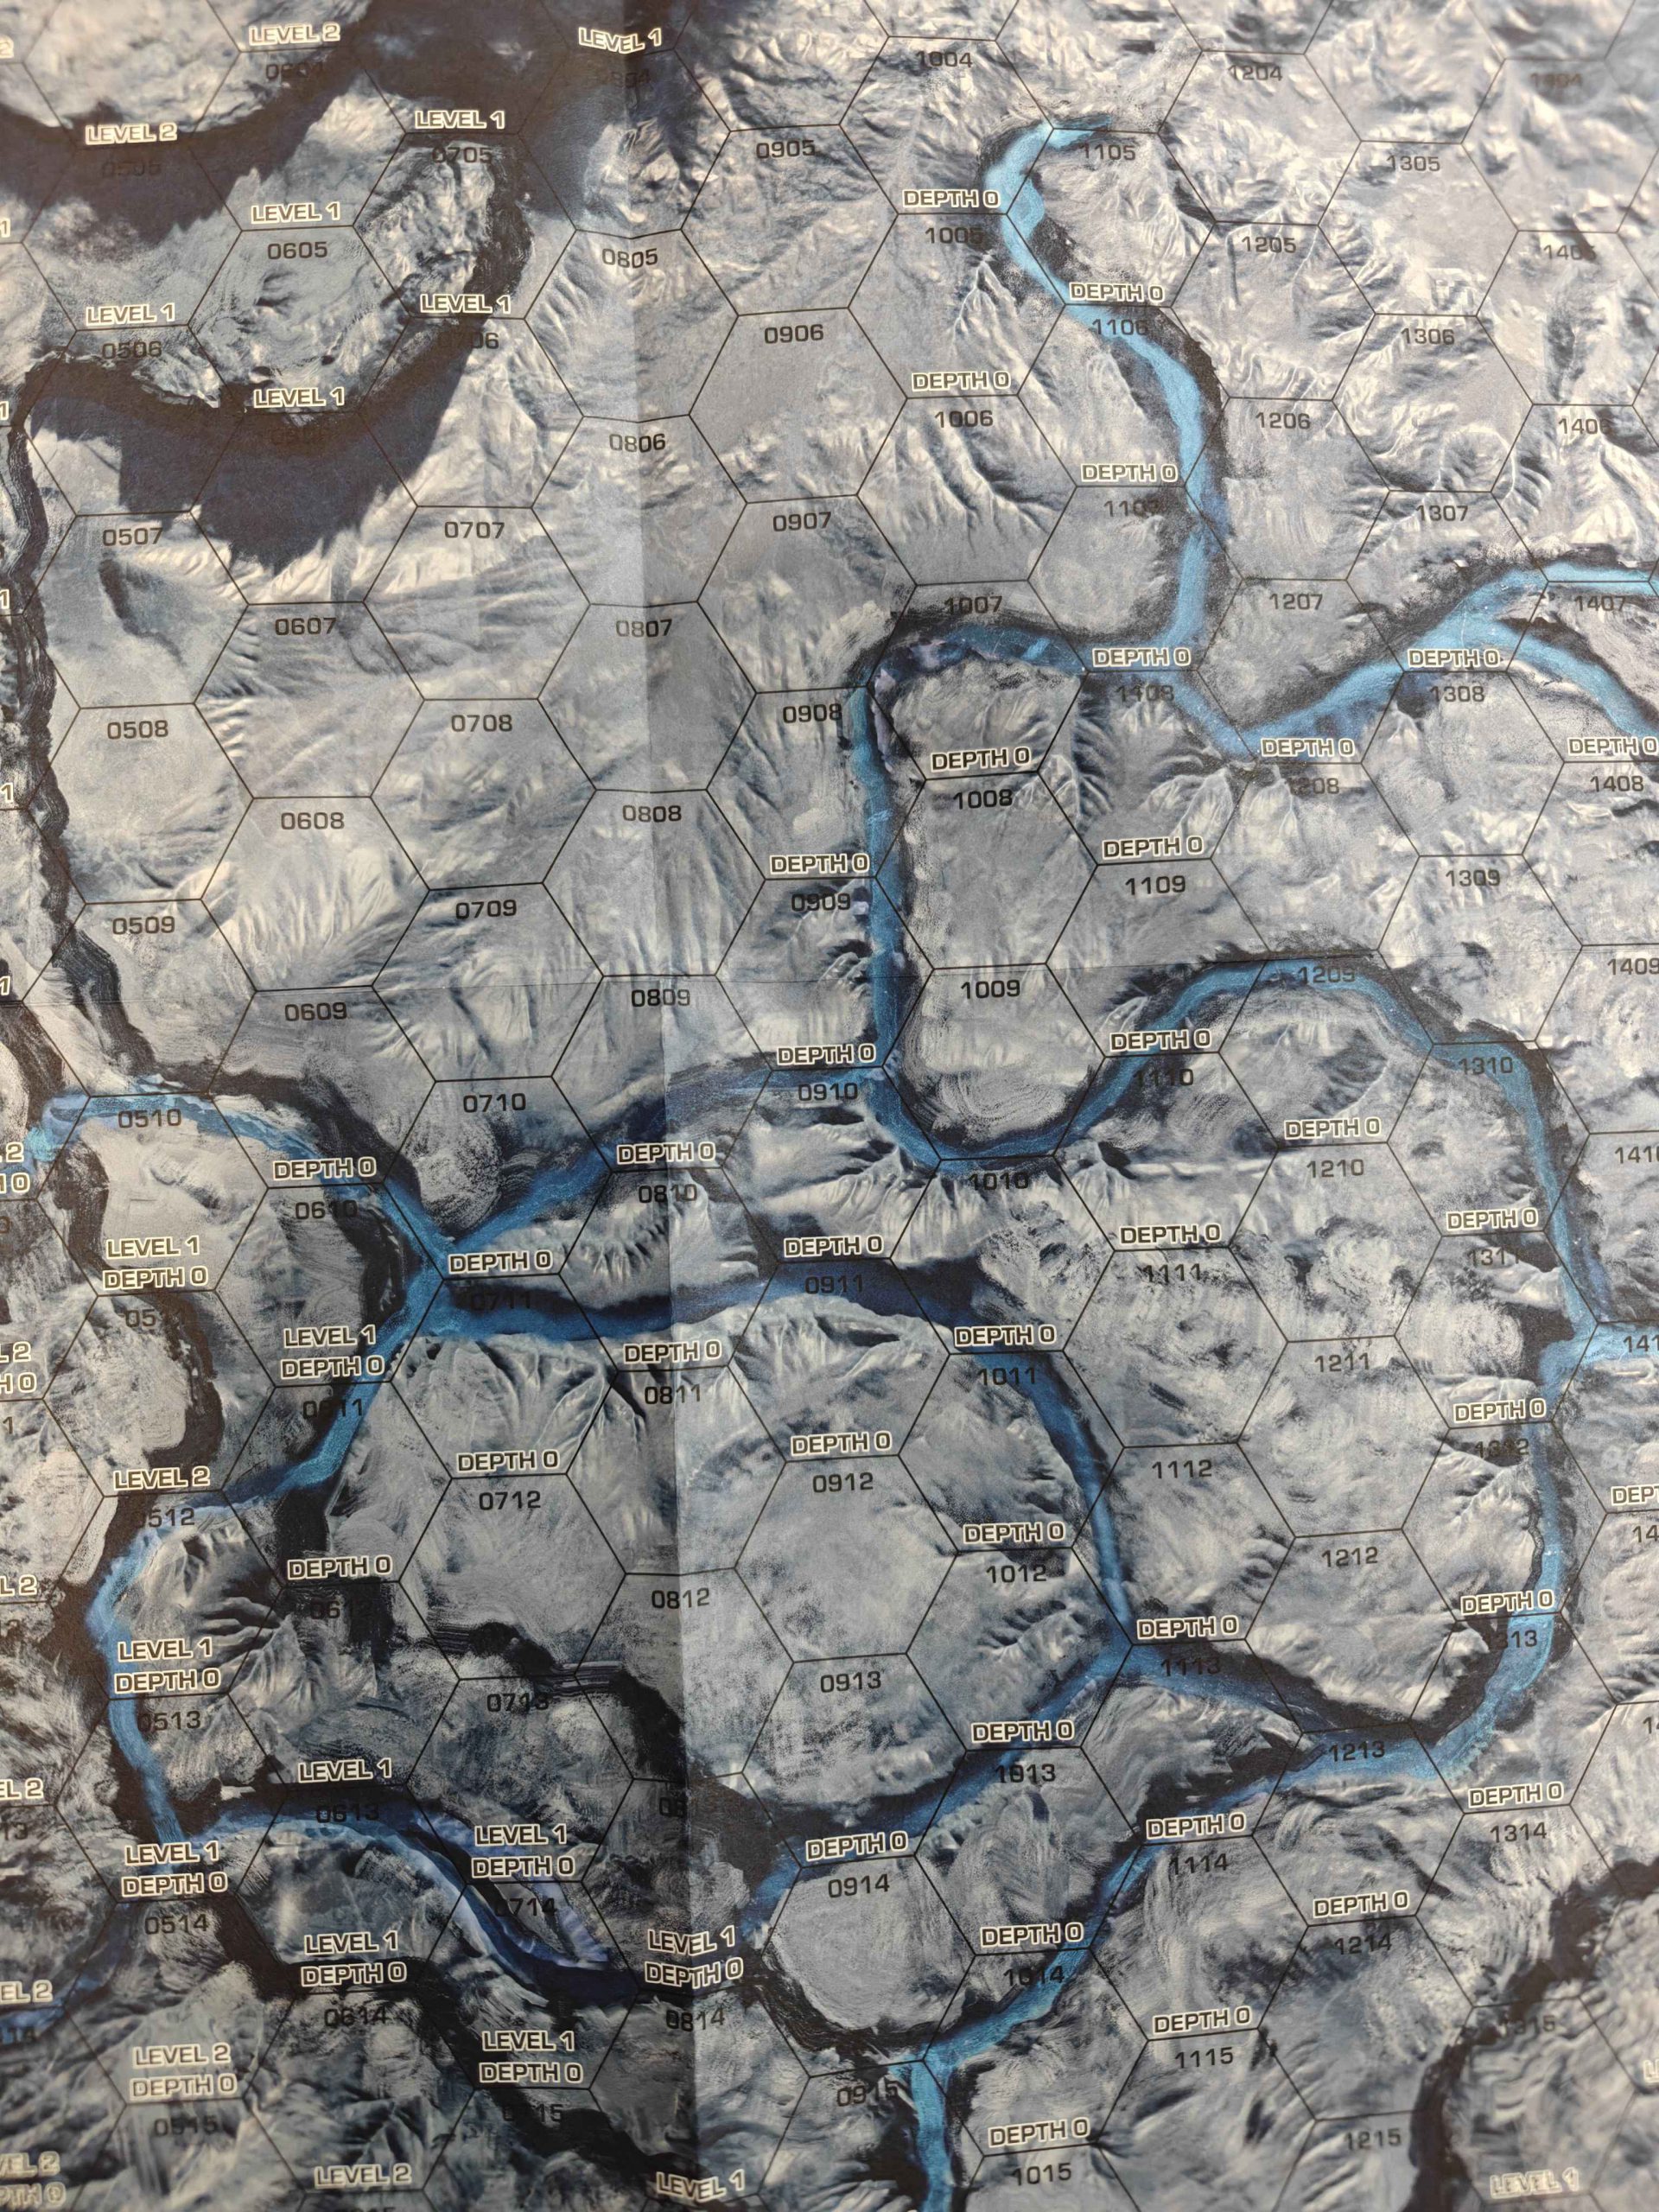
The Land of the Ice and Snow
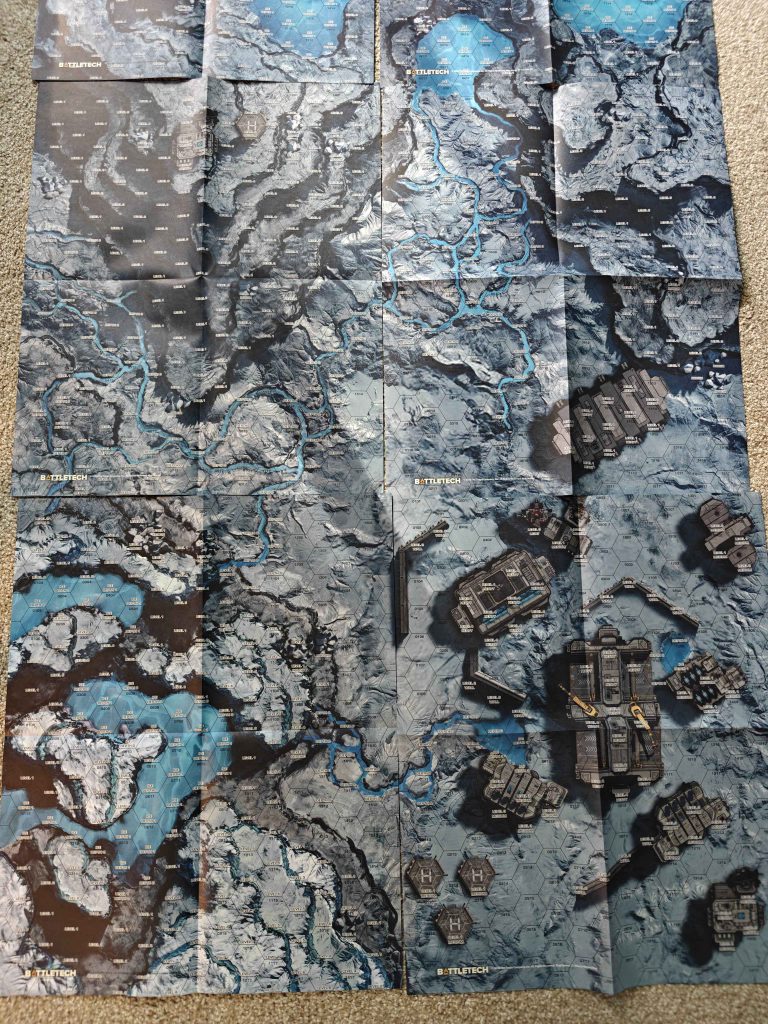
Map Pack: Glacier also falls into the “mostly for narrative play” bucket, but the lack of “floor is lava” in the design helps it to be much more amenable to non-narrative games than its hotter, steamier cousin. As before, there’s an included rules insert so you don’t have to dust off your copy of Tactical Operations, and a punchboard sheet that’ll help fill out the mostly barren terrain on each map (or mark broken ice hexes if you’re a sadist).
Unlike magma, ice is a little more straightforward, and the rules sheet actually provides two separate incarnations for players to choose from: BattleMech Manual’s Ice (Simplified) rules, where it’s mostly “water but with way worse PSR mods and no breach checks” and Tactical Operations’ full-fat Ice rules. The TacOps rules here are all-inclusive for interacting with ice hexes, including rules for breaking through ice, melting ice, and all unit types, up to and including DropShips and Mobile Structures. Thankfully, the rule sheet also helpfully suggests just ignoring the ones you
don’t want to use, which I feel will probably result in most player’s rules choices being “none of them.”
The included punchboard is a bit more varied than Volcanic’s was – while it includes your typical tokens for buildings and walls of various levels/sublevels, plus the aforementioned “broken ice” hex markers, there’s also a trio of 2-hex “woods” (read: ice crystal) sections that add some optional cover, and a completely new type of hex: Blast. The Blast tokens are all designed as Level 1 Light buildings, designated Blast A, Blast B, and Blast C. When in use, the player designated by the scenario as the defender is allowed to take all three for the cost of two Battlefield Support Long Tom Artillery Strikes using BSP (alternatively, you can pay 20 BV per BSP as a conversion if you’re not otherwise using Battlefield Support rules). Curiously, the sheet says to use BattleMech Manual’s BSP cost here, but I assume most players are likely to integrate it using the Mercenaries BSP pricing instead. The Mercs BSP pricing does scale pretty consistently with BMM's, so this shouldn't be a huge issue.
Once placed, the Blast tokens are effectively pre-sighted Long Tom strikes, which the defending player can detonate on demand as they would when using other Battlefield Support. However, only two of the three tokens are actually “live,” with the third being a decoy. This addition of uncertainty adds a powerful, albeit expensive, tactical wrinkle, and I do have to wonder if we’ll see people house ruling these to be less expensive so that they’ll be more accessible at smaller scales (i.e., pricing them as Thumper or Sniper artillery instead, with corresponding effects).

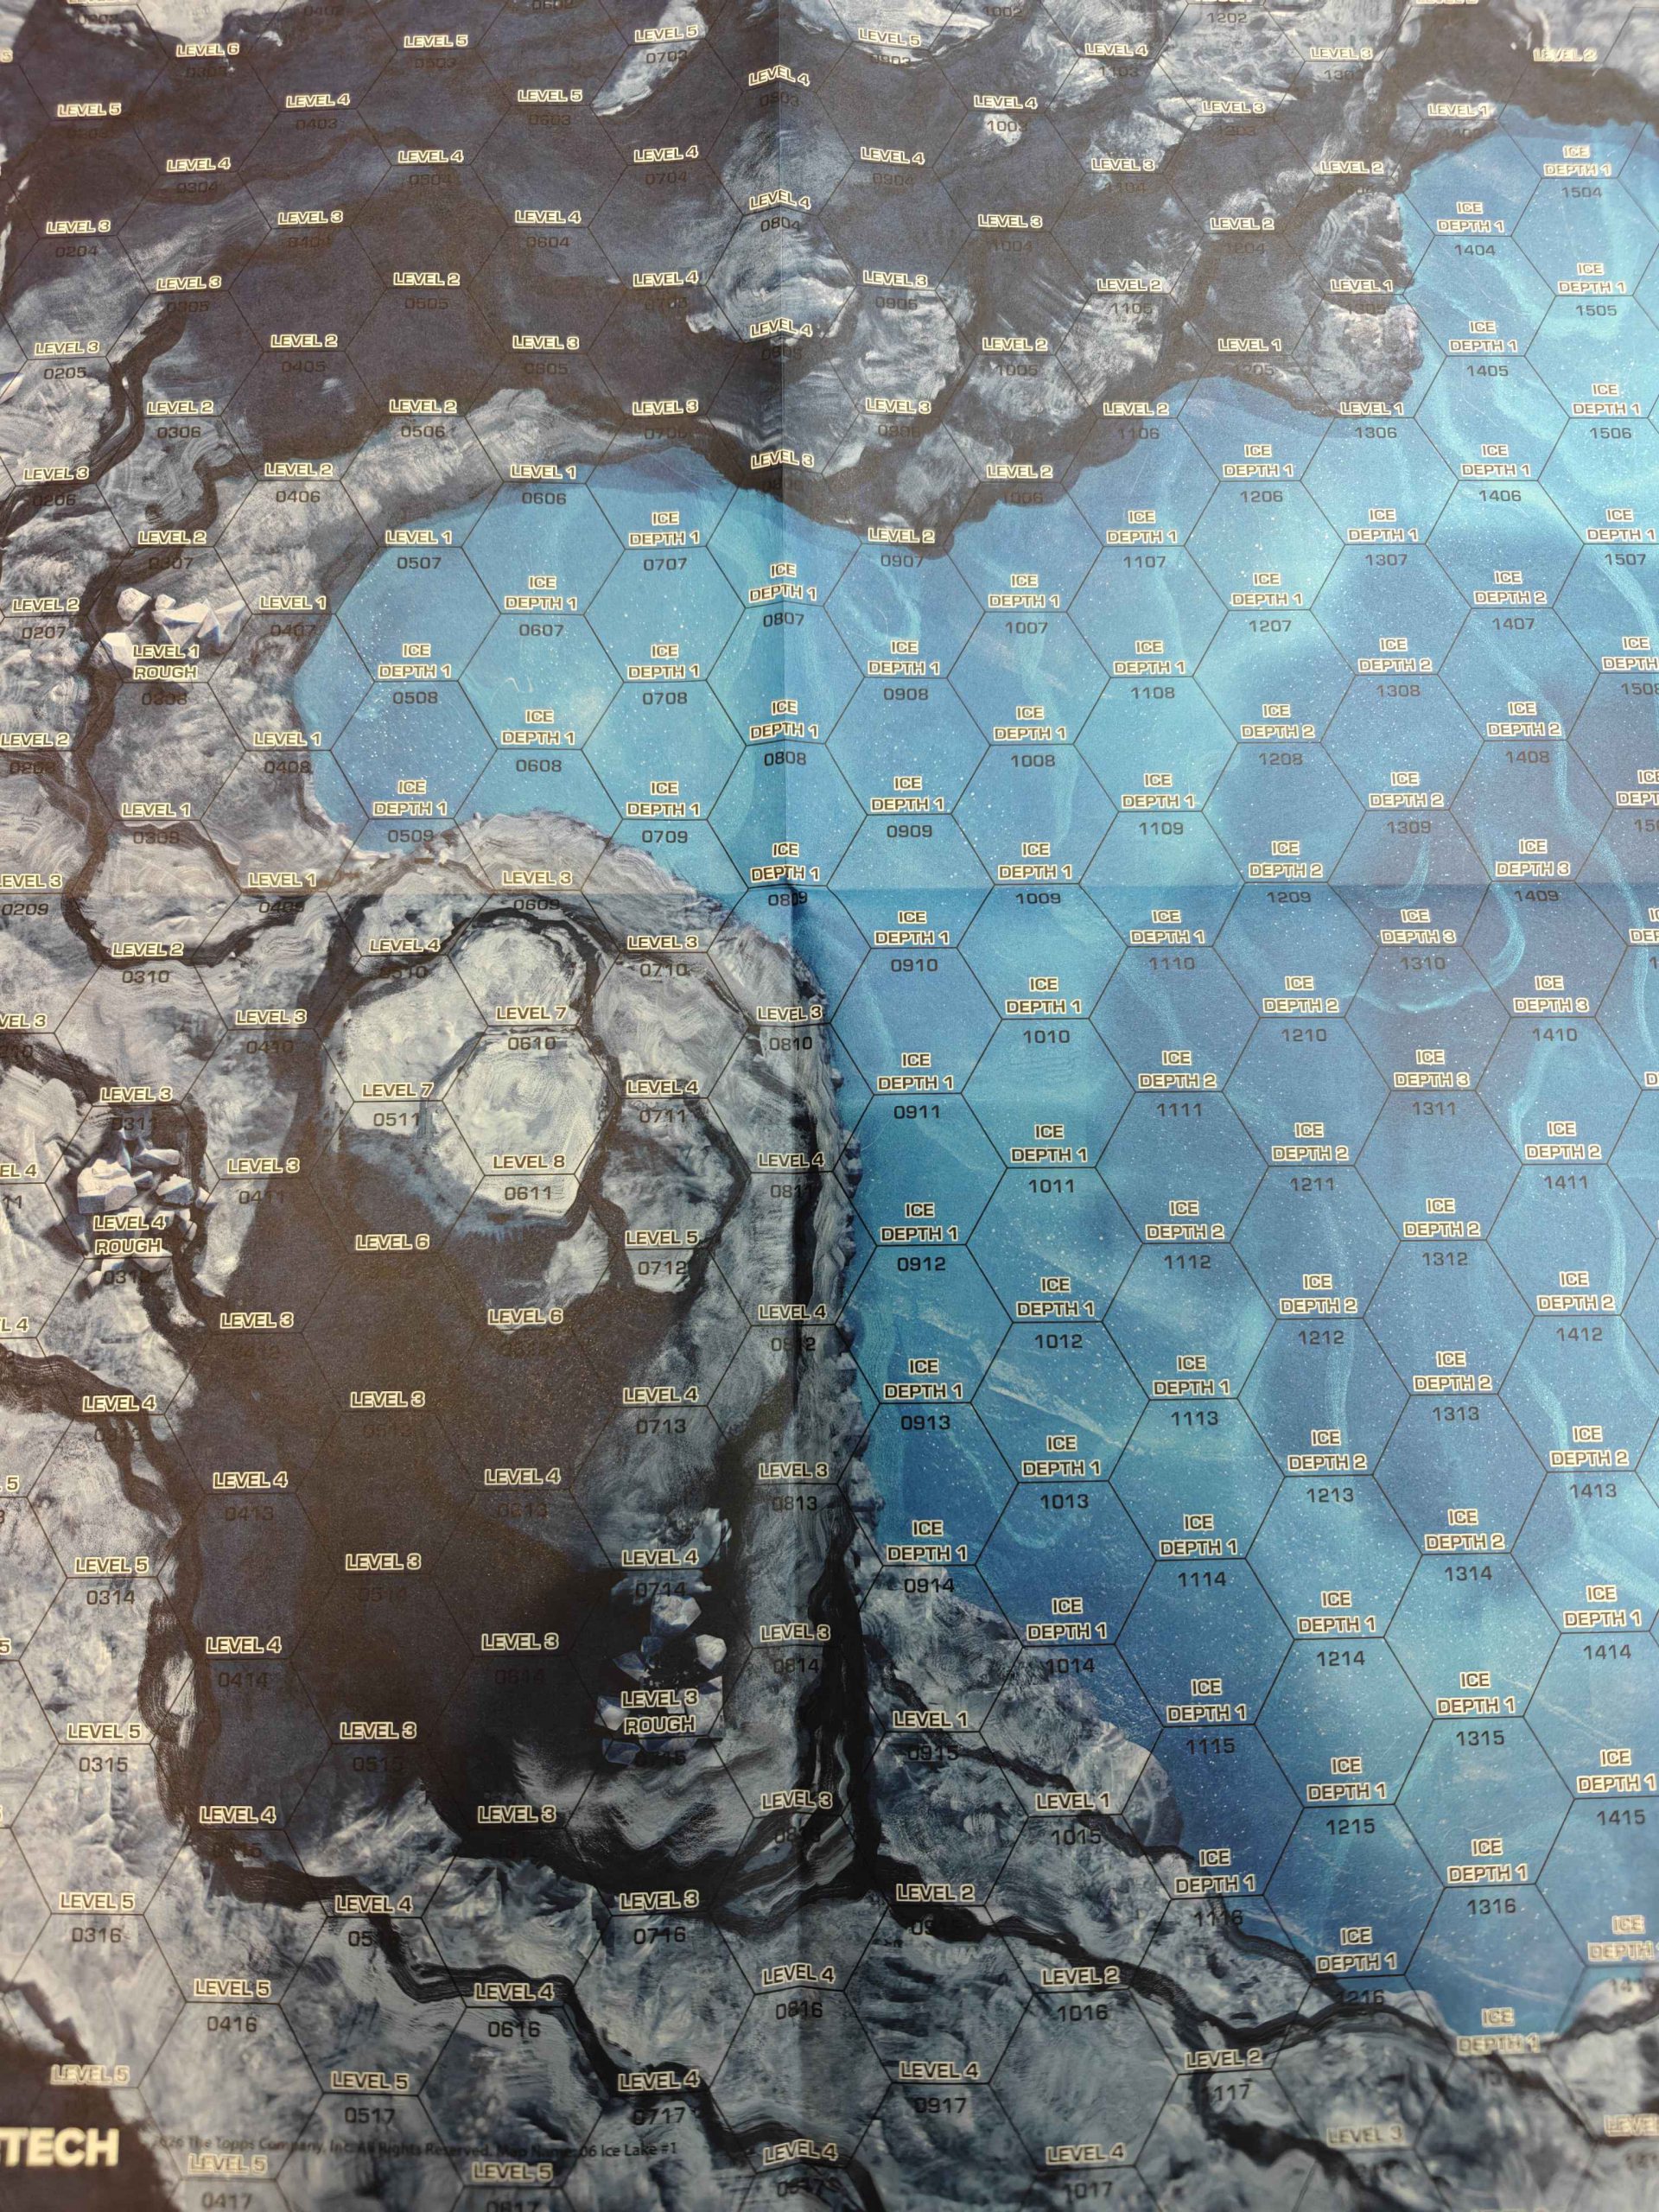
Looking at the maps themselves, the layout is again best described as having distinct northern and southern halves. The northern half -- part of which some players will recognize as BattleMat: Misery -- is just
covered in open fields of ice and moderate elevation shifts. It’s much more usable than the Lava Dome region of Volcanic and the elevation changes are much easier to read, but large amounts of ice are just rarely fun to play on without some kind of gimmick or a willingness to ignore the existing rules. The southern half of the map is a blend of valleys and heavy industrial terrain, with almost no ice to speak of outside of the two Hamar Valley maps, which makes them fairly usable…except they’re again printed in that weird pattern Jack mentioned for Volcanic, which means the pairs you’re most likely to
want to use will require a second set of maps. If there’s a good reason for Hamar Valley #1 and Hamar Valley #2 to be opposite sides of the same mapsheet, I’d
love to hear it.
 Jack:
Jack: I’d also like to comment that on the south of this map set that there’s quite a bit of space that looks like it might be interesting, but in practice (the 9/10/11 maps) is just flat depth 0, with elevation gain only around the outside rim of maps where it serves only to let you ignore what little partial cover you might find in the middle - it’s just a wide open firing pit. There’s a lot of space on these maps that’s just not conducive to actually playing an interesting game where movement choices matter.
 It almost looks interesting, but in practice is most of a map sheet of level 0.
Worth noting here is that the ice rules published in this set of maps don’t match the rules in the missions playtest packet. If you use those rules instead of the simplified ice rules here those hexes become somewhat less miserable to exist on. It does seem strange that Catalyst would know that there will be new ice rules in the new core rulebook that releases before this map pack goes to retail (Map Pack: Glacier is currently expected for late September, per the Tuesday Newsday stream) and yet still print these. They’ll be completely incorrect when they actually go up for sale.
Final Thoughts
I have what can only be described as very mixed feelings about these map packs. I’m a huge sucker for “more maps” in general; I own every map CGL has made in paper thus far (including the retailer-exclusive Tundra/Lunar one they made for the Clan Invasion Kickstarter) and have spent a few hundred dollars on high-resolution third party map files and high-quality large-format printing to have them made. However, the significant amount of “difficult” terrain on both of these maps make their use in games highly situational. Also, the decision to print the maps the way they were printed just
confounds me as someone who’s gotten used to playing games on 2x1 layouts with the long edges connecting. Sure, you can alleviate that problem and have the “big map” by just buying two copies of either map pack, but then it might even make more financial sense to just buy the BFM for these and have most of both map packs on each side (at MSRP, 4 paper map packs will run you about $140, whereas the BFMs are in the $150 range).
(
Jack: To my understanding from some of Randall’s Instagram posts, the BFM isn’t quite the full set of maps [thankfully, as that would be larger than 4x6], so it might still make sense to buy the paper sheets anyways if you want the full range of options.)
I don’t feel like it’s necessary to ask “who is this product for,” because the answer is “people like me, who want to GM a campaign where you can shove a Blakist
Archangel pilot into the magma around his own supervillain lair,” but with the upcoming Core Box pushing more objective-based pickup games, it doesn’t feel like the right
moment for these. If your game is moving away from big campaign setpieces and towards a more formalized set of missions, it would make more sense for the maps getting released alongside it to be designed to support those missions. In this case, that would mean fewer “narrative” map collections like these and Tukayyid, and more like Grasslands and Deserts, where the primary focus is letting players mix and match the sheets and their terrain features with ease. A “Grasslands But Snowy” map pack would be something I’d happily pick up two of, especially if I’m using the included sheets on a regular basis. Here’s hoping the next map packs return to that philosophy, because this is definitely a product for the narrative campaign players more than anyone else.
Have any questions or feedback? Drop us a note in the comments below or email us at contact@goonhammer.com. Want articles like this linked in your inbox every Monday morning? Sign up for our newsletter. And don’t forget that you can support us on Patreon for backer rewards like early video content, Administratum access, an ad-free experience on our website, and subscriber-only content covering competitive Warhammer 40K!Thank you for being a friend.

 Volcano map misalignment if used out of order


 It almost looks interesting, but in practice is most of a map sheet of level 0.