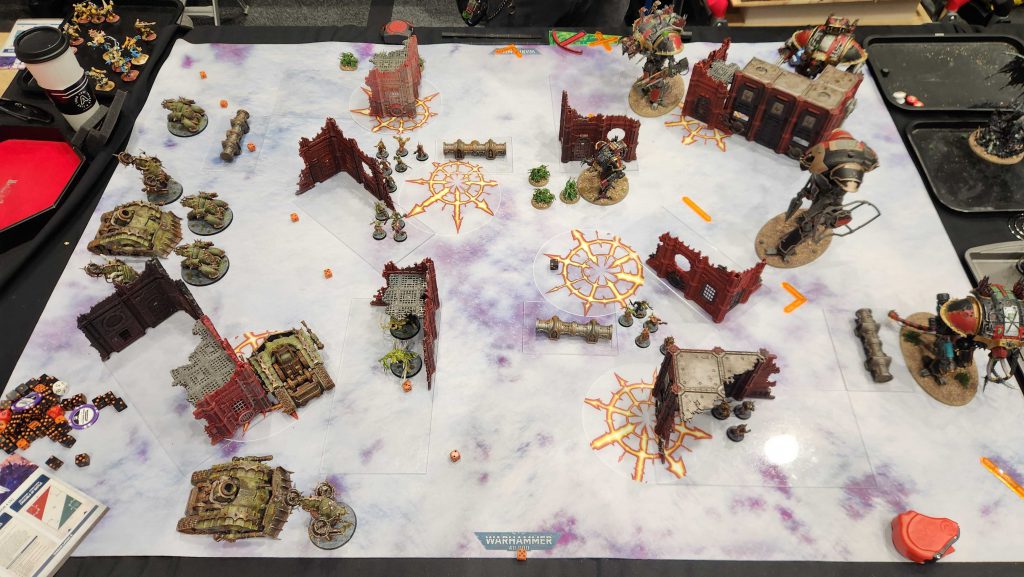
In this new series we’re looking at various terrain layouts for Warhammer 40,000 and exploring how they work, what you need to know about playing on them, and how you can improve your play when you play with those layouts.
Many games of Warhammer 40k are won or lost in deployment and a key part of that is terrain. In this series we’re going to look at various terrain layouts, looking at how the affect the game and how you can use them to your advantage. In this article we’ll start by looking at Layout 6 from the
Games Workshop Tournament Companion, specifically with regard to the Chapter Approved 2025-26 Missions Pack.
This is the fourth article in the series – if you missed the prior ones, you can find them here:
A Note on Terrain
In these articles I’ll be using Games Workshop terrain but it’s worth noting that terrain will change from event to event, and the layouts shown in the Games Workshop Tournament Companion are guidelines more than hard-and-fast rules about how terrain has to actually look. Most often you’ll find that terrain features may be longer or shorter than the layouts dictate, based on what the tournament organizers have available.
With that out of the way, let’s get into the layout:
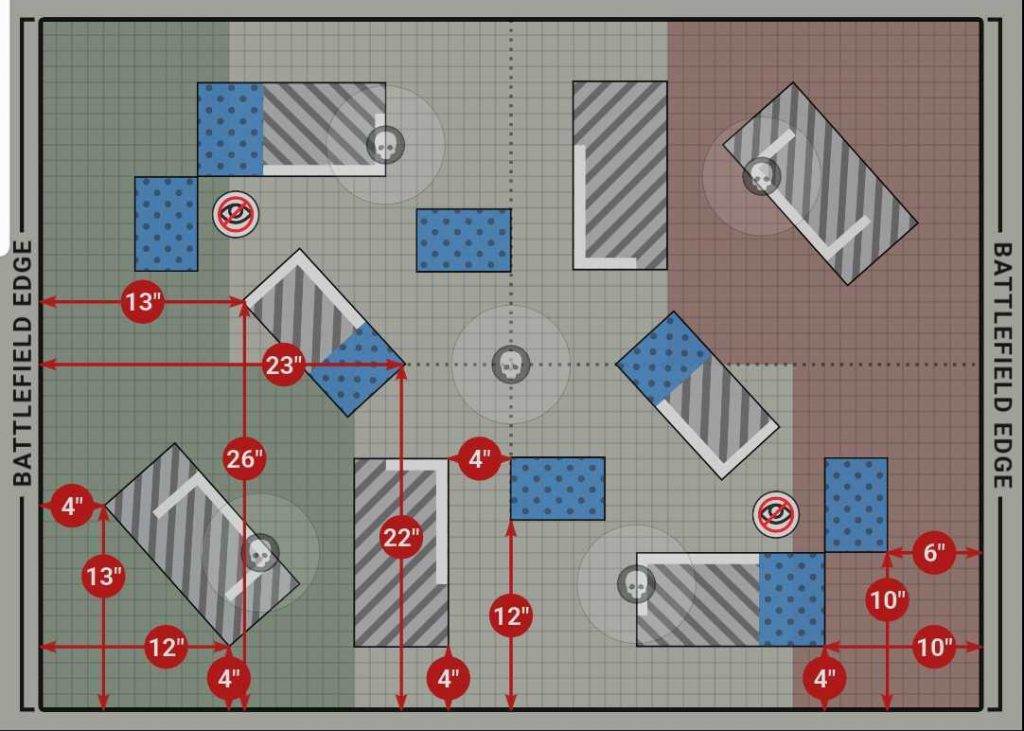
You can think of layout 6 as more or less a "fixed" version of layout 4. It has very similar corners but with a much tighter middle of the board that cuts down significantly on the firing lanes across the diagonal. It still has the same issues 4 has however, in that it has board-length sightlines down each table edge. This layout is recommended for missions with Search and Destroy, Tipping Point, and Crucible of Battle but I'd personally only recommend it for missions on Search and Destroy.
Like layout 4, layout 6 is pretty rare. That's because it requires the same number of left-facing L-shaped ruins as 4, which is to say many more than you typically need for the other layouts. That means that if you want to swap from say, layout 1 to layout 6, you need to swap out at least for of your ruins (or flip them over). That's not ideal, and it's a key reason you don't see this layout often.
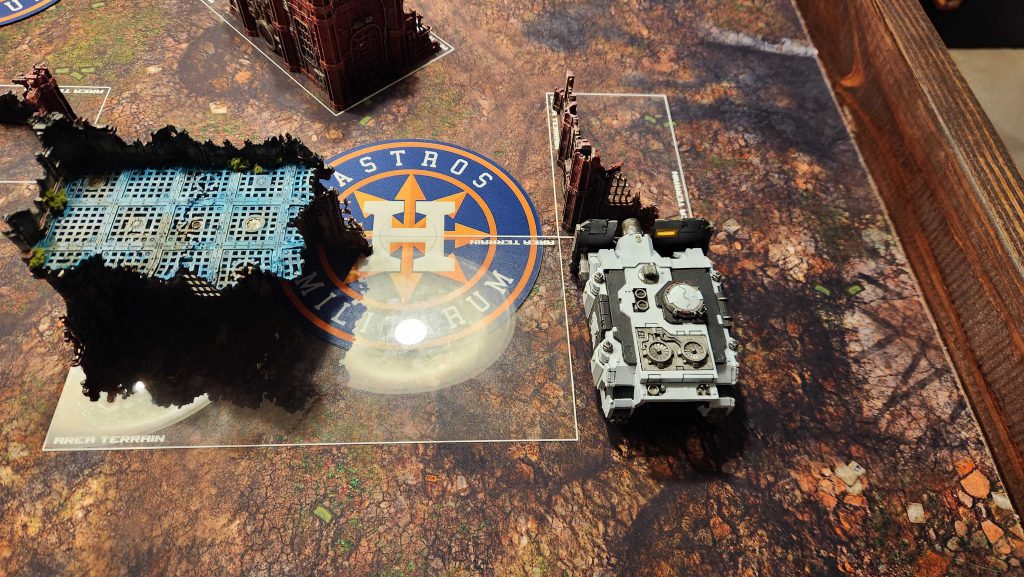
Similar to layout 4, this is one of the rare layouts that can fit really large models like Defilers or Baneblades - there are lanes for them to go around the bottom ruin (B, as we'll label it later), and between the B and F ruins, provided your Ls aren't longer than shown above. The gap to watch is between the tilted F ruin in the middle of the table and the corner ruin made with the D and E ruins - that gap is barely more than 4" across, with high walls on either side, making it too narrow for larger vehicles to fit.
Loading...
Finally note the crossed-out eye on the two L-shaped corner ruins made from a 12x6" terrain base and a 4x6" base - that means these are distinct ruins and you cannot see from one to the other. This won't matter often but does mean that you have some additional hiding options with these. These corner ruins are pretty far from your deployment zone on Search and Destroy, making it a challenge to get to them safely with slower armies. The good news is that you can move behind them for coverage - and unlike on layout four, they're much closer to the sides of the table, making it easier to go from ruin to ruin.
Loading...
On Search and Destroy these are in a fairly defensible spot, though not something you can hold from the hidden crook inside the L - your best bet defensively there is to hide in the ruin itself.
The big difference between this layout and 4 is that large open gaps on the sides of the table. These don't matter
that much in most games - that's home space to work with and not really an engagement area - but it does mean that you never really want to play this layout on a deployment map that isn't recommended.
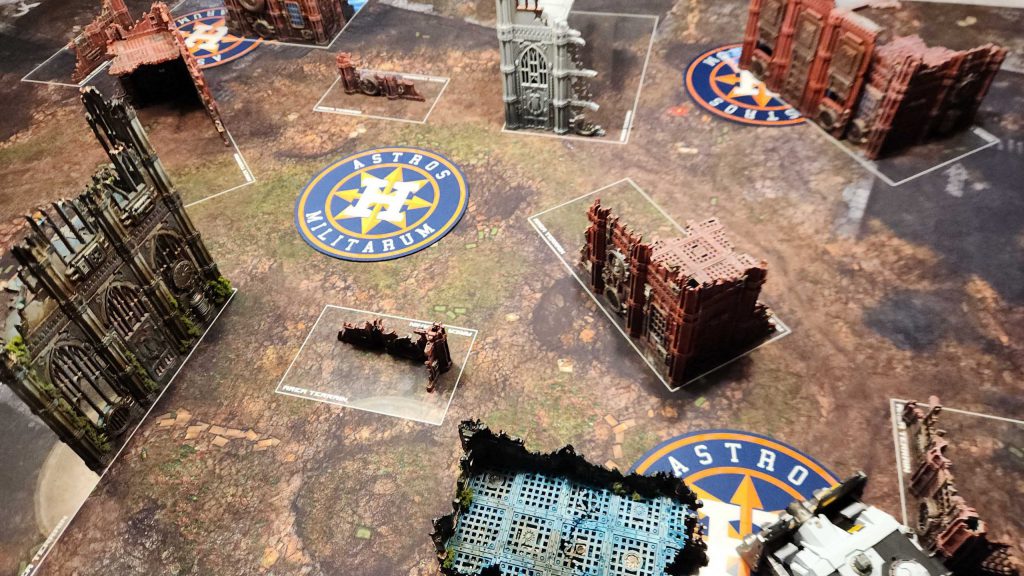
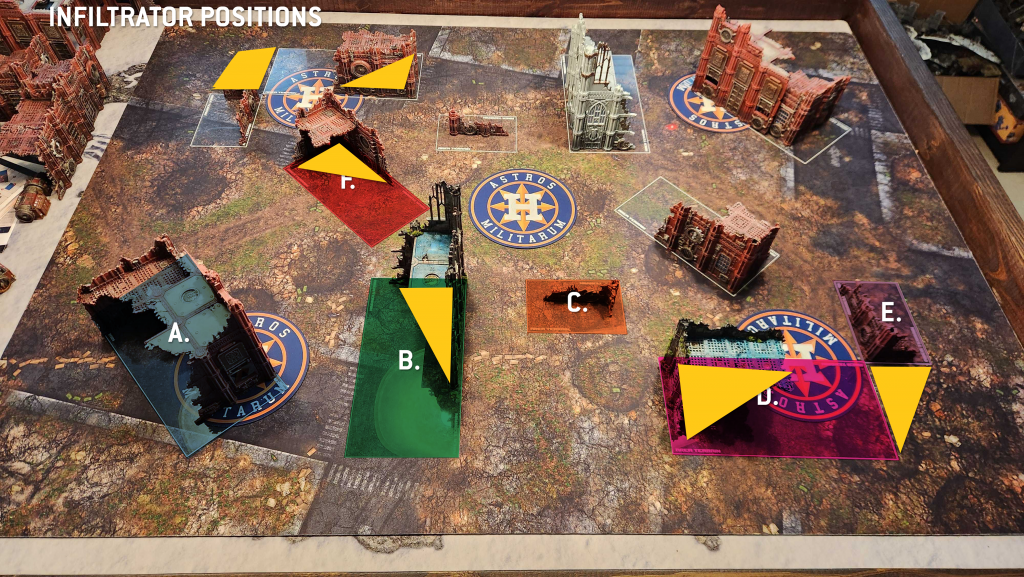
On that note, let's label these ruins.
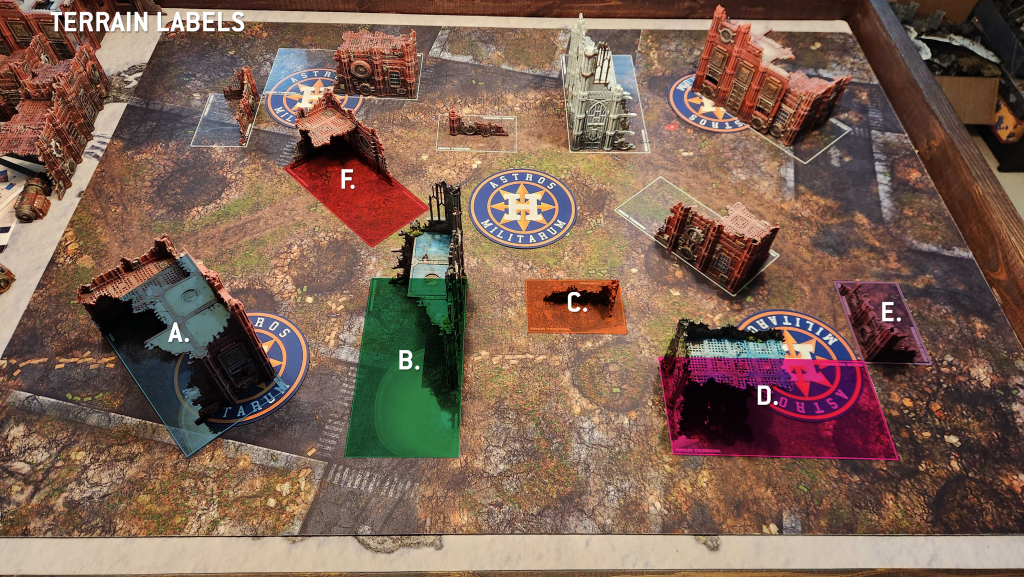
You have six pieces here:
A. Your Home Corner Ruin. This features a U-shaped terrain piece and on all three layouts will give you an easy hiding spot behind those walls, still in contact with the objective there. It's also relatively safe from the long firing lanes along the sides of the table. You'll have an easy time moving from this to the B ruin with Infantry units but it's otherwise pretty far from anywhere else you want to be. Getting from here to the F or your northern D ruins is a long walk.
B. Your second home ruin. This one is perpendicular to the long table edge and combines with the F. ruin to create your natural staging/hiding areas. It's large enough to hide big vehicles but doesn't block them from leaving - a Defiler can fit around either side of this ruin to walk toward the middle of the table.
C. The small ruin in the middle of the table. This one doesn't do a ton but it does break up the sightlines across the middle of the table a bit, making them harder to see across and generally making it a bit safer for small melee units to stage and move toward the middle of the table. These act as the big difference from 4, making the middle of the table a bit more dense and blocking the sight line across the middle of the table, making it easier to move from B. to D. without being seen.
D. The large section of the corner L ruins. This is going to be your protection when you're holding an expansion objective on any of Crucible, Tipping Point, or Search and Destroy, where you'll be likely hiding in that ruin while touching the objective. It combines with E to create a natural shield in the corner of the table, making it a great spot to hide Infiltrators or deep striking units.
 E. The small section of the corner L ruins.
 Not a ton extra to say here; this is great for hiding units and creates a natural wall near the corner of the table. The only downside is that you can't touch the objective from here - you'll have to move out. The good news is that moving out with a long-ranged unit will give you some big sightlines across the table.
F. The medium middle ruin. The two 10x5" ruins are placed diagonally here in the middle of the table, and provide you with cover to move toward the middle of the table and some OK melee staging if the ruin sitting on them is large enough (not necessarily a given).
Objectives
Loading...
You really do not want to play this map on Sweeping Engagement or Dawn of War, and I'd really only recommend it for Search and Destroy. Your biggest challenge on this maps is going to be getting to those expansion objectives, though the F ruins help provide cover when you're moving north and the C ruin helps provide some cover when going from B to D. Unlike with layout 4, there's no holding the expansion objectives from the "safe" spot in the corner ruin, so just be mindful you'll want to have a unit that can actually hide in the ruin itself.
Sightlines
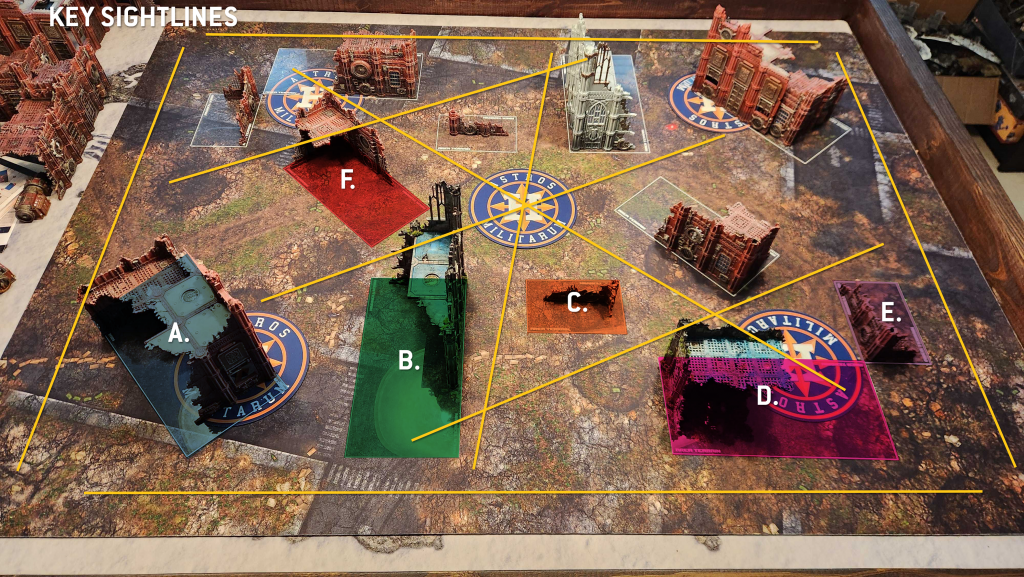
The most notable sightlines here are down the sides of the table. Those are essentially why I wouldn't recommend playing this map with Tipping Point or Crucible of Battle - having those suddenly turns this into a much more open, long-ranged shooting experience than if you push armies into the corners and make it difficult to move around and open those up. That said, even on those you can hide behind the A and B ruins fairly effectively as you move up, which does offer some succor, and they're better positioned here than on layout 4. The challenge then becomes the transition from the B to D ruin, where the gap here is fairly long - 12" across.
There are three diagonal sightlines across the board between deployment zones, though these are all pretty easy to hide from using the B ruin on Search and Destroy or the D/E/F ruins on Crucible/Tipping Point. The opposite diagonal is also an option going from one D ruin to the other, though this will typically require a weapon with range greater than 36" to shoot across.
Even with the addition of the C ruins, the middle of this map tends to be pretty open, and there's nowhere safe to be on the central objective. If you're there, you're likely getting shot from somewhere, and units hiding in the corner L ruin made by the D and E ruins can easily just peek in from across the corner to see you.
The long open sightlines along the table edges mean that shooting units arriving from Strategic Reserves are much more powerful here than they might otherwise be - a unit with a 48" gun can show up along any table edge and immediately bring the pain on some unit foolish enough to be hanging out.
Melee Staging
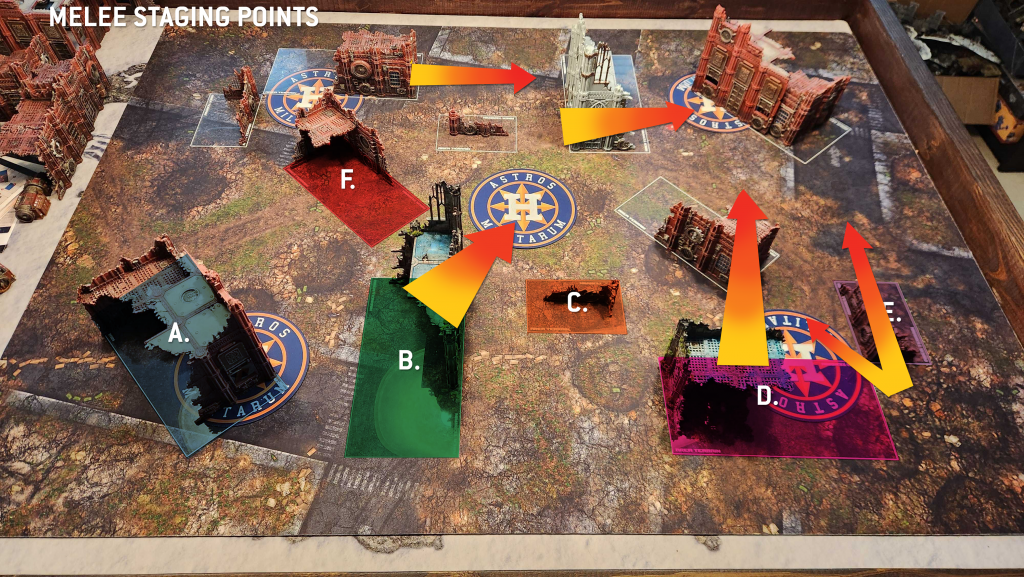
Staging on this map is going to be difficult. The key spots are in those corner L ruins, which provide great cover for a unit attempting to charge across them. Likewise the B ruin is a double-edged sword, giving you a great shield for your units from ranged threats in deployment but also acting as a nice large wall for melee units to stage behind when they charge to your home objective. Here the big open gaps between your F and A ruins makes running across much more hazardous; you're better off staging from the B or F ruins. ANd the 12" gap between the B and D ruins can make it hard to stage inside the D ruin going toward the enemy's home objective.
Generally speaking faster melee units like bikes do better here since they can shoot down the sides of the table without getting caught in ruins, but they'll be sitting ducks for a turn while they try and get up the board.
What Does Well Here?
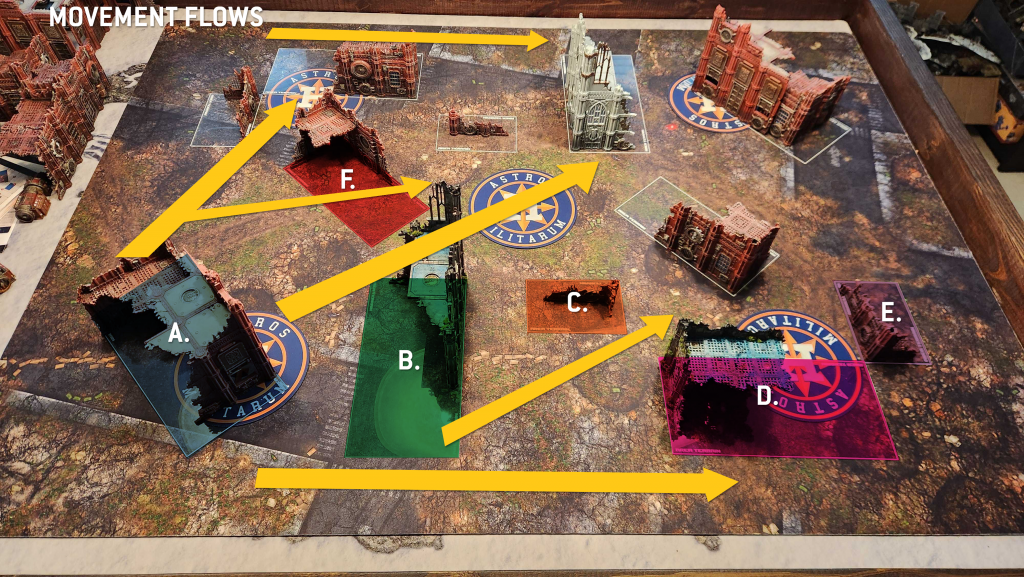
Ranged units, mostly. Movement here is pretty straightforward. You've got three lanes you're moving through on Search and Destroy, created by the gaps in the F and B ruins. Things open up a little bit more on Crucible/Tipping Point, but whether those long lanes up the long table edges are viable will heavily depend on your opponent and what they can drop in that space. Again, ranged units arriving from Strategic Reserves along those long, open table edges can more or less pick their targets and it's easy to get lines of sight from the long table edge to the objective in the middle of the table.
A lot of your fighting on this map is going to be around those expansion corner objectives, where there are spots to hide while holding the point. How easy it is to hold those will vary based on layout, but all three of the recommended deployment maps give you relatively safe spots in the ruin where you can sit and hold them out of line of sight.
Those corner ruins make for great Infiltrator/Scout positions, and there's just enough hiding space in the F ruin to make that viable. What's tougher here is that there isn't really a safe space near the middle for things like Area Denial and Locus. It's also hard for a unit to scout/move back from the middle objective to the safe part of the F ruin.
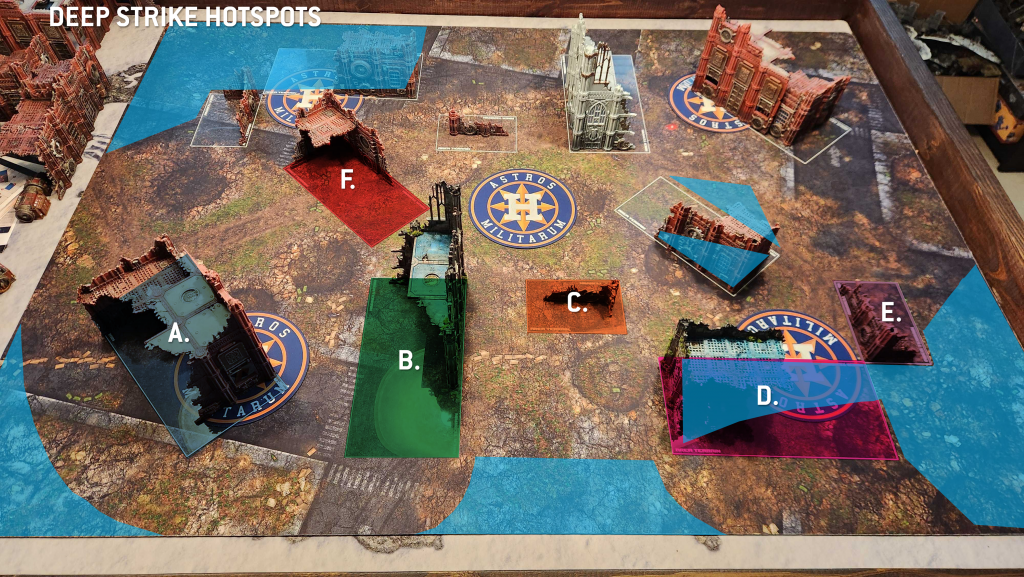
Those corner ruins also make amazing deep strike shielding spots, and the large open space on the sides of each table can also be easy spots to bring in a big unit from deep strike or strategic reserves. Because the middle is so open, a lot of time is going to be spent fighting over those corner ruins/objectives, and those are both great places for a unit to drop in out of line of sight and also difficult to screen completely. Depending on what you're expecting, you can hide on the "inside" of the D/E L-shaped ruin, but that will make you vulnerable to units dropping/coming in from the other side.
Final Thoughts
Layout 6 plays like a better version of Layout 4, but has a number of the same problems. The big ones being those table-length sightlines down the sides of the table. There are places to hide along the table sides on your approach, but the lines are wide enough that on Crucible of Battle or Tipping Point, shooting armies with long ranges will have a big advantage. Because of that, this layout is best when paired with the Search & Destroy deployment.
Have any questions or feedback? Drop us a note in the comments below or email us at contact@goonhammer.com. Want articles like this linked in your inbox every Monday morning? Sign up for our newsletter. And don’t forget that you can support us on Patreon for backer rewards like early video content, Administratum access, an ad-free experience on our website and more
Thank you for being a friend.


 Infinity N5 First Principles: Understanding the Outcomes of Face to Face Rolls
 Tactical Feedback: Timing the Go-Turn
 SRM's Roundabout to Adepticon 2026: Curd Is the Word