Welcome to another installment of Starting Hex, a series about Warhammer Underworlds. This article is returning to
a topic that I brought up back in January. In that first installment of the Objective Counterplay series, I took a look at the first six decks that had been released in Warhammer Underworlds with a focus on the multi-glory end phase objectives. The goal was to identify the high scoring objectives each deck had and try to come up with short lists in bullet point style on what you need to remember in a game to deny your opponent from scoring these objectives.
Since then, five new decks have come out – Edge of the Knife, Realmstone Raiders, Raging Slayers, Hunting Grounds, and Deadly Synergy. Seems like it's time to take a look at these decks as well to compile a cheat sheet for people with memories as bad as mine!
On a side note, in an interesting twist of fate this topic has also been recently
covered over at Spent Glory! Fishmode is a great player, writer, and person so I suggest checking it out if you want even more tips from a different perspective on how to handle these decks.
What Is Counterplay and Why Should You Do It?
As a brief refresher, when I say "counterplay" in this article I am talking about making intentional choices that deny your opponent from scoring. There are various examples in the
first Objective Counterplay entry, so be sure to check it out if you haven't already.
The first step in counterplay is to determine what your opponent is going to do. With practice, you'll start to remember which objectives are in which decks. For Rivals games, the format where you shuffle up and play pre-built decks, you have a guarantee that your opponent will always have the same set of objectives in every game. In Nemesis, when players are picking and choosing cards from two decks, it's a little less certain what you'll face. You'll start to get a feel for which objectives are more commonly chosen with practice playing as and against various decks. If you have less game time and more screen time, you can also go check out event winning deck lists at the
Battle Mallet Deck Library or peruse the
Staggerers Deck Repository to get a rough idea of what is being played.
The second step is to actively deny your opponent from achieving their goals. After you identify what your opponent wants to do, simply don't let them do that. That's a reductionist statement because it isn't always that easy, of course. Some examples are moving fighters into places your opponent doesn't want you to be or preventing their fighters from taking certain actions.
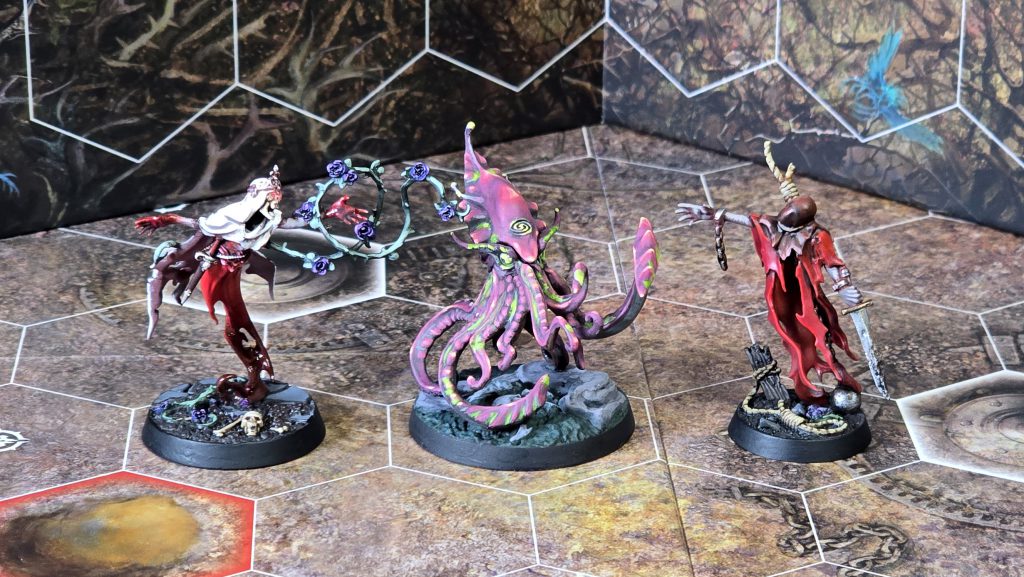 Cephanyr is in trouble! The Briar Queen and her Everhanged are out to get the squid. Credit: Jake Bennington
Broadly speaking, objectives in this game care about fighters being in certain locations (e.g. enemy territory, on a feature token, adjacent to another fighter), fighters being in certain states (e.g. having a charge token, being tempered/united/enraged, being damaged or vulnerable), or fighters performing specific actions (e.g. making some number of attacks, driving back an enemy, delving feature tokens).
The answer for why you should try to deny your opponent from scoring objectives is straightforward. After all, you win a game of Warhammer Underworlds by having more glory at the end than your opponent. You can do this by scoring more glory
or by preventing your opponent from scoring theirs. Ideally you'll be doing both, but by having the knowledge of what your opponent is likely to do, you can make more educated decisions. Is it worth going for that long shot kill to score two bounty from their injured fighter when you're also risking giving your opponent three or more glory by playing into their objectives?
Just like last time, this isn't an exhaustive list. I am covering the objectives that are worth two or more glory, which also means I won't be touching on any surge objectives because they're all single glory scorers in this edition. This is partly because (in general) the single glory objectives are much easier to score and therefore require a lot of effort to deny, but also because something designed as a quick reference guide with 60 entries is definitely not quick – it's instead a more reasonable 17 entries this way.
Edge of the Knife
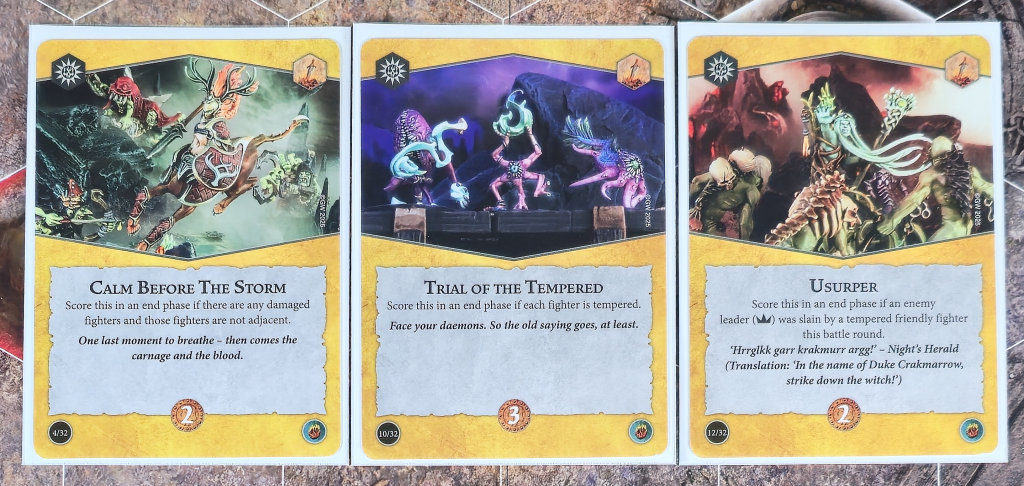 Objectives in the Edge of the Knife deck. Credit: Jake Bennington
In general, the bulk of the Edge of the Knife deck requires tempered fighters (so fighters who either have two or less starting health or who have taken two or more damage). If you just spend your activations trying to keep your own fighters from being tempered, preventing their fighters from becoming tempered if they aren't already, and focusing your damage into their tempered fighters to take them out of action, you'll be able to do a decent amount of disruption without having to specifically counter any one card.
If you are out to counter cards, a very common one you'll run into is
Calm Before the Storm. This two glory objective can be denied with only a moderate amount of planning – if you have a damaged fighter, end the round with them adjacent to another damaged fighter. It can be two of your own fighters being buddy-buddy or one of your fighters running up and glowering aggressively at a damaged enemy. The trick here is that a lot of warbands taking Edge of the Knife have fighters that are so squishy they go from full to dead with no in-between. Alternatively, don't have any damaged fighters. This isn't easy, but if you're one-shotting the enemy, packing healing in your deck, and you have a single injured fighter that you can top off to full, then you can do so before the end phase scoring.
Trial of the Tempered is the three glory bomb that the deck has and requires every fighter, friendly and enemy, to be tempered in an end phase. Conveniently, healing your own damaged fighters can pull them out of tempered status which helps block both this objective and the previous. You can also make a point of not damaging or slaying the fighters your opponent brings who don't start tempered – this is risky, because those are typically their leaders for the small horde warbands who have very important abilities and the deck also has two ways to temper their own fighters regardless of health or damage.
Usurper is last, and also going to be the least common to run into when playing Nemesis. It requires the enemy to slay your leader with a tempered fighter. The unreliability of achieving that goal while this card is in hand usually keeps it out of lists, but in Rivals you know it's there so keep it in mind. Try to not leave your leader stranded when tempered enemies can get to them. I know "don't let your leader die" isn't revolutionary advice, but if you're given the option of risking them near the enemy's non-tempered fighters or their tempered fighters, choose the former. Alternatively, you can bank on the odds of this not being in their opening hand and go all out aggressive with your leader (if it's matching your playstyle) and see if your opponent is willing to let them rampage through their lines before drawing this card. In the end I don't think this is worth playing around all that much in Nemesis because it's so rare, and in Rivals your own options are usually so limited that you can't afford to just not use your leader.
Recap:
- Broadly, focus on killing their tempered fighters first.
- If damaged fighters are present, end the round with them adjacent.
- Keep non-tempered fighters – yours and your opponent's – around as long as you can.
Realmstone Raiders
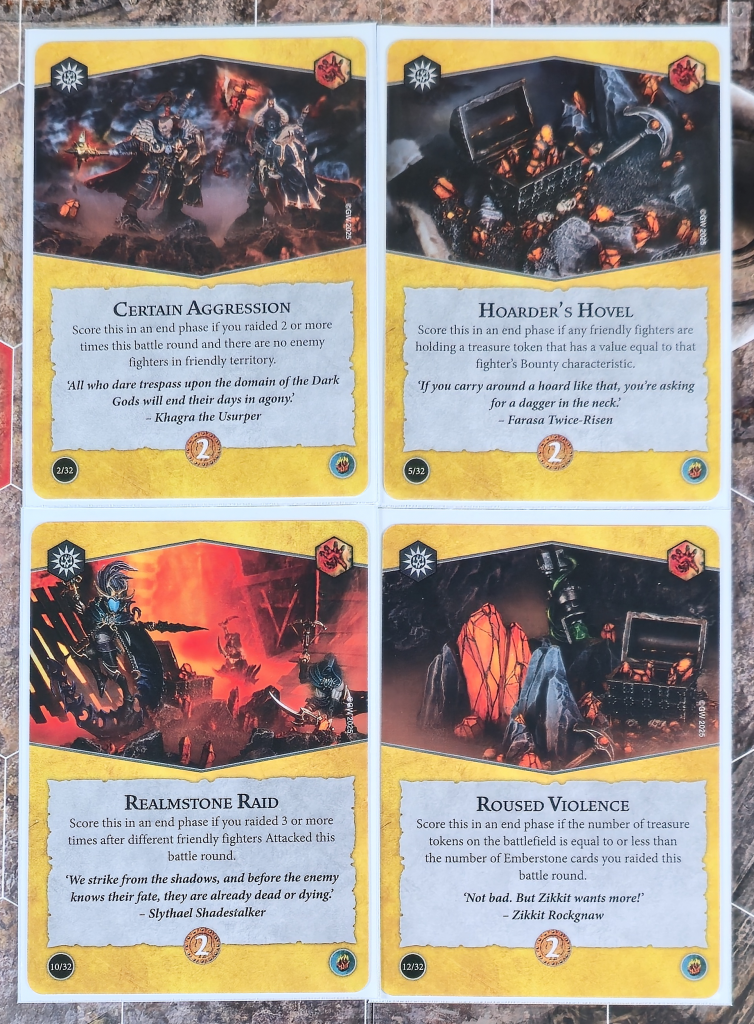 Objectives in the Realmstone Raiders deck. Credit: Jake Bennington
Another fairly niche deck, Realmstone Raiders will be picked when your opponent is focusing on making highly accurate melee attacks and they're likely to focus fire on your higher bounty fighters. You can throw a general wrench in their plan by preventing those from happening – stack the odds in your favor by making your fighters harder to hit with defensive buffs and sitting them in cover, prioritize taking out their accurate melee fighters first, and if you have a warband with very asymmetric bounties then keep your big bounty fighter from getting ganged up on and giving the opponent buckets of raiding opportunities. Realmstone Raiders is even less inclined to go after zero bounty fighters than normal, so leverage those fish, rats, lizards, and raised fighters.
This deck brings with it some annoying tracking if you want to plan around what your opponent is doing or even just try to keep them honest. Tracking the number of raids, the number of emberstone cards raided, and the number of
unique emberstone cards raided are all required.
Certain Aggression is a two glory objective made up of two parts. The first is going to be difficult to deny since it's the entire point of the deck. Simply raiding twice
will happen unless the dice are heavily skewed in one way. Don't bother even thinking about that and instead focus on the latter half which is by comparison dead easy. Just have a fighter in their territory and they can't score this. The ease of denying it and the prevalence of invading strategies means this isn't very common to see in Nemesis, but maybe it can pop up in a Hunting Grounds pairing to try and offset the poor scoring that deck has if the opponent chooses not to engage.
Hoarder's Hovel is one of my white whales of a card, which you'd know if you
read my article on misfit cards. The difficulty of blocking this is going to be dependent on the bounty spread of your opponent's warband – more bounty values mean they have more treasure token options. The exact method to deny this will depend on where the tokens wind up as well as what your opponent is playing, but you can target whatever value in their warband they have the least of to remove an option ASAP. For example, if they are playing a four fighter warband with a 2/2/2/1 split, then you can try to take out the one bounty fighter and then fight over treasure token 2.
Realmstone Raid is difficult to deny because, again, it's just asking the deck to Do Its Thing which is simply making melee attacks. I wouldn't go out of my way to dedicate brain power to countering Realmstone Raid specifically. Fortunately, by following the generic anti-Realmstone Raider tips you're also going to be making this a little more difficult to score than it would otherwise be.
Roused Violence has interesting overlap with delving, one of the most prevalent strategies in the game at the moment. If your deck doesn't care about delving, go ahead and flip those cover tokens back over to their treasure sides whenever you get a chance. If you're bringing Pillage and Plunder, you're going to be delving and thus making this easier to score for your opponent. There will be some push/pull there, but take into account how much of your glory is tied into delving compared to your opponent's and play to whatever your best out is. If you're denying their 2 glory objective but also blocking yourself from scoring multiple of your own, maybe don't bother. Alternatively, if they're playing Realmstone Raiders paired with Pillage and Plunder, they're betting a lot of glory on delving. There's also the issue that if they raid Emberstone cards five times, there's nothing you can do to stop this but that's not an easy hurdle to clear.
Recap:
- Do your best to reduce enemy accuracy – through defensive upgrades, cover tokens, and denying flanked/surrounded.
- Protect your high bounty fighters even more than normal.
- Have a friendly fighter parked in enemy territory in the end phase.
- Analyze the treasure token's values and placement; Prioritize their least common bounty value fighter.
- Be mindful of how many treasure tokens are face-up compared to the amount of emberstone cards that have been raided.
Raging Slayers
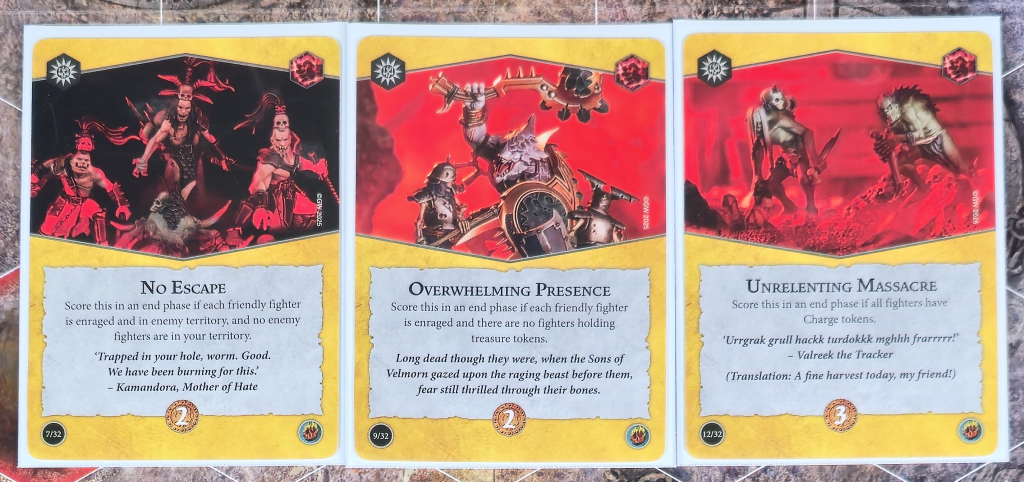 Objectives in the Raging Slayers deck. Credit: Jake Bennington
Raging Slayers is infamous for having a rough set of objectives. In Nemesis, if this deck is taken it's mostly for the plot card and some power cards, so the majority of its objectives aren't likely to come into play. That said, the reason many of them are considered so bad is because of how easy it is to deny them… so make sure you're trying to deny them, otherwise you're going to feel pretty silly when they score their Temu knockoff Strip the Realm. Some general advice when playing against Raging Slayers is to find ways to deny them from being able to enrage their fighters. You can do this if you can apply movement or charge tokens (since they only enrage when making a charge), reducing enemy move speed so your fighters are out of range, or doing some old fashioned keep-away and staying out of charge distance.
First up is
No Escape, another two glory objective with two conditions. The first (all their fighters are enraged and in your territory) is mostly out of your hands, but you can still make it harder for them by positioning your fighters in a way that denies one of their fighters from making a charge. Or, you could just put some of your fighters in their territory. This outright denies the objective from the second condition, and even if they charge into your fighter and kill it, this means they're charged out in their own territory and might not be able to get back into yours.
Overwhelming Presence yet again asks for all their fighters to be enraged, but given there's no territory requirement it's going to be even less likely for you to deny it. It's still possible with clever fighter placement, even if it's not sure fire. However, "stand on a treasure token" is (hopefully) something that has been ingrained in most players by now, and that's all you have to do to turn this off.
Unrelenting Massacre makes its triumphant return from the Reckless Fury deck. Everything I said earlier for that deck applies here, except Raging Slayers is missing many of the tools Reckless Fury has to force charge tokens onto your fighters when you don't want them. Just don't charge all of your fighters out. If you're down to a single uncharged fighter, play defensively with them so they aren't killed off before the end phase.
Recap:
- Deny your opponent the opportunity to make charges.
- Have one or more fighters in their territory.
- Hold a treasure token at the end of the round.
- Keep at least one fighter without a charge token at the end of the round.
Deadly Synergy
 Objectives in the Deadly Synergy deck. Credit: Jake Bennington
The first of the two new Spitewood decks is Deadly Synergy and it seems like it'll make an impact on the meta. In some ways, it's similar to Edge of the Knife in that it's asking the player to do certain things with their fighters to convey a keyword to them. Unlike Edge of the Knife, the united keyword actually does something and will increase both accuracy and defense of fighters by letting them flank more easily. As such, one of the primary goals is to prevent your opponent from having united fighters. Leverage knockbacks to spread them out, utilize the rare enemy push to pull them apart, and if there are any chains of fighters you can focus on killing the middle links to separate them.
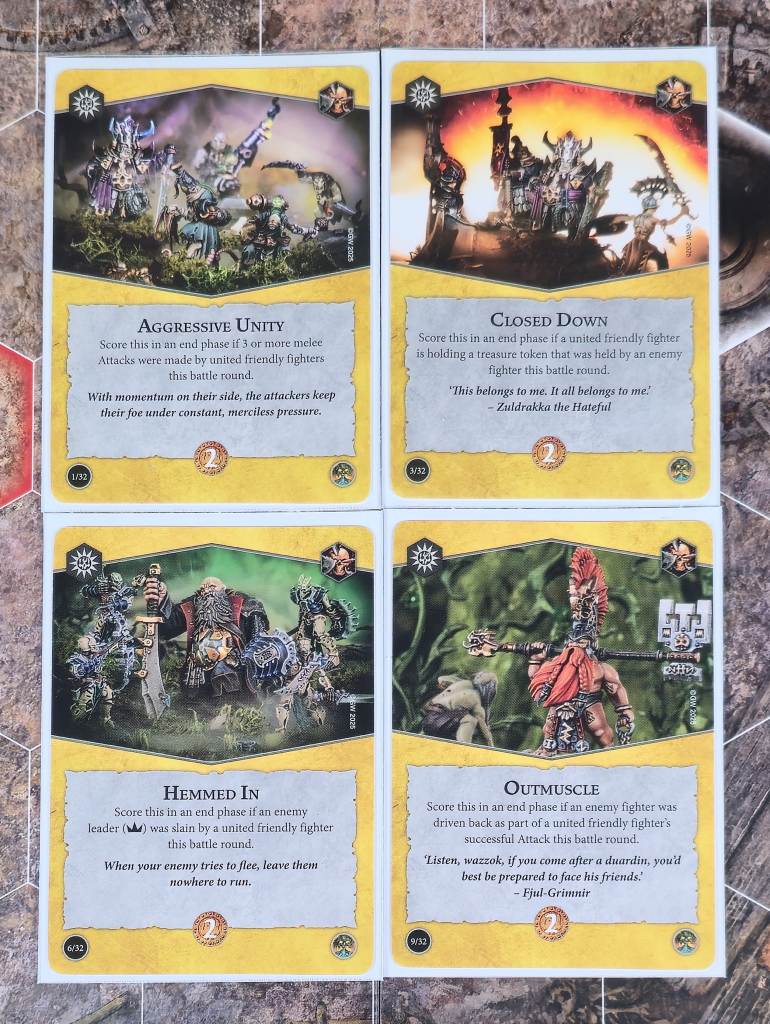
Aggressive Unity is a two glory end phase that rewards the player if they're able to make three melee attacks with united fighters. Since it won't count ranged attacks, you can try to use positioning to keep your fighters out of big balls of enemy fighters. The opponent will have to use some of their positioning tools in order to squeeze three attacks in if you are able to move away from their fighters as they try to charge into you. Keep your distance and do your best to disrupt their attempts at uniting fighters. An opponent willing to burn resources (warscroll, power cards) can be difficult to stop but at least you're making them use up effects to get there.
Closed Down will vary in difficult based on whether your game plan involves touching feature tokens. If you're planning to hold treasure tokens or even delve them away, you will at least briefly control the token your fighter stands on. If your plan doesn't involve tokens, then do your best to not stand on them and be wary about being in drive back range of a token. All it takes is an enemy fighter to
boop one of your fighters and push them back onto a treasure to set up this two glory objective. Basically, note any treasure you touch each round and either kill anything that gets near it or hold it until the end of the round – in the latter case, ideally delving it over to cover so it won't become a potential problem again in the next round. Anti-drive back tech can help both to prevent your fighters from being unwillingly pushed onto a token and from being driven off of one to begin with.
Hemmed In is like Usurper from Edge of the Knife in that it's unlikely to be seen due to how tight the timing restrictions are in scoring it. All the advice given there applies here, except that it's potentially a little easier to see coming if your opponent is working to set up united fighters in range of your leader. Don't sweat it too much in Nemesis, but be cautious with your leader placement in Rivals.
Outmuscle relies on the enemy being able to drive back one of your fighters. Having access to guard, stand fast effects, or generic drive back immunity shuts it down completely but those aren't common in all deck archetypes. When playing a horde warband, you can inadvertently deny it sometimes by just having your fighters die when hit – if they don't live through an attack, they won't be driven back. This isn't exactly ideal, but it could force your opponent into using less damaging weapon profiles that keep your fighters around for longer. Aside from that, it's the standard practice of trying to disrupt attempts of your opponent to have united fighters.
Recap:
- Disrupt your opponent's attempts at having united fighters.
- If your plan involves tokens, be mindful of Outmuscle (use guard and anti-drive back effects).
- If your plan doesn't, avoid standing on (or adjacent to) treasure tokens if you can help it.
Hunting Grounds
The final of the two new decks is Hunting Grounds, which is thematically really cool but does have some mechanical hurdles. I could sum up the counterplay of Hunting Grounds with five words: stay out of their territory. Nearly the entire deck requires you to invade the Hunting Grounds player's territory, and if you simply choose not to then they're kind of hosed. There are also a handful of objectives that key off of driving back enemy fighters, so if you're able to make timely uses of guard, stand fast, and other similar tech you can throw a wrench in their plans. Not all game plans can afford to just stand back and hang out in their own territory though, so if you do need to invade to score your own objectives there are a few worth playing around.
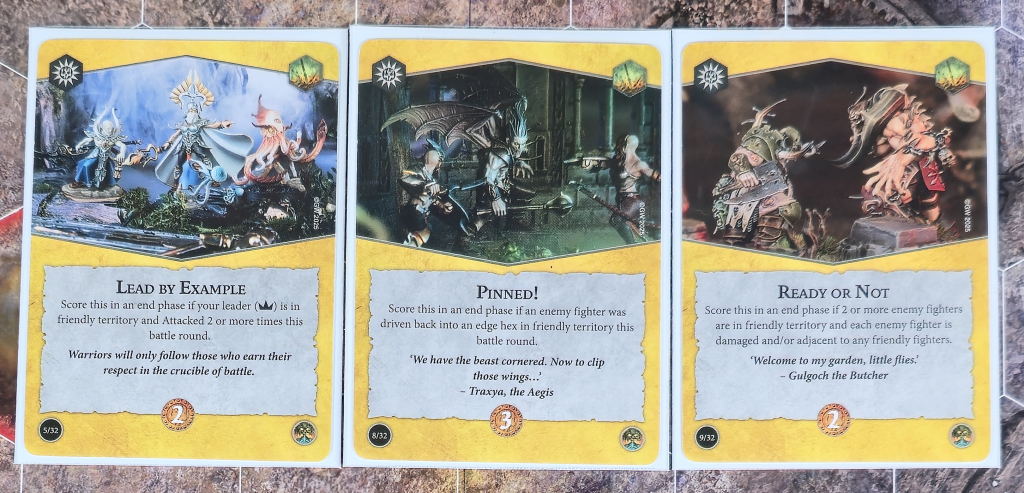
Lead by Example can show up, particularly if their leader has a ranged attack. It doesn't ask too much of the player for a nice two glory payoff, but there are a few places you can interact with it. The most blunt method is to kill their leader before they can score it. Then it's a completely dead card, whether it's in their hand now or they draw it later. Another option is to deny the leader from making attacks – this is harder or even impossible versus some warbands. Finally, you can draw their leader over into your territory and not let them back into theirs. This is also tricky to do and requires some niche effects like Growing Concerns from Countdown to Cataclysm, but it is technically possible.
The big payoff in Hunting Grounds is
Pinned! A whopping three glory is theirs for the taking if they just drive back one of your fighters into an edge hex in their territory. They can bait you into getting into position through the placement of treasure tokens if you're playing a hold strategy, the positioning of their own fighters if you're playing an aggressive one, or Aqua Ghyranis feature tokens regardless of what you plan to do. If you notice the enemy congregating around the edges of their side of the board, be wary. If you do choose to engage over there, make sure you have a way to push your fighter back into safety (e.g., Sidestep, Duellist, Illusionary Fighter) or a way to ensure your fighter isn't going anywhere (e.g., guard token, Inviolate, Hold the Line!).
Ready or Not is… bad. I don't think it will commonly appear in Nemesis, and even in Rivals you don't have to do a whole lot to brick this card in your opponent's hand. You can deny it by either not putting two or more fighters into enemy territory. You can also deny it by having a single undamaged fighter not be adjacent to an enemy. Given that most warbands and deck pairings with Hunting Grounds aren't likely to be charging deep into your own territory, a horde warband can just park a single ding dong in their back line to deny this. It's a little trickier to deny if you're playing an elite invasive aggro warband, but with some work you can still try to position an undamaged fighter to not be adjacent to an enemy.
Recap:
- Don't go in their territory.
- No, seriously, don't go over there unless you absolutely have to because their paired Nemesis deck can outscore you twiddling your thumbs.
- Kill their leader before Lead by Example shows up.
- Don't get within drive back range of edge hexes in their territory.
That's a Wrap!
Once again, all of the big end phases have been covered from the decks that currently exist in Underworlds. Use these bullet points as quick reminders and goals when playing against decks and you can probably tilt the scales by a few glory each game if you're able to deny some of your opponent's plans.
My goal is to actually put this stuff into practice next week because I'm going to be playing
a lot of games of Underworlds... at the World Championships of Warhammer! If you're going, I'd love to share a high five. If you're not, then don't worry -- I'll have a bit of a recap once I'm back as well as some interviews with players attending next week. Stay tuned!
Have any questions or feedback? Drop us a note in the comments below or email us at contact@goonhammer.com. Want articles like this linked in your inbox every Monday morning? Sign up for our newsletter. And don’t forget that you can support us on Patreon for backer rewards like early video content, Administratum access, an ad-free experience on our website, and more.Thank you for being a friend.


 Goonhammer Hobby Round-Up: March 2026
 Goonhammer Reviews: Tribal Conquest
 Conquest: Weaver Courts Gemred Knights and Scaile Dancers Model Review