Sirens’ Oath: Tides Turning is a new tabletop role-playing game from Twisted Spire. It’s currently in
crowdfunding, and if you’d like to know more about our feelings on the game you can check out Jay’s review
here.
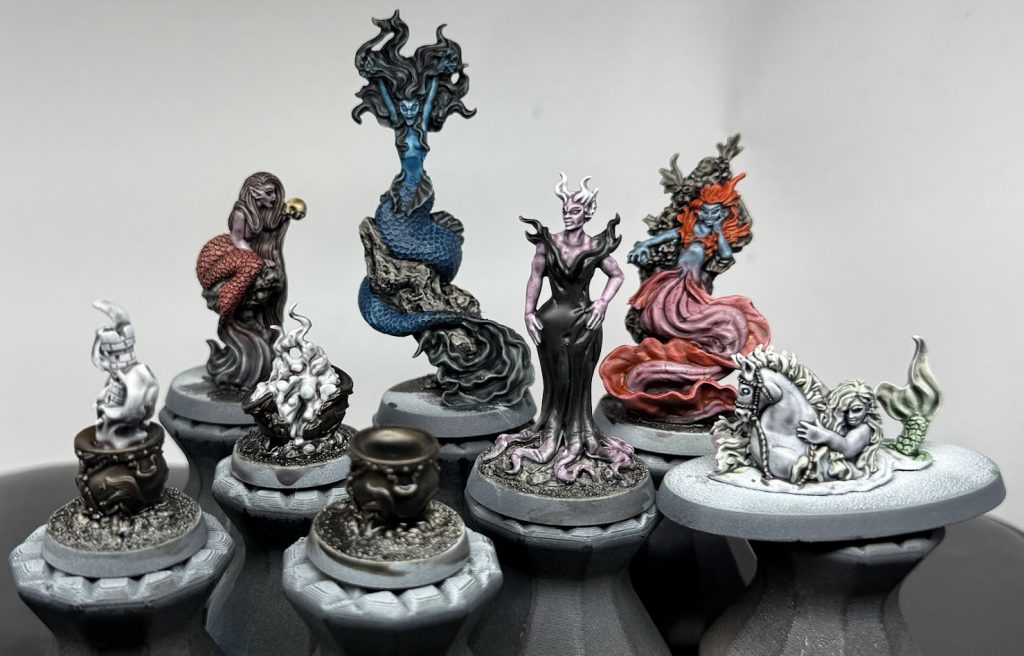
Alongside the rules for the game, backers will also receive a set of five metal miniatures to represent the sirens that players embody during their sessions, as well as three cauldron miniatures to represent narrative outcomes during the game. Twisted Spire were kind enough to send over a set of 3d-printed prototype miniatures for me to have a look at, so thanks go to them.
In this article I’ll be having a look over the miniatures and their design, and then walking through a quick way of getting these miniatures painted and ready for games.
The Miniatures
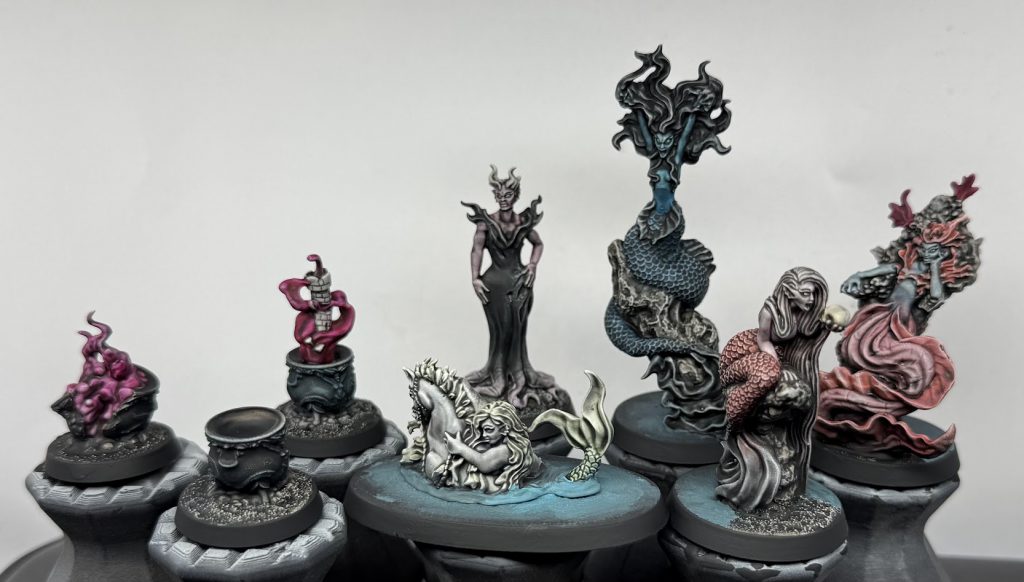
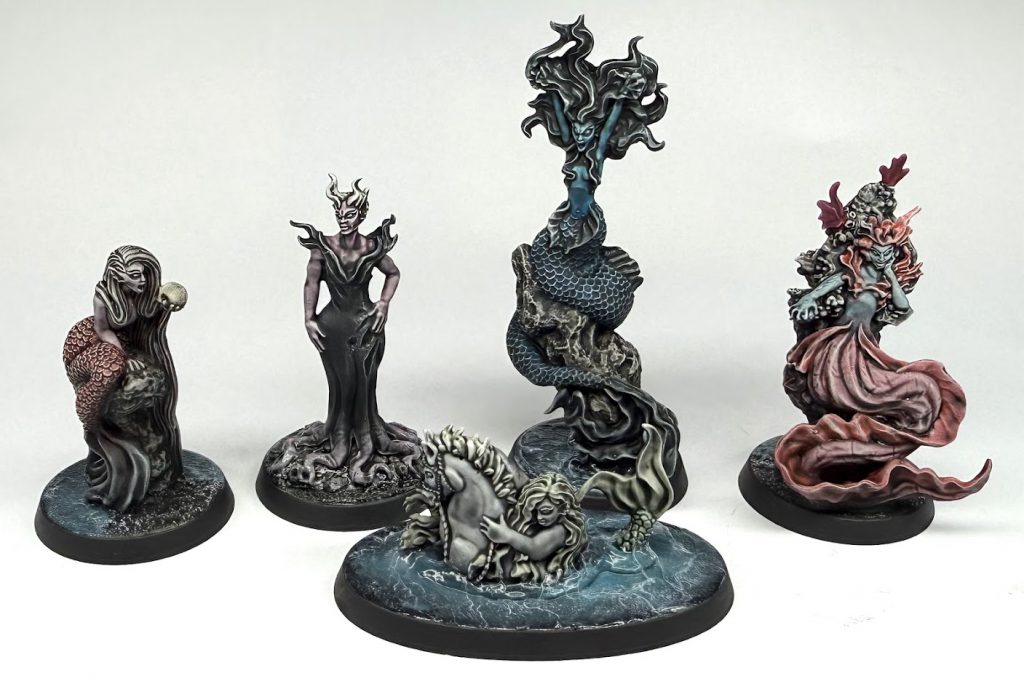
The distinctive style of the Sirens’ Oath miniatures should be immediately recognisable to any fans of Warp Miniatures and their ArcWorlde setting, which is unsurprising given that sculptor Alex Huntley is responsible for both. What that means is that we receive characterful, expressive sculpts that are oozing personality, with large (but not oversized) eyes drawing attention to the mermaids’ variety of severe facial expressions. The sculpts do a great job of communicating that these are powerful, potentially vengeful witches and not to be trifled with. Similarly, the three cauldron tokens clearly convey their themes of Healing, Destruction, and Discord.
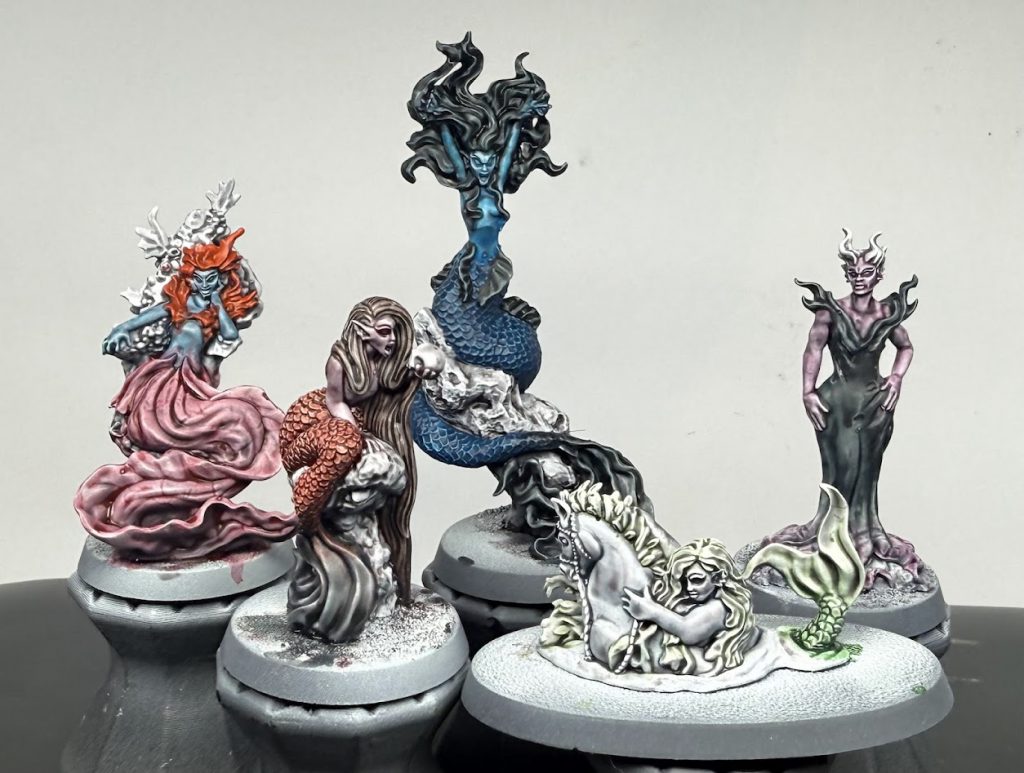
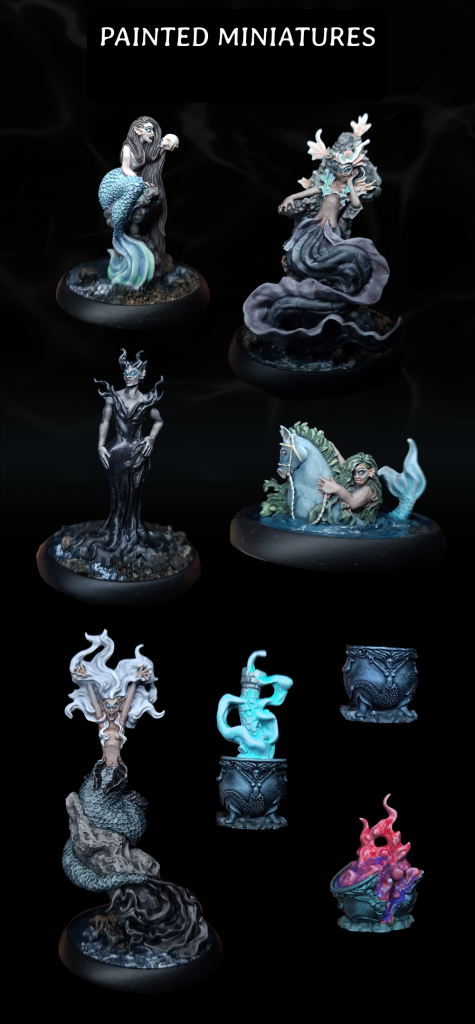 Sirens' Oath painted example miniatures. Credit: Twisted Spire
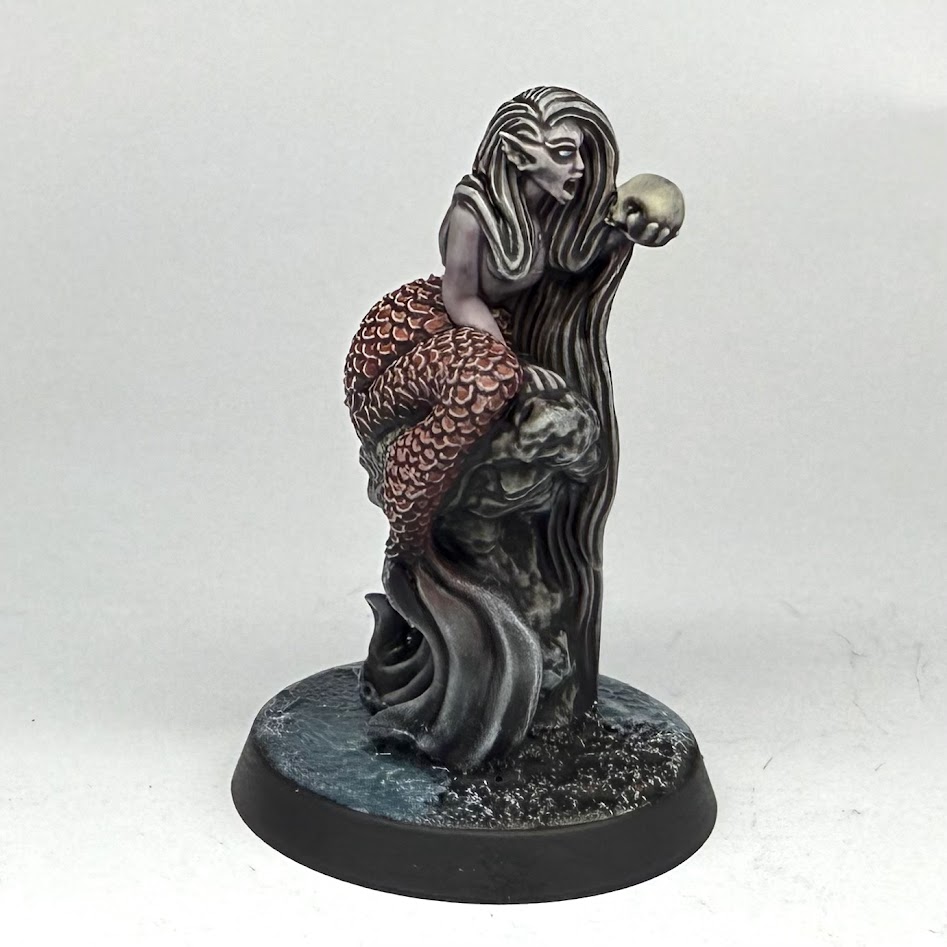
Each mini represents a different premade character from the game booklet, although there is no reason that they couldn’t be used to represent a mermaid-witch of your own creation, especially with a creative paintjob applied.
Painting
It’s clear from reading through the rule booklet and the Gamefound post that Sirens’ Oath is a game that might appeal to people who are not already immersed in the miniatures painting ecosystem, whether that’s because they’re RPG gamers who haven’t made the jump to games that involve miniatures, or because they’re completely new to tabletop gaming and have been attracted by the themes of the game. This is something that Twisted Spire also have a grasp of, as it’s possible to include a curated set of paints and brushes in your Gamefound pledge and have everything you need to get started.
To that end, my goal with this article is to provide some general guidance that will help you get your sirens ready to invoke rituals in double-quick time, whilst hopefully reaching a standard that you can still be proud of. To that end, I’ve focused on a method using thin, translucent paints known colloquially as “speed paints”, which tint areas of models whilst allowing the layers underneath to show through. This is sometimes called
Underpainting (among other names). By comparison, the curated paint set contains mostly-opaque more traditional acrylic paints. If you did back the tidal paint collection though, fear not - I’ll drop in some comments on how I’d vary my methods at appropriate points.
To keep the article from being incredibly long, where appropriate I’ll be linking to some of the great existing hobby content on the site to explain techniques in more detail.
Step 1: Preparing Your Miniatures
I was working with 3D-printed miniatures sent to my by Twisted Spire, so I did not have much clean-up to do. If you’re printing miniatures yourself after backing the
Frontiers page, be sure to clean and cure your miniatures in accordance with the printer and resin you’re using.
If you backed the Gamefound you’ll be working with miniatures hand-cast in white metal. Give the minis a look over for any casting artifacts like a seam line where the halves of the mold joined, or any tiny “sprues” of metal. These can be removed gently with a small needle file or some gentle sandpaper. In my experience, metal minis from Warp Miniatures often require little to no cleanup, so I wouldn’t expect this to be arduous. After this, it’s worth giving the models a quick wash in some warm water with some dish soap, and a gentle scrub with an old toothbrush or similar. This makes sure the models are rid of any residual dust from cleanup, and also any mold release that might have stayed on the surface during the casting process. This step often isn’t required, really, but better safe than sorry. Rinse the minis off and let them dry.
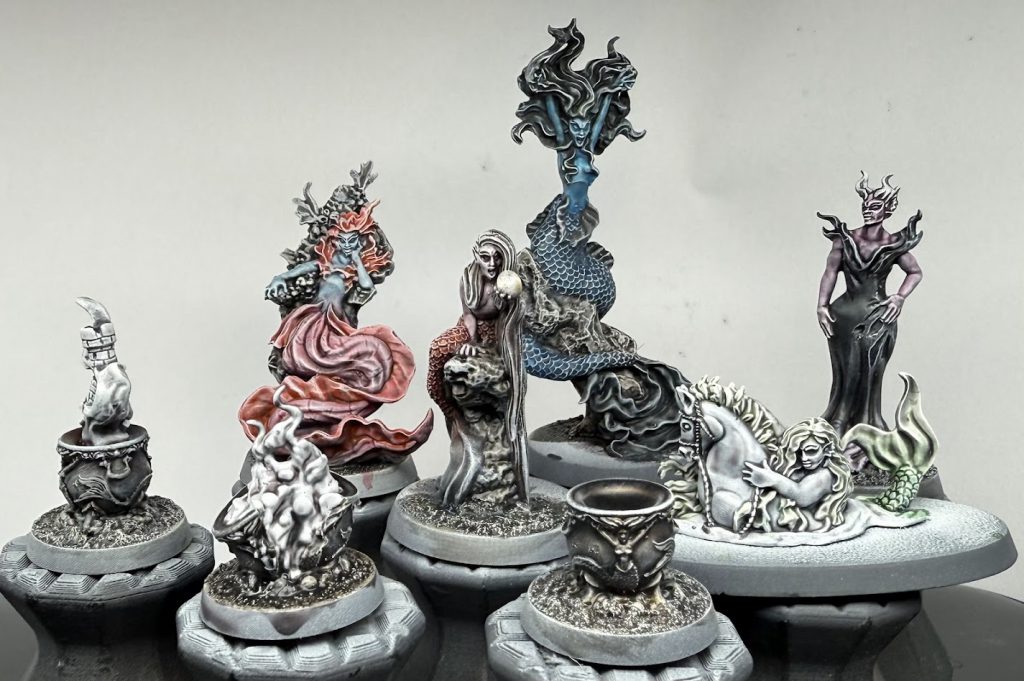
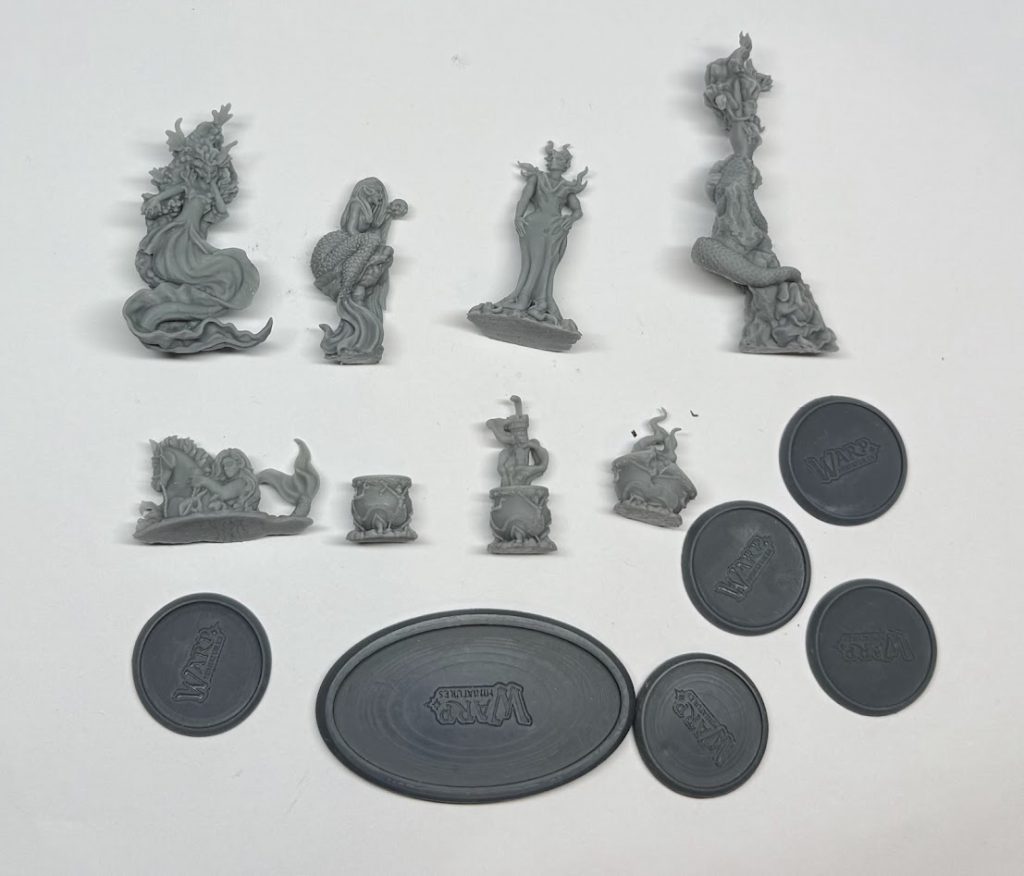 The miniatures as I received them from Twisted Spire. Credit: Rich Nutter
Once your minis are dry (or cured, if you’re using resin prints), you’ll want to stick them to some bases so that they can stand up on the tabletop. Put a dot of superglue (aka CA or cyanoacrylate glue) on the underside of your model, and press it onto a base. I was provided with resin bases from Warp Miniatures with my minis, but I chose to use plastic Citadel bases. No value judgement here, but almost every mini I own is on a Citadel base so I prefer to be consistent.
Give the glue an hour to fully cure, and then it’s time to prime our models ready for painting.
Step 2: Priming
Priming is the application of an initial layer of paint that our actual colours will be able to “key” onto, sticking more effectively than if we painted directly onto our miniatures’ surfaces. Priming is most commonly done with a spray can, such as “Matt Black” from Colour Forge. Citadel, Army Painter, Tamiya, Vallejo and others also make spray paints - the main thing you want is to make sure it is acrylic. “Primer” paint technically has additional ingredients to stick to surfaces more effectively, but for miniatures painting any acrylic spray will stick well enough.
The basic principle is to apply your paint in thin passes from around 30cm (1 foot) away, but we go into much more detail in
this Hobby 101 article. That article also covers what to do with the brush-on primer that you’ll have if you backed the tidal paint collection. For this method I recommend using a dark colour, like a grey or black, but you could also experiment with using a coloured primer spray to add a specific atmospheric undertone colour to your models.
Get your minis primed, give them time to dry fully, and I’ll see you in the next step!
(Note: for full disclosure, I actually primed my minis with an airbrush, which is another route you can go down. Given that getting set up with a decent airbrush is a £250+ endeavour, I’ve focused on simple, accessible methods here).
Step 3: Zenithal Highlighting
You’ll probably have noticed that I said we’re going to use translucent colours to show detail through underneath, and our mini is currently a very dark shade of grey or black. Don’t worry, we’re going to remedy that through applying a light tone over our primer. I used an airbrush to do this, simply spraying downwards with white for a few layers, making sure to leave dark in the recesses and get some pretty severe dark-light transitions across my sirens.
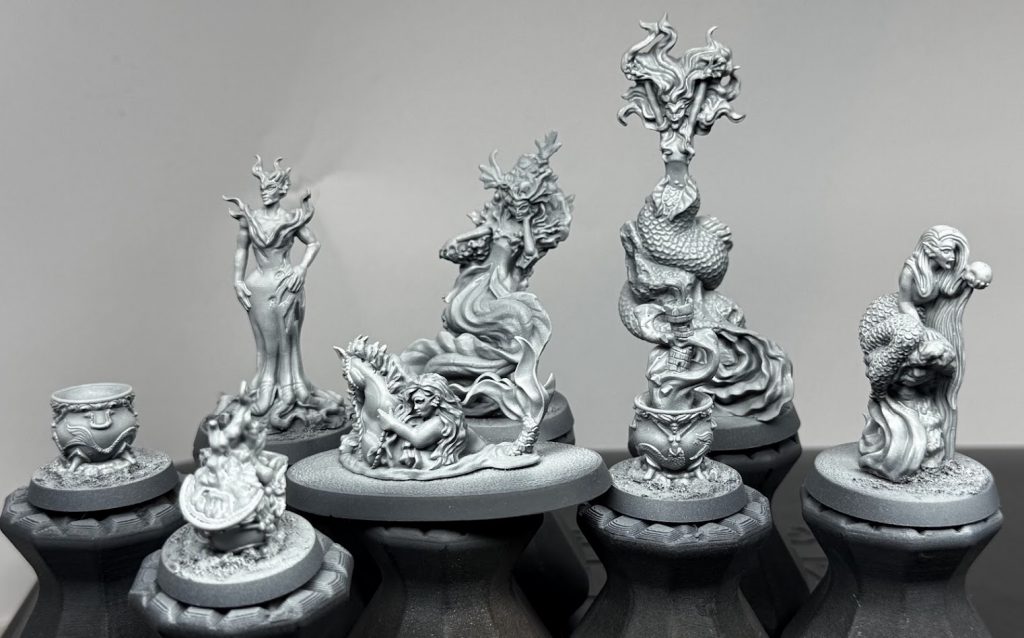 Siren's Oath miniatures, primed and with a white zenithal coat. Credit: Rich Nutter
If you don’t have an airbrush, there are two much cheaper and easier ways to do this. One option is to get a white or off-white spray paint and spray a quick burst at your models from directly above - this should get a very similar effect, albeit with less control. Another option is to drybrush up through a midtone and a light tone to build the transition with a brush. Drybrushing is the act of scrubbing across a mini with a large brush with most of the paint removed, which gradually deposits paint onto raised surfaces and builds transitions. You can learn much more about drybrushing
here.
After my zenithal, I gave the whole model a quick wash of Dreadful Visage from Citadel, which is a kind of translucent warm purple-grey colour. I did this in service of adding a more interesting undertone to my minis, but I’m not sure it had much effect, so I wouldn’t worry about replicating it.
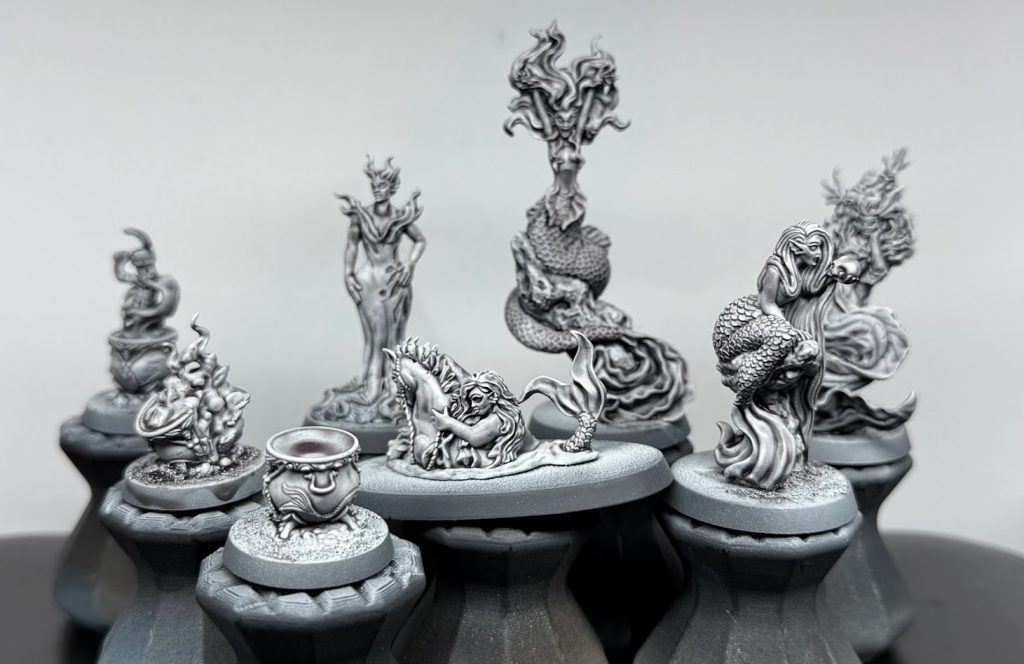 Minis washed with Dreadful Visage. Credit: Rich Nutter
If you’re using the tidal paint collection, don’t worry about either of these steps - your paints are all opaque acrylics, so there’s less value to establishing a gradient. We’ll work on building shade a different way later.
Step 4: Applying Colours
This is going to feel like a broad step compared to the previous ones, but now we’re really ready to get painting! This is where you get to unleash your creativity, so I don’t want to be too specific on what colours you should use. I’ve filled in all the areas of my mermaids with different translucent colours from the Citadel Contrast range, which tint the model whilst letting that dark-light transition we established show through still. I’ve tried to use different colours across models to keep them thematically different, but then use some consistent colours to tie them all together. As an example, I used Ratling Grime on all of the rocks to get a nice brown-grey tone that I thought was reminiscent of seaside stone.
 Starting to apply colours to the mermaids. Credit: Rich Nutter
It really is a case of applying colours to all of the areas of the model until you’re happy! With Contrast/Speedpaints, you can experiment by thinning them with water or a medium to get a lighter tone, or layering one over another after it has dried to get a third mixed tone, or blend them together wet on a model. Miniature painting is art, and art is about experimentation. Alongside the previous article on Underpainting,
this Hobby 101 article may be useful.
 Colours (almost) complete. Credit: Rich Nutter
If you’re using the acrylics in the tidal collection, this step will look a bit different for you. The basic premise is the same - use your colours to fill in the areas of the models until you’re happy, but what you will end up is flat colours rather than tinted shaded areas. The best advice here is to thin your paint with a little water, and apply 2-3 coats, rather than overloading your brush with thick paint and obscuring detail. Hobby 101 has you covered again with
this info on painting.
Great! We should have a model with colours that we like. Let’s look at getting it finished.
Step 5 (Optional): Easy Drybrush Highlight
I’ve chosen to do this to get my minis to the table quickly, although you could instead look to layer your mini up instead (see later steps). Alternatively, you could do neither!
This is really simple - I’ve taken a light colour (ivory in my case) and done a really, really gentle drybrush across my whole miniatures. This adds back a bit of a highlight that has been neutralised by my colours, and also ties the disparate areas together.
 Drybrushed ivory highlight. Credit: Rich Nutter
You could also do this if you’re using the tidal paint collection - either use the white provided, or mix an amount of the white with a smaller amount of the Amber Skin to create a kind of light, warm ivory colour.
Step 6: Extra Details
There is one real extra detail that sticks out on these models, and that is the eyes. I’m going to level with you - eyes can be hard to paint, and sometimes there’s no better remedy than practice and a steady hand. These Sirens’ Oath minis do at least have quite large and extremely well-defined eyes, so there’s no better place to try! I’ll walk you through 3 options.
Option 1 - this is what I did. I filled the eye in with white, and once it was dry I chose a suitably magical colour (a jade, for me) and dotted in a large-ish dot to be the combined iris/pupil. Once that was dry, I went back and dotted white into this coloured area. Finally, I went back with a dark colour to cover any overspill on the edge of the eyes. Overall this gives a good impression of an eye with white, iris, and pupil that is shining in the light, but it requires a steady hand.
Option 2 - this is how I normally paint smaller eyes on miniatures. First of all I fill in the eye with black, and then once this is dry I dot white to the left and right corner of each eye. This gives the impression of a cartoonish eye, and works well for a simple option. Still requires precision, but not as much, and it’s easier to adjust back and forth with black and white if you don’t get it quite right.
Option 3 - glowing eyes. Dot white into the eye (it doesn’t have to be precise), then pick either a speed paint or a thinned acrylic and wash it over the eyes. This should give the impression of eyes glowing with power, and is probably the easiest option.
Alternatively - don’t paint the eyes at all! Your minis will still look great, the shading we’re about to apply will still add some definition to the eyes, and you can always come back and do them later when you’re more confident.
Step 7: Shading
We’ve already got some shade on our mini thanks to the underpainting, but I’m taking a wash product and putting it all over the miniature to re-apply some dark lines in the deepest recesses. I’ve used Army Painter Grimdark Shadow, but I’ve thinned it with some Lahmian Medium to try and make sure it stains my surfaces a bit less. You don’t have to do this step if you’re happy with how your mini looks - it’s definitely a stylistic thing that I lean on a lot for my own minis.
 Wash added, and some basing work done. You can see the eyes too. Credit: Rich Nutter
If you’re using the tidal acrylics, your mini probably looks quite flat right now (or possibly flat with some drybrushed highlights). Luckily you’ve been given a bottle of Army Painter Strong Tone, and you can use that now. Wash it all over the model, you should find it hunts the recesses and adds shade to your miniature. Don’t be afraid to use your brush to wick it off of the model if it pools in the wrong place, but try not to touch the wash once it has started drying. If you’re worried about washing a dark brown tone over your paint work, you can try thinning it 1:1 with water (or purchasing a medium if you prefer). This will make the shade lighter - if it ends up too light, you can always apply another coat.
Give your wash a good 45-60 minutes to dry!
Step 8 (Optional): Layering
I didn’t do this, so I won’t spend a lot of time on it, but you can choose to start layering and highlighting your miniature here to build up the brightness and colour, especially if it has been knocked back a bit by your wash shade.
Check out our layering guide for more info if you’d like to dive in.
Step 9: Varnish
Having spent a good chunk of time on our paintwork, we’ll want to protect it. Varnishing can feel like a bit of a dark art, and a lot of people (including me) will tell you horror stories about varnish going wrong. I’m going to suggest following our guide
here. If you backed the paint set, you’ll have a bottle of matt varnish included. I use Mig or Vallejo varnishes through the airbrush, and spray cans are also available.
 The miniatures post-varnish. Credit: Rich Nutter
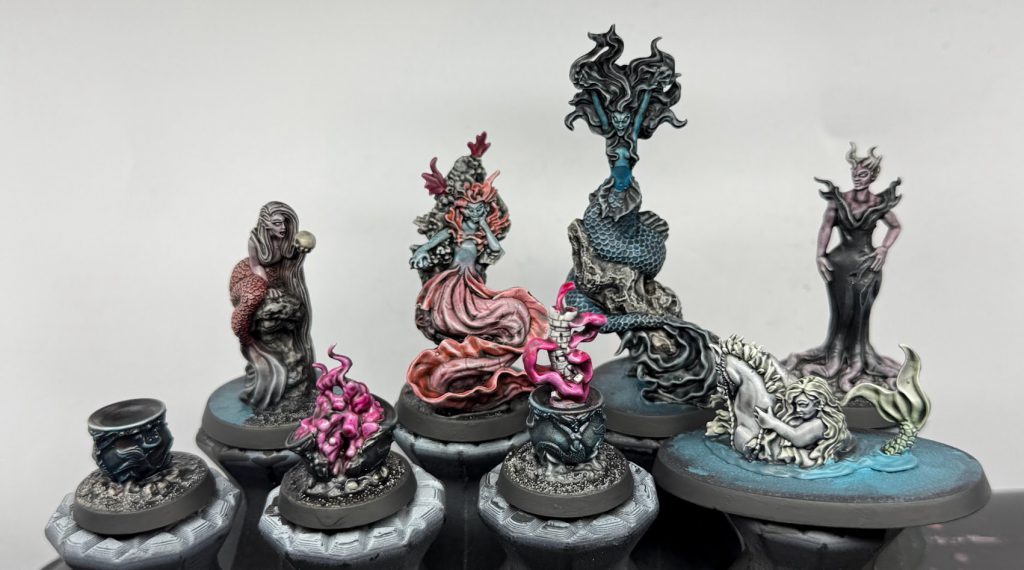
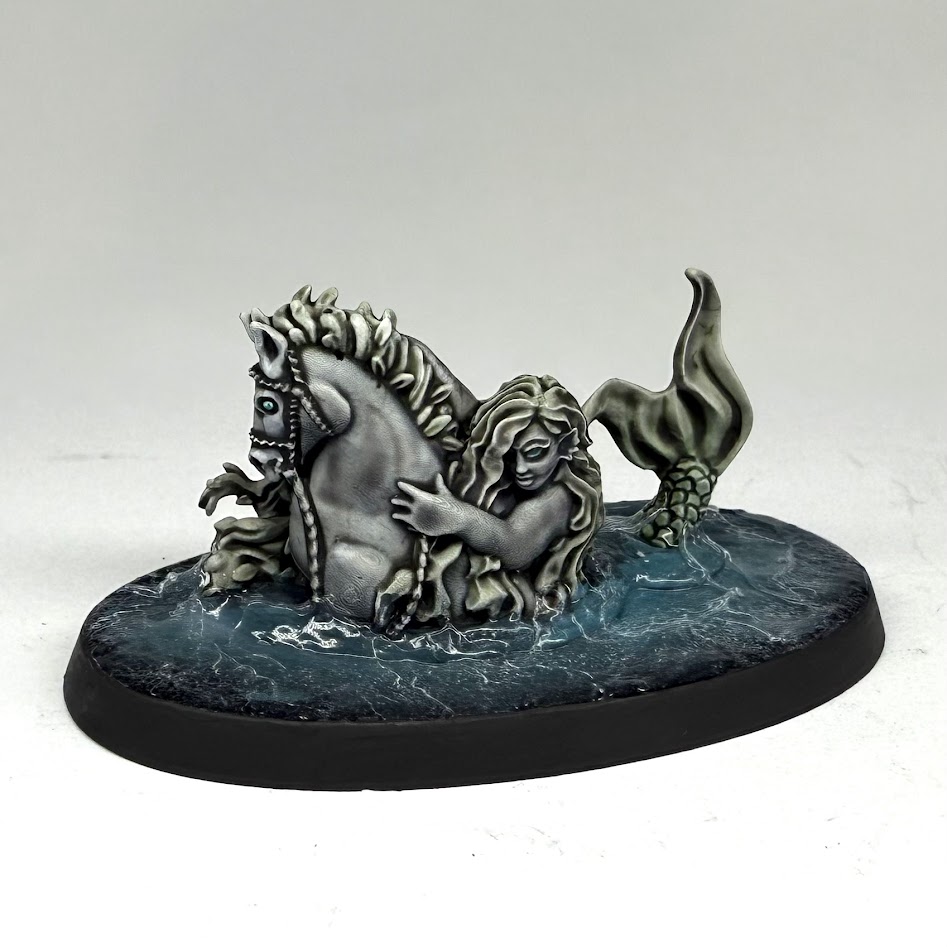
Step 10: Basing
Your minis are painted, but adding some nice basing can really make them feel like they’re set in an environment. I chose to go for a stormy shore, with some texture paste on the base representing sand and a painted water gradient covered in water texture gel for the sea parts.
 Sirens' Oath Mermaids. Credit: Rich Nutter
Basing is really to taste, so once again I’m going to point you at
a Hobby 101 article for more ideas.
Wrap Up
Congratulations, hopefully you’ve now painted your minis! Please do share pictures with us if you found this guide useful, I’d love to see them. Here are some pictures of my finished miniatures to leave you with. If you'd like to back Sirens' Oath: Tides Turning and get your own set of miniatures, it's available
on Gamefound until 13th November 2025.
 Myra, The Songweaver from Sirens' Oath. Credit: Rich Nutter
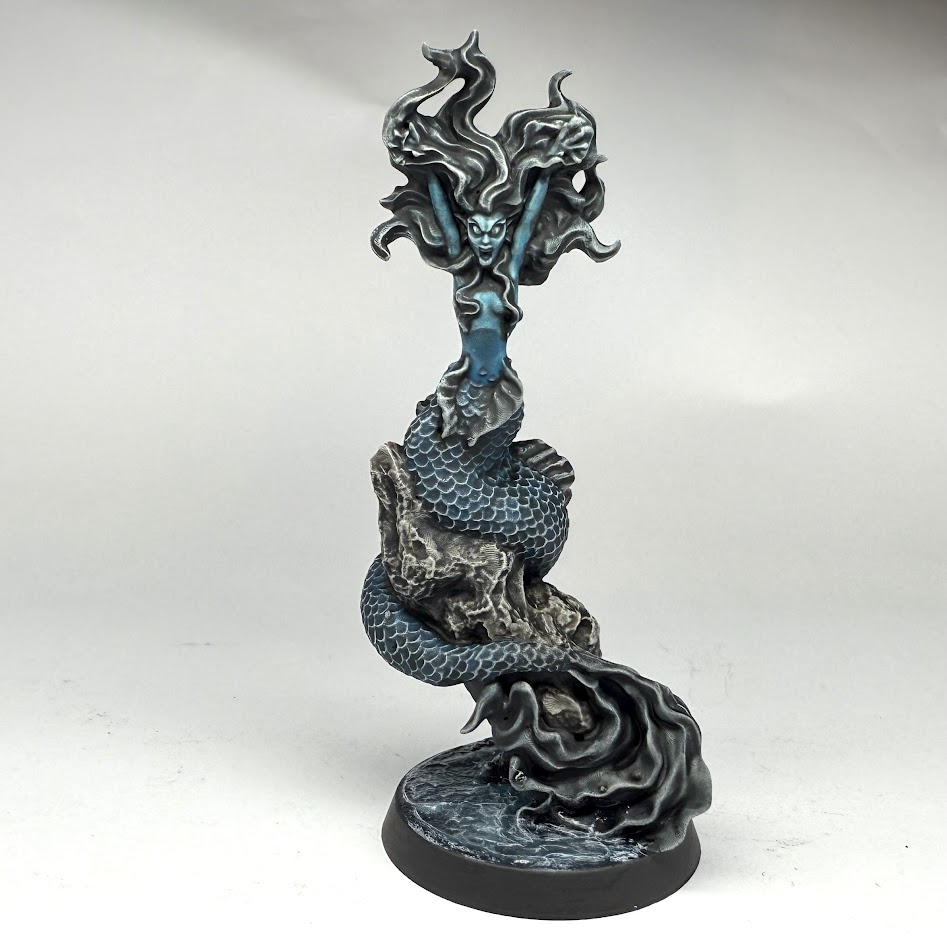 Leizi, The Stormforged from Sirens' Oath. Credit: Rich Nutter
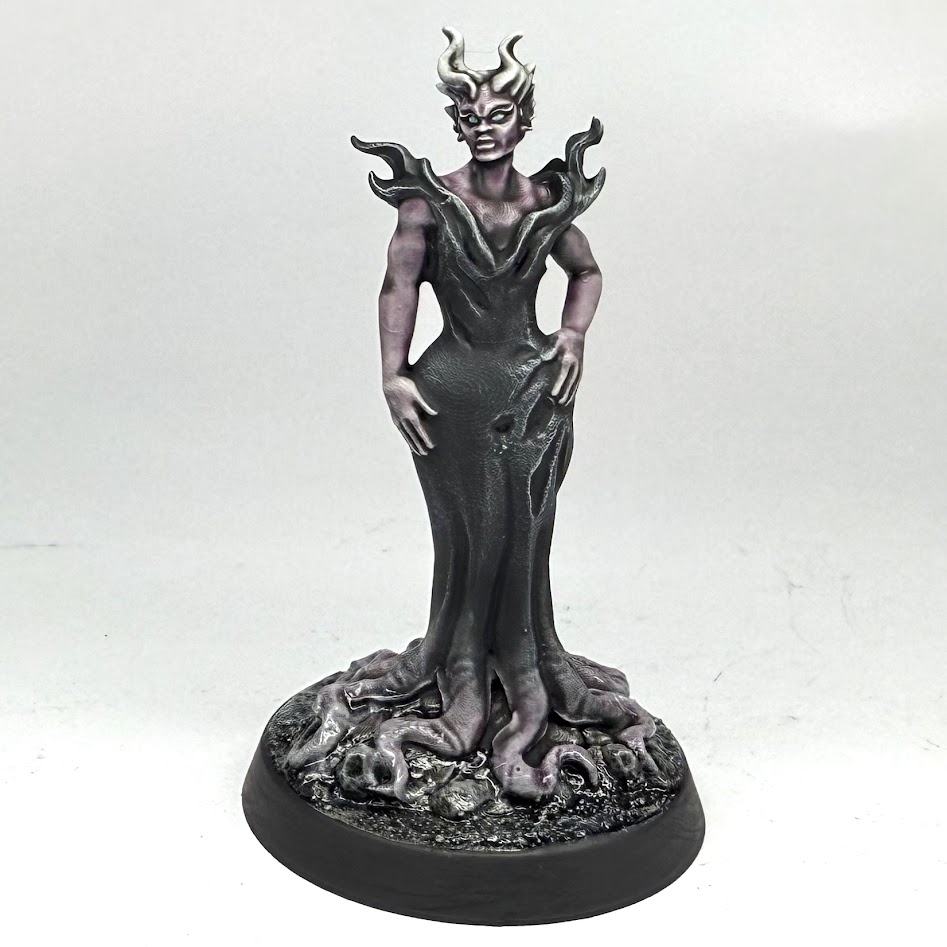 Kael, The Abysswalker from Sirens' Oath. Credit: Rich Nutter
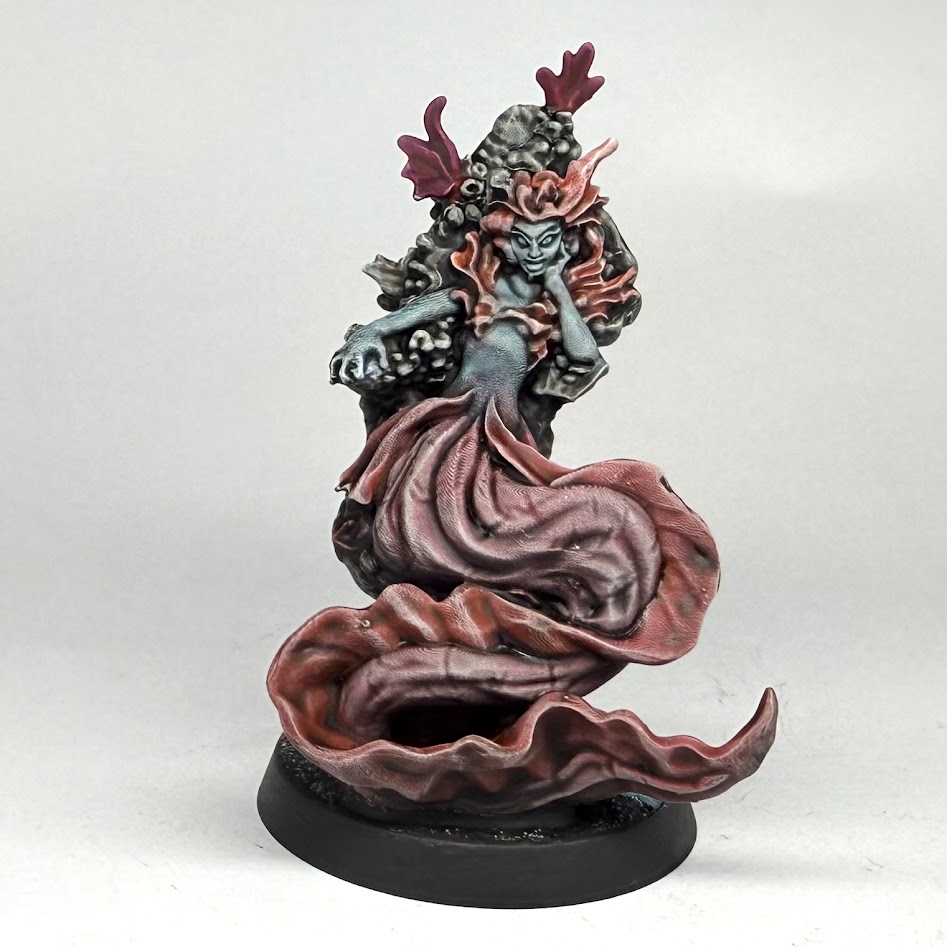 Oryn, The Reefshaper from Sirens' Oath. Credit: Rich Nutter
 Selis, The Whisperer from Sirens' Oath. Credit: Rich Nutter
Have any questions or feedback? Drop us a note in the comments below or email us at contact@goonhammer.com. Want articles like this linked in your inbox every Monday morning? Sign up for our newsletter. And don’t forget that you can support us on Patreon for backer rewards like early video content, Administratum access, an ad-free experience on our website and more.
Selis, The Whisperer from Sirens' Oath. Credit: Rich Nutter
Have any questions or feedback? Drop us a note in the comments below or email us at contact@goonhammer.com. Want articles like this linked in your inbox every Monday morning? Sign up for our newsletter. And don’t forget that you can support us on Patreon for backer rewards like early video content, Administratum access, an ad-free experience on our website and more.Thank you for being a friend.


 Goonhammer Hobby Round-Up: March 2026
 Goonhammer Reviews: Tribal Conquest
 Conquest: Weaver Courts Gemred Knights and Scaile Dancers Model Review