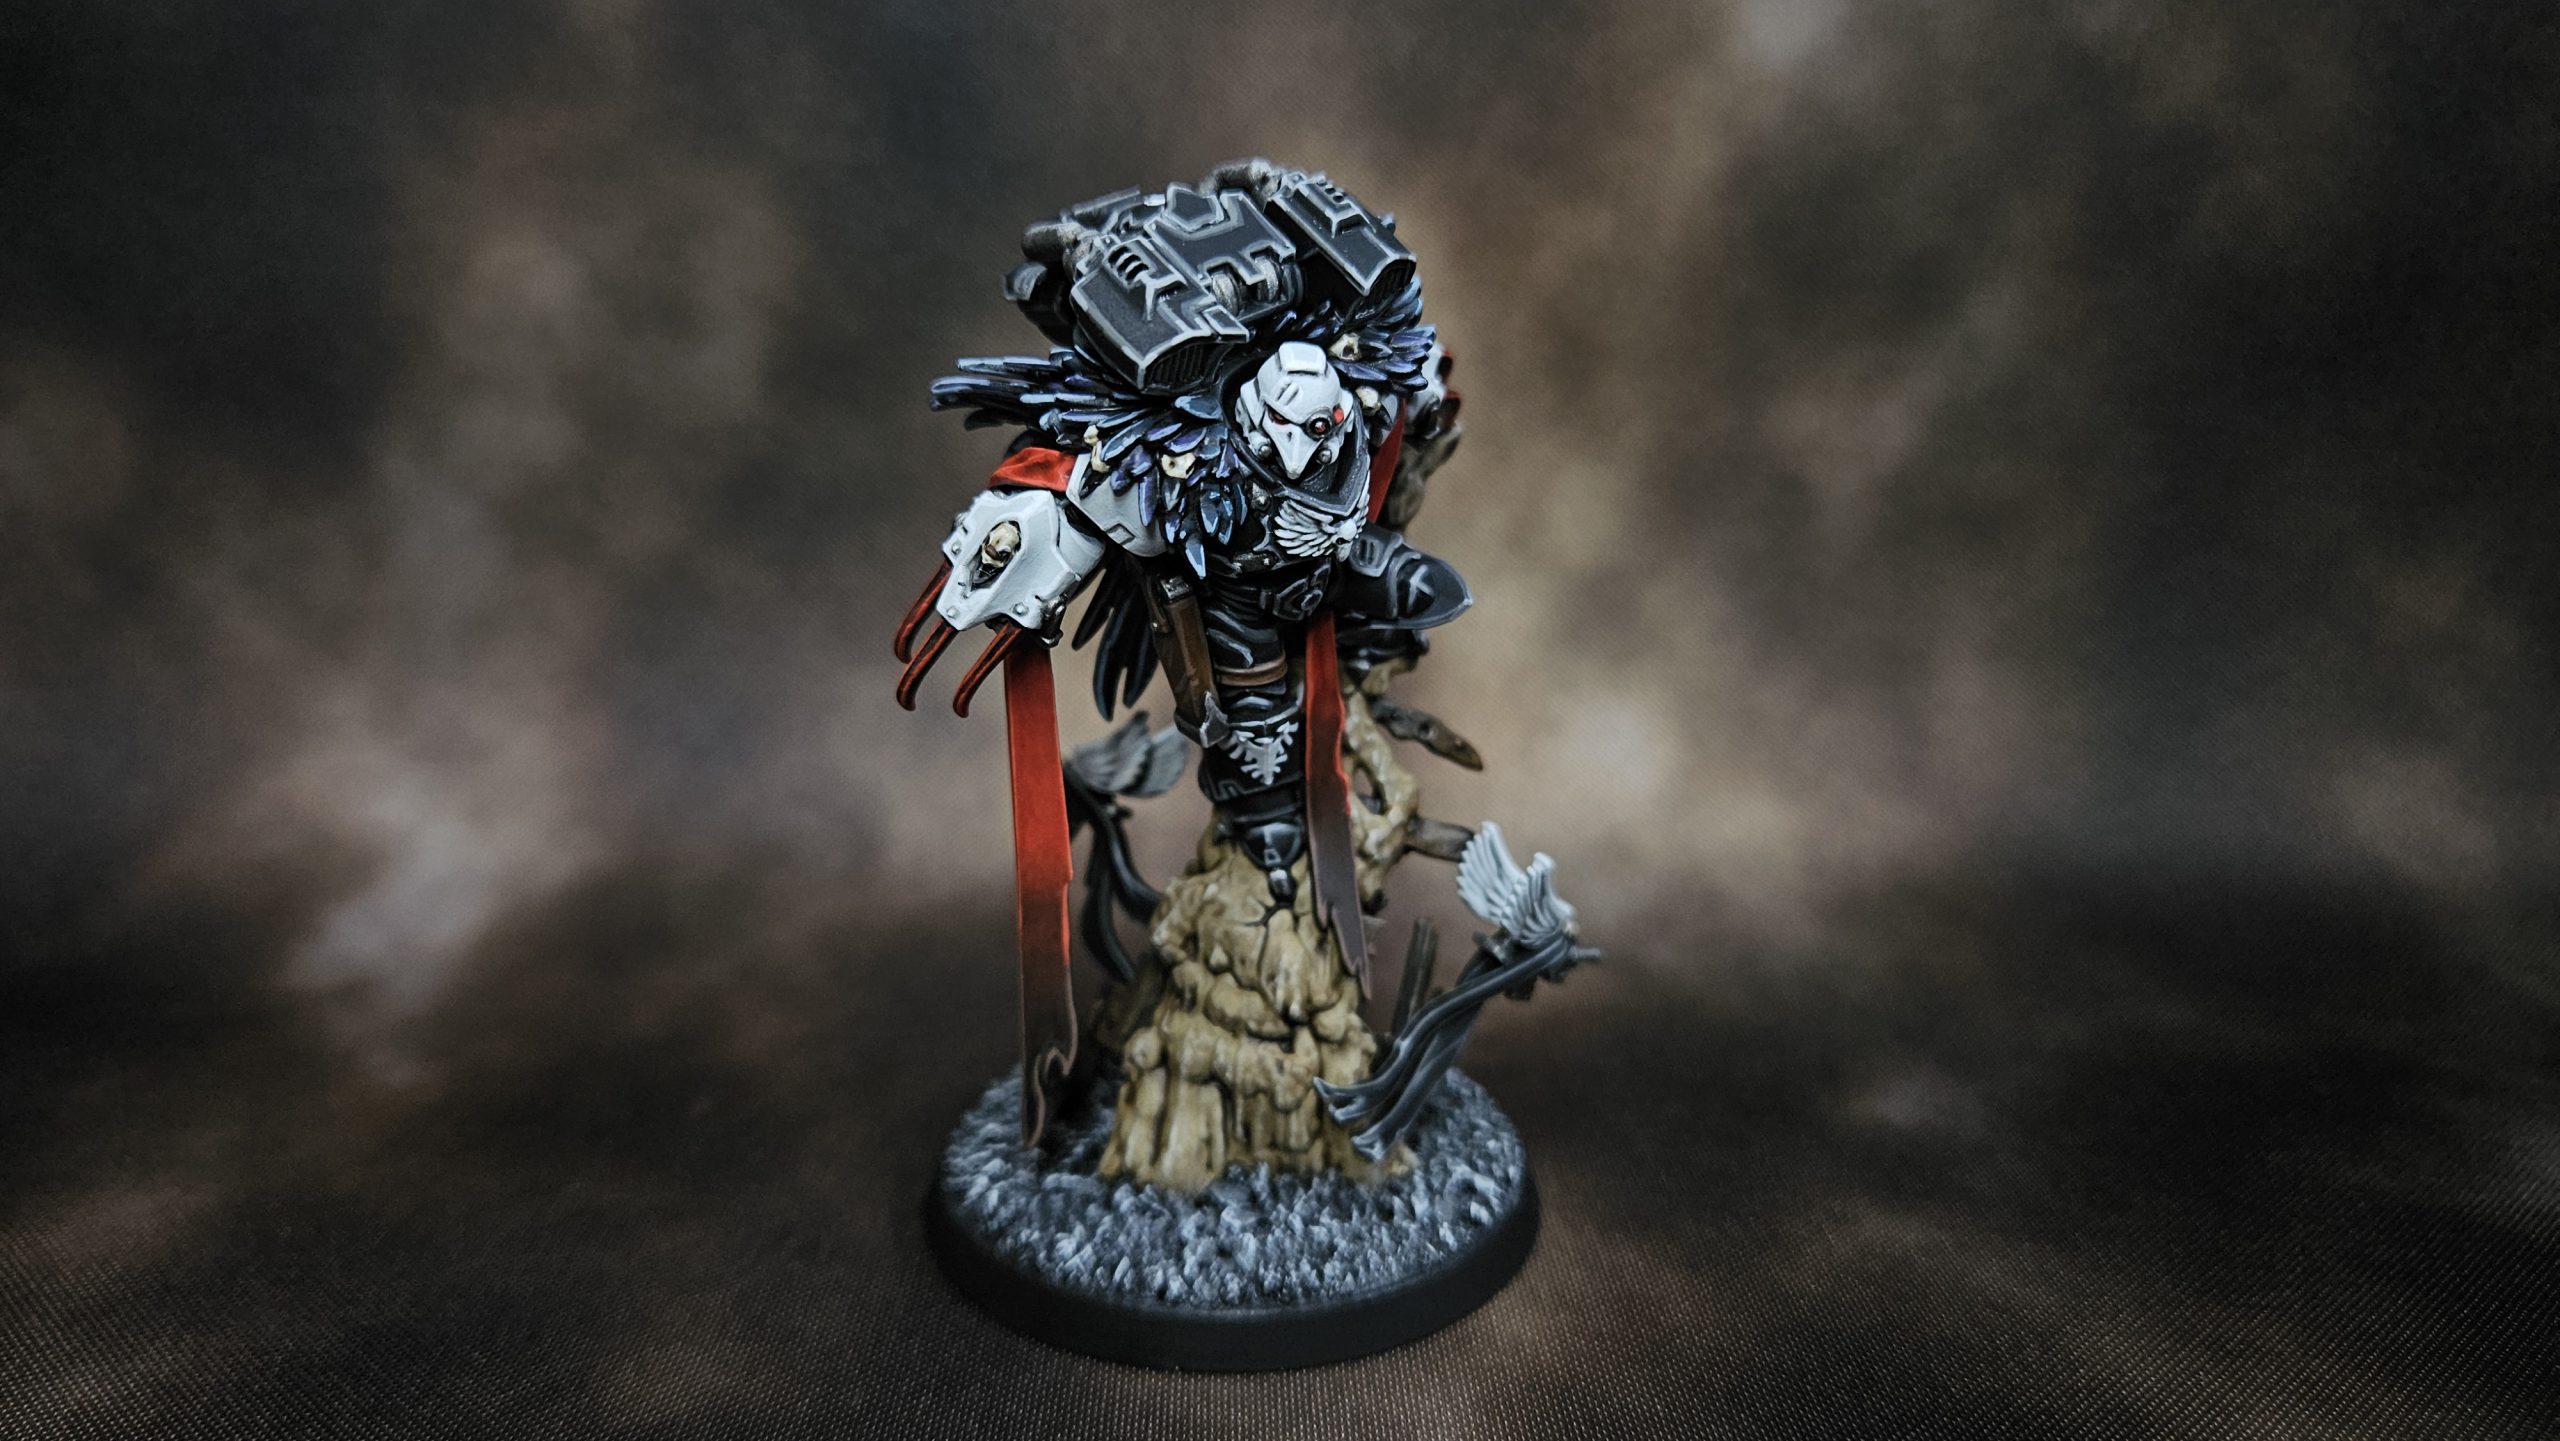
Hello friends! I’m back once again to bring you the gospel of black power armor, but this time with more feathers! I recently was afforded the opportunity to paint Aethon Shaan, the new Raven Guard Chapter Master. Here’s how I did it!
CAW!!!
The Method
Here’s where I cheat a little bit. Not with the painting, I did that honestly, but with the writing of this article. I’ve actually written out most of this method before in this article! If you want the deep dive on technique and the reasoning behind it, you should check that out, as a lot of what is here will be drawn from that.
I am still broadly using the same method to paint black power armor, but Aethon Shaan has a few new wrinkles and details where I stepped out of my comfort zone to make him look just a bit more cool than his compatriots.
The Assembly
I am not a coward. I prefer to fully assemble models, especially infantry and characters, before painting. However, with Shaan, you should not do this! Embrace your inner scaredy cat and keep the right arm fully separate, and do the same with the left arm and upper tassel. The lower part of the left tassel that is past his legs should also be kept separate if you want good angles on his greaves.
However, you can attach his feathered mantle and jump pack as the mantle doesn’t block the jump pack, and the jump pack doesn’t block the mantle. I also found that it was pretty easy to paint the underside of the feathered mantle even though it was attached to the mini.
I assembled Shaan with his helmeted option because it is a unique helmet, and I thought it looked the coolest.
The Process
I do not paint one color to completion like some folk do, but instead I paint in “like layers” because I am not good or steady enough to not splatter paint all over my finished highlights. It goes like this:
Prime black (obviously)
Basecoats
Touch-ups
Lighter basecoats for colors that need it (white and red, mainly)
Touch-ups
Shading
Touch-ups
Highlights
Bases
Transfers
Where I deviated here was with the feathered mantle. I left the whole thing to the end because I didn’t know exactly how I was going to do it at the beginning and just wanted to get crackin’ on the rest of him.
Loading...
Loading...
Previously Extant Recipes
These are all the colors and methods that I’ve covered before in the previously mentioned article. If you want step-by-step pictures and details, give it a click!
Primer
Black, as stated before.
Black
Abaddon Black basecoat.
I do actually paint Abaddon Black over black primer. They both finish differently, and any touch-ups in Abaddon are noticeable. To me, at least.
Eshin Grey edge highlight.
This one can be a little thick.
Stormvermin Fur edge highlight.
This one should be thinner than the previous layer.
Administratum Grey edge highlight.
Just at the corners and raised areas on the model, not all over.
White
Mechanicus Standard Grey undercoat.
Ulthuan Grey basecoat.
Nuln Oil recess shade.
White Scar edge highlight.
Leather
Mournfang Brown basecoat.
Agrax Earthshade all-over shade.
Gorthor Brown edge highlight.
Runefang Steel highlight on any buttons, snaps, or buckles.
Red
Khorne Red undercoat.
Evil Sunz Scarlet basecoat.
Agrax Earthshade all-over shade.
On cloaks and red cloth I keep the shade to the recesses.
Wild Rider Red edge highlight.
Troll Slayer orange corner highlight.
Little Bird Skulls
Zandri Dust undercoat.
Screaming Skull basecoat.
Agrax Earthshade all-over shade.
White Scar corner highlight.
Silver
Leadbelcher basecoat.
Nuln Oil all-over shade.
Runefang Steel edge highlight.
Eye Lens
White Scar horizontal line, done with a very tiny brush.
Bloodletter glaze.
Bionic Eye
Khorne red basecoat.
Apply to half of the area on the diagonal.
Evil Sunz Scarlet highlight.
Keep a line of Khorne Red still showing.
Wild Rider Red highlight.
Once again, keep some of the previous color showing.
Troll Slayer orange highlight.
Last time, but keep some of the previous color showing.
White Scar dot opposing the red gradient.
Makes it look like shiny glass.
New Recipes
These are the techniques I used that are not covered in the previously linked article.
Tassels
A wet-palette blend from Evil Sunz Scarlet to Rhinox Hide.
I have a Redgrass wet palette and I just took my time and blended in 1 brushfull of Rhinox hide each layer.
Agrax Earthshade recess shade.
Red highlight - Wild Rider Red.
Brown highlight - Gorthor Brown.
Note the gradient change on the tassels from red to brown.
Lightning Claws
A wet-palette blend from Evil Sunz Scarlet to Abaddon Black.
Same method as above, I just subbed in black for brown.
Wild Rider Red edge highlight.
Troll Slayer Orange highlight just on the tips of the claws.
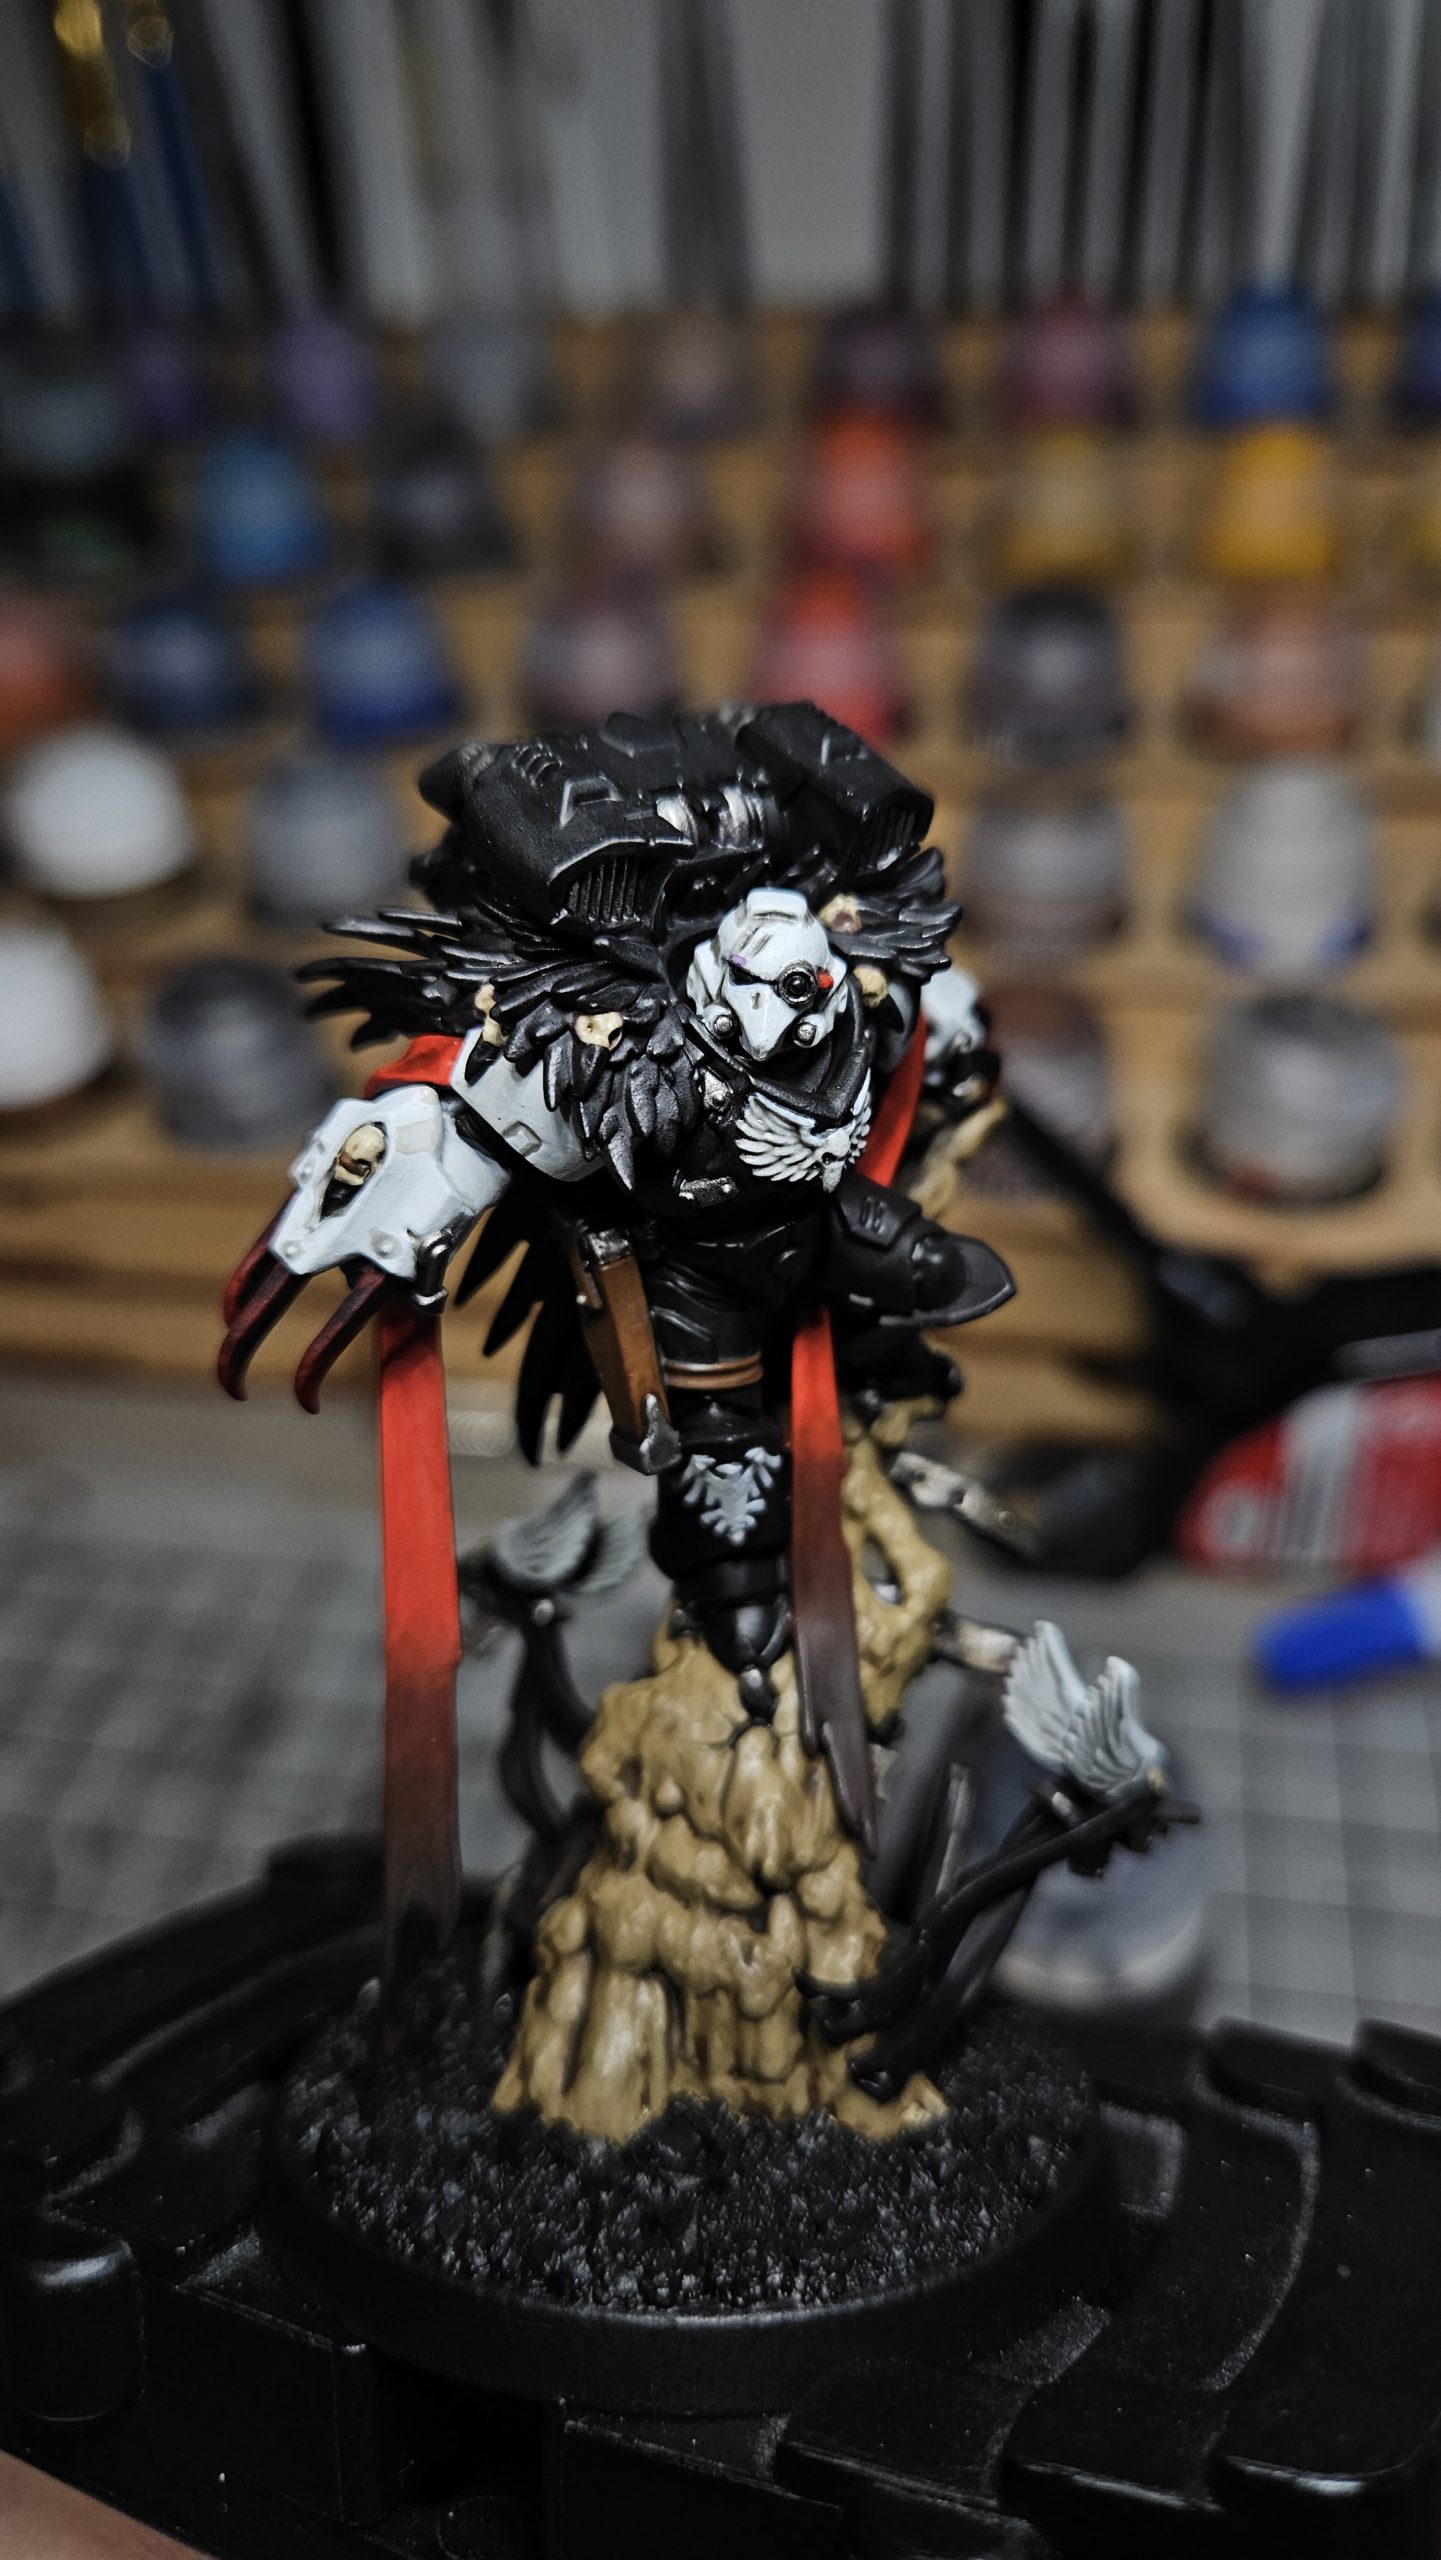
Feathered Mantle
Abaddon Black basecoat.
Make a feather-ish pattern of Incubi Darkness on half of the feathers.
Do the same on the other half of the feathers with Xereus Purple.
I’m going for an iridescent look, here. Some birds with black feathers look green or purple or even bronze in the sunlight, and I thought I’d try out mimicking that effect on Shaan’s mantle.
Fenrisian Grey Edge highlight
I went with Fenrisian here because it’s got a little blue in it, and I wanted the feathers to have a cooler theme to contrast with the warm tones of the rest of the model.
WIP feathered mantle. Note the half-jade and half-purple feathers.
Concrete
Zandri Dust basecoat.
Agrax Earthshade all-over shade.
Screaming Skull drybrush.
Rusty Metal
Warplock Bronze Basecoat.
Leadbelcher heavy drybrush.
Agrax Earthshade all-over shade.
Ryza Rust light drybrush.
The Finished Product
Loading...
There you have it, folks! I’d love to see what you all cook up with this fantastic model, so feel free to hit me up on the Goonhammer (or Badcast) Discord with a pic of what you’re working on. Happy painting!
Have any questions or feedback? Drop us a note in the comments below or email us at contact@goonhammer.com. Want articles like this linked in your inbox every Monday morning? Sign up for our newsletter. And don't forget that you can support us on Patreon for backer rewards like early video content, Administratum access, an ad-free experience on our website and more.
 CAW!!!
 Note the gradient change on the tassels from red to brown.
 WIP feathered mantle. Note the half-jade and half-purple feathers.

 Goonhammer Hobby Round-Up: March 2026
 Goonhammer Reviews: Tribal Conquest
 Conquest: Weaver Courts Gemred Knights and Scaile Dancers Model Review