Hey everybody, welcome to another How to Paint Everything: Marvel Crisis Protocol. This time we will be taking a look at the Daywalker himself, the vampire hunter and Blade!
After his mother was killed by the vampire Deacon Frost, Eric Cross Brooks was born with "vampire enzymes". He would grow up to be a vampire hunter and eventually work alongside Quincy Harker, Rachel van Helsing and Frank Drake while they hunted Dracula himself. After a battle with Dracula, he realized he was immune to the effects of vampire bites and left the group to hunt down Deacon Frost. He would eventually team back up with Frank Drake, alongside Hannibal King to form the Nightstalkers.
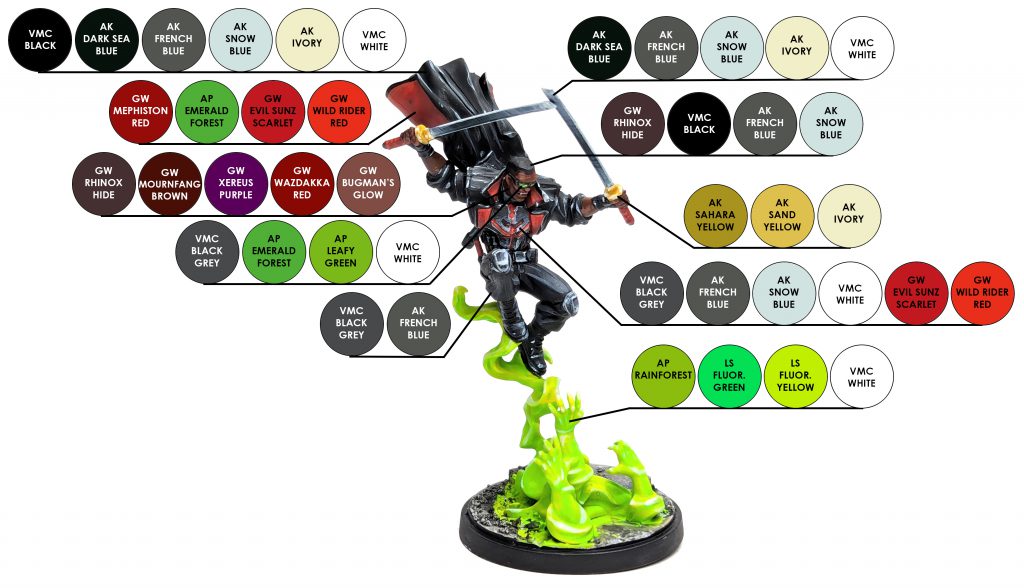
Blade's miniature sports a lot of dark colors, I've tried to break it up a bit with different dark tones, without leaning into true black. The leather all features blue tones, the cloth leans more into dark grey and this time around I brightened up his skin tone a bit and added in purple and red tones. All of these things add visual interest to the model and keep it from becoming a blob of dark colors on the gaming table.
Let's get into it, below you'll find a handy paint chart showing all the colors that were used on Blade.
 credit: Brushwizard
Skin
Basecoat - Citadel Mournfang Brown
Shadows - Citadel Mournfang Brown: Citadel Xerxes Purple
Warm Tones - Citadel Mournfang Brown: Wazdakka Red
Layer - Citadel Mournfang Brown
Highlight - Citadel Mournfang Brown: Citadel Bugman's Glow
Highlight - Citadel Bugman's Glow
Dark Lining - Citadel Rhinox Hide
Dark skin tones can be challenging. We don't want to paint the skin with only browns, instead we're going to inject some purple and red tones into the brown in order to make it more lively and interesting. To start, we will give the skin a basecoat of Mournfang Brown. I then mixed Xerxes Purple in and painted that in all of the shadows and the lower half of the face. On his forehead, nose, and cheeks, I painted a mix of Mournfang Brown and Wazdakka Red. I then went in with a thin layer of Mournfang Brown to help tie things together. From there, I mixed Bugman's Glow with Mournfang Brown to begin highlighting, followed by a final highlight of Bugman's Glow. To help add some definition, I used Rhinox hide in some recesses as well.
Hair
Basecoat - Citadel Rhinox Hide: Vallejo Model Color Black Grey
Layer - Vallejo Model Color Black
Highlight - Vallejo Model Color Black: AK Interactive French Blue
Highlight - Vallejo Model Color Black: AK Interactive Snow Blue
His hair started with a basecoat of Rhinox Hide and Black Grey, I wanted the sides to look like they were buzzed and that skin tones were showing through. I then painted the main section of his hair Black and highlighted with a mix of Black and French Blue followed by another highlight of Black and Snow Blue.
Glasses
Frames - Vallejo Model Color Black Grey
Frame Highlight - Vallejo Model Color Black Grey: Vallejo Model Color White
His glasses were painted Black Grey and given a small highlight of Black Grey mixed with White.
Lenses - Army Painter Emerald Forest
Lens Highlight - Army Painter Leafy Green
Lens Highlight - Vallejo Model Color White
I don't usually do much in the way of object source lighting on my Crisis Protocol miniatures, but I did feel like it would be fun to have the glasses reflecting the green ghost smoke. I started with a basecoat of Emerald Forest, followed by highlights of Leafy Green, and White. I think it works out pretty well and it helps draw the eye to his face.
Black Leather
Basecoat - Vallejo Model Color Black: AK Interactive Dark Sea Blue
Layer - Previous Mix: AK Interactive French Blue
Highlight - Previous Mix: AK Interactive Snow Blue
Highlight - Previous Mix: AK Interactive Ivory
Highlight - Vallejo Model Color White
All of the black leather that he is wearing, such as his boots and coat, were painted with a basecoat of Black and Dark Sea Blue. I then mixed in French Blue to build up the color. From there I cont inued using the previous mix and added Snow Blue for the first highlight, followed by adding in Ivory to the mix for another highlight and finally finishing it off with White spot highlights.
Black Cloth
Basecoat - Vallejo Model Color Black Grey
Layer - Vallejo Model Color Black Grey: AK Interactive French Blue
Layer - Previous Mix: AK Interactive French Blue
Highlight - AK Interactive French Blue
We are still going to keep away from true black. With this in mind, the black clothing was painted with a basecoat of Black Grey and then highlighted from there. I also doing highlight all the way to white, which helps keep the cloth from seeming reflective.
From a basecoat of Black Grey, I then mixed Black Grey and French Blue for the first layer, and painted that on any areas where the light would hit, or on the raised surfaces of the folds in the fabric. I then added additional French Blue to previous mix and added another layer. I finished the cloth off with a highlight of French Blue on the ridges and highest points of the cloth.
Coat Interior
Basecoat - Citadel Mephiston Red
Shadow - Citadel Mephiston Red: Army Painter Emerald Forest
Clean Up - Citadel Mephiston Red
Layer - Citadel Evil Sunz Scarlet
Highlight - Citadel Wild Rider Red
The interior of his coat started with a basecoat of Mephiston Red. I then mixed Emerald Forest green into Mephiston Red to create the shadow color - if you don't have that color, I've also used Warpstone Glow green previously. Paint this mix into all of the recesses of the folds. If needed, clean up the raised areas with Mephiston Red again and then you can start highlighting. This was done with a layer of Evil Sunz Scarlet followed by a highlight of Wild Rider Red.
Metal Armor
Basecoat - Vallejo Model Color Black Grey
Layer - AK Interactive French Blue
Highlight - AK Interactive Snow Blue
Highlight - Vallejo Model Color White
Red Accents - Citadel Evil Sunz Scarlet
Red Accent Highlight - Citadel Wild Rider Red
I wanted his breastplate to be a bit darker than I would normally paint metal, so I started with a base coat of Black Grey. I layered on French Blue as normal and then highlighted it with Snow Blue and White. To finish it off and make it more interesting, I added in some red accents using Evil Sunz Scarlet, which was then highlighted with Wild Rider Red. The knee pads were painted with the same colors, only without the red accents.
Sword Blades
Basecoat - AK Interactive Dark Sea Blue
Layer - AK Interactive Dark Sea Blue: AK Interactive French Blue
Layer - AK Interactive French Blue
Layer - AK Interactive French Blue: AK Interactive Snow Blue
Highlight - AK Interactive Snow Blue
Highlight - AK Interactive Ivory
Highlight - Vallejo Model Color White
The katanas needed to be slightly different when compared to the breastplate, so for on these I started with a basecoat of Dark Sea Blue. I had thought about adding green tones into them from the spirit effect, but decided against it, because I didn't want to go overboard on object source lighting. Once the Dark Sea Blue was down, I added layers of French Blue to it, blending it into the darker color. I mixed together French Blue and Snow Blue and worked that in, blending it to the pure French Blue layer. I then began highlighting it with Snow Blue, Ivory and White to brighten it up and add in reflections.
Gold
Basecoat - AK Interactive Sahara Yellow
Layer - AK Interactive Sand Yellow
Highlight - AK Interactive Ivory
I went for a fairly simple NMM gold on the sword hand guards. This time around I started with a basecoat of Sahara Yellow, followed by a layer of Sand Yellow and finally a highlight of Ivory to finish it off.
Spirit Effect
Basecoat - Army Painter Rainforest
Layer - Army Painter Rainforest: Lethal Shadows Fluorescent Green
Layer - Previous Mix: Lethal Shadows Fluorescent Yellow
Layer - Phalanx Yellow: Lethal Shadows Fluorescent Yellow
Highlight - Lethal Shadows Fluorescent Yellow
Highlight - Vallejo Model Color White
I wanted a very bright and vibrant spell effect for Blade. I decided to start with a green base using Rainforest, I did a few layers of this to make the next step easier on myself. I then mixed Fluorescent Green into Rainforest and painted multiple layers overtop the pure Rainforest layer, this time making sure I had even coverage. To brighten it up more, I added Fluorescent Yellow to my previous mix and layered that on, leaving the Rainforest/Fluor Green mix in the recesses. Next up I mixed Phalanx Yellow with Fluorescent Yellow and painted this in thin layers, reinforcing the previous layer. I then highlighted with pure Fluorescent Yellow and White to finish it off.
 credit: Brushwizard
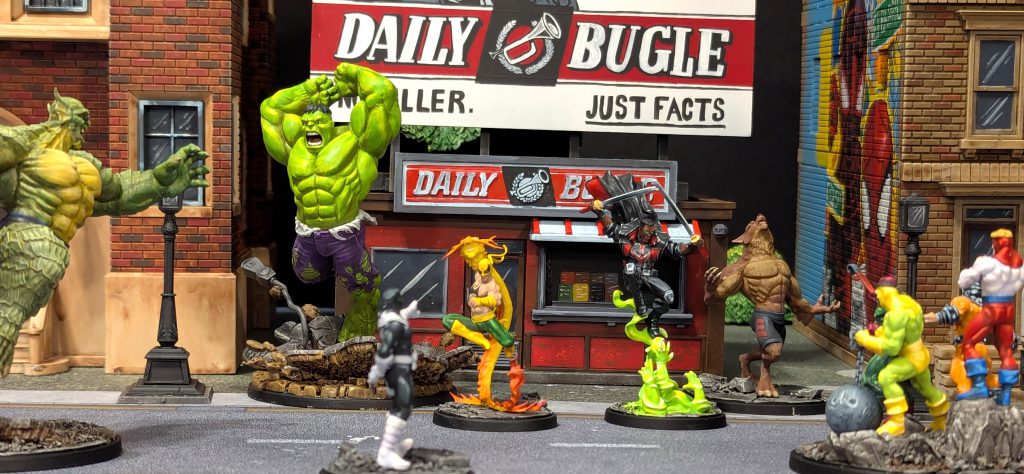
That should do it for Blade! He's now ready to lead the Midnight Sons into the night and vanquish vampire-kind and other supernatural threats from the streets.
Thanks to Atomic Mass Games for providing me with the Midnight Sons Affiliation Pack, stay tuned for more How To Paint Everything articles featuring the other models in the box. The Midnight Sons Affiliation Pack is now available in stores, make sure to check your friendly local gaming shop or you can also order it directly from Asmodee’s webstore.
Have you painted up Blade using this article? As always, hit me up on the socials, you can find me over on
Bluesky and
Instagram, I love seeing what the community is working on and try to share what I see whenever possible. If you're a member of the Goonhammer Discord server, be sure to share them on the Marvel: Crisis Protocol channel there as well.
Have any questions or feedback? Drop us a note in the comments below or email us at contact@goonhammer.com. Want articles like this linked in your inbox every Monday morning? Sign up for our newsletter. And don't forget that you can support us on Patreon for backer rewards like early video content, Administratum access, an ad-free experience on our website and more.Thank you for being a friend.


 Goonhammer Hobby Round-Up: March 2026
 Goonhammer Reviews: Tribal Conquest
 Conquest: Weaver Courts Gemred Knights and Scaile Dancers Model Review