Hey everybody! Today I'm back with another How to Paint Everything: Marvel Crisis Protocol and this time we are going to take a look at the Guardians of the Galaxy's new leader, Adam Warlock!
Adam Warlock was originally created by Stan Lee and Jack Kirby in the late 1960s, and appeared in two issues of Fantastic Four series, under the name Him, as well as three issues of Thor. Later, in 1972, he was given the first two issues of Marvel Premiere, and revamped by Roy Thomas and Gil Kane, renaming him Adam Warlock and turning him into a Christ-like figure. In the series that followed, he would fight to save Counter-Earth from the villainess Man-Beast.
Later still, Jim Starlin took over writing duties for Adam Warlock in Strange Tales and would proceed expand his adventures further into the cosmos, alongside Pip the Troll, Gamora ad Thanos to oppose the Magus and the Church of Universal Truth, during which they would all die in a final confrontation against Thanos (shocker).
A decade later, Starlin would revive the four of them to play major parts in the Infinity Gauntlet mini-series, and launching the series, Warlock and the Infinity Watch. This is where we meet this version of Adam Warlock.
For this miniature, I've decided to go with the classic suit from the 1970s Warlock series. This suit gives him bare arms and legs, rather than black sleeves and leggings. His earlier appearances also give him more of an orange skin tone, rather than the shiny gold metallic skin seen in the Guardians of the Galaxy films and some modern interpretations. I decided to go this route because I wanted him to be as bright as possible and it let me play around with orange skin tones a bit more. Also, I knew I would be doing non-metallic gold on this bracers, belt and boots and adding the skin on top of that could have made it a bit too much.
Anyway, let's get to it! As usual, you'll find a handy paint chart below for reference. It shows all of the colors that were used in each area of the model.
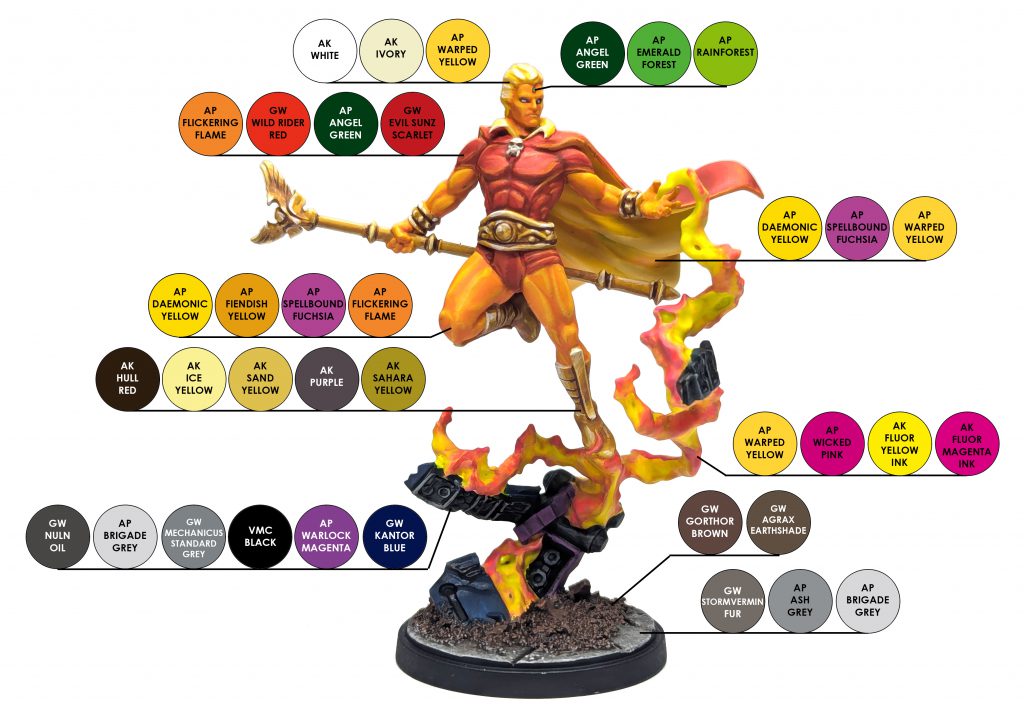 credit - Brushwizard
Skin
Basecoat - Army Painter Fanatics Flickering Flame
Shadows - Army Painter Fanatics Flickering Flame: Army Painter Spellbound Fuchsia
Layer - Army Painter Fanatics Flickering Flame
Layer - Army Painter Fanatics Fiendish Yellow
Highlight - Army Painter Fanatics Daemonic Yellow
Since we're doing a bright orange skin tone on Adam, we are going to start with a basecoat of Flickering Flame. Lay this down over white primer for maximum brightness possible and make sure the layer is nice and smooth too.
For the recesses of the muscles and shadows, we are going to mix Flickering Flame with Spellbound Fuchsia to darken it up without overpowering the orange with something like black. Once I'm happy with the shadows, I will then go back over the raise areas with Flickering Flame to clean up the surfaces a bit.
The skin was then highlighted, started with a layer of Fiendish Yellow, leaving some of the previous layers visible and finally a highlight of Daemonic Yellow.
Hair
Basecoat - Army Painter Fanatics Warped Yellow
Layer - AK Interactive Ivory
Highlight - AK Interactive White
Adam's hair was painted with a basecoat of Warped Yellow. Then given simple highlights of Ivory and White to finish it off.
Soul Gem
Basecoat - Army Painter Fanatics Angel Green
Highlight - Army Painter Fanatics Emerald Forest
Highlight - Army Painter Fanatics Rainforest
The gem on his forehead has been varying colors, depending on the artist. In early comics I've seen it as blue, green or even yellow. After much research, I decided to go with green, since that seems to be the most consistent color for the Soul Gem.
To paint it, I started with a basecoat of Angel Green and then gave it very simple highlights using Emerald Forest and Rainforest.
Suit and Cape Exterior
Basecoat - Citadel Evil Sunz Scarlet
Shadows - Citadel Evil Sunz Scarlet: Army Painter Fanatics Angel Green
Layer - Citadel Evil Sunz Scarlet
Layer - Citadel Evil Sunz Scarlet: Citadel Wild Rider Red
Highlight - Citadel Wild Rider Red
Highlight - Citadel Wild Rider Red: Army Painter Fanatics Flickering Flame
Highlight - Army Painter Fanatics Flickering Flame
Currently my go to for bright red begins with a basecoat of Evil Sunz Scarlet. It's a nice bright red and works really well for superhero costumes. Next we will add shadows by mixing a small amount of Angel Green into Evil Sunz Scarlet and painting that into all the recesses and shadowed areas.
After a recoat of Evil Sunz Scarlet to fix up any mistakes on the raised areas, I then mixed in Wild Rider Red to add another layer to it. From there it was highlighted with Wild Rider Red, followed by a highlight of Wild Rider Red mixed with Flickering Flame and a final highlight of Flickering Flame on its own.
Cape Interior
Basecoat - Army Painter Fanatics Daemonic Yellow
Shadows - Army Painter Fanatics Daemonic Yellow: Army Painter Fanatics Spellbound Fuchsia
Layer - Army Painter Fanatics Daemonic Yellow
Highlight - Army Painter Fanatics Daemonic Yellow: Army Painter Warped Yellow
The interior of his cape is a bright yellow, but since its not catching direct light we won't be going crazy with the highlights either. To get the color we are aiming for I start with Daemonic Yellow as a basecoat over white.
The recesses of the folds in the cloth and the shaded areas were then painted with a mix of Daemonic Yellow and Spellbound Fuchsia. This was painted in the deep shadows and behind his back. Be very careful not to get paint where you don't want it though, since yellow has terrible coverage in general.
After a clean up layer of Daemonic Yellow, I gave the raised areas of the cape a quick highlight of Daemonic Yellow mixed with Warped Yellow and painted that on all of the raised areas of the folds.
Gold Belt and Bracers and Staff
Basecoat - AK Interactive Sahara Yellow
Shadows - AK Interactive Sahara Yellow: AK Interactive Purple
Highlight - AK Interactive Sand Yellow
Highlight - AK Interactive Ice Yellow
Dark Lining - AK Interactive Hull Red
Adam's gold belt, bracers and staff were painted in non-metallic metal style. To begin, I painted all of those areas Sahara Yellow.
Next, the dark reflections are painted using a mix of Sahara Yellow with a small amount of Purple mixed in. In non-metallic metal, we want the bright areas to butt up against dark areas to push contrast as much as possible. So, this will be painted directly next to any area that we want a bright highlight.
With the dark areas laid down, I then start highlighting the gold. First I paint Sand Yellow on to the Sahara Yellow Areas, trying to leave the darker yellow showing alongside of the mix shade color. This is followed by a smaller highlight using Ice Yellow. To reinforce the shadows and break up the yellow, any border between two elements on the surface is painted with a thin line of Hull Red.
Spell Effect
Basecoat - Army Painter Fanatics Warped Yellow
Layer - Army Painter Fanatics Wicked Pink
Wash - AK Interactive Ink Fluor Yellow
Highlight - AK Interactive Ink Fluor Magenta
I tried to go for a yellow and magenta colored spell effect on him, which I think worked out pretty well, but the magenta sometimes just looks red instead.
I started by base coating it all with Warped Yellow over white. Then I started painting various sections of it Wicked Pink and blended it into the yellow. Once I was happy with the layout, coverage and my blends I then washed the entire spell effect with Fluorescent Yellow ink. This was followed with Fluorescent Magenta Ink carefully painted over top of the Wicked Pink Areas.
Debris
Blue Panels - Citadel Kantor Blue
Purple Panels - Army Painter Fanatics Warlock Magenta
Metal NMM Basecoat - Vallejo Model Color Black
Metal Mid Tone Drybrush - Citadel Mechanicus Standard Grey
Metal Highlight Drybrush - Army Painter Fanatics Brigade Grey
Wash - Citadel Nuln Oil
I didn't get too fancy with the floating debris, since there's a lot going on with this character anyway. The blue panels were painted Kantor Blue and the purple panels were painted Warlock Magenta. The metal bits were given a basecoat of Black and then were given drybrush applications of Mechanicus Standard Grey and Brigade Grey. To finish it off, all of the areas were washed with Nuln Oil.
Concrete Basing
Basecoat - Citadel Stormvermin Fur
Stipple - Army Painter Fanatics Ash Grey
Stipple - Army Painter Fanatics Brigade Grey
Wash - Citadel Nuln Oil
Once again, we will be painting the base with my standard basing colors for concrete. To begin, we give the entire base a basecoat of Stormvermin Fur. Next the base is stippled using Ash Grey and Brigade Grey to give it some texture. Its then given a Nuln Oil wash to tie it all together and shade the recesses.
Dirt Basing
Basecoat - Citadel Gorthor Brown
Wash - Citadel Agrax Earthshade
The dirt of the base is super easy. Its just a basecoat of Gorthor Brown and a wash of Agrax Earthshade.
 credit - Brushwizard
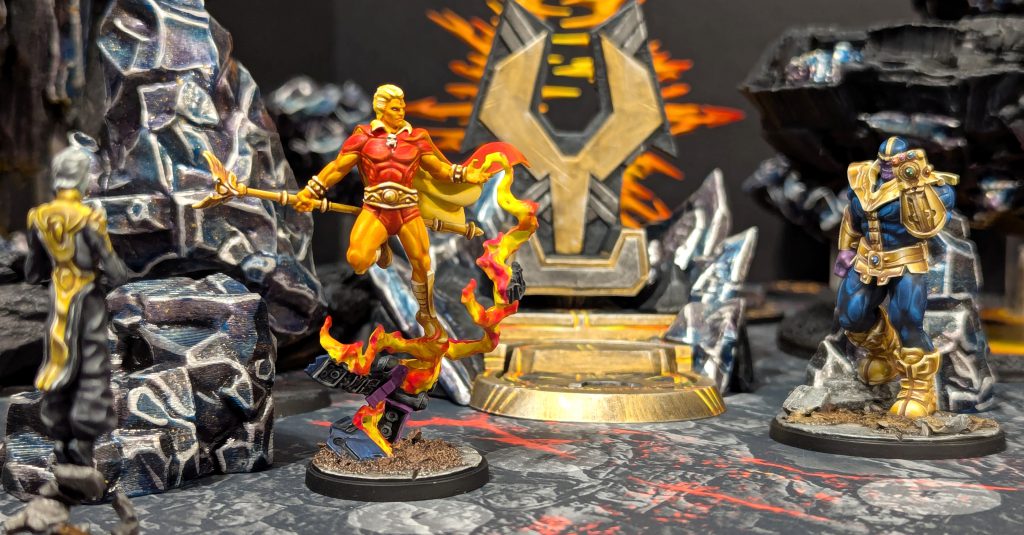
Adam Warlock is now ready to save the known universe, and protect the Infinity Gems from the forces of evil! I am very excited to get him to the table and start playing Guardians of the Galaxy again. It's going to be a great time!
A big thanks to Atomic Mass Games for sending these new characters for this tutorial, I very much appreciate it! Have you picked up the new Adam Warlock, Moondragon and Quasar character pack? Let us know in the comments, which of the new characters is your favorite. Hit me up on social media too, you can find me on Bluesky, and Instagram. Also, if you're on the Goonhammer Discord server, be sure to hop into the Marvel Crisis Protocol channel and join the conversation.
Thank you for being a friend.


 Goonhammer App and Patron Updates: April, 2026
 Contemptor Kevin's Combat Patrol Issue 46 Review
 Kill Team Tournament Report: Engage, Party, Repeat's March Madness 2026