This article is part of a larger series on how to paint Battletech. To return to that series, click here.
Simonson's Cutthroats (sometimes known as McGee's Cutthroats) are a mercenary unit that's existed from the Succession Wars all the way through to the ilClan era. Early on they were a well-equipped unit working for the Draconis Combine, though they later worked for the Federated Commonwealth, avoided the clans by working on the periphery, and then returned to work for the Word of Blake. After the Jihad they were declared criminals and hid out as pirates for several decades, before negotiating a way to rebrand and return. They're now known more for guerilla tactics and headhunting than their early days as a well equipped unit.
Their paint scheme is described as flat grey with black and blue highlights, though Force Manual Mercenaries depicts those as a camo pattern over a bluish grey base.
You can see some other examples on Camospecs
here, and read more about their history on Sarna
here.
Painting Simonson's Cutthroats
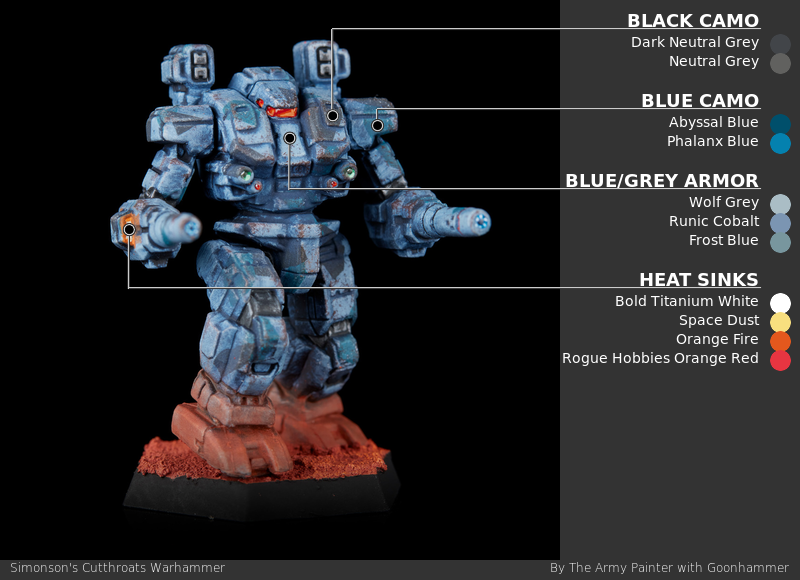
Step 1: Armor Base
After priming in grey, I basecoat the entire mech in
Army Painter Fanatics Wolf Grey. I then apply a pretty heavy zenithal of
Army Painter Fanatics Runic Cobalt, and edge highlight everything in
Army Painter Fanatics Frost Blue.
Step 2: Blue Camo
I paint the camo on with random geometric shapes. The blue doesn't cover as well as the black, so I do it first, using
Army Painter Fanatics Abyssal Blue as a base, edge highlighted with
Army Painter Fanatics Phalanx Blue.
Step 3: Black Camo
I repeat the blue camo process using
Proacryl Dark Neutral Grey highlighted with
Proacryl Neutral Grey. I make sure that many of these patches either cover the blue areas or appear to go under them. With both camo colors I try to spread some patches across multiple parts of the mech. It can be a little difficult to get the lines right when areas have turned, but I try to guess where they'd line up in a resting pose.
Step 4: Decals
I do a quick hit with gloss varnish then apply any decals I want to use, using microsol and microset to get them to conform to the surface. Once dry, I matte varnish back over them.
Step 5: Weathering
The weathering process here is straightforward and all done with a sponge. I start with an eyeshadow applicator using
Army Painter Fanatics Frost Blue to go back over a lot of the panel edges, particularly areas of camo. My goal is a broken highlight of the base color, which will minimize the effect of the camo on breaking up the outline. Next up I use a bit of torn up packing foam, first with the same frost blue for some mid-panel chipping (particularly over decals) and then with
Citadel Rhinox Hide for some deeper chipping and rust.
Step 5: Metal
As these are painted in camo I've tried to do very minimal metal, ignoring some of the gun barrels I'd normally hit. I start with
Vallejo True Metallic Metals Obsidian Black Base, then highlight with
Obsidian Black Light. I try to do a pretty rough highlight, flicking my brush back and forth across the edges rather than a thin clean line.
Step 6: Washing
I gloss the mech back up to about a satin, either using satin varnish or with a mix of matte and gloss varnish (mostly gloss). This will give a little bite for our oil wash, which I keep thick and make with
Payne's Grey. After a couple hours of dry time I buff it back off with a cloth and eyeshadow applicator, so it's stained the surface a little bit but mostly remains in recesses.
Now that all the base colors are done, I can go through and paint up windows and lenses using the techniques I describe on the main page.
I chose on these mechs to paint a heat sink glow - this was done by painting the whole heat sink with
Proacryl Bold Titanium White, then doing successively smaller passes on raised surfaces with
Army Painter Fanatics Space Dust,
Vallejo Game Color Orange Fire, and
Proacryl Orange Red. I paint a line around the outside edge in Orange Fire, then thin it way down to a glaze and paint that around the outside. I don't worry about whether light would naturally hit there - it's a mix of OSL and just a glow that's blowing out your eyes.
Have any questions or feedback? Drop us a note in the comments below or email us at contact@goonhammer.com. Want articles like this linked in your inbox every Monday morning? Sign up for our newsletter. And don’t forget that you can support us on Patreon for backer rewards like early video content, Administratum access, an ad-free experience on our website, and subscriber-only content covering competitive Warhammer 40K!
Thank you for being a friend.


 Goonhammer App and Patron Updates: April, 2026
 Contemptor Kevin's Combat Patrol Issue 46 Review
 Kill Team Tournament Report: Engage, Party, Repeat's March Madness 2026