We've covered the
Silver Bayonet extensively here at Goonhammer for good reason - it's a small buy-in, small model count, easily accessible, well-written skirmish warband campaign ruleset. It's got a really cool crossover with gothic horror but maintains the uniforms and weaponry that any grognard worth their tobacco would love.
Today we're going to do something a little different - we're going to walk through a game from unit selection to setup, from turn one to the final activation. The idea is that someone could read this if they were anxious about getting into the game and learn all they need to know to get going. We'll also try to dispel any usual mistakes that people make.
Unit Selection
Today's battle has the forces of Britain defending the honor of Chrimbo (Christmas to us USA types). The USA forces are from the Canada campaign book while the British forces are from the main rulebook. I use
New Recruit to make lists because it works pretty well. It provides a nice output if you're going to print out your list - otherwise I really like using this
PowerPoint I made to make little profile cards.
 Profile card output from New Recruit. Credit: New Recruit
Generally I like to choose one or two heavy hitters like a Supernatural Investigator or Veteran Hunter while padding out the rest of the list with some cheaper options. Doctors are sweet so I usually bring one. Skewing up to higher defence if possible is always useful - something like 14 defence is very difficult to hit.
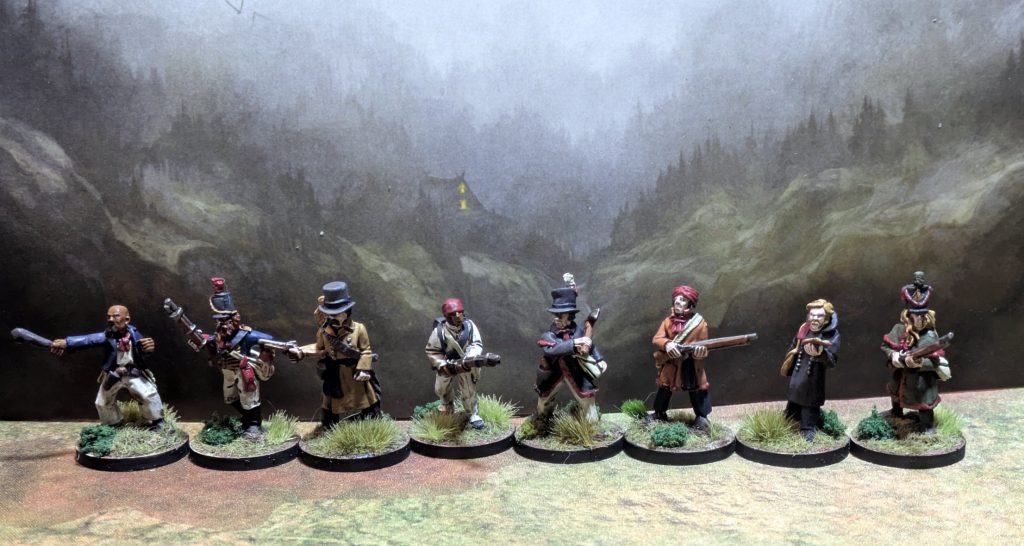 The USA Silver Bayonet. From L-R - Sailor, Marine, Veteran Hunter, Infantryman, Officer, Infantryman, Doctor, Riflewoman. Credit: Michael O "Mugginns"
The United States - USA - [97 Pts]
The USA Silver Bayonet. From L-R - Sailor, Marine, Veteran Hunter, Infantryman, Officer, Infantryman, Doctor, Riflewoman. Credit: Michael O "Mugginns"
The United States - USA - [97 Pts]
# ++ Warband ++ [97 Pts]
## Leader [-5 Pts]
Officer [-5 Pts]: Blunderbuss, Heavy Weapon, Pistol, Holy Symbol, Hard to Put Down, Strong, Recruitment +(5), Melee + 1, Health + 1, Shotbag (Silver Shot)
## Core [102 Pts]
Doctor [10 Pts]: Hand Weapon, Pistol, Shotbag (Cold Iron Shot)
Infantryman [10 Pts]: Cartridge Box, Musket, Salt Bag
Infantryman [10 Pts]: Cartridge Box, Musket
Marine [12 Pts]: Cartridge Box, Musket, Shotbag (Silver Shot)
Rifleman [18 Pts]: Cartridge Box, Rifle, Shotbag (Cold Iron Shot)
Sailor [12 Pts]: Hand Weapon, Pistol, Oil & Torches
Veteran Hunter [30 Pts]: Pistol, Rifle, Salt Bag, Lunge, Shotbag (Cold Iron Shot)
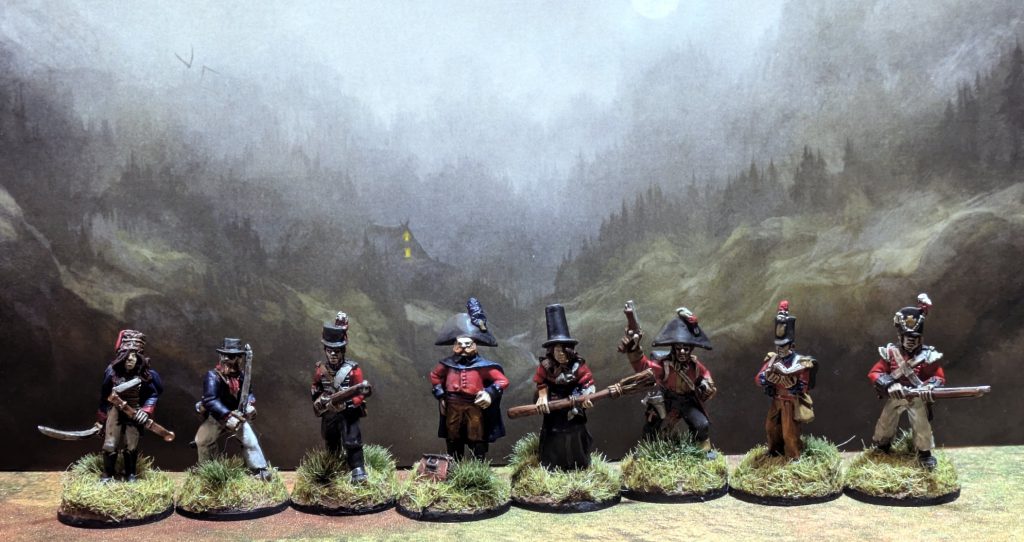 British Silver Bayonet unit. The witch with tall hat and broom is one of my favorite minis ever. From L-R - Light Cavalrywoman, Sailor, Marine, Doctor, Occultist, Officer, Supernatural Investigator, Infantryman. Credit: Michael O "Mugginns"
Britain - British - [99 Pts]
British Silver Bayonet unit. The witch with tall hat and broom is one of my favorite minis ever. From L-R - Light Cavalrywoman, Sailor, Marine, Doctor, Occultist, Officer, Supernatural Investigator, Infantryman. Credit: Michael O "Mugginns"
Britain - British - [99 Pts]
# ++ Warband ++ [99 Pts]
## Leader [-5 Pts]
Officer [-5 Pts]: Pistol, Great Faith, Hard to Put Down, Recruitment +(5), Melee + 1, Health + 1, Hand Weapon (Cold Iron Weapon), Shotbag (Silver Shot)
## Core [104 Pts]
Doctor [10 Pts]: Hand Weapon, Pistol, Salt Bag
Infantryman [10 Pts]: Cartridge Box, Musket, Shotbag (Cold Iron Shot)
Light Cavalryman [18 Pts]: Pistol, Hand Weapon (Silver Weapon)
Marine [12 Pts]: Cartridge Box, Musket, Shotbag (Cold Iron Shot)
Occultist [20 Pts]: Holy Symbol, Hand Weapon (Silver Weapon)
Sailor [12 Pts]: Hand Weapon, Pistol, Oil & Torches
Supernatural Investigator [22 Pts]: Salt Bag, Fencing Weapon (2x Pistol), Fencing Weapon (Cold Iron Weapon)
When it comes to the various types of ammunition or weapons, you'll need: silver, cold iron, holy, salt, and oil & torches. I don't have a special formula for that, I just like to spread them around evenly. You'll need the various types to fight different types of monsters who are allergic to them.
 We're using Gingerbread Men models as goblins today. Credit: Osprey Games
What We Need for Our Scenario
We're playing the fourth scenario, Confirmed Kill on page 96. Our agent, Christian Kringlski, has been lost in the dark forest near camp and must be returned at all costs - or at least the signet ring that he had so the winter gatherings in camp can continue with official approval. Small creatures have been spotted in the area that resemble gingerbread men - perhaps animated by a nearby witch?
We'll need some tokens:
- Reload tokens
- Activated tokens to show a mini has activated
- Fatigue tokens
- Something to mark Health loss (I use small D6)
- Clue markers – the places where you’ll go to investigate and find monsters. Six is a good number
We'll also need a standard deck of cards, specifically five of them from 10 to Ace. Each player needs two red, two blue, and one black D10 for their fate pool, plus one red and one blue D10 for their rolling dice.
Not all of these are strictly necessary, I think you could get by remembering who activated, and perhaps mark down fatigue on roster sheets. Many gamers will likely already have tokens that fit these in their collection.
For our board we'll need a 3×3 mat, a bunch of trees, some buildings, and scatter terrain like fences and hay piles should be great. Some scenarios ask for specific terrain, but I feel you can abstract it a bit with substitutions. I use a 3x3 mat for my games, but the rules state you can use 2x2 or larger. 3x3 works great in my experience so far.
For this scenario we'll need five total goblins (we're using gingerbread men with the goblin rules).
Setup
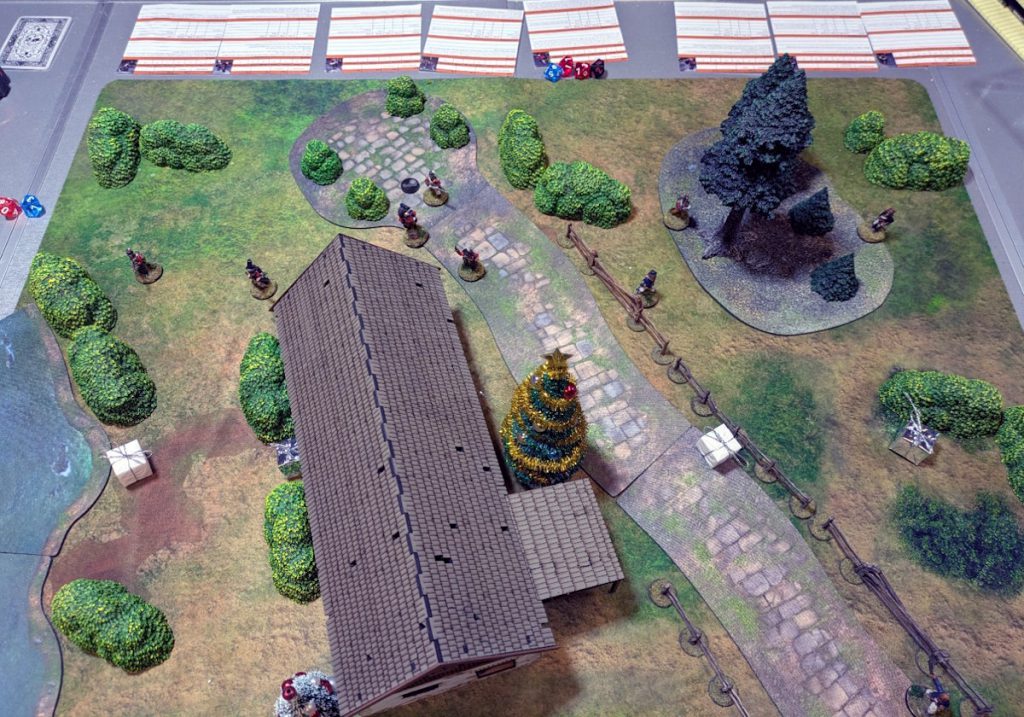
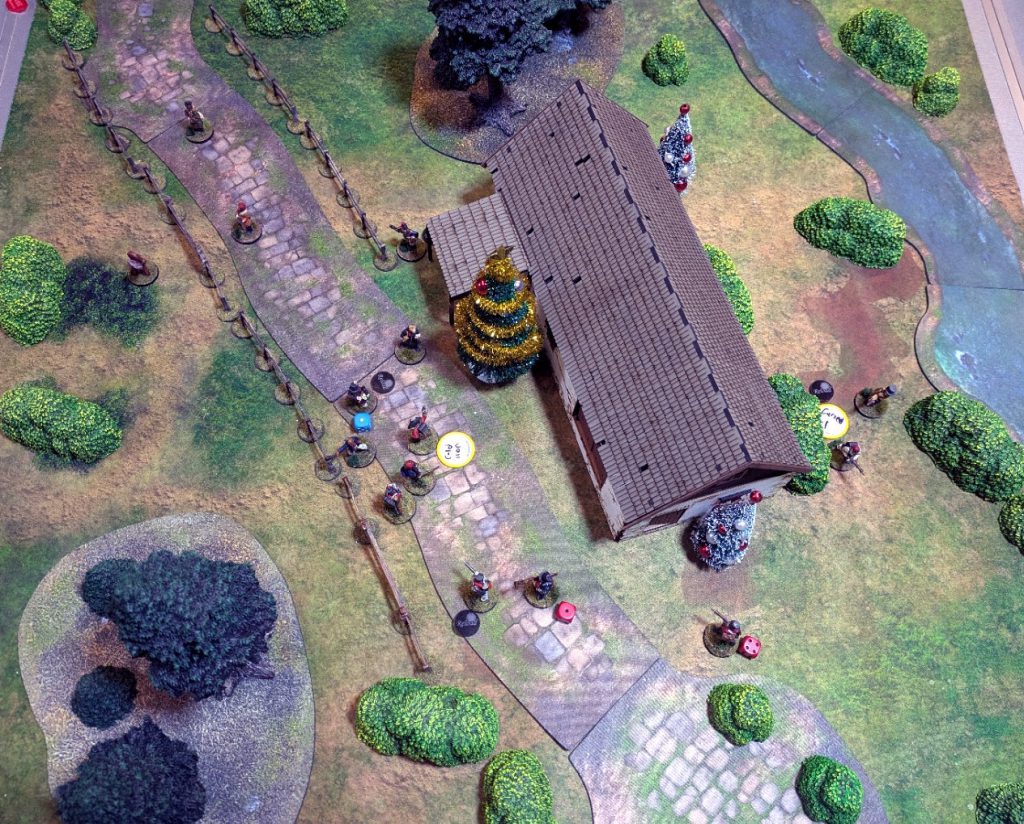
The board was setup with a barn in the middle, a stream on the right side and a road on the left. Bushes and trees were dispersed around the table liberally. I treat the bushes I have from Monster Fight Club as line of sight blocking, but if you're only partially covered by them obviously you can be seen.
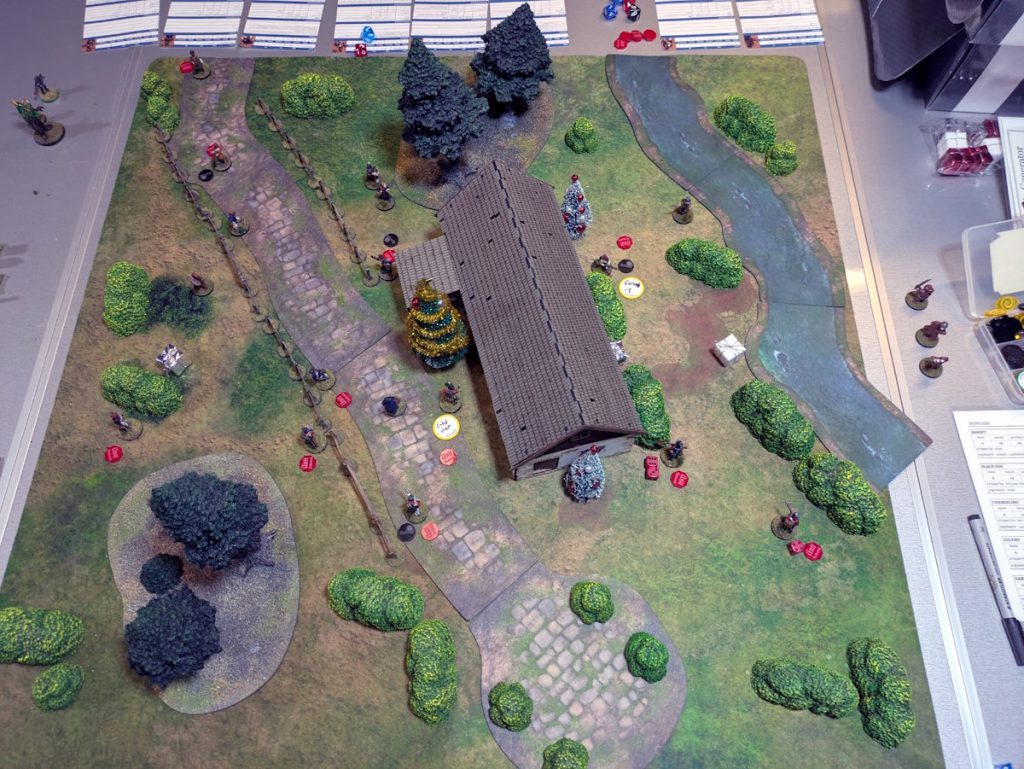
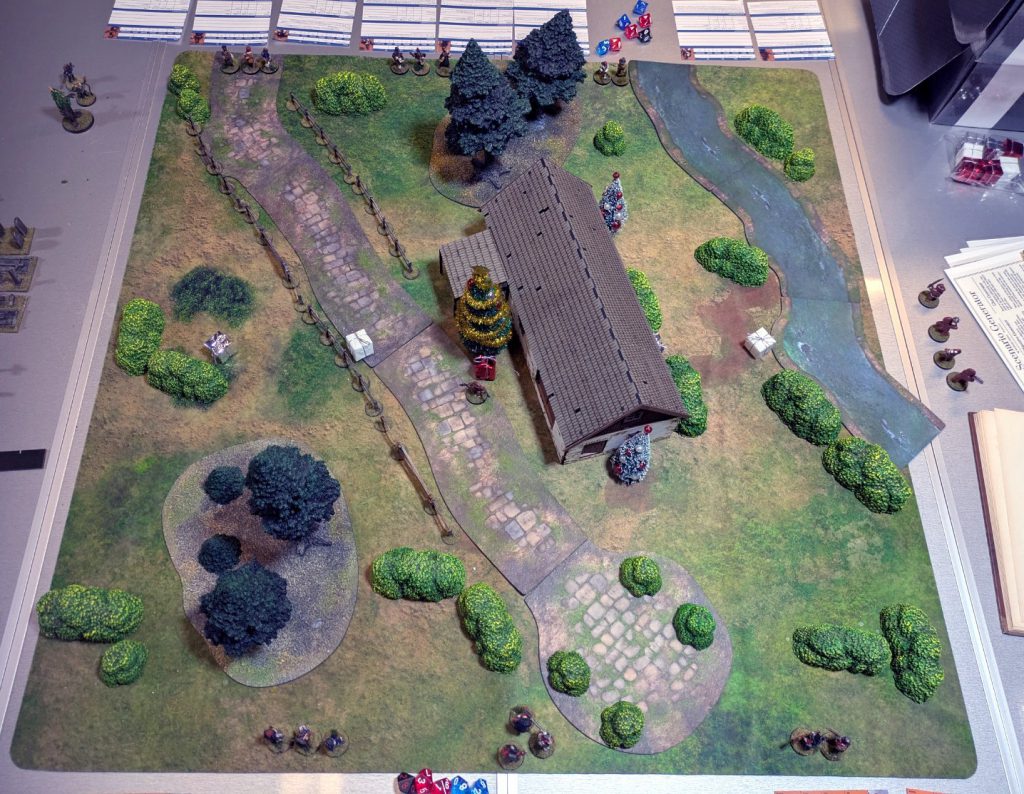 Deployment for both sides. Credit: Michael O "Mugginns"
Both units were deployed. I usually deploy my units in three groups - one of two and two of three, but you can definitely use what works for you. In this scenario each unit was deployed within 2" of the edge. I generally deploy my groups with at least one long range weapon and one close combat threat. The Officer usually goes in the middle with the doctor - the doctor can actually heal soldiers who fall as casualties, so having him in the middle makes it easier for him to get the fallen.
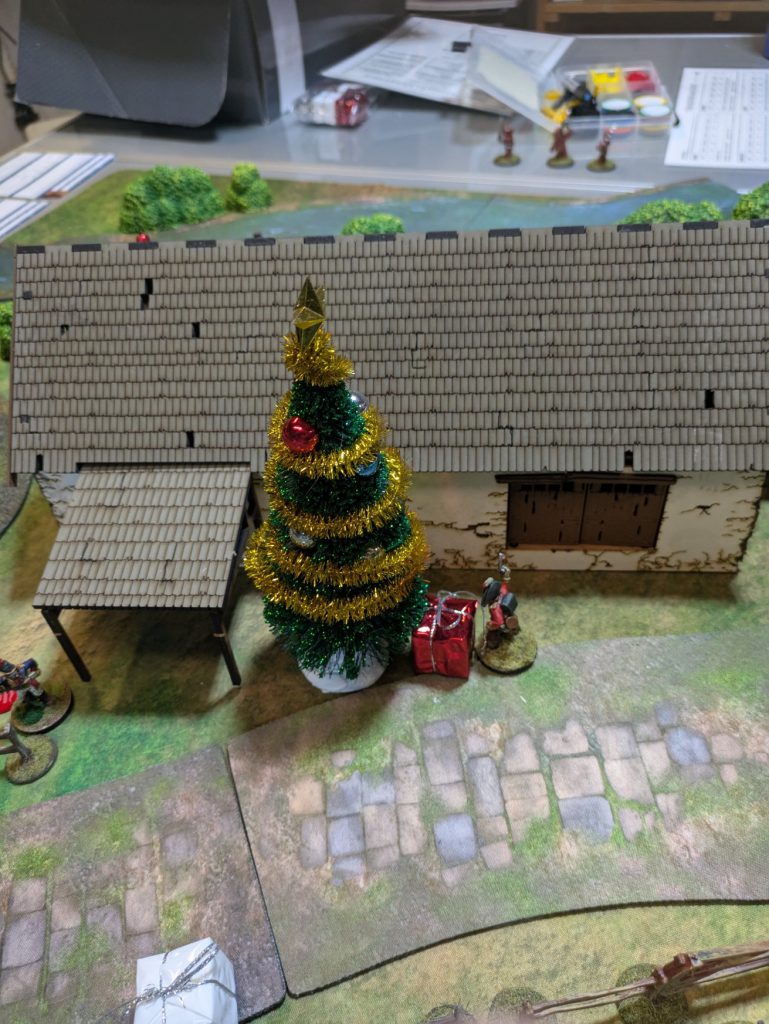
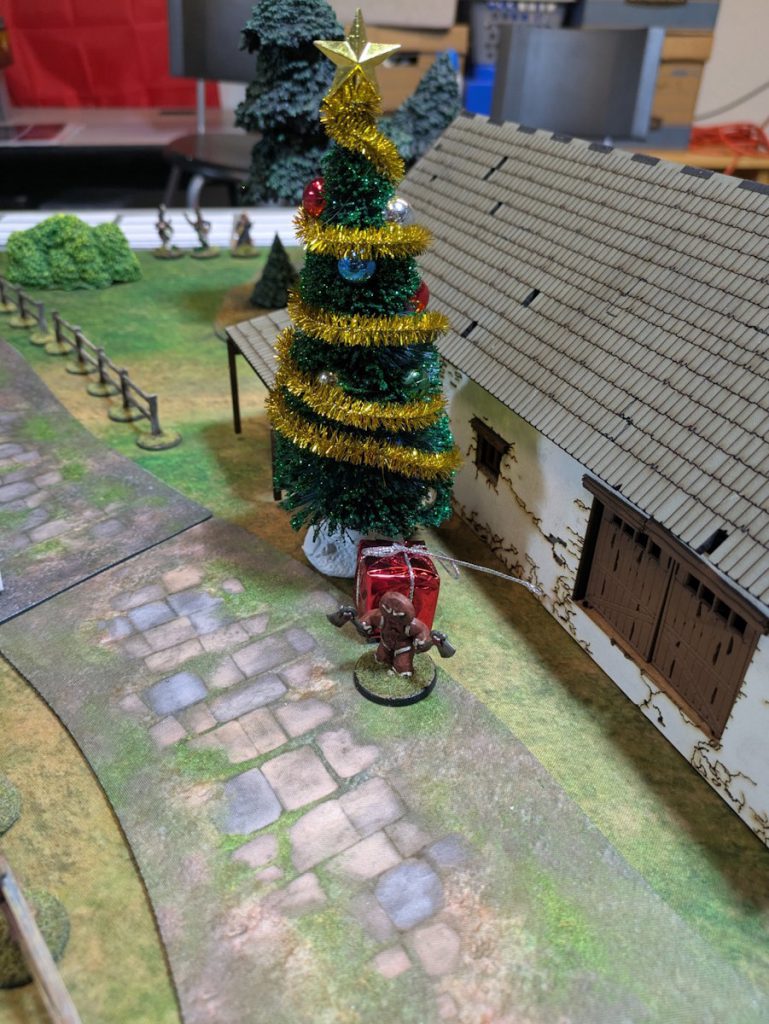 One gingerbread man started in the middle on the clue underneath the tree. Credit: Michael O "Mugginns"
Both units pull out two red, two blue, and one black die to make up their fate pool.
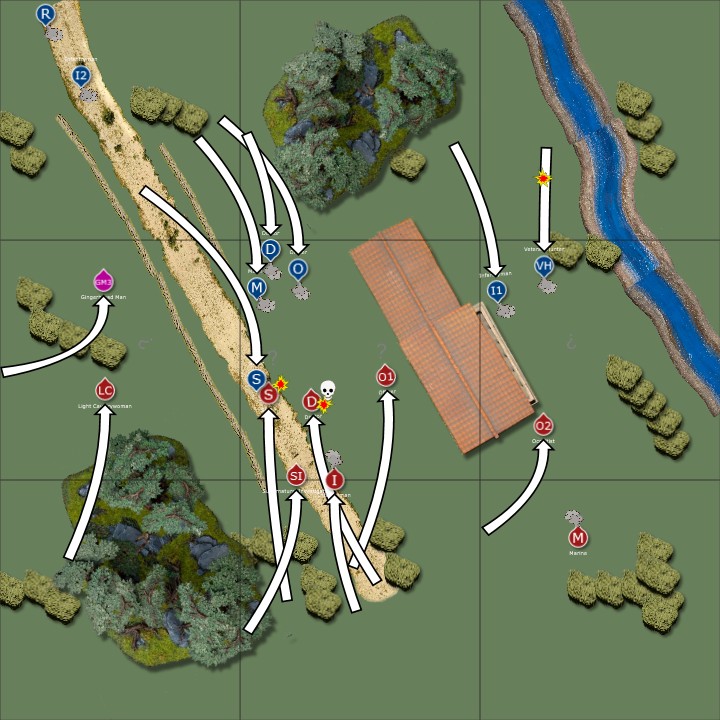
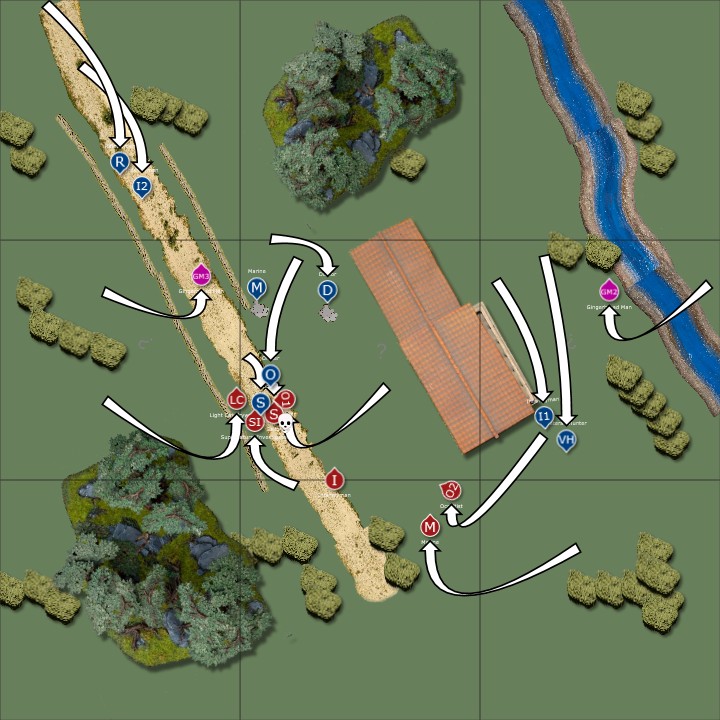
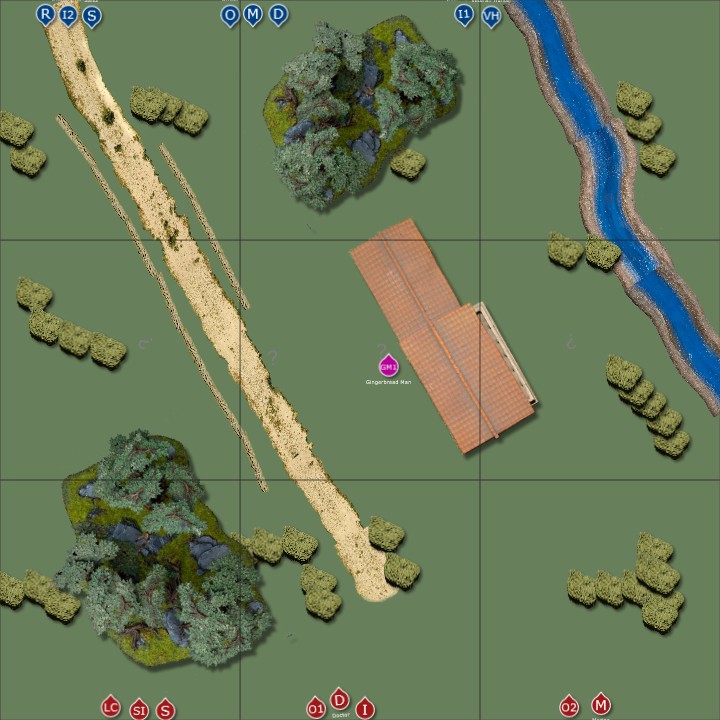 Using Battle Chronicler (available free on the web), I attempted to recreate some maps for the battle report. They're not entirely to scale or accurate but I did my best! Credit: Michael O "Mugginns"
Turn One
Each turn, both sides roll for initiative. Roll two D10s and add them together. If the result is a 2 or a 20 then you can get an Unexpected Event, which can be devastating. In our game, the British won initiative. They get to activate half their figures - in this case four.
During turn one, the Doctor moved up 6", then rolled for his sprint - if you roll an 11+ on two D10s, you get to move 4" extra. If you roll 10 or less you get to move 2" extra. The Doctor rolled a nine so he just moved 8".
Each turn, your figure can do one move action and one action. Generally actions are shooting, investigating, or reloading. If your figure sprints, it does a move action then a sprint action. If you manage to get into base contact with the enemy, close combat is fought - this is not an action.
Solomon the Infantryman also moved up, rolled a ten on his shoot roll (9 red, 1 blue). He was shooting at the gingerbread man with cold iron, so the enemy's damage resistance 4 didn't apply - so he grabbed a Fate Die and re-rolled his blue, hitting with a 10. It's always worth it to try to grab a hit from a miss when you have one high die and one low. In this case, with his 10 on the blue die, he does 10 damage to the gingerbread man, killing it. The center objective would no longer be guarded by a gingerbread man!
To work out this roll, we take Solomon's roll - a 9 red and a 10 blue, add them up, then compare them to the defence of the enemy - 15. If it equals or is greater, the shot hits. Then we look at the weapon - in this case his musket. It is a Power die weapon, so we take the value of the power die (10) and do that much damage to the enemy.
Using a fate die to do a re-roll can be done multiple times, but if you're trying to reroll a power die (blue), you have to use a power fate die (blue). If you're trying to reroll a skill die (red), you have to use a skill fate die (red). The black fate die is for monster actions and is separate.
Keeping in mind how damage works is really important - many players get caught up on how the roll works and just take the total minus the enemy's defence and take that as damage, which isn't how it works. The resource mechanic and the power vs skill damage type are integral to the game and it's important to remember!
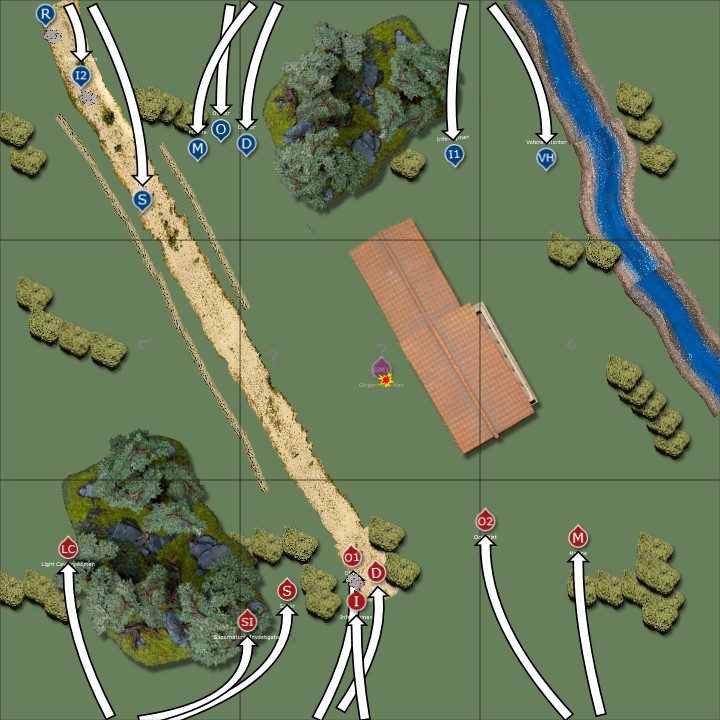
Next the British officer rolled 14 to sprint, moving 10" total toward the clue in the middle. The Light Cavalrywoman also sprinted, rolling a 17 and moving up the British left.
 Turn one - the British advance. Credit: Michael O "Mugginns"
Normally after one side activates half their figures, the monsters would have a go with their AI that is built into the rules, but the lone gingerbread man had been sniped, so they didn't activate.
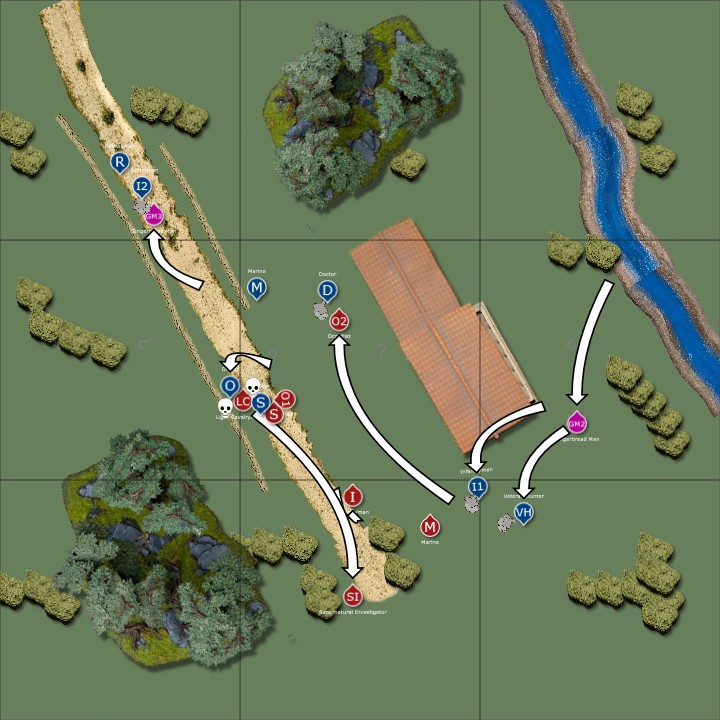
Next the USA would activate their entire force - eight figures. Daisy the riflewoman aimed and fired her rifle (I hadn't used one yet - they're 30" range, which is massive!) but missed on the enemy officer with a nine. Her colleague Lionel the infantryman tried the same, moving up and firing, missing with a four. When moving and shooting, you'll always take a -1 to hit - so it makes it much harder. Your average of two D10 is 11, so you already have to spike it a bit to hit the average defence of 13 (that's why you have the fate pool).
 The Americans advance during turn one. Credit: Michael O "Mugginns"
The Sailor, only equipped with a hand weapon and 8" range pistol, sprinted up with a roll of a 13, moving 10". The Doctor joined him in the sprint, while the Marine also moved up, but failed his sprint, only moving 8". Finally, the Officer attempted to sprint upfield but only managed 8". On the USA left, the supernatural investigator and Ricardo the infantryman both made their sprints upfield to try to get into cover. The first turn can generally be like this - a lot of sprinting - due to the shorter range weapons plus all the cover on the board.
 Turn One action. Credit: Michael O "Mugginns"
One gingerbread man was added to the British left side of the board at the end of the turn.
Turn Two
The USA won priority in turn two, 15-13. Priority can be a two-edged sword - you get to go first, but you only get to activate half your force, and if you move them up (you want to, to get clues) they'll be closer to your enemy's entire force, or possibly monsters.
Riflewoman Daisy again fired from a stationary position at the British Officer, again missing with a 13. Officers have a defence of 14, so they're a harder target to hit - you generally hope to get one high die at least so you can throw a fate die in to hopefully confirm your hit.
Lionel, her infantryman partner, took a pot shot at the officer again, this time hitting on a 19! The blue die (power) was a 10, so he'd do 10 damage to the Officer. The Officer (Reginald) definitely didn't want to take this much damage this early in the game, so he grabbed a fate die (it can be any color), and rolled it to negate damage. Usually you roll the D10, then half it rounding up, and that's how much damage you remove from the attack - but in this case he rolled a 10, totally negating the entire attack!
 Turn two - the Americans move up and start unloading. Credit: Michael O "Mugginns"
Generally weapons have to reload - if you move then fire, you put a reload marker next to your figure. If you stay stationary, you can forgo your move action to reload.
Turn two - the Americans move up and start unloading. Credit: Michael O "Mugginns"
Generally weapons have to reload - if you move then fire, you put a reload marker next to your figure. If you stay stationary, you can forgo your move action to reload.
Malcolm the Marine moved up and again took a shot at the Officer. Officers in TSB are tougher, more capable in combat, and better equipped, so the Americans wanted to remove him from the battle. Malcolm rolled a 7 + 7 - usually a good roll! - but was -1 to hit as he moved, and -1 from the Officer being in cover, so he missed.
On the American left, Ricardo moved up and fired, rolling a 10+1 to shoot. He re-rolled his red die to a six using fate, making his total a 17 (he's +1 accuracy). The Marine would die, as the power die was a 10 and he only has 10 health, so he used a fate die to negate damage. He rolled a seven, negating four damage, taking six.
After half the USA side activated, it was time for the Gingerbread Man. The British knew the cookie would be coming for them, so they spent the black monster die in their fate pool to make the monster move toward the American Sailor instead.
 British Officer Reginald takes the central clue. Credit: Michael O "Mugginns"
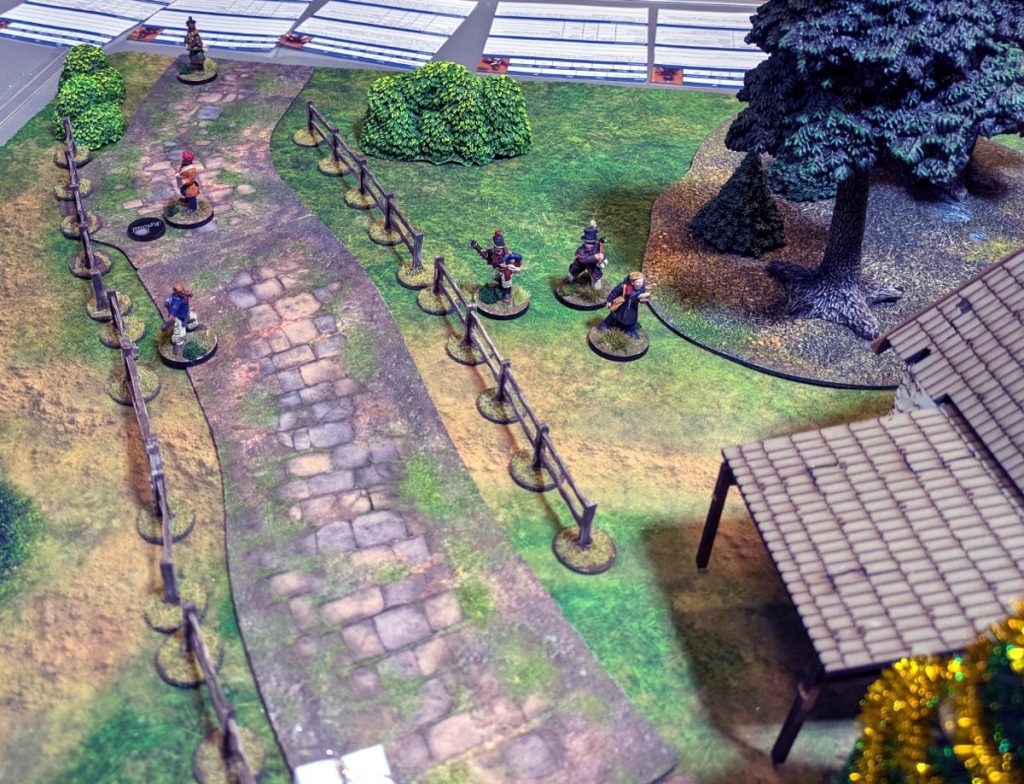
With the Americans finished, the British activate their entire force. The Marine on the British right fired at Ricardo and missed. Darcey the witch moved up and cast Curse on the Veteran Hunter. Casting spells is fairly easy - the figure always takes one damage for expending the energy to do so, then rolls a TN (target number) 10 courage check. Darcey rolled a 15 on two D10s, plus her courage of +3, resulting in an 18. The spell was cast - now the Veteran Hunter would try to resist it. The resist TN is 18, and he rolled a 10, so he'd be cursed for the rest of the game, suffering -1 to all of his rolls.
Reginald the Officer moved up the middle and investigated the clue under the big tree, finding a cold iron weapon. On his left, the Sailor moved up and over the fence using Expert Climber, moving to the clue in front of him. He investigated it (it's an action to do so), and ended up finding the dead body of the agent they were looking for, including the signet ring. The British had the clue to win the game, they just needed to exit the battlefield with it.
The Light Cavalrywoman moved up behind the shrubs on his left, while Solomon moved up the road in the middle, using a fate die to quick reload his weapon (generally it's an action to reload - but quick reload means you can move, reload, and shoot). He fired a shot at the American Marine, trying to provide cover for his Sailor friend, but missed totally.
The Supernatural Investigator and Doctor sprinted up behind the British Sailor to provide support (and extra hands in case he died and dropped the clue).
With the British having moved and found the clue, the Americans responded. The American Doctor fired a pistol round at the American Sailor holding the clue (the priority target!) and hit with a 14 (-1 for moving) and did five damage to the sailor.
The American Officer moved up next to him and pulled out his blunderbuss. Blunderbusses are a little different - they're -1 to hit always, plus any other modifiers, and only 8" range, but can hit more than one target if they're close. He fired a massive shot at the Sailor, missing with an 11. He then rolled a 19 to hit the Doctor next to the Sailor (within 1") and killed the Doctor outright with 10 damage!
One thing that I had forgotten so far in the game - when an enemy targets your figure with a ranged attack and you survive, you can make a reaction - either dive for cover (2" move, away from any enemies within 6" and in LOS) or fire back. This would have helped the Sailor make space between him and the enemy by moving 2" away when the enemy missed him.
The American Sailor saw his target and sprinted toward the enemy. Remember that a sprint is technically two actions - one move and one sprint that takes up your normal action - but the melee afterward is not an action. The Sailor rolled an 11 on his two dice, a massive miss. The enemy Sailor (the British one with the clue) could then choose to strike back, or move back 2". He chose to back off 2". Both figures then gain fatigue - a token that means they're -1 to defence and melee for the rest of the turn.
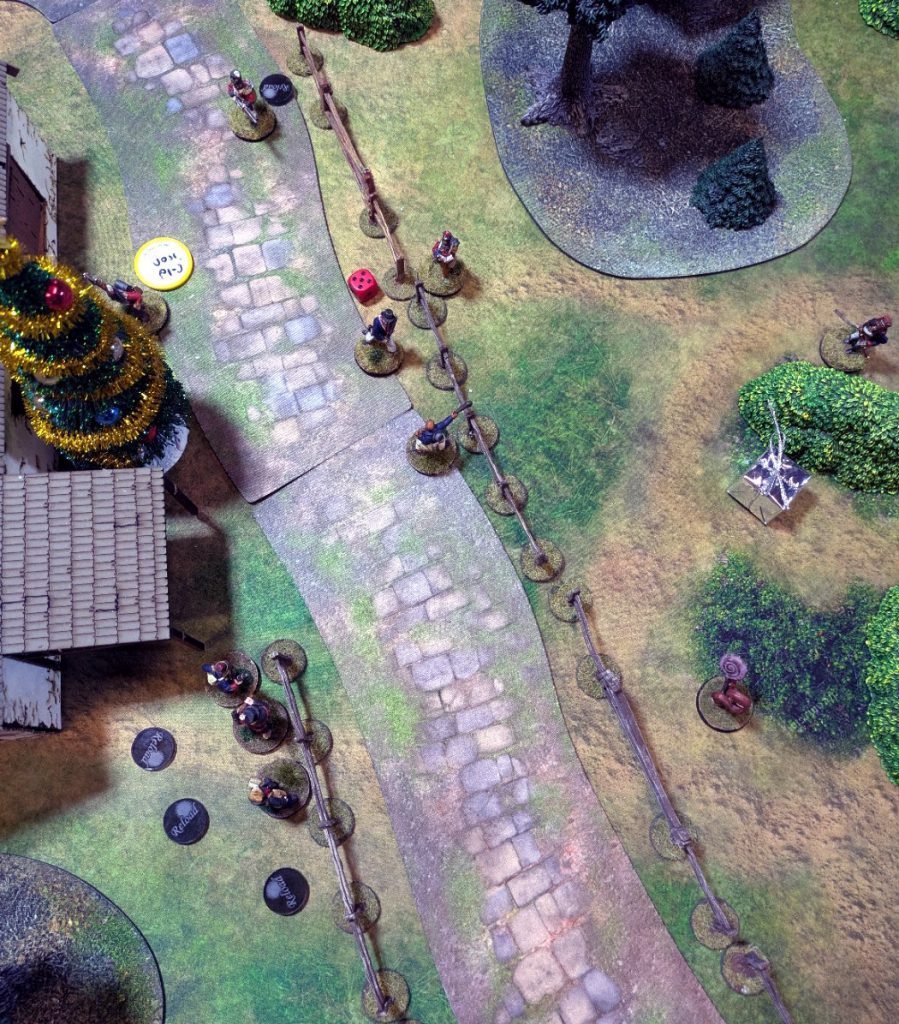
 Turn two end - the British have discovered clues while the Americans are moving into firing positions. Credit: Michael O "Mugginns"
On the American left, the Veteran Hunter moved up and fired at the witch, rolling a total 13, doing 8 damage to her. Fatigue was removed at the end of the turn. It's sometimes useful to get a fatigue on an enemy figure you really need to kill early in your turn, then using the rest of the turn trying to take it down when it has -1 defence, before the fatigue goes away at turn end. Another gingerbread man was added on the British right at the board edge to come in and try to cause chaos.
 Turn Two action. Credit: Michael O "Mugginns"
Turn Three
The USA won priority 14-8 at the start of Turn Three. This was useful because they wanted to get some fire downrange on the Sailor carrying the clue, but might end up hurting them because the British would then be able to activate their entire force.
Since the gingerbread man was still within 6" of the Americans, his 'Inimical to Technology' rule would shut down their guns. Outside of that range was the American Marine Malcolm Doyle, who shot a round at the Sailor but missed, rolling a 4 + 5. The American Officer, Moises Sweet, sprinted over the fence and into combat with the Sailor. Officers are generally good in combat, having a +2 modifier if you choose that upgrade. He rolled a 6 + 4, equaling a 12 total with his mod. He rerolled the four to an 8, hitting the sailor for eight damage. The Sailor spent the last fate die to negate damage, hoping to barely survive - and rolled a 10, negating all damage! After that, he backed off 2" to further move toward his own board edge, instead of fighting back.
The American Sailor charged in at the British Sailor who now had defence 12 because of his fatigue. The American rolled a 17, hitting the British Sailor and finally felling him. The clue is dropped on the ground right where the Sailor fell. Meanwhile at the back line Riflewoman Daisy took another shot at the British officer and missed with a four.
 During turn three the American Sailor eventually did finish off the British Sailor who was loaded up with Fatigue - dropping the clue on the ground. Credit: Michael O "Mugginns"
The Gingerbread men moved toward the Americans on both sides but did not make contact.
Starting off the British turn, the Supernatural Investigator (defence 14!) moved up to the clue and picked it up. He couldn't keep moving after he picked it up, as clues are picked up at the end of movement.
Trying to provide cover, the British Officer Reginald charged the American Sailor, hitting him with a 16, doing 9 damage. The Sailor fought back missing with a six total. Reginald had to back off.
Once a combat is finished, if both figures are surviving, the figure who moved into combat will back off. Combats are not ongoing in TSB.
The Light Cavalrywoman, seeing the Sailor fatigued, sprinted into combat with him, but missed, even with her +2 modifier. The Sailor struck back at her but missed as well, making her back off.
 The British Supernatural Investigator ran over to pick up the game-winning clue. Credit: Michael O "Mugginns"
Seeing that the clue was on the other side of the field from the, Ricardo the Infantryman and Toby the Veteran Hunter sprinted toward the end of the barn. Lionel the Infantryman moved up the road and reloaded, while Daisy the Riflewoman sprinted up the road. All that mattered now was for the Americans to take back the clue - so they had to collapse on it. The Doctor popped a shot at the enemy Officer but missed.
 Turn Three saw a lot of action! Credit: Michael O "Mugginns"
Turn Four
The British win Initiative, 13-4, after a tie re-roll. The Investigator knew he had to get out of the engagement, so he sprinted on an 11 - barely making his roll - but almost made it to the board edge. The Witch charged the enemy Doctor, attempting to provide cover. She missed her attack (with +0 melee mod, not surprising) and the Doctor missed back (again, melee mod +0). The Light Cavalrywoman charged the American Sailor and outright killed him in combat. Since the British only had six figures left that was the total of their first half activation.
Next, the Gingerbread Man on the British right charged the Veteran Hunter, missing. With 15 defence, the Gingerbread Man can be really annoying - but the Vet Hunter managed to hit, doing zero damage because of the Gingerbread Man's damage resistance (4). If the Vet Hunter had a cold iron weapon he'd bypass that and do damage.
 North Star Military Figures Grave Golem, The Silver Bayonet. Credit: Rich Nutter
The other Gingerbread Man charged the American Infantryman on the road on the British middle, missing. The Infantryman attacked back, rolling a 10 and a five, doing six damage to the Gingerbread Man (10 minus the four damage resist). It's a tough time for the Americans, because the Gingerbread Men are hard to kill, plus they make all their weapons just not work within 6", so they can't fire at the retreating British.
With the Monster Phase done, the Americans get to activate their full force, hoping to stop the British from retreating with the clue. At this time they outnumber the British 7-6, so they're hoping to use their numbers.
The American Doctor took a shot at the British officer, missing. I remembered the Reaction here - the British Officer reacted by diving back 2", blocking any charge lanes for the American Officer to get into the British backfield.
The American officer hoped for the best - maybe they'd get priority the next turn and charge or shoot the enemy carrying the clue - and charged the Light Cavalrywoman in front of him. He hit with a 10 and a 3 (+2 melee modifier), killing her outright. Ricardo the Infantryman took a shot at Solomon the Marine, trying to get rid of some of the British backup, and missed with a seven. Solomon reacted by diving for cover back 2" toward the clue carrier.
The Veteran Hunter paired up with Ricardo moved up and took a shot at Solomon the Marine, again missing, and again allowing Solomon to retreat 2" back toward the clue carrier. Hoping to get another turn in, the Riflewoman, Marine, and Infantryman on the American right sprinted up the road toward the clue carrier.
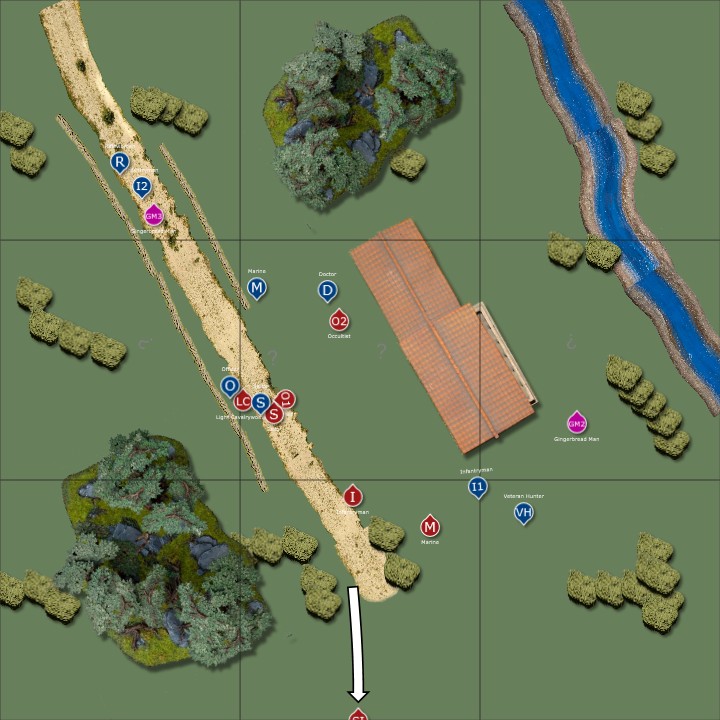
 Turn Four. Credit: Michael O "Mugginns"
Unfortunately for them, the British won initiative and managed to get the clue off the board. Players could play it out and have each individual figure make it off the board (or not) if they wished - we chose to end it there. The British did win the engagement, and managed to Save Chrimbo, but just barely, losing three soldiers in the process. If we were playing a campaign, these figures would be at a 1/10 risk of just dying after the game.
 The Supernatural Investigator makes it off the board with the clue. Credit: Michael O "Mugginns"
Final Thoughts
I hope this is helpful to those just getting into the game. I know it can be daunting to learn a new ruleset, even one as easy to learn as The Silver Bayonet. We didn't cover Campaign mechanics, Terror Checks, or quite a few special rules here. The monsters in this scenario were not hugely engaging or terrifying, but you will definitely fight monsters in TSB that are. Did I miss anything? Let us know below.
Have any questions or feedback? Drop us a note in the comments below or email us at contact@goonhammer.com. Want articles like this linked in your inbox every Monday morning? Sign up for our newsletter. And don’t forget that you can support us on Patreon for backer rewards like early video content, Administratum access, an ad-free experience on our website and more.Thank you for being a friend.


 Goonhammer Hobby Round-Up: March 2026
 Goonhammer Reviews: Tribal Conquest
 Conquest: Weaver Courts Gemred Knights and Scaile Dancers Model Review