Most towns in Britain have at least one. A fast food shop where the name is somewhat hyperbolic. Places like "Legendary Fried Chicken" or "Best Kebab" promise a lot, but only the brave or foolish are willing to run the food-poisoning gauntlet and discover if the fares actually live up to the name.
Sarissa Precision is a company that threw caution to wind and used the same naming convention as these culinary curiosities, but can they deliver a product that delivers on the promise of the name?
For those of you who have never heard of Sarissa Precision before, if you're able to come out from under your rock, I'll fill you in. As a company, they have been making laser-cut MDF terrain for a very long time, and have quite a few awards to show for it. If you type their name into any search engine you'll see that they have a huge variety of kits for almost any game imaginable, and even produce some pre-coloured kits if like my friend Lee you're a work-shy hobbyist who paints three models a year.
For myself, I'm currently building some dark ages armies and warbands, so when the opportunity to review Sarissa's viking settlement arrived, I jumped at the chance. All in, it includes a long house, two A-frame huts, a longship and a dock/bridge set. Quite a good amount of terrain for a small battlefield, especially as the ship is Massive.
On opening the kit, the first thing that came to mind (except for the smell which every laser-cut kit has) was that the set appears to have been designed with a lot of options and playstyles in mind. The roofs of the buildings are all assembled in a way that would allow them to be removed and replaced easily, without having to add magnets etc. The fit is very good too, some might even say precise. All this means that if you're the kind of person who would like to continue the fight inside the buildings, it would be very easy to add your own interiors and do so. It would be a pretty simple job to make the doors open and shut too, if tiny engineering is your thing. A good start.
The Houses
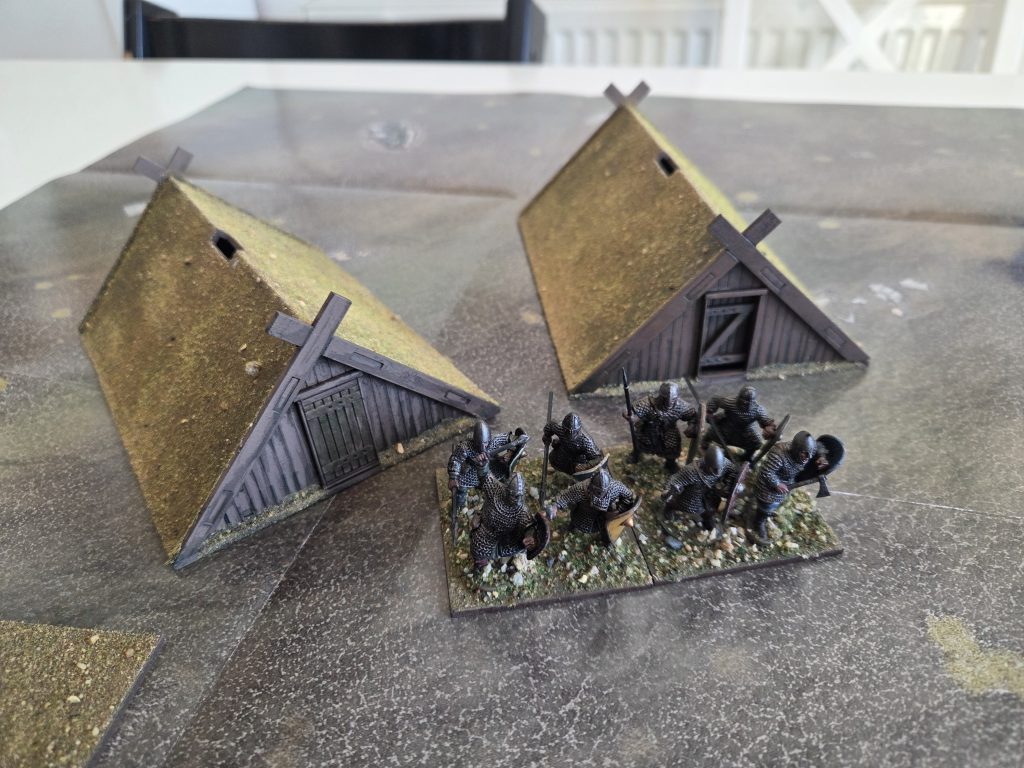 There are multiple ways you can assemble the doors, allowing for good variety throughout the village (Image Credit: Zac)
I decided to start with the easiest part of all: The A-Frame houses. These fun little buildings go together really easily, and with just some superglue and activator on the inside joints I had them fixed up in no time. Although they have planked roofs, the pictures on Sarissa's website show these with thatched roofs made with the old brillo-pad technique. For myself, I decided to go with a turf-roofed house, which is also authentic to the period. To do this, I just used some filler to smooth the roof down to the base and then flocked the whole roof as I would the bases on my models.
There are multiple ways you can assemble the doors, allowing for good variety throughout the village (Image Credit: Zac)
I decided to start with the easiest part of all: The A-Frame houses. These fun little buildings go together really easily, and with just some superglue and activator on the inside joints I had them fixed up in no time. Although they have planked roofs, the pictures on Sarissa's website show these with thatched roofs made with the old brillo-pad technique. For myself, I decided to go with a turf-roofed house, which is also authentic to the period. To do this, I just used some filler to smooth the roof down to the base and then flocked the whole roof as I would the bases on my models.
The Longhouse
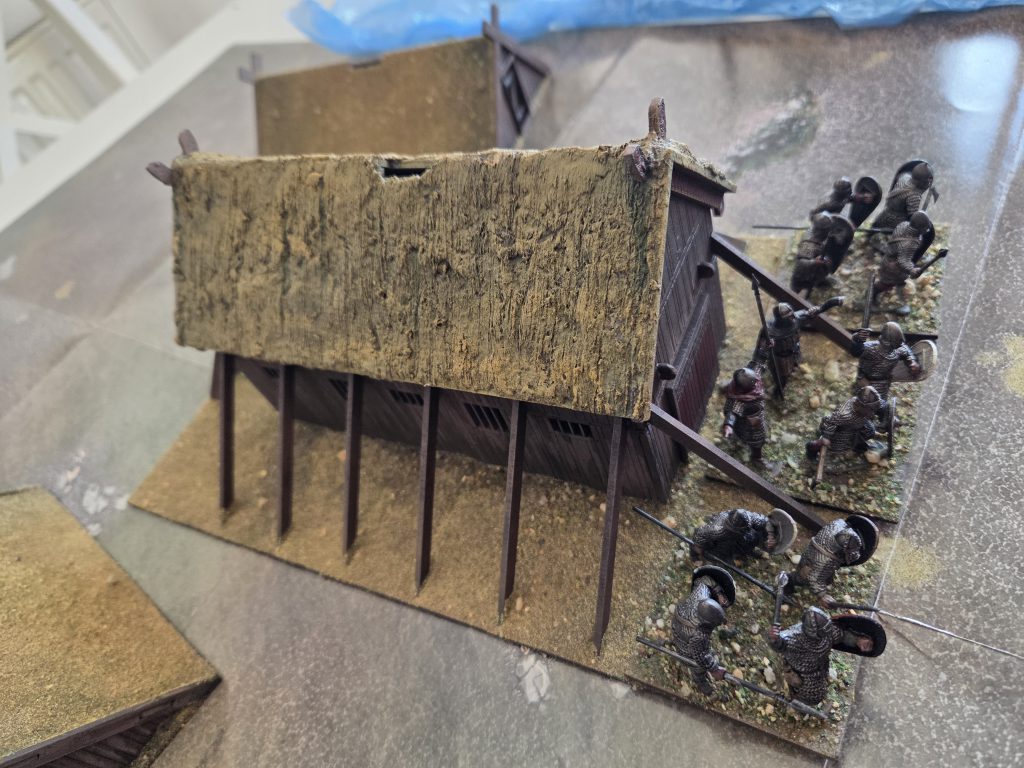
 I left two of the 45 degree beams off the front of the longhouse, as a lot of my historical models are on regiment style bases, and couldn't fit in between them. I plugged the remaining holes with the ends of some coffee stirrers. (Image credit: Zac)
To be honest, I was expecting this house to be a little bigger than it ended up being. As a centrepiece for the village, it does it's job well, but it's not quite Meduseld levels of imposing. I suppose that's probably more due to my unrealistic expectations than a problem with the kit though.
As before, the kit went together really easily, and the removable roof is spot on. I do wish that I had left the supporting beams off the sides until I had done at least some of the painting however, as it was tricky to get the brush underneath them, especially at the back.
For this one I had to go thatched. Not teddy-bear fur or brillo pads for me however: I decided to try something new. I mixed up some modelling compound (The stuff usually used to blend rocks into hills) and patted it down onto the roof. Then, before it dried fully I gave it a good comb with a stiff brush to add in the texture. I'm really pleased with how it turned out, although if you're planning on trying this out make sure you get your own brush. Using a borrowed hairbrush will upset the owner, unless they enjoy dried plaster in their hair.
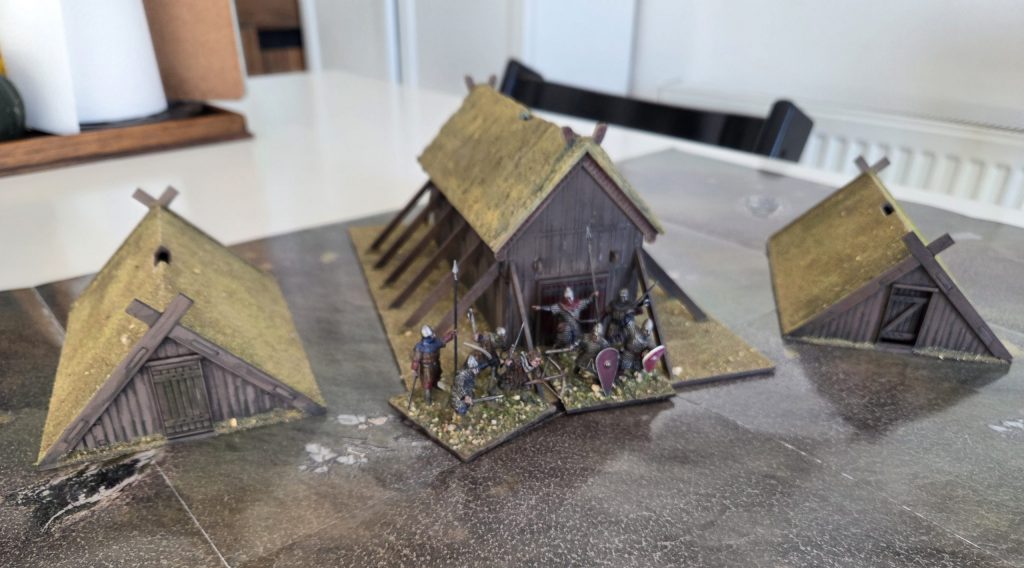
 I assume the guys who live in here have been planning on cleaning up the thatch for a while, but it's hard to find the time. (Image credit: Zac)
The Ship
 I'm going to have to make myself a shoreline board now: This blue plastic packaging was the best I could do for now. (Image credit: Zac)
I really wasn't sure how well this would work, but on opening the pack I discovered that the sides of the boat were actually cut out of card, allowing them to fit the curve of the deck beautifully. It went together surprisingly easily, and the mast is removable and friction-fit as well. They really weren't lying when they came up with their company's name.
There are lots of little extras in this kit too, including oars, and mast rests, so you can have the mast up or stowed. There are also some lazer-cut shields that I will probably just blue-tac to the sides. That way it can be a viking warship or a trading vessel depending on the needs of the game. I assembled the boat very basically, leaving the oars and stands on the MDF sprues: I wanted to have as much room on the boat as possible so the battle could continue onto the deck.
The Dock
At first glance, this is probably the most boring part of the kit. That's also the case at second and third glance. They're a useful addition, and they're simple to put together, but no-one is buying the kit for these. I actually keep forgetting about them. This paragraph almost didn’t happen.
Painting
My go to tactic for painting scenery is usually a couple of sprays (Dark from below, zenethal from above) and a heavy downward drybrush to pick out any raised details. This works for a lot of plastic kits, but it was clear that the details on this kit would require a different approach. For the buildings, most of the detail lines are vertical, so a top down drybrush wouldn’t pick them out half as well.
So having given them all a coat of PVA and water to seal the MDF, and a dark brown spray from the Colour Forge I started some experiments. The sponging experiment didn’t go well: The lazer cut lines were too thin for the sponge, which filled them easily. Not only that, but I absolutely chose the wrong brown for it, and it looked like a baby had thrown up on my lovely new scenery.
Re-undercoating the chunder-house I then added some really quick highlights at the top of each board. After that, I gave everything a black wash, and then added shading to the bottom section of each plank, going up the etched lines a random amount each time to make it look like it was holding on to some moisture. I did this with my favourite shade paint: Coelia Greenshade. The cold blue-green gives a nice suggestion of moss without making the whole place look overgrown.
 I used contrast paints straight over the wood colour on the doors to look like faded paint. (Image credit: Zac)
Happy with the wood, I could now think about the thatched roof. As it was still removable I was able to take it off and spray it with a pale grey. I then gave it a good coverage with aggaros dunes. Except I didn’t because I couldn’t find it, so I mixed an approximation from whatever I had lying around. A drybrush of a bone colour and some selected Coelia Greenshade and it was looking good.
When it came to painting the longship, I used a couple of sprays: Hyrax and Trench brown from The Colour Forge. Then I gave every board a simple highlight using a mixture of Raw Umber and Golden Brown from Pro-Acryl. I feel like this was very subtle, and I probably should have gone a bit heavier on that, when thinking about the distance most people will look at this piece from.
Finally, I painted the shields in alternating colours. I used Pro-Acryl paints again, but watered them down well, using them a bit like watercolours. This allowed me to place shadows towards the bottom of each shield just by leaving more of the wash there. This was mostly made possible by the fact that the shields are made of cardboard, and I hadn’t sealed them with PVA, so if you want to try this as well, make sure you leave them as part of the sheet while painting, and seal them afterwards.
I used contrast paints straight over the wood colour on the doors to look like faded paint. (Image credit: Zac)
Happy with the wood, I could now think about the thatched roof. As it was still removable I was able to take it off and spray it with a pale grey. I then gave it a good coverage with aggaros dunes. Except I didn’t because I couldn’t find it, so I mixed an approximation from whatever I had lying around. A drybrush of a bone colour and some selected Coelia Greenshade and it was looking good.
When it came to painting the longship, I used a couple of sprays: Hyrax and Trench brown from The Colour Forge. Then I gave every board a simple highlight using a mixture of Raw Umber and Golden Brown from Pro-Acryl. I feel like this was very subtle, and I probably should have gone a bit heavier on that, when thinking about the distance most people will look at this piece from.
Finally, I painted the shields in alternating colours. I used Pro-Acryl paints again, but watered them down well, using them a bit like watercolours. This allowed me to place shadows towards the bottom of each shield just by leaving more of the wash there. This was mostly made possible by the fact that the shields are made of cardboard, and I hadn’t sealed them with PVA, so if you want to try this as well, make sure you leave them as part of the sheet while painting, and seal them afterwards.
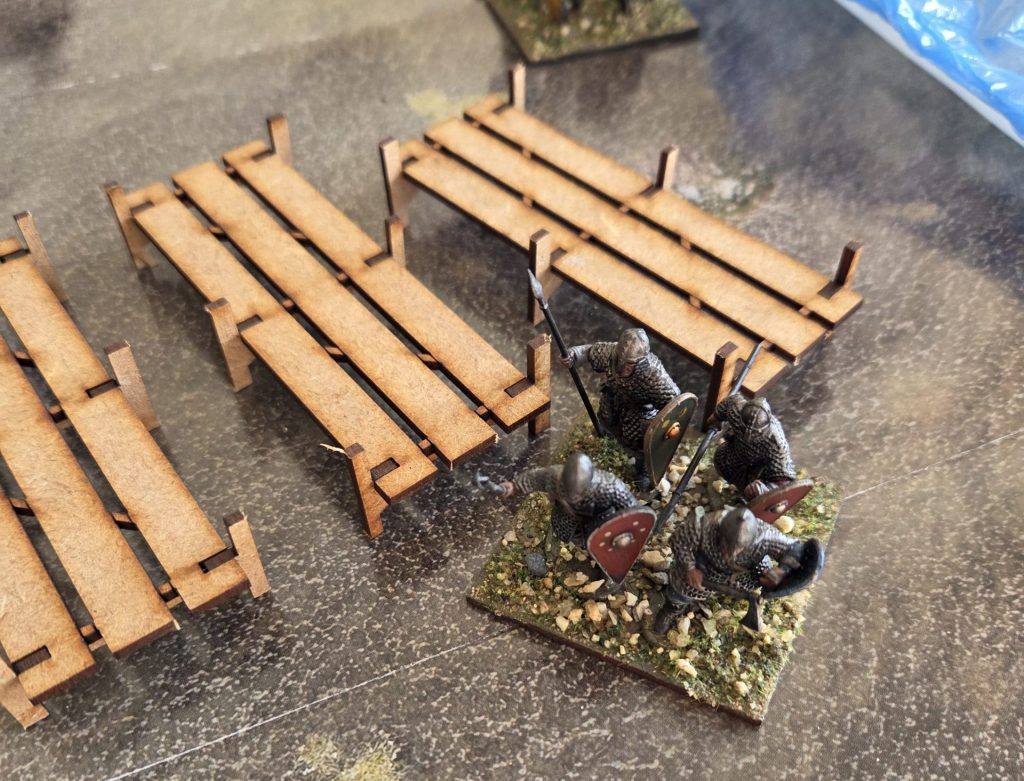 Each plank is around the same width as a Victrix man's shoulders. (Image credit: Zac)
As for the docks/bridge, I actually didn’t paint these yet. Lining them up with my Victrix Normans, I decided that they looked a bit out of scale, so I didn’t want to use them as is. They’re definitely a good starting point, but in this instance I am going to make some modifications. If that’s of interest to anyone, let me know, and I’ll write it up.
Final Thoughts
We live in a world that has so many different options for scenery it’s pretty hard to keep abreast of things going on. It’s been a long time since I’ve put together any MDF terrain, and I can definitely say that the quality has improved leaps and bounds. This kit went together so easily I did the whole lot in one evening, with hardly any sanding at all due to the tiny attachment points to the MDF “Sprues”.
So run down:
- Easy to assemble
- Easy to paint, but you may need to adapt your techniques
- Would be very easy to upgrade to interior detail
- The dock feels like it doesn’t quite fit the high standards of the rest of the kit
- The boat has lots of options, and looks great
So I’d give it four out of five goons. Or hammers. I don’t know, this is my first review; what are we using nowadays?
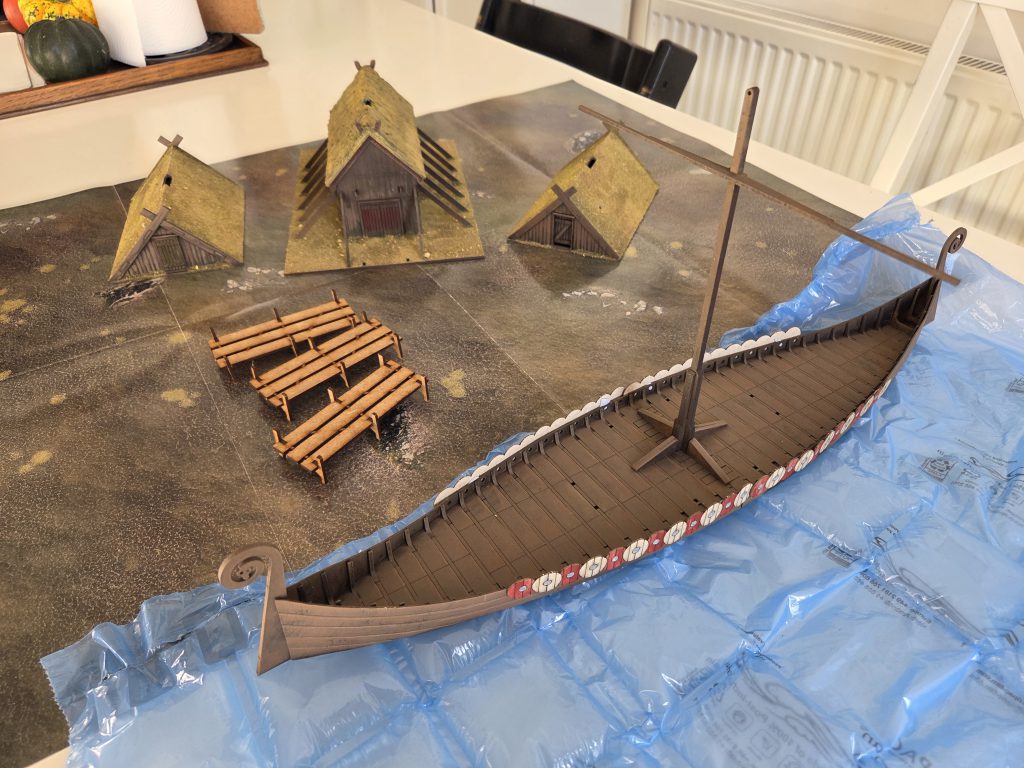 The whole kit together. I definitely will finish up the dock, but I need to make some modifications first. (Image credit: Zac)
Have any questions or feedback? Drop us a note in the comments below or email us at contact@goonhammer.com. Want articles like this linked in your inbox every Monday morning? Sign up for our newsletter. And don’t forget that you can support us on Patreon for backer rewards like early video content, Administratum access, an ad-free experience on our website and more.
The whole kit together. I definitely will finish up the dock, but I need to make some modifications first. (Image credit: Zac)
Have any questions or feedback? Drop us a note in the comments below or email us at contact@goonhammer.com. Want articles like this linked in your inbox every Monday morning? Sign up for our newsletter. And don’t forget that you can support us on Patreon for backer rewards like early video content, Administratum access, an ad-free experience on our website and more.
Thank you for being a friend.

 Infinity N5 First Principles: Understanding the Outcomes of Face to Face Rolls
 Tactical Feedback: Timing the Go-Turn
 SRM's Roundabout to Adepticon 2026: Curd Is the Word