The reason I love historicals so freaking much is that there’s so many options. At a certain age you really know what you want out of a miniature wargame and your hobby in general, and collecting and playing historicals is perfect for that. For every period, for every scale, for every format, there’s an option to satiate your needs. An historicals army will never be useless. Sometimes, you have to really look to find what you need. Today, I can help with that.
Clouds of Smoke (CoS) filled a hole in my head by being several things: scale agnostic by using base widths as measurement, fast playing so I can play a battle on a club night, and grand tactical, so I can put a corps or army on the table. In that sense it falls into the same ballpark as Altar of Freedom. I stumbled upon this ruleset through a reddit or discord link by chance. It is unknown. But it is great, and free.
https://clouds-of-smoke.com/
Written by Alexey Usachev, Clouds of Smoke gives you the rules, army lists and accoutrements to play European or North-American conflicts from roughly 1600 to 1815, the end of the 100 days campaign. At only 27 pages you get just the essentials. There are no primers on the different nations or periods, but the army builder gives a couple of paragraphs on each nation. You'll have to get your history fix somewhere else, but that being said, the ruleset feels drenched in historical background, if that makes sense.
Setup
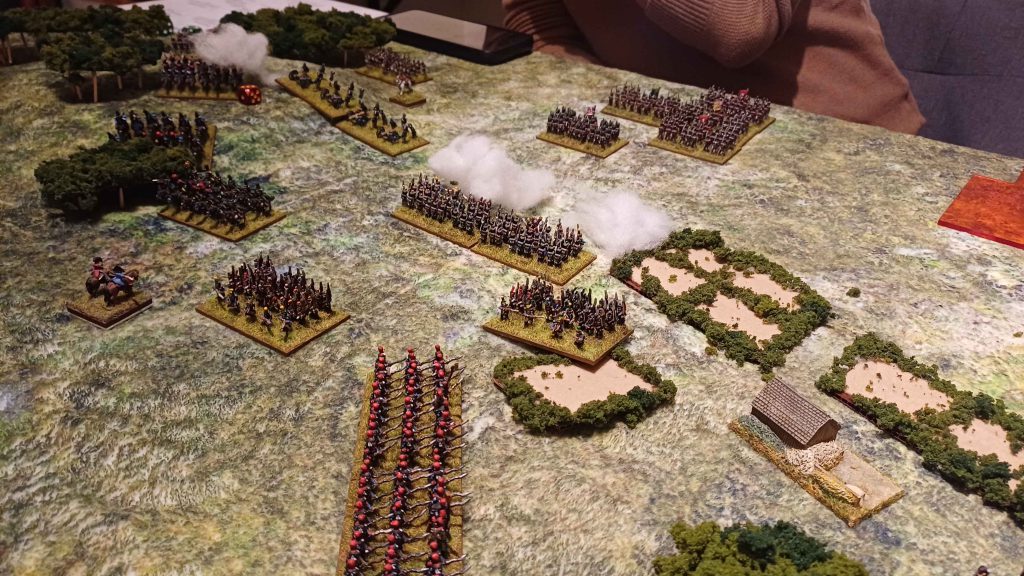
The game is model agnostic! Base size is the only thing that matters, so anything goes as long as the base sizes are uniform across the armies. This is a grand tactical level game, with each side having at least a corps under their command, so smaller scales will look better. Apart form that you need the usual stack of dice and some way to measure distance. The play area is a sensible 90x120cm/3x4, so getting a game in at home shouldn't be a problem for most people.
You can choose to build an army for a standard battle, or use one of the scenarios on the site. Next to that, you will have to print an action board for the period and army you’re playing and you’re good to go.
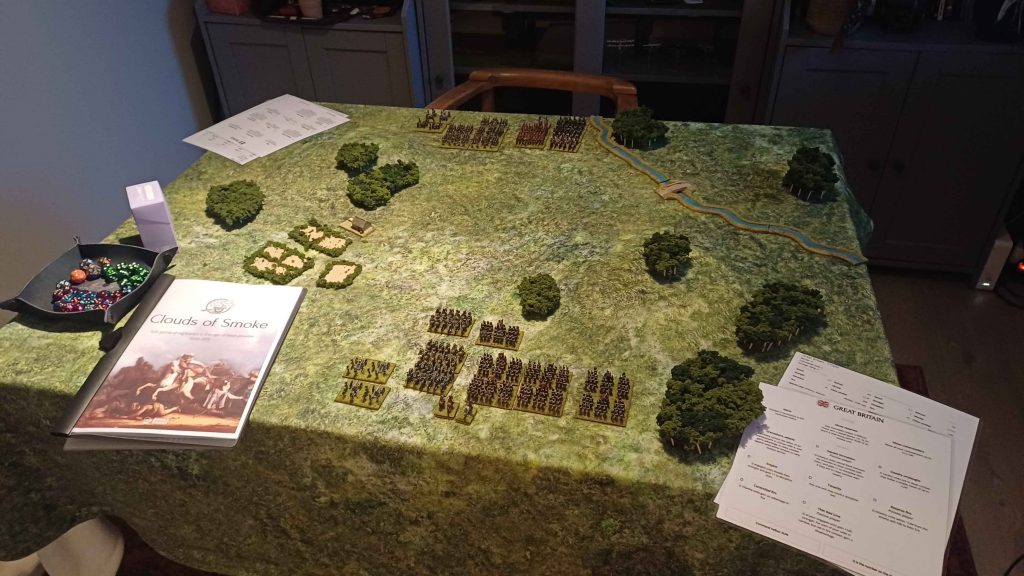 Two armies, actions boards, dice, etc yet no fortified wine Credit: Jackie Daytona
Your action board is the heart of the game and one of the two mechanics driving the friction and choices you have to make. At the bottom of every sheet there is a handy reminder:
Two armies, actions boards, dice, etc yet no fortified wine Credit: Jackie Daytona
Your action board is the heart of the game and one of the two mechanics driving the friction and choices you have to make. At the bottom of every sheet there is a handy reminder:
 Credit: Jackie Daytona
Gameplay
Unit Width or UW is the standard measurement you’ll use in the game. So for this army, my commanders have a radius to give orders at a range of 3 increments of measurement. This is a very fancy way of saying “my bases are 60mm wide, every Unit Width is 2 inches”. So every commander has a range of 6”.
But why do you need a radius? Well, you have two things on the action sheet; actions and tactics. Actions are used to activate units to move and charge. Tactics are used in combat, as reactions, depending if you’re the active or passive player. In that regard it is similar to SAGA, although the mechanic is implemented in a different way. You need an officer to relay your orders to the formations.
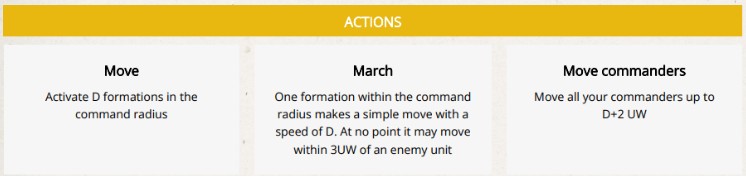 The actions on the different boards are the same regardless of nation or period Credit: Jackie Daytona
Actions are straightforward enough. At the start of your turn (in which you’re the active player, you guessed it) you roll a number of D6 depending on your general’s quality (3 or 4 are typical, 5 is Napoleon-level). A formation is a number of units grouped together. We’ll get to those in a bit.
Since D is the number on the die, that is the number of formations you get to move. Simple enough! If you have 4 formations at the start of the game you can move all 4, provided they are in command range. If they're not you can move your general around, and you'll have to put an additional die on the formation space as well. This is not an ideal use of dice! At the end of the movement phase any remaining dice are removed.
The second part of the action board are the tactics, and these are primarily used in combat. You don’t have to use an action to continue a combat, this will happen automatically, as the second thing that is different from the usual mechanics we’d expect is combat.
The actions on the different boards are the same regardless of nation or period Credit: Jackie Daytona
Actions are straightforward enough. At the start of your turn (in which you’re the active player, you guessed it) you roll a number of D6 depending on your general’s quality (3 or 4 are typical, 5 is Napoleon-level). A formation is a number of units grouped together. We’ll get to those in a bit.
Since D is the number on the die, that is the number of formations you get to move. Simple enough! If you have 4 formations at the start of the game you can move all 4, provided they are in command range. If they're not you can move your general around, and you'll have to put an additional die on the formation space as well. This is not an ideal use of dice! At the end of the movement phase any remaining dice are removed.
The second part of the action board are the tactics, and these are primarily used in combat. You don’t have to use an action to continue a combat, this will happen automatically, as the second thing that is different from the usual mechanics we’d expect is combat.
Combat
So let's look at a unit’s stats:
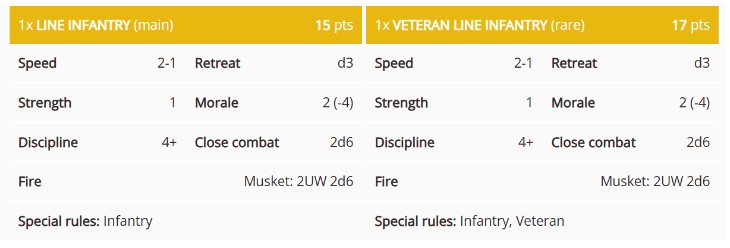 Credit: Jackie Daytona
We’ve got your bog standard line infantry from the Age of Reason period (Reason being represented by frilly lace hats here rather than common sense). They have muskets, as do the veterans next to them. They have a range of 2UW so in my book that’s 4 inches, and roll 2D6 to shoot. Every base or unit has either a close combat or ranged stat. This is important because that’s where the rank and flank comes into play.
Combat starts when you are in the engagement range of enemy troops. So the engagement range of line infantry is either base-to-base contact, or 2UW/4 inches. At the end of the action phase, if units are engaged, the active player puts a Combat Marker at the closest point between the engaged units so the most units are involved. Everything within 2UW of that combat marker is engaged. That’s your combat, and you had best put that marker in a good spot, because it will escalate. This gives the active player the chance to get their best units in for the first rounds, every engaged unit contributes to the fight.
Credit: Jackie Daytona
We’ve got your bog standard line infantry from the Age of Reason period (Reason being represented by frilly lace hats here rather than common sense). They have muskets, as do the veterans next to them. They have a range of 2UW so in my book that’s 4 inches, and roll 2D6 to shoot. Every base or unit has either a close combat or ranged stat. This is important because that’s where the rank and flank comes into play.
Combat starts when you are in the engagement range of enemy troops. So the engagement range of line infantry is either base-to-base contact, or 2UW/4 inches. At the end of the action phase, if units are engaged, the active player puts a Combat Marker at the closest point between the engaged units so the most units are involved. Everything within 2UW of that combat marker is engaged. That’s your combat, and you had best put that marker in a good spot, because it will escalate. This gives the active player the chance to get their best units in for the first rounds, every engaged unit contributes to the fight.
You'll have to get your head around that as well, there's no melee or shooting phase, it's all one big combat. Grand tactical scale baby! As the general you don't have to know the details, just make sure you have the initiative with movement and the right tactics on the board.
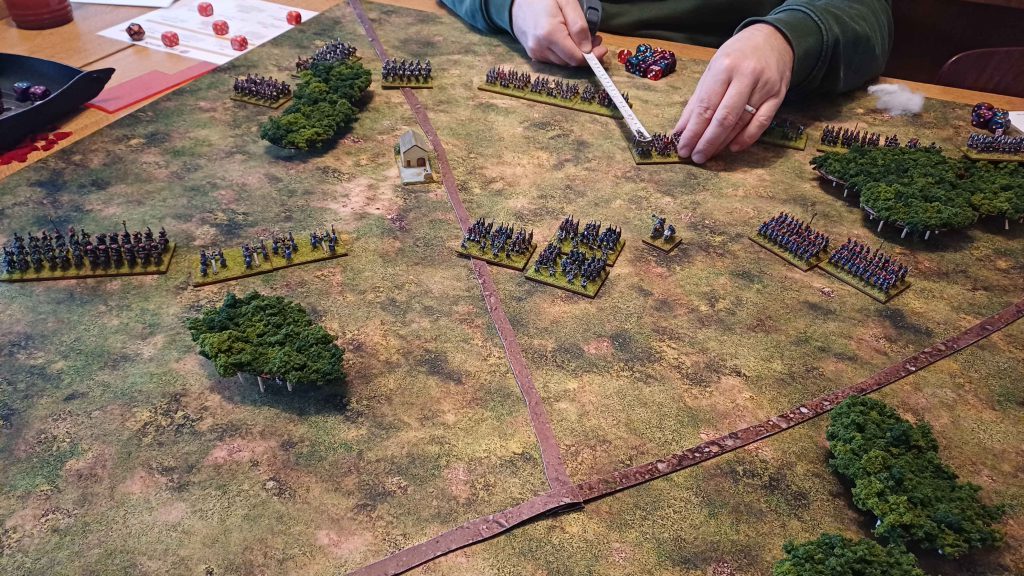
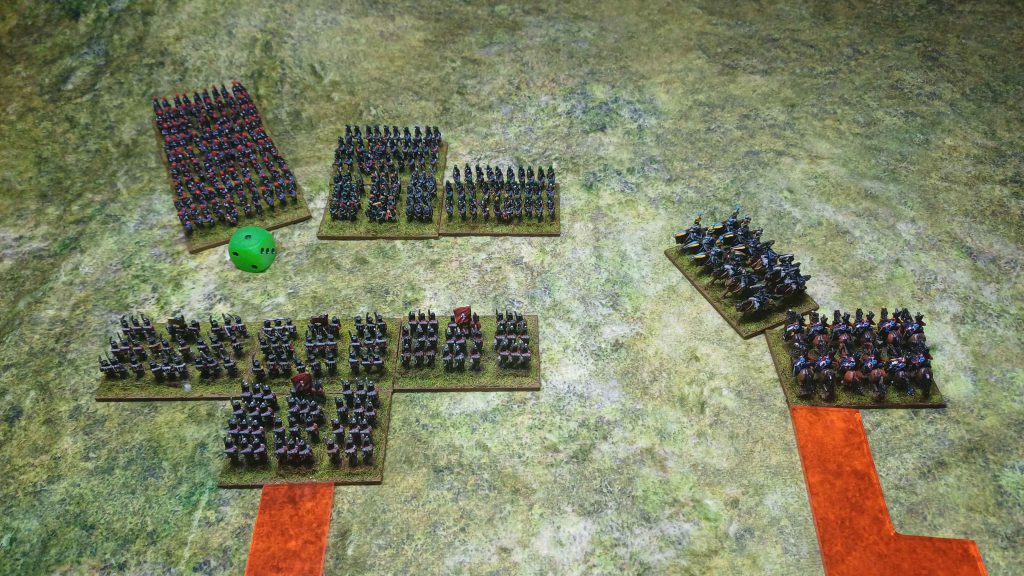 The British player (bottom) places a marker or die in this case so the most units are in range of the combat after movement. As the active player, putting the marker so the most of your own units are engaged can be key. Credit: Jackie Daytona
This is how Clouds of Smoke emulates the small skirmish that will end up deciding the battle. Every combat marker on the table has a rating. If you push your enemy out of the 2UW engagement range, and only your own units remain, you win the combat. The loser detracts their rating from their morale value. To give you an idea, in most games you’ll have 15-20 morale per side. What makes it interesting is that every time someone retreats out of the engagement zone, the rating goes up. So it starts out at one, every unit that retreats adds to it, so this can decide a whole battle! One game a marker went up to 11, so we kept pouring troops into it, because it was too late and too risky to pull out. That combat actually decided the game.
The obvious question is, why would you retreat out of the engagement zone? Well, next to the combat marker rating deducting morale points, you can save a hit by retreating. You can also chance a discipline roll, but as you can see in the examples above, that’s a 4+! Fail that roll and the entire base is destroyed, and you deduct the morale value, in this case 4 points! You can only save 1 hit by retreating by the way, so two hits per unit and things can escalate quickly.
Once an engagement is set, you have a very small window of opportunity to retreat without causing too much damage. Positioning and choosing your engagement is very very important. The next step is keeping your formations intact. Units will be pushed out of your formations, making them less effective or even break them.
The British player (bottom) places a marker or die in this case so the most units are in range of the combat after movement. As the active player, putting the marker so the most of your own units are engaged can be key. Credit: Jackie Daytona
This is how Clouds of Smoke emulates the small skirmish that will end up deciding the battle. Every combat marker on the table has a rating. If you push your enemy out of the 2UW engagement range, and only your own units remain, you win the combat. The loser detracts their rating from their morale value. To give you an idea, in most games you’ll have 15-20 morale per side. What makes it interesting is that every time someone retreats out of the engagement zone, the rating goes up. So it starts out at one, every unit that retreats adds to it, so this can decide a whole battle! One game a marker went up to 11, so we kept pouring troops into it, because it was too late and too risky to pull out. That combat actually decided the game.
The obvious question is, why would you retreat out of the engagement zone? Well, next to the combat marker rating deducting morale points, you can save a hit by retreating. You can also chance a discipline roll, but as you can see in the examples above, that’s a 4+! Fail that roll and the entire base is destroyed, and you deduct the morale value, in this case 4 points! You can only save 1 hit by retreating by the way, so two hits per unit and things can escalate quickly.
Once an engagement is set, you have a very small window of opportunity to retreat without causing too much damage. Positioning and choosing your engagement is very very important. The next step is keeping your formations intact. Units will be pushed out of your formations, making them less effective or even break them.
Stay in Line
Formations are - since I’ve used the heart already - the liver of the system. You cannot function without it. Keeping formations together and maneuvering them is what will give you victory or defeat! At the start of the game you will have to group your units in a number of formations. You can put as many units into one as you like, and since a picture says more than a thousand words:
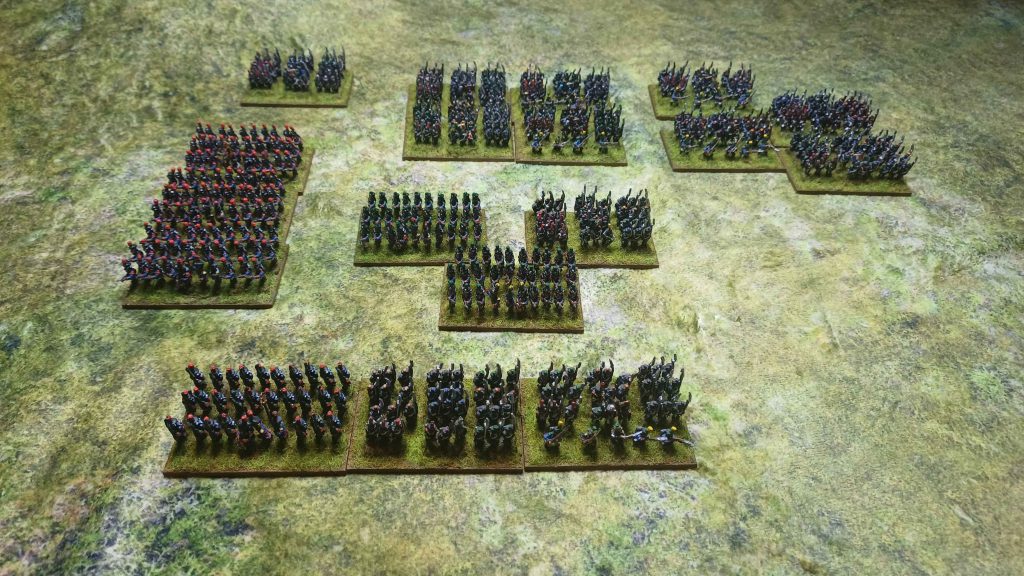 Pictured: something that has never fooled an editor. Credit: Jackie Daytona
These are all lined up neatly. They can be a combination of things as well. If you want to jam some artillery and cavalry in a formation, go right ahead! There's lessons to be learned at the end of that road. If you’re observant, you’ll also see two movement rates in the profiles of our infantry units above. The first is called simple movement, the second one is difficult. A simple movement lets you turn in any direction and then move straight forward. A difficult move lets you turn at the start, and end of movement, in exchange for speed. The only way to successfully keep your formation when turning is by doing difficult movement, as you move individual units independently of each other. This is a very easy way to represent the logistics of rank and flank on the field. Going in a straight line is simple, but as soon as you want to try something more fancy it’ll go more sluggish. It gives the right gravitas to maneuvering, and getting flanked can be devastating.
Pictured: something that has never fooled an editor. Credit: Jackie Daytona
These are all lined up neatly. They can be a combination of things as well. If you want to jam some artillery and cavalry in a formation, go right ahead! There's lessons to be learned at the end of that road. If you’re observant, you’ll also see two movement rates in the profiles of our infantry units above. The first is called simple movement, the second one is difficult. A simple movement lets you turn in any direction and then move straight forward. A difficult move lets you turn at the start, and end of movement, in exchange for speed. The only way to successfully keep your formation when turning is by doing difficult movement, as you move individual units independently of each other. This is a very easy way to represent the logistics of rank and flank on the field. Going in a straight line is simple, but as soon as you want to try something more fancy it’ll go more sluggish. It gives the right gravitas to maneuvering, and getting flanked can be devastating.
 Plans within plans, probably Credit: Jackie Daytona
Looking at the action board you’ll see that all movement is done by formations. Having individual units hanging around will quickly eat up your dice. So you need to move in formations to get the most of the movement, thereby getting the most troops in engagement range, so you can use the tactics board to its utmost effect.
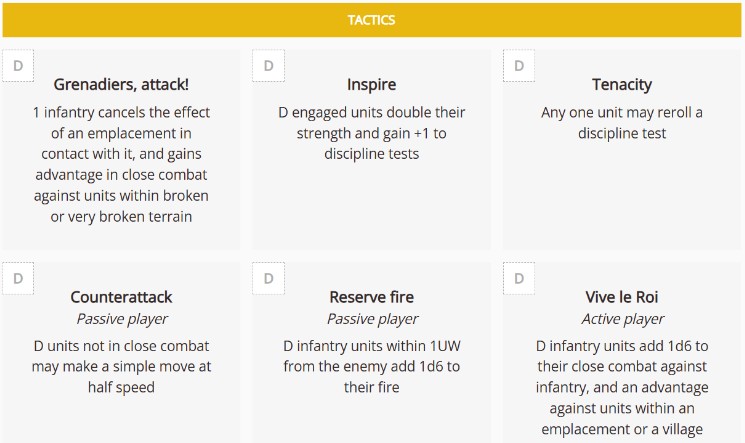
Let’s take a more in-depth look at the tactics you’ll be using in combat. This is very reminiscent of SAGA. You can only put 1 die per tactic, as opposed to multiple on the actions. On the other hand, tactics dice are set until you use them. So if you’re rolling hot and have a bunch of sixes, you may want to lock in some useful abilities as early as you can.
Plans within plans, probably Credit: Jackie Daytona
Looking at the action board you’ll see that all movement is done by formations. Having individual units hanging around will quickly eat up your dice. So you need to move in formations to get the most of the movement, thereby getting the most troops in engagement range, so you can use the tactics board to its utmost effect.
Let’s take a more in-depth look at the tactics you’ll be using in combat. This is very reminiscent of SAGA. You can only put 1 die per tactic, as opposed to multiple on the actions. On the other hand, tactics dice are set until you use them. So if you’re rolling hot and have a bunch of sixes, you may want to lock in some useful abilities as early as you can.
 Credit: Jackie Daytona
This’ll be the first point of friction every turn: go for optimal movement, or stack the board for engagements? You can certainly do combat without any dice on your tactics. But you will struggle if your opponent has planned something. Once a combat starts, it doesn't stop and you'll have to take this into account!
I want to point out that these boards are specific to a nation and time period. They are not identical. So an Age of Reason board like above will be different from an Age of Empires one. Vive l’Empereur instead of le Roi indeed! This also makes sense in that you won’t be able to form a square against cavalry attacks in this period. It plays differently and to get the most out of your tactics you’ll have to adapt accordingly. I absolutely love this, as it’s so subtle and you do away with a whole bunch of special rules or books. That’s not to say that there aren’t specific rules for certain types of troops of course. Light cavalry can retreat from an engagement without adding points to the engagement number. So they can perfectly harass or protect a vulnerable flank. Lancers can be devastating to a lone unit caught out of formation.
Credit: Jackie Daytona
This’ll be the first point of friction every turn: go for optimal movement, or stack the board for engagements? You can certainly do combat without any dice on your tactics. But you will struggle if your opponent has planned something. Once a combat starts, it doesn't stop and you'll have to take this into account!
I want to point out that these boards are specific to a nation and time period. They are not identical. So an Age of Reason board like above will be different from an Age of Empires one. Vive l’Empereur instead of le Roi indeed! This also makes sense in that you won’t be able to form a square against cavalry attacks in this period. It plays differently and to get the most out of your tactics you’ll have to adapt accordingly. I absolutely love this, as it’s so subtle and you do away with a whole bunch of special rules or books. That’s not to say that there aren’t specific rules for certain types of troops of course. Light cavalry can retreat from an engagement without adding points to the engagement number. So they can perfectly harass or protect a vulnerable flank. Lancers can be devastating to a lone unit caught out of formation.
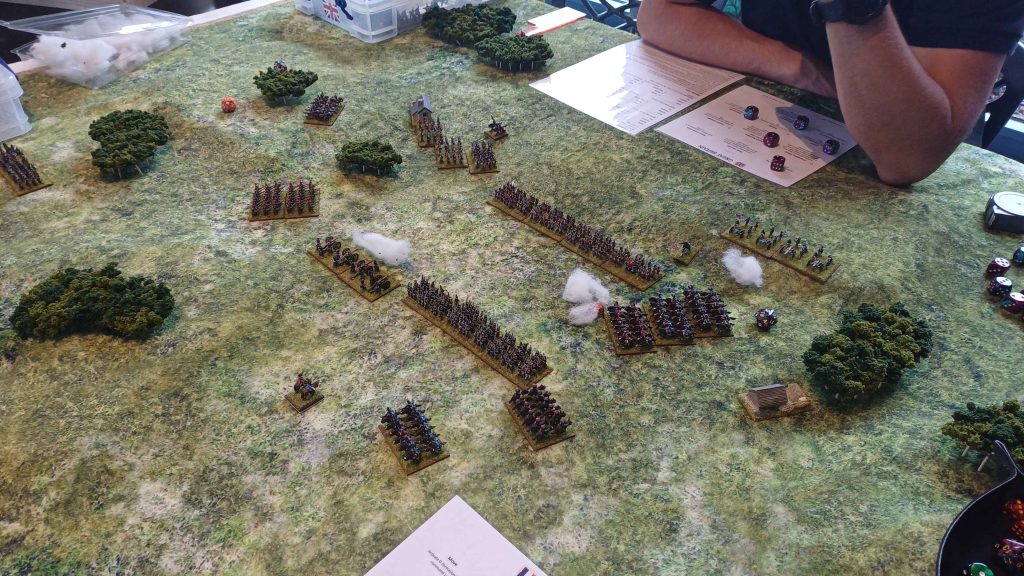 Why wouldn't you add little puffs of smoke Credit: Jackie Daytona
Most importantly: all elements neatly support each other. Like Altar of Freedom I unleashed this ruleset on unsuspecting gamers who weren’t really familiar with the period nor rules. Some even played warhammers with numbers or variants thereof, bless them. And every single one grasped the rules and really liked them, after a single turn.
Unfortunately, as we all know as Adult People, nothing is free and there’s always a downside. This ruleset has few though. As the author is Russian, and it’s a niche within a niche ruleset, you’ll have a hard time finding a community or forum to ask questions. It is hard to find any content outside of the site even. There might be a facebook group if you’re into that, but all I’ve found are vape shops.
You’ll have some questions for outliers or ambiguities which are inevitable in a translated ruleset. That can be tough, but not terrible, as historical precedent can help you find a solution. Also apply some of that common sense and don’t charge cavalry. This is also a living ruleset, at version 1.7. The FAQ included will take care of most stuff and will probably be addressed at some point.
Why wouldn't you add little puffs of smoke Credit: Jackie Daytona
Most importantly: all elements neatly support each other. Like Altar of Freedom I unleashed this ruleset on unsuspecting gamers who weren’t really familiar with the period nor rules. Some even played warhammers with numbers or variants thereof, bless them. And every single one grasped the rules and really liked them, after a single turn.
Unfortunately, as we all know as Adult People, nothing is free and there’s always a downside. This ruleset has few though. As the author is Russian, and it’s a niche within a niche ruleset, you’ll have a hard time finding a community or forum to ask questions. It is hard to find any content outside of the site even. There might be a facebook group if you’re into that, but all I’ve found are vape shops.
You’ll have some questions for outliers or ambiguities which are inevitable in a translated ruleset. That can be tough, but not terrible, as historical precedent can help you find a solution. Also apply some of that common sense and don’t charge cavalry. This is also a living ruleset, at version 1.7. The FAQ included will take care of most stuff and will probably be addressed at some point.
 Credit: Jackie Daytona
That being said, I have read worse rulesets from professional rules writers. Let’s not forget this is all completely free. This very much feels like a labour of love. The production value is high, it's all well laid-out. Examples of play are clear and there are echoes of the SAGA ruleset with guides who either explain game or technical concepts. You get a couple of scenarios for each period with order of battle, and optional cards to randomize set up and objectives for pick-up games. There's an army builder, and complete army lists for all major nations for every period. You can finetune your army by adding assets, which are specific and can have a big influence, for a cost. This is a complete package.
Credit: Jackie Daytona
That being said, I have read worse rulesets from professional rules writers. Let’s not forget this is all completely free. This very much feels like a labour of love. The production value is high, it's all well laid-out. Examples of play are clear and there are echoes of the SAGA ruleset with guides who either explain game or technical concepts. You get a couple of scenarios for each period with order of battle, and optional cards to randomize set up and objectives for pick-up games. There's an army builder, and complete army lists for all major nations for every period. You can finetune your army by adding assets, which are specific and can have a big influence, for a cost. This is a complete package.
Final Thoughts
The author’s goals of having a grand tactical scale game which can be played in 2-3 hours completely aligns with my own expectations of a game at the moment. Like Bilbo wanted to see mountains again, I want to play battles with armies. At a certain point the typical 28mm battles on a 6x4 feel like big skirmishes, and don’t really scratch that itch anymore. With this ruleset there’s a wonderful opportunity to try out smaller scales for free, with scraps of paper or by printing off some of these top down paper miniatures by Junior General.
The different mechanics click together wonderfully. Every turn you'll have to carefully plan out what you want to achieve. This is a simple game, but not an easy one.
You'll need to make tough choices, and it'll probably take a couple of games to really master the tactis of a nation. But you won't feel cheated by special rules or tactics. The boards are open, the battlefield in front of you. All the information is available and you'll have to use strategy and timing to win.
For the cost of a couple A4 pages, you have a complete historical game that gives a very good reflection of battles and tactics of the respective periods, and doesn’t ask you to invest months of painting even when you use 6 or 10mm miniatures. This is as accessible as wargaming can get people, so give it a try.
Have any questions or feedback? Drop us a note in the comments below or email us at contact@goonhammer.com. Want articles like this linked in your inbox every Monday morning? Sign up for our newsletter. And don’t forget that you can support us on Patreon for backer rewards like early video content, Administratum access, an ad-free experience on our website and more.
Thank you for being a friend.

 Goonhammer Hobby Round-Up: March 2026
 Goonhammer Reviews: Tribal Conquest
 Conquest: Weaver Courts Gemred Knights and Scaile Dancers Model Review