As the struggle for the 500 Worlds hots up, Necrons receive three new Detachments that provide new ways to strike terror into the heart of mortals. This guide covers the Pantheon of Woe Detachment.
Look, you know me - I love a C’tan. Always have. Always will, and I’ve frequently tried to make C’tan spam armies work in the past. It’s a happy new year to me from Games Workshop, therefore, because today the Pantheon of Woe is unleashed, bringing proper rules support for this plan. Let’s find out whether it’s got the Star God juice.
We’d like to thank Games Workshop for providing us with a preview copy of these rules for Review purposes. Please note that any of these rules are subject to change until the App and WarCom update with the full details.
Also, it’s worth being aware that in yesterday’s WarCom article covering the upgraded Nightbringer Datasheet, they announced that the rest of the C’tan are getting similar changes to the Nightbringer, so bear that in mind when considering what this Detachment offers!
Detachment Overview
Unsurprisingly, the Pantheon of Woe wants you to unleash a bunch of C’tan, and back them up with a few supporting tools to benefit from the horrors they unleash on the foe. In this Detachment, rather than Enhancements, your C’tan cost a few extra points to pick up some powerful new abilities, making them even more terrifying to handle. They also hit harder than ever thanks to the Detachment rule, and anything near them will have a bad time. Your biggest challenge here is going to be working out how to balance C’tan and other units in your army - you probably want to spend at least half your points on three Star Gods, but can you spring for a fourth, or do you need to invest in other toys after that?
The Video Version
If you'd rather watch this review than read it, or if you'd like a quick primer before you dive in, we've got you covered here.
Detachment Rule: Cosmic Distortion
Necron Monsters have a 6” aura that applies the “Unravelling” status effect on enemies within it. While a foe is unravelling, improve the AP of all attacks against them by 1. In addition to this:
Many Stratagems in this Detachment have boosted effect against Unravelling foes.
At the start of any phase, you can have any number of Necron Monsters in your army take three Mortal Wounds to increase the size of their aura to 9” for the phase. Obviously their Feel No Pain applies, and this is especially relevant with Transcendent C’tan in this Detachment, who get access to 6” Deep Strike/Teleport.
Boosting AP is usually a very strong effect, and just the baseline impact of upping the AP of most C’tan melee by 1 is solid here. Despite my best efforts, people sometimes roll 6s to save against the Nightbringer’s big swings against 2+ save stuff, so eliminating that possibility is very nice, and the impact is even bigger on sweep attacks from Nighty and (especially) the Void Dragon. Other units can also benefit here, as long as you can push past the tension of finding the points for them. Anything high volume gets plenty out of extra AP, so Immortals, Warriors, or Triarch Praetorians (for whom this looks like a perfect Detachment) can thrive. You could also go for stuff like enmitic Heavy Lokhusts, especially if you want to try and get clever with a Transcendent, but I think the play is more likely to be all-rounder stuff that can brawl a bit.
There is an obvious downside that against anything that’s all-Invulnerable (e.g. Daemons) this does nothing, which sucks. You kind of just have to lump it, and hope your C’tan are punchy enough to get there in that case.
Finally, there is the tiny, very fringe upside that once in every 50 games, the fact that this can let you just blow up a badly wounded C’tan at the start of the phase might be clutch. There’s no limitation on having to have enough wounds left to do it, so if it’s the start of the charge phase, a C’tan has lingered on 1W on a crucial objective, and your opponent is about to bust in and flip it, just blow yourself up. Walk out. Leave. Your Feel No Pain might mess thus up, but there’s only so much you can do here. This could also come up at the start of Fight Phase if an opponent has surrounded you and is clearly planning to swing into other units - blow up and use Disharmonisation Cascade to try and take a bunch of them with you. It’ll be very funny.
C'tan Shard of the Void Dragon. Credit: Rockfish
Necrodermal Bindings
Enhancements are out, Necrodermal Bindings are in. You must take these on any C’tan you take, including buying Reletivistic Tether for every Transcendent you take.
Singularity Matrix (TBC pts): The Deceiver gets a 12” Lord of Deceit CP tax aura. This is crazy good on something with a C’tan defensive profile, and makes the Deceiver an auto-take in this Detachment. Also, they are the Lord of Deceit, that’s right!
Quantum Goad (TBC pts): The Nightbringer gets to Advance/Charge. Vrooooom. With the new 10” base move, this allows for exceptional threat projection, and once again you are very likely taking the Nightbringer every time here.
Animus Damper (TBC pts): Upgrades the Void Dragon with an extra bit of anti-Vehicle tech. At the start of the opponent’s Shooting Phase, you force one visible Vehicle to take a Leadership test. They get -1 to Hit that phase, and if they fail the test, they also get -1 to Wound. Probably the weakest of the bunch here, and the one you resent having to spend extra points on. It’s OK sometimes, but it’s dead air in the matchups where you’re already a bit weaker like Daemons or World Eaters, and the stuff that’s scariest to C’tan is often packing re-rolls that will mitigate it.
Reletavistic Tether (TBC pts): In your turn, Transcendent C’tan can arrive 6” away when either using Deep Strike or their Teleport. If using Deep Strike, they cannot then charge. Obviously the intent of this is to let you set up Cosmic Distortion by using the range boost, which is cute, but I’m reasonably sure building around that is a trap, and most builds of this will just go for the big three Epic Heroes on the basis of the higher threat (Nightbringer/Void Dragon) and the extreme power of Singularity Matrix.
The Deceiver. Credit: Wings
Stratagems
There’s a real tension at play in the Stratagems here - there are obviously some boosts for C’tan themselves, but some of the big power plays need you to be buffing something else, creating quite a list building challenge.
Disharmonisation Cascade (1CP): Deadly Demise up a dying C’tan on a 3+ instead of a 6. Obviously it’s going to suck when you pop this and it does nothing, but a well-placed C’tan explosion does so much damage that you’re still going to swing for it a lot of the time.
Molecular Erosion (1CP): In either Command Phase, once per Battle Round, you can force an unravelling enemy unit visible to a Monster to take a Battle-shock test at -1, and if they fail they take d3+1 Mortal Wounds. This continues the theme of having a chance of doing nothing, but being really good when it works. Because almost everything maxes at LD6+, this often presents a 42% chance of flipping an objective and doing some damage, and you’ll generally know if that’s something worth gambling on in a given situation. Note that this is also separate to normal Battle-shock tests, so if they’re below Half Strength, this can make them test multiple times.
Mass Transmogrification (1CP): When a C’tan destroys an unravelling unit in either the Shooting or Fight Phase, you can activate the Reanimation Protocols of a non-Monster unit within 6” of them. Fairly niche, but potentially quite good with a big Warrior unit, which I think has solid potential in this Detachment.
Entrophasic Aura Targeting (1CP): When a non-Monster Necron shoots or fights, give them re-roll 1s to Hit, and re-roll 1s to Wound as well if the target is unravelling. Obviously it is tragic but probably for the best that the C’tan themselves cannot use this, so you need to hunt for stuff that can heavily benefit. Triarch Praetorians feel like the biggest winner from this - they have high volume melee attacks that are well-pitched to benefit from the extra AP as well, and the normal thing that holds them back is poor buff support. Also solid on herohammer pieces like Ammentar and Szeras, and a big squad of particle beamer Tomb Blades doesn’t do badly either.
Chronodistortion (1CP): Fight on death on a 4+, or a 3+ if the attacking unit is unravelling. Yes you can use this on C’tan, providing yet another way to spin the roulette wheel of destruction, and it’s again extremely solid with Triarch Praetorians.
Phase Melding (1CP): Force Desperate Breakout tests on an unravelling unit that falls back, with -1 if they’re already Battle-shocked. Unusually, this does work on Monsters/Vehicles, and while tests can be re-rolled on stuff that isn’t shocked, if you bump a tank with the Deceiver this might provide yet another way to play percentages on a huge swing.
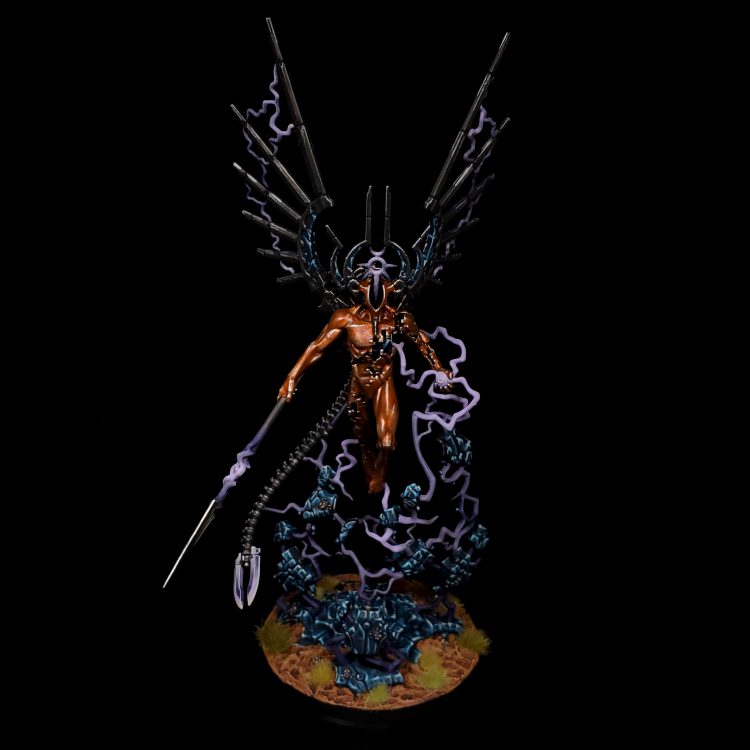
Transcendent C'tan Shard of Nyadra'zatha, the Burning One by Craig "MasterSlowPoke" Sniffen
Playing This Detachment
Obviously to some degree the answer here is “big monsters smash things”, but the more nuanced version is that you probably want some sort of central anvil around which your scary toys can operate. A big unit of Warriors seems ideal for this - they’re hard to lift at the best of times, and with the Deceiver’s aura to reduce the ability to pop murder combos on them in melee, that should only increase. That holds the centre, Nightbringer and Void Dragon pick up a flank, then roll through to finish the enemy off once done. Seems like a plan to me.
Strengths
Extremely lethal monsters, extra hard to handle thanks to the Deceiver’s aura.
Lots of ways to punish foes as they try and slog through the big threats.
Good support for units that can’t take Leaders.
Weaknesses
Needs you to spend 1000pts+ on Monsters, so lots of tension in list building.
High variance, as lots of Stratagems have a fail case.
Low unit count, so can fall apart if you lose stuff early.
A Sample List
Putting together all the thinking above, this is what I’ve come up with:
Terrible Trio - click to expand
Characters
C’tan Shard of the Nightbringer (with upgrade)
C’tan Shard of Void Dragon (with upgrade)
C’tan Shard of the Deceiver (with upgrade)
Nekrosor Ammentar
Orikan the Diviner (Warlord)
Royal Warden
Battleline
20 Necron Warriors
Other
10 Triarch Praetorians
Canoptek Crawlers
Canoptek Reanimator
5 Flayed Ones
5 Deathmarks
Lokhust Destroyer
Lokhust Destroyer
The plan is to push the Necron Warriors onto the central objective with the Deceiver lurking nearby, then use the Nightbringer, Void Dragon and Praetorians to play for a flank.
Assuming that all works out, sweep the Nightbringer onwards to victory using the alarming turn of speed it can put on here. Finally, Ammentar adds a bit of force multiplication wherever needed - his Sustained Hits aura is one of the few buffs out there that actually works on the C’tan themselves!
Final Thoughts
Smashing the enemy with big monsters is always fun, and this looks like a good suite of tools to do it with. I’ll certainly be giving it a runaround!
Have any questions or feedback? Drop us a note in the comments below or email us at contact@goonhammer.com. Want articles like this linked in your inbox every Monday morning? Sign up for our newsletter. And don’t forget that you can support us on Patreon for backer rewards like early video content, Administratum access, an ad-free experience on our website and more.


 C'tan Shard of the Void Dragon. Credit: Rockfish
 The Deceiver. Credit: Wings
 Transcendent C'tan Shard of Nyadra'zatha, the Burning One by Craig "MasterSlowPoke" Sniffen

 Goonhammer Hobby Round-Up: March 2026
 Goonhammer Reviews: Tribal Conquest
 Conquest: Weaver Courts Gemred Knights and Scaile Dancers Model Review