Hey, fellow badger enthusiasts! I've been working on getting together the components to create a nice board for some Burrows & Badgers games. Now that it's nearing completion, I'd like to share it with anyone else who might be interested doing something similar. There were a few unexpected bumps along the way, but the end result is something I'm quite happy with. I hope it can provide some inspiration for anyone who is interested in doing something similar and also show that mistakes can serve as learning and growing experiences. Don't let pursuit of perfection stop you from trying out new techniques or even doing something you're pretty sure you're bad at!
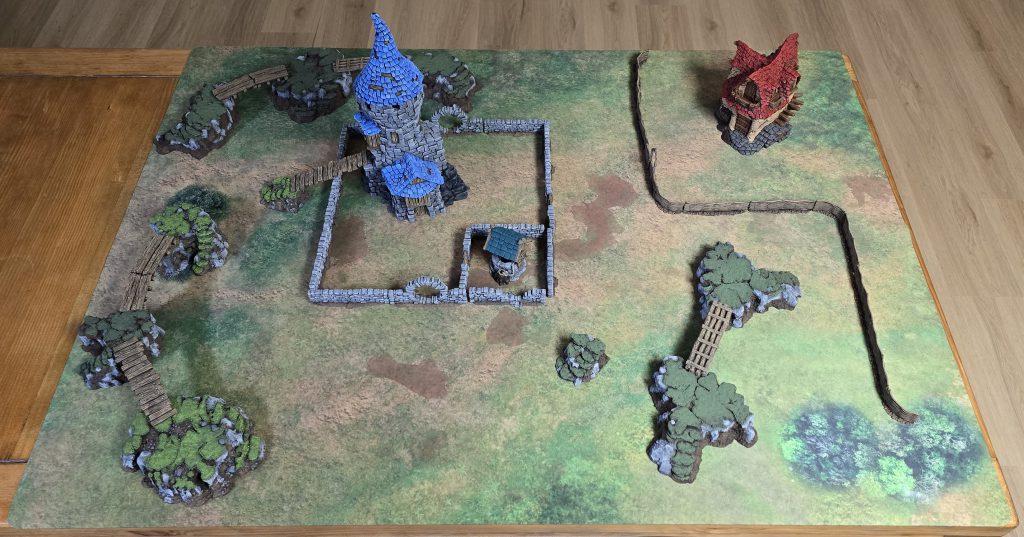 A quick layout of (most of) the terrain I have completed on the battle mat. Credit: Jake Bennington
My initial approach was pretty simple. I wanted a game mat and some basic terrain features to break it up and provide an immersive and engaging play space. Starting with the mat, I did some searching for different companies that made play mats with some decent looking grassy field type pattern. I was somewhat surprised at how many places offered the larger mats for bigger games but didn't have the smaller options that I was looking for. I spent a few days reading reviews, comparing prices, seeing how long shipping would be (I'm in the US and this was also during one of the
many periods of international shipping uncertainty that we are being plagued with). I eventually pulled the trigger on a 36" x 48" version of the Traveler's Road from
Grey Matter Gaming, pictured above and below. The day after I placed the order, I discovered that Goonhammer
had already positively reviewed it – I could have saved a lot of time if I just utilized the ultimate resource that is Goonhammer dot com! Learn from me and be sure to check this lovely site.
Once it arrived, I found that I was quite happy with the quality of the mat and the transport bag. The included thick cardboard tube to roll the mat around proved to be quite useful, as well.
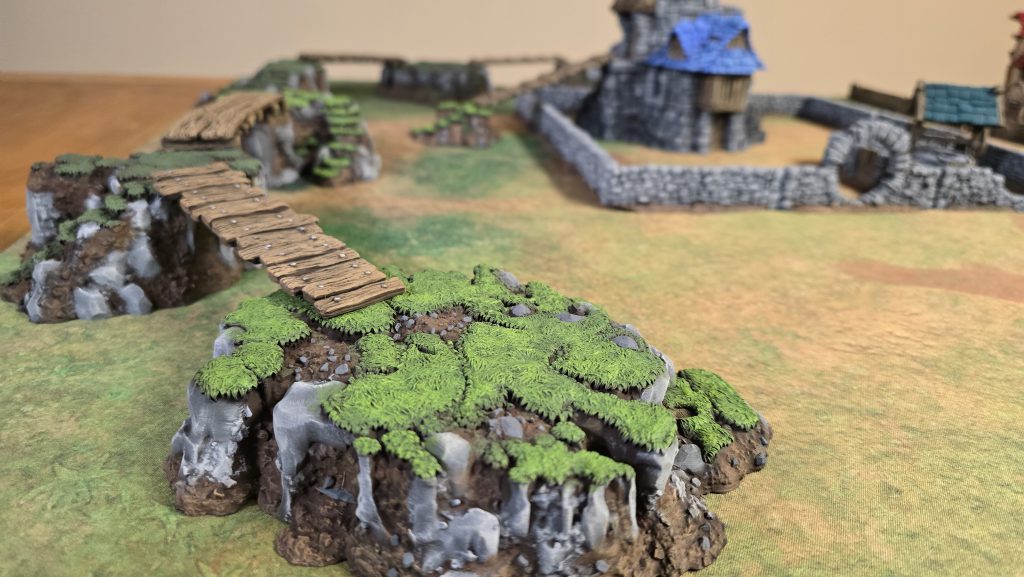 I initially printed these bridges out to go over a river. The river had an unfortunate accident, though... Credit: Jake Bennington
For terrain, I didn't have too many specifics in mind. I mostly wanted something that fit the whimsical but grounded vibe I get from looking at the art in the rulebook. Sure, there's a ferret wearing plate armor but it's
practical armor – no oversized pauldrons or eternally burning demon fires on the helmet. Given my obsession with a certain hex-based board game (shameless plug
for Goonhammer's Warhammer Underworlds coverage), it has been a few years since I played any games with terrain; my last full on wargame experience had a lot of L-shaped ruins, so this time around I wanted my table to be something substantially different from that. I started digging around for my options. There are plenty of awesome solutions for terrain out there and many of them work with the aesthetic that Burrows and Badgers has, whether you are leveraging fantasy themed or historical terrain.
The official kits from Sarissa Precision Limited look great (check out
the proof in this review!). Scratch building terrain is also a time honored hobby tradition. I know that I personally have many fond memories of flipping through the old 90s terrain building hobby books I had as a kid. I even recently built a little Hobbit house book nook for my beloved wife as a Christmas gift last year (utilizing yet another Goonhammer resource in
the handy tutorial) and had a lot of fun. However, for this particular venture, I wanted to leverage the new toy I had picked up – a 3d FDM printer. Specifically, it was a Bambu A1 mini that I got because I was fed up with the toxic annoyance of my previous resin printer. If you're curious, there's also a
2-part Goonhammer review of the A1 mini.
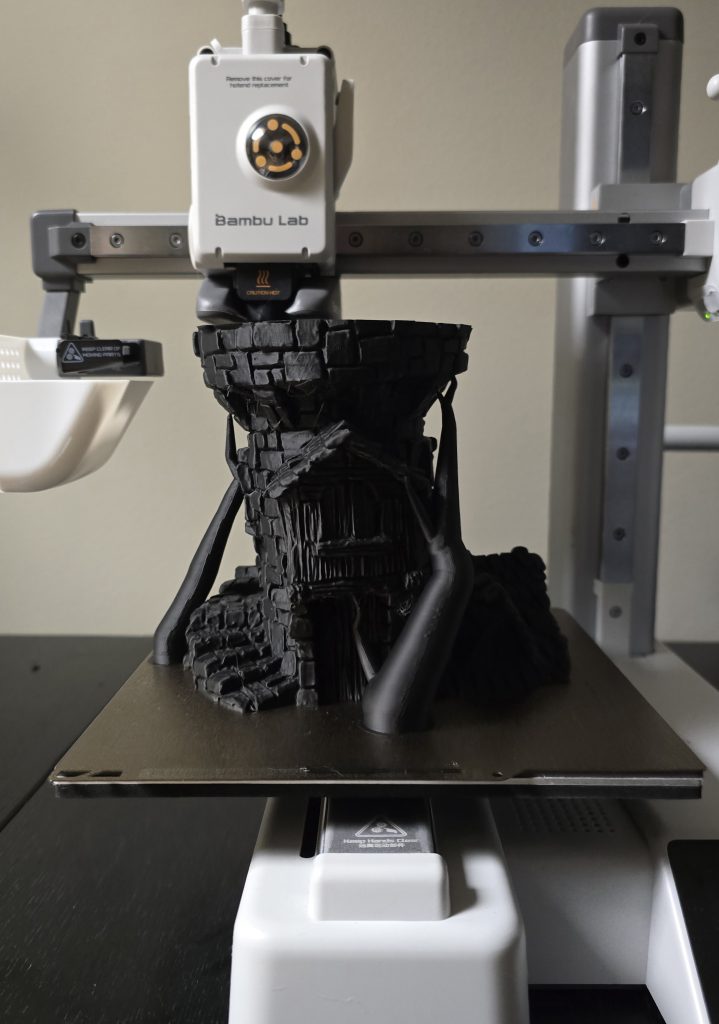 Printing off the Hagglethorn Tower on my Bambu A1 Mini. Credit: Jake Bennington
There are innumerable talented 3d sculptors out there who have files listed on various places. I spent another few days just poking around these websites, asking different hobby communities what they use, and getting annoyed at how often Pinterest results show up when doing image searches. I can't remember where I ultimately found the Hagglethorn Hollow line from Printable Scenery, but once I did I immediately fell for the charm present in the building sculpts.
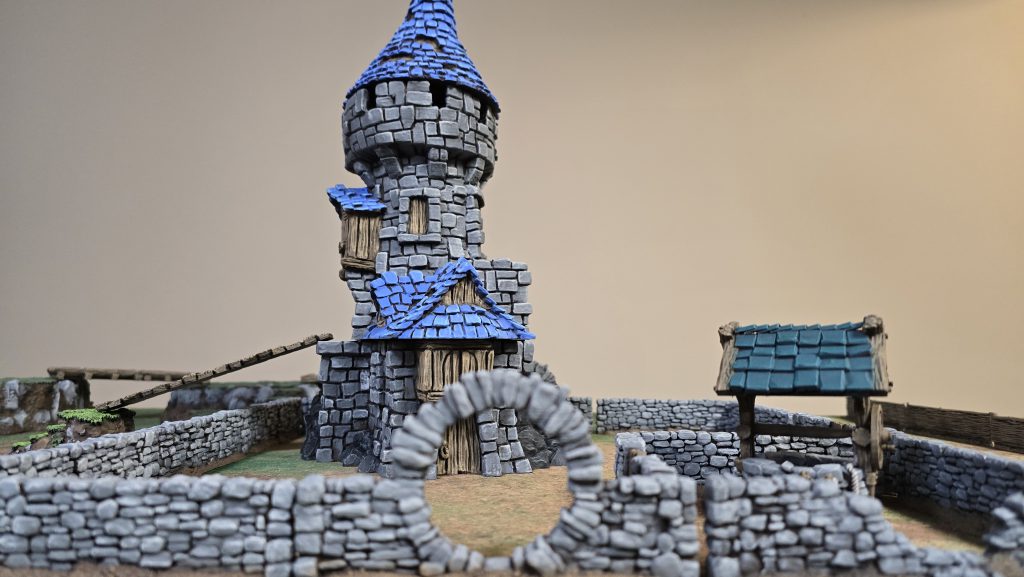 A ramshackle wizard tower looms in the distance. The roof is removable if you want to park any archers or wizards up there! Credit: Jake Bennington
After looking into them a little bit, I found out the build process was that they were first physically sculpted by Weta-Workshop sculptor Johnny Fraser-Allen before being digitally scanned. This might be one reason why I felt like it's a perfect match for Burrows & Badgers – the Oathsworn models for the game are lovingly hand sculpted by Michael Lovejoy, so having terrain that is also hand sculpted by another talented artist lends itself toward a thematically consistent board full of whimsy. There's an added bonus in that not only are there plenty of buildings, but there are fences, bridges, gardens, and other miscellaneous bits that can serve as scatter terrain from this same release. This isn't a sponsored review in any way; I just really like how they look and leaned in on them when printing out terrain.
There were a couple of hiccups I ran into while printing, but they were all 100% my fault as I got the hang of my new printer. The files for the models worked great out of the digital box. Many of the larger buildings also come pre-sliced into chunks for smaller printers like the A1 Mini, as well. That said, I stuck to printing the smaller buildings that would be able to fit comfortably on my build plate. I chose to print most of the pieces out in black filament just to ensure that if anything gets scratched or paint chips off during a game, it won't be as noticeable as if I used fluorescent orange or something equally bright.
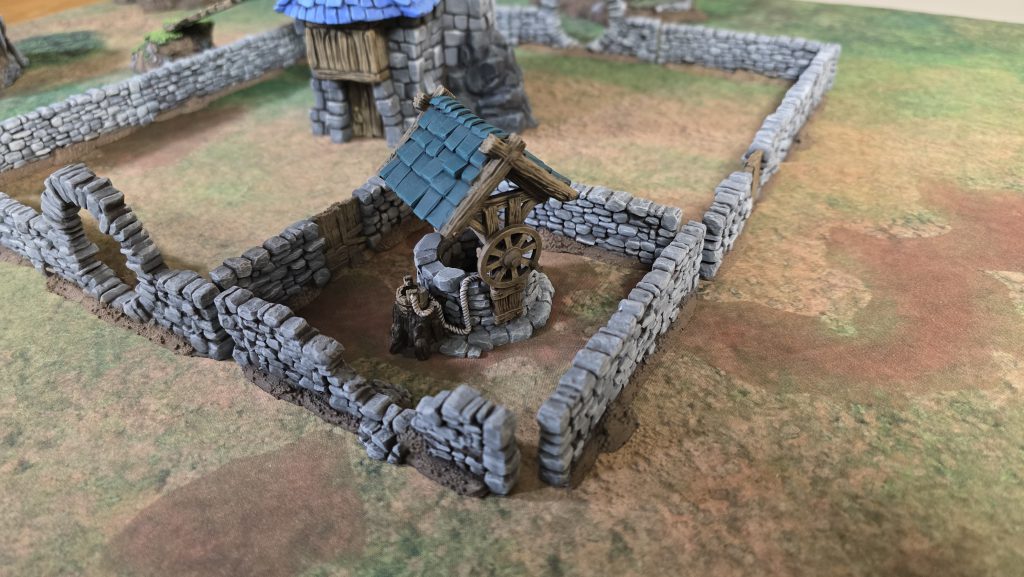 Various types of stone walls (normal, ruined, archway, and doors) along with a cute little well. Credit: Jake Bennington
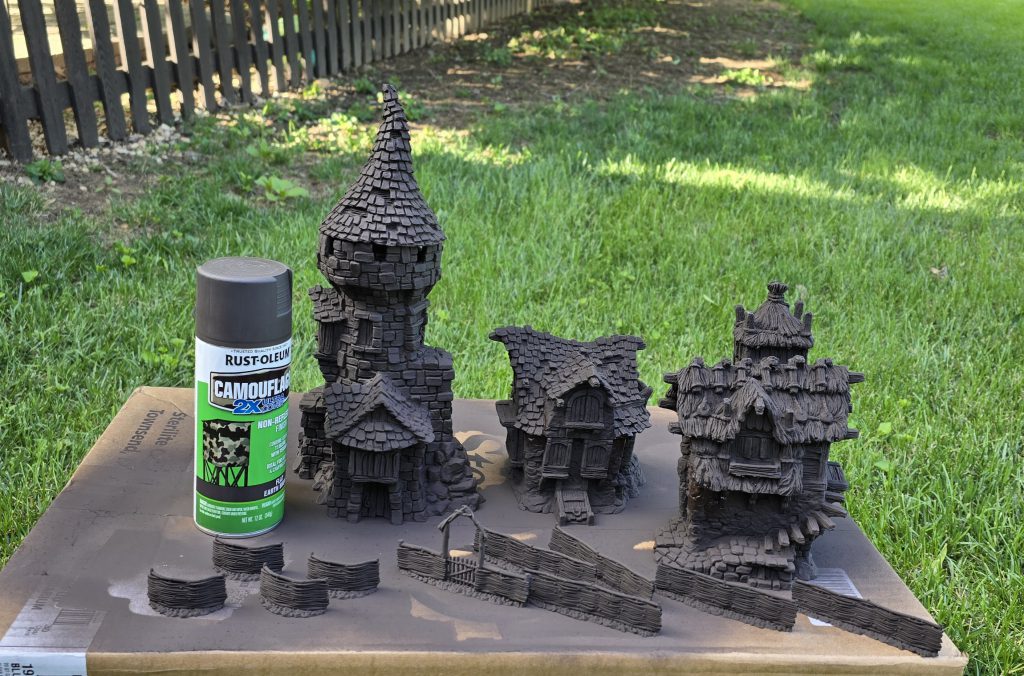
While I kicked off the print queue that would last a few weeks of off-and-on printing, I started to also prep for painting. I need to emphasize that I am
not a prolific painter. I've mentioned in previous articles that it's a miracle if I can get myself to paint a single squad size of models, let alone an entire board of terrain. I knew this would require some planning both in terms of color scheme but most importantly in making it something fast, easy, and repeatable across multiple items. I decided to lean hard on leveraging the time-honored terrain speed painting technique of dry brushing. This comes with some risks on printed terrain because the process can emphasize the layer lines, but I was pretty happy with the quality of my prints from using a smaller 0.2mm nozzle and a handy print profile that I found online. Sure, it meant that the small houses would take upwards of 2 days to print all the parts, but I wasn't really in a rush. Partly because I had no deadline and also partly because painting is a perpetually looming specter that fills me with dread and putting it off spares me for a few more days.
For anyone who has been in the miniatures hobby for a while, you've probably heard folks suggest using cheap craft paints for stuff like terrain – all those buildings and walls require a lot of paint to cover, so it makes a lot of sense to go for an economical solution. With this in mind, I made a trip down to the local craft store and picked up a few bottles of whatever brand of generic acrylic paint they had. I picked up a variety of browns for the wood, dirt, and straw; some greens to hit the grassy parts of the hills; greys for the various types of stones; and an assortment of brighter colors like red, teal, and blue to pick out spots of color like the roof tiles and doors. While I was there, I grabbed a couple of cheap brushes. No sense in needlessly beating up my fancy Artis Opus drybrush set, right? I stopped next door and picked up a can of very matte Rust-oleum Camouflage Flat Earth Brown to use as the primer for everything. I went with brown because I planned to essentially use that as the base coat for most of the colors and just drybrush successive highlights. Again, speed and ease are the name of the game.
 Taking the terrain outside to prime. Credit: Jake Bennington
Honestly, it was a miserable experience. The coverage of the paint was terrible and I was needing to do multiple coats to get anything looking even close to good. The cheap brushes I bought had some weird bristles that felt like they were made of plastic instead of (even synthetic) hair, causing the paint to just slide right off instantly. I kept with it because I had always heard this is what folks do with terrain – you use cheap paint to save money compared to the significantly higher price per volume of miniature paint and because you can't tell much of a difference in the final product.
The end result was… fine. The paint had pretty weak coverage, so I was doing multiple passes of each color which took more time than I anticipated. In an attempt to speed it up, I made the amateur mistake of going kind of heavy on some of the paints. This meant a bit of the definition of the sculpts was lost, particularly in the plaster cracks and in some of the wood grain. I attempted to salvage by trying a tool I had picked up a while ago and had yet to use – Streaking Grime from AMMO by Mig – which did help quite a bit after a generous coating and removal with some makeup sponges. This brought out the details again nicely, but did leave a surprisingly glossy finish to the house.
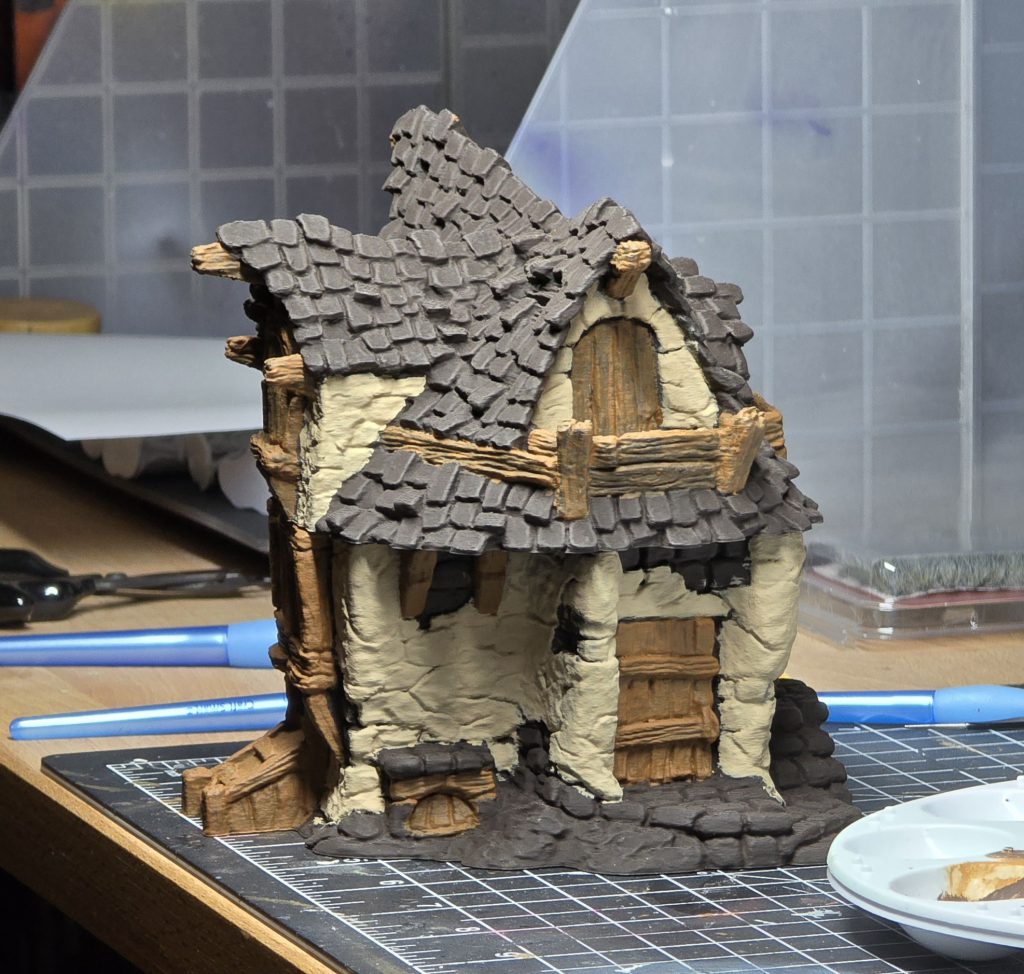 Work in progress picture of the Hagglethorn Cottage. Credit: Jake Bennington
This experiment wasn't a complete failure despite the unpleasant paints, brushes, and my time spent trying to make it all come together. The end result was acceptable and getting to finally try out streaking grime was fun. The primer was great. It had a nice brown color that I feel works as a base for all the other colors I am adding. I would say it was "rich" or "warm" or "color theory complementary to my hues" some other artsy sounding thing but I honestly don't know what those words mean so I'll just leave it at "it was a really nice brown." It did feel extremely matte with some extra texture that wasn't there before priming. I think this served double duty of disguising some of the layer lines from printing, but also gave the surfaces more tooth so subsequent drybrushing would work a bit better.
At this point I did some thinking and came to a decision. I already own more miniature paints than I'm conceivably ever going to use. Why am I trying to use subpar products to spare the bottles of paint that have been sitting on a rack for over a year? I bought them to use them, so I decided to use them. While I was at it, I wasn't going to use the cheap-ass plastic feeling brushes that I bought – it was time to grab the largest Artis Opus drybrush I had and go to town.
This experience was substantially more enjoyable. There's probably a lesson here about using quality tools. The hobby paint covered significantly better, meaning I had to do fewer coats which saved both time and paint, bringing the cost of paint per terrain bit a little more in line (I won't lie and say using Pro Acryl is cheaper than Apple Barrel or whatever, but it's probably not as bad as you think). The brushes were more predictable when using them, so I wasn't struggling with unsightly streaks. I was surprised with just how fast I was able to get through a fairly large tower – so large that I had to print it in three or four parts before assembling it.
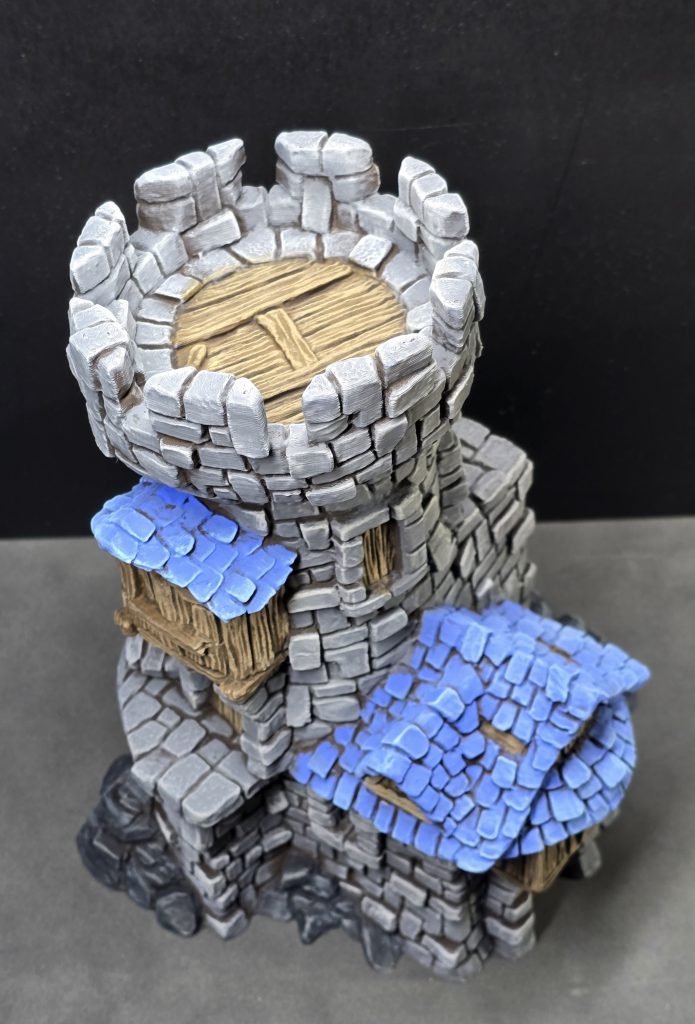 Hagglethorn Hollow terrain from Printable Scenery. Printed on my A1 Mini. Credit: Jake Bennington
The speed was solely due to the ease of drybrushing and using the Rust-oleum Camouflage Flat Earth Brown primer as my base. Each part of the terrain is just two different colors applied directly to the primer brown – the first is a fairly heavy drybrush, the second a much lighter one targeting the edges of the shapes.
Worked stone: PA Neutral Grey, PA Bright Neutral Grey
Natural stone: PA Payne's Grey, PA Bright Warm Grey
Wood: PA Dark Golden Brown, PA Caramel Brown
Roof tiles: PA Ultramarine, PA Grey Blue
[caption id="attachment_205850" align="aligncenter" width="1024"]
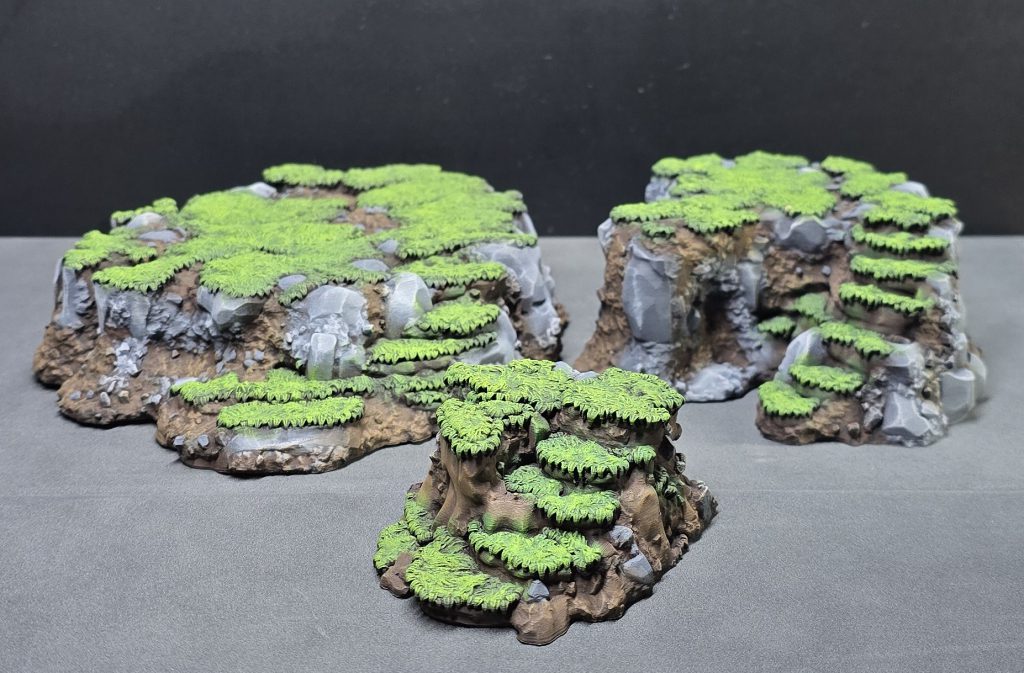
Grassy Gnolls [sic] from Printable Scenery. Printed on my A1 Mini. Credit: Jake Bennington[/caption]I'm glad I stuck with it, because after completing this piece of terrain I felt like I had momentum. It wasn't a chore now; it was fun. I did another test piece to pick out some colors for hills I had also found and after some trial and error, I settled on the following. Again, I am letting the brown primer serve as the base layer and applying a heavy and light drybrush of two colors.
Stone: PA Neutral Grey, PA Bright Neutral Grey
Grass: PA Camo Green, PA Bright Yellow Green
Dirt: PA Dark Orange Brown (yep, just one color on top of the primer here)
I was pumped. I had a plan and the end was in sight. I spent the next few weeks churning out a mass of prints, building up to another couple small buildings, half a dozen hills, and I got ambitious by printing out a whole river and a bridge crossing it. Once I had this massive backlog ready to go, I took it outside on a gloriously pleasant summer day here in Maryland and primed it all. I left it outside in the yard for an hour so the primer fumes would dissipate before bringing it back inside.
 Minutes before disaster. Credit: Jake Bennington
When I went back out to retrieve my weeks of prints, I realized something important. PLA (the material I was printing in) doesn't have a very high threshold for heat. The summer sun had blasted my terrain and the dark brown primer only served to soak in more heat. By the time I got to them, all the pieces had warped. The edges of the hills had curled up so much that they were wobbling around like awkward Weebles. The river sections had buckled and folded over like sad hot dog buns. My bridge, which I had spent time figuring out how to slice into two pieces to fit on my print bed and carefully assembled with Vallejo plastic putty to hide the seam, had ripped itself apart.
Damn. This honestly set me back a bit. An insightful reader may have noticed that this was the fault of the summer sun, but it's clearly no longer summer as you're reading this in late October. I had set this project aside after losing momentum, but after a few weeks and the continued desire to have a pretty board for once, I started it up again. More hills, more fences, a little well for the center of town… I used the magic of modern printing to convert plastic into differently shaped plastic and tried again. I even had a work trip where I brought some paint and a bag full of hills and painted them in the hotel room in the evenings.
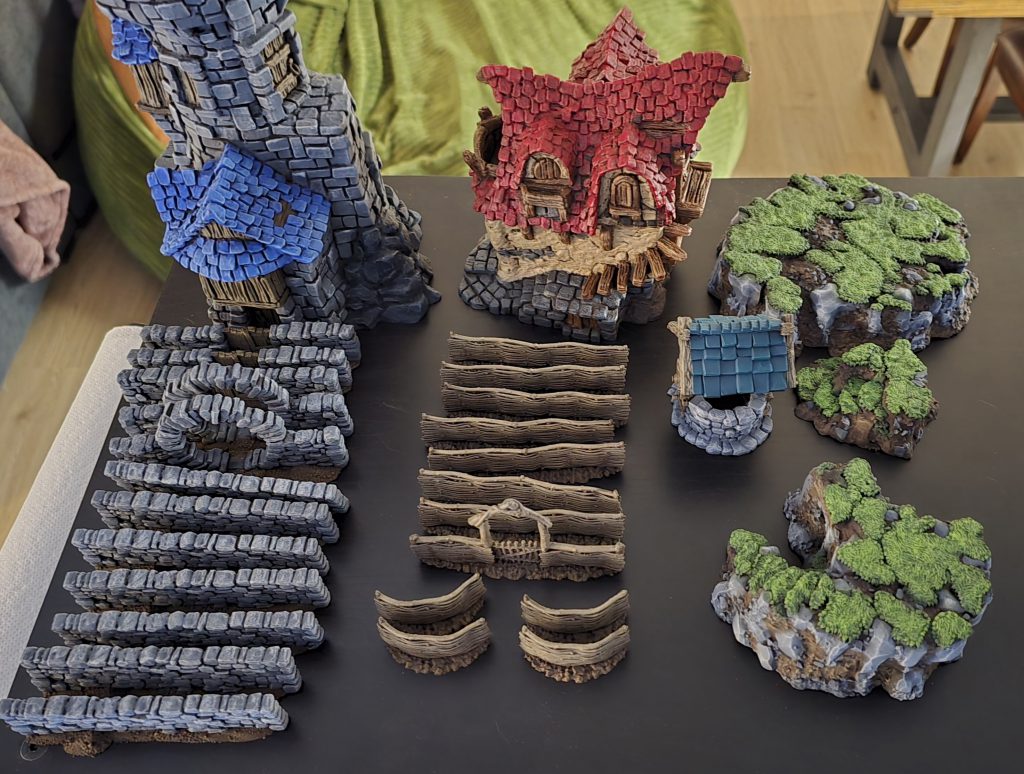 A good chunk of the finished terrain. Credit: Jake Bennington
And that's where my Burrows & Badgers board is at now. I have a completed pair of buildings, an assortment of fence and wall lengths, multiple hills, a cute little well, and some walkways/bridges that were intended to go over rivers but I guess can be used to connect various hilltops in the meantime. This is enough to start getting games in with a thematic backdrop. I definitely want to do more – I have another pair of buildings printed and primed, as well as various bits of scatter terrain picked out, and multiple sets of the Games Workshop Sylvaneth trees to do next – but I feel like this is a pretty decent starting point.
There were multiple setbacks along the way, but I feel like I've learned things. The primary one is that there's no point in being a hobby hoarder – if you have the supplies, use the damn supplies. The other is that I need to make sure I never leave this terrain in a hot car when taking it places or I will be sad. Finally, don't let perfect be the enemy of the good. Having
any painted terrain (or models) is substantially better than unpainted ones, even if they're just simply drybrushed or have an application of contrast paints. In this hobby, trying is good regardless of the outcome.
Now I just need to carry these lessons over to all the gorgeous models I've picked up from Oathsworn…
Have any questions or feedback? Drop us a note in the comments below or email us at contact@goonhammer.com. Want articles like this linked in your inbox every Monday morning? Sign up for our newsletter. And don’t forget that you can support us on Patreon for backer rewards like early video content, Administratum access, an ad-free experience on our website, and more.Thank you for being a friend.


 Infinity N5 First Principles: Understanding the Outcomes of Face to Face Rolls
 Tactical Feedback: Timing the Go-Turn
 SRM's Roundabout to Adepticon 2026: Curd Is the Word