In this new series we’re looking at various terrain layouts for Warhammer 40,000 and exploring how they work, what you need to know about playing on them, and how you can improve your play when you play with those layouts.
Many games of Warhammer 40k are won or lost in deployment and a key part of that is terrain. In this series we’re going to look at various terrain layouts, looking at how the affect the game and how you can use them to your advantage. In this article we’ll start by looking at Layout 4 from the
Games Workshop Tournament Companion, specifically with regard to the Chapter Approved 2025-26 Missions Pack.
This is the fourth article in the series – if you missed the prior ones, you can find them here:
A Note on Terrain
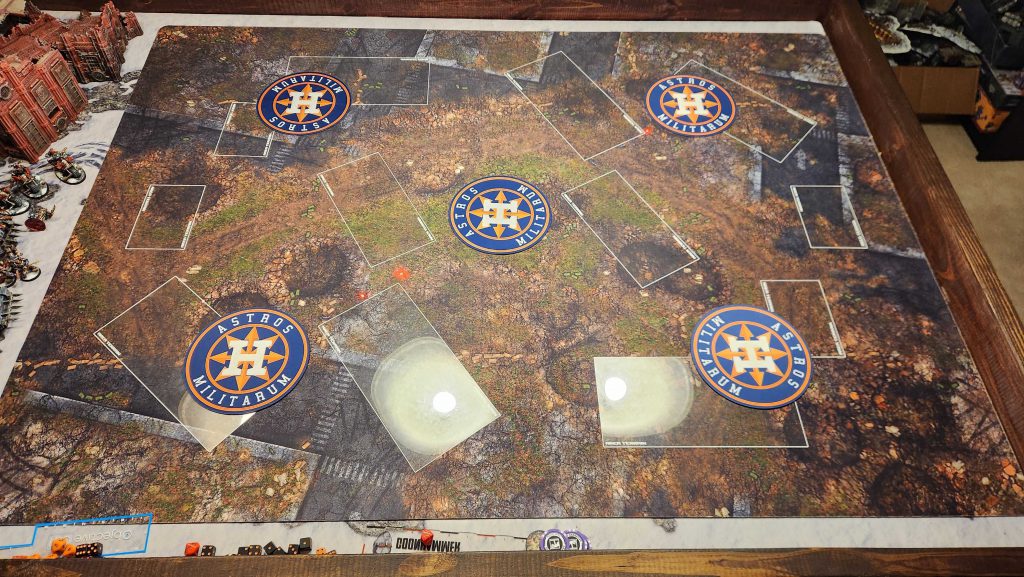
In these articles I’ll be using Games Workshop terrain but it’s worth noting that terrain will change from event to event, and the layouts shown in the Games Workshop Tournament Companion are guidelines more than hard-and-fast rules about how terrain has to actually look. Most often you’ll find that terrain features may be longer or shorter than the layouts dictate, based on what the tournament organizers have available.
With that out of the way, let’s get into the layout:
Meet Layout 4
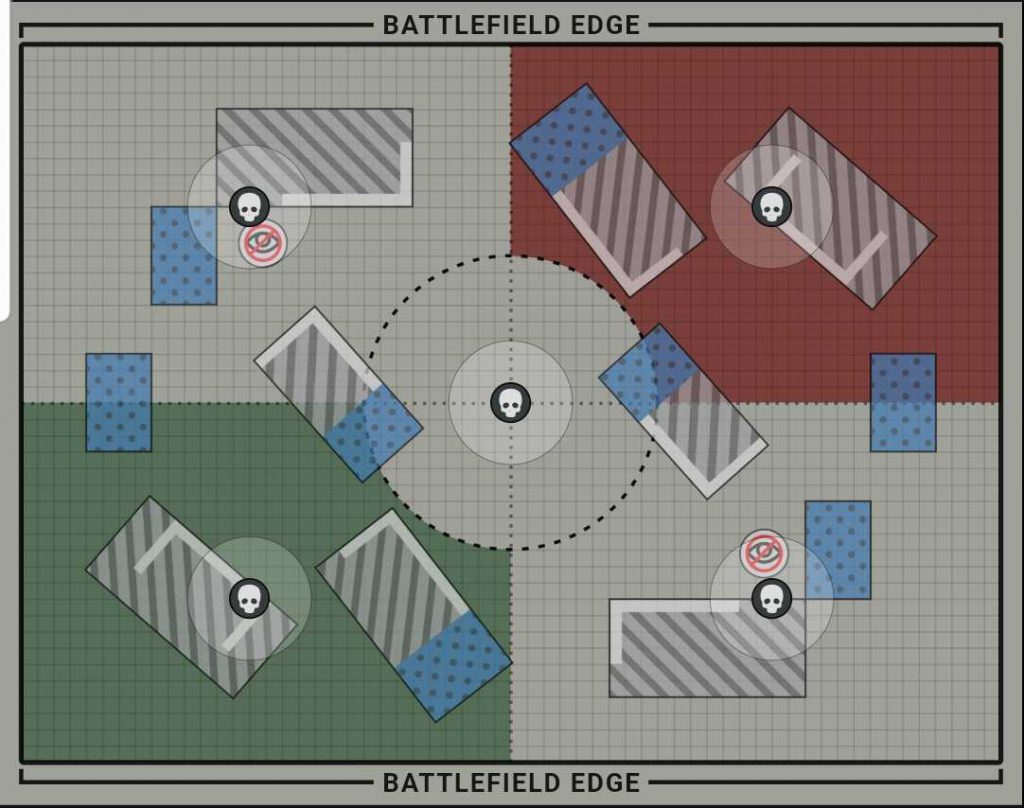
Layout 4 has a lot of diagonally-oriented ruins, but because of their placement it's a little bit easier to set up than Layout 3. It's recommended for missions using the Search and Destroy, Crucible of Battle, and Tipping Point deployments, but thanks to having board-length firing lines down the table edges it's much better suited for Search and Destroy than Crucible/Tipping Point, where it's a very open layout.
 So why don't you see it more often?
 The answer is that Layout 4 requires more left-facing L-shaped ruins than any of the other layouts, meaning that you'll need four extra terrain pieces if you want to switch between Layouts 1/2 and this - those have four "standard" right-pointing L ruins. That makes supporting this layout and Layout 1, Layout 2, or both kind of a nightmare for TOs, and even when they have the terrain, they typically have to leave extra ruins lying around on tables for players to switch between layouts. Not ideal.
This is a relatively open layout. There are some board-length sightlines down the sides of the table, but those are mitigated a bit by hiding spots along the ruins set 4" away from the long table edges. You do have a few melee staging points and deep strike zones and there are some pretty wide gaps between the terrain features. This is one of the few maps where a Defiler or Soul Grinder on a 160mm base can actually cross the table, using the gap between the E and B ruins (see below for labels), and they can also walk around the bottom of the B ruin.
Note that this will depend in part on the terrain being used - if your event is using particularly long L-shaped ruins (above and beyond what's recommended), these gaps will be shorter. They can also get messed up if you have ruins facing the wrong direction on the middle of the table, but if that happens, the gap will open up on the other side. That's fine on Crucible and Tipping Point but really bad on Search and Destroy, given where your deployment zone sits.
On that note, let's label these ruins before we go any further.
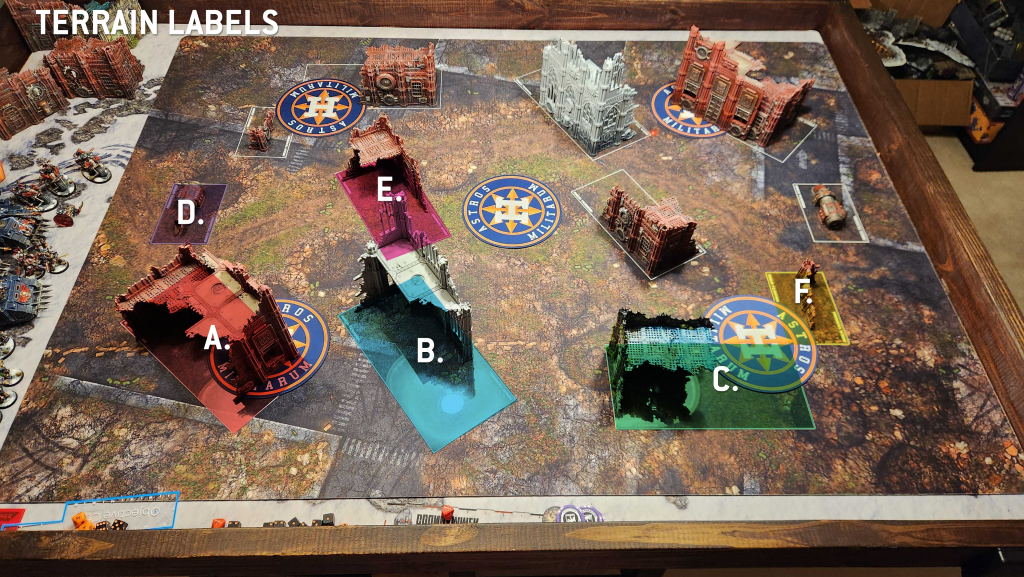
The key pieces here are:
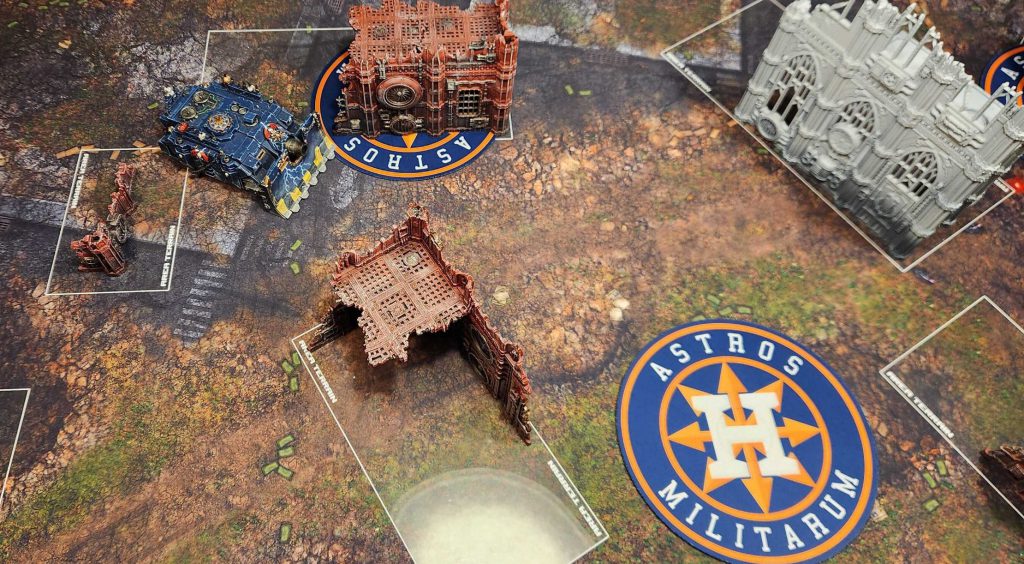
A. Your Home Corner Ruin. This features a U-shaped terrain piece and gives you an easy way to hide while holding the objective, then move out as you need. Infantry units will have an easy time moving from the A to the B ruin here and staying out of line of sight, though wider vehicles may struggle a bit with the gap between the A and B ruins. The width of it in any given game will depend heavily on the terrain being used - in most cases, you'll be able to fit a wider tank like a Rogal Dorn or Plagueburst Crawler through that gap but with some terrain and placement you may find that you can't fit more than a rhino through the gap.
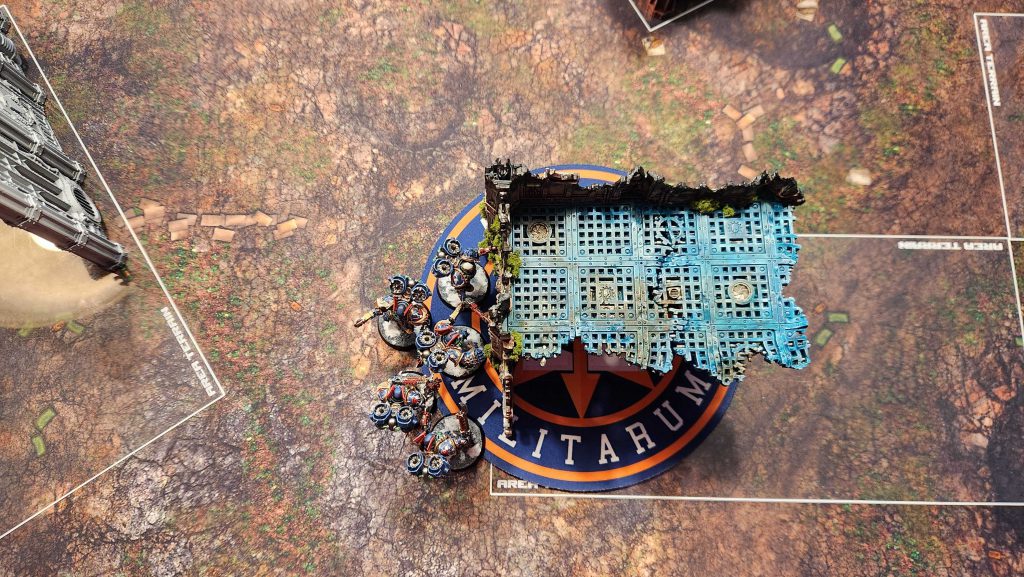
 B. Your second home corner ruin.
 There's a weird double diagonal ruin on Layout 4, part of a trio that makes up your home shield when it comes to line of sight. The ruin on B is L-shaped and acts as a solid secondary piece of cover for units moving into staging positions and for hiding vehicles that want to stay out of line of sight.
C. The large ruin parallel to the long table side. This features an L-shaped ruin and, with the small ruin F, makes up a corner L shape that offers some extremely solid screening and protection for infiltrators and deep strikers. On Search and Destroy you can hold the objective here from almost complete safety, and on Tipping Point/Crucible you can just hide inside the ruin and hold the point.
It's also easy to put a unit on that corner to see to the middle of the table, just pushing it forward across the corner whenever you need to take a shot.
 D. The small side ruins.
 These feel pretty superfluous on this layout, and I'd honestly have preferred they be turned 90 degrees and set against the side of the table to block line of sight down the short table edge. As is, their primary value is offering some protection for deep striking units and an additional spot to deploy smaller units where an enemy unit in the B ruin cannot see you.
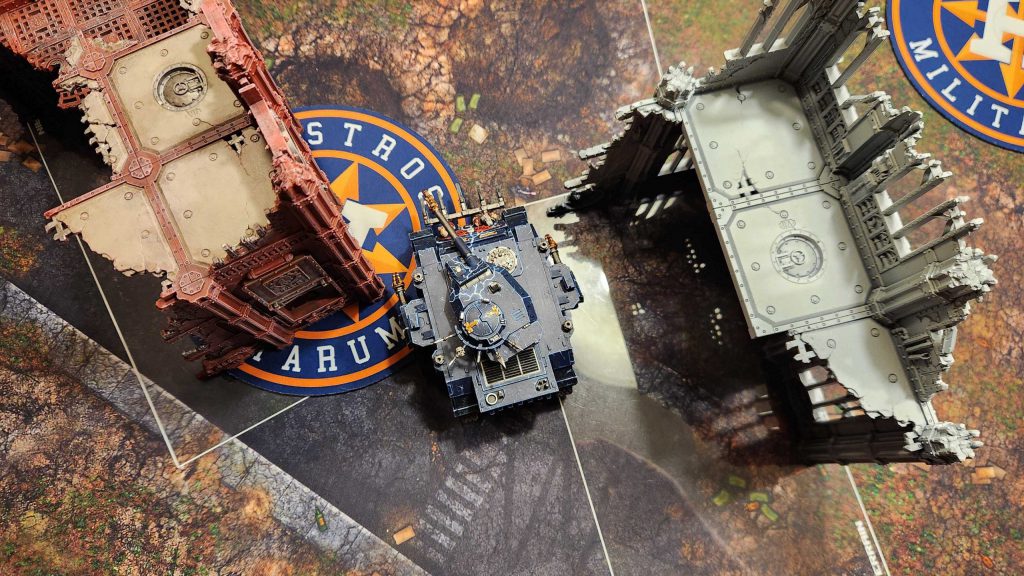
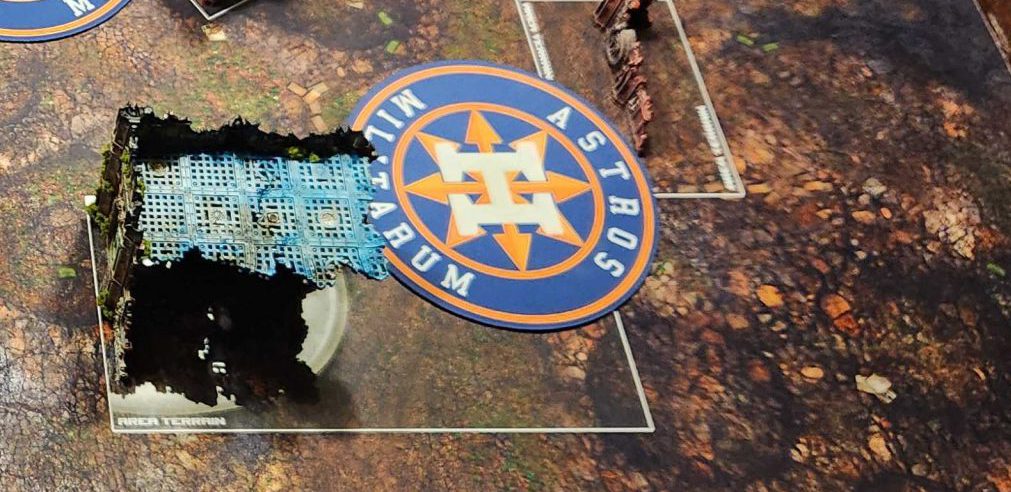
E. The middle ruin. The table's two 10"x5" ruins have been placed in the middle of the table at an angle. These act as both a great shield for line of sight on Crucible deployment and a fantastic staging area for melee units looking to either push into the center of the table or the opponent's B or C ruins - both are options.
F. The small corner ruin. This touches the C ruin at the corner to make a rough "L" shape. Note that the two pieces are counted as disconnected ruins, so being in one won't let you see or be seen through the other one. Together these create a wonderful little hiding/staging space for units and vehicles.
Objectives
Loading...
You really do not want to play this map on Sweeping Engagement or Dawn of War, where the long sightlines across the short sides of the table make it a nightmare. I think it fares a little better on Hammer and Anvil, but the clear line of sight down the middle of the table across all three objectives with nowhere to hide makes it a real tough one to recommend.
On that note, all three of the recommended deployments (Search and Destroy, Tipping Point, Crucible of Battle) offer solid hiding spots while you hold objectives that aren't the center - and Hidden Supplies will give you safer spots to hold the middle objectives.
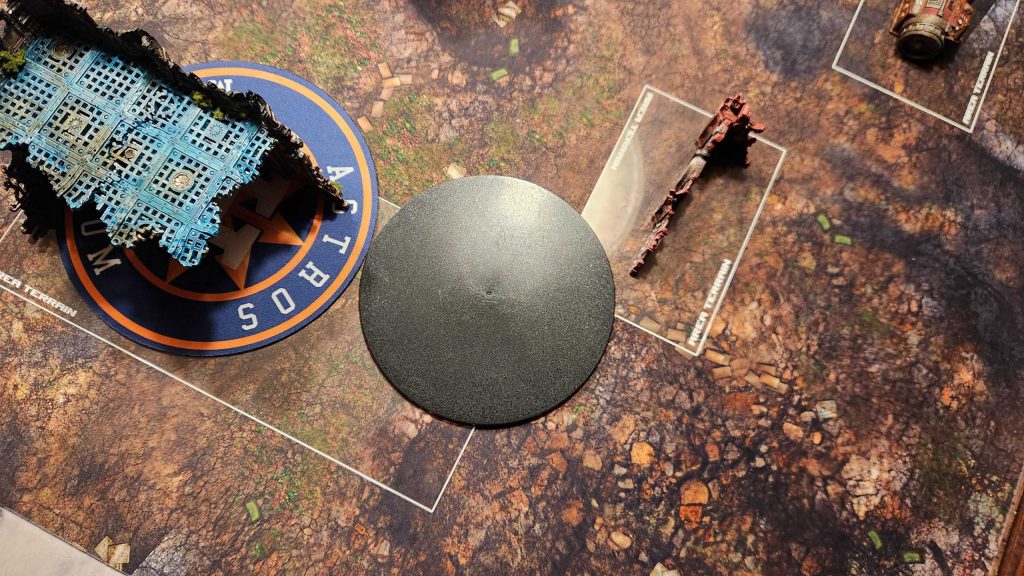
Search and Destroy in particular has a safe spot to hold the corner expansion objectives, tucked behind that corner where the two ruin pieces meet. This is large enough to hide most infantry units and smaller tanks, and doubles as a spot you can easily peek out of to gain line of sight toward the middle of the table. That C ruin also gives you a spot to hold and contest the objective from the other side of the wall on Tipping Point/Crucible deployments.
The big challenge here is that middle objective. Not only is it in the open, but if you've set up the correct ruins, you won't even be able to hide within 6" of the middle of the table, making Area Denial and Establish Locus particularly dangerous on this map. It's also easily visible from both of the other no man's land objectives so if you're standing on that objective, don't expect that to last long.
Sightlines
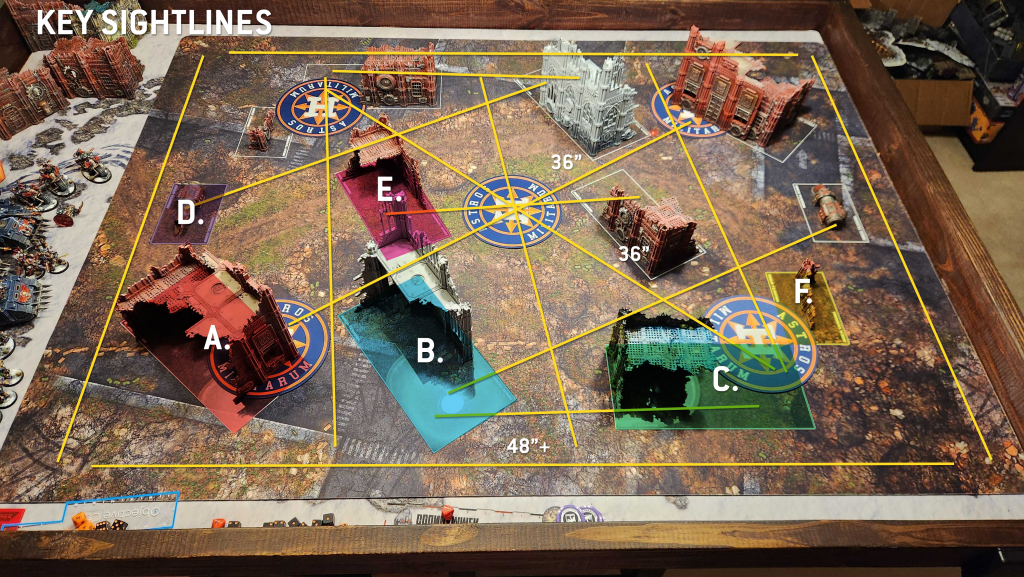
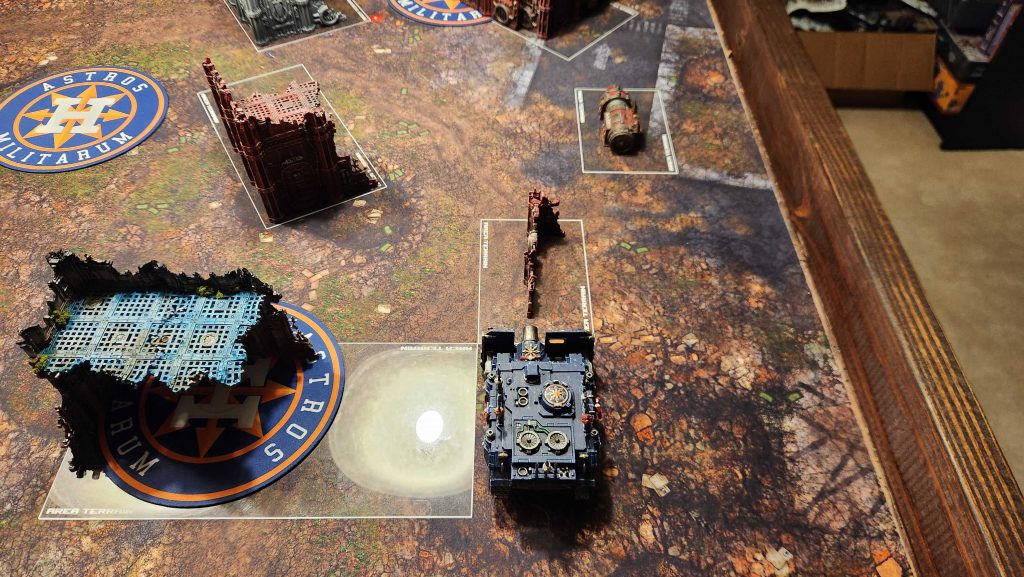
Layout 4 offers several long sightlines, but at the same time gives you ample places to hide and ways to easily avoid being in those sightlines. There are four that run the table length down each edge, plus one long sightline that runs diagonally across the player deployment zones. But again, you have hiding options for each of these. These long sightlines are largely going to require 36" range, save the two that run the length of the table. That said, it's easy for a tank with shorter range like a Vindicator to move into position behind the E ruin, then poke out and cause problems. A
TOWERING unit can straddle the gap between the E and B ruins to sit on both and see nearly everything on the table, and nearly any unit can use the corner of the C and F ruins to pull this trick off.
Because of the layout of the L-shaped ruins on terrain features B, C, and E, players on Layout 2 have to consider the sightlines into those ruins as well - it's easy on this layout for players to move into those features to get a big boost, and keeping the 2" ruin pieces in the corners means there will be more situations where vehicles are fully in cover in ruins shooting out across the table, using the B or E ruins for positioning.
Melee Staging
Layout 4 offers some great staging spots as well as the ability to move forward from one safe spot to another at the top, bottom, and middle paths along the table.
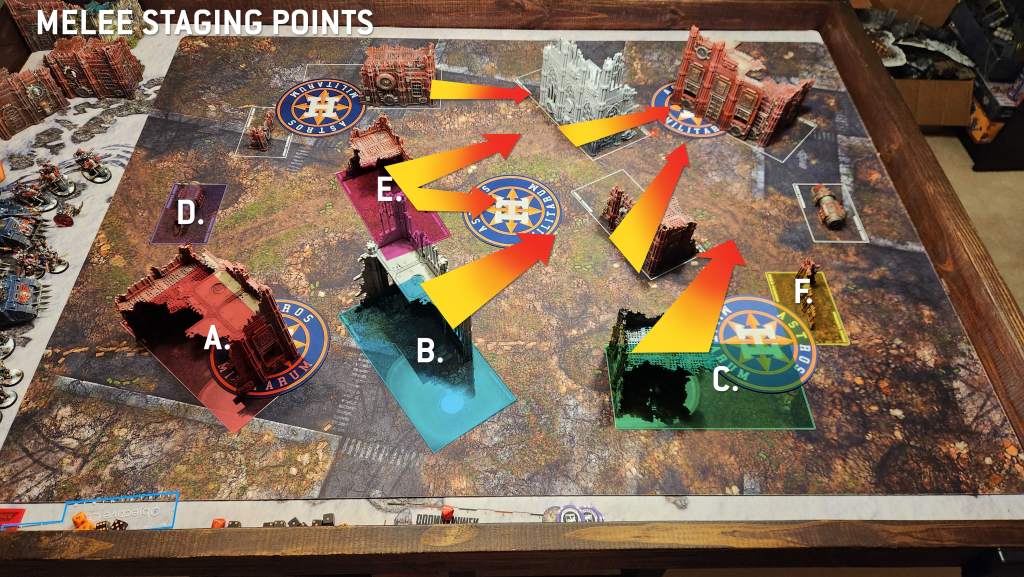
The middle ruin at E will be the most important of these, but players will frequently end up scrapping on the ruins at C on either side, and that will frequently also be where Deep Strikers and strategic reserves get involved. A faster unit can easily move from the B/E ruins to the corresponding pair on the opponent's side of the table and set up for a charge, and this will be particularly true on Search & Destroy deployment, where you can just deploy in either the E or B ruins and move up for a turn 1 charge.
Although the two middle ruins here offer line of sight protection for things behind them, they're fairly open to each other, making it nearly impossible to wall block melee units coming across the middle of the table - they can just easily go around, and the gap between those two ruins is only about 10".
Who Does Well Here?
This is a pretty balanced table, giving both shooting and melee armies plenty to work with. As long as you're not playing on one of the non-recommended deployment maps you should have a relatively easy time setting up or staging for what you want to do, and how you move across the table will depend on whether you're on Search and Destroy or Crucible/Tipping Point deployment.
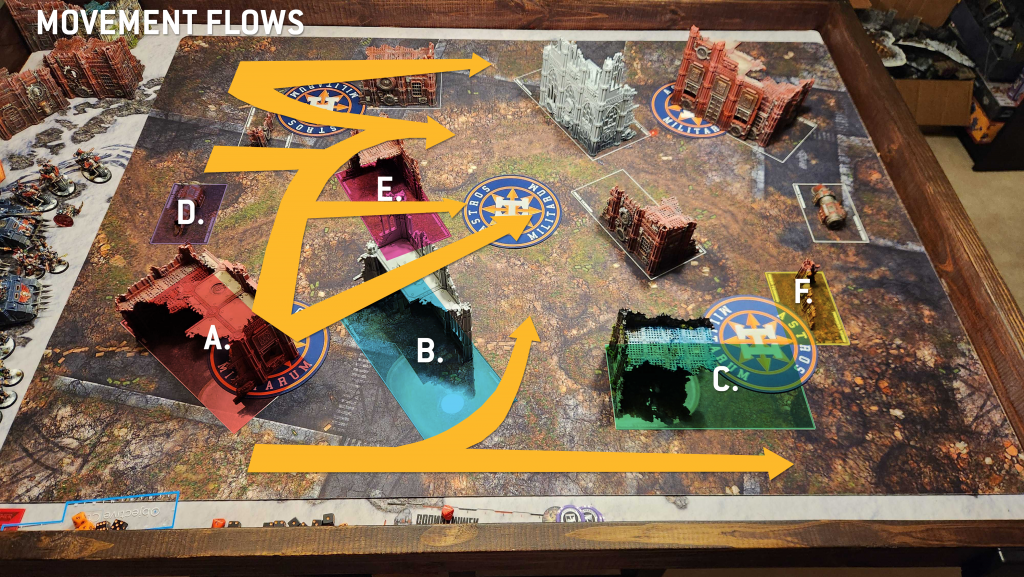
On Search and Destroy you're more likely to see armies move "north," using the cover of the E and B ruins to move up and capture their closer expansion objective with ranged or shooting units, then turning and moving to engage with an opponent. Melee units starting further up can move up on the C ruin relatively safely and so will end up taking that route or rocketing across the middle of the table.
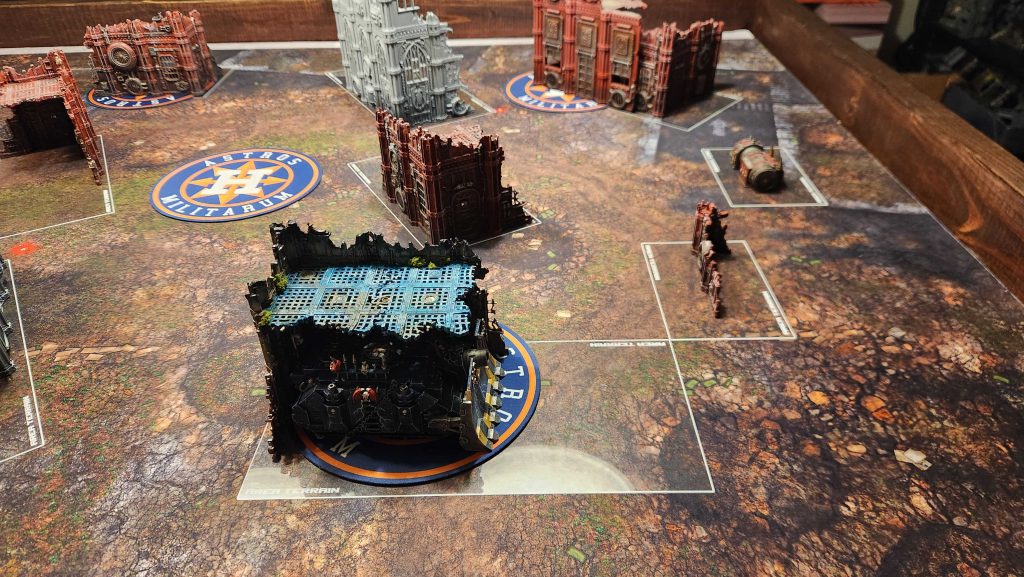
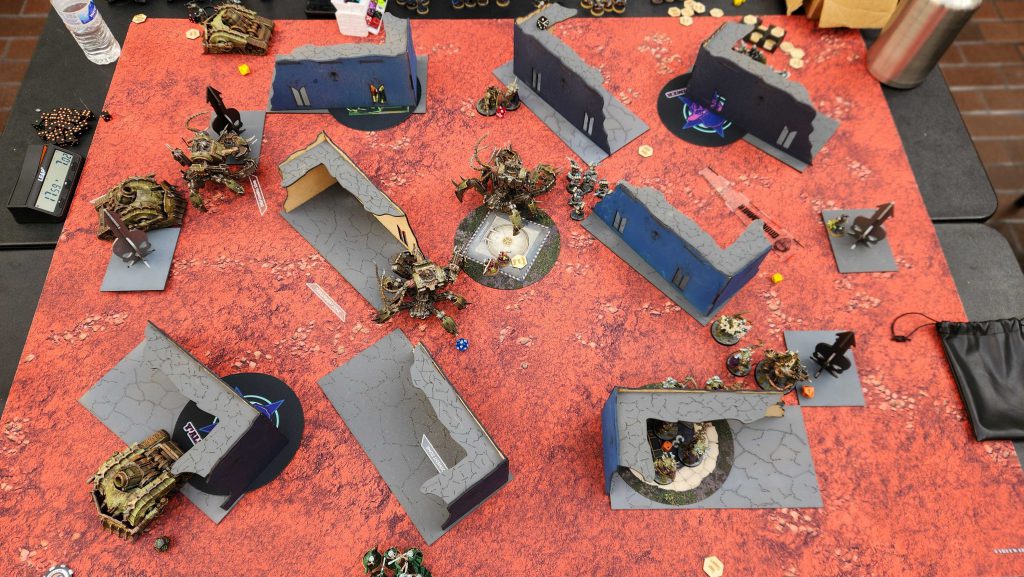 Layout 4 at Rise of the Empire - note the backwards L-shaped ruins on the B. Ruin spots. This is a fairly common variation if your event doesn't have the right ruin shapes.
This objective is much more "free" on Tipping Point/Crucible, but having easy access to that long sightline makes it much more dangerous to move down the long table edge with melee units if an opponent can just sit a tank on one end and delete you off the table. That lane tends to be "won" by the army with more range, who can sit in the C ruin while shooting anything that comes their way. On these deployments movement will be more likely to funnel through the middle of the table, between the C and E or B and E ruins.
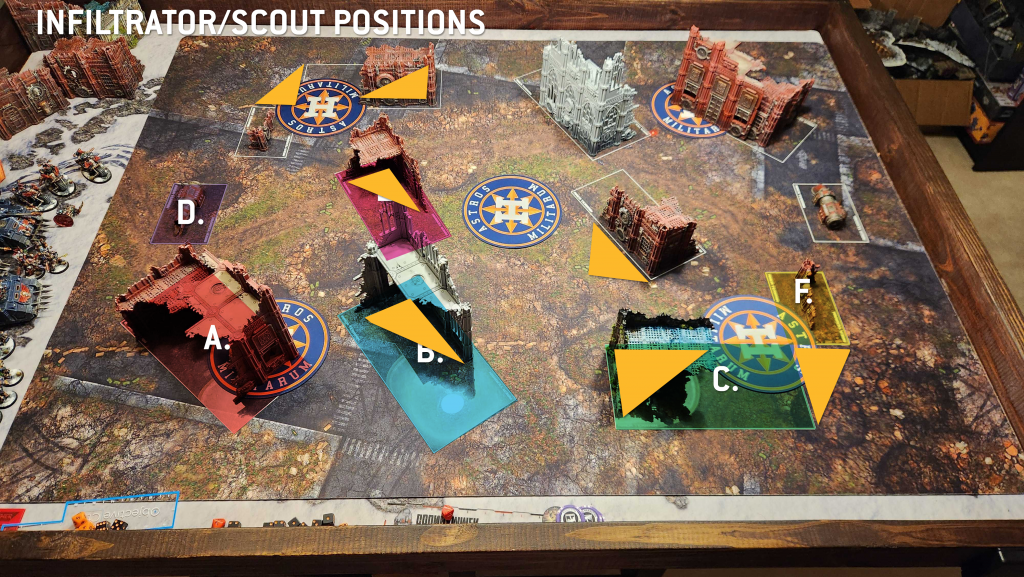
Most of those melee staging points also double as good Infiltrator/Scout spots. The corner gap between the C and F ruins is an amazing and safe space for Infiltrators to start in on Search and Destroy, and great to walk into with Scouts.
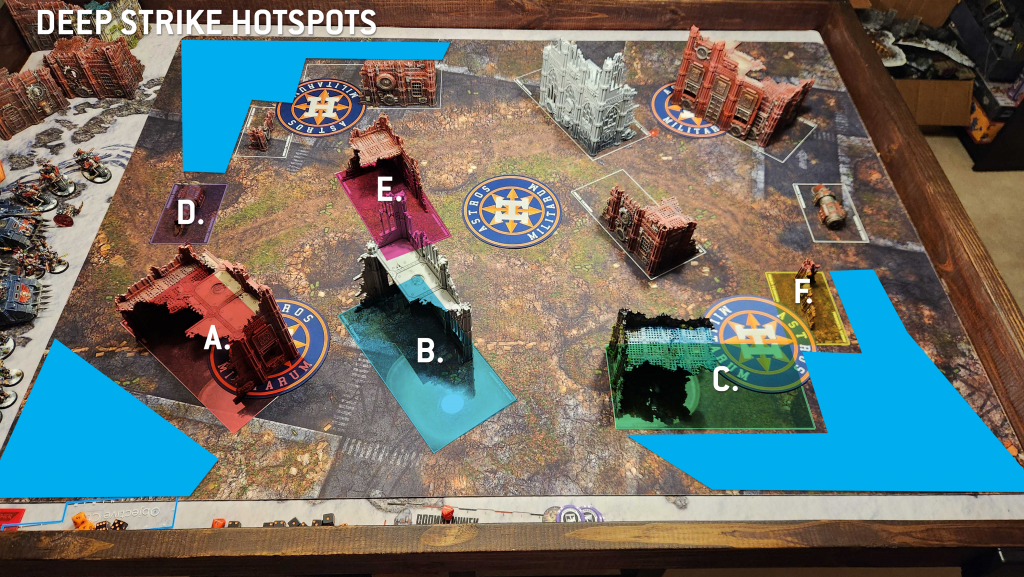
Layout 4 offers some choice deep strike spots - in addition to the usual corner play behind a player's A ruin, you've got large, relatively safe corners to drop into behind the C and F ruins. Open sightlines down the table edges hurt these a bit, but usually by the time you're bringing in your deep strikers your opponent will have moved out with those long-ranged units to try and take shots across the table. The disjointed nature of the C and F ruins works in your favor here, as a unit in the C ruin won't be able to see a unit deploying behind the F ruin, giving you a safe angle of approach.
One key thing to note: Those middle ruins are only 10" apart, and while you'll need to expose yourself a bit, it's pretty easy to be wholly within them while also screening out units from arriving on the middle objective.
Final Thoughts
Layout 4 isn't the best layout, and it can be hard to stage on. It's easily one of the ones I've played on the least. It's very similar to Layout 6 in a lot of ways, and that layout tends to see more play at GW events, in part because it gains a bit of value from putting the two additional small ruins in the middle of the table to break up those sight lines. It's still a solid layout and one I wish we'd see more of.
Have any questions or feedback? Drop us a note in the comments below or email us at contact@goonhammer.com. Want articles like this linked in your inbox every Monday morning? Sign up for our newsletter. And don’t forget that you can support us on Patreon for backer rewards like early video content, Administratum access, an ad-free experience on our website and more
Thank you for being a friend.


 Infinity N5 First Principles: Understanding the Outcomes of Face to Face Rolls
 Tactical Feedback: Timing the Go-Turn
 SRM's Roundabout to Adepticon 2026: Curd Is the Word